Two of paper. Do-it-yourself volumetric numbers from paper
A universal selection of gift ideas for every occasion and occasion. Surprise your friends and loved ones! ;)
Hello dear readers! As you know, the holiday should be first of all in the soul. But if good sincere wishes and gifts are added to this, then this is even better. And the decor of the room in honor of the festival is completely capable of turning a traditional celebration into something special. One of the simple and uncomplicated ways to decorate the house are numbers from napkins.
Such figures bring not only a sense of celebration, but also make you feel like a professional decorator. Although in fact, with due diligence, even a beginner is able to cope with such a number. Let's get started!
Necessary materials
I decided to present the necessary materials in the form of a list:
- The foundation. Give her special attention. The most common type for its creation are cardboard boxes and foam. Boxes can be used both from under a large household appliances, and small ones - from under the juice, etc. The larger the desired number size, the larger the box.
- Napkins. Several packs will do. You can use other types of paper, such as corrugated paper.
- Glue or skewers for attaching flowers and other decorations to the base.
- Scissors or utility knife. The latter is especially relevant for cutting foam.
- Double-sided and paper tape. For foam you will need the first, and for cardboard - the second.

Flowers from napkins: 5 options for decorating numbers
Before we start creating the numbers directly from cardboard, polystyrene and napkins, we need to understand how we will decorate these numbers. There are many options for creating the main decorative element - flowers.
The first and most common are fluffy roses that can be easily made from napkins. To do this, you will need a napkin folded several times, a stapler, a circle template and scissors.
Progress:
- Fold several napkins so that each makes a square. The more layers, the more magnificent the flower will be.
- Attach a circle to the resulting stack and cut out circles from all layers at once.
- Fasten the flower in the center with a stapler.
- Raise each layer so that you get a lush petal.

Can make designs bigger size. To do this, take napkins and fold them with an accordion in several layers. Cut the edges in a semicircle, tie the center with a thread. Fluff the edges - the flower is ready.

Similarly, you can make the flower below. The only difference will be that the edges do not need to be cut in a semicircle. Such additions for numbers can be made not only from paper napkins, but also from different types paper, such as crepe.

For the next flower, the napkin will need to be folded 4 times. Draw a semicircle on this base as shown below and cut off the edges. It will take several layers.

From corrugated paper, you can create such roses. The option is not as budget-friendly as with napkins, but the effect is very unusual.

If you want to know about other possible flower decorations for numbers, I recommend visiting. There is a flower for every idea
How many napkins and flowers will you need?
It all depends on the size finished product. But it costs from 3 to 5 packs of napkins to cook. It will take you flowers, most likely, from 200 to 500 per piece.
What determines the number of colors:
- from the size of the flower and the finished figure,
- from the splendor of the decorative element,
- on the density of the rows.
Other ways to decorate numbers
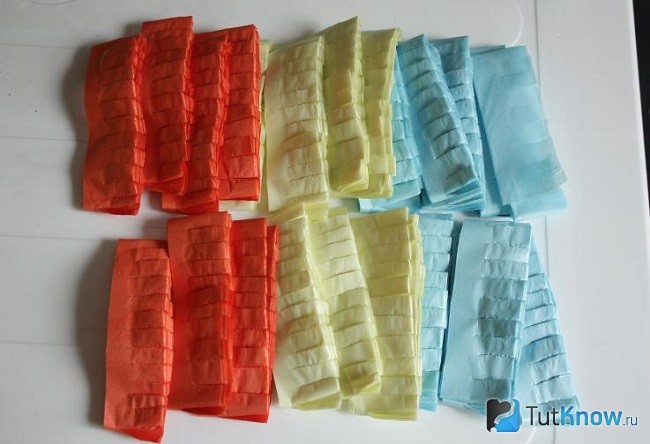
In addition to the most obvious method discussed above, there are other methods. For example, creating a fringe is much faster than creating many flowers and gluing them on. You can read how to make a fringe in the article about creating a piñata. There, the paper is folded in half, which gives the impression of volume. But you can use a single-layer fringe - it will go away less paper or napkins.
The general principle of operation is: Cut out a strip of paper and cut its edge. Glue the uncut part to the number. Glue each layer so that the previous one overlaps the uncut top.
In addition, you can resort to other methods. For example, trimming, when decorative square pieces of paper are attached to the center of the base (mostly foam). Or maybe you decide to create something unusual - say, a lot of quilling curls on the surface of a figure.
How to make numbers from napkins with your own hands for a birthday and not only
The most important date, on which the production and design of holiday figures usually falls, is the birthday and anniversary. Although in honor New Year and other memorial events. However, how to deal with the creation of such holiday decor?
For all products will be relevant:
- Saving time will give gluing the sides and bottom with paper or the same napkins. Then it will take much less time to decorate the number.
- Flowers take the most voluminous, lush, so that several pieces can easily decorate a large surface at once.
- Give preference to glue that sets quickly and easily squeezes out of the container. For lightweight wipes, you can also use double-sided tape (although this is a more expensive option).
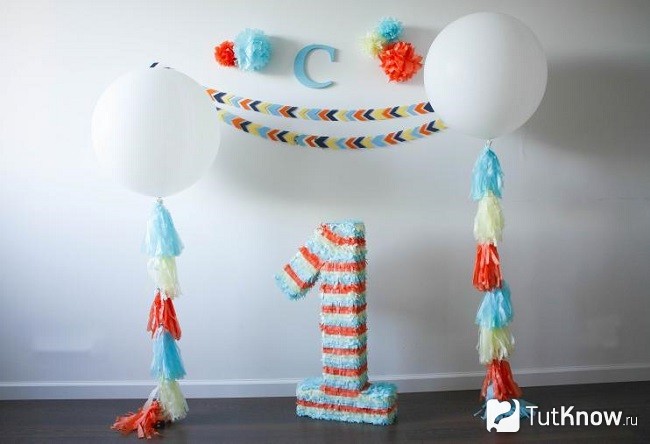
Number 1
The most popular number is 1. This is not surprising - it is usually used to design the first month and first year of a baby's life. You can make the basis for such decoration from cardboard boxes or from foam.
For a voluminous cardboard version, you need to cut out the front and back parts as in the photo. That is just 2 flat units. The side parts consist of rectangles of the same width, and their height should correspond to the height of each segment of the unit (again, see the photo).

Flower decoration can be completely different. Only you choose the type of decoration that is most attractive to you.

The Mickey Mouse style unit is a designer piece for a costume party.

A flat figure made from napkins, which is useful for decorating walls or windows.

The video shows another option for creating a base - from foam. It's easier than making a number out of cardboard: all you need is styrofoam and double-sided tape.
Step by step instructions for making:
- To make the number stable, cut out two numbers "1" and glue them with adhesive tape. It is most convenient to cut out the details with a clerical knife. Base dimensions are shown in the video. But you can make the number bigger or smaller.
- After that, you will need a large number of paper flowers, the process of creating which is also in the master class. Several packs of paper napkins of the desired shade will come in handy.
- Take glue. Suitable instant or ordinary PVA. Apply glue in lines as you stick the flowers.
- It is worth gluing flowers starting from the edge and moving towards the center. Choose the direction of movement yourself - from above or below.
If you want to make one or another number more interesting, then choose several shades that combine with each other at once. A smooth transition of colors can be achieved by creating elements from all shades of napkins. For example, if you chose red and yellow flowers, then about a third should be created from yellow napkins, a third from red, and a third from red and yellow at the same time with a different content of both colors.
The whole process is detailed in the video below.
Here is another example of a number with a smooth color transition:

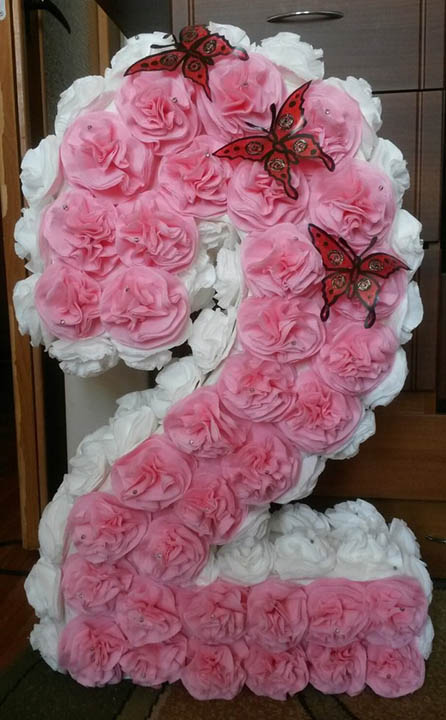
Number 2
There is a complication here. Unlike the angular unit, the deuce has smoother curves, due to which it will be much more difficult to make a cardboard base for the number. Therefore, for this case, the choice is clearly in favor of the foam base. Below are several options for the volumetric number 2.

If you want to make a flat version, then use the master class below. To do this, take cardboard and make a large number of roses for it, simply twisting strips of napkins or corrugated paper.

If you just crumple the napkins and stick them to the base, you get the option as below. It is simpler, but it is better to wrinkle napkins near the center.

The video-MK just uses a foam base. It looks very impressive, contrasting roses are used to create the figure.
Number 3
Is your little one turning 3 years old? Or preparing an anniversary in 30 or 35 years? Then you can’t do without the number 3. It’s difficult to make a base out of cardboard, but it’s the very thing out of polystyrene. See the different triplets below.
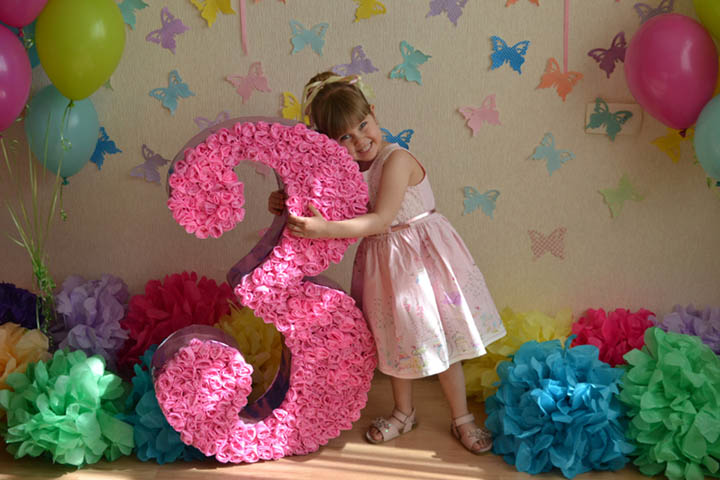


A master class in video format will show you how to make the number 3 with your own hands. And it will be done by a little girl with her mother.
Number 4
The four can be made in the same way as the one, they are similar in their own way. appearance. Choose a delicate pink color if you are preparing a surprise for a girl.


Boy's birthday? Then he will like the four, made in the style of Spider-Man. There are no more flowers and roses here, but there are many crumpled napkins of red and of blue color and a white lace resembling a web.

Another universal option is presented in the instructions below.
Number 5
It is best to choose a more straight shape for this figure so that it is easier to cut out the elements. But, if we are talking about the 55th anniversary, THEN take the option of a more curved five - this will draw attention to the birthday man or birthday girl.

Delicate girlish number with a very slight color transition.

For a boy, the option below is more suitable, you can even completely make such a figure from blue and blue napkins.

Double instructions (in two videos) for creating such fives, it is described in detail about creating a five for Birthday and similar dates.
Numbers 6 and 9
Having made a six, you immediately get another 9, because you just need to turn the number upside down to get the desired option.


And here are the numbers 9. One difference is that it is better to make the number in the most stable way on the top that you want to put it on. That is, for the nine, the lower coil must be strengthened, and for the six, the circumference.


You can also do a similar volumetric figure with your own hands if you watch the video.
Number 7
One of the simplest numbers in its execution. But there is one difficulty here - it is not so easy to put such a figure vertically, you will have to strengthen the base, or make a flat version that will be attached to a wall, door or something like that.

Volumetric figure 7 from napkins.

And here is the master class in video format.
Number 8
Such a figure is made not only for birthdays, but also used to decorate the premises on March 8th. So, by doing this, you will kill two birds with one stone.

Video, once again proving that even children can cope with such a task - after all, everything is quite simple.
But what about 0?
For any celebration designed to celebrate round anniversaries, you will need such a number from napkins as 0. Here again, the foam base will help you out, the rest is the same as for other numbers. Now anniversaries at 10, 50 and even 60 years are no longer a problem.

What size to do?
Agree, small numbers are more suitable for decorating a table or a decorative slide of gifts than for a photo shoot. For the latter, it is better to give preference to a large version with a height of about 70-80 cm.
In any case, focus on the height of the child or adult. For a child, it is desirable to create a figure as high as him, but for an adult, this is no longer relevant.
How much does the finished figure cost?
The final cost depends on the amount of labor expended by the master, the materials used to create the masterpiece and the size of the product. But basically you can find prices ranging from 1000 to 3000 rubles.
This is how you can make any holiday just unforgettable. Napkin numbers are a really budget-friendly and cool way to feel like a creator and at the same time decorate any room in style and quickly.
Share your impressions in the comments, tell in in social networks about the article to your friends and family - let them also learn how to create wonderful dates themselves. See you later!
Sincerely, Anastasia Skoreva
Making a festive interior with your own hands today has become a very fashionable trend. You can make anything you want: letters and flag streamers, big numbers, fun hats for guests and much more. Such paraphernalia creates a cheerful atmosphere and looks great in photographs. Most often, jewelry is made on. In this master class, I will tell you in detail and show you how to make a three-dimensional figure from napkins.
Number from napkins: materials for making
The number from napkins is quite a "budget", but at the same time an effective element of the festive decor. The main materials for its manufacture are thick cardboard and ordinary paper napkins.
For the frame, we need sheets of thick packaging cardboard (corrugated cardboard), so an old unnecessary box from household appliances will come in handy here. I found a box with dimensions of 50x30 cm.
Napkins - from them we will make openwork flowers. They are different sizes and quantity per pack. It is very difficult to predict in advance how many of them will be needed, here you need to focus on the size of the cardboard for the future figure. But it is best to take one or two packs in reserve. After all, in the future they will come in handy for decorating the festive table. For my figure, I purchased 4 packs of red napkins and one white (in fact, it took 2 of them).
We will also need auxiliary materials:
- Large scissors or construction cutter.
- Wide tape.
- Stapler and staples for it.
- Glue moment universal.
- A sheet of cardboard "under gold" for decoration (I have a holographic one).
How to make a volumetric figure from napkins
To begin with, I would like to note that the numbers from napkins are flat and voluminous.
Flat products are made faster, since there is no need to glue the frame, just cut out the outline from a sheet of cardboard. And it will also be required at times fewer flowers for her decoration.
On the volumetric figure more time and materials will be needed. However, she will justify the effort with her spectacular appearance.
In today's master class, I will tell you how to make a three-dimensional figure "two". The whole process of its manufacture can be divided into 3 stages. Next, I will describe each of them in detail.
We make flowers from napkins
This stage is very simple, but it takes a decent amount of time, since you will need a lot of flowers. If you have assistants, I advise you to involve them in this matter.
I started with red napkins. They are two-layer, and their unfolded size is 33 cm, so 2 flowers are obtained from one napkin.
So, the flower is made as follows:


To optimize the process, at first I made a lot of such blanks, from which beautiful flowers later turned out.

White flowers are made according to the same principle. However, the white napkins that I have, unlike the red ones, are single-layered and smaller in size. Therefore, in order for the blanks to turn out to be the same size, I had to make a little more effort:


In total, to design the figure, I needed to make 86 red and 65 white flowers. This took approximately 4 hours.

Making a cardboard frame
In order to build a three-dimensional frame, I needed 2 sheets of corrugated cardboard measuring 50 × 30 cm. I cut out the front parts of the “two” from them. The remaining scraps from the box went to the side of the figure.
The procedure was as follows:


We collect and decorate the figure

In order not to crush the flowers, I lightly press on them from above, and then gently press their base under the petals with my finger.


When the glue is dry, straighten the flowers to make them look more magnificent.
The design of the number can be anything, it all depends on your imagination and colors napkins.
I decided to decorate my “two” with a crown. To simplify the task, I found on the Internet ready stencil suitable sizes, printed it out and cut it out.
Since my number is two-sided, then the crown should be the same. Therefore, I circled it 2 times on a sheet of A4 holographic cardboard.

Then I cut out both halves and glued them together. As a result, it turned out to be “golden” on both sides.

At the final stage, I solemnly “crowned” my number, carefully gluing it to the flowers. Ready!

By a similar principle, you can make absolutely any number or even a letter.
If a child has a birthday coming up, learn how to make three-dimensional numbers and letters from cardboard to decorate them with flowers from napkins, paper, and threads.
How to turn cardboard into the basis of three-dimensional letters and numbers?

Volumetric figures draw up the most various materials using corrugated paper, threads, napkins for this. But the base is made of cardboard. If you want to make the number 1, then with your own hands you first need to make a blank for it.
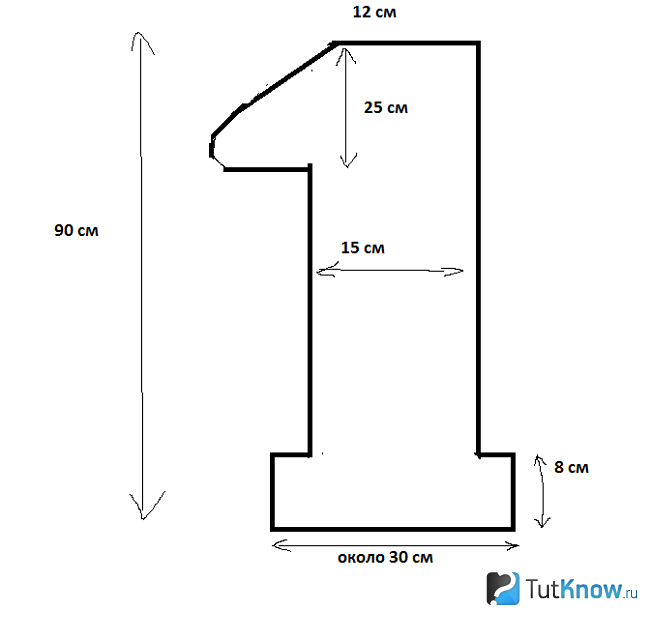
The diagram below shows the recommended sizes for this number. You will need 2 of these parts - one for the front, the other for the back, cut them out of cardboard. Decide how thick the number will be, such a width you need to cut a strip of cardboard.
It is better to carry out further manipulations together. Start at the top by first attaching a strip of sidewall to the front with masking tape.
Please note that where the number is bent, the adhesive tape must be cut evenly so that it fits well in this place.
After you fix a strip of cardboard on the front side of the number, you also need to glue it to the second side of this number, which will be the reverse.
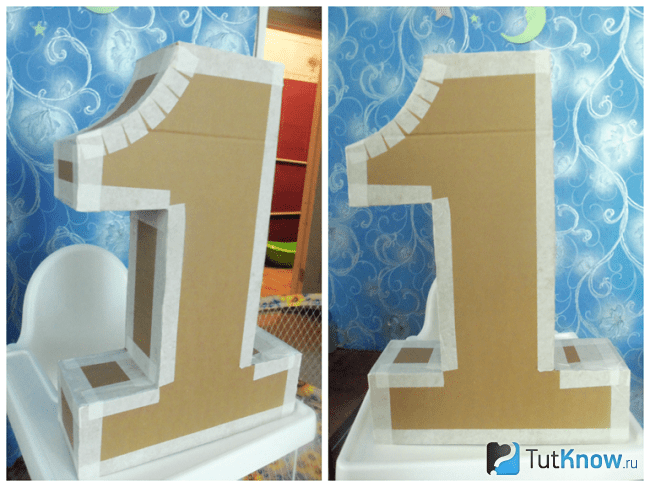
It remains to glue one edge of the strip to the second at the top, after which you can tell yourself that you were able to make the number 1 with your own hands.

Let's see how to make the base for the next number. To make the number 2 out of cardboard, transfer the presented template to it with your own hands. To do this, you can use checkered paper, so that you can then draw larger cells on the template, thus transferring the drawing.

You can also draw it by hand, repeating the lines and curves of this figure. As in the first case, for work you will need:
- number template;
- cardboard;
- construction tape;
- scissors.

Now attach the second half of the number.

As you can see, for this it is not necessary to stick adhesive tape over the entire surface, you can attach it in small pieces, fixing it perpendicular to the surface.
Surely, you have already understood the technology of how to make a three-dimensional figure out of cardboard. By the same principle, you will make all the other numbers, if the events being marked require it. Now check out various options decorating such figures.
How to make a fringe to decorate letters and numbers?
For this you can use different kinds paper: corrugated, colored, we will take silence. In another way, it is also called papyrus, wrapping. When you buy shoes, it is often in such a thin translucent material that they are wrapped.
To make a volumetric figure according to this principle, you will need:
- tissue paper of different colors;
- scissors;
- PVA glue.

The long edges of these blanks with scissors need to be cut with a fringe. To speed up this process, fold several strips at once or roll each one to make 4-5 layers.
Apply numbers from PVA cardboard to the bottom, glue a strip of prepared paper here. Since it is very thin, it is better to stick two tapes at once. If you use instead colored paper or corrugated, then attach in one layer. The second goes a little higher, located above the first.

Combine colors to make the number the most spectacular.

After you completely decorate it, decorate the corner of the apartment in the same colors.
Paper for volumetric letters and numbers
look interesting options drawing numbers from it.

To implement such a masterpiece, take:
- colored paper;
- scissors;
- double-sided tape or glue gun;
- compass or round object.

- Using a compass or circle template, draw a circle on the back of the colored paper.
- Cut a small segment outside, how long it will be, the flower petals will become such a width.
- Starting from here, cut this circle in a spiral, moving from the edges to the center.
- When this part of the work is done, take the outer edge of the flower in your hand and start twisting it.
- Fix the middle with a drop of glue, also attach a small circle to the back of the flower to this solution so that the structure does not unwind.
- Glue these blanks onto cardboard numbers, placing them rarely or often.
- For this, you need to cut out only one blank from cardboard, then decorate it. To do this, cut the paper into strips 5–6 cm wide, glue the edges of the number with them to decorate the front and back sides at the same time.
- Now from these strips we begin to twist the flowers. To make the edges voluminous, wrap the edge of the paper about 2 cm here.
- Bend the corner, make a coil, then bend the workpiece, make a coil again, bend the flower again, and so on.

See how to make paper roses, the master class will help you with this. Such a flower can be made not only to decorate volumetric figures, it is also suitable for other occasions. But then you will need to additionally create a stem.
To make crepe paper roses, take:
- a sheet of cardboard;
- pencil;
- ruler;
- scissors;
- corrugated paper;
- toothpick;
- glue stick.
Then attach this cardboard helper on top of the folded sheets of corrugated paper, cut along the contours.

Straighten the resulting part, starting from the left edge, wind it on a toothpick with a cut off sharp end. In this case, wire is used for this, take this idea into service when you make a paper flower with a stem. Tie at the bottom with a thread.
When making a piece of corrugated paper, twist the inner petals tightly, and the outer ones more loosely.
Having made several of these blanks, decorate the cardboard numbers with flowers.

The master class will also help you to make other roses from corrugated paper.
- Cut a strip of paper 6 cm wide. Fold it with an accordion.
- Use scissors to round the top edge. Expand this detail. Start twisting it so that the wavy edges are on top.
- Tie the bottom of the rose with a thread.
- To make the petals look more picturesque, wind each one around a toothpick.

To make an openwork flower, take:
- corrugated paper;
- scissors;
- threads.

In this way, decorate the entire edge of the strip, such tucks are similar to those that you make on dumplings, fastening their sides.

Now twist this ribbon, giving it the shape of a blossoming bud. Tie with thread to secure.

Here is another option, it is very simple to perform.
If you want the crepe paper flower to have a double color, then cut out a strip of white and a second, which will be wider, from a darker colored ribbon.
Lay two strips on top of each other so that the narrow one is on top. Fold them in widthwise with an accordion. Take this prepared canvas, starting from the narrow edge, twist it, giving it the shape of a flower.

The next idea will require the following materials and accessories:
- corrugated paper;
- cardboard;
- compass;
- scissors;
- glue.
Manufacturing instructions:
- Fold the cut paper strip across several times to immediately cut out a certain number of identical petals.
- Draw a circle on the cardboard, cut it out. Step back a little from the edge of this blank, glue the petals, overlaying each subsequent one on the edge of the previous one.
- Having completed the first outer row in this way, make the second inner one, if you want, then close the petals and the middle of the flower.

The last tutorial in this series will show you how to make the number 1 using colored paper.
- How to make a template, you already know. Now glue the cardboard with colored paper. From paper you need to cut strips, their width will be equal to the radius of the flower.
- Fold the first strip of paper, starting at the small edge, like an accordion. Now put a little glue on this edge, attach the second small edge to it to turn the strip into a circle.
- Close its core with a small circle of the same or another colored paper.
- You can make large and small flowers, arrange them on the figure as in the photo.

It's time to switch to another type of material, maybe you are just now thinking how to make the number 2 using yarn?
Knitting threads for decorating letters and numbers
With the help of them decorate volumetric numbers. You can use yarn of one or more colors. For such decoration you will need just:
- preparation of figures from cardboard;
- threads;
- PVA glue;
- tassel.

When you're done with one color of yarn, glue the loose end to the cardboard. Next, attach the end of the thread of the second ball. Decorate the volumetric figure in a different color. When the number is completely covered with yarn, you can admire the beautiful results of your work.

In skillful hands, knitting threads will quickly turn into. You can make them with a fork, a semicircle of cardboard or in another way.
The step by step photos will also help you make yarn pom poms.

- As you can see, first you need to cut out two identical rings from cardboard. Put the thread inside.
- The yarn from the ball is wound around the rings, gradually filling them. Then cut along the outer circle, passing the scissors between the two cardboard blanks.
- Pull the thread and the pompom is ready.
- Thus, make several different sizes using different yarns.

Decoration of three-dimensional letters and numbers with ribbons
This material will also help resolve the issue of how to make volumetric figures.

To draw the number 2 in this way, take:
- red satin ribbon;
- white beads of various diameters;
- glue;
- scissors.
A glue gun will help fix the beads of different diameters. They can also be sewn to fabric ribbons, but such work is more painstaking.
To implement the second variation, you need:
- braid of the same width, but different colors;
- scissors;
- glue.

If you have enough free time, you have the patience, then you can do it, decorate the whole figure with them or only individual fragments.

If you want, use the already known master class to make such flowers or make them in a different way.

As you can see, you need to periodically bend the corners of the tape, fix them with a basting seam. When it is framed in this way, twist it, giving it the appearance of a rose. Fix the workpiece with a thread and a needle.
A zigzag braid is a ready-made flower base. It is enough to collect it on a thread, pull it, shape it into a circle, fix it with a thread.

You can do more than one circular row such turns, but several. Each subsequent one will be slightly smaller than the previous one in diameter. Sew a button in the center and you can sew or glue a flower on the number.

It can be not only flat, but also voluminous. To do this, you will need all the same wavy braid. Cut two strips from it. Match them as shown in the photo, stitch along to connect. Now you will twist this ribbon so that it turns into a round flower. How to combine these two strips can be seen in the next photo.

Roses and other flowers from napkins do it yourself
For the next workshop you will need:
- napkins;
- circle pattern;
- stapler;
- scissors.

Place several napkins, without unfolding them, one on top of the other. Place a circle on top. Cut out the napkins according to this pattern.

In the center, these blanks must be fixed with a stapler. Lift the first layer, fold it in the form of an inner rosebud that has not yet blossomed. The second row of petals will be looser. Thus decorate the entire rose.
Here's another idea. You need to take 8 napkins or papyrus paper, fold it like an accordion. For this method, denser multilayer napkins are suitable. You should get a three-dimensional rectangle. Trim the ends to make them rounded. Now start straightening the blanks folded like an accordion, arranging them in the form of a flower.

To make the number 1, you need to stick such roses over the entire surface. See how beautiful flowers of different sizes and colors look.

- will also allow you to create blanks for the design of numbers. To do this, you need to cut the paper into squares, put a pencil in the center of each, twist.
- Without removing this square from the pencil, attach the blank to the cardboard base of the figure, after lubricating this area with glue.
- Trims need to be glued close to each other to create the effect of a single volumetric surface. It will also be appropriate to combine different colors of paper.

Plasticine can be used instead of glue. It is necessary to lubricate the surface of a cardboard blank with it, or roll a small ball out of plasticine, and wrap each end face with a half of a toothpick, insert such blanks into plasticine balls. Then, attach to the cardboard base.
If you plan to hang the number on the wall, then you can make it out of Styrofoam. In this case, the trimmings are attached to a toothpick, then stuck into the foam. If the sheet of this material is not very thin, then you can make volumetric figures and put them on. They are more durable than thin foam.
How to make big letters?
You will create them in the same way. For this you will need:
- cardboard;
- pencil;
- scissors;
- tube from paper towels;
- White paper;
- hot glue.

Decide how wide the letter will be. Cut the rings from the paper towel tube to this width.

Glue them on one half of the letter, then glue the second half on top, pressing it a little.

Cut sheets of white paper into strips, glue the sides of the letter with them, and then the whole of it.

Can you color these letters? acrylic paint or glue flowers from paper or napkins, or decorate them satin ribbons or threads. See how to make letters on cardboard by declaring them with cloth. How to make a dense base, you already know. Glue strips of fabric on it with PVA, and lace braid on the outer corners.

From these letters you can add a word to arrange a photo shoot on your wedding day.

If you are celebrating the anniversary of this event, then place one or two numbers near the letters indicating how many years of marriage you are celebrating.
You can paste over the letters with paper or wallpaper that remains from the repair.

An original, at the same time touching decor will be the design of such a letter with family photographs.
If the birthday boy loves the forest or you want to decorate the room on this theme, then glue birch bark and moss or maple leaves on the base.
![]()
How to make a birthday number with your own hands?
Children's birthday should be held in a special festive atmosphere. I would like to decorate the birthday boy’s room and hang a large inscription in the hallway so that right from the doorstep the little guests are charged with positive and fun.
You can call on the help of professional decorators. They will quickly hang expensive decor. But it is much more interesting to do interior design with beautiful “things” of your own making for both parents and children. Joint creativity will allow you to have fun.
This article contains a variety of ideas for performing figures for a birthday man. Can be made from balloons.
But if this design is tired, then arm yourself with scissors, cardboard, corrugated and colored paper, decorative elements, threads and get to work. The main thing in such an important matter - good mood and positive attitude.
What to make a number for a birthday?
Numbers corresponding to the age of the birthday person, made from small balls, are the most familiar way for us to decorate a room. Could there be anything easier than placing an order for the desired figure in the nearest event agency? But if you make a figure with your own hands from any other material, then it will look unusual.

Don't give up on an idea self-manufacturing figures for the birthday of the birthday boy, if you have little time. The figure is cut out of cardboard quickly, and the needlewoman always has the fabric and threads at hand.
If the figure is not needed urgently, then you can print bright photos in advance or come up with something completely original. An interesting photo shoot for a birthday boy in such a room with large numbers is guaranteed.


What are the ways to make numbers?
- A large number can be cut out of cardboard and decorated with whatever your imagination and resources are capable of.
- For the base, let's take a regular cardboard box of the preferred size. The contours of the desired number are outlined on the cardboard. The figure is cut out with a clerical knife and decorated. Such a figure will be flat. It can be hung on the wall.
- If you need a voluminous figure or you have the time and desire, then it is better to make such a figure with which the birthday man can play and rearrange from place to place if desired.
- To make the figure voluminous, you will need two identical cardboard blanks. But besides them, you will also need to cut long cardboard strips with even edges (of the same width) to glue the sidewalls.
- The frame is assembled easily with a heat gun or masking tape.


The decor of the figure must be selected in accordance with common style design. The most commonly used materials are:
- leg-split
- colored yarn
- bright fabric (organza, chiffon, satin, velvet)
- floral film used for packaging
- colored paper
- corrugated paper
- napkin flowers
All these materials are used for wrapping the base. But you can use them to give additional volume to the numbers. To do this, you need to make flowers with protruding petals from paper or fabric or make fluffy pompoms from woolen threads, add different "pounds" and bows.

Number in eco style
- To make an eco-style figure, you will need a cardboard base and twine. The base is gradually smeared with glue and carefully wrapped with twine over the glued area.
- The finished figure can be painted with acrylic paint, or you can leave the twine unpainted. Such a figure will decorate any interior, and it will take quite a bit of time and effort to make it.


Number from flowers
- To make a number with floral pattern, we will need a lot of roses cut and glued from paper
- The flowers are stacked tightly to each other, filling the entire base.
- Such a figure, even in the absence of other decor, will look great.

The time spent carving paper flowers is compensated by the smiles of the children and the joy of the birthday man. After the holiday, the figure can be hung in the children's room until the child is a whole year older.
Number from pom-poms
- To make a figure from pom-poms, you will need a large number of wool pom-poms
- The process of filling the base with pom-poms is the same as with paper flowers.
- In the following sections, we will take a closer look at how to make beautiful numbers for the birthday man.
Birthday number from napkins
You can decorate the frame cut out of cardboard with flowers from napkins. Having gained patience and cut flowers of the same size from ordinary napkins, you can please the birthday man with the most fluffy number in the world!


Manufacturing process:
- We cut out napkin flowers in unlimited quantities: we divide the single-layer napkin folded four times into 4 squares
- We lay the squares in an even pile and fix in the center with a stapler or a piece of thin wire
- The square stack is cut off to make a circle.
- It remains only to cut through the edges of the resulting circle, not reaching the center
- Raise the napkin petals and straighten them.
- So we will create fluffy flowers, which then will only need to be glued with PVA glue to the base


 This is the figure obtained after pasting with flowers
 Deuce and scenery
 Corrugated paper birthday number
Corrugated paper flowers look simply gorgeous. They can be done in two ways. You only need a large amount of corrugated paper desired color. The number will turn out more beautiful if you glue flowers of 2 or 3 different colors on it.
Method 1:
- We cut the paper into strips. Approximate dimensions in centimeters: 50 / 3.5. We follow the correct arrangement of the "veins" of future flowers: they should stretch along, and not across the flower.
- Next, you need to stretch the flower on one side to get waves. Such stretching is possible due to "veins".
- We hold the stretched flower blanks firmly by one side with the waves up, and grab the base-cup.
- We fix the lower part of the flower with an elastic band or threads to match the paper.
- The softer the corrugated paper, the more voluminous and fluffy the flowers are.
- The walls of the cardboard base are pasted over with corrugated paper to hide possible gaps between the flowers.
- The base is glued with flowers. To do this, it is convenient to use a hot glue gun. You can "plant" flowers on ordinary PVA glue.


Video: corrugated paper flowers
Method 2:
- Corrugated paper cut into equal squares
- We apply glue to the cardboard base of the number
- We wrap the pencil with corrugated paper, laying it with the central part to the core
- We lower the lower part of the future flower into the glue and apply it to the cardboard base
- So gradually fill the entire surface of the cardboard base with squares


Filling the cardboard base with squares
Numbers inflatable for birthday
A children's holiday is not complete without balloons. Can be done for birthday great wall decoration:
- you will need a styrofoam base (is it a rectangular piece or a square piece)
- small size balloons
draw the correct number - we inflate the balls and attach them to the base with double-sided tape according to a pre-drawn shape


Cardboard numbers for birthday
- The easiest way to make a number out of cardboard is to draw it on a piece of cardboard or a cardboard box and cut it out without bothering to create a three-dimensional product.
- The figure can be pasted over with colored paper or smeared with glue and sprinkled with tinsel. You can cut out a stencil of the desired pattern or pattern, attach it to a painted cardboard number and paint over the areas inside the stencil with contrasting paint.
- A volumetric cardboard base consists of two identical parts of the number (the second can simply be circled) and long strips of cardboard of the required thickness for the sidewalls.
- The parts are connected with a glue gun, and for the reliability of the structure and better fixation, stiffeners are glued from the inside.
- Volumetric figure can be placed vertically directly on holiday table. If you make a horizontal platform out of cardboard, then the figure can also be placed on the floor. Then it will become a chic attribute for photography as a keepsake.

 flat shiny digit
 How to make a volumetric figure:


 Glue the parts with adhesive tape


Decorative birthday numbers
Decorative numbers can be made using the quilling technique.
You can glue a lot of paper umbrellas of different sizes and fix them on a cardboard base.


The details of the figure can be cut out of the fabric and sew a large voluminous pillow. Ribbons, fabric flowers, lace and beads are suitable as decorative elements.


If you make the base from a special floristic sponge piaflora, then fresh flowers can be used as decor: the sponge retains moisture for a long time and nourishes the plants. But a significant drawback of such a piece of decor is its fragility.
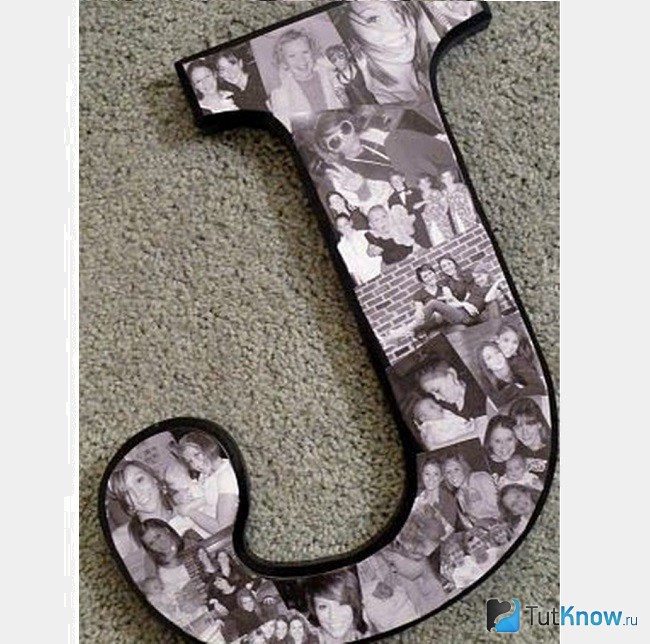
Numbers from birthday photos
Here are the numbers that will be truly unique, so these are made from photographs. They can be pasted on a cardboard flat figure or in Photoshop, pick up photos for a collage and line them up according to the intended shape. The finished collage only needs to be printed and pasted on the base or wall.


Numbers from felt for a birthday
A felt figure, if it is decorated with small toys cut out of felt, a child can use in his games after a name day.


To make a figure, you will need one piece of bright felt (for a flat figure) or two (for a three-dimensional one). The figure is sewn like soft toy and stuffed with filler - cotton wool or padding polyester.
Birthday balloon numbers
Can not imagine children's holiday without balls. Numbers from balloons, although they are a constant attribute in the photo of birthday people, they can also be made in an original way.

The video shows one of the ways to make figures from balloons.
Video: balloon figure
How to decorate a number for a birthday?
Anything can be used as a decoration for a number. If only it looked beautiful and festive. You can make paper flowers, you can paste over the number with buttons, or sew small animals from felt and attach them to the number.
Ribbons, lace, pieces of fur, crowns and hats, beautiful bouquets of artificial flowers and large beads suitable for decorating figures
Ways to decorate numbers:
- quilling decor
- use of internal illumination
- gluing squares of corrugated paper or pre-prepared flowers
- metallic, mother-of-pearl or embossed paper
- the cloth
- satin ribbons
- sequins
- colored cones


Number 1 for a birthday for a boy and a girl
- To make the number 1 for your birthday, you will need a large piece of cardboard or a cardboard box, tape or masking tape, and a utility knife.
- We draw the letter of the desired shape. Cut out. We circle the second part along the cut out unity and also cut it out.
- We fix the sides with tape. And let's start decorating.
- We cut out roses from napkins and glue them on a cardboard base, gradually filling the entire figure. You can pre-paste the number with colored paper to match the napkins used for roses.


Video: how to make a 3D volumetric figure 1 for a birthday?
Video: do-it-yourself number from napkins
Number two for a birthday for a boy and a girl
The number 2 can also be made voluminous and decorated with “napkin” roses. The manufacturing process of the number 2 is shown in the video.
Video: volumetric figure "2" from flowers (napkins) for a birthday
For a girl, the figure can be decorated with a crown, a chic bow, or dressed up in a skirt.

We propose to do number from ribbons. You will need a large piece of corrugated cardboard, double-sided tape, scissors and a bright ribbon about 7-8 m long and 5 cm wide. We will decorate the number with beads.
- Cut out 2 cardboard base blanks. If the cardboard is thin, then it is better for strength to cut out two identical sides and glue them together.
- Next, we proceed to tightening the numbers with tape. We fix it with a stapler or tape. You can fasten the ends of the tape with threads or hide them behind the tape and secure with tape.
- We glue the beads with a heat gun.


The figure for the boy can be done in nautical style: from blue and white stripes. A figure made in the same color with a bow tie or tie is also suitable.
Video: how to make the number 2 for a birthday
Number three for a birthday for a boy and a girl
The number 3 for a change can be "grown" in a flower pot.
You will need:
- flower pot
- cardboard box from which we will cut the number
wooden sticks - various decorations
- ribbon
- thermal gun
How to make a number?
- We cut out two identical triplets and put wooden sticks between them (they are necessary to fix the number in the flower pot)
- Glue the halves of the number and connect them
- We begin to wrap the top three with tape
- We fix the tape with a thermal gun, and where necessary - we sheathe
- We glue the pallet to the flower pot
- We fix wooden sticks with a thermal gun to the pot and put pebbles inside the pot for reliability of the structure
- Top can be decorated with decorative pebbles
- We decorate the figure with ribbon roses. It's not hard to make them
- We fold the ribbon in half and begin to wrap, gradually sewing on the lower part of the future rose

 Cut out the three How to make a rose How to cut a daisy
Video: corrugated paper and cardboard figure
How to make the number 5 for a birthday for a boy and a girl?
The five can be made from a cardboard base, decorated with ribbons or “napkin” flowers, or you can cut out circles of different sizes and cut spirals out of them. Then, having collected the resulting ribbons in the center, you get another original look floral decoration. you can insert a bead into the middle of the flower.


Video: how to make the number 5 for a birthday?
To arrange a holiday beautifully and create a three-dimensional figure, you need to use napkins. Napkins will give the desired volume and make the props more attractive and unusual. Such a figure will be a great decoration for the holiday. It will be possible to take pictures with it, both the baby and his parents. In order to understand how to make the number 2 for a birthday with your own hands from napkins, you need to read this post.


It turns out that when creating a number with your own hands, not only napkins play a big role in quality, but also the material from which the number is made. It should be light, while keeping its shape.
To make a number, it's best to use:
cardboard;
used large cardboard boxes;
juice boxes or baby food;
Styrofoam;
quality glue;
scotch;
Double-sided tape;
scissors.
The material from which the craft will be made should keep its shape well, not fail, not be very heavy. Napkins are best used in plain colors, you can also combine several colors of napkins.


Making a number with tissue paper flower buds
From boxes, cardboard or foam, it is necessary to carefully form the number 2. In order for the number to have an aesthetic appearance, it must be pasted over with paper, according to the papier-mâché principle. Now you need to make blanks for making flower buds from napkins. Napkins will need several packs of 100 pieces.
To work, you must use:
paper handkerchiefs;
stapler;
scissors;
glue.


Bud making technique:
paper napkins need to be folded in half, and then again in half;
the middle of the square is fixed with a stapler;
cut an arbitrary circle from a square;
bend each layer of the napkin to the center, forming flower petals;
so form beautiful buds from all prepared circles;
small beads can be glued onto the resulting buds;
blanks for pasting the number 2 are ready.
Ready-made buds must be pasted over the entire figure. It is convenient to fix the flowers on the layout using double-sided tape. To make the work a little easier, you can cover the finished layout with a cloth to match the color of the napkins. This will visually fill in the possible gaps that may appear when pasting crafts.


Creating a number with a fringe
A pre-prepared fringe must be applied to the finished layout of the number. The fringe is cut from corrugated paper. On sheets of corrugated paper, it will be necessary to make small cuts that imitate fringe. The resulting fringe must be glued onto the number using glue or double-sided tape. To make such a decoration look even more voluminous, you can take several shades of colors of corrugated paper and glue them, alternating with each other.


Facing
The number 2 can also be made using facing. The work is laborious, but not difficult.
Materials:
corrugated paper or napkins;
simple pencil;
scissors;
glue.
Master Class:
paper is cut into squares or a finished napkin is taken;
a pencil is inserted in the middle of the square, and the paper is crimped along its contour;
the resulting workpiece is glued to the figure. So it is necessary to create so many blanks so that you can glue the entire plane without gaps;
excess paper is cut off with scissors.


If the blanks made with the help of facing are attached to the figure made of foam, then glue is not needed, since the pencil will pierce the foam, and the blanks will be fixed inside.
Number Information


The figure should be the size of a child or slightly higher. You can also make a flat figure and also glue it with flower buds, fringe or using the trimming technique.
The color of the number can be chosen at your discretion. If the figure is for a boy, you can take blue, green. Pink, white, lilac paper is suitable for a girl. The edging of the craft can be made in one color, and the middle can be filled with another. Or you can make inserts from other shades of paper in one common tone. Buds can be decorated with various beads, bows or other decorative elements.


The figure can be worn with a crown or tied beautiful bow. Everything will depend on desire and imagination.
From napkins, you can cut roses with buds, asters, lilies. Flowers can be combined with each other.


Randomly cut and crumpled paper looks great, which is glued with glue or double-sided tape. This option also has the right to exist. The figure will also turn out to be voluminous and quite original.
Imagine, try and make your holiday unforgettable.
 Photo of what it looks like for a round, elongated, square, rectangular, oval face
 What is the best permanent eyebrow makeup?
 Making a kindergarten with your own hands Making a younger group in a nursery