What to make felt boots from for the New Year. DIY paper boots for kids
Making felt boots and DIY crafts from wool and other materials is always interesting activity, an excellent option for crafts are felt boots, this will be a completely unique activity and a product that will bring joy to both adults and children, so in this article we will offer you master classes on different options felt boots products. This product can be a wonderful interior decoration.
Of course, we associate felt boots with winter, so they can be a wonderful New Year's decoration, they can be hung on the Christmas tree or placed under it, they can also become a gift for your daughter, for her favorite doll. So, we suggest you make these interesting felt boots:
Let's get started
These little felt boots are called “whisperers”; they look very cute and will be a wonderful winter decoration for your home or toy.

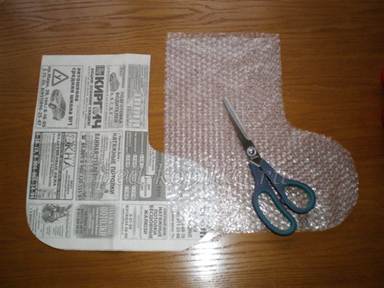
To work you will need:
- Wool;
- Scissors;
- Film with pimples, take it from some packaging;
- Soap solution;
- Unnecessary newspapers;
- Pencil:
- Sintepon;
- Elements for decor.

Stages of work. To get started, you need to create a pattern for the future product. To do this, take a sheet of newspaper and use a pencil to draw a felt boot of the size you need. We cut out the resulting figure, transfer the drawing to bubble wrap, and cut out this element too. If you don't know how to draw, don't worry, you can use this template.

Let's start working on the first layer. We take a small piece of wool, straighten it, getting rid of unnecessary compactions and excess lumps. We cover the pattern with such pieces so that the wool protrudes beyond the edges by one centimeter. Make the first layer vertically, and the second horizontally.

The first side looks like the photo below:
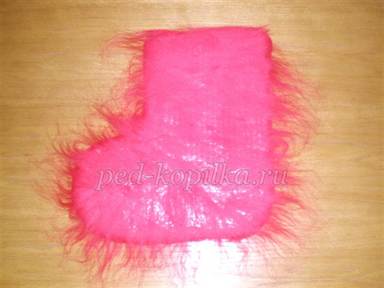
Now you need to turn the product over and tuck in the edges that were protruding. We make the second side of the workpiece in the same way as the first.

We lay out several layers using this principle and turn the product over. You need to make about four layers on each side. But, in any case, the number of layers depends on the thickness you need.

Carefully water the product with a soap solution and warm water.

It should look something like this:

We wash the wool with our hands, we need to ensure that the entire product is wet and saturated with soapy water. Movements should be confident, but not sharp, otherwise the first layer will be damaged.

Very convenient and in an effective way is rolling in a roll of bubble wrap. To do this, you just need to wrap the product in film and crush it.

When the product becomes denser, you can crumple it more confidently and do it in any direction.

After the product becomes dense enough, you need to rinse off the soap solution with hot water. Please note that you need to rinse off with hot water.
Carefully squeeze out the workpiece, make a cut and remove the pattern.

We make lumps from newspapers and use them to give the product the desired shape.
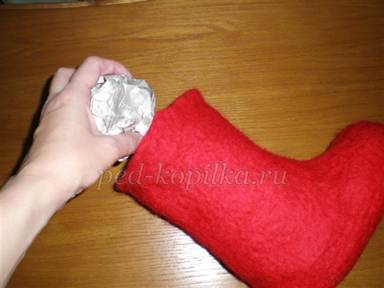
We continue to form our felt boots.

Now the product needs to be dried.

Newspaper lumps need to be pulled out when the product is completely dry.

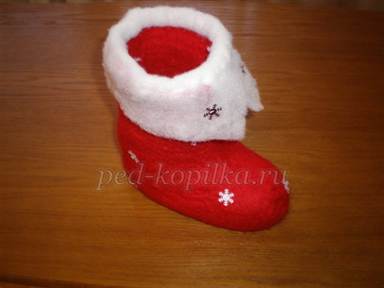
Now the product can be decorated. Since we have New Year's boots, we made patterns in the form of snowflakes. You can make felt boots with a pattern that we will sew or glue; in any case, the felt boots will look very cute and cute.


This is the kind of New Year's felt boot we got.
Felt boots can be made in a variety of ways, from any materials, and the technique can also be different. We invite you to watch a very detailed and understandable video tutorial on creating felt boots using the felting technique, as a result you will get such wonderful embroidered felt boots.
Craft for children
With the kids you can make a very simple paper felt boots craft. This product can also be used to decorate a room for the New Year or use it as a Christmas tree decoration.
Draw a pattern (you can use the template proposed in the first master class). For one felt boot you need to make two paper blanks. The parts need to be glued together. Now all that remains is to decorate the felt boots and that’s it, for decoration you can use appliqués, artificial snow and much more that comes to your mind.
This felt boot can also be used as gift wrapping, and you can put a sweet gift in it for a child, or it can simply be a New Year’s interior decoration.
Well, let's get started))
First, let's print out this diagram:

I printed it on A4 format, the height of the felt boots in this case is about 18 cm.
We cut out each detail and trace it on the paper of your choice as it is and in a mirror image.

You need to use thick paper as the basis for your felt boots, or glue thin paper onto cardboard. I chose thick double-sided designer cardboard. We cut out the heel and toe templates in duplicate. The result should be 10 parts:

Let's start decorating. Here, as they say, who likes what! I stitched the details of the heels and toes along the edges on a typewriter and tinted the distress a little with ink. I also used a chipboard, which I pre-painted gold. acrylic paint and covered it with craquelure.

In addition, for decoration I needed brads, waxed cord and a piece of old shrunken knitted hat)) As a result, we got these two felt boots:

Now we start making the “connecting link” - the box. To do this, draw the following diagram on thick paper:

In orange I showed the lines along which you will need to cut, and in blue - the fold lines. In order for the fold lines to be smooth and neat, you need to first do the creasing - run a special tool or a non-writing pen (knitting needle) from the wrong side along the fold lines. Dimensions may vary depending on the purpose of the object.
After you have folded this part, you need to fix it - glue the lower corners. The result should be the following.
Well, let's get started))
First, let's print out this diagram:
I printed it on A4 format, the height of the felt boots in this case is about 18 cm.
We cut out each detail and trace it on the paper of your choice as it is and in a mirror image.

You need to use thick paper as the basis for your felt boots, or glue thin paper onto cardboard. I chose thick double-sided designer cardboard. We cut out the heel and toe templates in duplicate. The result should be 10 parts:

Let's start decorating. Here, as they say, who likes what! I stitched the details of the heels and toes along the edges on a typewriter and tinted the distress a little with ink. I also used a chipboard, which I pre-painted with golden acrylic paint and covered with craquelure.

In addition, for decoration I needed brads, waxed cord and a piece of an old shrunken knitted hat)) As a result, these two felt boots turned out:

Now we start making the “connecting link” - the box. To do this, draw the following diagram on thick paper:

In orange I showed the lines along which you will need to cut, and in blue - the fold lines. In order for the fold lines to be smooth and neat, you need to first do the creasing - run a special tool or a non-writing pen (knitting needle) from the wrong side along the fold lines. Dimensions may vary depending on the purpose of the object.
After you have folded this part, you need to fix it - glue the lower corners. The result should be the following:

Now we put everything together: we glue our felt boots to the open sides of the box. OK it's all over Now! We admire the result!

If you wish, you can make a pocket for a tag with congratulations on the inside of one of the felt boots. In addition, you can attach handles, and then it will be gift bag for a New Year's gift.
Happy creativity!
New Year's fakes - felt boots.
The New Year is just around the corner. And we are still without new ones Christmas tree decorations. I suggest you use your imagination a little and come up with something new. There are a lot of ideas on the Internet, a variety of manufacturing technologies using various materials.
Felt crafts.
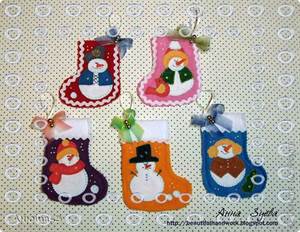
Felt boots with Christmas tree- white with red. It is necessary to cut out the following parts from felt: two white parts of the felt boots, two red socks, two red backs, two red transverse upper parts of the felt boots.


Making a tiny Christmas tree. We sew red round toys to the Christmas tree or green leaf using white threads using a French knot.
Making felt boots. We sew the red sock, back and transverse red border to the white part of the felt boot with white threads. We do the same with the second part in a mirror image, then you will need to fold them together with the wrong sides and sew them in a circle with red threads, putting filler (sintepon) in the middle. First, we sew a ready-made Christmas tree or leaf onto one of the parts of the felt boots. You can also decorate the New Year's leaf with a bow from satin ribbon. Sew a loop of satin ribbon in the middle of the felt boot or on the side and finish stitching both parts. We sew the top of the felt boots with red threads using a simple seam.
Alina Alekseeva
Happy New Year to everyone.
To work you will need fleece (you can use any other thick fabric), scissors, a needle, light threads and of course your imagination.

1 step. Fold the fabric in half, cut off the excess part, I used a pre-cut stencil


Step 2. Divide the cut out small part in half again, use it for insertion


It turns out beautifully if the insert is a different color from the color felt boots.
Step 3. Now the top part felt boots bent by 1.5 cm and sew the insert on both sides, sew a cross from the top


Step 4 We press the edges of the feet or connect them and sew along the edges, again with a cross

Step 5 Turn on your imagination and decorate with snowflakes yourself felt boots, sew on a loop so you can hang it

Publications on the topic:
Lesson notes on appliqué “Felt boots” Objectives: To consolidate children’s knowledge about the production of felt boots, their purpose, customs, to decorate felt boots using appliqué with Komi-Permyak ornaments.
New Year is the most magical holiday! New Year's bustle and excitement, elegant decorations, anticipation of a miracle, as everyone knows. Magic is everywhere. So.
I am glad to present to your attention my work from plastic bottles"New Year's Friends". This was my first time doing this kind of work. It turned out to be simple.
Soon, soon they will come winter holidays- the most amazing, magical holidays per year. Not a single New Year is complete without Santa Claus.
In order to make such Christmas trees, we need white smooth paper which we use for printing, A4 form, colored paper green.
GCD for applique (working with fabric) “Felt boots” Subject. Shoes - felt boots. Target. Creating a fabric applique - felt boots. Tasks. To develop children's interest in reviving traditions.
Project in the school preparatory group “Ay da valenki” Project “Oh yes boots!” Introduction: Probably, almost each of us remembers how once, in childhood, he wore felt boots in winter, in which there were.
Dance patterns for girls “Valenki” to a Russian folk song Felt boots (r.n.p) - girls' dance Introduction they run out and stand in two columns (felt boots on their feet) 1K: With a simple Russian step they go out and line up.
 How much fabric is needed for a dress: simple methods and basic calculation nuances
 Beautiful Christmas tree decorations made of plywood: we make decorations with our own hands using a jigsaw
 Manicure with acrylic paints at home