How to make a name bracelet from beads. Name bracelets on spandex - ideas, tips, master class

Personalized pins master class!
I welcome everyone to the jewelry accessories website.
Pins with names against the evil eye are gaining more and more popularity, because such an accessory is considered a talisman against the evil eye and is hung in a prominent place: on a child’s hat, jacket, stroller.
But even if you don’t give in to superstition, a personalized pin can be used as beautiful accessory, and also as original gift for a loved one.
So, how to make an evil eye pin? Everything ingenious is simple, so here is a master class on making a personalized pin with your own hands using a jewelry cable. In the upcoming issues there will be the 2nd part of a master class on making pins on spandex.
IN step by step instructions The photo below contains links to the necessary accessories, which you can immediately add to your shopping cart.
We need:
* Pliers - ideally, you should have pliers different types: round nose pliers, side cutters, crimper. There are also tools for opening double rings to widen the holes of the beads. I use round nose pliers with a nipping edge.
*Glue gun
*Hot-melt adhesive
*Lighter if you don't have hot glue.

Naturally, we cannot do without the accessories for making jewelry. We will need (the links I wrote about above):
- - beads
- from stones, plastic, glass, metal, etc. of your choice
- (pin)

So, let's begin!
First of all, we need to attach the jewelry cable to the pin. To do this, we pass the cable through the ring on the pin and make the first ordinary knot. Next, we need to make a new knot and, without tightening it, thread the short part of the cable back into the loop, as in the photo below. Now we tighten the loop and make another ordinary knot.

Now we put two beads on the cable, with a separator in the middle. In the master class, agate beads and separators with transparent rhinestones were used. We thread both ends of the rope through the beads. And immediately cut off the short end and hide it in the bead.

Now we string the letters with the chosen name, beads and a separator onto the cable.

We tie the cable to the penultimate loop of the pin using a regular knot.

We perform the same manipulations as at the beginning. We make a loop and bring the end of the cable back inside the loop. We tighten it.

We need to hide the tip of the cable inside the bead. To do this, we stretch it inside the beads and pull it out in front of the letters. Bite off or cut off the excess.


We attach the pin with the bead and the metal pendants to the pin using connecting rings.

Now we glue the plastic cabochon to the pin using a glue gun and hot glue. If you don't have a gun, you can heat the glue using a regular lighter.

This is the reverse side of the pin.

And here is the final result

Our master class on making a pin with a name is completed. Miracle beauty can be attached to anything. For example, for a T-shirt

In the near future you will find a second master class on making do-it-yourself personalized evil eye pins. Do not miss!
Ask questions and leave comments in the “reviews” under the article.
Weaving progress:
To weave a bracelet from rubber bands with an inscription we will need:
- Machine (5 columns each of the lower and upper rows)
- Diagram with the desired name or inscription
- Hook
- Rubber bands in two colors: for background and inscription

How to make a pattern and then how to weave a name bracelet.

Let's begin the weaving process itself.
- We will position the machine so that the posts look to the right.

- We put the iris on 5 columns from above.

- Throw on the next elastic band so as to connect 2 rows. To do this, we make an eight out of it. In this way we put on 4 more things.

- We throw a horizontal elastic band over all the others to the center.

- We put the elastic band back over all the others and put on the other 5 in a figure eight.
- We lift the bottom hook and throw it over the top, releasing it in the center. We carry out this operation with the remaining ones.


- We repeat steps 2,3,4 and 6 for another 3 rows, thus we will have 5 ready according to the pattern.
- Let's start weaving further. We throw one blue elastic band horizontally, then 5 pink ones vertically, turning them in a figure eight.

- We throw the blue one into the center, and lift the bottom layer to the middle.

- There is only one pink elastic in the next row, so we make it into a figure eight on the far right column after putting on the blue horizontal one. Then we throw in the remaining 4 blue ones.

- Let's do step 9.
- Weave the 8th in the same way as 7.
- The 9th one is empty, so we weave it only from blue ones.
- Now we make the remaining letters according to the scheme identical to how we made the first one.
- Having finished the entire name, we weave 4 more rows with blue (main) elastic bands.
- All that remains is to make the fasteners. Before this, we transfer all the rubber bands of the bottom row to the top one.

- We throw all the rubber bands onto our hook, inserting it from top to bottom.

- Take another blue one and pull it through all 10 loops. Now there are only 2 on the hook.

- Remove the loops from the hook and put on the clasp.

- From the reverse side we take out a long elastic band and fasten it to the lock. The bracelet with the name Lisa is ready. Now you know how to weave names from rubber bands.
Personalized bracelets woven by hand from beads, threads, and beads are considered fashionable and exciting among young people. It’s nice to receive a gift created with your own hands, carrying a positive attitude and the warmth of the craftswoman’s hands. This article will talk about how various variations of such decorations are woven.


Master class on beading a name bracelet Alice
I offer a step-by-step training lesson.
We will need:
- pink beads of two colors, size ten
- bead needle and thread
- padlock
- checkered paper for drawing a diagram

Video master class
Bracelet pattern
We take paper and write a name, remember that one cell is one bead. As can be seen from the diagram, the width is 9 beads, and the name itself takes up 24 beads - this is approximately 5 cm. This means that 1 cm will be occupied by 5 beads.

The length needed for a child's hand is approximately 10-11 cm. It turns out that about 3 cm remains at the edges of the name. We will fill it in beautiful pattern. You can draw your own pattern, for example, a heart or a diamond.
Step by step weaving
The main color will be light pink beads, and the name will stand out in a darkish color. We work from top to bottom - like a snake. We collect nine beads on a needle light pink color for the first row.

We collect 1 bead for the 2nd row, and pass the needle through the bead from the 1st row, and again pass the needle through the bead of the second row. Thus we secured the ranks.


From the first row, move 1 bead and take 1 bead for the second row with a needle, insert it into the prepared bead with a needle and again pass through the bead of the 2nd row, using a needle for fastening.

Thus we complete the second row to the end. The first two rows were completed.

Let's take the third row. We take a bead with a needle and insert it in the second row into the first bead, tightening them, and again we pass the needle through the collected bead of the third row.


As you can see, we snake up to the fifth row with light pink beads, and in the sixth we will insert dark color for the pattern.

Let's move on to the sixth row. We collect 4 beads of light color, the fifth one is dark and again we collect 4 beads of light color.

Let's continue and follow the thread. If the tip of the thread remains approximately fifteen centimeters during beading, then you will need to increase the thread. It is necessary to make a knot and hide the thread in the warp, making the last strong knot and cutting the thread.


Now we weave new thread, but vice versa. Having increased the thread, we continue to move according to the pattern.

Upon completion, you need to design the product for the locks. To do this, we extend the thread and bring it out from the middle to the edge of the product. We collect 9 beads, then put on a ring and weave.


Insert a needle into two beads and tighten the ring. We carry on further, grabbing 4 beads and thus continue until the thread is secured in the ring.


Thread jewelry
Thanks to the diversity in the world of needlework, you can learn how to weave bracelets not only with beads, but also with threads. For those who are just learning, I offer lessons on how to create baubles with your name.


Required material
- 2.5 m white rope
- letters of the name
- glue moment
- scotch
- scissors
- ruler

Video master class
Weaving technique
Prepare two threads of 50 cm and one of 1.5 m. Everything is very simple, it starts with a rope 50 cm long. You need to cut the tip obliquely and treat it with a drop of glue. This will give rigidity for easy insertion of the thread into the letters. Now you need to enter the letters with the name one by one.

We are preparing a device for a rope strung with personalized letters - it can be a notebook or a heavier material in the form of a wooden block. We fasten its end, already tied with a knot, to the device with tape.

Next, take a solid thread 1.5 m long and connect its ends exactly. In this way, we determine the middle of the rope and place it under the bottom of the main working thread with the letters. Begin. On the left side we put the rope on top of the main one (it turns out to be an intersection), and on the right side we thread the other end of the thread from below into this intersection. The result is a knot on the right side.


We measure 8 cm from the edge to the knot made with a ruler.

We continue weaving, but in reverse. We put a rope on the right side over the central one, and with the left end from below we pass into the corner and make the next knot.


We alternate knots from left to right and vice versa. Duration – 5 cm. Look how beautiful it turns out.

Let's get started. We lift the first letter up and make two knots, while tightening it tightly, then again the letter and two knots. We continue this procedure with all symbols.


After all the letters have been woven, you need to treat the last knots with transparent glue and trim the ends of the thread. We take a second rope 50 cm long and place it under the central thread with the letters near the last knot. The technique is still the same up to 5 cm.


When finished, glue the knots and cut the threads. Align the ends and make knots at the ends.


Apply glue to the last knots in the same way and trim the threads. The result is pleasing, isn't it? Success in creative work!

Master class on weaving “shambhala” with the name Lyubov
I suggest you look next video lesson. Such braids are also called shambhala. Necessary materials:
- waxed cord 2.5 m, thickness 1 mm
- name beads and for clasp
- nail polish colorless
- scotch
- scissors
- transparent glue

This technique is similar to the one we discussed step by step in the previous article.


Video master class
Name bracelet made of beads


This original decoration, woven with your own hands, can add to your collection of jewelry, and in the future give it to someone either for a birthday or as a keepsake.
Required accessories and materials:
- rubber band
- pink beads
- letters
- hanger connector
- decorative dividers
- needle
- pliers
- scissors

First, you need to distribute the accessories for the creation process on the table in order to see an approximate picture.

If you are ready to start working, then cut off 30 cm of elastic fishing line and pull it into the needle. Then we string it step by step from the first bead to the end. Having cut the fishing line from the needle, tie it in a knot three times, tighten the tails with pliers and cut off the ends of the fishing line, leaving 3 mm tails.

All that remains is to attach the pendant on the opposite side of the name. That's all, it's ready, wear it with pleasure! Nowadays it is very fashionable and popular to wear such clothes among young people. simple decorations with proper names.
Video master class bead decoration
Personalized beaded bracelet with the name Andrey
You will learn how to create wonderful gift for the holiday dedicated to St. Andrew the First-Called - the apostle of Jesus Christ, which is celebrated annually on December 13. On this day, it is customary to go to church for service in the morning, and then gather with the whole family at the large dining table. If among the relatives there is a man named Andrey, then the family gives him a small gift.
Preparing for work
To create a unique gift in the form of a beaded bracelet, you need to prepare the necessary working material:
- three shades of size ten beads: lilac, black and green
- black silk thread
- bead machine
- scissors
- schematic images
Having thoroughly prepared for exciting activity, let's start doing scrupulous and interesting work.
Weaving technique
You and I will learn how to make such an unusual decoration
So, we need a machine. They come in different types.


We make the machine ourselves
I don't have a standard machine, so I'll show you how to make it yourself. For these purposes, I prepared an ordinary lid from a cardboard shoe box.
- We need to take the prepared material and mark it with a ruler and a simple pencil on each side, 0.5 mm.
- We mark the entire width of the product.
- Having finished marking the lid, we take scissors in our hands and make small cuts with them. We carry out the work carefully and efficiently.
- Next, we connect the cuts along the entire length of the lid with a thread, wrapping it around both sides. Having finished wrapping the workpiece, we tie the fiber on the wrong side into a knot and secure it with tape.


Workflow and diagrams
To begin with, I suggest making a decoration diagram with a name. This is done very simply, draw your product on a notebook sheet in a box and color it, highlighting the name in a separate color. To your liking, create a pattern or a solid color. In this diagram, one cell is counted as one bead. Example diagrams could be:


The next step is to tie the thread to the first stretched fiber. Next, we carefully consider the diagram of the selected pattern. Let's start with the starting row.
1. String nine beads, alternating black and lilac beads, focusing on the template. Stringed on a thread, pass under the stretched threads.


2. Carefully place it in the space between the threads. We fix them well with our fingers. We pass the needle through all the beads in the opposite direction. The initial row is usually difficult, but further work will be easy and they will all fit in even bead rows.

4. Just like in the first row, place the strung beads evenly, evenly under the stretched yarn and place them in the cells.
5. Take a needle, thread it through the second row and carefully tighten the thread. The bead weaving technology is repeated. It is important to stick to the pattern and make the right set of beads - and then you will weave the desired product.
6. We knit the third, fourth, fifth, sixth and seventh rows like the first two, alternating in a checkerboard pattern - black and lilac beads.
7. Eighth, ninth and eleventh - we use exclusively black ones.
Create letters
The letter a
- The twelfth and thirteenth rows consist of one black, seven green and one black.
- On the 14th row, we string three black, one green, two black, one green and one black beads.
- Fifteenth - is formed from three black, one green, one glass, one green, and two black glass.
- Sixteenth row - one black, four green and three black beads.
- The first one is ready. The seventeenth row is formed by black glass.
"N"
"R"
- We do the thirty-second and thirty-third as the twelfth.
- The thirty-fourth and thirty-fifth rows are formed from 3 black, 1 green, 3 black, 1 green, 1 black glass.
- The thirty-sixth is created by dialing 4 black, 3 green, 2 black.
"E"
- The thirty-eighth and thirty-ninth trudge along like the twelfth row.
- We create the fortieth and forty-first rows from one black, one green, two black, 1st green, two black, 1st green, and one black beads.
- The forty-second row is formed as follows: 1 black, 1 green, 4 black, 2 green, 1 black.
"Y"
- Forty-fourth, forty-fifth and forty-eighth rubles, like the twelfth.
- We form the forty-sixth from 2 black, 1 green, 6 black pieces of glass.
- We create the forty-seventh row by assembling 3 black, 1 green and 5 black beads. When weaving, we focus on the diagram. This process is simple - with a little free time, we will get a beautiful bauble.
When finished, cut off the thread, leaving long ends, which during the process we divide into three equal parts and braid on both sides. He will be tied to them.

You can choose special accessories for the bauble for the fastener - the choice depends entirely on the needlewoman. Thus, we have woven together a wonderful personalized bracelet that you can give to a man named Andrey on his name day.
Features of bracelets with names
A bracelet is a piece of jewelry that is worn on the hand, most often on the wrist. The making of bracelets goes back far into the past; even in ancient times, tribal peoples made jewelry for themselves from various materials in the form of small straps or braided threads, which were nothing more than.
Since those times, the art of making wristwatches has come a long way. They began to be made in the form jewelry from precious metals, weave from openwork wire, from elastic bands and beautiful threads. There are many various types bracelets, including such a very common one as bracelets with names.
The main feature with names is its meaning to the owner. Most often, the names present in it are the names of people close and loved by the person.

Placing the wearer of the bracelet on the hand with the name of a dear person, it is as if he is always next to his loved one and always remembers him, one has only to look at his hand. It happens when the name of the owner himself is on the bracelet, which emphasizes the love for his name.
Even the classics of Russian literature associate bracelets as jewelry imbued with love. So A.I. Kuprin writes in his story “Garnet Bracelet” - “Hallowed be Thy Name”“Thus drawing a kind of bridge connecting the name of the beloved with a magnificent garnet bracelet.
Types of bracelets with name
Name bracelets can be divided into types according to several criteria. The main criterion for dividing bracelets into types is the materials from which they are made. These can be either special materials (metals, stones, charms, various inserts, elastic bands, etc.) or everyday materials (harnesses, ropes, threads, wire, etc.).

By design, there are soft and hard bracelets. In turn, soft ones are divided by type of connection into:
glider bracelet - consists of links of various shapes (gliders) with connections in the form of a hinge or spring. This type also includes the so-called “tennis bracelets”;
chain bracelet - is a chain with the same or different (alternating) sizes of links with some kind of insert on which the name is located;
woven bracelets - made in the form of a structure woven from various materials (wire, threads with beads, strands, and so on). This type includes very popular recently rubber band bracelets with name;
leather bracelets - made from a single strip of leather or from weaving thin strips and strands. The most common type of this type is a regular watch strap.

Hard bracelets with names can be divided into:
closed - one-piece, which is put on through the hand;
springy - a ring torn in one place that allows you to open the bracelet like a spring;
hinged - consisting of two halves or three parts, which have a hinge connection on one side and a lock on the other end.
Bracelets with names are also distinguished by thickness:
Thin beaded name bracelet or made from bugles will look great on a woman in evening dress, emphasizing its sophistication. When making such bracelets, the name can be made in the form of inserts with individual letters, or it can be directly written with the beads themselves.
A medium-sized bracelet will look nice for daily wear. An articulated bracelet with a name engraving looks beautiful on your hand.
Wide edge bracelet with name can be worn to highlight the individuality of its owner. For example, a bright bracelet made of thick strands of leather and fabric with a personalized insert.

Meaning of name bracelets
It has been known since ancient times that a person’s name has a huge impact on the character, life and fate of its owner. The interpretation of the name has been studied at all times by psychologists, astrologers and numerologists.
The sounds that occur when pronouncing a name subconsciously influence a person’s perception. With a name a person is born, lives and dies. That is why very serious attention is paid to what name to give born child and that is why name bracelets have become very popular all over the world.

In the Middle Ages, bracelets were worn as a symbol of prosperity and were called hoops. Secular ladies of high society wore bracelets made of precious metals and stones to evening balls, often making personal engravings on the inside or outside of the bracelet.
Mens Bracelets in those days they were not very common, but gentlemen, as a sign of sincerity in love, were presented by their chosen ones and the names of their loved ones were depicted on such bracelets.

Open spring bracelets came to us from the ancient Inca civilization. Historical finds were engraved with drawings of the gods that these people worshiped.
In the 20th century, bracelets with names began to be widely used by the military - they were engraved with the personal data of the serviceman (first name, last name, affiliation with a military unit).
During the development of such a movement as the hippies, bracelets with names made of beads, the so-called, became very popular. The idea of creating such bracelets was borrowed by hippies from American Indian tribes and was a unique way of self-expression.

They made such bracelets very bright because hippies considered themselves “children of flowers.” Very often they exchanged baubles because among them this was considered a rite of the said brotherhood.
Nowadays, bracelets with names have firmly occupied one of the areas of needlework. The list of materials used to create them has increased significantly and most of them can be purchased in handmade stores.

The simplest bracelets are very easy to make yourself. If you want to try, but you don't know, how to weave a bracelet with a name, then the easiest way to turn on the computer, open any browser and type in it: “ bracelet with name diagram" Or you can simply watch the video master classes below:
You will receive a huge variety various options indicating the materials used, with illustrations and photographs of various products in the form of name bracelets. In particular, you will be offered various tools with which you can make such jewelry.
Price of bracelets with name
The cost of a bracelet with a name consists of several factors, such as the price of the materials from which the product is made, whether the jewelry is made personally, purchased in a store or ordered from a world-famous one.
Eg, thread bracelets with names, made with your own hands from beads, bugles and charms with letters will cost the master a hundred rubles, and their production will take no more than an hour.

At the same time, a beautiful gold bracelet, skillfully made by a jeweler with beautiful engraving name and several elegant stones, you can buy it for several thousand rubles.
Children very often weave bracelets from special rubber rings. The cost of a pack of such rubber bands is about two hundred rubles and about 5-7 bracelets can be made from them.

If you want to give your loved one a bracelet with your name or his name, then you can choose an inexpensive, for example, silver bracelet in a jewelry store and order his name from the craftsman. Such a gift will not put a big dent in your pocket and will be very pleasant for someone close to you.
The Shambhala bracelet has gained immense popularity among both domestic and foreign stars, in addition, many women among ordinary people They also love to decorate their hands with such decorations. A bracelet in this style looks like woven beads, which are wrapped in silk threads or waxed cord, using flat knots, and tied using square macrame knots. This accessory has earned such popularity for the reason that it can be worn with any style of clothing. Moreover, it can be worn by both women and men. You can make such a Shambhala bracelet with your own hands without much difficulty. Moreover, manufacturing does not require a lot of time and money.
Some people use such a bracelet as a talisman, with the help of which they can attract good luck and money. There are different types of weaving jewelry and therefore, in order to make it yourself, you need to choose the one that is suitable for the craftswoman. The availability of materials for the product is amazing; they often just lie idle at home and gather dust. Many craftswomen make it from beads, and almost every needlewoman has this.
These decorations are woven in 2 rows, or even 3. It all depends on the desire and time of the needlewoman.
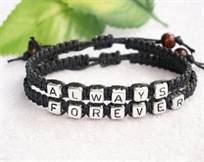
Bracelet with letters
Weaving bracelets with Shambhala knots is always interesting, but you want to stand out somehow, and this master class will tell you how to make a bracelet with a name. So why don't we try it?
To make a bracelet we will need:
- weaving board;
- waxed cords, 3 meters long;
- glue;
- scissors;
- lighter;
- beads with letters.
To begin with, cut a cord, the length of which will be up to 80 cm, and the second should be twice as long - 160 cm. Attach a short cord, in our case it will be a box.
Let's start weaving. We take a long cord and, stepping back 8 cm, pass it under the bottom of the working piece, fold it in half and tie a knot. Next, take the left lace and form a half ring, place it under the bottom of the worker. With the right one we repeat the same steps, only we put it on top.


We take the right lace and thread it into the loop of the left one, only from above, but the left one - inside the semicircle on the right, it remains to be tightened. Now we change places - we place the right one on the bottom in the same way, and the left one on top, while not forgetting to form a semicircle. Again we perform the same steps as in the previous step - thread the ends into the resulting loops and tighten. But we are careful, now we pass the left one into the right buttonhole, and we bring the left one from below into the right one and tighten it. This is how we got a macrame knot. We must make these five double knots.


We take the first bead with the letter and string it onto the middle cord, after which you need to make one double knot to secure it, without changing the direction. We do everything as indicated in the photo below.
Do this with each subsequent bead, braid it with a double knot. You can decorate the middle of the bracelet in some other way, it all depends on your desire. When the whole name is laid out, finish the bracelet as you wove before the first bead, which is 5 double knots. When everything is woven, we try it on the wrist.
We can cut the two laces that remain on the sides only after the knots are well tightened. Afterwards, we grease it with glue and let it dry, this is to fix the ends, and then we can cut it off so that the excess is not visible. Next, cut off another 30 cm of lace to form a clasp. We put the ropes of the bracelet on top of each other and put the newly cut cord under them, tying them with a tight knot.

We weave about 10 such double knots.
While working, it is worth considering that you do not need to tighten it too much so that the threads can move.
The very last knot should be tied tightly, coat the ends with glue and let dry, cut off. We singe the edges that remain free using a lighter. And now our bracelet is ready!
Enough simple knots and weaving, which will not be difficult even for beginners. All master classes are described in detail, so it won’t be difficult to make such a charming bracelet. And if you take two long pieces of cord and weave them with the same knots, you can make a Shambhala bracelet with infinity, which is suitable for both men and women.
 How to call your beloved guy so that he likes it: choose an affectionate nickname
 Mind-blowing hair carving (50 photos) - For short and medium curls Carling for long hair
 High-quality natural shampoos: product benefits, advantages, disadvantages and rating of the best manufacturers Rating of natural shampoos