How to make a paper ship diagram. How to make a paper boat: step-by-step do-it-yourself folding schemes, video
Parents have been making paper boats for their children since the invention of paper. After all, this simple toy gives children a lot of joy when they play it in the bathroom, pond, stream, puddle or even river. In the photos below you can see a vivid example of this magnificence.
The lonely sail is white. In the blue sea fog!..)))
Here they are, beauties. Amazing, isn't it?
By the way, do you remember how to make this beauty? It doesn’t matter, because our article today is designed to help you with this!
What paper is best to make a boat from? Tissue paper is perfect for making a paper “vessel,” but you can fold it from newspaper or regular notebook paper.
Let's see how to make a paper boat in the most common way.
By following the description and visual illustrations below, you can easily and simply make a paper boat. So…
All we need to make a paper boat is an ordinary rectangular piece of paper. Well, straight arms, of course. Well, let's get started.
 Fold a rectangular piece of paper in half and make a vertical fold
  Fold one top corner toward the center line
  Fold the second corner to the midline
  Fold the flap up on one side, as shown in the picture.
  Fold the second flap up
  Grab the center points and pull, turning the triangle into a square
  Bend the corner on one side as shown in the picture, unfold it, and do the same on the other side.
  Fold the second corner
  Stretch the center points
 Paper crafts are a fun activity. A simple white or colored sheet can make an interesting creation.
At first glance, folding figures looks like a child's game. But this is a real art with its own techniques and methods of work, which, nevertheless, every person can master.
Every child has folded paper figures at least once. The most familiar and beloved are paper airplanes and boats.
In childhood paper boats were launched into sailing and simply used in games. This simple toy gives room for the child's imagination.
Some were fond of making complex and large models with many small elements.
Anyone can create such a figurine from paper. It is enough to know simple instructions.
Instructions for folding a durable boat
In order to fold the craft, you need paper sheet. Nothing more is required. And the scheme itself is quite simple. It is enough to understand it carefully and fold the product several times.
 In the future, you can do without the hint.
- You need to prepare a sheet of paper rectangular shape. The final size of the boat will depend on its size.
The sheet can be white or colored, depending on your wishes. If you are using paper that has color on only one side, it is advisable to fold it with the color on the inside. The finished figurine will look more beautiful.
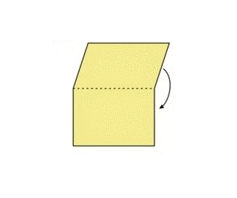
- You need to fold it in half crosswise.
- Place it in front of you with the fold up and find the middle of the sheet. To do this, you need to fold it again, but not completely. As soon as the middle is identified, you can make a light crease.
- At this stage there is a sheet folded in half, with the middle marked. Next, you need to fold both corners towards the center, focusing on the mark.
- Holding the corners, you need to run your finger along all the fold lines. They should become fixed and thin.
- Next, you need to tuck in the free edges of the sheet that remain under the formed triangle. One edge is on one side, and the other on the other.
- Now the corners of the folded edges need to be folded, repeating the shape of the triangle and again fix the fold with your finger. Do this on both sides.
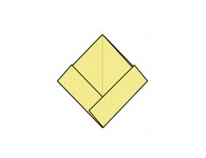
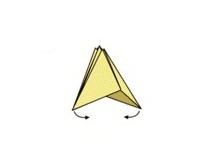
- Now you have a blank in the form of a triangle. If you move the edges of its base apart, a pocket will form inside.
- Next, you need to bring the corners of the base of the triangle together and fold its opposite sides. Now the workpiece has become square in shape.
- It is necessary to grab the upper corners of the square and stretch them in different directions.
- The product is ready.
How to make a paper boat with a child
The folding process may seem long and complicated. But in practice everything is much simpler and more interesting. In order to interest a child in such an activity, it is necessary to take part in the process. At least at the initial stage.
Folding figures will not only captivate your baby, but will benefit his development:
- the process helps develop fine motor skills;
- perseverance and patience are formed;
- imagination develops.
There are a huge variety of diagrams and figures. They vary in degree of complexity, and you can choose suitable option for a child of any age.
 In order to assemble a craft with your child, you must:
- Think in advance about which model you plan to fold. Prepare its diagram and understand it before starting the process.
- Prepare a suitable work surface and several sheets of paper (in case something doesn’t work out the first time).
- You can also prepare colored pencils, markers or paints. When the ship is ready, you can decorate it: come up with a name, draw holds, or simply paint it.
- When everything is ready, you can start working. It is necessary to fold the paper, showing the child the sequence of actions and technique. At the same time, the child must do his own crafts on his own.
- The finished figurine can be decorated to suit the child’s taste. Then put the “ship” on the water (even at home).
- It is necessary to be patient and not rush the child so that he can calmly figure out a new activity for himself.
Paper origami in the shape of a boat
Origami is the art of folding various paper figures. The classic version involves using only one sheet of paper, without using scissors.
Origami in the form of a boat with a sail can be assembled as follows:
- Fold a sheet of paper along both diagonals alternately, straighten it and turn it over.
- Now make folds in all corners and turn over again. The resulting folds make folding the figure easier.
- A piece of paper must be folded in half and then unfolded back.
- Now you need to fold the edges of the sheet to the central fold and press them.
- The result is a rectangular blank. The top and bottom edges need to be folded towards the center. Now it turns out to be a square.
- Next, the top and bottom need to be bent back.
- The lower corners need to be raised up and their corners turned outward to form a trapezoid.
- Do the same with the top part.
- Next, you need to grab the upper trapezoid by the central part and pull it up.
- Turn the workpiece over. It turns out to be a square in the center. The entire figure needs to be folded in half along the diagonal of this square.
- All that remains is to raise the bottom corner and the craft is ready.
 Another model in the form of a boat:
- The sheet must be folded in half horizontally.
- Then make one horizontal bend in the center of the sheet.
- Next, you need to bend the top corners outward on both sides towards the center line.
- Also bend the bottom corners towards the center.
- Now you need to bend the top layer forward and the bottom layer back.
- Next, fold the workpiece inward and straighten it.
- Bend the corners back and level the boat.
Ship made from A4 sheet
Most often, A4 (or landscape) sheet is used to make figurines. Its parameters allow you to create a ship of medium size and good shape.
It is preferable to use A4 with a density of 80 to 160 g.
Often the product requires a rectangular sheet (like for a classic boat). In this case, even scissors are not required.
If you need a square sheet, then it can be easily made from A4 using scissors (for example, as for a two-pipe boat).
Making a big boat out of cardboard
For making a ship big size you can use the same patterns as for regular crafts.


 And here plain paper It won’t work here, since such a workpiece will not hold well.
- Sometimes large figurines made from newspaper sheets in two or three layers. But even such tricks don’t really help. As a result, the craft does not hold its shape and has no appearance.
- For such a product, very thick paper or cardboard is suitable. This material will give rigidity and keep its shape.
- It should be noted that working with cardboard is more difficult than working with paper.
- First you need to take measurements, and then make bends in the right places.
- Fixing the bends will require some physical strength. Therefore, the child will need adult help.
- Sometimes a model of a large ship is made from thinner paper, and then reinforced with cardboard figures of the desired shape. They are glued to the ship and it becomes stable. But it is not recommended to place such a product on water, since the folds will quickly become saturated with water.
- Large ships often perform a decorative function and are a decoration or addition to the interior.
Beautiful sail for a paper boat
A sail is one of the ways to decorate paper crafts. With such a detail, the product takes on a finished look.
In this case, the sail does not functionally help you swim faster. Therefore, you only need to take care of its beauty and originality. It does not matter in which part of the ship it will be attached.
- First you need to prepare the base for the sail. If the figure is small, then a toothpick will do. For a large model, you can use any wooden stick. Or another material is not too heavy for the product.
- The base is attached with glue or mechanically (for example, with threads).
- The sail itself is attached to the top of the base. It can be of any shape and color, from any material: colored paper, material, shiny foil.
- For convenience, it is better to first attach the sail to the base, and then this structure to the craft.
- It is necessary to ensure that the sail does not overweight and the boat does not fall on its side.


Double-pipe boat for interior decoration
A two-pipe boat (or steamship) is as easy to manufacture as classic version. It can become not only a toy, but also a worthy addition and decoration in the interior.
 To make the boat look presentable, you can make it from beautiful, unusual paper. Or decorate the already prepared figurine so that it fits harmoniously into the interior.
The manufacturing process of a two-pipe boat:
- For this model you will need a square sheet of paper. If the shape is rectangular, then you also need scissors.
- The rectangular sheet must be folded, bending one corner diagonally to the opposite edge. Thus, you get a square folded in half and the remaining strip of paper that needs to be cut.
- The resulting square must be folded first along one diagonal, and then along the second. Thanks to this, the center of the sheet will stand out.
- Next, you need to bend all four corners to the center. You also get a square figure, but smaller in size.
- The workpiece must be turned over with its bent corners onto the table. And on the resulting surface, repeat the operation again - bend the corners to the center.
- We turn the workpiece over again and bend the corners to the center for the third time.
- Now you need to turn the figure over again. The top and bottom corners need to be straightened. They will serve as pipes for the boat.
- The other two corners (left and right) need to be pulled to the sides and the craft is ready.
 Another one simple instructions, and the result was new model boat with two pipes in the center.
How to properly launch ordinary boats on the water
To launch a finished paper boat on the water, you must first prepare.


 Of course, you can do this without preparation. But such a figurine will quickly become saturated with water, lose its shape and drown.
To prevent the product from becoming disposable, you need to follow these recommendations:
- use thick paper for production, which does not absorb water well;
- You can melt paraffin or wax and dip the figurine in it. When everything dries, a layer forms on the paper that will serve as protection against water;
- do not overload the ship with additional cargo. Sometimes during the game you can place a figure (captain) or cargo on the boat that needs to be transported. If all these items are too heavy, then some of them must be put aside for the duration of the voyage.
Any of the boat creation schemes is feasible for both adults and children. It's nice and interesting activity for all.
You can make such a craft in any conditions. This does not require any special skills or special materials.
Grandparents didn't know about Japanese technology origami, but without even knowing it, they easily made at least three such crafts with their own hands. Origami is the art of making a variety of craft figures with your hands by folding paper without using scissors or glue. Using the modular principle in origami technique, when figures are assembled from many separately assembled paper parts, oriental masters make anything - from small birds to huge dragons.
- The Japanese make them from special paper, and our parents took for these origami crafts, the most popular in Russia, any piece of paper that came to hand with notes and folded an airplane or a boat for the children. This skill is still in demand today.
- In spring, when children are delighted by the first streams and puddles, in winter, when any basin at home can be turned into a pond, not to mention summer and autumn, a paper boat will help entertain the child and turn slush into a fairy tale. A child is willing to learn from mom and dad how to make a simple paper boat with their own hands in one lesson. This skill develops fine motor skills hands, spatial thinking, and the ability to read diagrams is also always useful to him.
- For beginners, it’s better to make a simple origami paper boat for children, especially since step-by-step instruction according to the diagram it will be in front of you below. When you master this option, you can use photo lessons, diagrams and videos on the Internet to learn how to make an origami boat out of paper with pipes or under sail. This paper ship is easy to put in your pocket when going for a walk.
Easy Origami. Paper boat for beginners.
A child can easily master this classic paper boat under the guidance of parents. senior group kindergarten. Any paper will do to create a classic, simple paper boat, but if you want it to be easy for your child to bend, don't use something too thick, like craft cardboard. At the same time, if the paper is too thin, your ship will soften too quickly and fail, so it is better to take a sheet of medium thickness.
Usually the craft is made from A4 paper, but if your child wants to have a BIG ship at the end, then choose a larger format, the main thing is that the sheet is rectangular, and the steps according to the diagram will be the same as in the instructions below.
So, look at the photo and start the lesson:
 We bend the lower corners of our rhombus up again, each on its own side, transforming it into a new triangle.
 We carefully iron the folds of the resulting diamond and get ready to move on to the next transformation.
Now we take these corners and bring them together, resulting in a new shape - a rhombus.
 We bend the corners of the wrapped strips from each edge towards each other so that the craft blank finally takes the form of a triangle.
 We bend the remaining edges-strips below the resulting triangle upward, each to its own side.
 Along the fold line, we take the edges and bend them down towards the center so that we get a triangle at the top.
Take a sheet of A4 format and fold it in half.
 We repeat the technique from step 4: holding the opposite edges, we bring them together, again, like in a fairy tale, turning the triangle into a rhombus.
 The most crucial moment in our fairy tale is coming. We take the upper corners with our hands and slowly open the diamond, turning it into a boat.

If you want the boat to be beautiful and unique, you can make it from colored paper or paint it with wax crayons.

You can add a flag to the center, but any additions to the ship must be lightweight so that it does not become unstable. On the Internet you can see many photos of boats assembled according to this scheme, thanks to the interesting paper and small additions that have become a real decoration for the children's room.
If you want the ship to last longer and not be afraid of water, dip it in melted paraffin. Can your child make it with his own hands according to these instructions? beautiful paper boat postcard with congratulations for dad or grandfather.
A simple paper boat assembly diagram
Now that you have mastered assembling a simple classic origami boat, you can try to make a steamboat according to the instructions.
Look at the photo below, follow the bending instructions indicated by the arrows, and you will be able to do everything yourself.

It’s easy to find video tutorials on the Internet on how to create boats with two pipes, so that, having mastered the video instructions, a child can build a whole flotilla of steamships with one pipe, two pipes, simple boats and sailboats.
Complex scheme with a sail
To create a sailboat, as in the diagram below, you will need special origami paper, or simply cut out a square from A4 format, otherwise nothing will work.

DIY multi-colored origami paper boat. Instructions in verse for children!
Paper crafts - interesting, creative activity for children and adults. Among the varieties of paper works, the origami technique is of particular interest. In it, figures are folded without scissors and glue, using only sheets of paper. The first steps in origami begin with making figures familiar to us from childhood - an airplane, a box, a boat, a racing car. Let's look at how to assemble a simple paper boat, as well as complex models. Let's study the algorithms and sequence of creating boats of varying complexity.
The process of creating a paper figure is magic, a transformation that happens before a child’s eyes. Origami is so diverse that there are patterns for both kids and adults. In addition, the folding technique requires certain skills and abilities. She develops:
- perseverance and patience. It is often necessary to ruin several sheets in order to obtain the intended figure;
- accuracy. Paper is a capricious material. She does not allow inaccuracies. It is important to carefully align corners and smooth out folds;
- ability to concentrate.
Origami offers to improve skills by increasing the complexity of patterns and a large number of intermediate stages. Thus, you can create a boat out of paper in either 5 or 20 steps. At the same time, your fingers become more and more dexterous, you acquire the ability to read diagrams and the ability to clearly follow the designated plan.
What is needed to make a paper boat?
To begin with, select special paper for origami. It is sold in stationery stores. However for simple models You can use regular A4 sheets or single-sided multi-colored paper. Besides:
- located in a well-lit place;
- prepare several schemes you like;
- Make sure you have a ruler or pencil that will be useful for ironing out folds.
They are patient, have a great mood and work towards results.
Instructions for creating a simple boat
They begin to master folding a paper boat at the age of 3-4 years. Parents interest the child in a pre-made figurine and offer to build the same one together. First, choose a scheme that consists of several actions, for example:
The ship is painted with felt-tip pens or pencils together with the child or made from one-sided colored paper. They come up with a joint game with the resulting figures and praise the child for his help in making the toy.
Classic paper boat model
After training on a simple model, they move on to making a more complex version. The procedure is as follows:
- Take an A4 sheet and fold it in half (along the long side of the sheet). Unfold with the fold up. Bend the workpiece slightly, marking the middle on the top line.

- Fold the upper left corner towards the middle, with the previously marked middle as a guide.

- A similar action is performed with the right half. Smooth out the folds.

- Fold the resulting rectangle under the triangle upward (along the bottom line of the triangle), and do not touch the lower quadrilateral for now.

- Turn the workpiece over and bend the second rectangle in the same way.

- Secure the sides by bending two corners to the opposite side, as shown in the figure.

- The future paper boat is turned over again and the remaining two corners are fixed.

- Open the pocket that has formed inside the model.

- “Flatten” the workpiece by connecting its opposite corners.

- The free edge of the resulting pocket is turned outward diagonally.

- On the reverse side of the workpiece, exactly the same action is performed.

- Stretch the free edges to the sides.

- The model is ready.

If desired, it can be colored with pencils, gel pens or felt-tip pens. Test the ship in a basin of water or a nearby puddle.
Types of paper boats
Children love ship models that are different from each other. Therefore, to create their own flotilla, they make steamships, boats, and pleasure boats. By following instructions You can easily and quickly make a steamboat:

The main advantage of the resulting model is its stability on water.
Older children familiar with symbols, can design a boat. Let's consider the sequence of actions to create it:

A paper boat can become not only a toy, but also an interior item. The sailboat model shown below is suitable for decorating a boy's room. Quick to make, suitable for children different ages. Algorithm for creating a sailboat:

Sailboats make different sizes and flowers, placed on a tray, cabinet, placed on shelves. The marine interior is ready.
For schoolchildren they select more complex circuits ships. First-graders cope well with the algorithm for completing a motor ship.

Older children will be able to design a catamaran or motor boat. 
The process of creating ships and other paper figures is not possible without the participation of adults. In the early stages of mastering the origami technique, parents and teachers must support their children, help them master new elements, and encourage them. For interested guys, you should select more complex patterns in order to improve your technique and enjoy creating a new model.
Video instructions - how to make a paper boat
Useful tips
Many of us have loved making paper boats since childhood and let them flow in streams. This fun is still popular among those who love to craft.
You can make a boat using plain paper or cardboard. But you can also try materials like tree branches, polystyrene foam, walnut shells and plastic bottles.
You can build several boats and launch them race. Whose boat floats the longest will win.
Let's look at several ship options, starting with two types paper boats.
How to make a boat (diagram)

You can prepare both a sheet for printing, and a landscape or notebook sheet.
Here's how to make a regular paper boat.

This is how you can make a sailboat/frigate

And this is another type of paper boat

How to make a paper boat
The diagram below shows how to make origami boat.
How to make a boat (photo)
Prepare a sheet of A4 paper.
1. Fold the sheet in half lengthwise.
2. Bend and straighten the sheet again to mark the fold locations in advance.
3. Fold the top corners towards the line.

4. Fold the bottom edges up halfway (this must be done on both the front and back sides).

5. Now bend the bottom corners 90 degrees to the top. Do this on both sides.

6. Also on both sides you need to bend the bottom edges to the end.

7. Taking the folded piece by the center, begin to stretch it.

8. The bottom edge of the square needs to be folded up.

9. Again, take the workpiece by the center and begin to stretch it.

10. The bottom edge needs to be folded.

11. Holding the workpiece by the tips of the corners, begin to stretch it.

That's all!
This is another type of boat, or rather a steamship with two pipes. This steamer is very easy to make - follow the photo instructions.

Prepare a sheet of A4 paper (or a simple landscape sheet) and scissors.
1. First you need to make a square from a rectangular sheet.

Fold the top corner of the sheet so that the top side is on the left side.
Fold and cut off the excess bottom of the sheet and unfold it.
Since one fold line is already there, it remains to make a second one. To do this, fold the sheet as shown in the image, i.e. connect opposite corners diagonally. Next, unfold the sheet.

2. Fold the corners towards the middle.


3. Turn the workpiece over and repeat the same thing, i.e. bend the corners again towards the center.

4. Turn the workpiece over again and repeat the same action a third time.

5. Turn the workpiece over one last time and straighten the two opposite corners as shown in the picture. These corners should turn into rectangles, which will act as the pipes of your steamer.

6. All that remains is to take the product by the tips of the opposite corners and simply unfold it. The steamer's pipes must close together.
How to make a boat with your own hands

As was already said at the beginning of the article, boats can be made not only from paper. Here's what you can do if you use, for example, bottle caps.
Such a craft is not at all difficult to make. Simply glue three or more bottle caps together using superglue, add a toothpick mast and a sail.

If you wish, you can tie a string with a reel to your boat so that you do not lose it and can return it.
But what a cute boat you can make using walnut shells.

For such a boat, you first need to carefully split Walnut into two even halves and remove the entrails.
Light a candle and then drip paraffin into the shell.

While the paraffin is in liquid form in the shell, insert a toothpick to serve as the ship's mast.
Once the paraffin has hardened, you can decorate the ship. For example, add paper flag or sail.
Here's how to make a boat from tree branches.


DIY paper boat made from candies
1. First you need to trim off the excess from a piece of foam to give the shape of the future ship.

2. For a good poop, glue on a few flat pieces.

3. For now the ship is not very level, which means we will correct the situation with the help of papier-mâché.
 Relief knitting patterns with diagrams and descriptions Knitting patterns for dark yarn in leaf shape
 How to knit a tanker’s helmet: description and materials
 Wife kicks her out of the house: advice from a psychologist Man periodically kicks her out of the house