Drawing on a winter theme. How to draw a winter landscape with a pencil step by step
In winter, adults and children spend a lot of time at home, so there are more opportunities to get creative. Winter is very beautiful time of the year. Try to convey the beauty of this time of year in winter drawings. We will share with you simple techniques drawings, with the help of which you can teach your child to draw on his own beautiful drawings on the theme of winter. From this article you will learn how to make voluminous snow paint and learn how to draw winter pictures using the spray technique. When drawing pictures on winter theme we will use all kinds of additional materials, not just a brush and paints. You may not even suspect that you can draw winter using plastic film or salt, bubble wrap or shaving foam.
1. Winter drawings. "Volume snow paint"
If you mix equal amounts of PVA glue and shaving foam, you will get wonderful airy snow paint. She can draw snowflakes, snowmen, polar bears or winter landscapes. For beauty, you can add glitter to the paint. When drawing with such paint, it is better to first outline the contours of the drawing with a simple pencil, and then paint it with paint. After some time, the paint will harden, and you will get a voluminous winter picture.

2. Winter drawings of children. Using electrical tape in children's creativity
On the English blog Art Projects for Kids It shows how you can create beautiful winter landscapes using ordinary electrical tape or adhesive tape. For more information about this technique, see the article."Using electrical tape in children's creativity" .Note: to create winter drawings using this technique, it is advisable to use thick glossy paper, from which it will be easy to remove pieces of electrical tape later without damaging the paper.

A. First, make a frame around the perimeter of the sheet using electrical tape. After this, cut strips with uneven edges from electrical tape (wide ones for trunks, narrower ones for tree branches). Stick them on paper. Cut out and glue on the moon.
B. Now apply dark blue paint. While the paint is wet, you can sprinkle salt on it. Then interesting patterns will appear (the glossier the paper, the more beautiful the patterns will be).
B. When the paint dries, shake the salt off the paper and carefully remove the tape.
D. Using blue paint, apply narrow stripes of shadow on the trunk and branches of trees, and transverse stripes on tree trunks. Using a thin brush or cotton swab, paint the falling snow with white paint or putty.
3. Winter drawings. Drawings on the theme of winter
If there is snow outside the window, you can depict it using a cotton swab.

Or use a brush to put snow on each branch.

11. Winter drawings. Drawings on the theme of winter
An interesting idea on the topic of children's winter drawings was suggested by the author of the blog Homeschool Creations . She used putty to paint snow on the transparent film. Now it can be applied to any winter pattern or appliqué, simulating falling snow. They put the film on the picture - it started snowing, they removed the film - the snow stopped.

12. Winter drawings. "New Year's lights"
We would like to tell you about one interesting unconventional drawing technique. To draw New Year's garland as in the photo, you will need a sheet of thick paper of a dark color (blue, purple or black). You will also need regular chalk (the kind you use to draw on asphalt or a blackboard) and a light bulb stencil cut out of cardboard.
On a piece of paper, use a thin felt-tip pen to draw wires and light bulb sockets. Now apply the light bulb stencil to each socket in turn and outline it boldly with chalk. Then, without removing the stencil, smear the chalk on the paper using a piece of cotton wool or directly with your finger to create rays of light. You can replace chalk with colored pencil graphite chips.

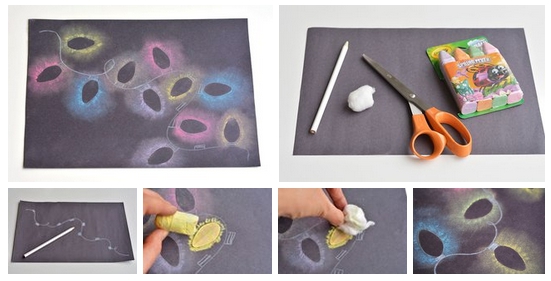
It is not necessary to use a stencil. You can simply paint over the light bulbs with chalk, and then gently rub the chalk in different directions to make rays.
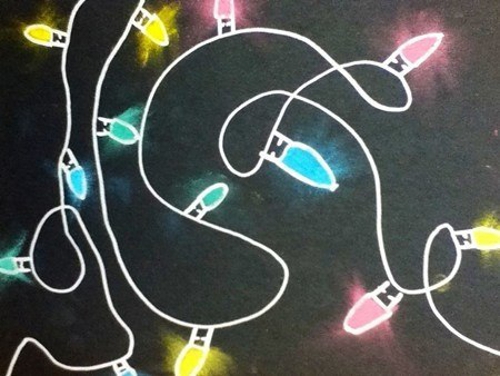
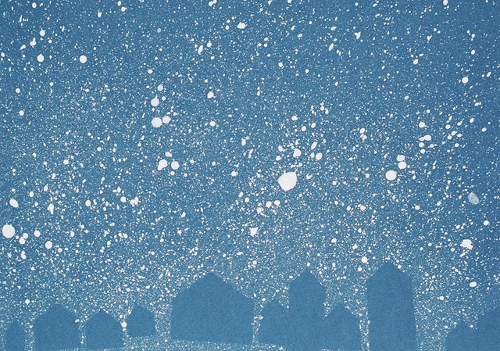
Using this technique, you can also draw a winter city, for example, or the northern lights.

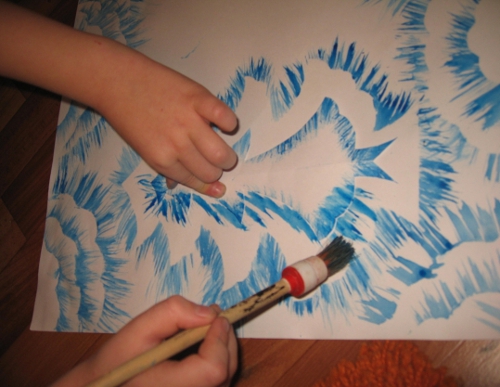
13. Drawings winter's tale. Winter forest drawings
On the site already mentioned above Maam.ru you will find interesting master class on drawing winter landscapes using templates. You will only need one base color - blue, a coarse bristle brush and a white drawing sheet. When cutting out templates, use the cutting method from paper folded in half. Look at what a magnificent drawing of a winter forest the author of the painting created. A real winter fairy tale!

14. Winter drawings. Drawings on the theme of winter
You are probably very eager to find out how the wonderful “marble” Christmas tree in the photo below was painted? We'll tell you everything in order...To draw such an original drawing on the theme of winter you will need:
Shaving cream (foam)
- watercolor paints or food colorings green shades
- flat plate for mixing shaving foam and paints
- paper
- scraper

1. Apply shaving foam to a plate in an even, thick layer.
2. Mix paints or food coloring different shades green color with a small amount of water to make a saturated solution.
3. Using a brush or pipette, drip paint onto the surface of the foam in a random order.
4. Now, using the same brush or stick, beautifully smear the paint over the surface so that it forms fancy zigzags, wavy lines, etc. This is the most creative stage of the whole work, which will bring pleasure to children.
5. Now take a sheet of paper and carefully apply it to the surface of the resulting patterned foam.
6. Place the sheet on the table. All you have to do is scrape off all the foam from the sheet of paper. For these purposes, you can use a piece of cardboard.
Simply amazing! Underneath the shaving foam you'll find stunning marble patterns. The paint has time to quickly absorb into the paper; you just need to let it dry for a few hours.
15. How to draw winter. How to paint winter with paints
Concluding our review article on winter drawings for children, we want to tell you about another interesting way how you can paint winter with paints with your child. To work you will need any small balls and a plastic cup(or any other cylindrical object with a lid).
Drawing winter with preschoolers: step-by-step master classes, a collection of ideas.

Drawing winter with preschoolers
In this article you will find step-by-step master classes on drawing with children preschool age winters in different techniques:
- drawing winter with gouache,
- we draw winter using the grattage technique,
- painting with salt.
Master classes will help teachers and parents conduct drawing classes in kindergarten, children's studio and home.
Master class 1. Drawing winter with gouache with preschoolers
Author of the master class: Parfentyeva Vera, technology teacher, head of the children's club artistic creativity, reader of "Native Path". In the article, the photo shows drawings of children - students of Vera's studio.
Materials and tools for drawing
To complete a winter drawing, you need to prepare for your child:
- album sheet,
- paints (watercolor or gouache),
- brush (you need a wide flat brush),
- round brushes No. 1 -2, 4-5.
Children's age
This drawing can be drawn by children aged 5 years and older (senior preschool and primary school age.
How to draw winter with children: step-by-step description
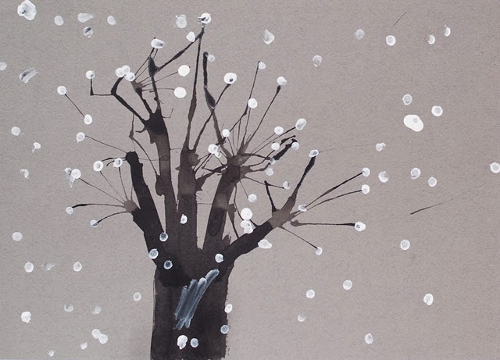
Step 1.Prepare the background. To do this, you need to apply several strokes of blue, red, yellow, purple (can be green) paint with a wide brush. Then put white paint on the brush and stretch the color. Until the desired background is obtained, in which one tone transforms into another.

Step 2. We draw the outlines of the trees.
— Apply white paint to a round brush No. 4 or 5, and holding the brush vertically, first point out the contours of two trees in the center of the sheet (or do it using the poking method). The trees consist of three tiers in the form of a month-like figure or “cloud”. Start drawing from the bottom tier. Make the middle and upper tiers smaller relative to each other.
— Mark “clouds” on the sides of the trees round shape for shrubs.
— Using the poking method, fill in the inside of each “cloud.”

Step 3. Draw snow caps on the trees.
Mix white and black paint on the palette to get a light gray color and also dot the white “clouds” with a gray tint (shadow on the snow caps).

Step 4. We draw trunks and branches of trees and bushes.
Using brush No. 1 or 2, draw thin lines on tree trunks between the tiers of the crown and trunks of shrubs.
Paint the tree trunks with black paint, carefully so as not to touch the crowns.
Draw branches from the trunk.

Step 5. We draw snow on tree trunks and snowdrifts.
- Use white paint to apply thin lines along the trunks of trees and shrubs.
- Under the trees, outline the contours of the snowdrifts with a brush No. 5 and fill the “drifts” with white paint.

Step 6. Drawing falling snow.
Spray the finished drawing with white paint, brushing it over the brush, simulating falling snow. How to draw falling snow “spray” You are shown in the photo.

Our drawing is ready. Try to depict winter in a drawing! Good luck in your creativity!

And below is an example of a child’s drawing based on this master class. It was drawn by Nastya (7.5 years old).

Drawing winter with children using scratch paper technique
Drawing a winter picture with salt: technique
In the video you will see the drawing technique using the example of a snowman. But you can also create an image of a winter tree, house, clearing, forest.
How to draw winter with gouache: step-by-step video for children 6 years and older
Summary: Children's drawings on the theme of winter. How to paint winter with paints. How to draw winter with a pencil. How to draw winter step by step. Drawing of a winter landscape. Drawing winter fairy tale. Picture of a winter forest.
In winter, adults and children spend a lot of time at home, so there are more opportunities to get creative. Winter is a very beautiful time of year. Try to convey the beauty of this time of year in winter drawings. We will share with you simple drawing techniques with which you can independently teach your child to draw beautiful drawings on the theme of winter. From this article you will learn how to make voluminous snow paint and learn how to draw winter pictures using the spray technique. When drawing pictures on a winter theme, we will use all kinds of additional materials, and not just a brush and paints. You may not even suspect that you can draw winter using plastic film or salt, bubble wrap or shaving foam.
1. Winter drawings. "Volume snow paint"
If you mix equal amounts of PVA glue and shaving foam, you will get wonderful airy snow paint. She can draw snowflakes, snowmen, polar bears or winter landscapes. For beauty, you can add glitter to the paint. When drawing with such paint, it is better to first outline the contours of the drawing with a simple pencil, and then paint it with paint. After some time, the paint will harden, and you will get a voluminous winter picture.
2. Winter drawings of children. Using electrical tape in children's creativity
3. Winter drawings. Drawings on the theme of winter
If there is snow outside the window, you can depict it using a cotton swab.
Or use a brush to put snow on each branch.
11. Winter drawings. Drawings on the theme of winter
An interesting idea on the topic of children's winter drawings was proposed by the author of the Homeschool Creations blog. She used putty to paint snow on the transparent film.
12. Winter drawings. "New Year's lights"
Now it can be applied to any winter pattern or appliqué, simulating falling snow. They put the film on the picture - it started snowing, they removed the film - the snow stopped.
On a piece of paper, use a thin felt-tip pen to draw wires and light bulb sockets. Now apply the light bulb stencil to each socket in turn and outline it boldly with chalk. Then, without removing the stencil, smear the chalk on the paper using a piece of cotton wool or directly with your finger to create rays of light. You can replace chalk with colored pencil graphite chips.
We would like to tell you about one interesting unconventional drawing technique. To draw a New Year's garland like in the photo, you will need a sheet of thick paper of a dark color (blue, purple or black). You will also need regular chalk (the kind you use to draw on asphalt or a blackboard) and a light bulb stencil cut out of cardboard.
It is not necessary to use a stencil. You can simply paint over the light bulbs with chalk, and then gently rub the chalk in different directions to make rays.
Using this technique, you can also draw a winter city, for example, or the northern lights.
13. Drawings of a winter fairy tale. Winter forest drawings
14. Winter drawings. Drawings on the theme of winter
You are probably very eager to find out how the wonderful “marble” Christmas tree in the photo below was painted? We'll tell you everything in order...To draw such an original drawing on the theme of winter you will need:
Shaving cream (foam)
- watercolor paints or food coloring in green shades
- flat plate for mixing shaving foam and paints
- paper
- scraper
1. Apply shaving foam to a plate in an even, thick layer.
2. Mix different shades of green paint or food coloring with a little water to make a rich solution.
3. Using a brush or pipette, drip paint onto the surface of the foam in a random order.
4. Now, using the same brush or stick, beautifully smear the paint over the surface so that it forms fancy zigzags, wavy lines, etc. This is the most creative stage of the whole work, which will bring pleasure to children.
5. Now take a sheet of paper and carefully apply it to the surface of the resulting patterned foam.
6. Place the sheet on the table. All you have to do is scrape off all the foam from the sheet of paper. For these purposes, you can use a piece of cardboard.
Simply amazing! Underneath the shaving foam you'll find stunning marble patterns. The paint has time to quickly absorb into the paper; you just need to let it dry for a few hours.
15. How to draw winter. How to paint winter with paints
Concluding our review article on winter drawings for children, we want to tell you about another interesting way how you can paint winter with paints with your child. To work, you will need any small balls and a plastic cup (or any other cylindrical object with a lid).
Place a piece of colored paper inside the glass. Dip the balls in white paint. Now put them in a glass, close the lid on top and shake well. As a result, you will end up with colored paper with white streaks. Do the same colored paper with white streaks of other colors. From these blanks, cut out the details of the applique on a winter theme.

Material prepared by: Anna Ponomarenko
Other publications on the topic of this article:
In the form of souvenirs or Christmas decorations. But it will look no less advantageous on New Year’s Eve children's drawing, in which the snow-white winter beauty will appear before the viewer in all her perfection.
And since even those who are not particularly comfortable with a brush and colored pencils can draw winter step by step, everyone can feel like a real artist.
Here's what you need for this: a simple pencil, watercolor, white gouache, a blank landscape sheet (or a sheet of paper for watercolors). And, of course, inspiration will not hurt you and your child, which will make the time of work fly by unnoticed by everyone, and the result will exceed even your wildest expectations.
Before drawing winter, we draw a horizon line with a pencil and make a simple sketch - a small village hut, several tall spruce and pine trees, and a forest visible in the distance.

Drawing "winter" in pencil
We arm ourselves with a clean brush and wet the surface of the sheet with paper.

We use pale blue watercolor to highlight the sky, and pale yellow or orange to highlight the windows of the house.

We dilute the watercolor with water until we get the palest shade possible. Let the sheet dry. You can remove excess moisture with a napkin.

We begin to paint the sky with dark ultramarine from the top edge to the bottom, directing the brush strokes horizontally.

Approaching the horizon line, we lighten the tone.

Before the sheet has time to dry, we draw the trees in the distance. We use dark green paint and ultramarine.

In the same way we draw the trees near the hut.


Draw snow in pale purple and blue.

We paint the hut. Add shadows from the hut and trees, highlight the snowdrifts.

And trees in the foreground.

Draw a shadow from the trees.

Since it is very difficult to paint winter with just one type of paint, we arm ourselves with white gouache. We draw snow on spruce paws.

Spray gouache onto the sheet, scattering it across the sky and snowdrifts.

Draw dead wood in the lower right corner, emphasizing the foreground.
Oksana Stol
Hello, dear friends and guests of my page!
I bring to your attention a photo report from classes on unconventional drawing on the theme "Winter"
"Penguins" - imprinted with vegetables (potatoes)
Means of expression: color, spot.
Materials: potatoes cut in half, saucer with gouache, thick paper.
Method of obtaining an image: a child dips a potato in a saucer of paint and makes an imprint on paper.
Potato signets - cut the potatoes in half, make a comfortable “handle” on the workpiece. For each child, two signets of different sizes.
We apply to pre-tinted sheets foam sponge snow, snowdrifts. We make black prints, then white ones, then we draw all the other parts of the body, and finally we draw cotton swabs snow.


If after the print there are still unpainted areas, paint over them with a brush.


We also drew, as last year, some works that children really like (but now with different children)
"Fairytale Tree" in mixed media: wood - blotography with a tube, snow - poked with a hard brush, snowflakes - with cotton swabs, owls - finger painting
Goal: to introduce children to a new drawing technique - tube blotography; develop imagination, imagination, interest in creative activities.


"Polar Owls"- foam sponge technique


"Owls"- palm painting

"Winter in the Village" with elements of unconventional drawing - cotton swabs.
Goal: to teach children to convey a picture of winter in the village in a drawing, to consolidate the ability to draw different houses and trees. Learn to draw different techniques using classical technique- brush, drawing with cotton swabs - snow. Develop imaginative perception and imaginative ideas, creativity.


"Polar Bear and Northern Lights"- drawing with applique elements
Goal: To clarify and expand children’s knowledge about the natural phenomena of the Far North.
Learn to create an image of the northern lights using watercolors - using the “wet on wet” technique
Strengthen children's knowledge about climate features;
Develop creative imagination, imagination, fine motor skills;
Continue teaching children to carefully cut out bears by first folding the sheet in half
To develop children's interest in natural phenomena


Publications on the topic:
Dear colleagues! Before we had time to celebrate summer, its golden mean arrived. Flower beds are fragrant with their beauty and at home.
Unconventional drawing - consultation Unconventional drawing- the art of depicting, not based on tradition. Drawing in unconventional ways, fascinating, mesmerizing.
Dear colleagues. Unconventional drawing leads to the development of imagination and creativity. Each technique is a small game.
Topic: "Chicken" Program content: Continue introducing different ways not traditional drawing - finger painting. Encourage.
Drawing is one of the most favorite activities for children. There you can reflect everything - your mood, your impressions, desires, etc. And drawing.
“Reflection of trees in the river” (monotype) Purpose: to introduce children to unconventional technology landscape images - monotype; show her.
 How much fabric is needed for a dress: simple methods and basic calculation nuances
 Beautiful Christmas tree decorations made of plywood: we make decorations with our own hands using a jigsaw
 Manicure with acrylic paints at home