“Heart” box using quilling technique made from paper bags. Box using quilling technique, DIY master class Twisted lid for a quilling box
- Lyubov Rogachevskaya is a recognized quilling master, the author of numerous quilling manuals for beginners. Lyubov was happy to provide her detailed Master Class " - ".

- Photo 1. The box should be made on a wooden board, smooth, made of soft wood, so that pins can be easily inserted. You may also need tweezers, a regular ruler, a sharp knife, a pin, and a gel pen. In this case, paper of two shades is used lilac color: light and dark.

- Photo 2. Glue together dark colored “washers”: 2 strips of 17 “washers” each and 2 strips of 11 “washers”. Glue the “washers” to each other, placing them against the ruler. Then connect the strips into a rectangle. These will be the boundaries of the bottom of the box.

- Photo 3. The space of the rectangle must be filled with a pattern. If necessary, secure the frame in several places with pins. Do this according to the diagram below:
- 1 - “washers”,
- 2 - “drops” No. 13 of light tone,
- 3-4 - “eyes” No. 13 of a light tone,
- 5 - “rings” of a dark tone,
- 6-7 - “drops” No. 13 of a dark tone.

- After complete drying, remove the bottom from the board. If it does stick, cut it off the board with a sharp knife. Coat the bottom with diluted glue and leave to dry.
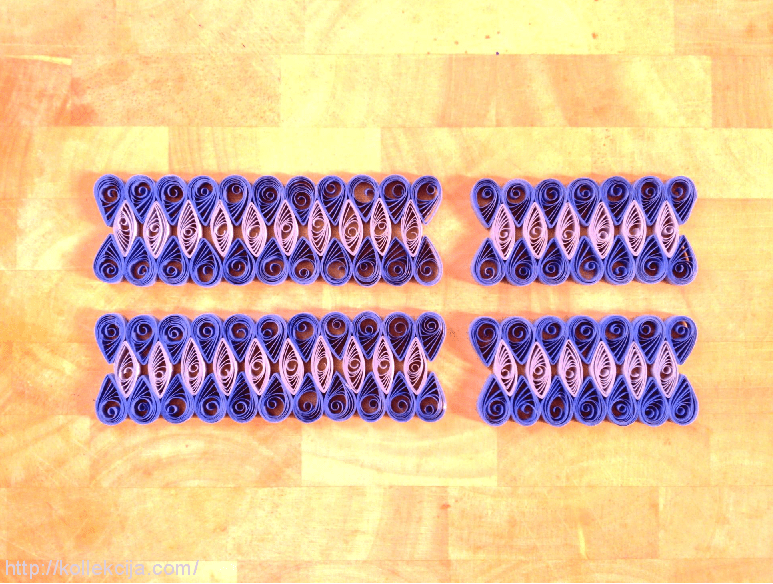
- Photo 4. The walls should be slightly shorter than the previously obtained rectangle. First, glue the parts in a row, aligning them with a ruler: 11 “drops” No. 13 of a dark tone. Glue 10 “eyes” No. 13 in a light tone inside and finish with another row of “drops” No. 13 in a dark tone.
- Make a short wall according to the 6*5*6 pattern. Cover the walls with diluted glue and dry.
- Photo 5. Spread the lower “drops” of the wall with glue and place it on the edge of the bottom. Adjust its position so that it touches the adjacent wall only at the corners. Glue the remaining parts sequentially, apply a drop of glue at the joint with a toothpick.
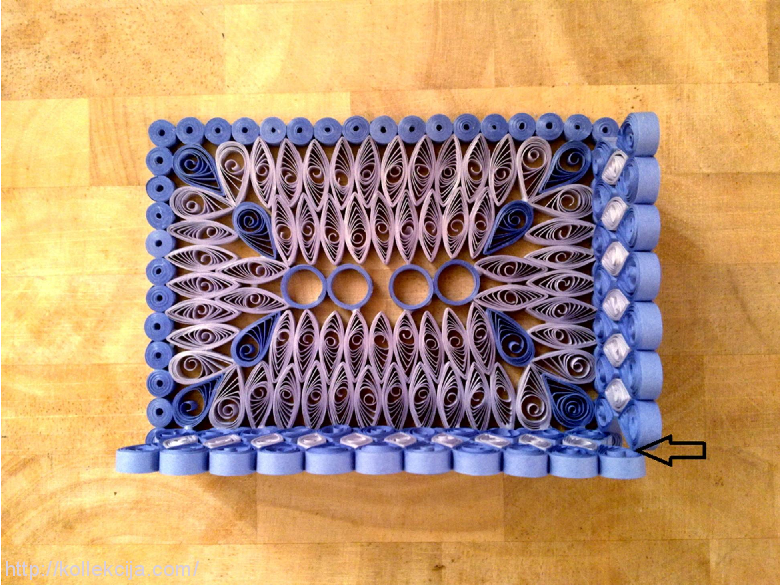
- Photo 6. Make strips of “washers” again, as in photo 2, and stick them on top of the walls, thereby completing the box. Glue one “washer” in the spaces between the walls.
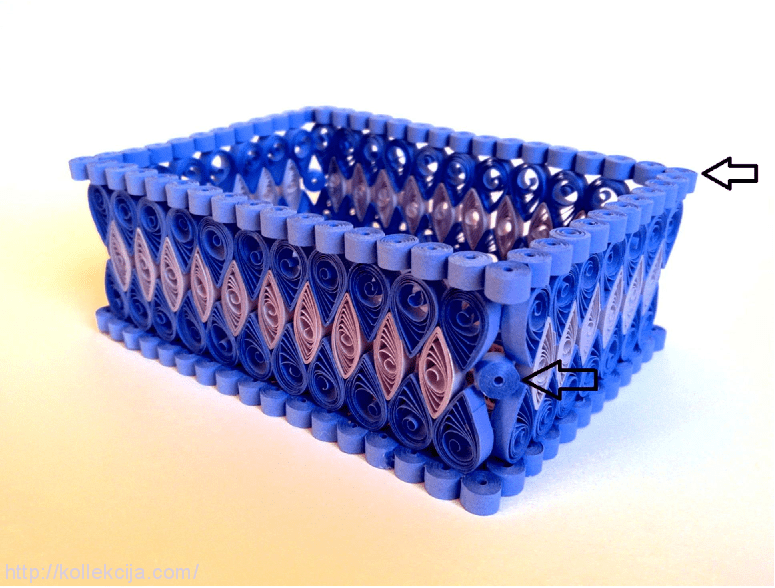
- Photo 7. Make the lid exactly the same as the bottom. they should be the same size. Decorate it with flowers of your choice. using the quilling technique is ready.

- To enlarge a photo, click on it.
Dear craft lovers!
The topic of our today's issue is box made using quilling technique. Elegant, delicate, airy women's handicrafts as if created to decorate an object in which representatives of the fair sex store their jewelry. And these jewels are not always expensive... After all, for every girl what is precious is what she loves.
There are a great many types of boxes using the quilling technique, as well as paintings, panels and other delights. In order to make a quilling box, you will need the box itself or its substitute - a box, jar, bottle. When you put the future box in order (cover it with paper or cloth, cover it with varnish, or maybe just wipe it with a cloth), the most interesting thing begins - turning it into a box using the quilling technique.


Design a pattern of twisted elements that will decorate the box. Depending on the type of surface of the casket, glue the elements onto the base or directly onto this very surface.


You can cover the entire surface of the box with a quilling pattern (top and sides) or, conversely, decorate the lid or wall with a small, simple design.

The quilling technique will help you make a picturesque lake, a beautiful butterfly, a charming box, or an original candy bowl out of paper. Photos and step by step instructions will facilitate the needlework process.
Volumetric quilling “Lake”

Look what a beautiful horizontal picture you will soon create.
As always, you need to first prepare what you need so that everything is at hand. Then during creative process you won't have to be distracted. If some material or tool is missing, you can replace it.
In order to start doing quilling step by step, you will need:
- scissors;
- PVA glue and a brush for it;
- corrugated green paper;
- ruler for quilling or officer;
- toothpick or awl or other tool for twisting strips;
- quilling paper or colored double-sided paper.
Here are the colors that will be used to create the volumetric work: green, blue, brown, gray. If a certain tone is missing, replace it with another. So, instead of blue you can use blue, instead of gray - brown.
For this craft you need a base, a large empty candy box will work perfectly for it. If you don't have one, create a picture on a sheet of thick cardboard. The work begins with decorating the base. If it is a box, then cut corrugated paper into strips of 3 cm with a fringe of 1 cm. Glue them to the inner edges of the box, and on its bottom - a sheet of blue paper.
We begin to make blanks. To do this, take quilling paper or double-sided colored strips. To make the lake itself voluminous, twist several pieces blue color in the form of a free spiral.
You can learn in detail how the main details of this type of creativity look and are performed by reading the first article about quilling for beginners, which describes this in detail. The step-by-step photographs presented in that article will also clearly show you how the elements of the lake are made.
Twist several loose spirals with a diameter of 16 mm from blue paper. Determine their size using the round holes of the ruler. Frog details are created in the same way, but from green paper. For the animal's legs, turn 6 “free spiral” parts into blanks called “drop”. To do this, simply press the blanks on one side with your fingers.

Now take the strips gray 14 mm long, twist each one first in a loose spiral, then press with your fingers so that the outer edges are shaped into a square. These blanks will act as stones around the water.
You can wind quilling paper on an awl, a rod, or a toothpick. If this is not the case, use other available materials of the same small diameter.
To make reeds, screw brown strips 7 cm long and 2 cm wide onto the top of the toothpicks, gluing them at the same time. Glue strips of green paper to the reeds to become the leaves of aquatic plants.

The photo also clearly demonstrates how to make frogs using the quilling technique. On the right you can see that the head consists of one tightly wound ribbon, and the body of a second.
If your strips are not long enough to make a part, glue them to paper tape. When it ends, add the next strip to make a tight circle.
Pull its middle slightly upward to give the part volume. Do the same with the second piece, which imitates the body, just pull the middle down. Glue these 2 blanks together, you have the body of a frog. Now you need to make the paws.
To do this, create 4 “drop” parts, glue them together, and attach one small free spiral next to each other. Glue these bottom tabs in place. For the top ones, it is enough to make two large blanks in the form of a drop, attach them to PVA as shown in the photo.

To make the eyes, cut out 2 circles from white paper, glue two black pupil circles of smaller diameter onto them, and attach them to the frog's head.

This is how paintings are created using the quilling technique that will decorate your home or become an unforgettable hand-made gift for any holiday.
How to make boxes using the quilling technique

Interesting creativity continues. Step by step quilling will help you create decorative useful things in which you can store jewelry and sweets.
For such a beautiful box you will need a minimum of material and equipment, these are:
- white quilling paper Brown;
- scissors;
- cardboard;
- glue;
- a paper curling device or its equivalent, which you have at home.
Now apply curls around the perimeter of the heart, while gluing them to each other.

You need to make 3 hearts from white paper.

Now you need to create several tight barrels of brown paper and curls from it. How these blanks are made in the quilling style, step by step photo will help you understand.

Here's how to make barrels and curls. They are needed to form the bottom of the box. By gluing the brown parts together, you will get it. They should fit inside the first heart blank.

Fill the second heart blank in the same way. This will be the top of the box. Now you need to glue 6 barrels vertically to the third blank. 3 on one side and the other, placing them on top of each other.

When the glue has dried, turn this third piece over and also use PVA to attach it to the first one, which is the bottom of the box you made yourself.

To fill the side of the product, glue barrels and curls of brown paper ribbons here.

All you have to do is wait until the glue has completely dried, cover the box with a lid and you can admire your creation or move on to the next product.

Crafts using quilling technique - candy bowl

You will get such a wonderful basket for sweets after 1-2 hours of work. To create it you will need:
- quilling tools;
- pins;
- glue and brush;
- quilling paper in lilac, white and black.
Start by rolling up some black paper quilling tape. When it is finished, glue the edge of the white strip to its tip and wrap it around the black core. Now attach the edge of the lilac strip to the remaining free edge of the white strip with glue, and wrap it around the round piece.

Make several of these parts and cover the selected base with them.
If you haven’t worked much with the quilling technique yet, then it’s better to first attach the parts to the base with pins so that you can align the workpieces. When you do this, then place them on the glue.
If you want the quilling details to be visible from both the front and back sides, then use the form only as a template. Having glued the elements of the basket together, remove them from the mold when the glue has dried. As a result, you will get such a wonderful candy bowl, in which you can store not only sweets, but also all sorts of little things, for example, keys.

To ensure that there are no gaps in it, glue the same ones, but small ones, between large blanks; they will fill the holes.
How to create a butterfly using the quilling technique

For needlework you will need a quilling kit. It should include strips of paper in yellow, red, brown, orange. If you have other shades, then the butterfly will turn out to be a different color, but it will be no less charming.
It is not difficult to do such quilling for beginners; with the description and photographs presented, the process will become easier and more fun. First, draw a butterfly on a landscape sheet; you can enlarge the next photo and use it as a basis.

Cover it with clear cellophane, place it on a wooden board and pin it to it. Now we begin to make quilling elements for the upper right wing. Twist the yellow ribbon into a spiral, and glue the beginning of the red strip of paper to its free edge. Twist it into a spiral, then press on one side to create a teardrop element. Make 3 such blanks.
From paper strips yellow color you need to make a “semicircle” element. To do this, the workpiece is given a flat shape at the bottom and a semicircular shape at the top.
Glue these parts together as shown in the photo. To make the wing, attach the blank to the template and attach with pins. Glue another element called a “drop” at the bottom, and 3 such parts at the top.

To further make a butterfly using the quilling technique, make and connect the parts for the second wing in the same way.
Now you need to make 2 lower wings. They also consist of “drop” and “semicircle” elements. How many of them are needed, what color they are, how these parts are attached to each other can be seen in the photo.
The upper and lower parts of the body are made of brown paper. To do this, 2 tapes are folded into two drops and glued to each other in a mirror image.
To make a butterfly head, fold a strip of paper halfway into a spiral, shape the outside of it into a polygon, then wind the tape around to shape it into a polyhedron as well.
All that remains is to make the mustache, glue the head and place it in place. Look how beautiful the butterfly is using the quilling technique.
This activity allows you to create many useful and charming things, and have an interesting and relaxing time. If you want to see how a butterfly is created using the quilling technique, this video will help you with this.
DIY quilling box. Master Class with step by step photos
Master class “Flower box”
Chernikova Dina Nikolaevna – teacher of MBDOU kindergarten No. 1 village Staroye Melkovo, Tver region, Konakovsky district.Description of material: This material is intended for children preschool age, teachers and parents.
Purpose: making gifts, participating in a competition, decorating the interior of a room.
Target: creating a box using the quilling technique.
Tasks:
- strengthen the skill of rolling a strip of paper into a roll;
-develop Creative skills children, attention, imagination and fantasy;
- develop fine motor skills hand, eye;
- cultivate perseverance, accuracy, and interest in working with paper.
Paper crafts are not only beautiful, but also useful. One of these crafts is a box made using the quilling technique. It can be used for its intended purpose and as a decorative element. The most important thing is to make a paper box with a soul. You can also give such a craft as a gift. After all, a gift made with your own hands is considered the best.
You may have to spend some time creating the craft, but in the end you will get a beautiful and unique box.
I give you a box.
It is very empty and echoing,
Only this is not a problem:
Use your talents
Take the diamonds out of the oven,
Without the slightest effort
Get the earrings from the attic
And silver brooches
From broken pots -
Turquoise and gold
From trunks with dresses
Pearls and platinum -
And the box is full!
It's a pity - it's not bottomless.
To complete the work we will need:
colored double-sided paper; white sheet of A4 format; file; rulers (simple and with circles); scissors; PVA glue; simple pencil; toothpick for rolling paper; beads.

Work order:
1. Let's start our work by preparing the frame of the box. To do this, cut strips of white and light green paper 1 cm wide and 42 cm long.

2.Insert the tip of the strip into the slot of the toothpick and twist it, making circular rotations. The turns of the strips should fit tightly to each other. Having reached the end, place a ruler with a diameter of 14 mm in the circle, remove it from the toothpick, and let the spiral unravel. Seal the edge.

3. For two identical sides of the frame you will need 20 white and 24 light green rolls. And for the whole craft you will need 230 rolls (148 white and 82 light green.

4.On a file, using PVA glue, glue 2 strips of 11 rolls each, alternating in color, starting with light green. Strip length 15 cm.

5. Cut 4 strips from white paper (width 9 cm, length 42 cm). Roll long rolls with a diameter of 14mm.

6.Glue side details boxes in a rectangular shape.

7.Cut strips of light and dark green 1 cm wide. Glue in this order: light green 56cm long and dark green 26cm.

8.Twist the roll, starting with a dark green strip, with a diameter of 23mm. Give the roll a leaf shape by pressing it on both sides with your fingers.

9.For the entire craft you will need 30 of these leaves.

10. From strips (1 cm wide) of white paper 42 cm long and light green 56 cm we make rolls with a diameter of 25 mm. Let's shape the leaves. For the entire craft you will need 96 of these leaves.

11. We will make flowers from pink stripes (width 1 cm, length 58 cm). We twist the rolls and open them to a diameter of 20mm. Making a droplet shape.

12.Fold a flower from 5 petals. We will need 10 of these flowers to work.

13. We will make unopened buds from orange stripes (width 1 cm, length 58 cm). Unroll the rolls to a diameter of 20 mm. You need 12 of them.

14.Use the prepared elements to decorate one of the sides of the box. For fastening we use PVA glue. Glue a bead into the middle of the flower.


15. Let's make two identical parts (sides).

16. Let's estimate the dimensions of the other two sides of the frame. The dimensions of these sides are: width 9cm, length 12cm.

17.We will decorate the other two sides in the likeness of the first sides.


18.Using glue, connect all 4 sides. The voids can be filled with white rolls.

19.This way you can lay out the bottom of the box from the elements.


20. Let's start making the lid. It will require two strips of 13 rolls and 6 strips of 9 rolls.

21.The two sides (triangular) of the lid need to be made with two fewer rolls, since the outer rolls are glued to the base.


22.Now let’s decorate them too.


23. Let's make two identical parts.

24.Calculate the size of the other two sides. You will get an equilateral triangle (side 13 cm).

25. Let’s decorate these sides of the lid as well.


26. Let's make two identical parts.

27.Prepare a flower for the top of the handle cover.

28.Use two strips of 13 rolls and two strips of 9 to glue the base for the lid. Connect all the parts.
A charming paper box can decorate your dressing table or a good gift for your friend, aunt, grandmother.
To make a paper box you will need:
- Office paper different colors
- Scissors
- Brush
- Pen rod (for twisting)
- Lid (mold for box)

You need to cut strips of paper of the same size. I do this using Microsoft Office Word. I create a document and insert a table (1-column, 42 rows), then stretch it to the entire sheet and print. The result is strips of 5 mm and two outer strips of 1 cm.

Let's get started:
Making the base of the box. From the paper of the color you need (I chose blue), we twist a free spiral - 26 pcs.

Lubricate with glue and let the parts dry, so they will become denser. After this, we insert them into the lid and give them the shape of a circle.

Then we make more free spirals of a different color. The size should be a little larger. Place the parts in the mold in two rows.

We are left with the middle. To do this, I glued two strips of different colors and twisted a large free spiral.

The lower part of the box is ready. We use the same method to make the lid of our box. Now let's start making the walls of the box. I twisted the loose spirals in advance and glued columns from them.

To do this, I needed 35 free spirals, that is, 5 spirals per column. There are 7 columns in total. You can make more or less. When the posts were dry, I began gluing them to the bottom of the box. At first it is very difficult because they come off and therefore you have to press and hold them.

Again, coat the box with glue and let it dry. After this, we begin assembly. We twist the loose yellow spirals and insert them into the walls of the box.

Glue another large spiral on top, but only compress it a little so that it takes the shape of an oval.

Now we glue the rim for the box, for this we also use free blue spirals.

We coat it with glue, let it dry and glue it to the box.
 How much fabric is needed for a dress: simple methods and basic calculation nuances
 Beautiful Christmas tree decorations made of plywood: we make decorations with our own hands using a jigsaw
 Manicure with acrylic paints at home