Figure by method of trimming. Cutting: the history of occurrence
Cutting from paper allows you to make fluffy crafts, unusually beautiful three-dimensional paintings. In this technique you can make postcards and even topiary.
The content of the article:
Paper gives immense scope for creativity. They draw on it, put it together, making unusual crafts. You are already familiar with many of them, but not everyone knows about facing. This needlework technique is quite simple: pieces of paper are twisted and glued or attached to the base. The result is volumetric and airy compositions.
Paper facing: technique, master classes

This needlework is of several types:
- Contour. When twisted pieces of paper frame the pattern along a previously drawn contour. This technique is sometimes used in conjunction with scrapbooking.
- On the plane. This is a cutting technique in which the workpieces are placed next to each other, filling them with the entire surface.
- When trimming layers the details are glued into each other. At the same time, the combination of elements of various shades helps the appearance of interesting effects.
- Volumetric trimming most often made on the basis of plasticine. Twisted parts are attached to the molded workpiece, which allows you to make complex compositions.

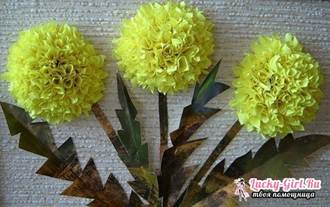
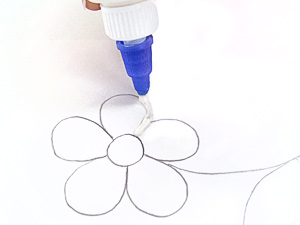
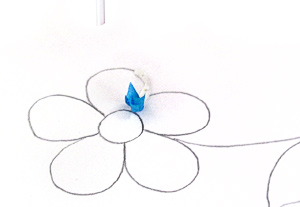
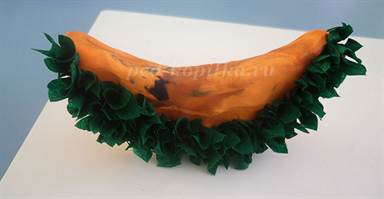
To make such a violet, take:
- corrugated paper;
- a sheet of cardboard;
- a simple pencil;
- scissors;
- bubble of glue with a nose.
To fold paper elements you need to use a special stick for cutting. If you don’t have one, you can replace it with a pen case, a sharpened pencil.
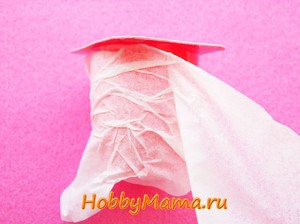
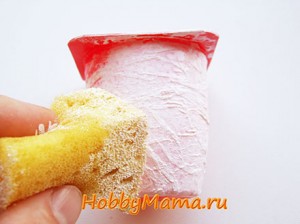
- With one of these tools, press the small paper blank in the center, wind it on a stick.
- Swipe with your fingers without removing from this tool. Lubricate a small portion of the contour with glue, attach a twisted blank here on a stick, carefully remove this tool.
- Create the second element in the same way, stick it next to the first. Having drawn the contours, proceed to filling the inside of the petal.
- When all the petals are glued blanks, twist the same elements from the squares of yellow corrugated paper. Glue them in the center of the flower.

To do this job, take:
- bright napkins;
- scissors;
- a sheet of cardboard;
- gouache;
- stick for trimming.

Draw a tree outline on a white sheet of cardboard. Apply glue to a small area so that it does not have time to dry.

At this time, take a small square from a napkin, wind it on the tip of a stick for trimming, glue to the smeared contour. Glue one more and others next.

Take napkins of different colors to make the tree bright and cheerful. Fill the entire crown, draw the trunk with brown gouache.

Since you made the foliage of the tree from elements of different colors, make the picture frame from napkins of the same color.

From blue napkins, make a background. Elements for this are also created using the facing technique.

You will get a wonderful picture that will surprise and delight everyone who sees it.

Using this technique, children and adults can do many other amazing work by trimming along the plane or contouring.

For this, corrugated paper of yellow, orange, lilac, green, white and blue color was used.
First, glue a sheet of blue paper on a white cardboard, then draw the contours of the fish, algae. After that, blanks for trimming are twisted from yellow squares, fill the tail of the fish with them. From orange make her body, from lilac head. And white and blue will create the eye of the fish. It remains to fill with algae with similar elements and enjoy the wonderful work.
See how you can make interesting crafts using another cutting technique.
Templates of volumetric crafts made of paper and plasticine

Such flowering cacti will also help create clipping. For these crafts, take:
- well-sharpened pencil;
- plasticine;
- corrugated paper;
- a toothpick;
- packing tape or satin;
- safety pin with bead;
- color cardboard.

Insert a toothpick into a cactus and its other end into a pot. Attach the base of the flower to the cactus. Fill his body with beautiful bulk blanks. To do this, put a pencil in the center of the paper triangle, wrap it around the rod, stick it into the base of plasticine.
Complete the first row, placing the elements closely, then go to the second and next.

To make the petal of the desired shape, leave its tip free, twist only the part that you will attach to plasticine.

To design a flower, you need to make 1-2 such petals, then make its middle with triangular blanks of orange paper.

See how the pot is decorated. It must be wrapped in a strip of colored cardboard or wrapping paper and bandaged with tape.

A cactus made by corrugating from paper is created.

Look at the manufacturing process of another work using volumetric technology. It will help the child to develop creative thinking, fine motor skills, imagination. Children show an interest in working with paper, as a result of which such wonderful models appear.

Prepare the following:
- corrugated paper;
- scissors;
- album sheet;
- pencil.

Smearing small areas with glue, let him attach small squares here to make a fabulous young apple.

You can draw a branch or stick a thin strip of brown paper instead.
You can glue one blank of a different color into the already attached, thereby obtaining the effect of trimming layers. The following two works are devoted to this technique.
Layering patterns of corrugated paper in layers
Not far off New Year. Children together with their parents will certainly be preparing for this holiday. They will be able to make a card by laying a Christmas tree on its front side.

Prepare with the children:
- corrugated paper;
- christmas tree pattern;
- glue and brush for him;
- pencil;
- thick sheet of paper.
First, the child will fill the contours of the Christmas tree with green squares wrapped in pencil. Then, in some places on top of them you need to glue blanks of other colors. They will become a Christmas tree decoration.
But you can do not trimming layers, but on a plane. Then you will need to first glue the colored squares, which will become toys, and then fill the surface with green.

Mom or grandmother can give a souvenir shawl. They will certainly be delighted, especially since this work was done by their beloved child.
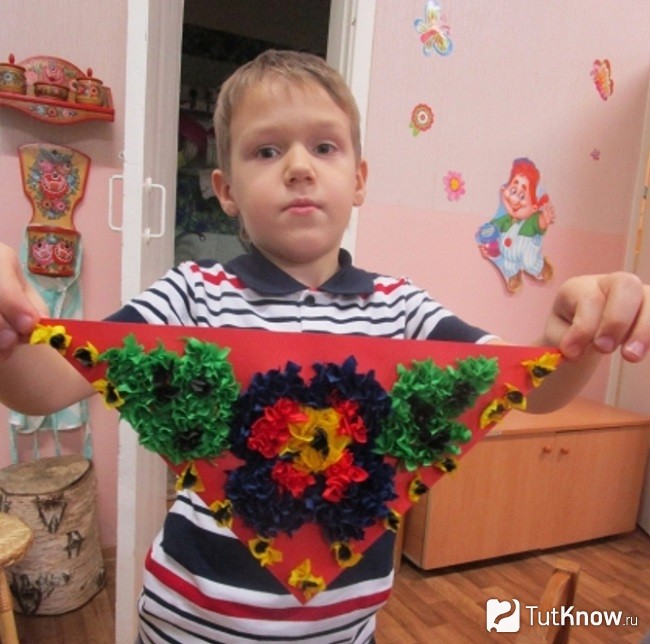
To make a scarf, you need to take:
- a sheet of red cardboard;
- corrugated paper of different colors or napkins;
- glue with a brush;
- scissors;
- pencil;
- pattern drawing.

Starting from small sections, let the baby fill the picture with squares of different colors. They will need a lot. If the child does not have the patience to twist trimming, help him in this, so as not to reduce his interest in work.
The result is such a wonderful scarf. The next work was done by his mother with the child. A great example that is worth adopting. The result will be mushrooms and autumn leaves made by trimming layers.
To create an autumn forest, take corrugated paper in red, orange, and yellow. You can also make blotches with brown, green.

For crafts, take:
- colored paper cut into squares with a side of 2 cm;
- patterns for application;
- clipping stick or pencil;
- glue;
- scissors.

You can take your favorite mushroom and leaf patterns from the Internet or use the presented ones. You can draw them yourself on thick cardboard, cut them out.

The most painstaking work is cutting squares and forming twisted blanks. To give the desired shape, put a square of paper on the left index finger. Hold it with your thumb. Put a pencil in the center of the workpiece, twist it.
As you can see, this is another option for forming parts. We will also stick it in another way, so that you choose the most suitable for you.
Pour glue into a bowl. Dipping the trimming here, attach it to the leaflet template. After gluing the red, directly on it, with the help of PVA, attach the yellow. The result is an interesting effect. Yellow is also glued to the orange blank, use green and brown squares as the basis.

To make mushrooms, lay the leg with white trimmings, and the hat brown, yellow or red.

Children's paintings from corrugated paper

The trimming technique will also help to make them. Such children's paintings are very cute and touching, they will remain for a long memory, decorate any corner of the house.
If the child can, let him draw a round lake, the reeds along its banks, ducklings swimming. He will depict where the birch, the rainbow will be, draw a horizon line. If this is difficult for the child, then adults will help.
For such work, you need squares of corrugated paper with a side of 1.5 cm.
The larger the size of the paper blanks for facing, the higher the pile at the finished work will be.
After cutting them, you need to proceed with gluing. In this case, it is most advisable to fill the space on the left side. First, pour rainbow over the colored stripes, then make grass around it, glue the green trimming. Also from this side, shape the sky, fill it with twisted blue squares. Leave room for the clouds, glue the white blanks here.

Also, on the left side, start gluing brown details in the form of reeds, make chickens yellow, lay out the lake in blue.
Moving gradually to the right, form a white birch trunk with black blotches twisted from paper of this color. Fill the whole space with volumetric blanks, after which you can enjoy the view of the colorful picture. For a kindergarten, such a craft would be an ideal option. Bringing her there, the child will certainly take first place in the competition.
But there are more complex works that students can do.
These viols were created by students in grades 1–8. This collaboration brings the guys together.

On a sheet of whatman paper you need to draw a viola with a pencil or transfer another image here. Then each of the guys will fill the flower with twisted trimming of a certain color.
For the New Year, you can make winter pictures.

If you draw well, draw the future art on a pencil with a pencil, if not, then just redraw. Good patterns are embroidery patterns. They are transferred to a sheet, decorated with twisted paper pieces of a certain color.
Please note that the contours of the Christmas trees are made of blue elements. This technique allows them to keep fit and look fluffy, snowy.

In conclusion, look at how to make a New Year's garland, which can also be created using the clipping technique.

For her, on a paper or white cardboard, draw the letters of the future inscription, cut them out. Now each one needs to be framed first by trimming the white color, glue the red ones inside.
For the base, take a satin ribbon. With a glue gun, letters are attached to it to make an inscription. Remember to keep the distance between the individual words.
Here is how many interesting and necessary things to do with trimming. But this is far from all that can be crafted in this technique. If you want to create a voluminous snowflake, see a visual master class.
Another will teach you how to make a heart shaped topiary using the same technique. You will give this to your loved one on your birthday, on Valentine's Day.
Face painting for kindergarten
"Fabulous paintings" in the technique of trimming. Photos and Tips
Author: Yakurina Marina Ivanovna, educator, Non-governmental preschool educational institution “Kindergarten No. 201 Open Joint-Stock Company“ Russian Railways ”, Russia, Republic of Khakassia, AbakanMaster - class This material is designed for children of senior preschool, primary school age, teachers and parents.
Appointment: making gifts, participating in contests, exhibitions, decorating groups and corridors of kindergarten, etc.
Goal: creating applications in the technique of cutting on paper.
Tasks:
- improve the technique of working with corrugated paper and colored napkins;
- develop artistic taste, sense of composition, creativity, fine motor skills of the hands;
- to cultivate perseverance, accuracy, the desire to bring the job started to the end.
Material: colored corrugated paper, colored napkins, ballpoint pen refill and PVA glue.
1. From corrugated paper strips, cut squares with approximately 1 cm side.

2. Take any picture or coloring you like on the theme of "Tales"
3. Apply glue with a strip to a small area of \u200b\u200bthe picture.
4. Put the butt end (blunt end) onto the prepared square of corrugated paper, then
crush the square and roll the bar between your fingers.

You will get a colored tube-butt.
5. Put it on the glue.
6. Take out a core.
7. Glue each next edge close to the previous one. Try to place the ends tightly to each other so that there are no gaps. You can dip each end in glue and then attach to the picture.

It is better to use color illustrations with a large pattern, since small details are poorly visible in this technique (and we will leave them unchanged), and color ones are better to use because in the case of a small gap between the ends, this will not look like sloppy work. The colors of corrugated paper do not always have a semitone or the desired color, so I recommend replacing them with ordinary colored paper towels, if necessary, at work this will be practically not noticeable. Here is an exhibition of the work of educators who were inspired by the idea of \u200b\u200bcreating such paintings. The works look like a carpet - a picture, very bright and aesthetically pleasing in kindergarten.
"Red Riding Hood"

Gingerbread man

"Swan geese"

"Gold fish"

"Masha and the bear"
We are introduced to the application in kindergarten. This type of creativity attracts a small child and undoubtedly brings enormous creative potential into development. Not only develops fine motor skills of hands, imagination, but also fosters an aesthetic perception of the world, teaches artistic taste. In this article, we will introduce you to a new type of application with the help of a corrugated paper cutting workshop.
And this type of application, such as trimming, will certainly interest even needlewomen, since its technique can be used to create fakes that decorate the interior. Facing is a three-dimensional structure of twisted pieces of light paper glued to the surface using a thin stick. The use of different colors allows you to create amazing mosaics that look like fluffy carpets, voluminous figures, postcard pictures.
Toolkit for work
To make such fakes, you need a very small set of materials: paper, glue, scissors and a “trimming” tool in the form of a thin stick.
Typically, corrugated paper or crepe paper is also used in this technique. Such paper can be purchased at stationery stores. From corrugated paper, “ends” are cut - elements of volume application. Glue will be needed to cut and glue these trimming to the base of the craft. As a basis, "fluff" corrugated paper can be any surface to which this paper is glued. It can be a sheet of whatman paper, cardboard, light ceiling tiles. For bulk crafts, blanks are made of polystyrene, newspapers, papier-mâché, plasticine.
Well, the main tool for trimming is a long thin stick with a blunt end. A pencil, a rod or a body from a ballpoint pen, a Chinese chopstick, a toothpick may well be suitable for the role of such an instrument.


Easy lesson
The technique of facing in a flat picture begins with the selection of a drawing. They draw it themselves or take it ready from any coloring, after pasting it on thick paper. We select the necessary paper colors and make blanks from them. To do this, cut the paper rolls without turning them into strips, and from these strips the square mode is about 1-2 cm side.

When there will be a lot of squares, apply PVA glue to a part of the picture, screw the squares tightly onto the end of the stick and put on a strip greased with glue at a right angle. We take out the wand and so work on the subsequent trimming. We place one by one tightly along the glue line. You can also fill the background of the picture to get whole landscapes. Cutting a flat picture is suitable for classes with children from 5 years old.


Volumetric method
Another interesting application method that creates velvet figures is the so-called “volumetric trimming method”. It is done on plasticine. The same squares of the workpiece are cut, only glue is no longer needed. It is enough to mold the desired figure from plasticine and begin to pierce in turn the ends with a stick into the surface.
As a result, we get voluminous crafts:


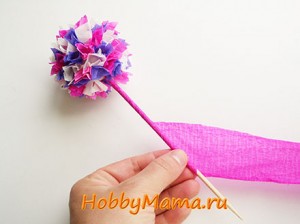
All these crafts can be done by a group of people, creating works of a larger volume, for example, large canvases of landscapes, photo frames, toys, decorations. Needlewomen in this way make interior decor items. If up to this point such an applique looked like children's fun, then the creation of flower balls and topiary in such a way fascinates with its magical light look.


Cutting of the topiary is also done with paper or napkins.
For the manufacture of topiary we will need: multi-colored corrugated paper or napkins, scissors, bamboo skewer, ping-pong ball, dry glue, PVA glue, brush, awl, cardboard, stick for cutting, yogurt cup, paper towel, acrylic paint , plasticine, a piece of narrow decorative tape.
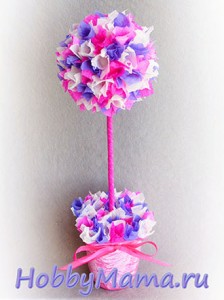
The ball, in extreme cases, can be twisted from old newspapers and wrapped with thread, cut out of polystyrene foam. The ball must first be sealed with a napkin layer so that our paper tubes are then glued to it, then it is decorated in the technique of trimming corrugated paper from top to bottom. Trimming at the same time cut out a larger size, so your product will be lush and airy.


A trunk is a skewer that is wrapped with decorative ribbons or a strip of paper. We glue the glass with a napkin, deliberately creating wrinkled bumps for the decor. When the glue dries, cover with acrylic paint. We insert cut cardboard into the barrel, which will serve as a lid for the glass. Now we put clay in our pot and stick the finished crown with the barrel there. We glue the lid on the glue and decorate it with paper trimming. Decorate with a satin ribbon.

Look what privilege they are waiting for you! And they will be available to you immediately after registration.
- Keep a personal blog and share your emotions
- Communicate, advise and receive advice on the forum
- Take part in super competitions and win prizes
- Get advice and recommendations experts and even stars!
- Be the first to know about the most juicy articles and new trends
One can talk endlessly about the types of needlework techniques using paper, because human imagination is limitless. What we don’t do with this grateful material - we cut, and glue, and crease, and we burn, and we tear, and we turn, and we twist and soak. And all this in order to turn a flat paper sheet into a miraculous miracle, which you can please the eye and apply in business. Well, if it’s not the case, then it’s a pleasure - for sure!
Cutting is one of the types of paper needlework. This technique can be attributed both to the application method and to the type of quilling (paper-drawing). With the help of facing, you can create amazing volumetric paintings, mosaics, panels, decorative elements of the interior, postcards. In this way, it is possible to decorate almost any objects, for example, photo frames. Still little known, this technique very quickly gains new fans and conquers popularity in the world of needlework. Such a rapid increase in its popularity is due, firstly, to the unusual effect of “fluffiness”, which gives trimming, and secondly, to a very easy way of execution. What is it, the technique of paper cutting? Let's get to know her better.
The basis of this technique is the creation of images and objects using volumetric elements from paper. Volumetric trimming element is called “trimming” or “protruding”. It is a piece of soft paper compressed in the form of a funnel or cone. It is from these elements that the conceived product is created. Each such “face” as one brush stroke in creating a picture, as one loop in knitting or one bead in beadwork.
Cutting - the work is not difficult, but painstaking. It requires not only perseverance, but also accuracy, attention and certain agility.
To do crafts in this technique, you need a minimal set materials and tools: paper, glue, scissors and the so-called “miter” tool.
Cutting paper is not suitable for everyone. Typically, corrugated paper or crepe paper is used in this technique. Such paper is sold practically in all stores of goods for creativity and in cultural goods. In addition to corrugated paper for trimming, ordinary paper napkins are also suitable. Corrugated paper is used to make directly “end faces” - elements of volume application. Scissors and glue will be needed to cut and glue these ends to the base of the craft.
As a basis, very diverse materials are used. As a matter of fact, you can “fluff” corrugated paper any surface to which this paper sticks. Therefore, for panels, paintings and mosaics, a flat base is taken - a sheet of whatman paper, cardboard, light ceiling tiles. For bulk crafts, blanks are made of polystyrene, newspapers, papier-mâché, plasticine.
Well, the main tool for trimming is a long thin stick with a blunt end. For the role of such instrument a pencil, a rod or a body from a ballpoint pen, a Chinese chopstick and any other suitable chopstick may well come up.
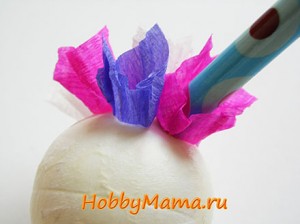
How to work with all these tools and materials? After you decided with the type of product needed to procure paper for "trimming". These should be squares cut from corrugated paper. Size - from one to three centimeters, quantity - depending on the area or volume of the product. The blank on which the “trims” will be attached can be spread with glue in advance. But you can also apply glue to each individual element - that's how you like it more.
How to make one such "fluffy"? Technology making "Trimming" requires accuracy. So, in your right hand you have a stick for trimming, in your left - a square of paper. Attach the paper leaf with the center to the end of the stick, and holding it, gently crumple the paper, wrapping it around the stick. When squeezing the paper, do not press too hard so as not to tear it. As a result, you get a small fluffy cone. The fluffy side will be given to it by the folds of the square. After that, without removing the cone from the rod, glue it to the workpiece so that the top of the cone is glued to the surface of the workpiece, and the folds of this kind of “clove” would look at you. Sticking trimming, remember that the denser to each other you place them on the surface of the product, the more fluffy and accurate it will look.
- Cut the squares (one on one cm) of corrugated paper.
- We make a blank for a bulk product or draw a pattern on a flat surface.
- The blunt end (end) of the rod is put on a paper square.
- Crumple the paper and roll the rod between the fingers.
- Glue the tube-end to the workpiece.
- We take out the rod.
Everything is so simple and concise that even children can do it. By the way, in kindergartens and schools, children learn technique in handicraft lessons. And if a real craftswoman undertakes this, then the result of her work can be a real masterpiece of cutting technique.
First of all, these are all kinds of decoration toys. Some needlewomen use this technique in scrapbooking and photo frame design, decorate greeting cards with it. If you make a picture or a panel using this technique, you will get a real terry rug with a solid pattern or a fluffy contour pattern.
For the manufacture of volumetric products, the paper facing technique is used on plasticine. To do this, a blank is made of plasticine, onto which “trimming” is already attached without glue. Souvenir flower balls and “trees of happiness” made using this technique look very impressive.
Easy to perform trimming has an unexpectedly effective result, which will not leave indifferent either the masters or those who will admire this result.
Cutting in kindergarten
Plasticine and corrugated paper workshop "Fruit Vase"made of corrugated paper in the technique of "Cutting on plasticine."
The master class was prepared by the teacher MBDOU TsRR D / S No. 4 "Freckles", Moscow region Kolomna Kozlova Natalya Yuryevna.
The master class is intended as a teaching aid for teachers to work with children of preschool age.
The presented work is a good assistant for educators both to use this technique in design classes and outside direct educational activities: manual labor, productive activities, etc. In addition, trimming contributes not only to the development of fine motor skills in children, but also to the development of imagination, thinking, and imagination. How many beautiful, vibrant and voluminous compositions a child and an adult can create by mastering the basic techniques of this technique.
"Fruit vase" made in the technique of "Cutting on plasticine" - unusually bright, saturated, as if real. Such a vase is ideal for decorating your interior. The fruits in it will always remain fresh and juicy. And the guests are pleasantly surprised by the colorful, unusual and interesting work done by you and your children.
Purpose of this composition: interior decoration.
The objectives of the workshop: to teach working in the technique of facing on plasticine, to develop imagination, motor skills, creative thinking.
Description of the “Trimming” technique.
Trimming - This is one of the types of productive activity - the technique of making voluminous paper crafts. This is a type of paper construction - the art of paper-rolling, in which by gluing onto a template or the basis of twisted pieces of paper - tubes - end faces, three-dimensional terry compositions are created: paintings, panels, mosaics, postcards, etc.
There are two types of facing:
On paper (trimming is glued to paper - the base);
On plasticine (trimming the basis of plasticine is laid out).
Punching on paper happens:
❀ planar (trimming is located tightly to each other over the entire surface of the picture);
❀ volumetric (trimming is glued at a different angle to the surface of the sheet, which allows you to create a three-dimensional image;
❀ multilayer (trimming is glued into each other in layers, one inside the other).
Cutting on plasticine happens:
❀ contour (trimming is laid out along the contour of the image without filling the internal space);
❀ planar (trimming is located tightly to each other over the entire surface of the workpiece);
Ное volumetric (trimming is glued at a different angle to the surface of the sheet, which allows you to create a three-dimensional image.
❀ An image covered with plasticine or a three-dimensional figure made of plasticine is taken as the basis for facing on plasticine.
For the manufacture of crafts in the clipping technique, the following equipment is required:
❖ Crepe (corrugated paper) or napkins
❖ Plasticine or PVA glue (glue stick may be used)
❖ Scissors
❖ Storage capacity for paper blanks
❖ Ballpoint pens or gel pens, or cotton buds, or blunt-ended brushes
The foundation: velvet paper, cardboard, bulk forms, polystyrene foam, thick paper, plasticine mold, etc.
Work Stages:
❖ a small square is cut out of corrugated colored paper, ranging in size from 1 - 1.5 cm
❖ put a rod in the middle of the box (for example, an unsharpened pencil) and tightly wind the paper around the rod. It turns out a tube - a trimming.
❖ The resulting small trimming, without removing from the rod, is glued to the workpiece and only then the rod is removed.
Each subsequent trimming is glued next to the previous one tightly to each other so that there are no gaps. The work is ready.
Works performed in the cutting technique are unusually beautiful, voluminous and are very popular with children and their parents.
Fruit vase using clipping technique. Master Class
To make our Fruit Vase, we need the following equipment:
❖ Corrugated paper in different colors
❖ Plasticine and cotton buds
.jpg)
❖ Scissors
❖ Storage container for paper blanks.
❖ wire
.jpg)
Element 1. "Bulk apple"
❖ we form an apple from plasticine;
.jpg)
❖ we cut squares of 1-1.5 cm in size from corrugated paper of red and orange color.
❖ we take a small box in the left hand, a cotton swab in the right hand. In the middle of the box we put the end of a cotton swab and tightly twist the box around the stick;
.jpg)
.jpg)
❖ it turns out a tube - a face;
❖ stick the resulting end face, without removing it from the stick, stick it, stick it into the plasticine blank - an apple and only then remove the stick;
❖ we insert each subsequent tortsovochka into plasticine near the previous;
.jpg)
❖ when the main part of the apple is filled with red end faces, the remaining barrels will be made of orange end faces;
.jpg)
.jpg)
❖ insert a wire into the middle - a twig wrapped in green corrugated paper;
.jpg)
❖ the bullseye is ready.
.jpg)
Element 2. "Juicy Watermelon".
❖ cut strips from a roll of corrugated paper;
.jpg)
❖ cut strips of green, red, black corrugated paper into squares;
.jpg)
❖ we form a slice of watermelon from plasticine;
❖ with the green ends, we lay out the base of the lobule - the peel of the watermelon;
.jpg)
.jpg)
❖ with red mites the rest of the lobule is juicy flesh;
.jpg)
.jpg)
❖ to obtain a volumetric and more terry composition, it is recommended to insert end faces into clay more densely to each other;
❖ juicy watermelon is ready.
 Decoration of bottles and vases for decorating the kitchen
 How to clean copper products
 Temperature labels, stickers Thermo strips TestoTerm