Home slippers for guests do-it-yourself pattern. How to sew leather men's slippers
- “Once in childhood, I had similar shoes in a small round heel and were also tied with thread. - Recalls Ladokhina Olga (Podolsk, Russia)- Why do I remember them? Probably really liked, now I can not say for sure. And so, based on my reasons and inventing something, I got what I wanted. She wanted to be made of leather by hand. "
- Master class Ladokhina Olga " do-it-yourself leather"
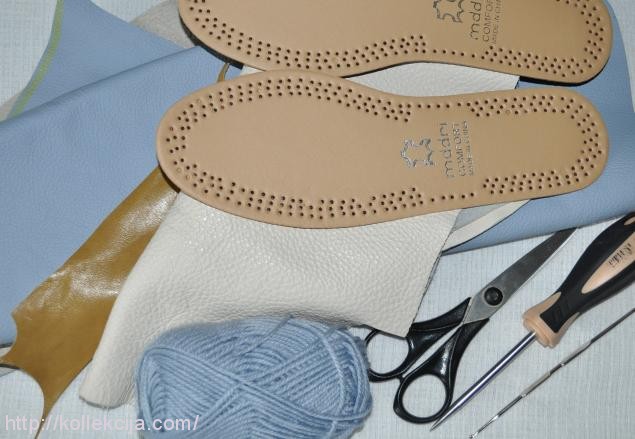
- Photo 1. To sew from leather with my own hands, I needed: genuine leather of several colors, an awl or punch for leather, woolen, glue for shoes, hook No. 2, scissors and most importantly, two insoles on a foam basis (felt insoles are also suitable, they can be bought both in the store and in other various places of trade).
- Photo 2. Pattern for the lower part is not necessary, the insole will serve as a pattern. I cut the skin along the contour of the insoles, two blanks of the lower part are obtained.
- Next, I turn the insoles so that the foam remains inside and fix the leather blank from above. In order not to slip the insole and the workpiece made of leather, you can add a few drops of glue in the middle between them.

- Photo 3. After I glued the bases together a little, I begin to carefully pierce the holes with an awl at an equal distance, retreating from the edge by about 0.5 cm. Then I take the hook and knit the edge with the woolen threads for knitting in the simplest way "single crochet". As a result, I got two neat details of slippers. The photo shows the bottom.

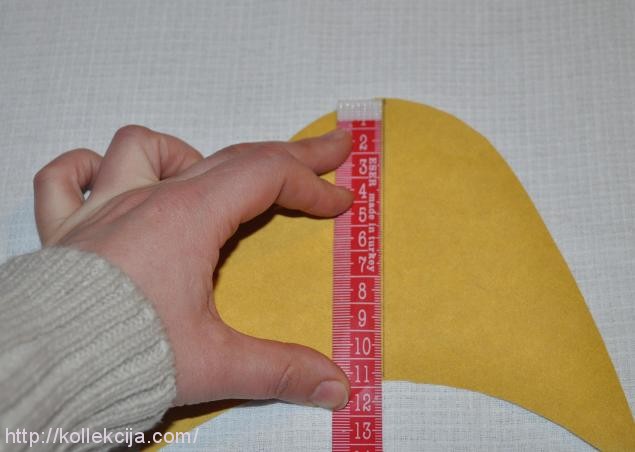
- Photo 4-5. The most crucial moment in tailoring is to correctly design the pattern of the upper part of the slipper.
You need to know the basic three sizes:
1. The distance from the highest point of the thumb to the highest point of entry of the feet into the slippers.
2. The width (circumference) of the entrance itself.
And you can take the old ones and use them to design a pattern of the upper part of the slipper.

- Photo 6. I put a pattern on the skin and cut the upper part of the slipper, it consists of two parts - the inside and the outside, i.e. one consists of four parts. Then I begin to prepare decorative elements for slippers.

- Photo 7. I cut a camomile on a stencil on a white skin, and cut a center out of a small piece of yellow skin. All the details of the flower are slightly burned above the candle so that all the edges are smooth and neat. I sew the chamomile, glue the middle and sew the slipper to the outer blank of the upper part. For strength, you can fix it with glue a little bit.

Having a good pattern, you can sew comfortable home slippers with your own hands, because this is a necessary thing in any home.
We will work with existing fabrics, we will not buy anything, we will use material from unnecessary old things, as well as pieces of leather from worn purses or even bootlegs.
In any house there are skirts, jackets, drape coats that are a pity to throw away, but you will not be wearing anymore. Usually they are lying somewhere in a bag in the basement. At least for me.
Even if you have worn them for a long time with pleasure, good pieces are always there. Let’s give unfashionable, but still very solid things a second life.
One tip: if you have an old wool sweater lying around, then it can be dumped in a car, dried, ironed - this is an excellent material for sewing home slippers! Fallen down, he is no longer subject to shedding.
Here, by and large, three patterns are presented for cutting and sewing soft cozy home slippers with your own hands.

There are several more options for soft slippers with knitting patterns, following the link you will find both crocheted and knitting needles, as well as varieties, for example, only with crochet trim. Slippers from the appendix to the old magazine, photos of poor quality, but I am convinced that the material is still relevant.
2 patterns of tailoring from the Peasant
Who does not know, in Soviet times, there were such magazines for women, which were called Peasant and Worker. The name frankly, not very, but they were once loved by many. There were given recipes, patterns. It is a pity that there were no good color pictures, but they were glad that they were.
In general, the materials were very useful, ideas inspired creativity. Since I recently got into the binder of this publication, I’m bringing you something useful.
Almost the same pattern can be used to sew ordinary slippers (without backs) and completely closed slippers.

The first model is more open, the second with the original valve. Size 36-37. If a larger size is needed, then increase the pattern along the entire contour. If the leg is narrow, then increase only in length.
The material will suit the simplest, perhaps even dusting in a pantry for a long time. For the upper part you need velveteen, drape or soft skin. Thin fabrics can be used: fold them in several layers and sew for density. The sole is best made from the skin of old boots or bags.
Inside the slippers, you can put an insole of their skin, fur, drape.
Cutting details (1 pc. Each is for one slipper, without allowances for seams, we will take it 0.5 cm):
- Valve
- Sole (cuts along the inner contour of the bottom part)

Sewing order:
Cut parts from material. Handle top. Cut a leg cut on the inside. The inner edge is either hemmed or hemmed with beautiful braid, edging. You can also design fluffy fringe.
Next, we work with the bottom detail. We cut out the sole separately and glue it with moment type glue. Now you can connect the details of the top and bottom. First, we tighten the detail of the top along the outer edge with a thread of the part. We do the same with the bottom. all the details must match the points from 1 to 10, which are written in circles.
They will look a little different - more assemblies on the back of the top and bow of the bottom. Sew them from the face.
You can make a decorative seam with leather or thick colored thread, lace. Or braid. One slipper is ready. Getting to the second. Just do not forget that the pattern will be upside down in relation to the first.
If you plan to design slippers with original valves, then cut the part 3. Work on the edge. Sew on the valve on line 11-12. It is fixed with ties attached to the point indicated by a cross on the top part and the valve itself. Sashes can be a continuation of the braid on which the edge is sewn.

Burda Pattern Option
The next way to sew slippers for the home was offered at one time by Burda magazine. True, because of pompons and a sharp, spout looking up, they look more like little butterflies. :)

The pattern is simple, for a start you only need to measure the length of your foot - it should match the length on the diagram. Zoom in to the desired width in the graphics editor and print to the printer.
The black part is the sole and the red part is the top.

The picture below briefly schematically shows the operating procedure. Light green indicates the lining - the inside, and the color pattern - the outside.
Increase the pattern of the sole and top to 28 centimeters.
Work description
- For each slipper, cut two tops of material and one sole of felt. To get the shoes on the right and left foot, cut one sole as on a pattern, and turn the other over to get a mirror image. Do exactly the same with the side parts - two for the pattern, two for the inverted. Additionally, cut for each slipper the top and the sole of the fleece. This will be the inside, lining. Do not forget the allowances for 5mm seams.
- Fold fabric sides face to face, chop, and then sew. Iron seams in different directions. Repeat for inner side elements (fig. 1 and 2).
- The outer and inner sides for each slipper are folded and chipped face to face, stitched around the inner circumference (Fig. 3). On a circle, make notches with scissors, twist, iron.
- Lining and soles to face each other. First sew on the sole, and then a seam on the heel (Fig. 4).
- Fold the lining and sole together inward with the front sides, stitch, leaving a small hole of 8 cm (Fig. 5). Join the calcaneal suture.
- Turn slippers out through the hole left, then sew this hole carefully by hand (Fig. 6).
- Make a pompom out of wool and sew it on slippers (Fig. 7).

If you like unusual, original things, made by yourself, soft home slippers will be a great option for replenishing your wardrobe. You can sew home slippers from any available materials, it can be an old sheepskin coat, bootlegs of unnecessary boots, pieces of fur, woolen fabric, drape, leather substitute and so on.
You can sew closed, very warm slippers yourself. At the bottom of the page is a file with full-size patterns that can be copied and printed. Three sizes are presented there, these are 38, 39, 41. If necessary, patterns can be reduced by several sizes and stitched compact children's slippers.

If you want to make your own pattern of slippers, then you can take a sheet of paper and circle your leg, you can also circle the outline of ordinary old slippers, tracing their sole. However, you need to trace the leg only in the toe, so it will be more spacious. To build your patterns of slippers, you can use the existing patterns shown in the picture, fitting them under your foot.


What material can make such comfortable slippers? You can choose any materials at hand. In most cases, the lower parts of the sole are made of leatherette, leather or split leather. The upper part of the sole is made of suede, split, cloth, and a gasket is placed between the upper and lower layers. You can take batting and cardboard for this. However, if desired, you can use any materials, cutting flaps from old things. The main thing is to show imagination and make a little work. Such slippers can be sewn on a sewing machine or manually, wrapping each seam with thick thread.
Slippers are comfortable slippers. Unfortunately, store options very often do not satisfy with their functionality and convenience. Therefore, you have to take this matter into your own hands and make slippers yourself. In addition, slippers with your own hands can be made as a special gift to someone, although the thing is extraordinary, but it is embedded in the “warmth” of your hands, which will probably be more pleasant than a regular store factory.
How to make them slippers with your own hands we will tell you in this article, while we will offer you several options. Choose which one is right for you.
Slippers "Lasso Slippers" by designer Gaspard Tiné-Berès

To create slippers you will need a piece of soft felt and a long lace.

The first stage is a pattern from a piece of felt. The base is made according to the size of the foot, the height of the sides of the slippers to your taste is 6-7cm or more or less.

Then cut out the rise of the foot. It is probably worth it to first do the pattern operation on the auxiliary material, and when it suits you, already cut the felt. Well, then, just tie the pieces of slippers with a string.

That's all.

Knitted slippers with his hands

You will need perforated insoles, a piece of fabric, a hook and thread.

Insoles are applied to the fabric, and we cut out the inside.

Sweep the fabric with the insole.

We knit the details of slippers. Five air loops are gathered, and then sized to fit.

The front parts of slippers are decorated with knitted bows.


The edging fits ...

... and the backdrop of slippers.

Sew the front of the slippers to the sidewalls.

Everything is ready.

Do-it-yourself Slippers "Sunflower"

As you know, for such bright slippers you will need felt of different colors. Harvest it. We take measurements from the legs and make a pattern.

Green felt goes on the manufacture of the sole, backdrop, front. Yellow felt goes to the sole and for the manufacture of sunflowers. Brown felt also goes for the manufacture of sunflowers. Then we sew the apron and back to the sole with the line “welt”. The green sole and yellow are also joined with a welt or glued.
How to make a sunflower is probably not worth telling. Enough is obvious.

As you can see, we got unusual bright slippers.
DIY slippers "Flower ornament"

We take measurements from the legs and make a pattern.

Yellow felt goes on the manufacture of the sole and front. From brown felt cut out the soles of slippers. Sew the front to the brown sole. Then the yellow part of the sole is sewn or glued. And the last touch is sewing on braid. Choose your own ornament.

DIY slippers

Pink fleece, pink lining fabric, white felt, satin ribbons half a centimeter wide will be used. We take measurements from the legs and make just such a pattern.

Top of slippers are made of fleece, details for tongue are made of lining fabric. The sole and edges of slippers are cut out of white felt. In the places of the cut, we connect the details with a pink ribbon with horizontal stitches and we sew the edges of the slippers both from above and from below. Then sew the top of the slippers with a satin ribbon. Glue the second layer of the sole. The top of slippers can be decorated with some flower made of satin fabric.

Another option for homemade slippers

We prepare insoles, genuine leather, awl, threads, glue.

Having put the insole to the skin, we cut out two leather insoles (our skin is blue)

Then between two leather insoles we put a foam or felt insole and fasten with glue droplets. And then gently overcast the edges of the sole.

Now we make the top of slippers. You need to know the width of the entrance and the distance from the thumb to the entry point.


Two pieces of leather are cut out according to the made pattern.


We trim the edges of the upper parts as at the sole - with a single crochet.

The next step is stitching the parts.

And the last stage is gluing the foam sole.

In fact, there are a lot of options for home slippers, we have given only part of the possible options. Perhaps you will come up with something of your own or take advantage of an existing idea, in any case, these slippers turn out to be special, we are sure of that.
Our attitude to home shoes is special. Slippers are associated with home comfort, relaxation with your family, warmth and comfort for tired legs. Often, women who are forced to wear high heels in the office and those who wear boots or heavy shoes and dandies in tight boots dream of them during the workday. For some, the symbol of simple happiness is a dog that meets its owner with slippers in his teeth. Slippers begin their history with eastern harems, where soft, silent shoes were worn by their inmates. In Europe, in the boudoirs, elegant, homely slippers decorated with exquisite embroidery have become fashionable. Well, in the 19th century, slippers turned into a familiar and necessary item for everyone.


And in order to sew such slippers, you can take a special pattern under the cut for printing on the thermal transfer. Its use greatly simplifies and speeds up the process and reduces to zero all possible difficulties and errors when cutting parts. 
In addition to the pattern, you will need a light felt to translate the transfer, any suitable (I only had white today) felt insole and, my main inspiration for this week, is a cork sheet. In this case, 3 mm thick. Well, and glue, I liked the most to use the "Crystal".

First of all, we will transfer the pattern to felt. Due to the fact that more recently I have been asked more questions about translation technology, I will allow myself to say a little more about it today. 
To begin with, we will need to place the pattern on the front side in felt and heat the iron to almost maximum temperature. With a hot iron, we begin to iron the sheet carefully, without missing the edges of the corners. 
In my opinion, it is better to overheat the iron a little and during ironing, notice that the felt has started to melt (this is not an instant process and you will always have time to slightly weaken the heating, nothing terrible will happen) than to iron everything with a cold iron and get a fragmented image, most spoiling and pattern, and felt.
We iron the entire structure for about a minute, then cool it to a slightly warm state and remove the upper checkered layer of paper. The picture has been translated.

Cut out the details of slippers without allowances for seams.
Since I made the pattern as universal as possible, I adhered to the principle of "better more than less." Therefore, at this stage of the work, I recommend trying it at least approximately and if it turns out to be more than necessary, cut the sides, as shown in the photo. The size of the top and bottom, as a rule, is not necessary to reduce, only if it will be slippers for the baby. 
We place patterns for both slippers on a felt sheet. It is no longer necessary to take white, you can use any color.

And attach a semicircular seam to the part. Only on the top edge.

Now we cut out the details along the contour, getting a double top for future slippers.


Now we need a pattern for the insole. Getting it is very simple. It is enough just to circle your foot on a sheet of paper with a decent margin or just take any ready-made slippers that you think are most convenient and circle them around the sole.

We only circle the insole, but do not cut it out. I found it more convenient to sew in this order.
Now we sweep the double top slipper. We sweep in two approaches, starting each of them from the middle of the sock.

On sour cream it will be very easy to sew up the top. After machine stitching, you can remove the bobbin thread.

Now slippers with insoles can be cut, 2-3 mm indent from the edge of the stitch. We do the same with the second slipper.

Now it is time to begin the final stage. We will make the sole for slippers. After a varied search for suitable material, I settled on a cork. As practice has shown, this is a fairly convenient material in the work, very light. It is very practical to wear, especially in the glued version. The cork has good cushioning properties and even a thin layer is sufficient to use slippers conveniently.
We take the glue and properly lubricate the bottom surface of the felt insole. The glue, among other things, perfectly stabilizes the cork, reducing its fragility and preventing the possibility of cracks during bending in the future.

Glue the insole to the cork sheet. We cut it roughly enough, just to be able to put clips.

The cork is glued well and quickly, after the glue is firmly set, you can remove the clips and cut slippers along the contour of the insole.

You can stop at this stage of work or alternatively stitch the perimeter of a slipper on a sewing machine. Cork is very easy to sew, despite the thickness.

That's all, the slippers are ready. In the next photo I tried to demonstrate that the cork glued to felt is strong enough to bend. 
Slippers turned out like this:


This idea of \u200b\u200bslippers is useful to everyone who often has guests. After all, sharing with your guests your home shoes is not only a bad taste, it is also unhygienic!
According to the elementary pattern of slippers, you can sew as much as you need. Those that will be designed for men, immediately make a large size. 
YOU NEED:
- any dense fabric (felt, jeans, tarpaulin, leather substitute ...).
- paper for building patterns.
- scissors, threads, needle.
- sewing machine.
PERFORMANCE:
- Put a drawing of the pattern on paper. No need to draw left and right slippers separately, just flip the pattern and cut out the blanks.
- Using a sewing machine, sew the edges of future slippers.
- The sole can be additionally sealed with felt insoles and sewn to the finished slippers with a regular overcast seam.
- Slippers are ready!
Show your imagination! You can create a real exclusive collection! A big plus of these slippers is that they can be washed in a washing machine.
Slipper patterns:


These patterns will help to sew wonderful indoor slippers. If necessary, you can resize the parts.
And finally, this master class in pictures will tell you how to sew soft slippers. In such slippers it is very comfortable to walk around the house during the cold season, and putting them on your feet after bed is a pleasure - not chilly. All you need is a sole from shale (new or used), terry towels (again new or old), faux leather and batting. 
Of the tools required:
Sewing machine, scissors for cutting fabric, marker for tags, needle (awl), breadboard knife, centimeter.
Working process
- Cut tracks from the skin, according to the layout of the slates.
- Now cut out the sides.
- According to the tracks, we cut blanks for slippers.
- Now we need to sweep the sole and toe out of the blanks. We put batting in the middle of terry blanks.
- At the next stage, we are preparing a box for slates, the soles of the slates will be inserted into such boxes.
- After the soft parts are assembled and sewn, through the unwired part of the backdrop we insert the slates into the body of the slipper, and then we sew the product.


 Crafts from candy wrappers: step-by-step instructions on how to make stylish jewelry with your own hands
 Beautiful ideas how to create knitted clothes for dolls, schemes with a description
 MK: knitting a sweater for a doll