Photoshop mask in red. Mask and quick mask in Photoshop
Now you can consider a more professional tool for working with selected areas - masks. Gradient masks.
We are already quite familiar with selections and have learned how to work with selected areas. Now you can consider a more professional tool for working with selected areas - masks. Why are masks needed at all? Are the selection tools we’ve studied really not capable of doing something? The fact is that all the previously discussed methods allow you to select areas of arbitrary shape, but none of them can take into account differences in focusing levels. Undoubtedly, you have seen collages in which one volume smoothly flows into another. It is with the help of masks that such transition effects are created. In addition, masks allow you to select an arbitrary area or adjust an existing one. Let's get acquainted with the most interesting and powerful Photoshop tool.
The essence of masks is as follows: if one part of the image is selected and we can only work with it, then the remaining part of the image is called masked, i.e. covered with a mask. The mask can be compared to the black paper that photographers use to cover part of the photo paper when printing photographs. This is done so that the light from the enlarger hits only certain areas of the paper and does not affect those areas that the photographer covered with black paper. The mask can be schematically represented as follows.
 - This is a selection outline presented in grayscale. Wherein:
- Selected areas appear in white.
- Unselected areas are shown in black.
- Partially selected areas appear in shades of gray. The more an area is selected, the lighter its mask. Respectively dark gray almost no highlighted areas are represented.
Quick Mask- A selection view in which selected areas retain their original color and unselected areas are covered with a translucent, solid-color mask. By default it is red.
It would be logical to assume that if we can specify the selected area, then we can also specify the masked area. In Photoshop, you can literally draw a mask using any drawing tool. Very often, a mask is an indispensable highlighting tool. Look at the photo. Even the Magnetic Lasso and Magic wand will go crazy if you make them pick out a white figure on a white background. I suggest using a mask to highlight the girl’s figure in the document  photo.jpg . To do this you need to do the following:


The question arises: why did we do all this if in the end everything except what was needed was selected? Then, now it is enough to invert the selection with the command Inverse menu Select, so that the girl’s figure is selected. I would like to note that masks are the shortest way to solve complex problems of selecting areas like this one.
The color and transparency of the created mask can be adjusted at your own discretion. To configure these parameters, just double-click on the button to switch to quick mask mode.  The mask settings are provided solely for your convenience. The color you use to mark the masked area does not affect the image, and the transparency changes only so that you can see what you are covering with the mask. Let's look at the action of the switches in the section Color Indicates(color indication). By default, red indicates the masked area. This matches the switch Masked Areas(masked area). If you want the color to indicate the selected area, switch the checkbox to (selected area). Again, this is a matter of personal habits and convenience. Let's look at this setting with an example. Select a rectangular area on any image. Switch to quick mask mode by pressing or clicking on the corresponding icon on the tool palette. Approximately the following picture will appear in the document window:
  Double-click on the icon to switch to quick mask mode. In the Quick Mask Settings dialog box that appears, switch the Color Indicates section to . The picture will instantly change and you will see the following:
  Pay attention to the icon for switching to quick mask mode. Depending on the setting, it changes its appearance, showing which setting is currently enabled. Once again, I insistently draw your attention to the fact that mask and selection (masked area and selected area) are two sides of the same coin. All the area that is not selected is masked, and all the unmasked area is selected. The settings discussed above are solely for your convenience.
Please note that the mask is drawn in black and erased with white or an eraser. All other colors in Quick Mask mode are displayed as grayscale (depending on their brightness). An interesting aspect is that what lighter color(gray scale), the more transparent the selected area will be. The transparency will also be special, namely, the same as when executing the Feather command. Make sure of this as follows.
Gradient masks.
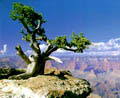
Let's try to get acquainted with the principle of creating gradient masks. As discussed above, a mask can add transparency to a selected area. Let's use this to create a beautiful effect called a gradient mask. The meaning of this action lies in the possibility of creating a mask with any drawing tool and in the peculiarities of interpreting the gray color that fills the mask as translucent. In other words, one image will be superimposed on another with gradient transparency. Let's carry out preparatory work with an image. According to my plan, I need to create a mirage in the form of an eagle’s head dissolving into the clouds. Now let's move on to the second document and try to select the eagle's head not just like that, but through a gradient mask. For this: 

In the lower right corner I pasted part of the Flower.psd image from the Samples folder. This part also fades into the background in a gradient manner. To create this effect, I filled a quick mask with a linear gradient.
Greetings, friends. In today's lesson I will talk about masks in photoshop. What is a mask in Photoshop, and how does it work? To answer this question, just imagine what happens when a person puts on a mask? That's right, the mask covers the face. This is roughly how it works mask in photoshop— closes all underlying layers, leaving visible only those areas where it is transparent. This allows you to achieve smooth transitions between different parts of one or several images. Masks are widely used in creating collages and processing photographs.
To get you started, I'll show you a few examples of using masks in Photoshop:

The planet was added using a simple mask.

And here there are only 2 layers - the original and the decolorized image, a mask was applied to the decolorized image, and one of the pomegranate pieces was “wiped” on it.

Everything is the same here - I took 3 images from a Ferrari and used a mask to hide the background.
As you can see, for those who use masks in Photoshop, an uncultivated field of experimentation opens up.
Photoshop allows you to work with 4 types of masks - Layer Mask, Vector Mask, Clipping Mask and Quick Mask, which is not really a mask... but more on that later :)
All masks in photoshop work with shades of gray (including black and white). Black color on the mask is a completely transparent area, white is opaque. Gray is used to add transparency varying degrees. The closer the gray is to black, the more transparent the area will be.
Interaction with masks is carried out using the tools, Gradient (Gradient), Paint Bucket Tool (Fill). You can also use the Mixer Brush Tool and Pecil (Pencil), but this is exotic and works on the same principle.
It is worth noting that the mask does not remove part of the image, but hides it. This has its pros and cons. The advantage is that you can always change the color to white and return the hidden part of the image. The downside is that the file size increases, so before saving, do Layer -> Layer Mask -> Apply
Layer masks in Photoshop
Let's start looking at a layer mask in Photoshop using a specific example. I found a photo of a soap bubble on the Internet:

You need to place this bubble on a different background. For example this one:

Copy the photo of a soap bubble onto the landscape photo, and use Free Warp (Ctrl+T) to make the bubble a little smaller:

The preparations are complete, now let's deal with the masks.
The section in the Layer menu is responsible for managing masks in Photoshop:
Now I will talk about ways to create a layer mask in Photoshop:

- Reveal All creates an open mask. This means that the mask is filled with white, i.e. the image is completely opaque. In order to hide part of the image, you need to start drawing over it in black. Let's try.
So, click Layer -> Layer Mask -> Reveal All. Notice that a white rectangle has appeared in the Layers panel to the right of the image thumbnail. This is the layer mask:

If you click on the image thumbnail on the left, it will be edited; you can return to editing the mask by clicking on the rectangle with the mask thumbnail. Remember this so that later the question does not arise - why is there a mask, but the brush does not edit it.
Take a soft black brush and begin to paint the background of the photo with a soap bubble:

The result was not very neat, but the main thing is that you understand the principle. If you still want to get a high-quality result, then first select the bubble, then invert the selection (Shift+Ctrl+I) and boldly paint over the background, without being afraid to hide the edges of the soap bubble:

If you still hid something that you didn’t want, it doesn’t matter, change the color to white and restore the hidden part of the image.
Let's now see what happens if we paint the bubble gray (I took #a1a1a1):

The bubble became semi-transparent. Do you already feel the power of masks in Photoshop? This is just the beginning, let's move on.
— The Hide All layer mask method hides the entire image behind a black mask. You will “develop the image” on the layer with the mask using a white brush.
Thus, you can solve the problem with a soap bubble with just one click of a white soft brush:

— Reveal Selection hides everything except the selected area:

— Hide Selection, on the contrary, hides the selected area:

— From Transparency creates a mask without taking into account invisible areas.
There is also a button in the Layers panel for creating a layer mask using the Reveal Selection method:

Filling a mask in Photoshop with a gradient
I have shown this technique many times in Photoshop tutorials on this site. It consists of applying a gradient to the layer mask. Let's say there is an image on one of the layers, part of which should smoothly disappear:

Create a mask and fill it with a black and white radial gradient. We get the following result:

Vector masks in Photoshop
Next type masks in photoshop is a vector mask. Like any other vector, a vector mask differs from a regular raster mask in the flexibility of customizing its shape thanks to curves and immunity from loss of quality when scaling.
To make it easier for you to understand the essence of working with vector masks, I recommend reading the lesson ““, in which I examine the main Photoshop tool for working with vector shapes.
Vector masks are created in exactly the same way as raster masks and work on the same principle, with the only difference being that they are controlled with vector tools, for example the Pen Tool:


Here we see a new Current Path item - it creates a mask along an existing vector path. Let's take a closer look at this. I took the tattoo image and outlined it using the Pen Tool:

And applied Layer – Vector Mask -> Current Path:

In principle, that’s all, there are no more differences between vector and raster masks in Photoshop. Use vector masks where precision is needed: creating logos, website layouts and other similar things.
Two masks in Photoshop
Photoshop makes it possible to use two masks at once - raster and vector. This is necessary primarily for user convenience.
Look at the following example:

I created a vector path outlining starfish. Then I converted it to a vector mask, and at the same time created a raster mask. As you can see, there are now 2 layer masks in the Layers panel. On the left is raster, and on the right is vector. Now if I want to make the middle and edges of the star a little transparent, I'll switch to the raster mask and paint the desired areas with a gray brush:

And at any time I can return to editing the vector and raster masks. Convenient, isn't it? This feature especially helps when creating a website layout, when there are many layers, and sometimes you need to go back and edit the shape, color or transparency of an element.
Clipping Mask in Photoshop
The next type of mask in Photoshop is Clipping Mask. It crops the image to which it is applied using the underlying path or mask:

In the example presented, a regular vector shape was created on the bottom layer using the Ellipse Tool (Ellipse), and on top of it was an image with a horse, to which a Clipping Mask was applied. Try to do something similar, and move the shape on the bottom layer - the image will “appear” in the place where the shape is located.
Actions with masks in Photoshop
Masks in Photoshop can be moved outside of the image. Now I will show you how to do this. Take any image and apply some kind of mask to it:

Now click on the chain icon between the mask and the layer thumbnail. Now you can move the mask using the regular Move Tool.
Masks in Photoshop can also be copied to another layer. Create a new layer (Shift+Ctrl+N), fill it with some color, hold Alt and drag the mask thumbnail onto the newly created layer:

Quick mask in Photoshop
Let's look at the last type of mask in Photoshop - the quick mask. As I said at the beginning, this is not exactly a mask, it is a selection tool that has a similar type of operation to masks. The quick mask is located in the toolbar:
But I recommend calling it using the Q shortcut key. Also, if you double-click on the quick mask icon, settings will appear that allow you to change the color of the mask. This is necessary solely for convenience, because... By default, the mask has a translucent red color, and if you select a red image, this will not be very convenient.
Now we’ll try to use a quick mask to highlight this gorgeous dog :)

Press Q, grab a hard opaque brush and start painting:

Please note that your main color should be black. If you make a mistake and paint over something unnecessary, select white (press X with the standard color layout) and thus erase the unnecessary area of the mask. When you're done painting, press Q again. That's it, the selection is ready:

This is where we will finish our review. masks in photoshop. I hope you learned a lot from this Photoshop lesson, and from now on working with masks in Photoshop will not cause you any difficulty.
Ask questions in the comments, share your impressions and share this lesson with your friends. I say goodbye to you until we meet again on our website and wish you creative success 😉
Some image, and . Then go to the background layer and desaturate it using the menu Image - Adjustments - Desaturate . This command has no parameters, but simply makes the image black and white. To verify this, you can turn off the top layer and look at the background layer.
Now select the top layer and select the selection tool Rectangular area . Select some significant part of the image. After that, on the layers palette, click the icon Add a layer mask . This icon is located at the bottom of the palette, and looks like a white circle in a gray rectangle. Click the icon and another icon appears in front of the layer name. In this icon, the selected area is marked in white. To view the mask image, press the key Alt, and while holding it, click on this icon. You will see that the mask is black and white. In the white area you will see the top layer, in the black area you will see the bottom layer.
 The mask image itself is hidden in the additional channel. You can see it if you open the Channel Palette. The channel is called a mask channel, or alpha channel. You can perform some actions with this channel, for example, blur the edges of the white area. Highlight a channel and select from the menu Filter - Blur - Gaussian Blur
. The edges of the colored area in the image will no longer be as sharp. And if you look at the mask again by clicking on its mask icon in the layers palette, and at the same time clicking Alt, then you will see that gray color has appeared at the edges of the white color. The gray color in the mask makes the top layer translucent. The darker the color, the more transparent the layer.
The mask image itself is hidden in the additional channel. You can see it if you open the Channel Palette. The channel is called a mask channel, or alpha channel. You can perform some actions with this channel, for example, blur the edges of the white area. Highlight a channel and select from the menu Filter - Blur - Gaussian Blur
. The edges of the colored area in the image will no longer be as sharp. And if you look at the mask again by clicking on its mask icon in the layers palette, and at the same time clicking Alt, then you will see that gray color has appeared at the edges of the white color. The gray color in the mask makes the top layer translucent. The darker the color, the more transparent the layer.
Now cancel the Gaussian blur via the menu Editing - Cancel , so that the edges of the colored area in the image become clear again. Let's now make a frame.
Double click to the right of the layer name to open the window Layer Style. Select an item Stroke, and start editing it. Select the stroke color white. Make the borders thicker, and make the position Inside so that the corners are sharp. Also select Shadow, and adjust its parameters, for example, lighting 135 degrees, size 20 and offset 40.
Now select the background layer, go to Image - Adjustments - Brightness/Contrast , and turn up the brightness.
You will get quite an interesting picture. All that remains is to merge all the layers into one by right-clicking on the layer name and selecting the Flatten command. And save the image in JPG format.
Quick mask in Photoshop
This is an operating mode that can be switched to by clicking the corresponding icon at the bottom of the toolbar. The icon looks like a white circle on a gray rectangle. You can also press the key Q, which is a switch between normal mode and quick mask mode.
Select any area of the image in normal mode and switch to quick mask mode. What is not included in the selected area is filled with translucent red color. This is the default mode for the quick mask in Photoshop. To change the mode, double-click on the quick mask icon, and in the dialog box that appears, change the settings to some others, for example, make the parameter Show highlighted areas in color .
By the quick mask icon on the toolbar you can determine what the mask will hide - the current layer in the selected areas or unselected ones. If the circle is gray on a white background, the mask will hide the selected areas; if the circle is white on a gray background, the mask will hide the unselected areas. Depending on your needs, you will use the mode you need.
Just like with the mask, when you switch to quick mask mode, an alpha channel will appear in the channels palette.

Now cancel quick mask mode, remove selection, select tool Brush, and set the colors in the Layers palette to black and white. After that, double-click on the quick mask icon and select Show selected areas in color in the dialog box. Enable quick mask mode. Now try painting with a black brush. Instead of black, you will see red - the color of the mask. You can use a white eraser to remove excess from what you have drawn.
After drawing, turn off the quick mask mode, and you will see the selected area where the red color was. Thus, by drawing in Quick Mask mode, you can select what you need, and very precisely. In addition, you can draw not with black, but with gray, and then the selection will be partial.
Video on how to apply a mask in Photoshop to create an image with a frame
You can get more detailed information in the “All courses” and “Utilities” sections, which can be accessed through the top menu of the site. In these sections, articles are grouped by topic into blocks containing the most detailed (as far as possible) information on various topics.
You can also subscribe to the blog and learn about all new articles.
It does not take a lot of time. Just click on the link below:
Quick mask in Photoshop.
Hello dear readers, today I will tell you how to use the mode to produce beautiful cutting any object geometric shape from any photo.
With the help of the knowledge gained, you can not only quickly place yourself next to any celebrity, but also cut out beautiful flowers, butterflies or images of wild animals for some of your creative ideas in photo processing.
After you have selected the photo you need, which would depict the object you need, open it in Photoshop by simply dragging the shortcut with the picture into the program’s work area.
Now select the Magic Lasso Tool from the various selection tools button and carefully go around the perimeter of the object you want. Naturally, the selection will not be at all what you need, it will not go strictly along the contour in all places of the selected object, and in some places it will cut off parts of the selected image. There is nothing wrong with this; all these defects will be corrected using the mode.
Now click on the “Quick Mask” mode button or simply press the letter “ on the keyboard Q”.
After this manipulation, the entire space around the selected object should acquire a red translucent tint.
Double-click the quick mask mode button and select “Selected Areas” in the dialog box that opens.
As a result, the object you select should become reddish, and the rest of the picture will be painted in the same colors.
When the mode is activated, you have only two colors at your disposal on the palette - black and white. If you select black, the brush will paint with a reddish tint; if you select white, then the reddish tint will be removed. To change the color, you need to press the “” button on your keyboard. D” (black) or “ X" (white).
Select the brush size so that it is convenient for you to work with the picture, and paint the area of the mask where it is missing, and delete it where it is unnecessary.
After a kind of “drawing”, when the mask lies exclusively on the picture you need, exit the “Quick Mask” mode by pressing the “ button Q” or the corresponding icon on the toolbar. As a result, the image will be selected strictly along the contour.
To remove the background you will have to invert the selection - press the keyboard shortcut Shift +Ctrl +I.
Visually, nothing will change in the image, it’s just that now when you press the Delete button, not the flower or person you selected will disappear, but the surrounding background.
Now you have the desired image at your disposal, which you can insert into various collages of your own making.
Mode Quick Mask(Quick Mask) is one of the best selection tools in Photoshop. I use it all the time when creating and modifying selections, and when evaluating the quality and accuracy of selections created using the standard selection tools discussed earlier in this chapter. In short, Quick Mask mode allows you to see which areas of an image are active (selected) and which are inactive (unselected) thanks to transparent overlay. Quick mask mode is very flexible and functional; it allows you to apply many selection tools and filters; Additionally, the quick mask can be saved as an alpha channel for future use. Unfortunately, many people consider Quick Mask mode to be a tool for beginners and hobbyists, but this is not true: Quick Mask mode has many uses.
OwlT Before you begin using the Quick Mask mode in the following exercises, make sure that the Quick Mask settings are set to the default settings. To do this, you can double click on the left icon Quick Mask(Quick Mask) in the Tools palette. Make sure
is that the parameter values specified on
rice. 2.52.
Rice. 2.52.
Standard Quick Mask Mode Options
Let's start with the selected area
After creating your initial selection using the standard marquee tool, click Quick Mask(Quick Mask) under the color picker icon in the tool palette; Alternatively, you can simply press the key
. Photoshop will render the image using a red transparent overlay (which can be compared to a protective clear film) over the inactive areas of the image. As a result, only the selected areas will be available for editing. Please note that the "marching ants" disappear. In mode

Quick Mask allows you to modify and adjust selected areas without fear of accidentally deselecting them. However, the best thing is that you can see which areas are highlighted and which are not, and you can also use black and white colors to create very precise selections.
Separating image elements
In the next example we have to separate a small sheet from the background.
1. Select the sheet using the tool Magnetic Lasso(Magnetic Lasso) or create an initial selection using the tool Magic Wand(Magic wand) (rice, 2,53).
2. Press the key to go
to quick mask mode (Fig. 2.54). All areas that are hidden under the red overlap are inactive, which means
not highlighted. All other areas are active, which means they are highlighted.

Rice, 2,53.
Start by creating an initial selection
3. To further separate the sheet from the pavement, brush the selected areas of the pavement with a black brush. In this case, a hard brush is used to imitate the crisp edges of a leaf. By working on areas of the image with a black brush, you subtract them from the selected area.
4. If you need to add new areas to the selected area, paint over them with a white brush. For example, enlarge the lower part of the leaf petiole. Brush it with a hard white brush at 100% opacity. (Fig. 2.55).
Rice, 2,54.
Go to quick mask mode

Rice. 2,55.
Change the quick mask by painting with black and white brushes
5. Having received the selected area as expected, press the key again . Photoshop converts a Quick Mask into an active selection (Fig. 2.56), after which the sheet image can be inserted into another image.
OwlT After entering Quick Mask mode, Photoshop sets the default colors (prime white and black
background). During operation, you can press the key<Х>to set the foreground color to black and the background color to white. To decrease the brush size, use the key<[>, and to increase<]>.


Rice. 256.
Keystroke allows you to exit quick mask mode and activate the selected area
 Military pensioners for Russia and its armed forces
 What is Brazilian hair straightening
 The nuances of re-registration of a car: can a husband sell a car to his wife?