Making gift boxes with your own hands. Fashionable DIY postcard: magic box or box with a surprise
On the eve New Year's holidays Shop windows are full of gift boxes, decorative bags, and wrapping paper for every taste. Smiling sellers helpfully offer to provide packaging services New Year's gifts. And all this seems great, because you must admit, it’s much nicer to receive a New Year’s trinket in a beautiful package. But on the other hand, the whole meaning of the gift is lost, the very gift that should be intended specifically for you.
The recipient of the gift will be doubly pleased if, in addition to choosing the gift, you spend a little more time on wrapping it. In this article we will teach you how to make gift boxes from paper or cardboard with your own hands. This is not at all difficult to do, because all the crafts presented with us are accompanied by ready-made diagrams, templates and step-by-step master classes. All you have to do is choose suitable option boxes, print the diagram and glue the paper box according to the instructions. By the way, some of the boxes we present are made using the origami technique, which means that you don’t even need glue!
So, before we get started, let's check if everything is ready. To make a paper gift box with your own hands, you will need: beautiful wrapping paper (you can get by with plain white paper and then decorate it), scissors, pencil, ruler, glue or double-sided tape, and a stationery knife. Everything is? Well then, let's create!
#1 Box “Herringbone”
A great way to pack a small trinket for friends or family is this New Year's themed box. By the way, it’s very easy to do. You'll need green paper and hole punchers (although you can do without). Well, any rhinestones, beads, sequins are suitable for decoration, in general, to your taste!
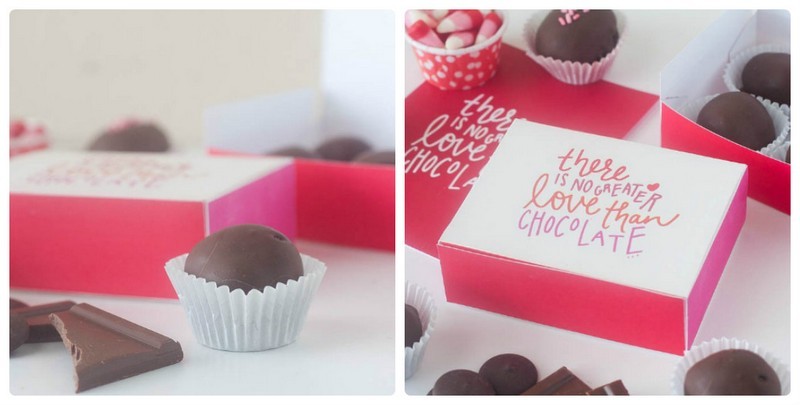
#2 Gift box “Mint Candy”
And here's another one original version gift box, which you can very easily make with your own hands, especially with our step-by-step master class. You will need red thick paper (for the box itself), as well as White paper for decoration. You can make the upper part of the box with applique or simply color the white sheet with pencils or felt-tip pens. By the way, there doesn’t have to be a lollipop on top. You can dream up a New Year theme and decorate the top of the box, for example, with a snowflake, Christmas ball or angry red M&M's.

#3 Box with lid (diagram)
Well, if you don’t have the time or desire to tinker with the box for a long time, you can use a simple ready-made template. You need to download it, print it, cut it and glue it. Voila, the box is ready! Please note that we have prepared 2 diagrams for you: square (size 5x5) and rectangular (size 7x6x4).

#4 Cup with a gift
But here is a gift packaging option for those who want to surprise with originality - a gift box-cup. It's quite simple to do, but looks impressive! To create, you will need thick paper, scissors and glue. And of course ours step-by-step instruction!
#5 New Year's box “Cake”
If new Year party planned in a large company, for example with a large family, it makes sense to pack gifts for everyone in one large composite box. The cake packaging box consists of 8-10 pieces, each of which is a separate paper gift box.

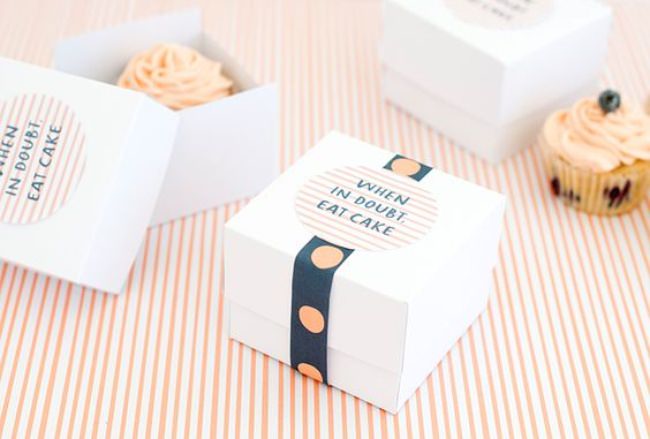
#6 Gift box with lid for muffins and other small items
During the New Year holidays, edible gifts are quite common: various sweets and baked goods. An original gift will be a muffin prepared with your own hands in a designer gift box.
#7 New Year's box “Diamond”
You can pack a New Year's gift in a diamond-shaped gift box. With our scheme, making such intricate packaging will not be difficult. All you have to do is print out the box template, cut it out and glue it according to the instructions. It's simple!

#8 New Year's packaging "Santa"
Very cute New Year's packaging will come out of ordinary paper bag, decorated with paper Santa. Download the Santa pattern, cut it out and glue it onto the bag. New Year's packaging ready with your own hands!

#9 Boxes “Harry Potter”
Fans of stories about Harry Potter will be indescribably delighted when they receive a piece of their favorite hero as a gift. By the way, such a box with magic sweet beans can be a wonderful addition to a set of books about the adventures of a young wizard.

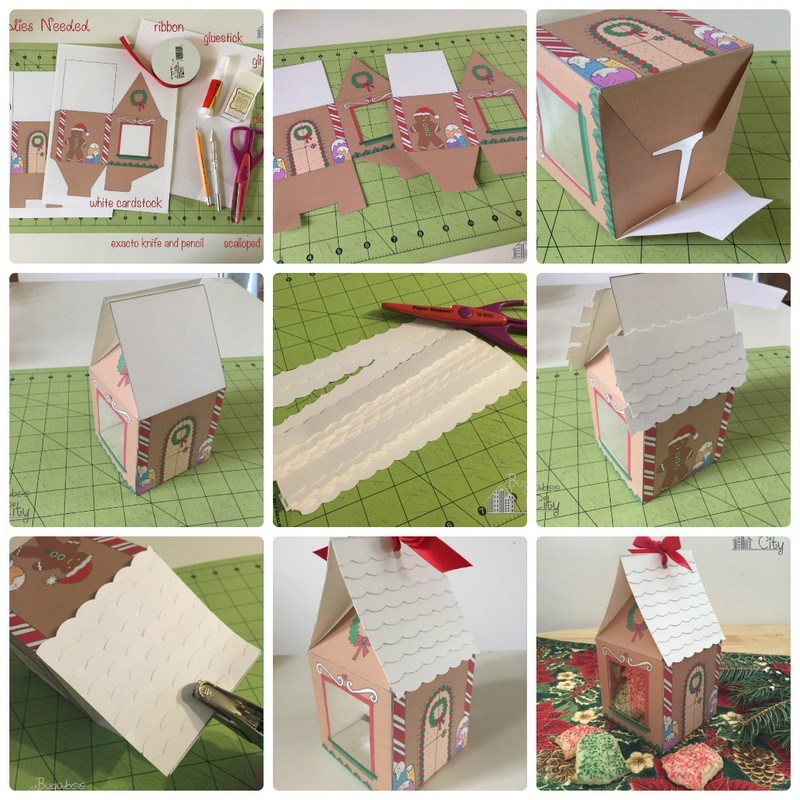
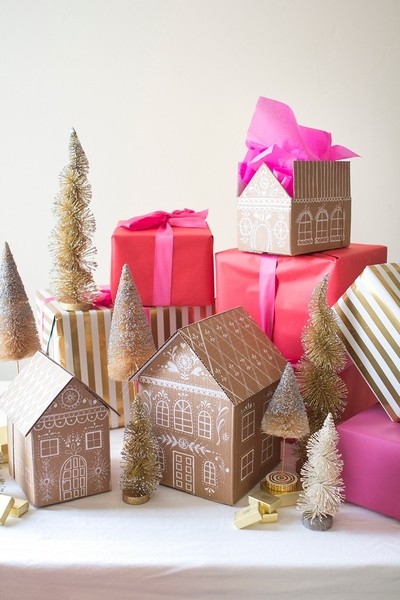
#10 Box “Gingerbread House”
The symbol of the Christmas and New Year holidays, well known to everyone from Hollywood films, is the gingerbread man. You can make a paper box in the shape of a gingerbread man's house. By the way, putting the gingerbread men themselves in such a house will be very symbolic, but if you also make them with your own hands, there is no price for such a gift at all! The “Gingerbread House” box is made according to a special pattern, which you can download below. Also below is a master class on making a box with your own hands.
You might be interested in:
The New Year's time is coming - a time of miracles, when everyone can feel a little like a helper to the kindest old man in the world. After all, think about it, if in addition to gifts for the children of the whole planet, the old grandfather also had to decorate our houses, how would he manage to do everything. That is why we, adults, help him in every possible way, because it is impossible for children to stop believing in […]
#11 Box “Heart of four parts”
A cute package consisting of four boxes can be made using our pattern. Giving your loved one not one, but four New Year's gifts at once is a true manifestation of love. You can download the diagram with four boxes and the base for them below.

#12 Box made using origami technique
To make such a gift box you will not need a diagram or template. To make a paper box with a lid, you only need a sheet of paper. The main condition is that the sheet must be square. Strictly follow the instructions of the master class and in 10 minutes you will have the cutest origami gift box made by yourself.

#13 And another option for an origami box
This box is very similar in appearance to the previous one, but the manufacturing method is slightly different. To make this box you will need scissors, but you don’t need a diagram: just a square sheet of paper. Follow the instructions of the master class and you will succeed!

#14 Box using origami technique “Volume Triangle”
If you want to get confused and ready-made templates are not for you, then be sure to pay attention to this complex and very impressive gift box. You will need paper and patience. Well, then follow the instructions and everything will work out!
If you like to make gift boxes without templates, glue and scissors, but only with the help of the correct folds of paper, then you will appreciate this box.
#16 Closing box using origami technique
Well, another version of the box using the origami technique. It's quite easy to do, especially if you follow the instructions. By the way, the steps of making the box are described below in the photo instructions.
#17 Box “Cupcake”
Original gift packaging for a gift on New Year It will become a cupcake-shaped box. It looks very impressive, but it will take a little work to create. In general, there is nothing complicated in creating this box; you just need patience and imagination! A step by step wizard see class below.

#18 And one more “Cupcake”
And here is another variation on the theme of a gift box in the form of a cupcake. The manufacturing scheme is very similar to the previous one, but you might like it!
#19 Gift box for cookies
A ready-made diagram for making a cardboard box with your own hands. All you need is to use our ready-made diagram, which you need to print, cut out of cardboard, and then glue it together in accordance with the master class.

#20 Chinese style gift box
You can put anything you want in this handmade box. And most importantly, it is done quickly and simply. You can download the box diagram from the link below.
Download the diagram

#21 Gift box in the shape of a cup

Truly original packaged gifts are valued much more than conventional gifts. gift bag. Pay special attention to this charming paper box, which you can make with your own hands using our pattern.
How to make a cup

How to make a lid

#22 Box “New Year's Sweater”
This beautiful gift box can be made with your own hands. To do this you will need a diagram, which you can download on our website, scissors, glue and a little patience.

#23 Box with bow closure
Quite simple to make, but very original gift box. You will need a square sheet of wrapping paper, glue and instructions from the master class. 15 minutes - and your gift box is ready!

It’s very easy to make a cardboard box for a New Year’s gift, but for this you will need not only cardboard, but also scissors (a stationery knife) and glue or double-sided tape (for secure fixation). Below is a step-by-step manufacturing master class, following which you can quickly and easily make a cardboard box with your own hands.

If you want to give a delicious gift in the form of cupcakes or muffins, then the ideal packaging for such a gift would be paper tray for eggs. Cut the required number of compartments, decorate the top of the box with decorative elements, tie with a ribbon and Voila! The gift is ready!

You may be interested in:

The New Year holidays are ahead, which means it’s time not only to receive, but also to give gifts. IN modern world When you can buy absolutely everything, the gift itself no longer matters much. Much more attention is paid to its “presentation”, i.e. presentation and packaging. Indeed, beautiful packaging can add significance to even the most ordinary trinket. Wrapping a gift beautifully may not […]
#26 Original box “Milk package”
Another incredibly cool New Year's box that will amaze anyone. You can pack a simple trifle in something like this: unusual box. It’s quite simple to make it if you use a ready-made diagram, which you can download on our website.

#27 Box with lid
Using our simple pattern, you can easily make a gift box with a paper lid with your own hands in just a few minutes. You can put anything in such a box as a gift: from a cute trinket to sweets self made. You can download the box diagram below.
#28 Packaging box with flower clasp
A simple design for a cute packaging box with a flower clasp. Fast, beautiful, original. Please your loved ones with a handmade gift. You can download the finished diagram from the link below.

#29 Gift box “Petals”
You can make a wonderful box for a New Year's gift with a petal-shaped lid with your own hands. In fact, making such a beauty will not only not take much time, but will also delight you with its unusual appearance.
#30 Gift box for New Year's cupcake
You can make a very cute cardboard box with your own hands. It will turn out no worse than store bought. You can make a special bottom for the cake in the box. By placing your little delicious gift in a special stand, you don’t have to worry that all the cream will remain on the box. To make such a cardboard box with your own hands, you need to print the template and follow the instructions of the master class.

#31 Gift box for children “Ice cream”
A New Year's gift should be packed not just well, but with taste. In the “Ice Cream” gift box, your gift will be appreciated! With our scheme, making a delicious box will only bring pleasure!

#32 Packaging box “Candy”
Another option for “delicious” packaging would be a candy-shaped box. To create a New Year's atmosphere, the packaging can be slightly enlivened by adding eyes and a mouth. Download the diagram, print it and glue the box in the right places.

#33 Gift box “Cheerful Bunny”
You always want to give a special gift to your dear and close people. And it’s best when this gift is not only special, but also in special packaging that emphasizes the significance of a particular person. Making such a paper box with your own hands is not difficult if you download the diagram from the link below.
On the eve of the New Year holidays, everyone is overwhelmed not only with joy and a fabulous atmosphere, but also with anxiety and fuss about choosing gifts for their loved ones. On this good holiday, I want to please and impress my family, but children are waiting for a special miracle these days. And here a caring parent faces a difficult dilemma: what to give their child for the New Year? […]
#34 Gift box “Pencil”
A New Year's gift for children or people in the education sector is symbolically packaged in a pencil-shaped box. Please your loved ones with a gift in an original handmade box. You can download the diagram below.

#35 Box “Funny Frog”
Another very cheerful and positive box for New Year's gifts is “Cheerful Frog”. It’s done quickly and gives a lot of emotions! Download the diagram and please your loved ones with a merry New Year's box.

#36 Box with a face
You can also pack a gift in an original way in a box made of plain white paper, adding some details on it in the form of eyes and a mouth, thus bringing the gift to life. With our ready-made diagram, making such a box is not at all difficult. Just download the diagram, print and glue.

#37 Gift box “Birdhouse”
Let's start with perhaps the most unusual paper gift box. Making such a birdhouse is quite simple when you have a ready-made diagram. The diagram needs to be printed, transferred to suitable paper, cut out and glued in certain places. Complex and intricate at first glance, DIY boxes will be ready in 10-15 minutes. 
#38 Box “Apple”
A gift in a paper box in the shape of an apple will be original. With such a box, choosing a gift is quite easy - gelatin worms will come in handy. Making such a box with your own hands with the appropriate diagram is very simple; the manufacturing process will take no more than 10 minutes!

#39 Box “Christmas wreath”
There is no limit to your originality, we just give you direction, and then you create on your own. You can come up with a lot of boxes for the New Year theme, for example, in the form of a Christmas wreath. Very symbolic!
Well, what would a real New Year be without the Nutcracker and music from the famous ballet by P.I. Tchaikovsky? A great gift would be a bag of nuts with a nutcracker tag attached. You can draw the fairytale hero yourself, but if you have no inclination to draw, you can find an image of the Nutcracker on the Internet and print it, then cut it out and attach it to the bag.

If you think that making a gift box is very difficult, then you are deeply mistaken. In order to make original gift packaging with your own hands, you just need to stock up on colored cardboard and patience. If you show at least a little imagination, you can please your family and friends with an originally wrapped gift.
Ideas, shapes and photos of beautiful DIY gift boxes
Gift box with openwork decor
 Gift box: heart
 Square gift box
 New Year's gift box
  Gift box: star
 If you want to show your friend or relative all your respect and love, then try making a gift box with your own hands. If possible, try to use all your imagination and create the most original packaging. If you wish, you can make the box round, triangular and diamond-shaped, or make a package visually similar to a flower, house, fruit or even a diamond.
Of course, the latter options will require a little more skill, but in the end you will get unique thing, which definitely cannot be purchased in the store. The only thing you must remember is that such crafts love precision. In this case, when cutting out the template, you cannot afford to deviate from the line in one direction or the other.
You must cut all the lines as accurately as possible, taking care to create perfectly straight edges. If this stage of work is not carried out as it should be, then with a high probability we can say that in the end the box will not be entirely presentable.
How to make a cardboard box for a gift: template, pattern

 Step #1
 Step #2
 If you are new to this business, then you need to start your acquaintance with this type of needlework with the simplest things. Believe me, if you do everything correctly, even an ordinary square box will look attractive. Now we will present to your attention a master class with which you can make a rectangular gift box.
To make it, you only need glue, scissors and special cardboard. If you don't have one, don't be too upset. You can quite easily take even the one that children use in school lessons and make a frame for a craft from it. It’s just that in this case, after the box is ready, you will have to decorate it additionally. This can be done using the decoupage technique or using organza, tulle or satin ribbons.
How to make a small mini gift box from paper: template, pattern

 Scheme for work
 Gift box
 Ready box
 Template No. 1
  Template No. 2
 If you are planning to give a loved one a small gift, then you can make a small box for such a gift. It is best to make a similar craft, like the previous one, from thick paper. If you make it out of thin material, then there is a possibility that it will not hold the desired shape, or it will simply tear due to the mechanical impact that the gift will have on its walls.
Yes, and in this case it is extremely important to take the most responsible approach to fastening all the side parts. Since these crafts do not have secret locks, it will be better if you fix everything with glue or double-sided tape. If the first box seems too simple to you, then below we have placed two more quite interesting templates, by printing which you can easily make some pretty cute crafts.
How to make a scrapbooking box for a gift?

 Template No. 1
  Box of squares
 In case you want to surprise your loved one for real, then make a scrapbooking box for him. To make it you will need both regular cardboard and special paper for scrapbooking. You will make a durable frame from cardboard, and use paper to give it a festive look. The best part is that in this case you will have a huge field for imagination. Since this box is supposed to be untied, you can decorate it both inside and outside.
Moreover, if you wish, you can even provide places for small gifts in those parts of the craft that will recline. For example, you can make places there for notes in which you write the most pleasant words. But keep in mind that the congratulatory notes fit well into general style gift box, they must be kept in the same color scheme as she did.
How to make an origami gift box?

 Step #1
 Step #2
  Step #3
 Recently, the origami technique has become so popular that even gift boxes have been made with its help. In principle, you can make such a craft from any colored paper, but since you are still making a product for an important holiday, it will be better if you spend money on scrapbooking paper.
In this case, you will not need additional decoration of the inside of the product, as you will immediately make it as it should be. The only thing you have to take into account is that to create a box, the master class for which is posted above, you need to use two square sheets, one of which will be literally 11-12 millimeters smaller. If you do not take this nuance into account, then in the end you simply will not be able to combine the two parts into one craft.
How to make a gift box with a lid?
 Recommendations for making a round box
 A gift box with a lid is the ideal packaging for heavier gifts. If you make it a little larger than shown in the master class, you can supplement the main gift with sweets, boutonnieres made of fresh flowers and cards made by yourself. As you probably already understood, it is best to make such a box from thick cardboard.
If you have the opportunity, purchase it at a specialty store, or go to the nearest supermarket and pick up any paper box there. When you bring it home, lay it out horizontally and place it under something heavy. Leave it in this position for literally an hour, and then proceed to drawing the frame of the future craft. This little trick will help you smooth out any kinks that would probably get in your way when creating your masterpiece.
How to make a surprise gift box?

 Box in the shape of a piece of cake
 Template #1
 Template No. 2
 In principle, a surprise box can have absolutely different shapes, color and decor. In this case, everything will depend solely on what event you are going to. If you are going to an employee’s birthday party, then it can be a completely standard square box and rectangular shape, inside of which, in addition to the present itself, a piece of paper with wishes will be placed (it should be as long as possible and folded into an accordion).
If you are going to a child's holiday, then make a gift box for him in the form of a piece of cake and be sure to place a couple inside cartoon characters from cardboard. And in order for them to really be a surprise for the baby, attach the figures to flexible springs that will push them out as soon as the lid is removed from the box.
How to make a gift box with wishes?
 Master class on making a pyramid
 Recommendations for making a pyramid
 If you want your gift box to be both packaging and greeting card, then make it in the form of a pyramid. In the photo above you can see templates that can be used to make a small pyramid. But if you try to enlarge the scale of the drawing, you will eventually be able to make a pyramid on which you can place wishes.
Remember, in order for such a surprise to look interesting, the scale of the picture must be increased at least twice. Only in this case will you have the opportunity to make pockets on the outside of the product, in which you can later put cute notes. Yes, and remember, these pockets do not have to be made of paper; you can quite easily use, for example, lace for this. Just when you attach them, use a stapler instead of glue.
How to make a transparent gift box?

 Rectangular gift box
 Tall gift box
 Triangular gift box
 Above we have already shown you how you can make a gift box from cardboard and plain paper, and now you will learn how to make very cute transparent packaging. The best part is that you don’t have to buy material to make such a craft.
Since it is made from an ordinary plastic bottle, you only have to buy ribbons and gobbets for decoration. So, take a transparent one plastic bottle and cut off the neck and bottom from it. As a result, you should be left with a perfect cylinder in your hands. Then take your scissors and carefully cut it exactly as shown in the picture.
After you're done with this, start bending the material so that you can clearly see all the edges of the future craft. If you can't do this with your hands, then use scissors for this. As soon as you realize that the plastic has become more obedient, you can safely assemble the box. For security, tie it with a satin ribbon.
How to make a box for a women's gift on March 8?

 Template #1
 Template No. 2
 Template No. 3
 It just so happened, but for some reason most women associate March 8 with delicate branches of mimosa and scarlet tulips. That is why when making a box for this holiday, you must remember that there must be flowers on its outside. Whether they are drawn or made using appliqué is up to you to decide. The main thing is that your packaging shows with all its appearance that spring is coming very soon.
If you don't want to spend extra time decorating the box, then invest in scrapbooking paper. If you are ready to work a little, then you can download some interesting template on the Internet, make flowers using it and cover the finished box with floral appliqué. Also, if you wish, you can simply paint it beautifully.
How to make a box for a men's gift on February 23?

 Template No. 1
 Template No. 2
 Template No. 3
 If there are real men in your family, then you simply must make February 23 a special day. Will help you create festive atmosphere correct packaging for a gift. In principle, it can be done quite simply. You can make a box according to any template or master class that we introduced you to, only taking into account the fact that you are preparing a gift for a representative of the stronger sex.
That is, in this case it is best to forget about flowers, curls and all sorts of feminine things. It will be better if you make a gift box from paper with a camouflage print, or simply paint it ready product different shades green and Brown. If you want to pack a present for an older man in this way, you can try decorating the box with a red star or any other attributes of the Soviet era.
You can also draw it, or print out the template and use the resulting blanks to make the desired applique. Well, if you are a lover of everything new, then try making a box in the form men's shirts. You can see how to do it in the picture, which is located a little higher.
How to make a gift box for lovers on February 14?

 Box for February 14
 Template No. 1
  Template No. 2
 Template No. 3
 Many people think that making a heart-shaped box is very difficult. In fact, such a product is made according to the same principle as all other packaging. All that will be required of you in this case is simply to find the correct template and use it to glue the box together. We decided to make the task easier for you and therefore offer you several options to choose from. interesting ideas For gift boxes on February 14th.
If you decide to make the largest and most voluminous one, remember that in this case you will also have to make a product consisting of two parts. One part will act as the gift box itself, and the other will be the lid. Therefore, when cutting out the frame of a future craft, be sure to double-check whether one of the parts is slightly larger in size.
As in the case of a rectangular product, this is necessary so that in the end you can easily put the upper part on the lower part. As for the color of the box, it doesn't have to be red, if you want you can make the heart pink, raspberry or even purple and white.
How to make a wedding gift box?
 Template #1
 Template No. 2
  Template No. 3
 Template No. 4
  Template No. 5
 It’s probably not even worth mentioning that the box is for wedding gift must be special. And the point here is not in the shape of the product, but in its decor. Therefore, feel free to choose the template according to which you would like to make such a craft, and then begin to think about what the finishing of the finished product will be like.
I would like to say right away that in order for you to end up with something truly festive, the decor should be multi-layered. That is, you can create volume using flowers, leaves or hearts glued to each other and complement all this beauty with elegant curls made of rhinestones and sequins.
It is best for beginning needlewomen to opt for square and rectangular crafts. Such products are not only made faster, but also easier to decorate. Since you will actually have a canvas in front of you, you can first lay out the future picture from the elements, see how all the details will look together, and only after that start fixing them.
How to make a birthday gift box?

 Template for making a cake
  Template #1
 Template No. 2
 Template No. 3
 Birthdays are one of those holidays that everyone looks forward to. It makes no difference how old the hero of the occasion is; on this day he still wants to feel most loved and dear. And what else can take us back to childhood and give us wonderful memories if not a gift packed in a box simulating a birthday cake. It’s easy to make such a craft, the main thing is to show a little patience.
Above you can see a template that you can use to make one piece of cake. If you see that in the end the gift wrap will be smaller in size than you need, then increase the scale to the desired size, just making sure that all proportions are respected in the process. Then make the required number of pieces, fold them into a circle and measure the diameter of the resulting figure.
But based on the data obtained, cut out a round stand on which you will place all the workpieces. If you wish, you can paste over its edge openwork snowflakes or lace. When the stand is ready, fill all the boxes with presents, form them into a cake and secure everything with a satin ribbon.
How to make a gift box for the New Year?

 Template #1
  Template No. 2
 Template No. 3
 Template No. 4
  Template No. 5
 As you probably already understood, if you wish, you can make a holiday box of any shape and color with your own hands. As for the New Year, in this case too you will have plenty to choose from. If you show a little patience and ingenuity, then with the help of our templates you can make a beautiful snowman, a fluffy Christmas tree, a house or Santa Claus.
If you print the templates on a color printer using photo paper, then all you have to do is cut out the parts of the future gift box and carefully glue them together. If you don't have the opportunity to print templates, you can always make gift wrapping from a paper bag and a winter applique, for example, the head of Santa Claus, the Snow Maiden or a snowman.
In this case, the bag, depending on the chosen character, will need to be made red, white or blue, and then a head, for example, Santa Claus, will be glued to the very top of the bag. You will need to stack two of them and be sure to provide holes at the very top for ribbons, which you will later use to tie your gift.
How to make a box for a cash gift?


 Template #1
  Flowers for decoration
 Nowadays you won’t surprise anyone with a gift envelope for money, so most people try to present it in a more original way. The best option for this case would be a box for cash gift. You can do it quite simple template. True, when making such a craft, you must remember that in this case you will be making a box, the inside of which will slide out.
Therefore, if you see that the sides of the product do not hold their shape well, then be sure to strengthen them. If you do this using cardboard, then one strip will be enough. If you use less dense paper, then first glue several pieces together, and only after that fix this element on your craft. And, of course, remember that until all the parts of the product are fastened together, it is not advisable to move the internal part.
If we talk about the finishing of such products, then everything depends solely on your imagination. You can decorate a cash gift box with whatever you have on hand, or try making flowers from scrapbooking paper. You can see how they can be made a little higher.
How to make a gift box for sweets?

 Recommendations for making a box


 Simple box for sweets
 In principle, the box for sweets can be anything. You can, for example, make a cake from boxes that imitate pieces of dessert (we described how to do this in the previous paragraph of our article) or make something simpler, for example, a round or rectangular box. Therefore, choose which shape you like and start making your holiday craft. If you don’t like such products, then try making boxes using the templates located a little higher.
But I would like to say right away that no matter what you choose, you need to pay special attention to the material from which you will make your craft. In this case, it is strictly forbidden to use thin standard paper as it is unlikely to be able to withstand the weight of the sweets. Therefore, it will be better if you spend money and find the most dense cardboard in a specialized store that will not require additional reinforcement.
Scrapbooking paper is also suitable for creating such a masterpiece, just try to find the material on which it will be applied. children's drawing. These could be castles, princesses, cute animals, racing cars or even Legos. But even if you don’t manage to buy something like that, then just use your imagination and decorate the product with appliqué.
How to design and decorate a gift box with your own hands?
 Paper roses
 Lush flower
 Corrugated paper flowers applique for decorating gift boxes
 If you were attentive, you probably realized that you can decorate a gift box with any decor. Therefore, you can use even simple colored paper. So, draw a flower of the desired shape on it in different sizes. After this is done, all you have to do is carefully cut out the blanks and then layer them on top of each other in 3-4 layers.
At the same time, you must ensure that the petals of your flowers are not located opposite each other. It will be better if the petals of each new ball move a little. This way you can achieve the effect of fluffiness and visual realism of the flower. You can also paste over the finished box with hearts, stars, openwork snowflakes, small notes with wishes and various kinds of signs.
In addition, you can make bows of different shapes from paper and also place them on the craft. And, of course, don’t forget that paper can be easily decorated with crafts made from ribbons and fabric. You can see how they can be made in the master classes posted a little higher.
Video: How to make a gift box in 10 minutes?
And other concerns).
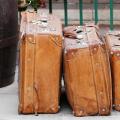
But recently I made a box as a gift and decided to post a small master class.
So let's do it surprise clamshell box.
The idea is this: a person receives a huge box as a gift, opens it, inside there is another smaller box, then another one, and so on until we have a tiny box with a small gift in front of us.
This packaging is very convenient when you want to give small gift like jewelry (rings), money or any other memorable gift.
The clamshell box solves several problems at once:
1. It looks impressive and does not create the impression that the gift is too small (this is for lovers of gigantism))));
2. It’s much nicer to receive such a box than just a banal envelope with money;
3. The box can be decorated with various wishes, photographs, small memorable items and becomes a repository of pleasant memories, and this, you see, is more valuable than even the gift itself.
What you will need for work:
1. Cardboard (binding or corrugated)
2. Wrapping paper is different
3. Decorative elements made of paper, wood, beads and anything else you want to decorate the box with.
4. Double-sided tape (thin and foam)
5. Paper glue (PVA, Moment Crystal or any other that you are used to working with)
6. Paper or masking tape of different widths
7. Scissors
8. Ruler
Working hours:
The time it takes to assemble a box depends entirely on the size. A box measuring 30x30x30 cm can be assembled in 1-1.5 hours (this is only one outer box!), smaller inner boxes can be assembled in 30 minutes to 1 hour. Plus add here the time for decorating - about half an hour for each box. In general, you can spend 10-15 hours assembling and decorating the entire package. Therefore, plan to create such packaging in advance; you definitely won’t be able to do it at the last moment.
I’ll say right away that this option does not pretend to be highly artistic, it was made quite simply and quickly, so we believe that this is a version of a simple clamshell box))) You can get confused and make a clamshell box that is ideal in all respects, but be prepared to spend a few on it full days, since working out the details will require an appropriate approach.
Begin?
1. Before starting work, decide on the size. I recommend starting with the largest, outer box, as this takes up the largest amount of material and can be used to plan the size of the inner boxes from there. It is better to make the box in the form of a cube, then it will be easier to calculate the dimensions - all dimensions of a cube are equal. Each subsequent box should be 3 cm smaller so that decor and a lid can be placed between the boxes inside. Also decide what size you should have the smallest inner box that will contain the gift.
2. Select base material.
Corrugated cardboard(from old boxes or purchased specifically in sheets) are much lighter, so the overall weight of the finished clamshell box will be relatively light. But keep in mind that the boxes will be larger, so the appearance will not be very compact and neat.
Binding cardboard much heavier, but it is smooth, sticks well and holds the paper, and is much thinner than corrugated, so the box will turn out smooth, beautiful and neat.
3. We will use 5 sheets of cardboard of the same size for the base of the box. In my case, these are sheets of 30x30 cm (in what follows I will give all sizes based on the size of my box).
We put one sheet in the middle and place 4 on its sides. Leave a small gap between the sheets (about 3-4 mm) so that the sides of the box can be laid out freely.

4. Use paper tape to glue all the joints of the sheets on one side, turn the workpiece over and do the same on the other side. Thus, we obtain a blank of 5 sheets, glued at the joints on both sides.

5. We are now working with the largest, outer box, so we need to glue the outer bottom so that the box looks decent from the outside.
Cut out a square measuring 35x35 cm from wrapping paper (it should be slightly larger than the cardboard bottom).

6. Glue strips of thin double-sided tape to the cardboard bottom, not too often and not too rarely, so that the paper sticks evenly.

7. Remove the protective paper from the tape and glue on the sheet of wrapping paper that we cut out in advance.

8. In the corners of the protruding parts of the paper, make cuts at an angle of 45 degrees.


9. Turn the bottom blank over, bend the corners and glue them to the base.


We bend the extra centimeters and glue them to the base. Here it is better to use glue, since you need to coat quite large areas of paper.
Before gluing the sides, you need to bend the corners of the paper so that the corners of the base look decent.


This is what the inside of a large box should look like after gluing the paper to the outside:


13. We have the base of the largest box ready, now we need to make the lid. We know that the size of our large box is 30x30 cm, so the size of the lid should be a centimeter larger. We cut out a square 31x31 cm and 4 strips measuring 31x5 cm from cardboard. Here 5 cm is the height of the lid, I took this size in particular because of the paper tape (I had it wide, 5 cm), so that it would be convenient to paste over and not need I had to constantly cut off the excess width. You can make the height of the lid smaller by adjusting it to suit your needs.
We lay out the cut out parts in the same way as when creating the base of the box, but close to the middle sheet (that is, we do not make gaps between the parts)

14. Cover the joints of the parts with paper tape only on one side of the workpiece

15. It turns out this design (we have glued joints inside)

16. Fold the corners tightly and cover them on the outside with a strip of paper tape. It is important to ensure that the parts are glued evenly and tightly - this directly affects appearance covers.


We get such a cute blank. By the way, you can “learn” this method of gluing at the post office - watch how they pack your box with a parcel, the principle will immediately become clear.


You should end up with a neat lid like this:

I successfully forgot to photograph the process of gluing the lid, but in principle this is worthy of a separate master class, since the process is interesting, but in order to have at least something, I am posting the process of gluing the lid from corrugated cardboard.
First you need to cut out a sheet of wrapping paper taking into account the height of the lid, that is, if the base of the lid is 31x31 cm, its height is 5 cm, then we cut out a sheet of at least 42x42 cm so that it is possible to seal the outer and inner heights of the lid:


19. Ufff. Are you tired?)) And we just made the first, biggest box! Go ahead. Each subsequent box needs to be made 3 cm smaller, that is, we cut out 5 sheets of cardboard measuring 27x27 cm.
Laying the sheets:
Cover both sides of the workpiece with tape


You should end up with something like this without the bottom covered with paper:

20. Now we glue the smaller box to the larger one. To do this, place the base of a large box on a flat surface, coat the bottom of the smaller box with glue and carefully glue it exactly to the center of the inside of the bottom of the large box. Like this:

21. Next, we repeat all the above procedures several times with a corresponding reduction in the size of the boxes. Here's what I got:
1 box – 30x30 cm, lid 31x31 cm
2 box – 27x27 cm, lid 28x28 cm
3 box – 24x24 cm, lid 25x25 cm
4 box – 21x21 cm, lid 22x22 cm
5 box – 18x18 cm, lid 19x19 cm
6 box – 15x15 cm, lid 16x16 cm
I didn’t make the box smaller, because... I needed to put an envelope with a gift card, and 15x15 - the smallest box was very convenient for this.
In general, you can make a larger number of boxes, increasing them, for example, to 9 pieces. Then the smallest box will fit a box with a ring or any other small gift.
22. Now we need to decorate all the boxes of our packaging.
We start with the smallest one, and in front of us lies this structure:

We decorate with congratulatory inscriptions, stickers and other decor, and insert the envelope right away!

We close the box with a lid (you also need to make decorations on the lid) and start decorating a larger box.

Close the lid again and decorate the following:


And finally, our big box!

To prevent the box from opening prematurely, you need to tie it up. beautiful ribbon and solemnly present it to the recipient. Delight and tears of happiness are guaranteed!
Here is another small gif where you can briefly see the process of creating a similar clamshell box:

The easiest way to hide or pack something is to use a box. It is an excellent storage for gifts, cosmetics, and large boxes will help you pack things when moving, or to hide unnecessary items in a closet.
You can buy a box of any size in the store, but why waste it when you can learn how to make a cardboard box with your own hands.
What is needed for the box
Today you can buy a box for any idea, but it’s not difficult to make, and you can save money on the purchase. 
You've probably seen beautiful boxes with round, rectangular, and oval shapes. There are boxes in the shape of butterflies, hearts and candies. You can build any box listed above with your own hands and give it a certain meaning, style and appearance. You will spend on work only the time and available tools that you have at home.
The craft is made from any type of cardboard. Of course, if you need a durable box, choose a dense material, the one in which they are packaged household appliances. Well, multi-colored thin cardboard is also suitable for gifts. What will be useful besides cardboard:
- Templates. With their help, you can understand by what principle this or that box is folded.
- For work it is better to use hot.
- Scissors and pencil for marks. Be sure to mark with a pencil before cutting. This is the only way the box will turn out to be of high quality and neat.

First, let's learn how to make a box yourself simple way. Using the box diagram we proposed, you can make a product of any size, depending on the dimensions you need. Before starting production, please review the drawing and draw a scaled view.
We decide on the strength of the future box. Depending on the purpose of use, choose the appropriate cardboard. If you plan to decorate the finished product, use white cardboard, it is easier to mark on it. Next, we work according to the instructions:
- When the drawing is transferred to cardboard, cut out the blank along the marked contours. Fold the material along the drawn folds.
- Glue all the edges, do this work sequentially. Glue the next edge when you are sure that the previous one is firmly bonded.
- Please note that the diagram has small protrusions at the top. They are made for the aesthetic appearance of the box and ease of carrying. We bend them and glue them.
The box is ready.
Cardboard box with lid
If you need to learn how to make a cardboard box with a finished lid, then we have selected for you simple diagram. Depending on its purpose, select the required material, for example, for a gift box, you can even use plain paper. 
If you need to make a box with a square shape at the bottom and rectangular on the sides, then use the proportions indicated in the diagram. Further work is simple: transfer the diagram to cardboard, press through the fold lines, cut and glue.
We offer a sketch that you can use if necessary. This option has some tricks.
In this box model, the edges have a beautiful, beveled appearance, and on the sides at the top there are special holes for fastening. The finished container according to this pattern is ideal for giving gifts.
To learn how to make a durable cardboard box with your own hands, use the third diagram with additional side slots.
Making such a box is more difficult than the one discussed above. It has special “wings” on the lid, which have a rounded aesthetic shape. They are placed in a box and the lid closes firmly.
This box can be made of any size, just change the proportions indicated in the diagram.
Making boxes with inserts and tops
If you are wondering how to make a box with cardboard inserts, then we have selected several such schemes for you.
The first type of box is chosen more often. She has additional "wings". During the assembly process, they are placed inside the box, and it becomes stronger.
The lid on such a box also has inserts on the side; in addition, it includes side overlaps and a lock on the front. The elements allow you to increase the strength of the finished product.
Another option for a box with inserts. In this case, the inserts are placed on the bottom of the container. You may have seen such boxes when purchasing shoes.
 We have attached a diagram of the box, print it out and then follow the instructions:
- Pay attention to the presence of curly lines in the diagram. You need to make cuts along these lines.
- The entire part that is at the bottom of the drawing relates to the bottom assembly. It's better to start working with it.
- Each of the four sides for the bottom must be assembled in the correct sequence. The glue is applied at the point that is located in the upper left edge of the diagram.
- Bend the wings on the lid and lower them onto the main part of the box. Thanks to the protrusions and an additional flap on the product, which is placed inside, the box closes tightly.
Box with removable lid

The following box options are ideal for gifts, packaging cakes, and if you need to make a small present, just reduce the proportions indicated in the diagram and make the desired size.
How to work with a drawing:
- transfer the diagram onto cardboard;
- We carefully bend the sides that are wider than the others upward;
- glue for strength;
- for the lid we take the same scheme, but make the width no longer three millimeters;
- glue the inserts and dry them.
If you need to learn how to make a cardboard box with your own hands with an aesthetic appearance, then use the following option. This product turns out beautiful and strong.
The proportions of the box are easy to maintain, despite the chosen size, because the basis of the work is an ordinary square. 
Making a box:
- from the “virtual” square we make sides, draw corners to the sides;
- fold the blank and glue the sides on both sides.
The work on manufacturing the main part is completed. But how to make a lid? After all, we did not include a drawing. It is not needed, because you can make a lid according to the diagram for the box; it is enough to make the drawing a few millimeters larger.
Like the box itself, the lid will have small sides. Here you need to glue the sides for strength.
The product is ready. You can make a box according to these instructions not only cubic, but also rectangular.
Gift boxes
All previous manufacturing methods were suitable for a wide variety of purposes, from packaging large items to miniature devices. Let's dwell on the question of how to make a cardboard box for gifts. There are plenty of options.

There is nothing complicated in manufacturing. All work consists of the following steps:
- take cardboard, scissors and glue;
- print the template and transfer it to the main material;
- cut out blanks;
- bend the places where the dotted line is indicated;
- carefully glue everything together and press tightly;
- leave the box until completely dry;
- decorate to your liking.
If a simple box doesn't suit you, you can go ahead and make a cardboard round box.
Round box

The product can be classified as practical and beautiful. There will always be a use for such a box. It stores:
- costume jewelry;
- materials for needlework;
- cosmetics;
- clippings;
- photos;
- fabrics.
This packaging will be an ideal gift solution. 
Making a box is easy. While these packages cost a lot of money in specialty stores, you can design them yourself.
Take cardboard and a template. Transfer the diagram to the material and cut out the blanks. Connect them with glue and you're done.
The round box has its own peculiarity. By cutting it out according to the template, you can change the size, but all the details and elements must remain unchanged, otherwise making the box will not work.
Romantic gift box

To those who love original packaging, you can make an interesting heart-shaped box. Put delicious candies or a cute gift there, and the person to whom the gift will be addressed will certainly appreciate your efforts. The packaging itself is easy to make. 
Even looking at the diagram, you can understand by what principle it is assembled:
- print out the diagram;
- transfer it to cardboard;
- iron the folds;
- glue the workpiece;
- put a gift inside.
Ready. It would seem that the instructions on how to make a heart box out of cardboard with your own hands are simple. But there are nuances.
The principle of folding a box is similar to making packaging with a round shape. But in this case, the proportionality of the bottom of the heart plays an important role. This box has two bottoms, inner and outer.
Therefore, during the manufacturing process, it is better to use the diagram we provide; hand sketches may lead to poor-quality results. As for the rest of the work, it is performed according to the principle of making a box with round walls.
What can you fill the box you made with:
- paper butterflies;
- confetti;
- sweets;
- souvenirs;
- blocks;
- flower petals.
It can fit everything that you want to present to your loved one.
After analyzing several MK packages, I found an option that suits me quite well for now. This way you can make a box of any size and color for a box, plate, etc. There is nothing new in the box design itself. The main thing that I “invented” for myself was making my own “designer” paper. In a small town to find beautiful paper difficult, and here's what I propose to do.
1. Materials:
- Whatman paper or cardboard,
- napkin or corrugated paper
- sheet of tracing paper
- PVA glue
- scissors
- ruler
- pencil
2. Determine the size of the box so that you can then draw a diagram.
Size of the bottom of the lower part: add 1 cm to the size of the product itself.
The size of the side parts is equal to the height of the product or slightly higher.
The size of the folds for the bottom part: 1 cm less than the size of the side part.
Cover size: 0.5 or 1 cm larger than the bottom.
I make the size of the side parts of the lid 3 cm.
The size of the folds for the lid is 2.5 cm (for a simple box you can do without them)
For example: the size of the box is 5X5X4. Box dimensions: bottom 6x6 cm; sidewalls 5cm; bend 4 cm. Lid 7x7 cm, sides 3 cm, bend 2.5 cm.
Now we determine the dimensions of the square, which will be the basis of our diagram. Add 4+5+6+5+4=24cm. This is the length of the square, which we will draw on whatman paper.
In fact, making all the calculations is not as difficult as it seems))) If you do it once and understand the principle, you will easily make them in your head without any papers or notes.
3. Draw a square on whatman paper, in our case with long sides = 24 cm. Cut it out.
4. Now we mark the square on each side according to the scheme: 4cm - 5cm - 6cm - 5cm - 4cm. We connect all the points and get the following diagram.
Here are the shaded parts that we then cut off.
5. Now, actually, let's start making paper. To do this, you can use a regular napkin of a suitable design and size. Or corrugated paper, then the box will be plain. The square we cut out of whatman paper. grease with PVA. Here it is important to coat the entire surface well, especially the edges, but there should not be too much glue so that the napkin does not get wet.
While the glue dries slightly, iron the napkin with a hot iron so that there are no wrinkles. Corrugated paper You don't have to iron it. Then we place the napkin on whatman paper, cover it with a sheet of tracing paper and carefully iron it with an iron. I didn’t get it right the first time, it requires some skill))) This is what happens.
6. Now we cut off the excess parts of our square. We get such a figure.
7. Make cuts along the red lines.
8. Carefully bend everything using a ruler
9. We wrap the flaps and folds inward and get a nice box. More precisely, its lower part.
10. For the lid of the box, we repeat all the operations, only the dimensions of the square will be different. In our example, 2.5 cm + 3 cm + 7 cm + 3 cm + 2.5 cm = 13 cm
As a result of all the described manipulations, such a box appears
Everything is done quite quickly, in about an hour I did 6 of these things
And this is what the finished product might look like in beautiful packaging.
 Wife kicks her out of the house: advice from a psychologist Man periodically kicks her out of the house
 Tatyana has a lot to do. "Helper" Agnia Barto. Analysis of the poem “The Helper” by Barto
 How to develop memory in teenagers: turning problems into opportunities Development of attention and memory of teenagers