How to sew with a sewing machine. How to learn to sew clothes from scratch at home? Where to start sewing: the required minimum
An article for those who want to learn how to sew at home. You will learn what to make from old jeans, how to sew a sock hat, culottes, scarves from T-shirts.
Sock hat at home: master class

This headdress is very easy to create. To do this you need to have:
- knitted fabric;
- pattern;
- scissors;
- pins;
- threads;
- sewing machine

This pattern is designed for head sizes 54–56. One panel has a height of 28 and a width of 22–23 cm.
Pin the pattern to the fabric, cut out the fabric, leaving a 1 cm seam allowance.

This model will help you learn how to sew from scratch yourself; you can repeat this master class at home. To do this, we continue with the description of the work.
Remove the pins and immediately stick them into the pincushion so as not to drop or lose them. Unfold the fabric blank, it should look like this.

Now fold it in half, right sides inward, stitch here using an overlocker or a special stitch that is used to cover the edges of the product.

Sew the semi-circular seams of the top and bottom of the hat. Now fold it in half so that one of the parts becomes the lining of the headdress. Pin the pieces at the top and sew using the same overlock stitch.

Here's how to learn how to sew a hat and cut it from scratch. You will get a stylish new thing that will take little time to make. Turn it right side out, put it on and you can go for a walk.

How to make a scarf with your own hands?
A knitted scarf is perfect for this headdress. You can do it in 5 minutes. To do this, cut off the lower part of the T-shirt under the armhole, slightly squeeze this part from top to bottom to make drapery elements. After which you can try on a new thing.
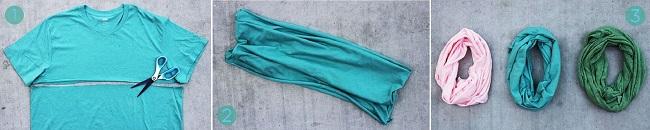
If you want the scarf to have fringes, then do this: cut off the part of the T-shirt from the armpits. At the bottom, chop it into strips 1 cm wide and 17–20 cm long. Tie each pair of resulting ribbons with a knot. Then make the same knots in a checkerboard pattern, stepping back 7 cm.

By the way, you can decorate a T-shirt with such fringe to give it a more original look.

As for how to make a similar snood scarf with your own hands, you can decorate it with beads. To do this, the cut-out fragment of a T-shirt must first be cut from the top and bottom into strips 2 cm wide, then put a bead on each and secure it at the bottom with a knot.

If you like your scarf to have a lot of fringe, then cut the scarf into long strips. Then each of them needs to be slightly stretched, giving the desired shape. To make a snood scarf, you need to sew the sides of these blanks with your own hands. This seam will be at the back.

But these are not all the ideas that will tell you how easy it is to learn how to sew at home using unnecessary T-shirts. To implement the following you will need:
- lid from a pot or frying pan;
- simple pencil;
- scissors;
- t-shirt.

The next scarf is no less original.

To do it, take:
- two T-shirts of different colors;
- needle and thread;
- measuring tape;
- scissors.

Trim the t-shirts along the red dotted lines. Cut one of the sides on both pieces to create two pieces. Fold each of them in half lengthwise and stitch along the long edge.
Now see how to make a braid. To do this, place the middle of the first piece in the center of the second. By inserting your hand here, you will bring the loop of the first workpiece to the top. Continue creating the braid in the same way. All that remains is to sew the edges of the two blanks, this seam will be at the back.

You can do it beautiful scarf snood if you sew openwork sewing to a cut strip of a T-shirt with your own hands.

Cut lots of T-shirt strips different colors to get another original scarf. There are several ways to tie it.
Here's how to learn how to sew clothes at home. The following ideas are also very easy to implement, suitable for beginner dressmakers, and will allow them to fall in love with this type of needlework.
How to learn to sew a top or vest at home?
For beginner tailors, the following idea will also be easy to implement.

To sew a vest of this type, you will need:
- quite dense fabric;
- 2 large buttons;
- thread and needle or overlock;
- scissors.
Divide the top section into three equal parts to mark the location of the slots. Complete them. If the fabric is frayed, then overcast the armholes, and if it is a fabric like a drape, then you can leave the slits in their original form.
And the loop needs to be stitched so that it does not stretch. Sew on the buttons, the second one can be basted for decoration, the vest is ready.
Now about how to sew a top for the summer with beautiful flower. For it you will need:
- knitted fabric;
- scissors;
- threads;
- sewing machine;
- tailor's needle.

The back and front, in this case, are two rectangles. To make a pattern to your size, attach an unfolded newspaper to the back, determine the width and length of the future top in this part. Make a pattern for the front in the same way.
To make it more convenient to form the flower, do not sew the front and back on the sides yet.
- For the straps, cut two strips 10 cm wide and 50 cm long. Connect each strip in half lengthwise, right sides inward. Topstitch along the long edge, turn the straps right side out, and sew them to the wrong side of the front.
- Finish the upper part of the product by tucking it twice and stitching it on a machine. Here's how to sew the top with your own hands next.
- Start forming the flower. Cut strips 10 cm wide. In total, you will need about 2 meters of such blanks.
- Fold them in half lengthwise, right side up, and iron them in this position. Start sewing the flower in a large circle, gradually moving towards the center. Make a frill out of the ribbon, securing it in this position with pins. Each circle is then sewn on using a sewing machine.

When you have completed it completely, work on the top of the back, sew the straps here, and stitch the sides. Here's how to sew a top. For beginners, such work will not be difficult. The next one should also not cause difficulties.
For it you will need:
- well-draped fabric;
- sewing machine;
- chalk;
- ruler;
- needle with thread;
- scissors.
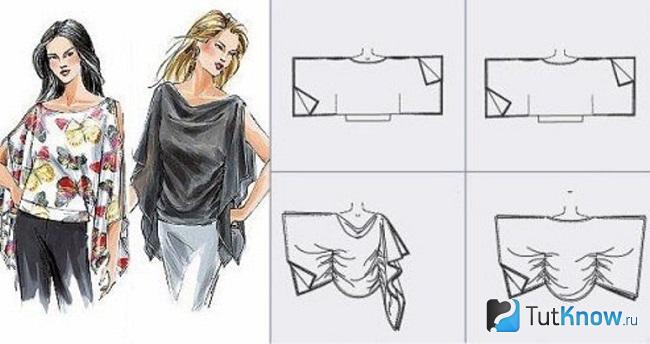
Cut out 2 squares of fabric with sides of 80 cm. Determine according to your size where you need to stitch on the right and left sides to separate the arms from the sides. Then you need to sew the top on the shoulders, after which the product can be put on.
If you have old jeans that are pretty tired or frayed in some places, you can use them to make a fashionable vest-top. The photo shows in red how to cut out a new product.

It can be worn as an independent item, worn over a T-shirt, turtleneck, or as the top part of a sundress.

In this case, for the bottom you need to cut a rectangle from cotton fabric, the width of which is one and a half times the volume of the hips. It is gathered at the top and sewn to the bottom of the top.

If you already have denim vest, you want to update and decorate it, then sew lace in the collar area, and narrower ones? along the bottom and on the bar.

In general, for those who want to learn how to sew from scratch on their own, remaking old things is a very fertile topic. The process will be easy and interesting, so you can consider it in more detail.
What to make from old jeans?
If you want to sew an apron and you’ve had unwanted jeans lying around for years, use them.

The main part of the apron will be the top of the jeans. If you want to sew it with a breast, then rip it out of the trouser leg that has been opened on one side, unfolding it. Such an apron is trimmed with braid or a strip of colored fabric, gathered together. Use the same material to make ties at the waist and neck.
If you want to create a flirty apron, then make the bottom frill longer. Thread the belt through the belt loops to highlight your waistline.

An apron without a breast also looks great. It can be decorated with ruffles and a belt made of another fabric.

To avoid sewing pockets separately and have a comfortable apron, use back jeans. By the way, you can create a couple more aprons from the front and from the panels.

If you want to quickly turn white jeans into romantic ones with clouds, then take:
- bowl;
- sponge;
- acrylic paints for fabric;
- gloves.
Pour water into a bowl, add just a little blue acrylic paint, just a few drops, you should get a sky blue tint.
Place the jeans on the cellophane, dip the sponge in the prepared solution, and apply it to the fabric.
Now dilute the paint in a different proportion to get a picture of a slightly different shade. Apply this solution using a sponge to your jeans.

When the background is ready, take the white acrylic paint, do not dilute it with water, draw the clouds themselves.

Now wait until the product dries, then iron it with a hot iron and you can put it on beautiful jeans with clouds.

But let's return to the main topic. You can make a wonderful organizer for small items from old jeans.
Take the back of the pants with patch pockets and cut it off. If the organizer needs to be vertical, as in this case, then cut the back of the trousers in half and sew one to the other vertically. If you want the organizer to have several compartments, then sew pockets on the trouser leg. Sew a jeans belt along the edges of the product so that it does not stretch in different directions.
But here is an option with a vertical arrangement of pockets, for which you need to cut the back of the trousers to the knees and sew on additional pockets.

Of course, there are many options on what to do. You can use them to make a bag, oven mitts, a chair seat and much more. For beginners, this is a great opportunity to learn an interesting craft.
Once you get the hang of it, you can create other things, like pants.
How to sew culottes and leggings?
Leggings do not restrict movement; they are comfortable for playing sports, working in the garden, and just walking.
Slender young ladies can wear a short top, a turtleneck with a vest under such trousers. Ladies with curvy figures can be advised to wear a spacious shirt with cutouts on the sides, which covers the hips. They will feel comfortable in such clothes.
To sew leggings you will need:
- knitted fabric;
- threads;
- underwear elastic;
- scissors and related small equipment.

The following is a universal pattern for several sizes, for:
- XL is yellow;
- L is represented in green;
- blue is M;
- and pink is S.
If you have a pattern, transfer the pattern onto it. If not, glue two newspapers together with tape and draw it here. You can draw squares on white paper or whatman paper. The side of small squares is 2 cm, and the large ones are 10 cm.
On the left of the pattern is the back of the leggings, on the right? front To learn how to sew at home, fold the knitted fabric in half with the right sides facing inward. Place the pattern on it, pin it along the edges, cut it out, leaving a 7mm seam allowance on all sides. Sew the edges of the pieces.

Now sew the right, then the left half on the sides on the wrong side, then stitch front and back, and then? crotch seams. Fold the pants at the bottom and hem here. Fold the top of the trousers, stitch, then insert the elastic and you are ready to wear fashionable leggings.

Culottes are also called culottes. This is universal clothing that will be comfortable for female representatives of different sizes.
To sew culottes, remake the following pattern.

As you can see, it is given for several sizes at once, for 44–42 and 46. You will put folds on top, sew the crotch seams of the left and right halves of the trousers. Then sew the new thing on the sides and in the center of the back and front.
Sew the belt to the folds laid on top, bending it in half.
If you want to see how to quickly make a pattern and create culottes, watch the video below:
From the second you will learn how to sew an off-shoulder top:
Many women have a desire to sew various reasons. Some want to sew things for themselves and their loved ones in order to save money, others want to have clothes that fit them perfectly, and still others simply want to sew something for the home, thereby creating coziness and comfort.
But not everyone knows how to sew, cut, develop a design, and cutting and sewing courses are not a cheap pleasure, so many set the goal of learning how to sew from scratch on their own.

I want to learn to sew, where to start?
The goal of learning to sew has been set, but where to start? We suggest first defining the main stages of this process:
- Firstly, you need to think through to the smallest detail the idea and design of the future product, including the type of fabric, color, shape, additional elements and decor. Ideally, sketch out a sketch that you understand.
- Secondly, you must understand that you practically cannot do without patterns, so you need to be prepared for the fact that you will need to make measurements, calculations and drawings.
- Third, It is imperative to master the simplest functions of a sewing machine and learn how to make the basic elements of sewing. You can learn this thanks to master classes on the Internet, where all types of fabric finishing, neck and hem processing, how to sew in a zipper and make buttonholes, and much more are described in detail. Having worked through each such element on a piece of fabric, you will gain skills that will help you in the future.
And, of course, you need to prepare everything you need for this process:
- paper and pencils for creating a sketch;
- centimeter tape for taking measurements;
- square, ruler, patterns, paper with markings and a simple pencil for drawing a pattern;
- scissors, needles, pins and threads;
- additional elements for decoration: buttons, zippers, ribbons, braid, lace.

When the idea for the future product is ready, you need to make a pattern. Of course, you can use ready-made (close to your idea) patterns from the Internet or sewing magazines, but we recommend trying another method.
To get a feel for and practice for those who have never dealt with sewing clothes at all, we recommend that you do not throw away your favorite things that fit you perfectly but have already been worn out, but rather rip them apart at the seams and use them as patterns. Ripping ready product, you will also be able to consider all the finishing methods and repeat them in your new product.
But before sewing the cut parts of the product on a typewriter, We recommend making a light estimate of the product and trying it on., to fit the figure, if we are talking about clothing, or to eliminate shortcomings.
How to learn to sew on a sewing machine from scratch
In order to confidently use sewing machine, you need to first study the instructions and understand how it is structured, what functions it has and how it all works. Numerous videos on the Internet can help you: which offer full reviews sewing machines of any modifications.
The main stages of working with a sewing machine:
- thread;
- adjust thread tension;
- adjust the presser foot clamp;
- set the stitch type;
- perform various types of seams;
- be able to secure the thread at the end of the work.
All these points need to be worked out once and practice making different types of stitches, so that later you don’t stop at this while sewing.

How to learn to sew various interesting things
We offer you a selection of ideas that will tell you how to sew various things for yourself and for the home yourself.
How to learn to sew curtains and lambrequins yourself
You can beautifully decorate the windows in your apartment thanks to ready-made sketches and drawings that abound on the Internet:
- Take measurements from the window and cut the purchased tulle (or other fabric) as shown in the diagram.
- Finish the edges of the curtains with an overlocker or thin silk ribbon.
- Drape each piece and secure with one stitch along the edge.
- Sew a ribbon to this edge, but on the wrong side, for attaching to the cornice.
- Decorate the upper edge of all blanks with a thin ribbon to hide the junction of the ribbon and the tulle.

How to learn to sew dolls with your own hands
If you are planning to sew a doll yourself, but are still having difficulties with the sketch, we recommend finding ready-made patterns for dolls:
- Transfer all the elements of the pattern first onto paper, taking into account the scaling, and then onto the prepared pieces of fabric.
- First, mark each part, and then stitch all the seams on a machine.
- Then turn out all the parts and place the filler prepared in advance inside.
- All parts of the doll are sewn by hand using a hidden seam.

How to learn to sew underwear
When sewing underwear, you can use ready-made patterns, but you will need to take measurements very carefully, or you can retake the uniform from old model, which is no longer wearable, but fits you well.

How to learn to sew dresses
When the sketch of the future dress is already ready, then you need to:
- take all measurements;
- create a drawing or use ready-made pattern, editing it to your size;
- transfer all the details of the dress from the patterns to the fabric, taking into account the direction of the longitudinal and transverse threads;
- cut out all the details of the dress with a margin of 1 cm for the seams;
- make an estimate of the entire product;
- try on the dress and mark with pins all the places that require correction;
- make a machine seam along all basting lines;
- process the edge of the hem, armholes and neckline;
- sew on buttons or a zipper.

Video with master class lessons
In this collection of videos you will find simple recommendations on how to learn how to sew various things for yourself and for your home, without spending a lot of time, effort and money.
- Video with a lesson on how to learn how to sew clothes from scratch at home.
https://youtu.be/rIXsemD3Ggw
- A video about whether it is possible to learn to sew on your own and where to start.
- A video about how to quickly learn to sew without spending years on training.
- Video course on how to learn how to sew curtains and lambrequins yourself.
- Video tutorial for beginners on how to learn to sew on a sewing machine.
- In this video you will learn how to sew a dress without a pattern.
- Video about how to process the edges of a product without an overlocker.
- In this video you will learn how to sew a sun skirt at home.
- Video tutorial for beginners on how to sew a doll with your own hands.
- This video is dedicated to how to sew a snood yourself.
- If you want to know how to sew a hat, watch this video.
- In this video you will learn how to sew bumpers into a crib and a blanket in the bonbon style.
- A short master class on how to sew a pillowcase with a flap.
We hope that our tips and recommendations will help you master the skill of sewing in a short period of time, and you will be able to please yourself and your loved ones beautiful products own tailoring. Tell us about your first steps in sewing and how quickly you mastered the process.

Where and how can I learn to sew on my own? Many people ask this question because learning to sew your own clothes is profitable and exciting. creative activity, and sometimes additional income. If you can learn how to sew clothes with your own hands, you can always sew simple things for quickly growing children, replace a zipper in a jacket or jeans, sew curtains or furniture covers and, as a result, significantly save the family budget.
In this video you will see how to thread a sewing machine, the purpose of the main feet of a sewing machine, what stitches it can make sewing machine and other.
Many people think that learn to sew You can make clothes yourself, the main thing is to buy a good sewing machine with many operations and learn how to cut. Unfortunately, this is a big misconception, since the construction of a pattern has nothing to do with the technology of sewing clothes, and in addition, any pattern has to be adjusted during sewing, adjusting it to the figure during fittings.
You can learn to sew on a machine, master the technology of sewing a particular product, but fitting can only be done with a lot of professional experience. The first fitting of a dress or any other clothing is the most important stage of tailoring. During the fitting, all inaccuracies in the construction of the pattern are finalized and the cut details are adjusted to fit the figure, according to your measurements.
To learn how to sew professionally, you will need to spend a lot of time, since any theoretical knowledge must always be supported by practice. Even a qualified seamstress with years of practice always feels the need for new knowledge.

However, many people start sewing “from scratch”, mastering sewing technology and cutting techniques from various fashionable women’s magazines, online resources, books and other sources, which is quite commendable and justified. Our website "Sew.ru" is one of such resources, with the help of which you can learn to sew and cut yourself. All practical materials site prepared by sewing production specialists.
Author of the site is Aksakova Natalya. Education - sewing production technologist. Teacher of cutting and sewing courses, owner of the Silhouette studio and the Internet studio Skirts Plus.
Do you like indoor or garden flowers? At the Green Gate nursery you can buy rooted cuttings and divisions of various domestic and perennial garden flowers. We have a constantly updated collection of anthuriums and hibiscus. Flowers and plants are sent by mail.
Technology for sewing a baseball cap, from pattern to clasp. Subscribe to my channel and you will learn a lot of sewing useful tips from a professional.
You can learn to sew and cut at cutting and sewing courses

If you have patience and diligence, you can learn to sew and cut yourself. However, generally accepted practice still provides for professional training in any specialty, including at the amateur level, be it driving a car or the ability to sew and cut.
A qualified specialist is able to competently and concisely explain all the features of the technology of sewing and cutting clothes, teach how to operate a sewing machine, and teach how to understand modern fabrics and materials and much more.
Paid training courses in cutting and tailoring are only conditionally paid. In fact, training gives you the opportunity to get back the money you spent by saving on sewing clothes for yourself and your loved ones after training. In addition, if you are a capable and careful student, the knowledge you gain can be a source of additional income.
However, training in courses will require spending a lot of time, including money. And this training may not always be effective, since any theoretical knowledge should be immediately consolidated with practice. Courses where you only have to write down theory won't do you any good. The best training course should include practical tailoring of a product according to your measurements in the classroom and at home, with the theoretical material being reinforced in practice.
This is a universal guide for threading any sewing machine and bobbin winding. A video with professional commentary will help you learn how to thread your sewing machine correctly.
Sewing machine for beginners to learn to sew

Almost any clothing can be sewn on an old sewing machine like Podolsk. This sewing machine is especially suitable for beginners, those who are just learning the basics of sewing art at school during labor lessons. This machine is very reliable, it is almost impossible to break it, and most importantly, it can sew any fabric, including rough denim and leather. Such a machine does only one operation - a straight stitch, but if you need a zigzag stitch, you can use a Seagull-type sewing machine. Even if you don’t have such a machine, you can buy one from an ad for very little money.
But if you decide to learn to sew “seriously and for a long time,” then, of course, you need to purchase a modern sewing machine, taking into account your financial capabilities. The main thing is not to forget that your success in sewing depends not on how much the sewing machine costs and how many types of decorative seams it can perform, but on how well you know how to use the machine. For a beginning seamstress, an economy-class machine from any company, similar to the one in this photo, is quite sufficient.
To learn how to sew on a sewing machine, first learn how to use a simple manual granny machine, but first carefully study the instruction manual, which indicates which needles and threads should be used for a particular fabric and much more. Also, take the time to learn how to use all the accessories and accessories.
Keep your sewing machine clean and don't forget to lubricate it periodically to keep it running smoothly.
The shuttle mechanism especially needs cleaning and lubrication. From time to time, remove the needle plate and use a brush to clean the comb (rail) of the fabric movement mechanism and the shuttle device from dust and fibers. A well-oiled and well-oiled machine operates almost silently.
If you are going to buy a sewing machine and don’t know which model and brand to choose, the site has a number of articles on this topic, for example this one - Inexpensive sewing machine: “Pros and cons”.

It often happens that when planning to learn how to sew, they immediately buy an expensive sewing machine, a lot of sewing accessories, and even an overlocker. And then it turns out that they were in a hurry, because there was no time, and most importantly, no desire. A great “hunt” to learn how to sew and cut is easily discouraged by the first thing that fails. Therefore, do not rush to purchase a serger until you are sure that you really need it. At first, you can get by with a zigzag or a special foot that can imitate an overcast stitch.
In this video you will learn what an overlocker is used for and what is the difference between an overlocker and a sewing machine.
If you sew a lot and constantly, then an overlocker will allow you to professionally process your seams and make your work easier. Modern household overlockers, as a rule, perform a four-thread overlock stitch and their technical characteristics differ little from each other, so if you don’t have enough money, you can buy an inexpensive overlocker model from Singer, Juki, Elna, etc.
You can even buy a used overlocker of class 51. Its price is no more than 3 thousand rubles, however, the overlock stitch can be not only three-thread, but also two-thread. But such an overlocker is capable of overcasting thick drape fabrics, denim fabrics and may be useful to you in the future, even when you have a modern 4-thread overlocker.
Sewing accessories

It is impossible to learn how to sew with your own hands without special sewing tools and devices. Of course, you won’t need all of them right away, but many of them should definitely be in your arsenal.
It is very convenient to use special tailor's scissors, in which one ring is larger than the other, and the blades are inclined relative to the handle. With stationery scissors with flat blades, you will not be able to make cuts in the corners of the fabric. When processing a “leaf” pocket, even and precise cuts can be made only with these scissors. Tailors often use zigzag scissors to cut thick drape fabrics. The cut edges with a zigzag do not require finishing the edge with an overlocker and will facilitate the process of sewing the product.
Sewing needles for handmade
. You will also need them for work, since sweeping parts and other operations are carried out only by hand. Different types of hand needles are used and selected depending on the work being performed. Thus, needles with a rounded end are used to join parts made of knitted fabrics with a hand seam. This needle gently pushes the loops apart and slips between them without breaking the thread.
Short sewing needles with a round eye are designed for small stitches on thick fabric or lining stitches.
Wedge-shaped needles (triangular in cross-section) are used for working on the skin.
Tailor's pins are necessary for chopping parts during the sewing process and make work easier when trying on clothes. There are tailor's pins different lengths, thickness and, depending on this, are used to perform a particular operation.
Thimble Protects the tip of your middle finger from needle pricks when sewing by hand. Select the exact size thimble. It should fit freely on your finger without squeezing it, but at the same time not slip off during operation. Learn to use it by pressing the side of the needle, not the bottom. The habit of working with a thimble develops quite quickly; it is enough to put it on and wear it for the whole day, without taking it off when doing any other household work.
Threader- This is a loop of very thin wire fixed in a flat plate. It is used to thread the eye of the needle. Using a threader, you can remove thread residues to the wrong side of a product or eliminate thread strands that have appeared on the fabric.

To learn how to sew, you need not only to be able to create a pattern, to be familiar with a sewing machine and to know the basics of tailoring technology. You definitely need to learn how to take measurements. Don't think that taking measurements is easy. Unfortunately, it is incorrectly taken measurements that cause inaccurate patterns and cuts.
Measurements should be taken from a person when he is standing in a natural position, without tension. However, with increased attention to any of us, we tense up, turning from stooped to slender, “losing weight,” etc. In the future, this results in poor fit of clothing or tightness of the product. To ensure accurate measurements, it is advisable to measure several times, especially if you do not have sufficient experience. Some measurements need to be done by two people.
Before taking measurements, you should girdle your figure around the waist with a slightly stretched ribbon located strictly horizontally. It is advisable to take girth measurements (chest, hips) from the back, so ask someone to help. When taking measurements, stand straight, without tension, in a natural position. It is advisable to take measurements over underwear. Don't think that taking measurements naked will allow you to get more accurate measurements.
To avoid inaccuracy, the measuring tape should not be pulled too tight or held too loosely. Record your results in a table.
When creating a dress pattern, it is necessary to take many additional measurements. You will find a list of measurements for creating a dress pattern in this article.
Skirt pattern - pencil. Very simple construction, accessible for beginners. The video is in English, but you can choose captions in any other language. If you like to sew, be sure to subscribe to this video channel. You will learn a lot of useful things. The channel was created by professional tailors.
I can't call myself such a fan of sewing, but sewing the most simple skirt, and even more so, every woman should be able to sew up a hole or sew on a button.
However, sometimes you have to work hard on the product. My headache is the stitching on thick areas of the product. For example, when working with denim items.
It can also be problematic tame the dress or too long skirt when you want to do it quickly and without the help of a studio.
How to sew on a machine
Experienced dressmakers know special tricks with which these everyday moments cease to be a problem.
Editorial "So simple!" prepared 10 for you useful life hacks, with which sewing will become interesting, exciting, and most importantly, simple.
- If you don't like doing monotonous work, it will be a real challenge for you to mark exactly the seam allowances on the fabric. To make this process easier, the best solution will make a template like this.
- When you're home alone, and something you recently bought is too much long dress you definitely want to wear it tomorrow, exactly measure out the part that needs to be shortened, this simple method will help you.
In the doorway, fix a rope or thick thread at the required height, rubbing it thickly with chalk. To the marked line you need to add a hem allowance, the width of which will depend on the method of processing the bottom.

- To make stitching on thick areas of fabric easier, place cardboard under the back of the foot and necks with ease and pleasure.

- And this is another simple and convenient trick. Take some thin elastic bands and use them as stitching guides.

- I really like this one convenient way outlining the pattern immediately with seam allowances.
To do this, wrap two pencils with tape and feel free to get to work. And if the allowance should be wider, add another pencil with the lead facing up in the middle of the design.

- Correctly and accurately prepared binding is the key to convenient and quick edging of the entire product. Creating bias tape for many craftswomen was, is and remains one of the most difficult problems.
I suggest you make such a template out of paper, and working with the processing of this “terrible beast” will become easier and simpler.

- And here’s an idea for a template for even allowances for hemming the bottom of the product. Very convenient and not difficult at all!

- Another neat trick to make pinning easier air loops. The basis is again a paper template.

- If there are no pins at home, regular clothespins or hairpins can replace them.

- How do you like this method of processing loops on knitwear? Very convenient, isn't it?

As you can see, there are such subtleties and wisdom in sewing that are sometimes difficult to reach on your own, and here they really help out advice from experienced dressmakers. Feel free to adopt these simple tricks, and the issue of sewing and repairing your favorite clothes will no longer be a problem for you.
We all want to learn something new quickly and without spending much effort, but in order for the result to really live up to expectations, we need to be patient. Therefore, I suggest that in order not to step on the same rake, novice needlewomen should learn from the mistakes of others.
For everyone who wants to start sewing correctly, I have compiled 13 typical mistakes novice seamstress. So, if you are interested in knowing where to start sewing for beginners, let’s move on)
Where to start sewing for beginners. 13 common seamstress mistakes
Textile
If you are new to sewing and are wondering what fabric to choose for sewing clothes, then you have several ways to solve this issue. The first is to listen to the advice of sales consultants in a fabric salon. The second is to read the sewing recommendations in Burda magazine. The third is to find this information on the forums or ask me in the comments. Therefore, before you start sewing, you need to take a responsible approach to choosing fabric, otherwise it happens that:
Error 1
The wrong fabric was chosen for sewing the product. Usually in sewing magazines, recommendations are given along with the pattern on what fabric to choose for this model. When a particular type of clothing is being developed, a fashion designer, designer, or technologist works on it. It is the technologist who selects the required fabric, taking into account all its properties: stretchability, shrinkage, etc. This advice determines how the item will look - if you choose the wrong fabric for the skirt, the folds may not lie properly, and the trousers may bulge at the knees.
 Recommendations for choosing fabric in Burda magazine
 Error 2
A complex fabric was chosen to sew the product. If you are familiar with the properties of fabrics, then you know that according to the complexity of processing, they are divided into simple and complex. I always recommend that my students start with fabrics that are easy to sew. In order to sew products from chiffon or lace, you first need to “get your hand” - learn how to work with any fabric.
In order to know what types of fabrics for clothing there are, I recommend that you familiarize yourself with this.

Error 3
Expensive fabric was purchased to sew the product. Now in salons there are many materials of different price categories. Don't think that if you choose cheap fabric, you will make the wrong choice. Sometimes a well-made item made from inexpensive gabardine looks much better than a poorly fitted dress made from Italian lace. Focus on the fact that you are still learning to sew, training, training your hand.

Error 4
To sew the product, fabric was purchased back to back. This is a particularly common situation among novice dressmakers. Having calculated the approximate consumption of fabric, do not be greedy and buy a little with a margin of 30 - 40 centimeters, making the calculation that you may spoil some part and will have to cut it again.

Mistake 5: Model complexity
The item taken was too complex for sewing. This is one of the most common mistakes that novice seamstresses and needlewomen make - taking on jackets, coats and cardigans at first. In sewing magazines there is a gradation of models according to the degree of complexity - for beginners (sewing is easy and simple) and models that require special knowledge. If you are not familiar with the process of connecting the lining to the product or sewing a pocket - leaves, it is better to study these sewing operations and practice on a sample. In the meantime, choose models recommended for beginning needlewomen - then you won’t give up halfway because you simply don’t know what to do next.

Mistake 6. Sewing machine
Buying a sewing machine with too many functions. This mistake is common to all novice seamstresses planning to purchase sewing equipment. Yes, the quality of the item largely depends on a good tool, but if you sew sloppy and crookedly, no expensive machine will save you.
I often get asked the question: how to choose a sewing machine and what set of sewing operations should it have? I answer from personal experience, proven over the years, that a sewing machine should be able to make a straight stitch, a zigzag stitch, and overcast buttonholes. This is all I use in my long sewing practice, and for overcasting the edges of the fabric, I have an overlocker, so I have two sewing machines. If you don’t have the opportunity to buy a serger, use a zigzag stitch, it will also prevent the fabric from fraying.

When buying a machine, it is better to pay attention to models with a minimum set of sewing operations - but from trusted manufacturers. I answer this question in more detail: 10 simple tips how to choose a sewing machine.
How to sew on a machine correctly
Error 7
Failure to read the instructions for using the sewing machine. Before you start sewing, you need to set up your sewing equipment. To ensure straight stitches, you need to regularly lubricate the necessary parts and clean the inside of the machine with a special brush.
Advice from an expert on where to lubricate a sewing machine and how to do it here
Error 8
Do not change needles. Often, a beginning seamstress is faced with the fact that the machine makes poor-quality stitches, loops or skips. It must be borne in mind that for each type of fabric there are certain sizes sewing needles. They are divided by numbers: 70, 80...110. There are also special needles for stretch fabrics. If you don’t know how to sew knitwear correctly, then the main thing here is to use the right needles. In addition, keep in mind that over time the needles will have to be changed, they may become dull or scratches may form on them - such needles leave snags on the fabric.

Error 9. Time
Sew quickly. When a novice seamstress starts sewing, due to lack of experience and patience, she wants to sew the item quickly, so she skips such important stages in work, like basting. Or leaves uneven lines. You need to not be lazy to use a seam ripper and learn to sew well. There is a misconception - that if a thing is sewn for oneself, then only I can see the wrong side and crooked stitches, so it will do just fine. Train yourself to sew a “beautiful inside out.”
Mistake 10. Trying on
Sew without trying on. In the process of sewing a product, you must definitely try it on; you can skip this step only if the pattern is tailored to your figure and you have already sewn according to these patterns.
Mistake 11. Desire
Leaving an item unfinished. It often happens that a seamstress begins to sew, but then the desire disappears, and the item remains unfinished. Be patient - if something doesn’t work out, try to find your mistakes and correct them. Don't start sewing new thing until you finish the previous work.
Error 12: Tools
Not having what you need on hand. Before you start sewing, take the trouble to acquire the most necessary tools for sewing: tailor's chalk, pins, measuring tape, good fabric scissors, an iron with a steam function. They will make your work easier and save time, and the result will be much better.
 How much fabric is needed for a dress: simple methods and basic calculation nuances
 Beautiful Christmas tree decorations made of plywood: we make decorations with our own hands using a jigsaw
 Manicure with acrylic paints at home