How to weave an elephant from rubber bands. Large figurines made from rubber bands: making a cute elephant Lessons on weaving from rubber bands 3D elephant
Creative weaving from thin rubber bands is quite young. It very quickly gained popularity and developed, mainly among schoolchildren. Depending on age, perseverance and aspirations, we learned to make thick and thin bracelets, weave accessories, key rings, jewelry and even large figures from rubber bands. What makes rubber band weaving so popular and widespread? Of course, individuality. Handmade jewelry and accessories can be created in various shapes, colors, with inscriptions, beads, and pendants. This weaving trains memory, perseverance, fine motor skills hands The decoration turns out to be unique, original and exactly as the artist intended it.
In order to weave a toy or decoration, you will need the rubber bands and a hook. Depending on the type of weaving chosen, you may need a special weaving machine, slingshot or fork. To create large figures, weaving experience and lumigurumi skills are required. If you are taking up knitting a toy for the first time, a video can help you cope with the work. Let's look at the example of creating large figures from rubber bands.
We weave an elephant
A toy woven from rubber bands will be very cute and interesting to the touch.
Such a gift will delight and surprise the baby. In addition, using the same rubber bands, you can weave accessories and household items for role-playing games.
We will need:
- rubber bands of two colors;
- hook;
- padding polyester;
- 2 black beads for decoration.
Let's get started detailed master class. The first elements we will make will be the elephant's legs. To do this, we knit a magic ring, which should consist of 6 loops. In the next row we double the number of elastic bands, making 12 loops.
The third row is woven a little differently. We thread one rubber band through each loop and weave it behind the front wall of the loop. We continue to work without additions. We weave along the 1st loop 5 rows in a row. Replace the color and weave 2 more rows. Change the color to the main color again and weave 1 more row. One paw is ready. We weave the second front leg in the same way and stuff them with padding polyester.
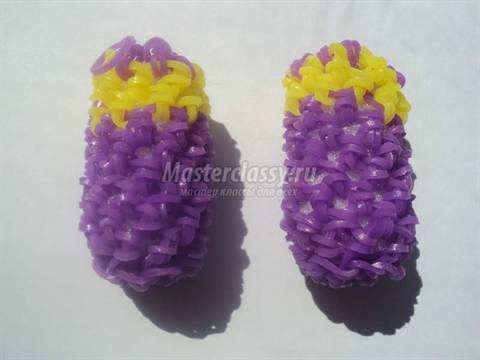
Let's start weaving the elephant's hind legs. We weave the first 3 rows in the same way as the front legs. In the 4th row we make 3 decreases - every 4 loops.
We weave the 1st elastic band for each loop of 3 rows, change the color and weave 2 rows, again change the color to the main one and weave 1 more row.
Let's weave the second leg. We stuff both paws with padding polyester.

Let's start weaving the elephant ears. We weave a chain of 8 loops. We weave the first row one elastic band at a time, weaving only 3 elastic bands into the last loop.
- two rows: 11111121211111211;
- third row: 12111111211211111121;
- fourth row: 112111111121112111111121;
- We weave the fifth row one elastic band of a secondary color. The sixth is exactly the same;
- We knit the seventh row with a decrease according to this pattern: 11 decrease 1111111 decrease 111 decrease 1111111 decrease 1;
- We weave the eighth row with the main color: 1 decrease 111111 decrease 11 decrease 111111 decrease 1.
The ears are ready!

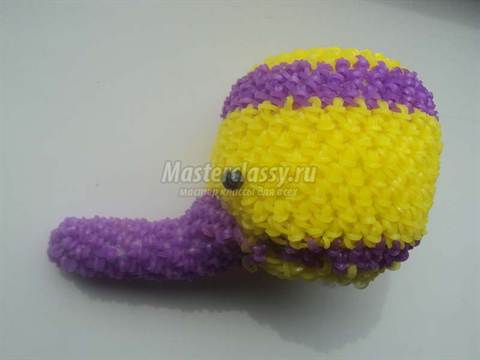
Let's start weaving the trunk. We knit a ring of 4 loops. In the second row we increase the number of loops by two. We weave 6 rows of 1 elastic band in the main color. We weave 4 more rows, weaving in the last loop not one, but two elastic bands at once. We continue weaving the trunk. We knit 2 more rows in one loop. We stuff the trunk with padding polyester. Ready.

You can move on to weaving the body of the toy. We weave the base as for the legs: 6 loops, of which 12. Next we knit according to the pattern:
- 12121;
- 112112;
- 11121112.
Change the color to a secondary one. We weave 1 elastic band 3 rows in a row. For the next 3 rows we decrease every 3 stitches. Change the color to the main one. We weave two rows in one loop.
Change the color to a secondary one and weave 3 more rows one loop at a time. We fill the resulting element with padding polyester.

Let's start knitting the head. Cast on 6 stitches again and double the number in the next row. Next we weave rows according to the diagrams:
- third row: 12121;
- fourth row: 112112;
- fifth row: 11121112;
- sixth row: 111112111112.
We weave the next 6 rows with the main color along the 1st elastic band.
In the next row we weave the eyes, so we weave 18 loops along the 1st elastic band, and weave a bead in the 19th. We weave 7 rubber bands and in the 8th we weave the 2nd eye. Next, we finish the row by weaving the first elastic band into each loop.

Let's start making decreases:
- first row every 5 stitches;
- second row every 4 stitches;
- third row every 3;
- fourth row every 2 stitches.
We weave the next row with the 1st elastic band in each loop. We fill the head with padding polyester.

All details of the elephant are ready. You can start assembling. You should sew it with the same rubber bands that were used to do the work. We attach the trunk to the head.
We fasten the body to the head.

Cute elephant made from rubber bands. Let's weave from rubber bands Rainbow Loom Band.
Lesson on weaving an elephant from Sergey
To make an elephant from rubber bands, a hook and a special weaving machine are used. Consists of three rows, the middle row is slightly extended to the left. The open part of the columns is directed to the right. Procedure for carrying out manipulations:
- The first elastic band is wound around the hook four times.
- The second one is folded in half and placed on the middle finger of the left hand.
- Use a hook to hook the elastic band worn on the middle finger, string the first elastic band twisted in four onto it, and leave it in the middle.
- Pass the hook into the second free loop so that the elastic band twisted in four is in the middle, and the hook is threaded through both loops (the ends of the double folded elastic band).
- The next elastic band is again twisted in half on the middle finger of the left hand, hooked and the existing workpiece is threaded onto it. Grab the free end so that the hook is again threaded through two loops, with a wicker structure hanging in the middle.
- The manipulation is performed three times. This will be the trunk.
- Take three elastic bands, put one end of them on a hook, string the existing blanks, and pick up the second end of the elastic bands. They get a thickening - a transition from the trunk to the elephant's muzzle.
- Then they take five rubber bands and perform a similar manipulation.
- The next two elastic bands are threaded through the loops on the hook. Place the structure on the first and third columns of the second row of the machine. The trunk should be on the second column of the row.
- Take two more elastic bands and thread them through the ten loops of the last row of the trunk, parallel to the previous two elastic bands. The loose ends are thrown onto the first column of the far row and the second column of the near row.
- They take another pair, perform a similar manipulation, putting the free ends on the second column of the far row and the first column of the near one. The result is a six-pointed structure with a trunk in the center.
- The next two elastic bands are placed over a pair of adjacent free columns. A new pair is thrown in sequence onto the occupied and free columns and so on in a circle until the circle is closed.
- Use a hook to grab the two lower elastic bands of each column, throw them over the four upper ones and throw them inside the structure (towards the trunk).
- Create eyes. To do this, use two black rubber bands. One of them is screwed four turns onto the hook. Throw the structure onto two green elastic bands. A hook is threaded through the free ends of the green elastic bands. The resulting blank is put on the first columns of the central and near rows.
- The second eye is created in the same way. Put it on the first columns of the middle and far rows. To complete the row, two more elastic bands are placed on the remaining columns in sequence so that one end ends up on the occupied column, and the other ends on the free one.
- The bottom row, consisting of four elastic bands, is thrown into the center of the circle towards the trunk.
Making the ears:
- Use the free columns of the machine. Two elastic bands are placed on adjacent posts in the middle and near rows. Two more elastic bands are placed on the same column in the middle row and the adjacent one in the far row.
- In the first row, two elastic bands are put on again on the occupied column and the free column adjacent to the right. This manipulation is carried out three times in the near row.
- In the far row, two elastic bands are put on adjacent columns, the next two are put on the occupied column in the far row and the free one in the middle row. The result is a design similar to the letter “P”. Another pair of elastic bands is put on the occupied and free columns in the central row. Then the near and middle rows are connected with new rubber bands, thereby closing the entire structure.
- Two elastic bands are put on the fourth and third columns on the right, as well as from the third to the second. After which two more elastic bands are put on the third columns of each row. It turns out to be a triangle.
- Put an elastic band on the first column of the near row on the right and twist it four times. Lower the hook inside the column, grab the lowest row and throw it onto the column in the reverse order in relation to putting it on. Such manipulations are performed with all columns of the structure. The loops on the last column are held with your finger. Remove the elastic bands from all columns one by one, obtaining a blank for the ear. On the last column, a couple of elastic bands are threaded through the loops, so the structure will not fall apart.
- The second ear of the elephant is created in the same way.
- The ears are placed on the same columns where the blanks with eyes were placed.

Creating legs
The baby elephant's limbs are created by analogy with the trunk. Only the number of elastic bands used in each row is the same. The legs are thrown onto the columns of the central and near (central and far) rows, attached with loops.
- After this, four lower elastic bands on each column are thrown into the structure.
- Throw on the next row in a circle, again every four layers are thrown inward.
- The manipulation is repeated four times.
- Afterwards, blanks are created for the two hind legs by analogy with the forelimbs.
- The hind legs are attached to the columns of the middle and near (middle and far) rows. The same ones on which the front legs were attached.
- The field is put on in a circle using a pair of elastic bands, and the bottom rows are folded inward. The manipulation is repeated twice.
- The structure is removed from the machine using a hook. All loose loops should remain on the hook.
- Grab two new elastic bands with a hook and carefully thread them through the free loops of the structure.
- One of the protruding loops is hidden inside the structure, the second is threaded so that it ends up in the center of the elephant’s butt. A tail is formed from it.

Channel 2+3 https://www.youtube.com/c/TwoplusThreefamily?sub_confirmation=1 "ELEPHANT made of rubber bands 3D ELEPHANT Rainbow loom bands tutorial for kids DIY" will teach us: how to weave an ELEPHANT from 3D rubber bands using a loom hook and multi-colored elastic bands!
Video of the channel 2+3 "ELEPHANT made from rubber bands 3D ELEPHANT Rainbow loom bands tutorial for kids DIY" will teach us: how to using hook loom and colored rubber bands make a 3D ELEPHANT Rainbow loom bands!
We hope that the video of channel 2+3 “ELEPHANT made from rubber bands 3D ELEPHANT Rainbow loom bands tutorial for kids DIY” will help you have a good time and improve your skills.
We hope that the video of the channel 2 + 3 "ELEPHANT made from rubber bands 3D ELEPHANT Rainbow loom bands tutorial for kids DIY" will help you to have a good time, and improve your skills.
Loom bands or Rainbow Loom is a toy machine that makes it convenient to create various complex products, from bracelets to toys, using multi-colored rubber bands.
Here's how Rainbow Loom is also called: FunLoom, Cra-Z-Loom
Here"s how to say Rainbow loom in other languages: Rainbow vegjë, قوس قزح المنوال, Rainbow ehuna, hanger Weaving loom, রেনবো তাঁত, သက်တံ့ရ ောင် Loom, Rainbow tezgjah, Rainbow ehuna, রেনবো তাঁত, Rainbow Hablanan, 彩虹織機, ĉielarko teksilo, arco da vella Loom, Rainbow იკვეთება, Rainbow tise, zaj sawv Ntos, Arcobaleno Loom, レインボールーム, ឥន្ទធនូ loom, 무지개 베틀 , Mauris Loom, qawsalla newl, Rainbow whenu, wine Razboj, tęcza Krosno, Arco-íris Loom, Rainbow ਖੱਡੀ, Rainbow Loom, regnbåge Loom, rainbow Razboј, dúha Loom, Rainbow marada, Rainbow kufungwa, รุ้งทอผ้า, duha Loom, gökkuşağı Loom, Rainbow Loom, cầu vồng Loom, Rainbow gwŷdd, hanger Loom
Subscribe to our channel and you will be the first to see new videos: https://www.youtube.com/c/TwoplusThreefamily?sub_confirmation=1
3D mouse https://youtu.be/IIdAAs4wzRM
Chameleon 3D https://youtu.be/3fiBylDr2H4
Dragonfly https://youtu.be/Y0uZyDnFMPY
Turtle 3D https://youtu.be/WoSofg47AUo
Hedgehog 3D https://youtu.be/1e-46vdMd2Q
Rabbit 3D https://youtu.be/TCAe3QdH2VQ
Unicorn 3D https://youtu.be/eBN-VpEbEMQ
Bee 3D https://youtu.be/cJ_ylZyUuBA
Dragonfly mini 3D https://youtu.be/IRpaPL8uEcg
Mini butterfly https://youtu.be/sb_IQUAd_eo
JOIN VSP GROUP PARTNER PROGRAM: https://youpartnerwsp.com/ru/join?87978
When creating the video tutorial, we used tips from this video (in English): https://youtu.be/CcdGsSzjdTw?list=PLFSIdh11tyMNbW1dDM1aIDj66gG1T-VNf
4 years ago
DUMBO THE ELEPHANT. "Mini" series of Rainbow Loom Bands. Lesson 321 | Rainbow Loom Dumbo ★ Buy weaving kits: http://myloom.ru/ ☀ Join our VKontakte group: http://vk.com/myLoomRU I'm on VK: https://vk.com/sergeypatin After watching this lesson, you will learn how to weave Dumbo the elephant from Rainbow Loom Bands. We will need: 65 pink, 2 black, 14 light pink elastic bands. If you liked my lesson, like it, share it with your friends on social networks and leave your opinion in the comments :) Subscribe to my channel: http://www.youtube.com/user/LBandsRU Here you will find a huge number of lessons on weaving from rubber bands RAINBOW LOOM (Loom Bands) in Russian. Here you will learn how to weave bracelets from Rainbow Loom rubber bands with your own hands, and not only bracelets, but also funny figures from rubber bands, keychains from rubber bands and other amazing things that you can weave yourself. My other weaving lessons: 281. Sansa bracelet: http://youtu.be/0M19NXutYSU 282. 3d mini ice cream: http://youtu.be/hnyrZYEsekc 283. Daenerys bracelet: http://youtu.be /j1f54BcnFwE When creating the video tutorial, we used tips from this video (in English): https://youtu.be/cwpTREN8qks
4 years ago
In this video tutorial I will show you how to weave beautiful bracelet from rubber bands. First you need to weave a regular fish tail in rainbow colors, then make a shell for the bracelet from rubber bands and twist the bracelet. You can weave this bracelet on a slingshot, on two loom posts, on your fingers or on two pencils. Subscribe to my channel: https://www.youtube.com/channel/UCK3f1p6VlYidoBfL8aAjXXA VK group: https://vk.com/rainbowloomart
4 years ago
In the video of channel 2+3 - My collection of figurines made from Rainbow Loom Bands Action Figures, we will show a collection of figurines woven using: a machine, a hook, a monster tail and multi-colored elastic bands. In the video channel 2 + 3 - My collection of figurines of gum Rainbow Loom Bands Action Figure we"ll show a collection of figurines, woven with help of: loom, hooks, monster tail and colorful loom bands.
4 years ago
Copyright© 2015@craftingfantastic This material may not be published, broadcast, rewritten, rerecorded, remade or redistributed without permission. BLOG: http://craftingfantastic.blogspot.com FACEBOOK: https://facebook.com/feelinspiffy INSTAGRAM: http://instagram.com/craftingfantastic This is probably the most adorable elephant, ever! ever! And that"s why the high band count makes it absolutely worth it! It does take some prep work and it"s made in pieces that are loomed together to get it"s final shape. It does get a bit tough with putting the head on, but if I can do it....you bet you can too! I didn"t add the cheeks because of the tusks, but I"m still calling this cutie a Happy Elephant because it makes me happy :) Enjoy! ! Band Requirements: Main Color: 603 Tusks: 8 Eyes: 4 or 9mm pony beads Mouth: 1
3 years ago
Channel 2+3 https://www.youtube.com/c/TwoplusThreefamily?sub_confirmation=1 "CRAB from 3D rubber bands CRAB Rainbow loom bands tutorial for kids DIY" will teach us: how to weave a CRAB from 3D rubber bands using a crochet machine and multi-colored rubber bands ! Video of the channel 2+3 "CRAB from rubber bands 3D CRAB Rainbow loom bands tutorial for kids DIY" will teach us: how to use hook loom and colored rubber bands make a 3D CRAB Rainbow loom bands! We hope that the video of channel 2+3 “CRAB from rubber bands 3D CRAB Rainbow loom bands tutorial for kids DIY” will help you have a good time and improve your skills. We hope that the video of the channel 2 + 3 "CRAB from rubber bands 3D CRAB Rainbow loom bands tutorial for kids DIY" will help you to have a good time, and improve your skills. loom bands or Rainbow Loom is a toy machine that makes it convenient to create various complex products, from bracelets to toys, using multi-colored rubber bands. Here"s how Rainbow Loom is also called: FunLoom, Cra-Z-Loom Here"s how to say Rainbow loom in other languages: Rainbow vegjë, قوس قزح المنوال, Rainbow ehuna, weaving loom, রেনবো তাঁত, သက်တံ့ရောင် Loom, Rainbow tezgjah, Rainbow ehuna, রেনবো তাঁত, Rainbow Hablanan, 彩虹織機, ĉielarko teksilo, arco da vella Loom, Rainbow იკვეთება, Rainbow tise, zaj sawv Ntos, Loom, レインボールーム, ឥន្ទធនូ loom, 무지개 베틀, Mauris Loom, qawsalla newl, Rainbow whenu, wine Razboј, tęcza Krosno, Arco-íris Loom, Rainbow ਖੱਡੀ, Rainbow Loom, regnbåge Loom, rainbow Razboј, dúha Loom, Rainbow marada, Rainbow kufungwa, รุ้งทอผ้า, duha Loom, kkuşağı Loom, Rainbow Loom, cầu vồng Loom, Rainbow gwŷdd, Vyaselka Loom Subscribe to our channel and you will be the first to see new videos: https://www.youtube.com/c/TwoplusThreefamily?sub_confirmation=1 Mouse 3D https://youtu.be/IIdAAs4wzRM Chameleon 3D https ://youtu.be/3fiBylDr2H4 Dragonfly https://youtu.be/Y0uZyDnFMPY Turtle 3D https://youtu.be/WoSofg47AUo Hedgehog 3D https://youtu.be/1e-46vdMd2Q Rabbit 3D https://youtu. be/TCAe3QdH2VQ Unicorn 3D https://youtu.be/eBN-VpEbEMQ Bee 3D https://youtu.be/cJ_ylZyUuBA Dragonfly mini 3D https://youtu.be/IRpaPL8uEcg Butterfly mini https://youtu.be/sb_IQUAd_eo JOIN VSP GROUP PARTNER PROGRAM: https://youpartnerwsp.com/ru/join?87978 When creating the video tutorial, we used tips from this video (in English. language): https://youtu.be/U9zupxIcTPU?list=PLFSIdh11tyMNbW1dDM1aIDj66gG1T-VNf
3 years ago
Video of channel 2+3 SEA HORSE 3D from Rainbow loom bands on a loom will teach you how to weave a 3D seahorse using a loom and rubber bands Raibow Loom Bands Video lesson on how to weave a 3D seahorse from Rainbow loom bands elastic bands invented and woven specifically for the twoplusthreefamily channel Copyright © [email protected] copying or use for commercial purposes without the written consent of the author is prohibited. Copyright © [email protected] This material may not be published, broadcast, rewritten, rewritten, altered or redistributed without permission
4 years ago
DOLPHIN from Rainbow Loom elastic bands. After watching this lesson, you will learn how to weave a DOLPHIN from Rainbow Loom elastic bands. We will need: 110 blue, 12 white and 1 black elastic band. Good luck! SECOND PART: https://youtu.be/DN7Sds53MEg If you liked this lesson, be sure to leave your opinion in the comments, and also like and share with friends :) Subscribe to my channel to be the first to see new video tutorials: https:/ /www.youtube.com/user/raduzki Here you will find many lessons in Russian on weaving from RAINBOW LOOM elastic bands (Loom Bands). Copyright 2015 © Rainbow Loom irises. After watching several tutorials on weaving from Rainbow Loom rubber bands, you will learn how to make not only bracelets, but also all kinds of toys, funny figures, keychains and other very useful things. With the help of our master classes, you can weave them yourself and give them to your family, friends, and teachers. What could it be better than a gift made with your own hands! I divided all my lessons into playlists: lumigurumi, funny figures, bracelets, without a machine, adventure time, etc. You can select the lesson you are interested in from a specific playlist by following this link: https://www.youtube.com/view_all_playlists ☀ Subscribers of my channel Rainbow Loom Rainbow Loom VKontakte: http://vk.com/raduzki1 JOIN!!! ☀ Buy weaving kits: http://rainbowloombands.ru/ ☀We are on Odnoklassniki: http://www.odnoklassniki.ru/raduzhki ☀You can also watch photo and video lessons on our website http://yrokirainbowloom.com /e-mail: [email protected] yt:quality=high: THANK YOU for LIKES and SUBSCRIBE to OUR CHANNEL =) Previous video: https://youtu.be/6Z0W0Hh3mJM My collection of figurines and bracelets: https://youtu.be/LuYim6w_COA Subscribe to our channel to be the first see new videos: https://www.youtube.com/user/raduzki?sub_confirmation=1 Ksyusha's channel: http://www.youtube.com/c/KsenyaJoy?sub_confirmation=1 Raduzki is a children's channel. Here you will find videos for children and about children, challenges, reviews of children's toys, delicious recipes, master classes on handicrafts, DIY, unusual ideas, a blog about our life and many more interesting things. We try to upload new videos every day. Irises are you and me. Our subscribers take part in the creation of new videos: suggest a topic that interests you in the comments and we will definitely record a new Iris video. If you want to congratulate your friends on their birthday or say hello to your classmates, leave your request in the comments, we will definitely try to fulfill it =) I have divided all the videos on the channel into playlists by topic. You can select a video on a topic that interests you by following this link: https://www.youtube.com/view_all_playlists ☀ Irises VKontakte: http://vk.com/raduzki1 ☀ Photo and video lessons on weaving from Rainbow Loom elastic bands you can also look at our website http://yrokirainbowloom.com/ e-mail: [email protected] My referral program VSP Group: https://youpartnerwsp.com/join?38142 yt:quality=high:
3 years ago
A baby elephant is a figurine made of rubber bands that can only be crocheted. In this lesson I will show you weaving from Lumigurumi rubber bands Baby elephant.
4 years ago
You will need a hook, a filler, and 320 elastic bands.. In the weaving lesson the following colors of elastic bands are used: purple - 250 pink - 1 metallic silver - 62 black - 2, or 2 beads 4 mm light green - 3 My other lessons on weaving similar figures: Owl Klusha - https://www.youtube.com/watch?v=d7wRG2AwbG4 Watermelon slice - https://www.youtube.com/watch?v=bKIGQOTDGBA Mouse keychain - https://www.youtube.com/ watch?v=3_E5kXqEaKk In order to weave such a 3D Giraffe you will need only 507 rubber bands. This lesson uses orange and rubber band. Of the total quantity, you need 2 pink rubber bands for the cheeks, 2 black rubber bands for the mouth, 2 black ones for the eyes (or replace them with beads), 59 are brown, the rest are orange. If you liked this lesson, like and share the video with your friends) Subscribe to our channel: You will see a lot of videos in Russian to learn how to weave Rainbow Loom (Loom Bands) from rubber bands. In just a few lessons you will learn to make wonderful bracelets and figurines from DIY rubber band! Join our VKontakte group: http://vk.com/loomplanet Buy weaving kits: http://loompla.net My other videos: Monkey https://youtu.be/gHuGStCQGT8 Owlet https://youtu.be/ ymuf9rLjXdo Coral bracelet https://youtu.be/A_BQ02x1nLk Lumigurumi Bear https://youtu.be/56E58HWx4Q4 Pusheen the Cat https://youtu.be/h7wwhREXDP8 JOIN VSP GROUP PARTNER PROGRAM: https://youpartnerwsp.com/ru/ join?95911
4 years ago
Today I invite you to weave a very funny penguin with me. Original design by Elegant Fashion 360 You will need: purple - 206;
 orange - 15 Happy weaving! I hope everything works out for you! My previous video tutorials Bracelet “Floral” https://youtu.be/BSq8N8ZBY5w Bracelet “Mermaid Braid” https://youtu.be/9gtP0p6ohFE
 Did not find an answer to your question? Look at here
 How much fabric is needed for a dress: simple methods and basic calculation nuances