How to carve a donkey's face from a pumpkin. Pumpkin for Halloween - original decor ideas
Halloween pumpkin is as much a symbol of the holiday as numerous costumes, specific dishes and horror stories. With the appearance of a pumpkin with a candle inside, the magic unique to this holiday penetrates into our home, and everything takes on some special, mystical meaning.
It's simply impossible to forget about pumpkins on the eve of Halloween. There are many articles, photographs and recommendations on the Internet about ways and techniques of carving pumpkins for Halloween. Almost everywhere they say that there is nothing difficult about carving a funny or scary face out of a pumpkin. However, if you have ever tried to make a Jack-o'-lantern yourself, you have probably encountered a number of problems.
Firstly, the pumpkin peel can be quite dense and tough, which creates significant difficulties when cutting; in addition to the fact that significant physical force is required, the chance of cutting yourself increases sharply. Secondly, even if you managed to cut off the top of the pumpkin and take out the insides, when cutting the pumpkin easily breaks, cracks, and in general everything turns out not as beautiful and neat as in numerous pictures on the Internet. And thirdly, the pumpkin must be cut out exactly on October 30-31, otherwise it will begin to dry out, wither, or even worse, become moldy.

Faced with all these problems, you might think that there is a special profession in the world called pumpkin carving, which is in great demand on the eve of Halloween. Of course, in reality such a profession does not exist, but knowing the technology and with a little practice, you can carve the most creepy and impressive pumpkin for Halloween. To begin with, it would be a good idea to prepare and stock up on all the necessary tools and materials. You should start by choosing a pumpkin. A classic Halloween pumpkin should be orange; the brighter and more saturated the color, the better. But in fact, it is not at all necessary to look for an orange pumpkin. There are many varieties of pumpkin different colors, and you can take any one, because in the twilight of the night, when the uneven flame of a candle sparkles inside this pumpkin, it will be difficult to make out the color of the pumpkin itself.

Color is not the most important thing about a pumpkin. Examine it carefully; the fresher it is, the better. It is also worth paying attention to the shape; try to choose a pumpkin with the most rounded shapes. Oval, flattened or any other shapes may be generally interesting for decoration, but they will be much more difficult to carve into. Once your Halloween pumpkin has been chosen, prepare the basic tools that will definitely come in handy during carving. You will need dishwashing liquid, a sponge, a marker, several very sharp knives with blades different lengths, board, plate, tablespoon, alcohol, cotton wool, awl and candle. Don’t be intimidated by such a long list; each of these tools will definitely come in handy.

You need to start by thoroughly washing the pumpkin. Use a sponge and dish soap to not only clean, but also degrease the peel. This is necessary so that the marker fits better on the surface. Now it's time to use the marker. Using it, draw a circle around the stalk; the diameter can be any, the main thing is that your hand can fit freely into the future hole. Take a sharp knife with a strong, rigid blade and cut out the “lid” along the drawn circle. In this case, the knife should be held at an angle to form a cone-shaped cut, then the future lid will not fall into the pumpkin. Now you will need strength and accuracy. Grab the stem and begin to turn the cap while pulling it out, using the knife again if necessary. Trim off excess pulp and fibers from the lid. Now use an awl to make several holes in it. They are necessary so that the hot air from the candle comes out of the pumpkin better, and it does not start to fry from the inside. Half the job is done, your Halloween pumpkin is almost ready.

Now you need to clean the inside of the pumpkin. First, remove the seeds and fibers with your hands, place them on a plate and do not throw them away. The seeds can then be dried and added to soups and many other dishes. Next, a spoon will come in handy. Surely, the walls of the pumpkin are still quite wide, and you can’t remove all the fibers with your hands, so you can’t do without a strong tablespoon. Carefully scrape out any remaining fibers, seeds, and excess pulp. The optimal thickness of the pumpkin walls is about 2 centimeters. In this case, it will be easier for you to cut it, and at the same time it will not break.

And now the most difficult part - cutting out the face. To get the most original and impressive Halloween pumpkin, you need to be patient. Think about what exactly you want to carve out of your pumpkin. Whether it will be a classic face or something else, if it is still a face, then what kind of face it will be - cheerful, angry or surprised. You can find a template, cut it out and use a marker to transfer it to your prepared pumpkin, or you can show your imagination and draw something yourself. Before you start carving, look at the pumpkin again, make sure that the design meets all your requirements, if you don’t like something, use cotton wool and alcohol, carefully erase the marker and redo the design. Paint over the places that you need to cut, this will avoid annoying mistakes. Now you can start cutting. Place the tip of the knife on the outline and press gently, now the main thing is not to rush and follow the pattern as closely as possible. If you need to cut a corner, do not try to turn the knife, it is better to pull it out and stick it in at a different angle. Once the face is cut out, remove any remaining marker.

Don't expect that this is the end of the Halloween pumpkin carving process. There are still 12 long hours ahead, which will be required to dry the pumpkin. And only then can you put a candle inside and cover the pumpkin with the cut-out lid. The carving procedure is not easy; preparing a pumpkin requires time, patience and accuracy. However, only the first time will be difficult, and each subsequent pumpkin will turn out more accurately than the previous one. While you are imagining and coming up with your own ways to decorate a pumpkin for Halloween, we offer several original ways design of the main symbol of this holiday.
A Halloween pumpkin is also called a Jack-O-Lantern, so you don't have to cut out a scary face. Patterns made from circles or diamonds carved on a pumpkin will look original. This method is suitable for novice pumpkin carvers, and will also be useful if you decide to carve not one, but several pumpkins at once for Halloween. Prepare the pumpkin in the same way as above, remove the flesh and cut out small circles or diamonds in any order or by folding them into a pattern. Place candles inside and put several pumpkins together, you will get a bright, unusual composition that will surely be remembered by all your guests.

What to do if a pumpkin perfect shape can't find it? Don't despair and use your imagination. Even if you decide that you will carve a face, you can get creative and do something unusual and unusual, and an irregularly shaped pumpkin will only help you with this. Prepare the pumpkin by removing the seeds and carefully scooping out the flesh. Draw the future eyes and mouth of the face. Now use a vegetable peeler and simply peel off the peel from these places. Now you can use a sharp knife with a short blade and carefully cut out the eyes and turn the pumpkin into a charming monster with an equally charming fanged smile. Once the skin of the pumpkin is cut, carving will become much easier, so you won't have any problems creating 3D, sharp teeth. Now you can use the wire and Christmas tree toy, painted in the shape of a Halloween pumpkin. Attach the wire to the stem and hang the toy. You will get an original flashlight that will definitely impress all those invited.

A Halloween pumpkin doesn't have to be scary! It should be just a pumpkin with a candle inside, and what character and “face” it will have is up to you to decide. So, the pumpkin may well turn out to be cute, and it’s not just a matter of smiling. Try making an "elderly" pumpkin for Halloween! Prepare the pumpkin, cut out a kind face smiling with a toothless smile and place it in a preheated oven. The baking time depends on the size of the pumpkin, make sure that it does not start to burn and remove it from the oven as soon as it becomes soft and wrinkled. When the pumpkin has cooled, place a candle in it and surprise your guests!

While preparing for Halloween, you will probably come across many striking examples of the design of the main symbol of the holiday, inspired by which you will come up with and make your most original and amazing pumpkin.
Alena Karamzina
A universal selection of gift ideas for any occasion and occasion. Surprise your friends and loved ones! ;)
Hello, dear guest readers! Today on the blog there is a post about what a pumpkin can be for Halloween and an unusual event - a guest post from Anastasia Kalashnikova, author of the blog rat-felt.ru.
We met on her creative resource during the competition “I am a creator! “It turned out that we are similar in many ways, which allowed us to become closer in the future. But we'll start with classic options handling the main symbol of Halloween, which is also called the head or Jack-o'-lantern.
According to legend, Jack was a heavy drinker and, as a result of his risky disputes with Satan, was forced to wander the world. He was not allowed into heaven and he did not fit in in hell. Therefore, he carries a jack-o-lantern with a smoldering coal with him. Since then, such a composition has become a symbol of a lighthouse helping lost souls to rest.
Every year on October 31, many parts of the world celebrate (sometimes on a grand scale) the wonderful Night of Floating Apples. Of course, such a celebration is more typical for countries like Mexico, but in Russia and the CIS countries the tradition of carving pumpkins at the end of October is gaining momentum. And that's great! Agree, there is nothing even remotely similar in our traditions.
Let's start from the very beginning classic way creating a holiday accessory - carving a pumpkin.
How to make a pumpkin for Halloween: detailed instructions with photos
Carving a pumpkin into a beautiful addition to Halloween is not that difficult. It is enough to prepare the following tools and materials:
- pumpkin,
- scotch,
- sharp knife,
- spoon (choose the size depending on the size of the pumpkin),
- scissors,
- something long and sharp (wooden skewer, awl or knitting needle),
- marker (food grade is best),
- stencil (if you can handle it, you can draw a face or a design on the pumpkin itself),
- one or more candles (you can use a small battery-powered lamp).
Progress
- First, cut off the lid of the pumpkin. To do this, draw an outline with a marker and cut out this element with a knife. You will have to put in a lot of effort, especially if the pumpkin is large. The juice released can be wiped off with a cloth. If you stuck the knife deep enough, you can remove the lid without any problems.
- Cut the seeds from the top and remove them from the inside of the pumpkin. If the fruit is large, it will be much easier to do this by hand. Otherwise, use a spoon.
- Don't forget to scoop out the pulp. To do this, make cuts inside the vegetable with a knife and remove the soft contents with a spoon. Cut off pieces of pulp from the lid, leaving a hard layer.
- Now attach a pre-prepared template with the image you like (there will also be several photo options below). Glue it with tape so that the image does not slip.
- Now the image needs to be transferred to the pumpkin. To do this, make small holes along the template with an awl along the entire contour.
- After this, use a sharp knife to connect all the dots to each other, cutting out the pattern. The more complex the chosen composition, the more time it will take to complete this stage.
That's all. All that remains is to put candles or a small lamp inside. For greater safety, you can degrease the pumpkin with alcohol.
For anyone who wants to see all the actions in detail, I advise you to watch the video:
Stencils and templates for the pumpkin head
For pumpkin carving, you will need the following templates:


By the way, these ideas can also be used in makeup.
Other ways to process pumpkin
If you want to do something less traditional, then the following ideas will come in handy.
Scary and toothy pumpkin head
Ideal for small pumpkins. For this you will need a pumpkin, a small sharp knife, plastic vampire teeth and a couple of round-tipped pins. You need to cut a hole large enough for the plastic teeth to fit in. After this, they need to be placed in the opening and pin eyes should be inserted.

Cutting out pictures... with a drill
An alternative way to create patterns (if you prefer them rather than faces) can be brought to life by using a drill with drills of different diameters. In this case, at the stage of creating the pattern, mark the places where the pattern should be located and drill holes.

Small pumpkin candles
Pumpkins are usually used as lamps. But why not make an original candle out of a small fruit? To do this, you will need to cut off the top (you can use a metal baking dish). After completing all the other steps, you will need to insert a wick inside the cleaned pumpkin and fill it with melted wax. Before the wax hardens, secure the wick in a vertical position.
Use wax that contrasts with the pumpkin to create a bright colors. The vegetable itself can be additionally decorated with rhinestones or painted.
Decorative pumpkins: for those who don't like to carve
To decorate your home for Halloween, you don't have to go through the hassle of cutting out and removing the pulp. You can leave the fruit whole. At the same time, it will be stored much longer.
Multi-colored pumpkins
This collection contains several options. Firstly, you can simply paint the vegetables as you wish (for example, with acrylic paints). You can also glue rhinestones or use markers.
Decorate with a garland
If you have some glue and a solid piece of garland with balls, you can glue it to the pumpkin. To do this, coat the vegetable with glue and attach the garland to it in layers.
Confetti
Grab some confetti or create your own using a hole punch and colorful paper. Coat the pumpkin with glue and sprinkle with the resulting circles. You can add an additional layer of glue on top to prevent the confetti from flying around.

Pumpkin unicorns
Of all the ideas presented, this is the most interesting and unusual (especially if you are creating a surprise for a girl). For it you will need a pumpkin, foamiran for the ears, acrylic paints (you can take a balloon), polymer clay, glue and wooden skewers.
Start by painting the pumpkin and cutting off the stem. After this, glue the ears pre-made from foamiran. Twist the horn and stick a skewer into it, bake the structure (if the clay is baked). After that, stick the structure into the “forehead” of the unicorn. Make a mane from several sausages of polymer clay and also attach it to the creature's head. Color the face.
Pumpkins in a variety of interpretations
You don't have to use only live vegetables for Halloween. You can use them in the most different options to decorate yourself and your room.
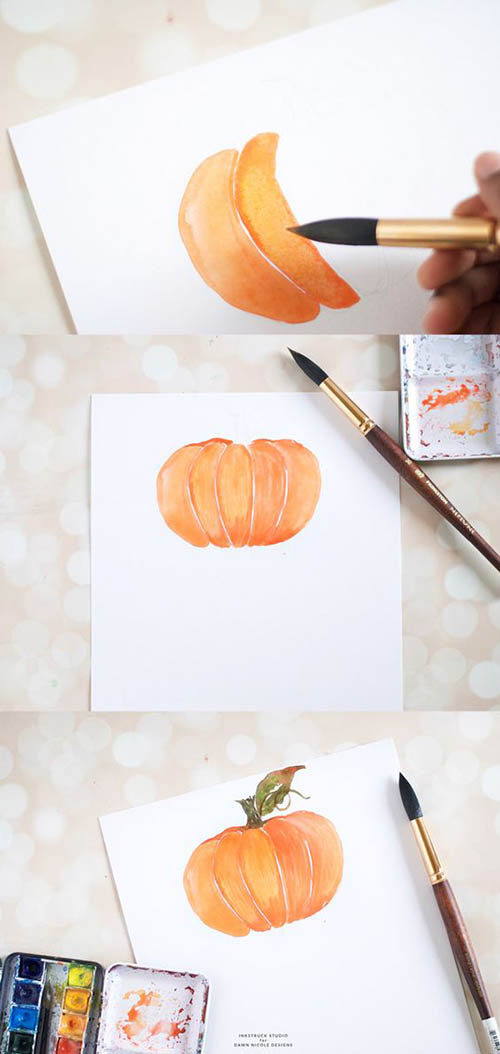
Drawing a pumpkin
Do you think it's difficult? In fact, it is enough to have watercolor paints and this simple master class on hand. Do you agree that everyone can draw such slices?
Halloween costume
You or your child can look like an adorable pumpkin. In the first version presented, you only need a large amount of orange mesh, which can be assembled like a skirt, make a green border and sew on a scary face.

We did the same for the second variation.

But the next suit can easily be turned into a men's one. To do this, you just need to replace the pack with red or green pants.

For even more options for holiday costumes, see this article.
Pumpkin mask
To create one you will need colored cardboard, colored paper or paints and a thin rubber band. Cut out the mask using the template below. Cut out the remaining parts from colored paper or paint with paints. Make holes on the side and thread the rubber band through.

Paper pumpkins
To create such a paper pumpkin, you will need a template (available in the master class), thick decorative paper, a glue gun and scissors. Here it will be enough to cut out the base, glue it along the top pieces and attach all the other elements.

Papier mache
Also paper, but the result is much more realistic. For such a pumpkin you will need a ball, threads, many strips of newspaper, primer and acrylic paints.
To begin, inflate the balloon (not very tightly), tie a tail and tie threads (preferably twine) to it so that the balloon can be divided into several sections. Tie the ends of the threads tightly at the opposite base. After this, start gluing the strips to the base (more on this). After applying all the layers and drying, prime the product and leave to dry, then paint.

Thread garland
There is nothing easier than making a garland of many pumpkins from threads. To do this, you only need a couple of colors of thread and a “fluffy” wire for the leg. Each fruit is a skein of thread, fastened with fluffy wire.
From cinnamon sticks and lid rings
Take 22 metal lid rings, twine and a few cinnamon sticks. Connect the rings like bagels on a bunch and place cinnamon sticks inside.
Fabric pumpkin
For it, take a fabric bag and stuff it tightly. Then fasten a knot of thread at one end and pull it out at the opposite end. Distribute the threads as in the papier-mâché master class. You can use a stick as a ponytail.


Pipes in progress
A piece of corrugated pipe can easily turn into a festive fruit if you connect it together, paint it and make a stick-tail.

What about acorns?
Have you ever thought that acorns look like little pumpkins? If you paint them accordingly, you will get a bright resemblance to pumpkins.

Kawaii felt pumpkin for Halloween
And here is a guest post from Nastya. Anastasia is very creative and versatile developed person– needlewoman, layout designer, caring mother. And she brings a piece of herself to every direction, creating something new and magnificent. What wonderful toys she makes from wool and felt! How he optimizes websites (and at the same time creates designs)! I’m generally silent about the role of a young mother and the combination of all this.
So, I give the floor to Anastasia herself, who will tell us how to make a Halloween pumpkin with your own hands from felt - a wonderful cute souvenir for family and friends on the Night of Floating Apples ^^ After all, who said that a pumpkin must be hard?
My name is Anastasia Kalashnikova, and I present to you today this small master class. Halloween is very soon, so I suggest sewing its symbol from felt - a cute pumpkin. The toy consists of simple parts, so it is perfect for creativity with children.
You will need:

- Orange, white and black felt;
- Orange and white floss;
- Needle;
- Scissors;
- A little padding polyester;
- Black beads for eyes;
- Ribbon or magnet optional
You can download the pattern HERE, this is what it looks like:

The process of creating a pumpkin
First of all, cut out all the necessary parts from felt. According to the pattern given above, the toy will be about 5 * 5 centimeters.
Using a vanishing pencil or pencil, draw curved lines to represent the segments of the pumpkin. Embroider them with a back stitch, I used two strands of light orange floss.

The first line is ready

And on the reverse side:

Now it's the peephole's turn. Place them according to the pattern, just above the center line of the pumpkin's body. Then sew with an overlock stitch or a needle-forward stitch.


Sew the stalk from the front part.

My favorite moment: choosing the expression on the toy’s face. Look how much changes when I just change the location of the bead eyes))


The muzzle is almost finished!)

You can embroider the mouth with black floss or cut it out of felt. My toys are intended for children, so I don't use glue when making them.

Well, the pumpkin face is ready. On the back of the toy I sew a pocket with a magnet, but you can replace it with ribbon if you wish.
Then sew both parts of the pumpkin together using your favorite stitch. Don't forget to leave a hole for stuffing.

Fill with a small amount of padding polyester to give the toy volume.


Sew up the hole and voila! The cute pumpkin is completely ready!

If you wish, you can sew the second half of the cutting on the back side:


Photo of pumpkin and her owl friend ^^


If you liked my little master class, you can get acquainted with the rest of the Halloween toys in the article “Crafts from felt for children on Halloween. Patterns and master classes."
Creative inspiration to you!
On my own behalf, I would like to add that I hope to meet Anastasia on my blog more than once. This concludes the post about Halloween pumpkins and we hope to see you here more than once.
Sincerely, Anastasia Skoracheva and Anastasia Kalashnikova
Although Celtic monks have long made lanterns from vegetables, usually rutabaga, beets and turnips, to drive away evil spirits, the tradition of lighting a jack-o'-lantern comes from North America. They were the first to use pumpkin and made it one of the main attributes of the most “terrible” holiday.
Classic Halloween Pumpkin
Traditionally, the jack-o'-lantern is carved into the shape of a scary head. Americans call it the Jack-O-Lantern. It appeared thanks to an old legend about an old farmer named Jack. This man was lazy, dishonest and very fond of drinking. At the same time, he managed to deceive the devil twice. After death, there was no place for Jack in heaven or hell. Looking for a way in the darkness, the farmer asked the devil for a lamp, but he only threw him a few smoldering coals. Jack had to make a jack-o'-lantern and put coals in it. With him he began to wander in search of peace between earth and sky.
Making your own pumpkin for Halloween is not that difficult.
- To keep your pumpkin decor fresh for a long time, soak the vegetable in water for several hours.
- To make the pattern last longer, it should be coated vegetable oil or Vaseline.
- To prevent the jack-o-lantern from frying from the inside, make several small holes in the lid of the vegetable - streams of hot air will flow out.
- If you rub the inside of the lantern nutmeg, it will emit a pleasant aroma after ignition.
- Try to choose a fresh pumpkin for your lantern. The fruit has a not too hard skin, so it will be easier for you to cut out patterns on it.
Making a lamp
Take a pumpkin, its size may vary, but its color is only orange. Draw a circle, square or zigzag around its stem. The size of the figure must be large to free the vegetable from the pulp. Using a thin knife, cut through the fruit along the marked lines. Do this at a slight angle so that the cut top does not fall inside the lantern.
Using a spoon, remove the pulp and seeds from the vegetable. Using a felt-tip pen, draw the contours of the fetus’s eyes, mouth and nose – the mouth is often shaped like a crescent with a pair of fangs, the eyes and nose are shaped like triangles. If you have a stencil, attach it to the vegetable with tape, and then transfer the outline of the design by piercing the lines with a thin awl or needle. Cut through the peel of the fruit along the marked lines.

You can remove the cut pieces by prying them with a knife, or push them inside. To make the outline beautiful, scrape off the protruding pulp with a knife. Remove the cut pieces from the fruit, place a candle inside and cover it with a “lid”. The Halloween pumpkin is ready.

Original pumpkin ideas
Halloween doesn't have to be limited to just Jack-O-Lantern. The house can be decorated with other pumpkin crafts. This fruit is an excellent material for creativity. You can create many unusual decorative items from it.
Modern pumpkin
If you don't really like the sinister face, you can decorate the vegetable more in a modern way. For example, using rivets.

This pumpkin is easy to make. Purchase several packs of rivets from a craft or sewing store. They need to be stuck in a row so that they run parallel to the stripes of the fruit. This is how you need to decorate the entire pumpkin.


Another unusual Halloween pumpkin, the photo of which is presented above, is also simple to create. You will need acrylic paints in contrasting colors. They need to paint the peel through the sections.


Elegant lamp
Option 1
In addition to its intended purpose, such a lamp can serve as a vase.

You will need:
- drill and drill bits of different sizes;
- glow sticks – plastic tubes that, after breaking, can glow for a while or wireless LED lights;
- pumpkin;
- tape or tape;
- glass beaker or jar;
- large knife;
- flowers;
- scissors.
Using a marker or felt-tip pen, outline the design with which you plan to decorate the fruit. It should consist of holes of different diameters. They are best done using various verifiers. To make the design symmetrical, use electrical tape. When all the holes have been drilled, use a knife to cut off the top of the vegetable at an angle and scoop out its contents with a spoon.
Read also:
How to decorate a Christmas tree in an original way - ideas for a New Year's beauty

If you want to decorate the pumpkin with flowers, place a jar or glass filled with water inside it. Place sticks or lanterns around the container for illumination.

Option 2

Making such a lamp will require skill.
You will need:
- pumpkin;
- screwdriver;
- chisel for cutting linoleum;
- nail or awl;
- pattern template;
- masking tape;
- spoon;
- candles.
Cut a hole in the bottom of the fruit, and then use a spoon to remove the pulp along with the seeds. After this, attach the template to the vegetable with masking tape and pierce it with a nail or awl in accordance with the lines of the drawing. The holes should be next to each other.

When the design is transferred to the fruit, take a chisel and carefully, trying not to cut through the flesh too much, cut out the peel along the puncture lines. After this, completely remove the peel, but keep in mind that the holes should not be through. In this case, the light from the candle will not be bright, but dull.

To ensure ventilation and at the same time a beautiful appearance, use a screwdriver or drill to drill several through holes in the vegetable. The original pumpkin is ready!

Glowing pumpkin
These pumpkins will look beautiful with the lights off.

You will need:
- fluorescent neon paints of different colors;
- several pumpkins;
Clean the surface of the vegetable. Starting from the stem, draw thin vertical stripes, then next to them draw stripes of a different color.

The lines do not have to be neat; they can go down to the bottom of the fruit or up to the middle. You don’t have to paint over the entire surface of the vegetable. You can apply other designs this way. Before painting the pumpkin, you can cover it acrylic paint any desired shade.
Pumpkin candle holder

Candlesticks like these, depending on how you decorate them, can make beautiful fall decor or a worthy decoration for Halloween.
You will need:
- small pumpkin;
- brush;
- drill;
- candle;
- glitter;
- universal glue.
Measure the diameter of the candle and select a hole saw of the appropriate diameter. Cut off the stem of the fruit, determine its middle and carefully drill out the core. From time to time, clearing the drill from the pulp, drill the vegetable to the required depth. If you don't have such a tool, you can use a sharp knife with a thin blade.

When the hole is ready, cover the fruit with glue and sprinkle it generously with glitter. Once dry, spray with hairspray to prevent glitter from falling off. Now place the candle in the hole.
Spooky pumpkin ideas
For those who are sure that they need to scare someone on Halloween, we suggest making scary crafts out of pumpkins.
creepy pumpkin
This is a variation on the Jack-O-Lantern theme. This Halloween pumpkin will impress your friends and family. To make it you will need 2 pumpkins - large and small.
Let's deal with the big fruit first. Cut off its top; do this at an angle so that later the “lid” does not fall through. Use a spoon to remove all the pulp and seeds. After that, apply the design as in the photo. The opening of the “mouth” should be large enough to fit a smaller pumpkin.

Cut out the mouth along the contour and highlight the teeth. The latter need a little polishing.

You can start making the eyes. Make pupils - they will give the craft a more frightening look.

Now take a small pumpkin. She needs to be made scared. It is better to remove the pulp from the fruit through the mouth, so it must be large. When the small pumpkin is ready, insert it into the large mouth.

Pumpkin - bat
Halloween symbols are evil spirits, including the bats. So why not make these ominous creatures from another traditional attribute - pumpkins.
You will need:
- black acrylic paint;
- white cardboard;
- small pumpkin;
- black paper.
Cover the surface of the pumpkin with paint. While it dries, start making the eyes, ears and wings. Cut out eyes from white cardboard. Make pupils from black paper and glue them to the center of the cardboard eye blanks.
Draw a pattern of wings and ears. Place them on black paper and cut out four identical shapes. Place 2 shapes together and glue them together, after placing part of a toothpick inside. For the wings, you can use skewers or stiff wire.
Read also:
How to make soap with your own hands - Recipes for beginners
Glue the eyes to the surface of the pumpkin, then stick the ears into the upper part of it, and the wings not far from them.
Paper pumpkin
Not everyone has the opportunity or desire to tinker with a real pumpkin. The house can be decorated with a paper pumpkin.
Option 1
Cut out blanks from green and orange paper, as shown in the photo. Sizes may vary depending on how big you want your pumpkin to be. Take a rectangular piece - the middle of the fruit, bend it so that a cylinder comes out, and glue it together. Bend all the cloves outward.

Apply glue to the bottom and top teeth of the cylinder. Glue one of the long strips to the teeth. Glue the remaining strips in the same way.

Take 2 green pieces and score them, cutting one piece from bottom to middle and the other from top to middle. Connect the parts. Glue the tail to one side of the pumpkin.

Option 2

You will need:
- orange paper;
- thin green ribbon;
- thin wire;
- needle;
- scissors;
- pencil;
- glue;
- pliers.
Make a template that matches the picture below and use it to cut out blanks from orange paper.


Bend each segment slightly inward, and then do the same with their round parts.
Gather the round ends of the lower parts together and insert the wire with the sharp end into the hole.

Glue the first and last segment together, then slide the top round pieces onto the wire and round the end of the wire.

Tie a ribbon to the curve.
Pumpkin from a book
If you have unnecessary books lying around, you can find a worthy use for them, for example, make something unusual out of them. There are many crafts that can be made from unwanted publications - postcards, frames, boxes, lamps and even flower pots. We'll show you how to make a Halloween pumpkin from an old book.
You will need:
- Old book;
- paper;
- paper cutting knife;
- glue – glue in a gun is suitable, it can be replaced with PVA;
- a can of orange paint;
- green decorative ribbon;
- twig;
- pencil.
Draw the outline of the future pumpkin on paper. To make it symmetrical, fold the sheet in half, draw only half of the fruit, and then cut it out. Separate the cover from the book and fold the prepared template onto the binding.

Trace the template with a pencil, separating several pages - 5-6, and start cutting out the shape.

Continue cutting out book pages until you run out. When you cut out the pumpkin half, try to cut a couple of millimeters closer to the center each time, otherwise your fruit will begin to expand. It is better to cut off unnecessary pages from the spine with a paper knife.

When the blank is ready, glue the first and last pages. Apply glue to one sheet at a distance of 5 mm from the binding, attach another to it and press. To make the pumpkin stable, glue a few more pages in different places. Place the book vertically and, slightly pulling away from the binding, straighten each leaf, making the pumpkin more symmetrical. If necessary, you can glue the pages.

Once the pumpkin has the desired shape, start painting. Place the product on the paper and spray paint on it from a can. You can paint the edges or the entire surface of the petals.

Cut a small piece from the prepared stick, apply glue to one of its ends and insert it into the core of the product. Hold the stick until the glue dries, and then tie a ribbon.
The main attribute of Halloween is a pumpkin head. In fact, few people know why a pumpkin with carved eyes, a mouth and a candle inside is considered a symbol of the holiday. It turns out that there is a legend about Jack, who managed to deceive the devil. The cunning drunkard Jack cannot go to either hell or heaven, so he wanders the earth, lighting his path with a jack-o'-lantern. This is where the name of the pumpkin came from - Jack-O-Lantern. Now let’s figure out how to cut out the Halloween flnarik correctly.
Let's see how this is done in the presented video in Russian, since Halloween is now celebrated in Russia, and not just in the USA, Ireland and other countries that love this holiday.
Today, there are a lot of ways and recommendations for carving pumpkins for Halloween. You can see what the result is in the photo:


A master class will help you understand how to carve a Jack-o'-lantern from a pumpkin.
How to carve a Halloween pumpkin: a master class for beginners
Materials:
- pumpkin;
- sharp knife;
- scraper or regular spoon;
- awl or thick needle;
- paper;
- marker;
- scissors.
1) When choosing a suitable pumpkin, you need to ensure that the fruit has a dense and smooth surface without spots or defects. It is desirable that the vegetable has a height of more than 20 cm, is ripe, symmetrical, with a hard, dry stalk at least 5 cm long.

2) Using a felt-tip pen, draw a round, square or other shaped lid. The hole for the candle is made on top of the pumpkin, and for the jar with lanterns - on the bottom. Cut out the drawn lid using a sharp knife and carefully remove it, taking it by the tail.

3) Clean the inside of the vegetable from pulp, fibers and seeds with a special scraper or spoon until the walls become 2-3 cm thick.

4) To give the pumpkin a facial expression, you need to come up with a face and draw it on paper. Color over the areas that will be cut out with a marker. Attach the image to the pumpkin with tape and pierce the outlines with an awl.

5) Using a sharp knife, cut out the picture, carefully adhering to the boundaries that you drew.

6) All that remains is to do the lighting. You can use an ordinary candle by placing it in a glass. To prevent the vegetable from burning, the lid must be removed. A lamp in the form of a cord with light bulbs, which should be wrapped around a glass jar, is also suitable. Place the lamp inside the pumpkin, take the wire out through the hole at the bottom and plug it into the outlet.

It is believed that on the eve of the holiday such a talisman should be placed near your home so that no evil spirits could come close. That's why pumpkins are carved at Halloween. Unfortunately, the Jack-O-Lantern made from pumpkin will sooner or later have to be thrown away, as the vegetable may begin to spoil. A great alternative to this craft is a paper pumpkin.
Let's look at some ways to make it.
Making a pumpkin out of paper
You can cut a paper pumpkin in the same way. paper snowflakes. You will need a piece of orange paper, scissors and a pencil. Suitable paper is matte colored or decorative with a corrugated texture. Fold a sheet of paper in half with the front side inward and draw half a pumpkin with any face from the fold line. Next, cut out the design along the contour. Lay out the sheet and align the fold line. The result is a pumpkin that can be attached to the wall or used to decorate a fancy dress costume.


Paper pumpkin with surprise
To make the craft, prepare strips cut from double-sided orange paper 2-3 cm wide.

Fold them in half to determine the middle. Glue each pair of strips together in the form of a cross. Then glue the resulting parts together to make a snowflake. You can use a stapler instead of glue.

Place a surprise in the form of a candy, toy or chocolate in the center of the craft and connect the opposite strips, giving it a rounded pumpkin shape.

You can make a tail for a vegetable from green paper by cutting out a strip and twisting it onto a pencil in the form of a spiral. Make leaves from corrugated paper.

Paper crafts are a budget-friendly decoration option, and making them will be a lot of fun.
Video on the topic
The oldest Celtic holiday, Halloween, has surprisingly taken root in many countries. This celebration has its own amazing story, established traditions and recognizable attributes. Interestingly, the holiday is based on a contradictory meaning: the worship of saints and the glorification of evil spirits.
Traditionally, on Halloween, everyone prepares for themselves a costume of an evil spirit, witch, vampire and other frightening creatures. But the main attribute of the holiday is always a pumpkin lamp - a Jack-lantern. It is placed on windows, hung above the threshold to scare away evil spirits. How to make a pumpkin for Halloween with your own hands - read below.
Why, among all the variety of fruits, pumpkin?
The Halloween pumpkin is a ripe fruit with carved holes in the shape of sinister faces with sharp fangs. A candle is placed inside such a pumpkin, which is why it is called a lamp. Originally, vegetable lanterns were made in England and Ireland, and they had nothing to do with Halloween, but in the 19th century, North America adopted this tradition and introduced it into the celebration. The pumpkin was chosen as a symbol of the harvest, and the Americans called their vegetable lantern the Jack-O-Lantern.

Festive Halloween pumpkin
There is also a legend about Jack-O-lantern - a thief, a worthless farmer and a noble drunkard. Once again, having collected some stolen goods, Jack ran away from the peasants and met the devil. He told him that now it was time for him to die, but Jack asked to delay his death, and in return to commit some dirty trick - to discredit the good names of the peasants. According to the agreement, the devil became a gold coin, which Jack paid for the stolen things. But the moment the coin is handed over, it should disappear, and the peasants will start a fight, finding out which of them stole it. The devil liked the idea and put a gold coin in Jack's pocket.

Kids can decorate pumpkins for Halloween too
But it so happened that the stolen thing was a cross, so the devil immediately lost his power, and Jack released him on the condition that he would not drag him to hell. However, after death, Jack's soul was not accepted either in hell or in heaven. On the road in complete darkness, Jack looked for a lantern, but the devil threw him only a few coals. Then he carved a lamp from a pumpkin, put coals in it and continued his eternal wandering between heaven and earth.

Halloween Cookies 
Decorating cans for Halloween 
Halloween Lanterns
DIY Halloween pumpkin - simple and fun
First you need to choose the freshest pumpkin - it has a soft crust, which will make carving easier. The shape of the pumpkin is at your discretion; it can be an elongated pumpkin or a traditional round one. work surface Cover it with paper or oilcloth first, because during the cutting process, most likely, it will get pretty dirty.
You will need:
- fresh pumpkin;
- food board;
- well-sharpened long and short knives;
- spoon with sharp edges;
- marker, felt-tip pen and stencil with a face (you can draw without a stencil);
- candle.

Pumpkin carving option
If you get the hang of it, carving a Halloween pumpkin will be quite easy:

Instructions for making a Halloween pumpkin with your own hands 
Halloween pumpkin example 
Fun pumpkins for Halloween 
Pumpkin carving
Preserve your jack-o'-lantern for a long time
Naturally, the jack-o-lantern will soon begin to deteriorate; it is affected by oxygen and various microorganisms. In order for Jack to live longer, you can apply a few simple measures. You need to prepare a solution to disinfect the pumpkin and prevent the spread of bacteria:

Decorating a pumpkin with sequins 
An example of how to carve a pumpkin for Halloween 
Halloween Pumpkin Carving Options 
Halloween decor and pumpkin 
Decorating a pumpkin with rivets
How to make a Halloween pumpkin using paper
It is not always possible to purchase a fresh and beautiful pumpkin to make a lamp; in this case, you can use paper. Prepare:
- A4 sheet of orange and green paper;
- scotch;
- pen or pencil;
- scissors or stationery knife.

Halloween pumpkin made from caps and leaves
After preparing everyone necessary tools and materials, let's start making paper pumpkins:

Step-by-step instructions for creating a Halloween pumpkin using paper 
Halloween pumpkin using paper 
Paper pumpkin
So, using ripe pumpkin or colored paper, you can create a unique atmosphere in your home while celebrating the mysterious Halloween.
 How to call your beloved guy so that he likes it: choose an affectionate nickname
 Mind-blowing hair carving (50 photos) - For short and medium curls Carling for long hair
 High-quality natural shampoos: product benefits, advantages, disadvantages and rating of the best manufacturers Rating of natural shampoos