Kanzashi round petals with folds. Round kanzashi petal: delicate and beautiful petals made from ribbons
The art of kanzashi is the creation of beautiful flowers from ribbons. These flowers make great paintings, panels, decorations for clothing, accessories and hair. To make different flowers, you need to learn how to make a round kanzashi petal. It is the main element for creating not only flowers, but also other interesting objects using this technique.
Beautiful flowers
Satin ribbons are best suited for making kanzashi flowers. Squares are cut out of them and petals are formed by folding them according to patterns. To prevent the edges of the ribbons from fraying, they need to be scorched with a lighter or candle. The most suitable method for gluing elements is hot glue gun. Or you can choose a transparent glue, for example, “Moment Crystal” or “Dragon”. The main thing is that it does not leave stains. It is very convenient to work with tweezers, because it is inconvenient to hold small parts with your fingers, and when singeing sections, tweezers are simply irreplaceable. Flowers and products made from them can be decorated with beads, seed beads, sequins, rhinestones, and stones. To ensure that ribbon flowers keep their shape well, you can spray them with hairspray.
This type of needlework first appeared in Japan. Geishas did beautiful flowers made of silk and decorated their hair with them. Now this technique has been more improved and new types of elements for jewelry are appearing. To master the kanzashi technique, you need to learn how to make basic elements, without which further work is impossible. This basic element is a round petal.
Very beautiful flowers are obtained from round petals. With the help of these flowers you can decorate your wardrobe, hairstyle, and interior items. Satin flowers can be used as a charming brooch, to decorate bags and other accessories.

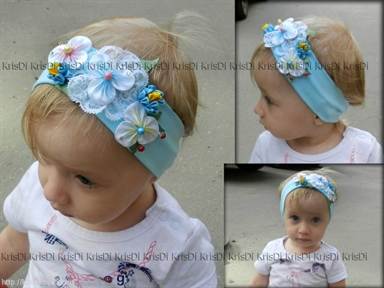
Kanzashi flowers are used to make magnificent hairpins, hairpins, elastic bands, headbands and headbands.

Panels and paintings of flowers will fit very organically into the interior. Due to the fact that the petals are very similar to real ones, it creates the feeling of the presence of fresh flowers in the house.


Flowers with round petals look incredibly beautiful on photo frames.


These flowers are suitable for creating various wonderful crafts and souvenirs.

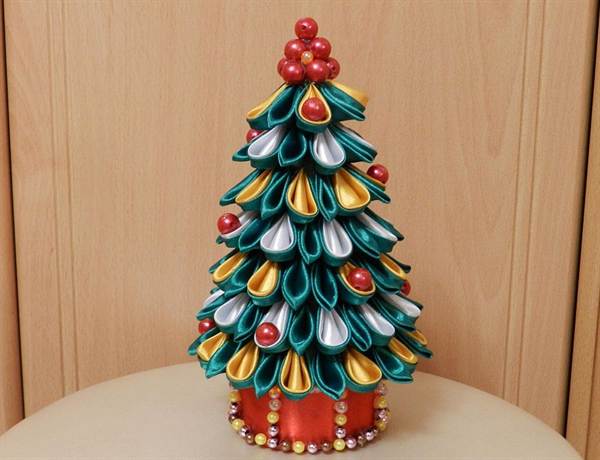
You can make original New Year's decorations from the petals.

Let's start simple
A simple round petal is the basis of kanzashi products. It can be done in several ways. In each method, the start of production will be the same.
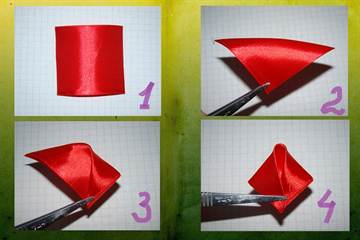
You need to cut a square from the tape. Burn the edges with a lighter. Fold in half diagonally. Connect two side corners to the bottom corner.
Then we fold the edges back and fold the petal in half.


Then the bottom corner is cut off. Its two parts are singed separately.


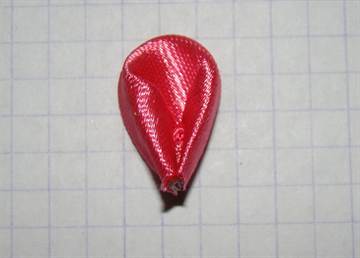
The result is the first version of a round petal.

In the second option, after cutting the lower corner, its two parts are singed together.


Drop glue into the base from the front side.

Now we press the petal and wait until it sticks.

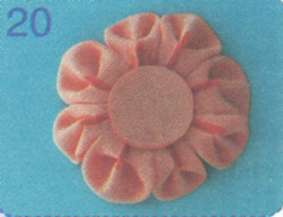
And this version of the petal will look like this:


And one more option for a simple petal. After bending the side corners towards the central one at the very beginning, we bend the edges of the petal back.


Now you need to fold the petal in half so that the curved edges are on the inside.

Then the corner is cut off and singed with a lighter.

This turns out to be another version of a simple petal.
Double round petal
To make the flower more interesting, some petals are made double. That is, it will consist of a ribbon of not one, but two colors.

A small amount will help you learn how to make such a petal. step-by-step master class its manufacture.
You need to cut out squares from ribbons of two colors.

Fold the squares in half diagonally so that the front side of the tape is on the outside.

One triangle overlaps the second. The bottom triangle should protrude quite a bit.

We lower the side corners to the bottom corner.


We wrap the edges of the petal back and bend it.


The tip is then cut off and singed.

The bottom edges are trimmed depending on the desired height.

Each edge is singed separately.


If you have already encountered the kanzashi technique, let alone made something, and intend to continue mastering this unusual type of needlework, you will probably need to learn how to create round petals. These petals are the most common and versatile elements in the kanzashi technique. They are often used to create very sophisticated, and in some cases, even very naturalistic flowers. In addition, the round petal in interesting technology Kanzashi is ideal for creating multi-tiered compositions.
Making petals different color and size, and by combining them at your discretion, you can get a wide variety of kanzashi flowers that will be a wonderful decoration and gift. In this article, you can watch a master class and get acquainted with three options for making a round petal, and also learn how to make an unusual folded one.
Making a round kanzashi petal: what you need for work
To begin, prepare necessary tools and materials: satin ribbon of your favorite color, glue, scissors, candle/lighter, and needle and thread. If you intend to immediately create a lush flower, or several products, and even from multi-colored petals, it makes sense to prepare boxes or containers where, during the work process, you will need to put cut-up squares and finished petals so that they do not accidentally fly off the desktop and get lost .
First round petal option:1) Using scissors or a soldering iron, cut identical squares. To prevent the ribbon from unraveling, you can (but not necessarily) solder the cuts over a fire. Then take the square and fold it once diagonally. Now fold the two side corners of the triangle towards the bottom end, so that only the tips of the corners touch. To make it more convenient, you can secure the corners - glue them, solder them.
2) Now we fold the petal in half, and we get this figure:

3) Cut the corner and solder the tape.
Please note that how you cut the petal in step 3 will determine its final appearance. The more tape is cut, the narrower the petal becomes. Accordingly, leaving more material, you will get a slightly fuller petal. To assemble a flower, it is better to achieve identical petals so that the craft is neat.
4) Unfold the resulting petal and glue (solder) the sides separately.
5) You should get a petal like this.

This petal is very similar to the first option. It was invented by master Evgenia Bolotova. And it was created to somewhat reduce the splendor and breadth of the petal presented above. Thanks to the modification, the petal turns out to be rigid and holds well in the composition. It's easy to do. Repeat steps 1-3 for creating the petal, and after you have cut off the desired side, solder the sides of the petal together, not separately.
Now turn the workpiece over with the wrong side facing you - the leaf should be positioned with the convex part towards you, and drip glue onto the middle of the recess, so as to glue the cut and sealed sides of the petal to the middle. Turn the workpiece over to the front side. Before us is a finished petal.

Also performed based on the first option. We perform action 1. We bend the corners of the resulting workpiece back, as in the photo:

Then you need to fold the petal in half, so that the curved ends are on the inside.
We cut off the corner and carefully sew or seal the petal:

Let's consider another option for obtaining a round petal from a square. Don't worry if you don't get this petal the first time. A certain amount of skill and dexterity is required here. An additional tool such as tweezers with a long handle wouldn’t hurt either. But as a result, you will learn to add original flower, which goes very well with various fabrics, which means it can be useful for decorating clothes and creating textiles.
1. First, take the prepared square piece, fold it diagonally, and then in half. Before us is a small triangle.
2. Bend one half of the triangle by about a third, while holding the tape (this is convenient to do with tweezers).
Then we bend the remaining part so that it looks like several layers of tape overlap each other.
Now, we do the same addition with the second half of the “former” triangle.
We cut off the tip of the resulting petal and melt it over the fire.
We cut off the height of the petal and singe it too.
This is such a cute petal with folds.

Video on the topic of the article
It is known that it is better to see once than to read 10 times. Therefore, we bring to your attention videos of several detailed master classes on making round petals using the kanzashi technique. With their help, you will learn how to make petals, which means that soon ribbon kanzashi flowers will bloom in your hands. Happy creativity!
There are different algorithms for folding round kanzashi petals. Let's consider the first option of folding round petals, as a result of which you can get two subtypes of petals. Jewelry, hair clips and elastic bands made using this technique look very beautiful and stylish. With such flowers in her hair, your daughter will look very cute. And having learned how to make such jewelry yourself, you will be able to create unique hairstyles on your baby’s head every day.
Round kanzashi petals: Option 1
For clarity of the master class, the technique of folding a round petal will be shown on a square blank measuring 6 x 6 cm made of gabardine. Such petals can be folded from 5 x 5 cm squares from satin ribbon and various fabrics, such as satin and crepe satin. Examples of products with a kanzashi flower with round petals from various fabrics and sizes are given at the end of the master class. We also suggest sewing for the little princess. It will definitely become her favorite toy.
Let's prepare a square piece of gabardine measuring 6 x 6 cm and tweezers (Fig. 1). Fold the square diagonally (Fig. 2), and then the triangle in half (Fig. 3).


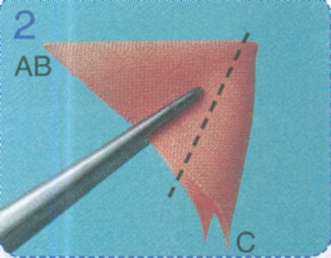
We bend one of the side ends of the workpiece to the lower corner along the dotted line in Fig. 3 (Fig. 4). We proceed similarly with the other side end of the workpiece (Fig. 5). As a result, we obtain a workpiece of this type (Fig. 6).


Holding the workpiece diagonally with tweezers (Fig. 7), cut off the unnecessary part of the fabric with scissors (Fig. 8) and carefully process the cut over a candle fire (Fig. 9).


As a result, we get a round kanzashi petal, which will have the shape of an elongated drop (Fig. 10-12).


 To assemble the flower, we make 13 more such petals (Fig. 13). Apply glue to the side surface of the petal (Fig. 14) and glue it with another petal (Fig. 15). If you have contact adhesive, then remember that the glue must be applied to both surfaces to be glued, and not to one, as is the case with a glue gun.

Consistently glue all 14 pieces. petals (Fig. 16). As a result, we will obtain a flower blank, the middle of which will be convex (Fig. 17-18). 


Now you know how to make a round kanzashi petal. The resulting flower blank must be glued to the base. As a base, let's take a circle with a diameter of 5 cm. If you make a product from squares 5 x 5 cm, then the diameter of the flower will be smaller and, accordingly, the diameter of the base can also be smaller. After gluing the flower to the base, we get a flat product with a diameter of 8 cm (Fig. 19-20), which, after modification (decorating the center of the flower), is perfect for a hairpin or hoop. A detailed master class on creating round kanzashi petals is almost finished.

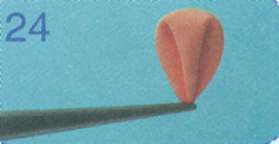
 Based on the algorithm described above, we can make two more options from the round kanzashi petal we received (Fig. 21). To do this, in the first case you need to turn the end of the petal towards yourself (Fig. 22-23), and in the second - away from you (Fig. 24-25).
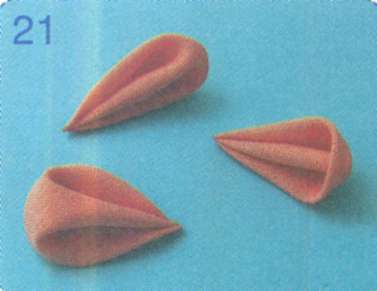


Next, we’ll talk about how to carefully glue petals or entire flower blanks onto the base, that is, how to properly design the back of the product. Let’s consider assembling flowers from this type of petals, having previously made 6 pieces. blanks and cutting out the base - a circle with a diameter of 3.5 cm (Fig. 26).
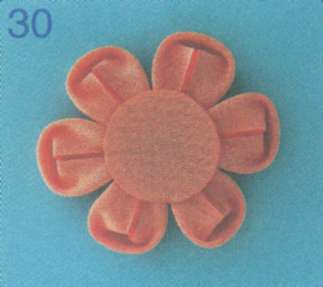
 In this case, the petals can be glued directly to the base (Fig. 27-28). As a result, we obtain a flat flower blank with a diameter of 7 cm (Fig. 29-30).


Similarly, you can assemble a flower from 6 petals of another type (Fig. 31-34), the diameter of such a flower is 6 cm. 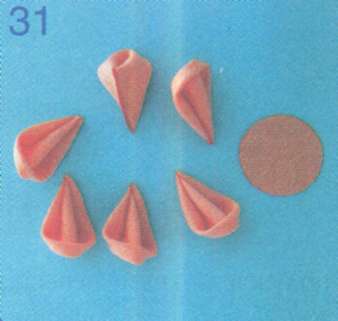


So, based on the first option step-by-step folding we received three round kanzashi petals various types petal (Fig. 35), and now look what wonderful decorations you can make with such petals! 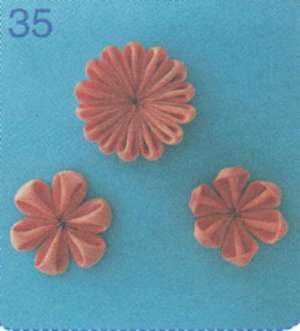
Hair band "Chamomile" kanzashi
The flower petals are made of satin ribbon, the size of the square blank is 5 x 5 cm. The diameter of the flower is 7 cm. The middle is a button covered with fabric, the leaves are made of satin ribbon by firing. 
Hoop with kanzashi flower made of gabardine
Each round kanzashi petal is made from square blanks measuring 6 x 6 cm. The diameter of the flower is 8 cm. The middle is organza and ready-made accessories. 
Kanzashi “click-clack” hair clips
The petals are made of gabardine, the size of the square blanks is 5x5 cm. The middle is a decorative half-bead. Flower diameter 5 cm. We suggest you read detailed master Class 
Kanzashi hair bands
The first tier of the flower is made of gabardine petals, the size of the square blanks is 5 x 5 cm. The second tier of the flower is made of sharp gabardine petals (the manufacturing description will be discussed below, section 2.4). The middle is a half bead. Flower diameter 6 cm. 
Round kanzashi petals: Option 2
Let's consider another option for folding a round petal on a square piece measuring 6 x 6 cm made of gabardine. Such petals can also be folded from 5 x 5 cm squares made of satin ribbon and other fabrics. So, round kanzashi petals master class - the second method. We fold the prepared square blank measuring 6 x 6 cm diagonally (Fig. 1), and then in half (Fig. 2). Bend one of the side ends of the workpiece along the dotted line in Fig. 2, and we get the result shown in Fig. 3. 


Then we bend the same end of the workpiece along the dotted line shown in Fig. 3, and we get a workpiece as in Fig. 4. We repeat similar operations for the other side end (Fig. 5). 
As a result, we obtain a petal blank (Fig. 6). 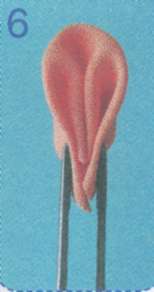
Holding the workpiece with tweezers (Fig. 7), cut off the excess tissue with scissors (Fig. 8) and carefully process the cut over a candle fire (Fig. 9). 


We get a petal (Fig. 10-12) of a more rounded shape than in the first folding option.


 Having prepared 8 such petals and a base with a diameter of 2.5 cm (Fig. 13), you can assemble the petals into a flower either immediately using a glue gun (Fig. 14), or first using a needle and thread (Fig. 15).


 For many craftswomen, it is first more convenient to collect round kanzashi petals with folds on a needle and thread (Fig. 16) and only then glue the petals (Fig. 17). Try it different variants and choose the most optimal assembly method for you. The resulting flower blank must be glued to the base (Fig. 18).
After gluing the blank to the base, the flower takes on the correct round shape (Fig. 19-20). If necessary, glue the petals together. Flower diameter 6 cm. 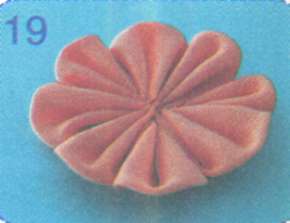

Let's go back a few steps and once again consider the preparation of the petal before cutting (Fig. 7 and 21). If we cut the folded fabric along the dotted line shown and process the cut over a candle fire, we will get a “high petal” (Fig. 22-23). 


In Fig. 24 shows for comparison both types of petal - “flat” and “high”. Such petals are used for more voluminous and multi-tiered flowers. And if you bend the edge of the petal away from you, you can get another type of petal (Fig. 25). Moreover, you already know how to make a round kanzashi petal.
Let's consider assembling such petals into a flower, preparing 5 of them. and a base with a diameter of 2.5 cm (Fig. 26). We glue each round kanzashi petal with folds onto the base sequentially (Fig. 27), as a result we get a blank flower with a diameter of 5 cm (Fig. 28-29). 


The second version of the master class on round kanzashi petals is over. Remember that flowers made using the same algorithm, but from different fabrics, look different. When using, for example, crepe satin, the folds drape softer, and gabardine petals hold their shape very well.
Kanzashi hair bands made of lining fabric
The flower petals are made of lining fabric, the size of the square blanks is 7 x 7 cm, the centers are decorated with half beads. The leaves are made of satin ribbon 5 cm wide (their production is described in paragraph 2.7). Flower diameter 6.5 cm. 
Children's kanzashi "crocodile" hair clips
The flower petals are made of satin ribbon, the width of which is 5 cm. The size of the square blanks is 5 x 5 cm, the center of the flower is decorated with half beads. The leaves are made of crepe satin (see paragraph 2.7). Flower diameter 5 cm. 
If you liked our site or found the information on this page useful, share it with your friends and acquaintances - click one of the social network buttons at the bottom of the page or at the top, because among the heaps of unnecessary garbage on the Internet it is quite difficult to find truly interesting materials.
 We make beautiful and festive garlands ourselves Cut out the letters Happy Birthday
 Royal Treasures: A Short Guide to Kate Middleton's Rings
 How to do makeup with golden eyeshadow?