Light toys made from socks. Crafts from socks: a selection of the best ideas and tips for beginners, which crafts can be made easily and quickly (75 photos)
Funny soft toys can be made from anything. Modern needlewomen are looking for different materials and patterns to sew cartoon characters or just fun toys for their children. In this article we will talk about crafts from socks, which in Lately are becoming increasingly popular. Elephant made from socks It will become a real decoration for a child’s room and will appeal to both preschoolers and schoolchildren.
Materials:
- scissors;
- filler;
- needle;
- buttons for the eyes.
Elephant made from socks. Master class with photos

You can also use old socks that have lost a pair or worn out the heel. The main thing is that they appearance was still worthy.


Craft from socks. Elephant
Craft elephant from socks ready. You can show your imagination and come up with clothes for such an elephant. Such a soft toy will become beautiful decoration children's room and a nice gift from loving parents. Make a whole collection of cute elephants or try sewing other crafts from socks.

Surprise your guests by getting alcohol from the original minibar, which will be a doll from nylon tights. And from socks and signets you can sew soft toys for children.
Toys made from socks and children's tights

Even a very young child can make such a funny caterpillar.
To create such a thing, you can use old tights from which the baby has already outgrown. Cut one pant leg, turn it inside out, sew it on one side, tying it with thread.

Turn the workpiece onto its face, stuff it with padding polyester and pull it in several places with thread to create rounded fragments of the caterpillar’s body.
Finish making this toy from socks by turning the edges inward in the area of the tail and sewing them together. Instead of eyes, we attach two beads, make a mouth out of threads, after which the work is finished. Here's how to make your own stuffed animal out of practically nothing.

You can also make amazing things out of socks, for example, this funny bunny.

To create it you will need:
- two socks;
- threads;
- scissors;
- needle;
- padding polyester
Place the first sock vertically in front of you, cut it as shown in the photo. You will have a head with ears.

Sew this blank on the wrong side, leaving the bottom edge free. Fill your head with padding polyester through it.

For such a toy made from socks, you will also need a second part, which will become both the body and the hind legs. To get it, cut out the second sock as shown in the photo below.

Sew this blank on the wrong side, leaving the part near the elastic untouched. Fill it with padding polyester through this hole. Insert the head element into this part and connect the parts soft toy seam

You have 2 parts left from the socks, which you will quickly turn into the front legs of a hare. Also sew them in place.
From another small piece that remains from cutting out the parts, make a tail. Sew it on, decorate the eyes, mouth, nose and admire what a wonderful toy you have made from socks with your own hands.

We turn old gloves into useful things

To make such a cat, you only need one glove.
Sometimes one glove gets lost, don't throw away the second one, but use it to create a soft toy.
Cut the glove as shown in the photo. In place of the little finger, place the ring finger and sew it on, it will become the second front paw of the soft toy.

Stuff the glove with synthetic padding, up, in the elastic area, shape it in the form of ears, give them texture using a thread and a needle.

Drag the thread under the cat's head to define the animal's neck. Stuff the cut little finger with padding polyester and sew it on instead of a tail.

Embroider the eyes and nose of the cat, tie it around the neck beautiful bow, and another soft toy from unnecessary things is ready.
How dolls are made from nylon tights

Seeing this dashing Ukrainian with a forelock, not everyone will guess that this is a mini-bar. A bottle is cleverly hidden inside.
You can give it to a man on February 23 or surprise guests. When you put up such a doll made of nylon tights, remove its head, there will be a bottle of alcohol inside.
For a DIY craft, you need the following:
- plastic bottle or canister;
- scissors;
- 40 denier flesh-colored nylon tights;
- needle and thread;
- scraps of fabric;
- thick wire;
- yarn;
- 2 eyes for toys;
- foam;
- braid;
- string;
- foam rubber 1-1.5 cm thick;
- padding polyester
Cut off the top of the canister, put the bottle inside to see if it will fit inside so that the neck looks out. If the height is insufficient, place a piece of foam rubber on the bottom of the canister.
Now take a rectangle of foam rubber, wrap it around the bottle, trim off the excess. Sew it end to end at the top and bottom. plastic bottle, trim off the excess.

Now pull the rope around the toy’s waist.

Twist hand blanks from wire. Wrap them with foam rubber and padding polyester.

Sew the arms in place as shown in the photo.
From white fabric, cut out 2 identical blanks (they will be sleeves) and one that will become a panel for the body. The last part must be long so that one part fits freely inside the plastic bottle.

Now cut out a rectangle from blue fabric. Its width should be such that you can gather the fabric and put it on the bottom of the bottle. These are the doll's wide pants.
Sew them in place, and tie a strip of red ribbon around your waist, which will become a belt.

How to decorate the face of a toy with your own hands

To make the head, cut the neck of a 1.5 liter plastic bottle below the shoulders. Wrap it in foam rubber and sew it.
Wrap your head with padding polyester and sew it. Cut the panel from the tights, pull it over the doll’s head, chipping the top with a pin.

To make the nose wide and the face realistic, it is necessary to make the doll's harnesses from nylon tights. In the photo, the places where the tension marks are marked are marked with numbers so that you can understand where to place the stitches. There is no need to draw them on the face blank itself; pin it here.

Make several stitches from point 1 to 2. Remove the needle from 2 and pierce it through 3. Sew several times, tightening the thread, from 3 to 4.
Also, without cutting the thread, we pierce with a needle from point 4 to point number 5, and make several stitches along this path.
We take the needle out from point 4, stick it into point 3, and then from it into the area indicated by number 6. We make several stitches here.
We remove the needle from point 3. We need to make the wings of the nose. To do this, take the needle out of point 3, stick it into point 5, pass the thread through the top, and tighten it. Thus, we designed the wing of one half of the nose. To do the second, we make the same punctures, from 3 to point 4. And then from here we return through 6 to 4, passing the thread through the top and tightening it.

Let's move on to decorating the doll's nostrils using nylon tights. To do this, pin 2 pins as seen in the photo. To create a drawstring, pierce point 3 with a needle, then 5. Pull the thread over the top, return to point 3. From there you need to move to 4, and then to point No. 6.

When tightening, do not cut the thread. If it runs out, you need to first fix it by making a knot, and then use a new thread.
We continue to form the face of the doll from tights, made with our own hands. Place padding polyester through the bottom of the stocking, making your chin, cheeks, and lips more voluminous. Mark with pins the places of the tension marks (No. 7, 8, 9, 10).
Start at point 7, push the needle through it, and then #8, go back to #7 and make a few stitches along that path. Passing the thread through the top, go from 8 to 10, pierce point 9 with a needle. Sew from point 9 to 10 and back several times.
Make an inner fold to separate the upper lip from the lower lip. Sew a few stitches between the center of the upper lip and the middle of the lower lip.
Ideas and master classes on creating toys from socks with your own hands will be understood not only by adults, but also by children aged 7-9 years. Making the craft is so simple that you won’t have to sit for several days and will be able to complete the task in 2-3 hours.
General principles for making toys from sock
Of course, not everyone is a super fashion designer or seamstress and it will take a lot of effort to create a test toy, so The following principles should be adhered to:
Just 5 principles that will help a child or parent create the most the best toy- with your own hands.
Required materials and tools
DIY sock toys are created using different materials. The master classes presented below will help in the implementation of any idea.
The main tools that may be needed include:

Having prepared all the materials and stocked up with ideas, choose a convenient place and start making crafts.
How can you decorate a toy?
Creating a toy and adding zest to it using various decorative means is not an easy task, because it is difficult to choose just one from a wide variety of ideas. For example, you can add hair, flowers, a hat, a cap, a ball, a bow, and earrings to a toy. Or make a backpack out of it by sewing 2 ribbons. As an addition to the toy there will be a costume made for it.
You can trim the craft with beads or ribbons or contrasting threads.
 Materials needed for decoration:
- Multi-colored threads, ribbons;
- Paints;
- Beads, sequins, beads, rhinestones, stones;
- Fabrics;
- Buttons;
- Figures of eyes, ears, lips, nose;
- Pompoms;
- Floral nets;
- Foam tubes, multi-colored.
Select material for the toy self made You can find it at any fabric store.
Master class on making a snowman from a sock
DIY sock toys (master class) are often made in the shape of snowmen. For the first job it is better to use the most simple idea. The Snowman toy can be entrusted to a 5-6 year old child to sew, under the supervision and help of parents.
Master class – “Snowman”
The snowman is white - therefore, take a white sock, white threads, buttons, eyes. You will also need a piece of fabric or a red or orange sock (nose), scissors, glue, a smaller colored sock (hat), filler (sand). If you need a large snowman, then choose a sock size 52 or larger. 
Youcontent:
- Divide the sock into two parts, cutting off the part with the heel at a right angle with the elastic band of the sock;
- Iron the second part a little with a warm iron;
- By eye, outline 2-3 parts of the snowman, if desired. It’s better in 2 parts, so it will look more voluminous;
- Fill the sock with sand to approximately the middle and tie it tightly with white thread, first shaping it into a ball;
- Fill the top part with sand so that it is smaller than the bottom (this is the head);
- Sew the upper part with thread, twist and tie the tip, as after the body. It turned out that the tail was sticking out;
- Fold the red fabric in half and draw a triangle at the bend with a pencil. Cut without cutting the fold of the fabric. Sew 2 edges with red thread, stuff with light filler (cotton wool);
- Sew the nose to the snowman, bending the edges inward so that the cuts are not visible. Or you can sew the nose right away and then sew it to the snowman;
- Glue the eyes, sew 2 buttons on the body, sew the mouth with red thread;
- For the hat you need a smaller colored sock; cut off the top part with the elastic band. The side of the elastic band will be worn on the head. So, sew the lower part of the cut with a suitable thread and make a pom-pom. Put it on the snowman's head. Instead of a hat, you can buy a small bucket in a souvenir shop and glue it on with a glue gun;
- Make a scarf from a red ribbon or knit a braid from red knitting threads and tie it around the snowman’s neck.
Snowman is ready! Joy to the child and development fine motor skills, plus extra time spent with mom. In general, there are only advantages and pleasure. Such a master class on creating a Snowman toy will allow a child to realize all his original and incredible ideas with his own hands from socks of any color, not just white.
I sew an owl from a sock
For the owl you will need:
- sock of the corresponding color;
- threads;
- eyes;
- scissors;
- glue;
- sawdust;
- decorative elements - optional.
You can offer a schoolchild to make a toy from a sock in the shape of an owl with his own hands, playing with the idea - as a talisman that helps to learn and gain wisdom. And offer to watch or read a master class on how to make it. After all, since ancient times the owl has been considered a symbol of intelligence, wisdom, and knowledge.

Performance:
- Cut off the toe, do not throw away the second part from the heel, it will be needed for making wings;
- Divide part of the sock in half, you can mark it with chalk or thread;
- Fill the lower part with sawdust, close the sides a little so that the body is separated from the head;
- Fill the toy tightly with sawdust;
- Deepen the cut of the sock a little, make a semicircle, and cut it with scissors. If, after cutting off part of the sock, you fold 2 parts of the cut, then 2 protrusions (corners) are formed on the sides - these are the ears;
- Sew from one ear and from the second to the middle of the cut, so that there is room for stuffing with sawdust. Fill more sawdust on the side of the ears than in the middle. Sew up the rest of the part;
- Near the fold, draw a semicircle in the shape of a month with chalk, on one side and on the other. Cut, sew, leaving space for stuffing with sawdust;
- Sew wings to the body of the owl. Glue the eyes;
- Cut the beak in the shape of a triangle, stuff it with sawdust and sew or glue it between the eyes;
- Cut paws from the sock fabric. Make 2 thick strips, sew them together and stuff them with sawdust. From one edge, make 2 seams over the fabric - these will be the owl's fingers. Sew the other side to the body;
You can decorate the owl by adding a scarf and hat or covering the wings with sequins.
Sock kitten
To make a kitten you will need 2 socks with colored heels, scissors, threads, eyes, padding poly:

To decorate the kitten you will need a bow, beads or a flower with an elastic band. You can also add a scarf. If you make a kitten from a plain sock, you can additionally sew a costume, like Matroskin’s cat.
Sew a hare from a sock
There are different types of hares, you can sew them using the technology of making an owl or a kitten, adding a round fur tail and longer ears. Take white or gray socks and 1 colored one, scissors, threads, paints, eyes, cotton wool, buttons. 
Performance:
- Cut off part of the sock (white, gray) to the heel - this is the body and head of the hare, sew it and stuff it with cotton wool. Find the middle of the resulting figure and tie it with a thread of the appropriate color - this will be the hare’s neck;
- Cut 4 circles from the heel and sew 2 pieces. stuff them with cotton wool and sew them to the body - these are the hind legs of a bunny;
- Cut out 4 rectangular pieces with sharp ends, sew them on the sides and stuff them with cotton wool, sew ears to the head;
- From a colored sock, cut off a part of the sock with an elastic band, make 2 holes on the sides - this is a jacket for a hare;
- Make the upper paws in the same way as the lower ones, but from a colored sock. Sew to the hare and put on a jacket;
- Glue the eyes to the hare, sew the mouth and nose with thread. Sew buttons onto the jacket;
In addition to the hare, you can sew pants, a hat, and a scarf. Add bows or elastic bands to the ears.
Sock puppy
A master class on creating a toy puppy from socks with your own hands must begin with the purchase of 2 socks, a piece of fur (ears, tail), scissors, thread with a needle, eyes or buttons, and black fishing line. 
Performance:
- Trim 2 socks from the elastic side, leaving 1-1.5 cm near the heel - this is the torso and head;
- Fill both parts with padding polyester. On the first sock, making stitches with a thread and a needle, the side of the toes of the sock is pulled together (this is the dog’s nose);
- Where the heel is near the first sock, sew buttons or eyes with glue and fishing line, near the nose we pierce through the sock - these are the dog’s whiskers;
- Sew 2 unsewn parts, body with heel down, head with heel up;
- Make paws. Cut the remaining parts in half, stuff with padding polyester, curl the edges, and sew with thread. It turned out to be a ball and uneven edges - 4 parts. Sew balls to the body, the uneven fabric is the dog’s nails;
- Cut out the ears and tail from fur and sew on the puppy.
For the dog, make a separate collar with a leash; you can tie bows to the ears.
Teddy bear made from a sock
A small bear can be made from one sock and several white or brown scraps:

You can sew a barrel of honey and a hat for this bear.
Master class on making a sock puppet
It is better to use golf to make a doll, then it will turn out big. To create it you will need 2 socks (a golf sock and a sock of a different color), scissors, thread with a No. 40 needle, thick acrylic threads - beige or yellow, glue, eyes, nose, lips. 
Performance:
- Cut off the convex part for the fingers from the golf course;
- Make a cut from the cutting side 3-4 cm upward, so that the heel is at the back (this will be the doll’s buttocks) - these are the doll’s legs;
- Measure 2-3 cm from the cuff side and mark it. After marking, measure another 2-2.5 cm, mark with chalk;
- Fill with padding polyester from the legs to the top mark, tie a thin hair elastic;
- On the second mark from the bottom, sew with threads, making a neck and highlighting the head from the total mass;
- Just below the neck, sew 2 opposite sides through padding polyester on both sides - these will be the doll’s hands, it looks as if they are lowered into the pockets. You can make arms that stick out separately from the body; to do this, just make a pattern of the arms, stuff them with padding polyester and sew them on;
- Make a pattern from a sock of a different color, 2 halves of a sundress and sew on top of the doll, make pockets in place of the hands;
- Sew on the mouth, eyes, nose;
- Mode equal length acrylic threads and sew over the elastic band around the tail - this is the doll's hair.
The doll will turn out to be original and beautiful, especially if you make it together with a child.
We sew a monkey from a sock
Take 2 socks big size, threads, scissors, eye accessories. 
Performance:
- Cut the first sock from the elastic side to the heel, in half, sew the cut edges together - these are the legs, stuff the toy with padding polyester;
- Cut the second sock into several pieces. First, cut off the part from the elastic to the heel, and cut it lengthwise into three equal parts, these are the arms and tail of the monkey, sew and stuff with padding polyester;
- From the second, cut off the part where the fingers should be, stuff it with padding polyester and do not sew it up;
- Cut the part with the body lengthwise from the toe side and sew a part from the second sock to it - this is the monkey’s head;
- On the second sock, cut out the heel and sew it to the animal’s muzzle, stuffing it with padding polyester;
- Glue the eyes, and use thread to sew a seam along the heel - this is the monkey’s mouth;
- Now sew on the arms and tail of the monkey;
- From the remaining piece of socks, cut out 2 rectangles, sew and stuff. Next, we roll each one into a ball and sew it to the head - these are monkey ears.
For a monkey, you can sew a suit and a banana in your hand.
Hedgehog from a sock
You can make hedgehog spines from pompoms, fur, or buy socks with toes. 
Performance:
- If the sock is long, then cut off part of the elastic, leaving 1-2 cm after the heel;
- Just above the middle of the sock, twist the sock - this is the neck;
- On the heel side there is a hedgehog nose, hem the sock from below to make it angular;
- Sew the head with a twisted neck to the body;
- Cut 4 rectangles from another sock, sew the cuts and stuff them with padding polyester, sew them to the body - these are the paws;
- Make pompoms from threads and sew them to the back of the hedgehog - these are needles. Or sew a piece of fur to the back, shaped like a nesting doll. If the socks have toes, then cut off the part of the sock with the toes from two socks, stuff it with padding polyester, and sew it to the back.
For beauty, mushrooms and apples are sewn from socks and sewn onto the back of a hedgehog.
What other toys can be made from a sock?
They create a huge number of toys from socks with their own hands, the main thing is imagination and the presence of an unlimited number of socks. Next you can read master classes on making a turkey, a boa constrictor, and a horse.
One of the simplest options for toys made from socks is making a boa constrictor
For this, take 5-10 pairs of socks, cut off the part before the heel, after the heel and toe to make rectangles. All parts are sewn together, alternating different socks. The first sock does not need to cut off the edge for the toes - this is the head, sew the eyes and a large forked tongue there.
An original idea for a sock toy - making a turkey
It will require 2 socks and 2 socks with toes.
Performance:
- From the first sock, cut off a part from heel to toe, stuff with padding polyester and sew on both sides - this is the body;
- From the second part of the sock, cut out two identical shapes of a turkey’s head from below - narrow, on top in a semicircle, sew and stuff with padding polyester. Sew to the body;
- Make wings from the second sock;
- Make a cone-shaped beak out of fabric, sew a piece of red ribbon on top of it, these are turkey earrings;
- Cut off a portion of 3-4 cm from the socks, including the toes. Sew the top so that it is narrow - these are the legs of the turkey and sew to the body;
- From the remains of the knee socks, cut into rectangles along the entire length, sew all the edges into one ribbon, and then sew them together to form a pipe, which is stuffed with padding polyester. Fold it in a zigzag several times and sew it to the buttocks - this is the tail.
You can decorate such a toy with sequins, sew a hat or a worm.
An easy sewing toy made from a sock in the shape of a horse
Take 2 socks. Cut one from the toe to the heel in the center - this is the hooves and torso, sew and stuff with cotton wool. Cut off the part from the heel to the toe of the second sock, sew it on the heel side and stuff it with cotton wool. Sew the head to the body with the elastic side. Cut 3 rectangles from the remaining sock, sew three tubes from them, fill them with cotton wool and sew them to the horse, 2 legs and a tail. Cover the tail with acrylic threads.
 Thanks to simple step-by-step photo instructions You can easily make toys from socks.
 Sew bundles of thick, multi-colored threads from the top of the head to the middle of the back. Glue on the eyes, make a mouth, and 2 nostrils. For additional decoration, belts are used to make a bridle for a horse. Master classes on creating toy animals from socks with your own hands are simple and accessible for everyone: from small children to the elderly.
Video: sock toys
How to make a hare from a sock, watch the video:
Find out how to make a sock doll in the video:
How often can we observe a situation in which one of a pair of socks magically evaporates, and the second is still completely new, forced to lie idle, and will most likely be thrown away. It happens that a very beautiful pair does not fit in size. How much beautiful socks You can buy it in the store now! The colors are striped, dotted, and even with faces. Terry, plain, with fingers, the kind that don’t exist now! We suggest you give a single sock a chance, and even more so give it to paired socks. What should we turn them into? Why don’t you and I turn it into a cool soft toy?
After all, such an original craft can become a wonderful decoration for your interior, a favorite for your child, or a wonderful gift for a friend. Such cute toys are becoming more and more popular. How can you create soft toys from the most ordinary warm socks? Is it difficult or simple, what might you need for this when working with your own hands?
We knit a toy in the form of a striped hare from a sock with our own hands
Let's just try to make a simple toy first. For example, a striped bunny.
Materials. Sock – 1 pc. Buttons – 2 pcs. or eyes for crafts, suitable size. Any soft material is for stuffing, it can be either cotton wool, padding polyester, or special small balls, or even small grains. A needle of medium size and thickness for sewing toys and a thinner one for embroidering small details. Threads to match the sock for sewing. Black threads for decoration. Knitting needle or thin stick. Scissors. Pencil. Any relevant to the topic small elements decor: hats, scarves, buttons and everything that your imagination and resourcefulness tell you. If desired, you can use a hot glue gun.
Let's look at a simple sequence of work
Choose your favorite striped sock.
Cut off the top elastic band from the sock and a small piece from the opposite edge. Fold the sock so that the heel is sticking out at the top.
Using a pencil or colored chalk, draw an outline for the bunny's ears.
And carefully cut out along the resulting contour. If you feel confident enough with scissors, you can cut without a preliminary sketch.
We sew the edges along the contours and turn them back inside out.
Let's start stuffing.
We fill our product with what we like, cotton wool or padding polyester. The main subtlety is that the ears, as the thinnest part, are filled using a long stick or knitting needle. You need to take a small piece of stuffing and use a stick to push it into the very edge of the ears.
We gather the sock along the edges with a needle and thread, but do not secure it completely. Let's move on to designing the face of our animal. At your discretion, you can draw a muzzle or sew some details with black thread. It remains to solve the issue with the eyes: you can make them from cute buttons or glue the eyes with warm glue.
From the bottom of the bunny we sew a circle with a simple basting stitch. Then we tighten and secure

As you understand, the color of the sock you choose and how you stitch the muzzle will determine what kind of character you get. At this stage, we will need the small decor options that you have prepared. Maybe you will make the hare's hair out of a piece of wool or give him an object in his hand.

Other options for crafts from unwanted clothes and accessories
We really hope that you liked our simple master class on toys made from socks, and that you have already become fans of such cute animals and weirdos. Of course, there are various schemes for making toys from socks, from the simplest to the most complex.
We will show you a few of them.


Making fun crafts with templates together with your child

Since we're talking about children, there are still very interesting toys, which you can not only make from a sock, but also perform a little performance with them.

We now invite you to sew a toy from a sock the way your imagination tells you. Maybe you will invent a toy or figurine that no one has ever done before I tried to do it.
To give your imagination more inspiration, we will show you several videos about sock crafts.
Content
Modern fakes are made from any material, for example, old and unnecessary socks can be an excellent basis for creating original toys, jewelry, paintings and much more. Very beautiful fakes are made from children's terry, bright and soft socks; there are many ideas on how to put old socks to good use.
Soft hare

In order to make a soft toy, you need to take materials such as thread, scissors, a marker, cotton wool, a needle and, of course, the main part, a sock, in this case a light one. The work begins by dividing the upper part of the sock into two identical halves, cutting out a rectangle in the middle to create two bunny ears. Then, the ears should be sewn together, and the sock should be filled with cotton wool; on the heel side, using a marker, draw the mouth and eyes of the animal. From below, so that the cotton wool does not fall out, the material should be sewn, thus obtaining an original and soft hare, everything is simple and fast.
You can watch the video in more detail.
Monkey

To create this soft toy you will need a simple pair of socks; this option for making fakes is the most inexpensive and accessible to anyone. Old socks are used as materials, and the filler can be not only cotton wool, but also padding polyester or small foam rubber.
One sock will be used to make the torso, hind legs and head, and the second will be used to create the front legs, tail and ears. For the muzzle, you can leave the cut part of the heel. After all the parts are cut out and prepared, you should sew the large ones first, then fill them with filler, finish the work and move on to the small items, the tail, ears and paws.
When all the individual parts are ready, you can assemble the toy into a single whole; for this, the ears, tail and paws are sewn on, the muzzle is shaped, and buttons are sewn in place of the eyes.
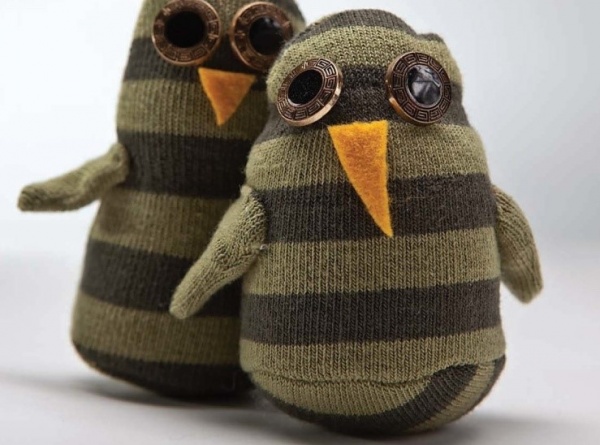
Using the same principle, you can sew not only a monkey, but also a raccoon, for example, you just need to use old socks of a different color. Among other things, the raccoon should not forget to sew one detail on its face, in the form of glasses, this will be a common feature of the toy with a real animal.
This type of counterfeit can be an original and real gift for those people who value “just because” items. It will become your favorite sofa toy and memory for a long life.
The video will show you how to make a toy in more detail.
Small fakes from old socks
Material such as worn-out socks can be used to create not only toys; they can be used to make, for example, small rugs. To do this, there are two manufacturing options, for example, cut the products lengthwise and use the resulting pieces like regular yarn, or you can sew the resulting shreds yourself. The process is labor-intensive, but the result is a very beautiful rug.

Using an old sock, you can decorate a cup, for this you will need the neck of the sock, carefully cut out a rectangle, hem it at the bottom so that the fabric does not fray, you can sew buttons in a random order or in places where the sides will be connected. Whether the piece is small or large, it doesn’t matter, you can sew on buttonholes, it will look very original.
And if the socks have a bright pattern, then there will be no need for decoration, the result will look good in any case. If the fabric of the socks is plain and dark, you can sew not only a button, but also another detail for decoration. This can be another colored fabric, decorative mesh or beads, beads or straw, as well as strands.
Bear
To work, you will need two terry socks, thread and needle, filling material, scissors, a felt-tip pen or stamp, and a button for the nose.
First of all, you need to make a pattern, cut out the bear, one sock will be used to create the head with ears, the second will go to the body and hind legs. All parts are carefully cut out and sewn together; only one side remains uncovered, because through it the paws, head and body will be filled with padding polyester.
All components are sewn on the wrong side, after which they are turned right side out; if the inside of the socks is terry, then this part can be made right side. Next, take the part that will be the head, cut off the elastic, fill it with filler and tighten the edges, attach a circle for the muzzle on top, and draw a smile and eyes with a felt-tip pen. These elements can be embroidered rather than drawn; a small button will serve as a nose.
Similar processes must be done with the second sock, cut out the parts, sew the edges on the wrong side, turn them right side out and fill them with filling. Thus, you will get a torso and hind legs; the final stage involves connecting all the parts into one whole.
Important ! The main advantage of fakes made from old socks is obvious: the toys are soft and unpretentious, they just beg to be picked up, you just have to look at them. And the most important thing is that you can make any animal in this way, just show your imagination.

Owl
Children can play with any fake made from old, worn-out socks, without having to spend a lot of money on materials. If you show initiative and imagination, you can turn a simple owl from an old sock into a rattle. To do this, you just need to put a Kinder Surprise capsule into it, fill the container with peas and it will rattle.
To begin with, all the parts need to be cut out, these are the wings, tail and beak, after which they should be sewn and set aside. The top of the sock, which is located at the very heel, must be cut off and pulled off, the resulting bag should be stuffed with soft material, then the excess elastic should be cut off. Don't forget about the capsule with peas to make a rattle.
Next, the body is sewn together, attaching the beak on one side and the tail on the other, draw 4 lines on the bird’s forehead, and also sew stitches and connect them, resulting in two rollers. The final stage will be the eyes and wings, the original rattle is ready.
Horse
In order to create an original horse on a stick for a child, you will need a little time and a minimum of materials, but it will really please any tomboy. To fake it, you should take a stick, the length of which is 1 m, and put the animal’s head on one side.
This fake is made quite simply, you need to take an old sock, stuff it with any material, for example, foam rubber, cotton wool or even hay, sew on the eyes and mane, put on a bridle and put the head on a stick.
Each fake confirms the fact that creating toys from socks does not require special skills and talent, and such work will not take much time, the main thing is desire.

DIY funny cat made from old socks
To make a cat, you need to take a knitted sock, padding polyester as a filler, thread with a needle, buttons and wool thread from which the bow will be made.

The height of the toy is optional; you can cut a piece of the sock of any length and stuff this part tightly with padding polyester. In the place where the sock was cut, fold the edges and sew them together using a blind stitch to form the animal's ears, pulling the corners. Pull the woolen thread in the place of the sock where the neck will be, pull it over, then sew a button on the body that will be a tie. On the cat's face, draw a smile, eyes and nose using a thread and a needle, and embroider along the contour.
Additionally, you can watch the video on how to make a cat out of socks
Snowman made from an old sock

Each toy will be unique and will be an excellent gift for any occasion, because it is made with your own hands. The manufacturing technique is very simple and does not require professional knowledge; homemade products will delight not only adults, but also children.
You need to take white socks, stuffing, beans, wool thread or floss, any decorations, such as small pompoms, buttons or any other items that you have on hand. Black beads are suitable for the eyes; you will also need a ribbon or a small piece of paper knitted fabric, thermo gun.
Fill the third part of the sock with dried beans, tie it at the top, lower this part and roll back the edges so that you get the brim of a hat. You should use a special gun to ensure that the margins do not roll down; they must be glued.
With help wool threads or tie ribbons around the snowman’s neck to make a scarf. The head of the toy should be large, because it will also have eyes made of beads, a mouth embroidered with black thread and a nose in the form of a colored pompom; the body can be decorated with other elements.
Additionally, you can watch the video on how to make a snowman
Post Views: 26
 How much fabric is needed for a dress: simple methods and basic calculation nuances
 Beautiful Christmas tree decorations made of plywood: we make decorations with our own hands using a jigsaw
 Manicure with acrylic paints at home