We sew the bear ourselves. How to sew a simple plush toy with your own hands
Useful tips
This is a soft toy good gift child, and if you make such a toy with your own hands, the joy and satisfaction will be many times greater.
Follow the tips, use your imagination and come up with your own soft toys that will delight you and your children.
DIY soft toys. Matryoshka.

This doll is very easy to sew, so it has become popular among those who like to make soft toy with your own hands. An experienced craftsman can make a tilde doll in less than an hour. You can involve children in the process - they will definitely be interested.
1. You can use tilde fabric to get a more colorful effect. But if you haven’t found a similar fabric, then two pieces of cotton will help you different colors, thick calico or satin.
2. Sew one piece of cotton to another and iron it.
3. You can use a printer to print the pattern or draw it yourself to the desired size.


* In this example, the matryoshka doll pattern is shown for three sizes, namely large, medium and small.
5. Now you need to sew the fabric along the pre-drawn outline. In this case, you need to leave a hole at the bottom. All that remains is to cut and turn.


6. Prepare white cotton fabric to draw your doll's face on it. Now cut it out and glue it to the matryoshka on the web.
7. Using acrylic paints and a thin brush, you should paint the portrait, and after the paints have dried, sew the doll’s face along the contour to the main part, using a decorative stitch.


* If you sew this doll correctly, it will be able to stand on its own. Pay attention to the pictures to understand how to stitch and fold the bottom corners inward, thereby creating a stable rectangle for both toys.


How to sew soft toys with your own hands. Photo lessons.
Baby

As in the previous example, this doll can be sewn with your own hands quite quickly. Despite the fact that the soft toy is immediately dressed, you can come up with separate clothes for it so that you can change it.

It is advisable to use soft but durable fabrics. In this example, the toy is sewn using American flannel and knitwear. The height of the “Kid” is 27 cm. The arms and legs were attached using button fastenings.
Snake

The pattern of this toy is not at all complicated, and if you pay attention to the images, you can see how the toy was cut in a spiral and sewn using an external decorative seam.
The view from the back is beautiful and simple.

It is advisable to use bright fleece or felt. Next, you can decorate the soft toy with multi-colored circles, flowers, etc.


Elephant

In this photo tutorial you can learn how to sew an elephant from a sock. For this soft toy you will need 2 pairs of warm socks.


Sunny is a little animal

The name of the toy may sound a little strange, but there is no denying that the product itself is very cute and children will really enjoy making and playing with it.


DIY soft toys (video)
Make a soft toy with your own hands. Kitty.

Such a bright, soft cat can be used not only as a toy, but also as a pillow.
1. Prepare a special tildo fabric, or thick cotton that does not fade or shrink after washing.

The main part of this toy is easy to sew - just trace along the pattern, stitch along the outline and cut with zigzag scissors so that the fabric does not wrinkle when you turn it inside out.
2. Making a muzzle

2.1 Take a close look at the image to see where you need to fill with filler. Next you need to sew and decorate.
2.2 Cut out an oval to make the face. Embroider the muzzle with threads and then make petals for the face, which then need to be turned out and sewn along the contour of the oval - this must be done from the inside.
2.3 The entire structure prepared in step 3 must be sewn from the main part of the toy cat.
3. Making a flower


3.1 First you need to cut out the petals for the flower.
3.2 The cut petals need to be rolled up, turned out, and a fold made at the base. After that, simply sew them together.
3.3 You need to attach a fabric-covered button to the middle and decorate the cat’s head (see picture).
* To make the ears more voluminous, you can use thin synthetic padding.
This is how it should work out for you
This is a tilde pattern

This is the other half of the toy cat

How to sew a soft toy with your own hands. Bear is a midget.

Unlike previous soft toys, this bear is not entirely easy to make, but the result will pleasantly surprise you.
To make this toy you will need knitting needles No. 2.5 and 100% acrylic threads (100g - 230 meters).
1. Prepare a thread in the color of the toy dress (in this example, the color is red) and start casting on 20 loops. It is worth noting that the first stitch of a row should always be removed, and the last stitch should be knitted purlwise, while knitting tightly.


Structure:
Rows 1 and 2 - knit all - thread color: red
Row 3 - purl all, start introducing white thread and alternating colors: red loop - white loop.
Row 4 - knit all - thread color: red.
The next 6 rows need to be knitted in stockinette stitch.
Row 1 - purl all - thread color: beige
Knit the next 8 rows with beige thread (the wrong side - with purl loops, and the front side - with knit stitches).
2. Now all the loops need to be collected on an auxiliary thread. At the same time, pass another auxiliary thread where the red and beige threads meet (from the wrong side - see image).

3. The face should be embroidered with dark thread. Prepare the fabric for the backing and cut a circle of small diameter from it.
4. Prepare the ribbon on which you want to hang your toy. Tie a knot at the bottom of the ribbon and secure it to the toy. Next you need to tighten the upper auxiliary thread.

5. Making bear ears. First you need to cast on 3 loops. Knit once and bind off the stitches.
6. Attach the ears to the toy’s head. Use a needle and thread to tie a knot inside the toy.
* To make the neck, thread and pull the thread between the bear's head and his dress.
7. We make the arms and legs of the bear in the form of a cord. First, cast on 4 loops using two knitting needles, and then knit 6 rows in a circle.
* For those who don’t know how to knit in the round, watch the video tutorial below.
8. At the end, the loops need to be gathered onto one thread, namely the one you knitted with. Next, using a needle, pass through the limb to the first thread, thereby the two threads will be side by side. You need to make 4 similar blanks.
* If you want to make the handles more neat, try threading them tightly into the body and tying the threads together in a tight knot.
9. All that remains is to fill the head and body of the bear with stuffing, and sew along the back seam. The handles need to be attached to the dress and a knot should be made inside the toy, and the legs, along with the hem of the dress, need to be sewn at the bottom.
DIY soft toys. Flying cat.

A cat like this can be easily sewn and painted at home, using only a small amount of materials.
Prepare a piece of plain light-colored fabric (its size depends on the size of the toy).
1. The picture shows a pattern. You need to make a tail, a paw, half a muzzle, and a torso.


2. Using a simple pencil, trace all the details on the fabric, placing them on the fabric in advance. Small parts can be sewn directly on the main piece and then cut out. You will need: 2 legs, 1 tail, a back with a head, a belly without a head and the face of a future plush cat.
3. Sew the toy’s face in the middle and cut it out.
4. Sew the tail and legs, being sure to leave a small hole where you need to make a straight seam. Next, cut out the back and belly.
Making your own teddy bear is quite simple if you follow these instructions described in this article! The first thing you need to do when you learn how to sew a teddy bear is to find a pattern that you like, as there are many options from beginner to advanced. Making a Teddy bear making is one of my favorite homemade crafts. These two approaches are easy for beginners and are created using very easy-to-follow patterns that can be made over and over again using different fabrics and materials, and without adding layers of complexity.
I mean, who says your pet teddy bear has to be brown and just fluffy to be cuddly? Why not make your own teddy bear with ultra-long purple hair, which would make a wonderful creative home gift. There's so much interesting stuff out there; It seems to be a shame to only make “normal” teddy bears.
Features of sewing a bear with your own hands
These two bears were a lot of fun and I would recommend going from scratch. But if you want to start something a little simpler, or if you're looking for a good craft gift, then a kit might be the best option.
How to sew a teddy bear with your own hands (1 option)

Even a pair of favorite pajamas that your child has just outgrown can be cut up and sewn into a cute bear. You may even find old beat-up stuffed toys that can be divided up and reused to stuff your bear or create new bears.
The first version of the teddy bear pattern
A fancy mini teddy bear that looks great when made with bright patterns and colorful fabrics.
This toy is perfect for a child to ride on; it's small enough to make a little extra fabric into something big enough to get creative with.
What do you need to sew a bear?
- Brown kraft paper (plain cardboard)
- Buttons, embroidery thread or fabric pen
How to sew a teddy bear
Step 1


Draw this loose Teddy Bear pattern and then cut it out. To make your teddy bear template, place the design on a piece of cardboard (an empty grain box works well for this), draw it, and then cut it out. Place the cardboard toy template on the back of your material, make sure any design on the material will exactly fit the size of the bear, then draw the template, flip it over and draw it again.
Step 2


Cut out both parts. Make your own teddy bear. Place both pieces on top of each other, on the other side. Sew together, leaving a gap large enough to stuff the bear.
Step 3


To help stop any wrinkles as you turn the right side of the bear by clicking around the curves of the bear.
Step 4


Turn the right side of the bear inside out. You may find it easier to use the wooden handle of a wooden spoon to push out the arms and legs.
Step 5


Fill the bear with polyfiber stuffing or soft toy stuffing of your own choice, then stitch the gap.
Step 6


However, for the bear's eyes I used a couple of sewn on snap buttons, however if you don't find anything that fits, it is best to sew on the "eyes" with thread. You can plan out the shape of the nose by stitching a triangle and then fill it in with vertical stitches. Using the (Y) shape for the nose will result in beautiful lips. Now steal your bear using the tape; use a bow on the head for a girl or a bow around the neck for a boy.
Of course, you don't have to be a kid to have one of these cute shades; These fun little hairstyles would make a great gift to use as a pillow for mom or grandma!
How to sew a Teddy bear (2nd option)


This cute little plush baby has a small belly and arms and legs that have enough flexibility to easily get the toy into a sitting position, but this little Ted is easy to make and can be created by hand or with a sewing machine.
I used long thick fur for the teddy in the picture, the great thing about using long fur (besides the wonderful one of course) is that it doesn't show any imperfections so the stitching doesn't have to be perfect which is good news because such thick fur can be hard work for sewing machine, so I usually stitch it by hand. When using any other fur or fabric, I would usually use a sewing machine.
Necessary materials:
- Sewing needle or machine
- Scissors
- Marker or chalk
- Buttons
- Cardboard (a large grain bin is good for this)
- Fake Fur or Cotton Fabric Material (3/8 yards)
- 1 small plastic nose or embroidery thread
- Polyester fiber filling
- Embroidery Floss for mouth (optional)
How to do it
Step 1


Print and cut out this teddy bear design. Place the template on the cardboard and draw it, then cut it out to make the template. Hamster teddy bear
Step 2


Place the fur back at the top and place templates on it to make sure you have fur going from top to bottom. Draw the templates with a marker or chalk, then turn the templates over and draw them again.
Step 3


Cut out all four pieces (two backs and two fronts). This model was made to provide 1cm seams. With the right sides together, pin the 2 front pieces together. Sew the two front pieces together; start at the top of the bears head and end at the beginning of the legs (see the pins in the picture) Repeat with the back sections but leave a hole in the middle of the back as shown in the picture (see the middle pins in the picture).
Step 4


Secure the seams (this helps stop any wrinkles when you turn the right side of the bear)
Step 5


If you are using a plastic shank and eyes, insert them now
Step 6


Attach or secure the front and back (wrong side) and then connect everything around.
Step 7


Turn the bear on the right side, you may find it easier to use the handle of a wooden spoon in your hands and feet to push them out.
Step 8
Align along the ear marks as shown. Fill the head of the head with Fiberfill, using enough filling to give the character a snout. Will be useful here again wooden handle for a spoon.
Step 9


Tie the head area with a strong thread, wrapping the thread around the bear's neck and tying it, this will be vitally invisible later and can be covered with tape. Place both arms and legs (use a wooden spoon if necessary), then draw along the marks as shown. Finally, strain the body cavity and close the hole in the back.
Step 10


If you didn't use shaded ones, place them on the buttons for the eyes. pull out any fur that gets caught in the seams
Step 11


If you didn't use a plastic nose, you will need to plan out the shape of the nose. You can easily create a natural looking nose by stitching a triangle onto the muzzle and then filling it in with vertical seams. you may find it easier to cut a triangle from a piece of black felt and then glue it onto the bear before stitching it, this will stop any fur poking through your seam and will give the nose a neat finish. Using a (Y) shape for the nose makes it easy to lead to the lips.
Step 12


Finally, wrap your pet toy in some chic new ribbon.
making a cute little homemade teddy bear
Let's delve a little deeper into this fascinating process and learn the technology of sewing soft toys. They are the easiest to make and the most sought after. To make a toy with your own hands, you should pay attention to the color of the fabrics. They should be bright and cheerful and pleasing to the eye; you can combine several shades. If you don’t have the colors you need at home, you can dye the fabric yourself; for this you need to purchase special dyes.
Their choice should be taken seriously, because they will be in the hands of children and the dyes must be natural and not fade. You need to cut the fabric very carefully and carefully ensure that the paired parts are the same size and that the sides completely match.

And for those who dream of playing real games, I recommend the site http://mygame-s.ru. There are interesting games for boys and girls that will bring benefits and a lot of fun.
It's not just racing, it's also a lot of interesting games different genres, as well as games based on famous cartoons and films. The mygame-s.ru portal will help you find your favorite entertainment and play it online!

Before processing the pattern on a sewing machine, it must first be processed with a buttonhole stitch. If the fabric is loose, it is necessary to leave seam allowances. When the pattern is ready, you can fill it with various materials.
The most affordable and popular is padding polyester. These toys can be machine washed, they dry very quickly and do not lose their shape. Toys can also be stuffed with synthetic fluff (these are soft small balls). It does not pill and also holds up well in washing.
If you do not want to spend additional money on purchasing fillers, you can use several options:
1. Remove such fillings from old blankets or pillows that you will no longer use.
2. Stuff the toy with small pieces of soft fabrics available at home. Before you start sewing a toy, you need to know what will be needed to create it: - fabric of different strengths and colors;
Sintepon, cotton wool, foam rubber, and other substitutes;
Buttons and beads for eyes and nose;
Sewing tools;
Ruler, pencil and paper for patterns.
For the right choice the fabric from which the toy will be sewn, you need to know their properties. For example, knitwear has excellent stretch, and you can sew any toy from it. Cotton fabrics are also suitable for different types, but they make harder toys. Terry is perfect for toys that require imitation wool. A bear cub, bunny or fox can be made from velor velvet or wool; such fabric will do its job perfectly. Felted fabric makes creative and original toys. But still, it is more suitable for making additional parts, such as paws, ears, nose, and so on.
Patterns of soft toys:
1.
2.
3.
4.
5.
6.
7.
8.
9.
10.
11.
12.
13.
14.
15.
16.
17.
18.
19.
20.
21.
22.
23.
24.
25.
26.
27.
28.
29.
30.
31.
32.
33.
34.
35.
36.
37.
38.
Sewing a soft toy with your own hands is always more enjoyable. You know for sure that it is made from safe materials and your child will be healthy and happy.
Today, teddy bears are very popular toys. Children especially love them.
These toys may not talk or hear, but kids still trust them with their secrets. Besides, boys love to play with them, and no one laughs at them - these are not dolls. Therefore, even doctors try to have such bears in their offices that can calm crying baby.
From this article you will learn how to make soft toys with your own hands. How to sew a bear, what tools and materials to use, and even learn how to make a talking bear with your own hands.
Now this is a very popular activity all over the world. Everyone who sews soft toys with their own hands finds their own style and manner. There are many exhibitions, competitions, and auctions taking place everywhere.
Bear creators communicate, share experiences and compete with each other, and bear collectors really have a lot to choose from.
Here you will learn not only how to sew a soft toy, but also, thanks to the recommendations given, you will learn how to make various other animals - you just need to find patterns or develop them yourself. And we, in turn, will advise how to understand them and how to sew on them.
Before starting work, familiarize yourself with the basic materials, fixtures and all stages creative process.
Materials for sewing a soft toy "Bears" with your own hands
Fabric for soft toy "Bears"
Bear creators choose 100 percent mohair fur. Its manufacturers offer a wide variety of colors, direction and shape of the pile.
The work is greatly facilitated by the dense base of such fur (the base of synthetic furs most often stretches, it needs to be strengthened), and even more so by the delicacy and quality of the pile!

The soles, palms, and inner sides of the ears are sewn from suede, velor, cotton, and felt. They often use the same fur, only they cut it off and pluck out the lint.
Clothes for the soft toy "Bears"
It is preferable to make clothes for bears from 100 percent cotton. You can use the old one as a material - after all, it has its own history and gives rise to memories.

How to stuff a soft toy "Bear"
Most often, soft toys are stuffed with padding polyester with your own hands. Before stuffing, tear it into small pieces.
For these purposes, you can also choose natural undyed combed wool. There is no need to grind it.
To make the bear cub heavier and creaky, a few small or larger stones are often thrown inside.
In addition, the bear can be stuffed with sawdust, dried plants with different scents, coffee beans, cherry pits, etc.
How to make a soft toy talk
If you want to make a talking bear, insert a cardboard or plastic box with a voice inside it.
Cover it with stuffing on all sides. When you turn the bear, you will hear him growl.
Bear eyes
Collectors and other creators of bears insert glass eyes into them. It is not recommended to give birth to bear cubs with such eyes, but we still admit that glass eyes look livelier and more natural.
They have a thin metal leg through which the thread is pulled. The eyes come in different colors and sizes. Often transparent eyes are scraped out from the back side and painted in desired color.
Bear eyelashes
You can use special eyelashes intended for making toys (sold in the form of short strips) and false eyelashes from cosmetics stores. They are glued to the eyelid with glue or any other transparent glue.
Threads for sewing soft toys "Bears"
When creating soft toys with your own hands, choose durable threads. Most often they are sewn with one thread.
Especially strong threads will be needed to form the eyes and eye orbits. Special threads are offered for these purposes.
Used for embroidering fingers and nose floss threads or "Iris".
Glue
Glue will be needed to glue the eyelashes and connect the threads of the head. Any craft glue will do.
The most important thing is that, after drying, it remains transparent and does not turn yellow.
A special composition, sold in specialized stores, is also useful, which prevents the edges and fabric from fraying.
Use it to lubricate the edges of the parts, especially the slots through which you will stuff them. Use small amounts as this product is very thin.
Colors that highlight the bear's personality
A sewn bear is often tinted, i.e. paints slightly emphasize certain places. For this, it is best to use oil or textile paints - once dry, they do not make the fabric hard.
Patterns for soft toy "Bears"
Perhaps many of us, admiring the store shelves, wanted to learn how to make the same ones, but as soon as we wanted to take on this work, a lot of different questions immediately appeared.
Is not it? But they all fade into the background if you don’t know where to get patterns for soft toys and how to read them.
In this article, perhaps, you will find answers to these questions. You will also learn about common markings on seams used for toys.
You can’t sew a teddy bear without patterns. They can be found on the Internet (some masters publish their patterns for public access and offer to use them for free), in special magazines and books. Everywhere there are certain symbols.

This article offers a pattern for a soft toy “Bear”. How to read a pattern correctly:
- First of all, on each soft toy pattern you will find an arrow. It indicates the direction of the pile.
- The large dot indicates the junction. Here you will need to pierce a hole and insert a metal jumper. Remember that the jumpers will only be in the internal parts of the front and hind legs. The body should have four joints (two each for the front and hind legs). Often, but not always, the junction of the head and body is marked. Make a hole on the paper pattern so that the joint can be marked on the material.
- Most often, patterns for soft toys mark areas that do not need to be sewn up. When you sew the parts together, leave these places open, only here secure the thread very firmly and be sure to lubricate the edges with a liquid that prevents the fabric from fraying. At this point, you will turn the toy right side out and stuff it, and then sew the hole shut.
- On some patterns, the bodies of toys (and sometimes heads) are marked with triangles. These are darts. In such places you will need to sew inserts, thanks to which the body (sometimes the head) looks more swollen and round. Often there are inserts at the bottom and top of the body, sometimes there can be only one. When cutting out all the parts, do not rush to cut these triangles.
- Also, the pattern of the soft toy Teddy Bear or any other indicates how many parts you will need. If two parts are needed, 2 (1 piece) may be written. This means that you will need two parts in total, one of which should be a mirror image. The same thing can be written like this: 1 = 1 pc. Make as many pieces as indicated on the pattern.
Preparing a pattern for a soft toy
Prepare all the details of the pattern from cardboard (which are given in the previous article) or any thick paper, cut out as many parts as indicated on each part (for example, head - 2 pieces, ear - 4 pieces).
Mark all the necessary markings on them, be sure to transfer them to the fur. Selecting the fur in advance, washing and drying it.
Save fur, fold all the parts as closely as possible. Next to the pattern it will be indicated whether it has already been made with a 5mm seam allowance at the edges.
This is a pattern with no seam allowance! Therefore, leave 1 cm gaps between the parts.
Use a pen to clearly outline all the details. Use a cross or a dot to mark all joints, as well as places that do not need to be sewn. Remove the pieces and mark a seam allowance of approximately 5mm around them.
What seams to use for soft toys
Most often, the pattern of a soft toy bear or other animals is sewn by hand after cutting out - only sewn big toys. In this tutorial we will learn how to make the following seams.
All parts are sewn together with this seam. Pull the thread out at point 1. Then stick the needle into point 2, from there into point 3. From point 3 stick the needle into point 1, from there into point 4, etc.

This seam will need to be used to cover the ears and tail. Stick a needle from the inside at point 1, prick from the top into point 2. Then pin from below at point 3, etc.

With this seam it is necessary to sew up those places on the paws and body through which the bear cub was stuffed. Stick a needle from the inside at point T, from the top to point 2. Then from below, stick the needle at point 3, etc. After making a few stitches, tighten the thread, and then sew further.

How to connect the parts of a soft toy
The arms, legs and head of real stuffed bear toys must move. Therefore, body parts are connected with special devices.
To connect body parts, wooden disks or disks made of thick compressed cardboard, as well as metal disks, are used. They are different sizes. Choose them according to your pattern sizes.
The disk should be attached at a distance of 5-10 mm from the edges of the pattern.
Wooden disks and disks made of thick compressed cardboard are the main ones - they are like the joints of a bear.

Metal discs are placed on wooden or cardboard ones. They are needed so that the metal jumpers do not break the disk.
For small bears they make special plastic discs. They are small (can be as little as 6mm in diameter) but very durable.
Metal jumpers
Metal jumpers come in two types of shapes and with a round head. All metal jumpers come in several sizes.
Using T-shaped jumpers, the arms, legs, and sometimes the head of the bear are connected. They are used for one-way connection.
Metal jumpers with a round head are used for two-way connection. The head is most often attached to the body in this way.
Types of connections between paws and head:
One way connection
- This connection requires T-shaped metal jumpers, a wooden or pressed cardboard disk and a metal disk.
- First, place a metal disk on the T-shaped jumper, and then a wooden or cardboard one.
- With the help of such fastenings, arms and legs, and often the head, are attached to the body. Thus, the soft bear toy will move its legs and arms.

- This mount will require two metal jumpers with round heads, two metal and one wooden (or cardboard) disk.
- Disconnect the legs of the metal jumper.
- Interconnect two jumpers and squeeze the legs together.
- String disks first with metal, then with wood, or with cardboard and again with metal.
- Using a special device, bend the legs of the metal jumper; one leg is slightly longer than the other, so bend it first, and then the second. Press the legs firmly against the metal disk so that the jumper does not move.
- This is how the head is attached to the body.

Tools for connecting parts of a soft toy:
- Scissors. They must be pointed, sharp and always straight. Scissors with curved blades will not work; they are difficult to work with.
- Tweezers. It will be very useful when you stuff the bear. Using tweezers, you can easily insert a piece of padding polyester into even the smallest part of the bear.
- Wire cutters. Have several types of wire cutters with you. Some will be needed to twist the fasteners, others will push or pull out the needle, etc.
- Special cutters will especially help when you make small bear cubs. They have teeth. Take the fabric with a pair of wire cutters, bring the handles together and turn them inside out. This way you can turn even the smallest part right side out without the slightest difficulty.
- Awl. It is necessary to pierce holes for connections.
- Stick for stuffing. With its help, it is much easier to stuff the details of the bears, reaching all the bends. A comfortable handle will protect your hands from calluses and abrasions.
- Needles and pins. you can use regular needles, but for shaping fingers, eyes and eye orbits, be sure to purchase needles different lengths(approximately 8-18 cm). You won’t be able to do without buttons; you need to use them to sweep away the parts in order to sew them together more evenly.
- Binding Tool. This is a metal tool with a slot, the end of the fastener is inserted into it and bent. The slots come in different sizes depending on which fastener needs to be bent.
- Brush. During sewing, the bears' fur gets tangled and dust and debris stick to it. Therefore, after finishing your work, comb the bear. Animal brushes are suitable for this.
How to sew a soft toy "Bear"?
Preparations for sewing
Cut out all the parts along the lines already with seam allowances. Do not cut the dart into the body. Also, so that the soft toy with your own hands and its seams turn out beautiful, and the wool next to them does not get tangled, cut off the pile from all parts about 5 mm from the edge.

At the joints (they are marked on the wrong side with crosses or dots), thread a thread of a different color from the fur. The knot should be on the front side. There will be eight such places in total, two on the inner sides of the front paws, two on the inner sides of the hind legs, four on the body.
Coat the edges of the fur special means for fur. If you are sewing the soles, palms and inner sides of the ears from the same fur, trim the pile on it. To make the material even, shave or pluck the remaining fibers with tweezers.
How to sew on Mishka's hind legs
You can start sewing a Teddy Bear toy with your own hands from any part. This time we'll start by sewing the back legs.
Using pins, pin together the paw parts. Sew them together using a machine stitch. Leave open spaces for stuffing and for soles. Then baste the soles with the right sides facing inward.
To ensure that the paws are the same and the soles are not skewed, first secure them in the middle. Then baste the soles and sides. Turn the paws right side out.

Stuffing paws "Bears"
Start stuffing. First, push small pieces of padding polyester or wool to the soles.
If you embroider your fingers, stuff it tighter. When it comes to stuffing the upper part of the paw, do not forget about the one-way connection.
First, in the place marked by the knots of the thread, make a hole with an awl.

Insert a metal jumper, metal and cardboard disks inside. The discs should remain inside the paw, and metal jumpers should fit through the hole.
The trick to ensure that the disk is pressed tightly against the material and no wool or pebbles gets under it is to put a hard eraser on the jumper.

Make a few stitches again and tighten the thread again. If you want your soft toy to be neatly made with your own hands, and the seams are not visible at all, sew with threads of the same color as the fur.
Often the seams or their sections are specially made with threads of a different color - this makes the bear look more ancient.

Now let's learn how to form fingers with threads. The classic bear has four fingers. Mark the toes with pins at the top and middle of the foot. Do this on both paws at once so that the toes are equal and identical.
Prepare a long needle and cotton. Embroider them with double thread. Insert the needle into the fur on the side of the sole and embroider as shown in the photo. To make your fingers stand out more, shorten the pile in the rows with them or cut them off completely.

Sew the palms to the inner sides of the paws using a machine stitch. To sew smoothly, pin them first.
Sweep both parts of the paw - outer and inner. Also sew the parts with a machine seam. Be sure to leave an open space for stuffing.


How to sew the head of a soft toy "Bear"
The head consists of three parts, two side parts in a mirror image and an insert. First of all, pin the side parts together and fold them right side inward.
Machine stitch using small, even stitches. Pin the insert with its side parts and sew with a machine stitch.
The head needs to be filled very hard and firmly. Therefore, coat all seams with a thin layer of craft glue.
When the glue dries, turn the head out and stuff it - first it’s easier to push the pieces of wool in with tweezers, then use a special stick for stuffing.
While stuffing, constantly monitor the shape of the head so that the wool is distributed evenly. The head should turn out to be very hard, especially the muzzle, because you will need to embroider a nose on it.
Insert the bent legs of the metal jumper inside the head. The other legs, not bent, should remain protruding from the head. Pull the thread firmly until all the material is pulled together around the leg of the jumper.
If you cannot pull the fabric together completely, sew it with the same thread using an invisible seam and secure it firmly.

How to make a "Bear" face
Next, the most interesting and creative part of the work will begin - we will create the little bear’s face, give it expression and emotions. You can start either from the nose or from the eyes - as you wish. This time let's take the nose.
As you already understand, do-it-yourself soft toys are made by hand, so even the nose will be made not from a button, but in a more artistic way. The nose of a traditional bear is embroidered, so we will demonstrate this method to you.
First of all, trim the lint on the muzzle a little, this will make it easier to see what shape to make the nose. Just take your time and don't cut off too much at once; it's better to cut a little at a time until you have enough. Then, on paper, draw a nose of the desired shape and size.
To make it easier to draw the desired shape, cut it out from soft material. Place the piece cut out of fabric onto the muzzle. Secure the shape with pins. Make sure it is centered. Then sew the nose with thread.

First, play with your eyes, put them in different places and see which location turns out to be the most successful. Next, trim the fur around the eyes.
To make your eyes look more alive, you can make eye sockets by threading a thread through and pulling tightly to form a hole. Then glue on the eyes.

First, fold the ear pieces right side out and pin them together. Machine stitch. Turn it inside out.
Use pins to pin the ears to the head, but first place them in different places until you decide that this is how the bear looks the cutest. Sew on the details.

The mouth of these do-it-yourself soft toys Mishek is embroidered with the same threads as the nose. Also use pins to make a mouth for the bear.

How to sew the body of a soft toy "Bear"
The parts of the body, like all the others, are folded with the front side inward, fastened with pins, and swept away. Then sew with a machine stitch. Leave an unsewn gap at the top, in the place where the dart seam will be, this is where we will attach the head.
Also, do not sew up the padding areas. Turn it inside out. All parts (front and hind legs and head) are attached to the body, so don’t rush to stuff it.
Use an awl to pierce the connection points in the body (two for the front and hind legs). Insert the leg of the metal bridge of the front or rear paw into the hole. Place wooden and metal disks on the leg of the bridge from the inside of the abdomen.
Using a screwdriver, bend the legs of the jumper. Press them firmly onto the metal disc. In this way, attach the front and hind legs and head to the body. This is what all the connections look like inside.

When you connect all the parts, fill the tummy with small pieces of wool. It is very important to compact the padding well around the legs of the jumpers so that by pressing on the bear they cannot be felt. Add a few spoons of small stones.
If you want, now is the time to insert a box with a bear's voice. Surround it with fur so that it cannot be felt. Sew up the back in the same way as you sewed up the paws.

Pin the tail parts together, baste them and machine stitch them. Turn it inside out. Since the tail is very small, it will be much easier to turn it out with special pliers - pinch the tip of the tail with the teeth and pull. Fold the edges of the ponytail inward and sew around it, just like the ears.
Use a pin to mark the location for the tail and sew it on.
While sewing, the teddy bear's fur gets tangled and debris and dust stick to it. Therefore, after finishing your work, comb the bear.
DIY decoration of a soft toy "Bears"
Very often, bears and other animals are tinted, i.e. certain places are made brighter with the help of oil or textile paints. When painting with both colors, use soft brushes several millimeters thick.
Dip the brush into the paint, remove excess, and carefully tint soft bear. Most often, the muzzle around the nose, mouth, around the eyes, and ears are tinted. The toes of the front and hind paws, soles, palms, and the fur around them are distinguished.
This is what our bear looked like before tinting and this is what it looks like after it.

So we did plush toy with your own hands, and the master class with photos, we hope, helped you in creating it. There's still quite a bit left.

The nose can either be waxed or varnished. It is often covered acrylic varnish, several layers. The nose of a traditional bear is turned up.
Natural beeswax or batik wax is suitable for these purposes. Melt some wax and apply it to your nose with a brush.
Immediately, using a hair dryer, blow a stream of hot air onto the wax - it will melt and be absorbed into the threads. Treat one side of the nose first, then the other, making sure that the melted wax does not drip onto the muzzle.
When the first layer melts and cools, repeat the same procedure at least one more time.
When the wax is well absorbed into the nose and cools down, bring it to a shine using a woolen cloth.


Even the most mischievous child will be pleased with such a hand-sewn soft toy “Bear”!
Cute plush toys win the hearts of not only small children, but also adults. And every family probably has a Teddy bear at home. The variety of such bears is amazing: classic Teddy, Teddy of the 20s and 40s, antique style, vintage. Many needlewomen love to lovingly sew toys for children. This article will be useful to everyone who wants to know how to sew Teddy bears with their own hands using patterns.


Classic version
The pattern of a classic Teddy bear looks like this:

Necessary materials:
- paper;
- a simple pencil;
- scissors;
- accessories;
- padding polyester.
First you need to create a pattern. It is better to print it from the Internet in full size.
- front part of the head (2 pcs.)
- back of the head (2 pcs.)
— belly parts (2 pcs.);
— back parts (2 pcs.);
— ear parts (4 pcs.);
— tail parts (2 pcs.);
— legs (4 pcs.);
— hands (4 pcs.);
— feet (2 pcs.).
Transfer the pattern onto the plush fabric. Then cut along the outline of the pattern on the fabric. Place the pieces with right sides facing each other. Stitch them. Handle sewing machine. Turn right side out. Sew the resulting parts of the head and body together, leaving a small hole. Fill with padding polyester. Next, fill in the details of the arms and legs of the bear.
Sew all the finished parts. The product begins to look like a bear. Add accessories in the form of a nose, eyes, the inside of the ears and feet. On the tummy you can embroider the letters of the English alphabet “Me to you”.
To make the Teddy more touching, apply patches to create a vintage look.

The master class on sewing a classic bear is over, all that remains is to please your beloved baby with a new toy.
Pants for teddy bear
Clothes for Teddy bears using patterns are very easy to sew. To do this, you will need detailed instructions presented below.

Select materials for future pants.
Cotton corduroy and a piece of cotton for the pocket facing are perfect. A piece of Velcro tape and rapeseed tape will also come in handy.

Then start cutting, outline the details of the front and back halves of the trousers, the detail of the pocket and facing. Leave an allowance at the bottom of 1 cm and an allowance on the sides of 5-7 mm. Cut the pocket facing along the contour of the pocket entrance and the bottom of the pocket.


Then fold the facing to the wrong side, iron and lay finishing stitch. You will get two trouser parts.

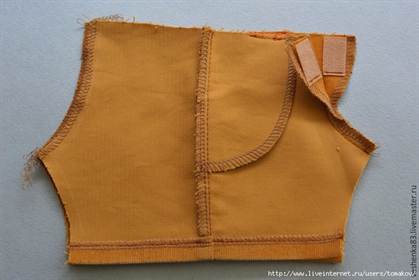
Place the pocket piece on the front halves of the trousers, align the side and top sections, and baste. The photo below shows what the parts look like from the front and back sides:

Overcast the edge of the pocket and sew it on the side and top, as in the photo.

Stitch and overcast the side seam and at the same time the bottoms of the trousers, 1 cm - hem of the bottom, sweep and iron.

Place a finishing stitch along the bottom of the trouser legs.

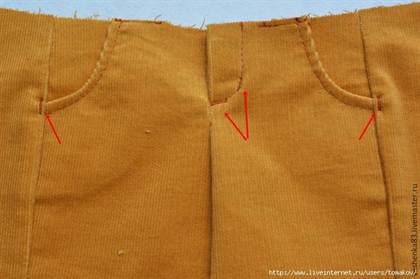
Now it's time to start processing the codpiece and the middle seam of the trousers. Overcast the middle seam sections of the front and back halves of the trousers. Make a line as in the photo.

Sew pieces of Velcro tape along the bottom section. Sew only along the bottom edge so that the top section is not covered with ribbon or belt.
Make a finishing stitch - codpiece.

Place fastenings on the codpiece and pockets.
Sew the middle seam on the back half of the trousers, leaving an unsewn area for the tail.

Baste the rapeseed tape and stitch. Sew the top edges of the Velcro tape.

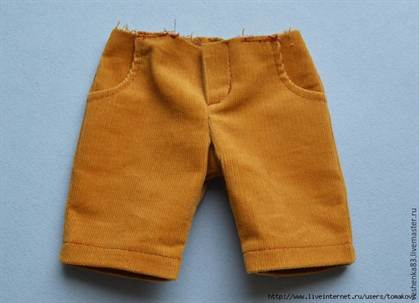
The pants are ready! If you reduce the size of the pattern, the pants will easily fit mini Teddy bears.
 “Thrown out of the window, forced to drink urine”
 Interesting DIY photo frames
 How to call your beloved guy so that he likes it: choose an affectionate nickname