DIY triangular garlands. DIY birthday flags
Very little remains until New Year's holidays. And although Metal White Rat will take effect only on January 25, we need to prepare for the meeting now. Think over the menu that should include. Think about how to decorate a house, apartment,...
The totem likes everything original, so hand-made or garlands are perfect. The rat loves shine and soft colors. She will especially like gold and silver, white, shades of the pastel spectrum, orange, purple. You shouldn’t use everything in one decoration at once; it’s better to give preference to one.
I offer you several interesting options, which everyone will surely like and will decorate your home. Many jobs can be done with children or even offered to do something during labor lessons at school.
How to make New Year's garlands with the symbol of the year with your own hands - Rat (Mouse) templates
Themed decorations are the simplest and most original way appease the symbol of the year. Cute, almost cartoonish, images will surely delight children. Therefore, such garlands will decorate a children's room and groups in a kindergarten.

To work we will need:
- thick paper;
- scissors;
- hole puncher;
- braid.
Operating procedure:
Download animal templates. The images are mirrored. This is done so that the garland looks the same from any side. Carefully cut out the shape and glue it together. Use a hole punch to make holes in the animals' ears and thread the ribbon through them.


The finished decoration can be mounted under the ceiling. You can also make simple flags with images.

Catch the flag template and single images of animals. Right-click, download, and then simply enlarge to the size you need. You can also draw the blank by hand.


Another option is to fix it in a spiral on the Christmas tree. You can place the same or different images on one garland.
And try to create another decoration in Japanese technology origami. This work can be entrusted to children 9-10 years old. They will surely love how a simple piece of paper turns into a very cute mouse.

To work we will need:
- paper (regular or special for origami) 15x15 cm;
- rope;
- wide ribbon.
Operating procedure:
Fold the sheet diagonally twice. Make sure that the corners meet clearly, the fold lines are clear and even. Position the workpiece so that the square becomes a diamond. Bring the bottom vertex on the left and right to the center line. Repeat the same steps from the top.
Expand. Fold along the folds, creating a triangle fold in the center. These are future ears. You should get an elongated rhombus. Immediately determine where the mouse’s muzzle will be (in this master class it’s on the bottom) and where the tail will be. Take each triangle-ear by the top point and lead it to the base. Iron all folds carefully.
The diagram looks like this.

Lead the lower part of the workpiece with its apex to the triangle, which is formed by the bends next to the “ears”. The vertices should touch. Iron the fold, bend it back. Turn the workpiece over. Fold the halves towards the middle on both sides. Turn inside out. The result is a muzzle.
Grasp the top point of the remaining part of the workpiece. Lower it down, folding it in half. Mark the fold. Carefully unfold and fold the middle inward. Then bend the tip so that it fits slightly inside the first fold. Hide any excess by simply folding it under. This will create the tail and back.
Return to the ears. Fold the top so that it lines up with the back. Take pencils, felt-tip pens and draw a mustache and eyes for the mouse. Attach the finished symbols of the year to a rope with some distance from each other. For this I use decorative clothespins or brightly colored paper clips.
I suggest tying bows from a wide ribbon between the mice. Its color should match the tone of the central design elements.
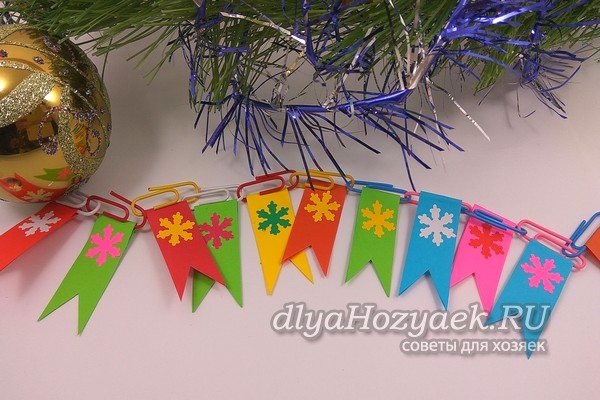
Garland of flags made of paper and paper clips for the New Year 2020
It is not difficult to imagine that such multi-colored chains can become the basis of beautiful garlands. You can hang them in this form on a small Christmas tree, they will look bright. But you can also make children’s favorite flags. And come up with your own version of decoration.

What you need to prepare to create a craft:
- a box of multi-colored paper clips;
- colored paper(you can use leftovers from previous creative works, since you will still need to cut the paper into thin strips);
- glue;
- a snowflake-shaped hole punch for decoration (or stickers, printouts of snowflake designs, pens to draw them on, etc.);
- scissors.

How to do
To create the frame, take colored paper clips, coated with enamel or painted in another way. For the flags themselves you will need colored paper. Cut thin strips from it. The width should not exceed the length of the paperclip. Draw a bird on one side so that you can later cut out the corner of the flag.

Thread one side of the strip through a paperclip and pull through. Fold the strip in half crosswise. Glue the ends together. Cut out the bottom part with a birdie shape to create a flag.

Prepare many strips of the same size for decoration.

Insert a different color of paper into the hole of each brightly colored paperclip and turn it into flags in the same way. Use glue and scissors.

Using a shaped hole punch, make a snowfall using not only white, but also colored paper. This way you can mix 3 colors in each link.

Glue snowflakes on both sides of each flag (or use another decoration method, such as adding snowmen, penguins, bullfinches, or other winter objects).

All that remains is to fasten the paper clips using the standard method to form a long chain of flags. The result is a wonderful New Year's garland that will become an unusual holiday decoration.

Homemade garland from candy wrappers
You can collect a huge number of candy wrappers of different colors, patterns, textures, you shouldn’t throw away this wealth, because you can make New Year’s crafts from it. It is enough to come up with some fragments that can be endlessly alternated and assembled onto a thread, and you will get an interesting decoration.

To work you will need:
- mix of candy wrappers and foil;
- thread and needle;
- stapler if necessary;
- scissors if necessary.

Prepare different wrappers. It is advisable to use different shades, and the sizes can either be the same, or cut them with scissors. All completed parts will be attached to a strong thread.
Step by step work
Roll the silver foil into balls of approximately the same size. They, like beads, will be strung on a thread.

To make fan-shaped pieces to create alternating links, fold each candy wrapper like an accordion. Then bend the resulting strips in the center. Use your fingers to press down on this area to secure the bend.

Take a long thread and thread the needle, tie a knot at the end of the thread. Thread the first foil ball through, then thread the folded part of the fan through.

Thus, alternate the details. Thread the balls and then the wide pieces. You can use a stapler to fasten the side parts, and the garland becomes one whole.

Assemble a snake from a large number of segments. If you will use the original wrappers different color, then the whole structure will turn out to be motley.

I suggested a great way to utilize the wealth that children collect after each candy they eat. And after the holiday, you will have even more such raw materials, so you can come up with other options for decorating the Christmas tree.

Craft Stars in the form of a garland for the New Year for kindergarten
You can create this beauty with your own hands using glitter foamiran (preferably with an adhesive base). Be sure to involve children in such creativity, because it is for them, by and large, that the room and the Christmas tree are decorated before the fabulous night. Glitter foamiran with an adhesive base is an inexpensive material for children's creativity, which is sold in sets. You can buy yourself such sparkling wealth, then make a lot of stars different sizes to fill the garland to the required length. Let's look at a master class on how to make it.

What was used:
- glitter foamiran (thick, sticky on the back side);
- 2 star templates printed on a printer;
- scissors;
- strong thread (knitting yarn, but can be replaced with nylon or other thread, thin tape).

How to do
Choose 2 sheets of different colors or use the entire mix included in the set for a colorful effect. Print on paper and cut out the stars, you can use parts of two sizes or more. For convenience, stick the templates onto cardboard. Trace the outline of the stars on the back side of the selected sheets of shiny material.

Cut out all the stars along the outline. Make 2 servings if you only choose 2 sheets to work with.

For one star on the garland you will need 2 blanks, since they will be glued together with their back parts. Take a strong thread. Remove the protective paper. Stick on sticky layer thread in the center.

Cover the top with a second similar star, trying to clearly align the corners to create a symmetrical figure.

Assemble a long garland at random, alternating parts by color and size. This adhesive-based material adheres well.

A beautiful interior or Christmas tree decoration is ready. It sparkles and sparkles, looks very beautiful, and is easy to do if you work together.


An easy master class on making a garland from colored paper
The name speaks for itself. The work will take very little time, but the result will please you. Such decorations are suitable for home, kindergarten or even schools. The idea can be implemented in school labor lessons.
 Source: https://www.youtube.com/channel/UC5ULDV816GiEvfgvrC4hNsg
 To work we will need:
- double-sided colored paper;
- scissors;
- ruler;
- pencil.
Operating procedure:
Fold the paper in half lengthwise. Then again from the blind side. Iron the folds carefully. Place the workpiece with the fold down. Draw a strip 1 cm wide on top. Place marks on the fold line in increments of 1.5 cm. Draw lines. Slice the “noodles” to a horizontal line.

Turn it over. Make cuts between the cuts, also not reaching the edge 1 cm. Carefully unfold the sheet and stretch it. There should be a “network”.

Make a few more blanks in other colors. Glue them together, bringing them to the desired length. The garland can be hung on the window, secured to the tulle with pins.

DIY garland of paper snowflakes for New Year's Eve
I really like the paper analogues of winter precipitation. But I also love garlands. In this master class I propose to combine them. You will get one original decoration.
 Source: https://www.youtube.com/channel/UCWqcfwUxk9a7qGqt7892FFA
 To work we will need:
- white paper;
- scissors;
- pencil.
Operating procedure:
Divide a sheet of paper in half lengthwise. Then cross each half by two more stitches. Fold the resulting rectangle along its width. Each wing is brought to a fold. Fold in half again.

Starting from the fold line, draw the outline of the future snowflake. Carefully cut and then unfold.

Repeat steps 1-3 with the remaining paper. Fasten all parts of the garland together with tape. Add elements until you reach the length you need.

Snowflakes don't have to be white, they can be colored.

How to make a garland of pine cones and bows to decorate a room
Look how beautiful it is! Natural material can be painted with golden paint and bows, beads or Christmas balls can be added. A version of such a craft is presented in this master class, and you can easily reproduce a similar copy with your children to decorate a room or even an entire classroom. The more cones you collect in the park or forest in the fall, the longer the garland you will get.

What you need to prepare for work:
- twine or thin brocade ribbon for the base;
- cones;
- golden acrylic paint with a brush or other paint to cover the surface of the pine cones;
- beautiful satin ribbon with lurex;
- glue;
- half beads;
- Christmas balls.

How to do
Take everything to work necessary materials. You can keep bows and balloons in one color scheme, you don't have to use balloons if you have enough pine cones to fill the decoration. Cover the surface of natural material with golden acrylic paint. If you use a brush, this coating will be uneven. Full coloring can be achieved using spray paint.

Prepare the base of the garland, such as twine or thin brocade ribbon. Attach the cones at some distance from each other using a glue gun.

For additional decoration, prepare bows from satin ribbon, and decorate the middles of the bows with beautiful half-beads.

Glue each resulting bow to the top of the pine cone to hide the places where it is attached to the twine. This way, you will already have a beautiful garland modeled, but you can also decorate it additionally.

Between natural materials stick small balls. There you have it, something wonderful is ready. Christmas decoration, which can be hung on the Christmas tree or on the wall. It is unusual, looks elegant, festive and lifts your spirits.


Step-by-step production of the New Year's garland “Snowmen” for windows
On New Year's Eve, glass surfaces are often painted in my family. But how difficult it is to wash them later. And I found an alternative. Making such a decoration is not as difficult as it might seem.
 Source: https://www.youtube.com/channel/UCfUNn0nNcM35FBKL11tB1Iw
 To work we will need:
- A4 paper;
- stationery knife;
- pencil;
- scissors.
Operating procedure:
Divide the paper along the long side. Take one half. Fold it in half. Then fold each wing again, towards the fold line. Draw a snowman. Carefully cut along the outline. Open it up.

Repeat step 1-3. Then we color our characters, draw the nose, eyes, buttons and hat. We connect all the parts with tape. Or you can do all this using the applique technique - it will be even more beautiful.

Making a garland from plasticine for a wall or Christmas tree with the children
Candy decoration is popular at all times. Who among us has not made long chains of sweets and hung them on the Christmas tree or on the walls? How nice it is to gradually remove the candies from the branches and enjoy such delicious and favorite treats. This lesson also shows how to make a simple candy garland, but these will not be real sweets, but lollipops made from ball plasticine. Such a craft can be considered as a practical joke, because friends will probably want to eat delicious candies, but it turns out that they are not real at all.

What you need to prepare to make a New Year's craft:
- ball plasticine;
- stapler;
- file or tight plastic bag;
- golden ribbon or serpentine;
- thread (optional).

How to make a decoration
Prepare plasticine for work. Candies reminiscent of candies will be made from it. You can tie “treats” to the thread or simply staple them together. First, prepare these small pieces.

Turn each into a small triangular-shaped slice. Connect them together, alternating colors. These slices should be approximately the same size.

To make each lollipop round, fasten together about 4 pieces of two colors around the circumference. You will get two-color caramels. Then continue working the next day, when the plasticine has dried well.

Cut the prepared file or thick plastic bag into squares. Wrap a piece of candy in each one. Also have a golden ribbon ready to tie the ends.

Twist the candy wrappers, the candies will be clearly visible through the transparent plastic, they will be in no way inferior to the real thing. Tie bows at the ends with gold ribbon.

Using a stapler, assemble a garland or tie each candy onto a thread. The result was a beautiful New Year's decoration - bright and believable.


Ideas for making garlands with your own hands from all sorts of things
Shortly before the New Year, all housewives begin to sort through all the boxes, boxes, bags in search of what is high time to throw away. But I ask you not to rush. I offer several master classes in which I will tell you how you can easily turn unnecessary objects into a real masterpiece. I'll start with the original, very fragrant garland. Such eco-friendly jewelry is in trend today. And the Metal Rat likes them too.

Childhood is such a wonderful time when every holiday is a great joy. And, of course, we want our children to remember these days for a long time. A birthday, graduation from kindergarten, a matinee - all this should be held in the appropriate atmosphere. You can create it yourself by decorating the children’s room with balloons, garlands, flags with inscriptions, delicious gifts just good mood guests.
Varieties of garlands
You can make several types of garlands with your own hands:
- The simplest and most common ones are made of paper. They can be in the form of flags of any shape, hearts and any other symbols.
- Made from fabric - similar to paper.
- From artificial finished parts (butterflies, volumetric letters, flowers).
Garlands made of paper flags have a number of advantages both in production and in use:

Well, now let's move on to step by step production. We choose the shape of the flags of our future garland. It can be triangular, square, rectangular or more fancy and complex. In order not to draw each flag separately, if you have a printer, the stencil can be easily printed on colored paper. And if you want to add originality, you can print the pattern on white paper using a color printer. Garlands made from bright pages of old magazines look interesting. And if the garland is made by children in kindergarten, give them ready-made flags cut out of white paper and paint. Let everyone color theirs the way they want.
If you are using plain paper for a printer or colored paper from creativity kits, we will make double flags. The flag blank should be 2 times larger than the finished element and contain its mirror image, with a fold line in the middle. Accordingly, when folding the template along this line, the contours of the two parts should coincide. You can immediately glue the flags together, making sure to leave a pocket a few centimeters wide to thread the base thread of the garland through. Or you can fold and glue the flags already on this thread. This way you will also secure them to the base, and they will not slide unruly along it.
There is another option for securing the parts to the base rope. If you use thicker paper or cardboard, you can not fold the blanks in half, but immediately cut out the finished flag and, using a hole punch, make 2 holes in the upper part and string them on a thread, inserting it into one hole and out of the other. The result is a design like this.
How many flags there will be, what their size is and the distance between them is up to you to decide. Their shape does not have to be the same; play with a variety of shapes and their combinations. The finished garland can be decorated with bows, pendants and other decorative elements, but in itself it looks very elegant and festive.
Making a Fabric Garland
A more difficult level is fabric flags made with your own hands. In addition to fabric of absolutely any color, you will need fabric scissors, chalk, if available - a sewing machine, threads in color, rope or braid for the base, in some cases - glue or double-sided tape and even a soldering iron, a cardboard template, a little patience and imagination.
The first method is the laziest. Despite the fact that the manufacturing material is fabric, there is no need to sew. Take a dense, non-fraying material, cut out blanks from it of the same shape as we made from paper. And also glue it with PVA glue, putting a rope inside. Better yet, secure it with double-sided tape, mainly around the perimeter of the flag. It may not turn out very neatly, but this method is very fast.
Another simple manufacturing option: place the cut out figures on the braid, leaving approximately the same distance between them, and sew them together. But there is one problem - crumbling edges. For this option, a material like tourist fabric is suitable, and we will also need a soldering iron. Yes, it is with a soldering iron, and not with scissors, that we will “cut” the fabric, since then its edges will melt and will not crumble. Of course, we should not forget about safety precautions, and you should work with a soldering iron carefully, on a special board, only using an iron ruler. You don’t have to use a template, but simply draw our triangles end-to-end with a ruler. This way there will be almost no scraps of fabric left..
Fabric flags and garlands made of canvas will look very interesting. Shedding of such parts can be prevented by treating the edges with glue. They will fit perfectly into a delicate interior and will not be too provocative or eye-catching. Felt will look neat and expensive. This is a rather heavy material, so such flags will not flutter in the wind, but they hold their shape well.
Of course, if you are making a very small garland of 10-15 flags, you can give it more originality and sophistication than just pieces of fabric strung on a rope. It all depends, perhaps, on the occasion of the holiday. After all, a garland can decorate not only children's party or a birthday, but also a wedding feast or a sweet evening for your loved one on Valentine's Day. You can place photographs on such flags, put some kind of inscription on them - everything is in your hands.
Skewers and flags on a stick
For decoration festive table I have one interesting idea: make funny skewers for sandwiches and canapés, as well as to mark the places of guests. Why don't they take the form of a waving flag? And on children's party cute flags on a stick can be distributed to all the children present as a small memorable present - cheap and cheerful. All that remains is to find out how to make a flag on a stick with your own hands.
Everything here is similar to garlands. Flags on a stick can be either paper or canvas. The blank is cut out according to the template, wrapped around a stick, and its halves are glued together. You can do it a little differently. Simply coat the stick with glue and wrap the wide end of the single piece around it. With the help of glue it will be firmly fixed.
Well, for skewers, you don’t have to bother with the blanks at all, but cut out thin strips of paper and wrap them around a stick and secure them with glue.
Supplement your flags as desired with any available means, and you can be sure - with You've done it with decorating your table and room!
Attention, TODAY only!
A paper garland is quite simple to make; it can be made for a child’s birthday or simply to decorate a room for any holiday. Making the brightest and most spectacular paper garlands is not at all difficult - the instructions will help you do it in literally a matter of minutes.
We make a garland of flowers with our own hands.

Stylized flowers
We cut out blanks for future flowers from colored paper - a semicircle with markings for the petals. It's better to take bright colors and double-sided colored paper.

We collect flowers - we glue the cones and collect the buds. Three blanks should form one flower.

We cut out a spiral from green paper - it will be the basis for our garland. We straighten the base and glue the flowers at approximately the same distance.

From felt
It is very easy to make a garland with your own hands from felt.

For this we need:
- colored felt (it is better to take pure shades);
- lace, ribbon or braid;
- sharp scissors;
- sewing machine (or thread and needle).
A DIY felt garland is made like this:
We cut out the elements of the future garland - these could be geometric figures and simple symbols.

We sew a garland of flags with our own hands or using sewing machine.

We sew a ribbon on both sides - the birthday garland is ready!

If you already have a flat garland, and now you want to make voluminous ones New Year's garlands, then you will love the butterfly garland.
Make this original garland Christmas tree is very, very simple:
- we cut the blanks (you can use diagrams - you can download them for free, you can cut them by eye);
- we collect bow ties - we sew a large rectangle with thread across it, pull it together, tighten the knot and close it with a small jumper;
- we string the butterflies on a thread or a beautiful cord; you can also use twine or ribbon for the garland;
- straighten the butterflies - your DIY wedding garland is ready!
From hearts
Garlands made of hearts look very impressive - they can be used for any holiday, you can make your own decoration for a wedding or simply decorate your apartment or office for Valentine's Day.

How to make a garland of hearts using colored paper and a stapler:
Step 1: cut the paper into medium-sized strips; Using a stapler, we make a heart from two strips of paper (we fasten the ends of the paper strips in pairs as in the photo).

Step 2: We attach two more strips of paper to the bottom of the heart and use them to make the next heart.

Step 3: We continue this way until the length of the decor is sufficient.

You can make a one-color garland - for example, in red or pink tones, or you can use paper of several shades (by the way, double-sided colored paper works well for a printer).


There is another option for a garland of hearts made from paper yourself. We will need colored paper, a cutting template (you can download and print), a pencil (to transfer the template onto paper), scissors and a sewing machine.

This DIY heart garland is made like this:
Step 1: cut out a lot of hearts, the more the better.

Step 2: fold in pairs and stitch using a sewing machine.

Step 3: leave some distance if desired and sew the next pair without cutting the thread; sew all the hearts.

Step 4: straighten the hearts in each pair so that they look three-dimensional figures; our decor is ready.

By the way, a garland of paper circles is made using the same principle - circles of colored paper are folded in pairs and stitched. You can stack three or four blanks, then you will get multi-colored paper balls.


From checkboxes
A flag garland looks very elegant - it can have an inscription happy birthday, or welcome, and a garland of flags can be used at any party or children's party.

How to make a garland of flags for a children's birthday with your own hands? Three simple steps:

Simple, isn't it?
For those who want a little more complexity, a garland of flags and fabric. So, we already understand how to make a garland of flags with our own hands, but at what stage should we add fabric and what kind? Again, it's simple.

From colored paper we cut out the shape of our flag - for example, a triangle.

Cut out a smaller triangle from fabric and glue it onto paper.

We sew or glue buttons and sequins on top.

We sew flags onto the future garland with our own hands or using a sewing machine. It is best to use braid or bias tape and place flags on it.

It is clear that paper garlands are not very durable - they will last a maximum of one or two uses, but what if you want to make something more durable? For example, for a kindergarten you can make a flag garland from fabric.

How to sew a garland of flags step by step:
- We will prepare several colors of fabric;

- make a pattern in the shape of a triangle (you can use triangles of different sizes);

- transfer the pattern to the fabric (it is best to take two or three shades of fabric - a three-color garland looks very beautiful);

- cut out the pattern and fold the triangles in pairs with the front side inward;

- we pin it with tailor's pins or quickly baste it and then sew on two sides of each triangle on a machine (I also overlaid the edges) - leave a very small seam allowance, this will make the triangle sharper and more beautiful;

- we turn out the triangles and make rough seams around the perimeter;

- we baste the flags to the tape (in my case, a narrow strip of fabric); sew on a machine;

- remove the basting; wash and iron the product.

Decorative braid with flags made in this way can be used at home and in the kindergarten, you can make special decor for the street (kids especially like this for the New Year).
for the new year
Making Christmas garlands is fun and exciting! To make a beautiful and original garland you will need small candle lamps, narrow tinsel and a couple of jars of paint - special for glass or regular acrylic. The light bulbs are dipped one at a time in paint and dried on a cardboard stand (the bases can be wrapped in cling film to prevent them from getting dirty). Then the light bulbs are glued to the tinsel in a chaotic manner, and the unusual Christmas tree garland is ready!

Making another Christmas tree garland is also not too difficult - the main thing is to stock up on a template. For printing, you can use colored paper at once, or you can make one general template and copy it onto paper of any color. Printed or redrawn templates must be cut as shown in the diagram and strung on bright twine.
Printable template (click on image to enlarge):
A garland made of felt balls looks very cozy and very Christmas-like. You can do it together with your child - you just need help. In order to make such an interior decoration, you will need felt balls. No, not even that - A LOT of felt balls.

Making them is quite simple - take some wool for felting in your palm, wet it under the tap, and then lightly roll it into a ball. Add foam or soap and continue rolling. When the ball starts to form, you need to apply a little effort.

If the fur is capricious, try changing the water temperature several times - after a couple of changes with cold water when hot and back, the fibers begin to fall off. The future ball must be thoroughly rinsed from soap. The ball is ready when it becomes hard.

Make a lot of these balls - they can be the same color (then it’s better to take a contrasting thread for stringing) or different shades, and then just string them on a thread and a needle, and your cozy winter decor is ready. By the way, you can decorate a Christmas wreath on a door or a New Year tree with these balls.


Well, I’ve infected you with my handicraft enthusiasm and you already want to make all kinds of garlands from flowers, felt balls, flags and other things? Then it's time to see what other decors are available.
A DIY festive garland for a wedding can be not only solemn, but also very cute - like this country-style flower garland.
Use your imagination - use the materials you have at hand. These can be scraps of colored paper and sheets for scrap, rags beautiful fabric and thick film, beads and buttons, sequins and feathers, old light bulbs and even small wooden clothespins - holiday decor can be made from literally anything!
If you are planning to celebrate a children's birthday at home in the near future, you want to throw fun party or just create a festive mood, you will need decorations that will help create the appropriate atmosphere. A garland of flags will do the job perfectly. But you don’t have to spend money to purchase it. A DIY garland of paper flags will look no worse, and its creation will not take much of your time.
Fast, simple and effectiveIn this master class we will tell you how to make a garland of flags, spending half an hour of time, several sheets of colored paper and several meters of wide ribbon or elastic. First, cut out squares of equal size from paper. Then bend them diagonally and cut them in half to create triangles. Now prepare the tape to which the flags will be attached. At both ends, sew two identical pieces at a distance of 20-25 centimeters from the end of the tape. These elements will be needed so that the garland can be attached to supports (wood, column, pipe, etc.). Then sew the triangles to the tape at the same distance from each other. Use a zigzag stitch to prevent the paper from tearing. And don’t forget to alternate flags of different colors. The decoration is ready!
 |
 |
 |
 |
 |
 |
More creativity!
You have plenty of time, but a regular garland seems boring to you? Then try sewing a garland of fabric flags, decorated with decorative buttons.
You will need:
- sheets of multi-colored paper;
- pieces of fabric;
- elastic band or wide ribbon;
- buttons, sequins;
- PVA glue.

You can make a beautiful and romantic garland and
Paper flags are an excellent decoration for a room or other room during parties, New Year's holidays or birthday celebrations. In addition to being inexpensive, fast and easy to manufacture, subject to individual, creative approach- this is a way to give your event a festive, unique look. After all, the options for making flags are endless in their variety. You can print ready-made templates by downloading them from the Internet. Or you can work a little and create an exclusive, unique interior decoration. However, flags can not only decorate walls. An original gift from one child to another there may be a large, hand-made postcard, on the spread of which, along with sincere, warm congratulations, you can attach a ribbon with small flags. We will try to talk in detail about this method, and not only about it, in our article.
Flags made from a ready-made template

To make flags using a ready-made template, we will need:
- White paper A4 format
- Color printer
- Scissors
- Ribbon or a nice long cord
The further sequence of actions is so simple that even a child can handle it school age. You need to find ready-made flag templates on the Internet, download them, and print them. Then cut out the printed blanks with scissors and fasten them together in any way that suits you. You can put them on a long ribbon and stretch them along the wall of the room or from one corner to another. You can simply attach it to the wall using beautiful push pins. The determining factor in choosing this method is the speed of production and a large assortment of designs, allowing you to choose what you need. And the level of artistic execution, for example, in the version of flags with letters (wedding, birthday), in the case of Internet templates, is undoubtedly more advantageous.
Simple DIY flags

Of course, hand-made flags, in some cases, may be inferior in terms of execution technique to ready-made templates. But with a modern selection of paper materials and stationery, and with some effort, such flags can compete with ready-made templates, and even surpass them. The advantage of this method is that the flags made in this way will be 100% exclusive, and there will not be a situation where identical flags will take place at many events, causing the feeling of cheap consumer goods.
Most in a simple way In this situation, it is necessary to make flags from thick colored paper using the standard method.
For this we need:
- Colored paper of different colors
- Scissors
- Sample
- Ribbon or thick nylon line

Fold a sheet of paper in half lengthwise. Use a pencil and ruler to mark equal intervals and cut the flags. You can design the cut rectangles to your liking by cutting them to the desired shape using a template. Then you need to glue the adjacent sides together, leaving at the top, at the fold, an unglued space for threading the tape or lace. Alternating colors, we put flags on the ribbon and decorate the room. You can also attach flags to wooden sticks. It is recommended to use paper of bright, ultramarine colors and make flags large sizes. You can also decorate these flags with inscriptions. To do this, we prepare templates for the letters required for this. Using the template, we cut them out of golden, white or silver paper and glue each letter onto a separate flag. Original and beautiful design It will be a pleasure to the eye.
Lantern flags

To make such interesting and bright flags, you need to fold a sheet of colored paper of the required size like an accordion, bend it in half, and glue the touching edges with glue. We will get a kind of semicircle. Make two such semicircles and glue them together.

Glue a paper circle in the center to the resulting accordion paper circle. It can later be supplemented with letters or additional decor.

Then we glue the resulting volumetric accordion lantern onto the prepared flag fabric of the required shape and color. It turns out something like the photo above.

Then we fix the flags on the wall or on tape in the way you need. Well, that’s basically all the manufacturing technique. You can admire the end result.

An unusual and original addition to a birthday gift or holiday greeting can be a hand-made card decorated with small, bright flags. Flags can be located both on the cover of the postcard and inside it. In the version shown in the photo above, the flags are simply cut out of bright paper and glued to the cover of the card.

In this version, the flags are made using the technology of making simple flags, but in a very reduced size, and are attached to a strong thread inside the postcard. Very original and unusual congratulations, in our opinion. Suitable as a craft for preschool and primary school children.
How to make flags from paper /video/
New Year's flags
Birthday flags
Holiday decor
Wedding garland
Scrapbooking for Beginners
Conclusion:
Of course, in our article we cannot describe in detail all the methods for making paper flags. But we tried to reveal the most basic ones for you. Create, improvise... Let your holiday be the brightest and happiest!
 Relief knitting patterns with diagrams and descriptions Knitting patterns for dark yarn in leaf shape
 How to knit a tanker’s helmet: description and materials
 Wife kicks her out of the house: advice from a psychologist Man periodically kicks her out of the house