Crafts for mother's day made of cardboard. DIY Mother's Day crafts for kindergarten and school
Mother's Day is celebrated all over the world in autumn. Children and adults alike try to surprise their mothers with gifts in addition to warm words. Consider interesting crafts for Mother's Day in kindergarten?
The most expensive gift is a handmade one. Mom will definitely appreciate the postcard, paper flowers. Especially if a preschooler made the craft.
Interesting crafts for Mother's Day in kindergarten
In kindergarten, kids make simple crafts. Children, led by educators, try to comprehend master classes, develop fine motor skills and learn perseverance.
In the younger group, simpler flowers, postcards are created. In this case, plain or double-sided colored paper, corrugated sheets, cardboard, glue, paints are used.
Take colored sheets as a basis, but newspaper clippings and magazine pages are also suitable. It turns out lovely and dear to the mother's heart surprises.
Flower in a pot
We invite kids to make a simple craft - a flower in a pot.
You will need:
- corrugated paper of any color and colored green sheet;
- pVA glue;
- wooden skewer;
- threads are green;
- small pot;
- cotton wool;
- scotch;
- scissors with rounded edges;
- a flap of fabric.
Work plan:
- Cut a strip from the corrugated piece. Do not cut it all the way across.
- Coat a wooden skewer with glue. Wrap it with a blank. Inflorescences are obtained.
- Wrap the edge of the flower with thread. Insert into a cotton pot. Pre-moisten medical cotton wool with PVA glue. When the lump is dry, the flower will be firm.
- Cut a leaf out of a green piece. Stick to the skewer.
- Wrap the pot with a piece of cloth. Secure with tape or satin tape.
Children from middle, senior and preparatory groups will make more complex corrugated flowers.
Corrugated paper flower
The manufacturing process is as follows:
- long strips of paper are split from one side;
- the strip is twisted with a rose;
- the edges are glued.
We suggest planting a similar rose on a twig of wire or a wooden skewer. Or paste over a ball with flowers. You will get a pink bouquet.
Ball of flowers
A used tennis ball, a plastic Christmas tree ball, a foam ball or just a well-crumpled lump of newspaper will serve for the ball blank.
Older children will be able to create products more difficult. The work will be painstaking. In addition to the main material, prepare multi-colored tape, wire, threads and pieces of foil. We suggest replacing the foil with real chocolates.
Original flowers from corrugated paper are made using the kanzashi technique. Flowers come out like real ones.
If desired, make a bouquet arrangement or join paper flowers and satin ribbons together.
Children usually make postcards for mom with dads, friends in kindergarten or educators, at school in technology lessons. Collective crafts teaches children not only to make their own hands, but also to work in a group. Postcards are made in the simplest origami style, applications.
Small children do an excellent job of creating postcards. Handicrafts are often made in the preschool educational institution. They are simple and easy to make. A minimum set of materials is required.
Make more sophisticated scrapbooking. Do-it-yourself paper cards are hidden behind the scary word "scrapbooking". Various ribbons, braid, buttons, beads are used to decorate masterpieces.

We suggest trying to make voluminous cards for Mother's Day. Several master classes and examples will help you.
Take pasta for work.
For the little ones, we suggest downloading and cutting out the base picture.
A great option is a butterfly card. Inside, write warm words or glue a joint photo with your mom.
Do you want to create a 3D postcard with your own hands? I have an idea for you.
Elementary school DIY craft ideas with templates
Crafts from napkins and cotton pads look original. We suggest creating a quick bouquet of mimosa.
You will need the following materials:
- scissors;
- glue;
- a sheet of white cardboard;
- green paper;
- satin ribbon;
- pencil;
- soft yellow napkin.
Make simple cotton pads with your kids. Even younger preschoolers can do such masterpieces. After Mother's Day, an exhibition of works by children is organized in kindergartens. Little masters will be proud of their creations.
With the help of adults, older preschoolers will happily start creating a tree for their mother. For it, glue rolled cotton pads onto a ball base. A well-crumpled piece of newspaper will serve as a ball. Place on a skewer in a small pot. It is important to fill the pot with something heavy so that the crown of the tree does not outweigh it. Decorate the tree with bows, beads.
A similar tree is obtained from paper napkins. In the photo, the napkins are pink. We suggest using material of any color, even with a pattern.
How to make a craft for mom: video
The most pleasant gift is flowers. But the real ones fade quickly. And paper flowers with their own hands warm mom's heart for a very long time. We suggest making a pink bouquet.
For work you will need:
- a4 sheet of white paper and 2 sheets of pink;
- scissors;
- glue stick;
- pencil;
- white toilet paper or napkins.
Did you like the crafts? Be sure to try creating a surprise for your mom or grandmother. Tell us about it and share with your friends on social networks.
Best regards, Natalia Krasnova.


A beautiful gift for every mother is the best sign of attention from a beloved child. And the gifts that he makes with his own hands are especially valuable. Such products are able to express love and respect, tell how much the baby is attached to the mother. You can make an original gift for Mother's Day in elementary school, kindergarten. At home, dad or grandmother can help with making crafts. Regardless of the product chosen, the materials from which it will be assembled, mom will certainly appreciate the time and effort spent. The proposed master classes have options for crafts for children of all ages. They are made from paper, fabric or napkins. In the given lessons with step-by-step photo and video tips, you can find really original and amazing options.
What gifts can be made for Mother's Day in kindergarten, elementary school?

A bright and memorable gift for Mother's Day with your own hands at school can be made from any materials. But in order for it to be really pleasant and useful, it is important to think about what will delight mom the most. For example, a beautiful jewelry box is a great gift for mom on Mother's Day if she wears a lot of jewelry. A vase made of cardboard is well suited for decorating a dressing table or desk. It will help you find out what gifts can be made for Mother's Day and the following tip:
- a bouquet of paper and sweets, a picture of paper;
- brooch, beads;
- a figurine made of plasticine, polymer clay;
- drawing or postcard;
- bright and comfortable potholder.
Each idea is good in its own way, but since all mothers are different, then you need to choose the best option based on her preferences, hobbies. You can ask your dad, grandmother or grandfather for advice. They will be able to tell you what kind of gift mom will like the most.
A good gift for Mother's Day with your own hands in kindergarten made of paper: photo and video lessons

You can make a beautiful gift for your mother with your own hands on Mother's Day from various materials: from ordinary napkins to cotton fabric. But children in the kindergarten can be offered a more interesting option - crepe paper. Every kid will be able to make a gift for Mother's Day from such material with his own hands in kindergarten.
Materials for the master class "Flowers for mom" for kindergarten
- crepe paper (white and pink);
- PVA glue;
- scissors.
Step-by-step instructions for the “Flowers for Mom” master class for kindergarten
- Cut the crepe paper into strips 4-5 cm wide. Put the pink one down, white on top.

- From the ribbons obtained, start twisting from one of the edges.

- Gradually wrapping the flower, it is necessary to coat the lower part (bottom of the bud) with PVA glue.

- When the flower is ready, you need to grease the twisted bottom of PVA with glue well, wait until it dries completely.

- Ready-made flowers can be glued to a greeting card or mother's portrait.

The specified master class shows how easy it is to prepare buds for decorating postcards, crafts. But you can make a real bouquet of flowers from paper. The following video will tell you about what gift to give your mom on Mother's Day, and how to make it:
An unusual gift for Mother's Day with your own hands in elementary school: a step-by-step photo lesson

A bright gift for Mother's Day with your own hands in elementary school can be made from fabric. Many children already know how to sew, but even if making a brooch is their first experience with a thread and a needle, it's okay. The specified lesson with step-by-step photos on the shoulder of any first grader.
Materials for the master class "Brooch for Mom's Day" for elementary school:
- satin ribbon 70 cm (width about 3-4 cm);
- waxed cotton lace;
- a piece of denim;
- beads (50-70 pieces);
- thread to match the color of the ribbon, needle, thimble;
- medium safety pin.
Step-by-step instructions with a photo on the master class "Brooch for Mom's Day" for elementary school
- The ribbon along one side is sewn with small stitches, pulled together into a small flower.

- The finished base is additionally stitched with threads so that the tape does not move.

- The lace is cut into pieces of 3.5 cm. Plastic beads (7-10 pieces each) are strung on it.

- Each piece of lace is folded in half and sewn with thread to secure the beads.

- All prepared pieces of cord are folded into a bundle and tied together.

- A bunch of stamens is inserted into the flower base. From the seamy side, the ends of the cord are sewn to the ribbon with threads. A circle of thick fabric is glued / sewn on the back side. A pin is attached to the denim.

Such a good gift for Mother's Day will definitely please mommy and will become her favorite decoration. No less beautiful brooch can be made according to the following master class:
A simple do-it-yourself gift for Mother's Day from napkins - photo master class

You can make amazing and simple flowers from napkins without a pattern. They are perfect for creating a unique postcard. Both preschoolers and elementary school students will be able to make a gift for Mother's Day with their own hands from napkins.
Materials for the master class "Postcard for Mom" \u200b\u200bfor schoolchildren and preschoolers
- table napkins;
- stapler;
- plasticine;
- pVA glue;
- white thick A4 paper.
Detailed master class on the topic "Postcard for Mom" \u200b\u200bfor schoolchildren and preschoolers
- Small circles are cut from napkins (pink, yellow, white).

- A stack of circles is punched in the middle with a stapler.

- The edges of the circles rise and wrap: they make lush flowers.
- The prepared paper is folded in half. On the inside, a wish is written, on the outside, plasticine is glued.

- Flowers are glued to the plasticine, the edges of the petals are covered with PVA.
- Thin twigs are twisted from light green napkins, leaves are cut out. Elements are glued to the postcard. A heart cut from a pink napkin is glued to the top.

It's quite easy to make an original Mother's Day gift from a photo. But you can make more complex crafts from napkins. The attached video describes the process of creating a whole bouquet:
You can make a wonderful gift for Mother's Day from simple napkins, paper or cloth. Each product can have its own flavor, because it will be created for a mother with sincere love. These video and photo master classes are optimal for elementary school, kindergarten. Every kid can make simple crafts with their own hands. Mom will definitely like the bouquet, the brooch, and the postcard, since her beloved child will make such a beauty for her.
In our articles dedicated to Mother's Day, we have repeatedly said that this holiday is very symbolic, and it is not the functionality and high cost of the gift that is important, but its sincerity and sincerity. These are the gifts made with your own hands. We tried to find ideas that would be adequately accepted from both an adult and a child. The main secret is stylish and simple.

Idea 1: making colored hyacinths
A paper gift for mom for Mother's Day is the most versatile and budgetary option. Flowers are especially elegant from this material. Take a look at the photo below: paper hyacinths look flawless.

- a set of colored paper (use a variety of tones, the paper must be double-sided);
- scissors;
- good glue;
- you may also need a simple pencil and ruler.


Idea 2: soft tulips
Such a gift for mom on Mother's Day will definitely not go without compliments. If you have at least minimal sewing skills, then you can easily bring the idea to life. Soft tulips, unlike paper ones, are durable and fit perfectly into the interior. Take a look at the beauty you get.


- several scraps of bright fabric from which the buds will be sewn. It is desirable that the fabric be of different shades that are harmoniously combined with each other. Feel free to use patterns on fabric: for example, polka dots or stripes.
- a piece of green fabric for the leaves and stems of future tulips;
- soft filler (for example, cotton wool or foam rubber);
- wire for stiffness.
Getting started:
First you need to cut out a pattern and transfer it to paper from the computer screen. Then we fold a piece of fabric for the bud in half and use a pencil to outline the pattern. Next, the part needs to be swept away (so the fabric will not corrode). We do the same with the stem and leaves of the future tulip. When all the details are cut, we carefully sew them on a typewriter. Do not forget to leave some room for turning inside out. We fill our buds with soft cotton wool, padding polyester or foam rubber, sew and attach to the stem (this can be done using a blind seam). This is how you just make a gift for mom on Mother's Day with your own hands. Such a flower will never fade for sure!


Idea 3: stone cactus
If you need a gift that will surprise, then this idea is what you need. The craft looks original, but it is done very simply. If there are children in the house, be sure to include them in the process.
You will need:
- a small flower pot (it is advisable to use ceramic pots, you can use old ones, so the craft will look more natural); some sand;
- pieces of 5-6 flat stones of different sizes and shapes;
- set of acrylic paints.


Idea 4: a heart of flowers
A very delicate gift that symbolizes your love. It is not difficult to make it: the whole process will take you no more than forty minutes.
You will need:
- many small roses;
- one heart made of cardboard (blank);
- stapler;
- a rope to hang the heart from.


First, on a sheet of thick cardboard, you need to draw a heart of the size that you need. Then we hang the future flower heart on a rope. We carefully cut off the flower buds from the stems (or it is better to use branches at all), and fix them on a cardboard blank with a stapler. A beautiful DIY handicraft for Mother's Day is ready!

Idea 5: spring birds
Such birds look incredibly cute, but they are easy to do. However, almost every felt craft delights the one to whom it is intended. So let's get started.
You will need:
- several pieces of multi-colored felt;
- threads;
- soft filler;
- glue;
- scissors;
- ribbons;
- beads.


Getting started:
On the album sheet you need to draw the wings and body of the future bird. We cut out the blanks. Then the felt needs to be folded in half, and the bird's body blank should be attached. Cut along the contour. We do the same with the wings, only we use felt of a different color. Cut out a small beak. Now the bird's body needs to be swept away and filled with soft fillers. Wings are sewn on the sides, a beak is sewn. Don't forget to add eye beads. The bird can be attached to wooden sticks or hung on satin ribbons, and a small heart or flower can be inserted into the beak.

In autumn, our country also celebrates various holidays. The brightest and most beloved holiday is Mother's Day, which is usually celebrated in autumn. For this day, children at school and in kindergartens are preparing concerts for mothers. In addition, the kids independently make various crafts. These crafts are usually presented to mothers during the holiday. In this article, we have selected for you Mother's Day crafts, which are very easy to make in elementary school with your own hands. We hope that you will like our ideas and that you will be able to make something interesting.
Mom's Day Crafts
Gift for mom from napkins.
It is very easy to make a touching gift for mom. Now we will offer you an interesting master class with which you can express your love for your mother. To make such a wonderful gift, prepare:
- red cardboard sheet,
- glue stick,
- paper napkins (pink and white),
- narrow satin ribbon,
- scissors and double-sided tape,
- a simple pencil and a sheet of yellow colored paper,
- album sheet.

Working process:
- Hand draw a heart on a piece of cardboard. Cut it out.
- Turn the heart over with the white side up and place your palm on the sheet. Circle it with a simple pencil.
- Now take white and pink napkins. Cut each napkin into 4 even strips. Then cut each strip into squares, which will be 3x3 cm in size.
- Further, each such square must be rolled into a lump. At the same time, you should not press down the paper too much. The finished lump should be fluffy, but not hard.
- Lubricate the palm you drew with glue. You need to lubricate along the contour. Place the white lumps on the glue. Also, they should fill the entire space of the palm. In this case, the balls are quite tightly attached to each other.
- In order for the balls to stick well, the workpiece must lie down for a while. After that, from the satin ribbon it is worth cutting off a segment, which is glued to the heart from above by means of double-sided tape. This will be the pendant for the heart.
- The space that is not filled with balls around the palm is smeared with glue. Now lumps of pink napkins are laid out on the glue. Lumps should be laid out close enough to each other.
- Now it is worth drawing a flower with petals on a white sheet with a pencil. Cut it out with scissors and glue it to the heart. Cut a core out of yellow paper and glue it to the flower as well.
- After that, on the back surface, you can glue the warm words that they were written on paper.
An interesting craft for mom.
On a public holiday, it is customary for mothers to give cute gifts. Mainly gifts are made for mothers from paper and cardboard. For the next craft, you will need colored paper and cardboard.
- On another sheet, a palm is drawn, which needs to be cut.
- First, a pot is made from cardboard. Of course, in this case, cardboard of cheerful colors is used.
- Flowers are drawn separately on bright cardboard, which will be used to decorate the palm. The palm is glued to the pot and as a result, a wonderful craft is ready.

Snails for mothers.
In this article, we list the first grader crafts that are made for Mother's Day. It is very easy to make cute crafts out of colored paper, which will be a great gift for mom.
Strips are cut out of colored paper, from which the heart is glued. Strips are cut from cardboard. On the stripes it is worth depicting facial features.
Flowers for mothers.
Of course, mothers love to receive flowers as a gift. On a bright holiday, mom can be pleased with cardboard flowers. Just cut a cardboard tulip bud and a stem. These elements are glued to each other with glue. You can use ribbon for decoration.

A vase of flowers for mom.
A variety of simple crafts for Mother's Day are enough for first graders to make. The following craft is also very easy to do. For work, you should prepare:
- plain paper napkins,
- plasticine,
- unnecessary markers,
- old yogurt cups.

Working process:
- Napkins are cut into squares.
- You need to roll a ball out of plasticine. It is put on a felt-tip pen.
- Now the napkin is attached to the plasticine by cutting. It is worth filling the entire ball with napkins.
- The rod with napkins is attached to the glass by means of plasticine.
- The label on the cup is sealed with a label on which you can write a good wish for mom.

Finally
As you can see, for Mother's Day, you can make a wide variety of crafts. Any such craft will give you a great mood. Therefore, make crafts for mothers in creativity lessons and give your loved ones happiness.
Mother's Day is celebrated in Russia on November 24, 2019. It's great that a holiday was invented for our mothers. We so rarely tell them about our feelings that even if this holiday did not exist, it should have been invented. And how to express your love to your mother, if not a gift made by yourself. These gifts are made with a soul, imbued with warmth and gratitude. On the eve of the holiday, the NNmama.ru portal has prepared for you a selection of interesting DIY gifts for Mother's Day.
DIY Mother's Day Gifts
Postcard with balloons
You will need:
- photo of the child (from whom the gift is);
- scissors;
- air balloons;
- multi-colored threads;
- white sheet of cardboard or colored paper;
- a sheet of colored paper;
- pVA glue.
2. Inflate small balls.
3. Tie with woolen colored threads. It is better if the ends are long, so the card will look more impressive.
4. On a white sheet of paper, glue colored paper slightly smaller than the white one.
Your gift is ready!
Flower vase

You will need:
- green paper;
- napkins or corrugated paper;
- scissors;
- glue.
2. The resulting parallel lines must be cut to the horizontal line, not reaching 3 cm to the edge.
3. Unfold the cut sheet.
4. Turn the sheet over the other side and fold, backing 1 cm.
5. After that, coat with glue and glue.
6. When the paper is well glued, roll the blank with a tube.
7. It turned out to be a stable vase with petals.
8. Make flowers from napkin or corrugated paper.
9. Glue the finished flowers to the stems.
10. You can decorate the resulting bouquet to your liking, for example, glue sequins or tie with a satin ribbon.
Idea:flowers can be made multi-colored and then decorated with beads. If the option with glue and paper does not suit you, then take an ordinary can, paint and a glass of water. Draw flowers on the jar and you will be happy.
Gift decorative candle

You will need:
- candle;
- baking paper;
- paints.
2. Then place the drawing on the thick candle and fix it. Next, treat the candle with hot air, such as a hairdryer. Beautiful candles are ready.
Idea: you can write an original greeting or message in verse.
Application "The Sun for Mom"

You will need:
- ribbons;
- pasta;
- glue;
- colored paper;
- paints.
2. A sun is formed from round pasta. All elements are glued with glue.
3. Then the eyes are glued to the main circle.
4. After that, we glue colored stripes to the circle, which will symbolize the rays.
5. Bow pasta is glued to the end of these rays.
6. And in order to decorate the craft and make it even more interesting, use flowers that are glued to the upper part of the sun.
Wish flower

You will need:
- colored paper;
- scissors;
- glue.
2. Then cut the flowers with scissors.
3. Collect the flower.
4. Glue all the petals together with a ribbon, and make the middle of the squares. The size of the squares should be 3.5 cm by 3.5 cm. Fold them in the form of a frog. Glue all the resulting blanks to each other, and then glue them to the middle of the flower.
Idea: if there is no printer, then you can draw a flower, and write wishes or compliments by hand.
Flower bed

You will need:
- glue;
- double-sided colored paper;
- scissors;
- pen or black felt-tip pen.
2. Then find the middle and glue the two parts of the blank so that a lush fan comes out.
3. Now for the most creative process, draw any flowers, lilies of the valley or tulips. Cut them out.
4. You can give the children ready-made templates, or you can have them draw and cut them themselves.
5. After that, spread the finished workpieces with glue on a fan. A good mood for children and mothers are guaranteed!
Application "Calla" from cotton pads

You will need:
- glue;
- paints or felt-tip pens;
- cocktail tubes;
- cotton buds.
2. Paint the cotton tip with a felt-tip pen.
3. Insert a Q-tip into the cocktail tube.
4. Place a cotton pad under the finished structure.
5. Apply some glue to the bottom edges of the disc and press the edges together. A couple of minutes and the flower is ready.
The whole bouquet is performed in a similar way.
3D postcard

You will need:
- double-sided colored paper;
- cardboard;
- ruler;
- scissors;
- glue stick;
- felt-tip pens.
2. Fold it in half and get a smaller right-angled triangle. We bend it in the middle again. Press the smaller side to the larger side. On it we draw the rounded edge of the petal.
3. It remains to cut the flower along the marked line and straighten it.
4. Now let's cut off one of the petals of the flower. This is necessary in order for it to be voluminous.
5. Outline the edges, then the flower will become more realistic. We do not touch one of the petals near the cutout, since we will glue the other on it.
6. Now put the painted petal on the one that we did not touch and glue them together.
7. Paint the core and continue making 6 more of the same colors.
8. We fold the resulting flowers in half. Putting it in a bouquet. For the side petals, glue two to one flower, on both sides.
9. To the top flower we glue another one, but for three petals.
10. Glue two more flowers on the sides.
11. And we put the last flower up.
12. Cut out two hearts from cardboard that fit the bouquet. The red should be larger than the white. We put a white heart on a red one and glue it.
13.On the other hand, glue a slightly smaller white one to the red heart, and another smaller red one on it. We bend it in the middle. As a result, we got a card of four hearts. It is white on the inside and red on the outside.
14. Now glue the bouquet with the top petal to one side of the heart. In the same way, we glue the bouquet to the second side of the postcard. Done!
Bouquet of spirals

You will need:
- colored paper - double-sided in different shades;
- pVA glue;
- scissors;
- simple pencil.
2. Choose your favorite shade of colored paper, then draw a circle with jagged (wavy) edges.
 Rules for the selection of haircuts for a full face: photos, stylist tips and general recommendations for choosing winning hairstyles
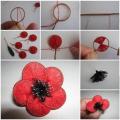 DIY gift for mom - original surprises for Mother's Day
 Wedding makeup for brown eyes