Air loop. Chain of air loops
Friends, today we will return to the basics... we will figure out how to crochet a double chain... I here from time to time conduct an audit on the blog and find out what I haven’t written about yet... So, today is the day when I discovered my mistake...
A double chain of air loops remained away from the general public... The simple one was knitted, but the double one was not... Not in order! But this is a very useful crochet technique.
Let's look at how this is done...
Double chain of air loops - how to knit
1. Make the initial loop by unwinding the long tail from the ball - we will need it for knitting. We arrange the threads as shown in the photo below, namely, the working thread on top, the tail on the bottom...2. Insert a hook under the tail...  and loop it over the hook... on the hook there is the initial loop plus the yarn over.
 ....and pull it through the yarn over and loop on the hook...on the hook there is again one loop.
  repeat the operation))) Insert the hook under the “tail” thread from top to bottom
  throw it on the hook
  grab the working thread
 we continue in the same spirit... The result is a double braid made of air loops,
  which can be used very well as a lace, for example, for booties or for some other products, for example. as a finishing element))) Can you tie the lace differently... how? see article ""
In addition, many advise using a similar technique to start knitting a product, that is, like a cast-on chain, referring to the fact that with such a cast-on, the edge of the fabric does not tighten... I don’t know... I myself have never used a double braid made of air loops for these purposes, By the way, we need to correct this oversight too - try it)))
For those who are more comfortable learning from video lessons, I made a short video on how to crochet a double chain using air loops... The video, of course, is so-so... but how old we are - someday I’ll learn how to make films too))) Now look what I was filming here)))
And don't forget to leave your comment. Your opinion is important to me!
If you liked the article, then share this information with your friends by clicking the social network buttons! Just a huge request! - do not copy the entire material, please use social buttons! Do not be shy! I will help as much as I can :) An idea has arisen - Share! If you find any errors, write to us and we will fix them! I have a desire to help the blog in some way - I will be only too glad! Hosting costs money, and materials are not cheap these days... So, if possible, then help financially)))
First crochet lesson
I love to knit, especially crochet. Give to friends, relatives, good people their knitted crafts- great pleasure.
It’s nice to watch how a person rejoices, how he turns into a child and his eyes glow with tenderness.
Don’t know how to crochet or even hold it in your hand correctly? So we will study. Take a hook and yarn in your hands about one and a half to two times thinner than a crochet hook.
It is best to train on yarn that is not twisted into several threads, so that it does not cling to the hook, because this is very annoying. If something doesn’t work out, be stubborn - undo the knitting and start again.
Or set it aside for a while and knit again until you get the hang of it. And everything will definitely work out.
When knitting the loops, do not tighten too much, because the most important thing for you is to understand the knitting technique.

Starting Crochet
How to hold a crochet hook in your hand correctly? I will answer - how convenient. You can hold it like a pencil or as you usually take something in your hand. (Fig. 1 and Fig. 2)
The left hand should hold the product while knitting and control the thread tension. Use the index finger of your left hand to support the thread, and the middle finger to knit. (Fig. 3)
To maintain a slight tension on the thread, you can wrap the thread around the fingers of your left hand. (Fig. 4)

First crochet stitch
Almost every crochet starts with making a chain, which consists of so-called air loops. Knit loosely without tightening the loops. Below are details on how to crochet the first loop:
- Throw a thread on forefinger left hand, hold with large and middle.
- With your right hand, place the hook under the thread and turn it clockwise in a circle and hold the resulting loop with your thumb and forefinger.
- The loop should not fit tightly to the hook, then it can be adjusted.
- Hook the working thread and tighten it into a loop.
- The first loop must be pulled together - hold the thread with your thumb and forefinger, and lift the hook and loop slightly up.
- Then slightly stretch the working thread and the beginning of the thread with your fingers.
Everything takes a long time to write, but it’s done quickly. So, the first air loop is ready. Throw the thread over the crochet hook or hold the thread still and maneuver the crochet hook.
Pull the yarn through to form a new loop without compressing the previous loop. Repeat knitting until the desired length of the product.

Crochet chain
Knit several links of the chain, then move the hook onto the index finger of your left hand. It will be easier if you hold the loop on the crochet hook with the index finger of your right hand. The starting loop is not included in the count of the number of loops in the chain.
To count the loops, you need to turn the chain over to the left side of the knitting and count backwards, without the loop that is on the crochet hook.
Double chain
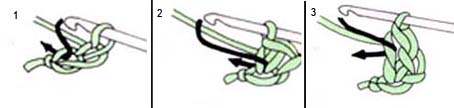
Double chain
- The double chain is looser and makes it possible to make the edge of the product more elastic without much effort, and can also serve as decor (cord).
- Knit a chain of two air loops (Fig. 1) Insert the hook into the first air loop cast on. Grab and pull the working thread towards you.
- There are two loops on the hook. Pull the working yarn through two loops on the hook. (Fig.2)
Insert the hook into the left loop of the previous pair of loops, pull the thread and knit both loops together. (Fig.3) - Then repeat knitting until the desired length.

The final row of the product
Insert the crochet hook into the second loop, grab the thread and pull it through the loop of the chain (Fig. 1). Repeat to the end of the row for each loop of the chain (Fig. 2)
Different types of loops
To avoid repetition, each point will begin like this: knit a chain of 15–20 chain stitches.
For the experiment, you need to knit several rows, and to move to the next row, knit several loops of the chain for lifting and turn the product to the opposite side.
Half single crochet (connecting loop)

Half double crochet
Insert the crochet hook into the second loop of the chain from the hook, grab the working thread and pull it through both loops on the hook at once. Continue to the end of the row, one lifting loop.
Single crochet
Insert the crochet hook into the second loop of the hook chain, grab the working thread and pull it through the first loop. Grab the thread again and pull it through two loops.
Continue knitting into each loop of the chain until the end of the row, using two air loops for lifting.
Half double crochet

Half double crochet
The fabric from such loops turns out to be dense with pronounced horizontal rows.
- Throw the thread over the hook and insert it into the third loop of the chain from the hook side (Fig. 1). Pull out the working thread (Fig. 2)
- Then make a second yarn over and pull the thread through all three loops on the crochet hook (Fig. 3)
Double crochet

Double crochet
- Thread the thread over the crochet hook and pull the thread through the fourth loop from the hook side.
- There are three loops on the hook, yarn over and pull the thread through two loops on the hook, then yarn over again and knit two loops on the hook.
- The result is a double crochet.
- Next, repeat on each loop of the chain, four air loops for lifting.
Double crochet stitch

Double crochet stitch
- Make two yarn overs and pull the thread through the fifth loop of the chain, counting from the hook.
- Grab the working thread and pull it through this loop.
- There are two loops and two yarn overs on the hook.
- They are knitted like this: grab the working thread with a hook, pull it through the loop and the first yarn over, grab the working thread again and pull through the loop and the second yarn over, grab the thread for the last time and pull through the remaining 2 loops.
- Repeat in each loop of the chain, five air loops for lifting.
Double crochet stitch

Double crochet stitch
- Make three yarn overs on the hook and insert it into the sixth loop of the chain from the hook (Fig. 1).
- Grab the thread and pull out a new loop. There are now five loops on the hook (Fig. 2).
- Repeat the following action three times: grab the thread and knit 2 loops together.
- After the first time there are four loops on the hook, the second time there are three loops, the third time there are two loops (Fig. 2-3).
- Grab the thread again and knit two loops together (Fig. 4-5).
Continue knitting a row of double crochets into each loop of the chain. At the end of the row, knit six lifting chain stitches, turn the fabric over and continue knitting.
Columns with N crochets(where N is an integer) are performed similarly to double or triple crochet stitches.
The more yarn overs, the higher the row.
Knit loops in pairs until one loop remains on the hook.
When turning the fabric, the number of lifting loops is equal to the number of yarn overs plus two.
Embossed double crochet stitch (Figure 1)

Embossed crochet posts
- Throw the thread over the hook and insert it under the “body” of the column of the previous row from right to left from the front side of the fabric and pull out the loop.
Throw the thread over again and knit the last 2 loops on the hook.
Embossed purl double crochet (Figure 2)
- Throw the thread over the hook and insert it under the “body” of the column of the previous row from right to left from the wrong side of the fabric and pull the loop to the wrong side.
- Yarn over again and pull it through the loop and yarn over on the hook.
- Throw the thread over again and knit the last 2 loops on the hook.

Lush column “bump”
1.
Yarn over and pull out a loop of the required length from the loop of the previous row, pull the thread through two loops on the hook - there are two loops on the hook.
2.
Complete the first step - there are three loops on the hook.
3.
Repeat the first step - there are four loops on the hook, pull the thread through these four loops. Knit one loop to secure.
Lush double crochet stitch knit similar to the previous one
Yarn over and pull out a loop of the required length from the loop of the previous row, *pull the thread through two loops on the hook* repeat twice - there are two loops on the hook.
How to knit picot

How to knit picot
Pico is such a small mullet, a growth on knitting, such a decoration.
- On the part during knitting, knit a chain of three air loops.
- Insert the hook through two loops of the column from which the knitting of the chain began; There are three loops on the hook.
- Pick up the working yarn and pull it through these three loops on the hook.
Rachy step

Step for finishing products
Knit the Rachy step from left to right, so you need to hold the product with the front side facing you.
1.
Insert the hook away from you under both half-loops of the previous row.
2
. Grab the working thread with your hook and pull it out. There are 2 loops on the hook.
3.
Yarn over.
4.
Knit all the loops in one step.
Long loops
You can learn more about knitting long loops on a ruler.
An example of long loops is also the beard of Santa Claus.
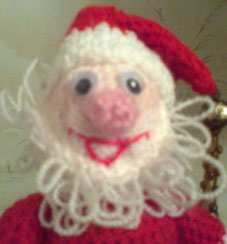
Long loops
Knit a chain of air loops of the required length and two rows of single crochets, on which long loops will then be knitted.
1st row: on the second loop of the chain from the hook, tie a sc; The next loops are the so-called “Long loops”.
To knit a long loop, work a single crochet, but pull the loop on the hook up 1-2 cm.
Remove the hook from the loop and thumb With your left hand, press the elongated loop down onto the knitting.
At the base of this loop two stripes in the form of an equal sign are visible. These are the threads of the double crochet (point 1).
Insert the hook under these two threads and into the hole at the beginning of knitting the column, and use the working thread to knit all three loops together.
Knit like this until the end of the row on each base loop.
2nd row: ch, to the end of the row, sc.
3rd row: knit as the first row, but at the beginning of the VP row.
Repeat knitting stitches as described.
Very often knitting intersects with French knot embroidery. More details, with sequential pictures, can be found. Or look at the photo below and read the description.
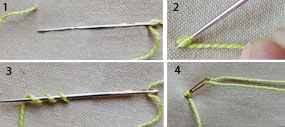
1. Bring the needle and thread to the right side of the fabric.
2. Wrap the thread around the tip of the needle three to four times.
3. Poke the needle through the fabric near the entry point, holding the thread tightly in your fingers.
4. Pull the needle out from the wrong side and secure the thread.

Thanks for reading
Crochet Lesson 1 updated: December 5, 2018 by:
I said that learning to crochet is easy.
Today you will see this. Just please don’t force things, learn little by little, don’t try to get ahead of yourself and don’t try to learn how to knit in one day. Sometimes we set ourselves impossible goals, and then get upset because nothing works out.
So let's move in small steps, not quickly, but confidently. And, believe me, knitting is easy!
Do you have a hook? If not, it's time to buy it. There are different hooks on sale - steel, aluminum, plastic, bamboo, wood and even bone. Bone and plastic ones weigh less (weight is a very important factor, especially at first) but they are fragile and not as smooth as metal ones. Aluminum is a light metal, but hooks made from it are coated with a special protective layer, which comes off quickly, and then the yarn may get dirty, and your fingers will also become covered with a gray coating. Steel hooks are heavier, but they are strong, smooth, and do not leave marks.
We'll talk more about hooks and their varieties later. And now main question first lesson: which hook to choose for training? There can only be one correct answer - the one that is more convenient for you to use.
Take a close look at the hook. It must be absolutely smooth for the thread to glide well. The head should be sharp, but with a rounded tip. If it is too sharp, then when knitting it may not enter between the threads, but into the thread itself, separating it. A hook with a head that is too blunt will be difficult to fit into the loop. And another important parameter is the depth of the beard cut. If it is too small, then the thread may slip off for an inexperienced knitter.
And, of course, not the last factor is ergonomics. If possible, hold different hooks in your hands and choose the one that feels more comfortable in your hand.
Saw it in the store long hooks? They will come in handy later when you begin to master Tunisian knitting. Knitting with them using the usual technique is not very convenient, and there is no need for extra weight.
It is better to take smooth, lint-free yarn for training. It should be well, but not too tightly twisted. General rule This is: the thread should be 1.5 - 2 times thicker than the recess of the working part. The main parameter that determines the size of the loop is the diameter of the hook handle.
Let's start from the very beginning - we'll figure out how to hold the hook and thread, how to make the initial loops.
I would like to immediately apologize if your working hand is your left. I don't know how to knit with my left hand. One of my friends studied according to the usual manual, sitting in front of a mirror and looking at her hands in the reflection. This deserves great respect and admiration.
So, take the thread coming from the ball in left hand tip towards you. The thread should cover the thumb and index finger of the left hand and press the remaining fingers to the palm.
Take the hook in your right hand. Classic way- the way you usually take a pen or pencil. The hook is held with the thumb and forefinger, lightly holding it with the middle one.
People often ask what difference it makes how exactly to hold it, because the main thing is to make the right movements. I admit: I find it more convenient to hold the hook differently. It so happened that first I learned to knit, and only then I mastered crochet. Many years have passed, and I still sometimes, out of habit, use a hook as a knitting needle. I think that experienced knitters know that with this style of knitting it is not easy to maintain an even tension on the thread and the loops can turn out uneven.

But this method also has its advantages. Try grasping the hook with your thumb and middle finger and placing the handle in your palm. The ring finger will support the hook, and the index finger will hold the loops on the working part of the hook when knitting. When knitting, the hook will not move relative to the fingers and the hand will get less tired.
Try both ways. Whichever one you like, use it.
Ready to take the first step? The first loop, of course...
So, the thread from the ball is in your left hand, thrown over your index finger, its tip is directed towards you and lightly pressed with your fingers into your palm (do not overdo it, please). Place the hook under the thread towards you, lift the barbed end slightly and turn the hook 180 degrees.


Pick up the thread coming from the ball and pull it through the loop on the hook. This initial loop is fastening and does not participate in calculations.


Complex manipulation? Make it easier! Tighten a regular loop with your fingers and place it on the hook. And, believe me, no one will ever guess how exactly you knitted the initial loop. And on appearance This will not affect the product in any way. You shouldn’t complicate your life, don’t you agree? Then let's continue.
Now you can start knitting a chain of air loops. Place the hook under the thread (the head should be facing your direction) and pull the working thread through the first loop. While pulling, you can turn the hook slightly (about 90°) so that the head is directed towards the chain. These are not mandatory recommendations, it’s just easier this way, and perhaps over time you will begin to get this movement automatically.

Now continue to grab the thread and pull it through a new loop on the hook each time. That's it - you know how to knit a chain!

No matter how simple the process may seem, there are still some subtleties. To ensure that the chain is even and not too tight, the loops need to be formed on the handle of the hook, and not on its tapering part.
Most beginners find the chain too tight. So tight that it is impossible to knit the next row on it. What to do?
Disband and start over. Practice until you get it right...
Don't be upset - I was joking!
I'll share a little secret. if you have hook of a larger number - tie a chain with it, and when knitting the main fabric, go to necessary hook size.
And in addition to practical skills, today there is a little more theory.
Look carefully at the connected chain. It has a front side (looks like a pigtail) and a back side (there are a number of tubercles on it).

Ta a loop, which is now on your hook, is called working.
A thread coming from the ball - too working.
Each loop of the chain consists of two arches. The one closest to you is called front half loop, far - rear half-loop.
A chain of air loops is the basis, the initial row of any knitting. There are, of course, other options - double chain or elastic cast-on edge (they are more complicated, we will talk about them later).

In diagrams, an air loop can be indicated by one of the following icons:
That's all you needed to learn in lesson two. In you will begin to master columns, their simplest variety. This means that you can already try to knit the simplest patterns.
We are starting a series of crochet lessons, from which you will learn how to knit basic elements: air loops and chains, half-columns, single crochets, double crochets, etc.
In this article we will look at how to hold a hook, a working thread, how to knit a starting loop and a chain of air loops. Watch the video tutorial at the end of the article.
How to hold a hook.
The hook can be held in two ways: like a pencil
or like a table knife.

Use the method that seems more convenient to you. I usually hold it like a pencil, but when my fingers get tired, I change the position.
How to knit a starting stitch.
Before we start knitting and casting on loops, we need to make an initial loop, or rather a knot.
Fold the thread into a loop

we put this loop on the hook so that the working thread is on the index finger, while holding the tail of the thread with the thumb and middle finger,

hook the thread

and pull it through this loop, tighten the knot.

The hook will be inside the loop. This is how we knitted the initial loop.
How to knit air loops.
Make the initial loop (knot) as described above, hook the working thread

and pull it through the initial loop, we get the first air loop. (v.p.)

To obtain subsequent loops, perform the same steps. We hook the working thread

and pull it through the air loop.

This is how we form a chain; it is knitted to the length required to obtain the width of the product we need. When counting the number of loops each air loop counts as one loop, the loop on the hook and the starting loop (knot) are not counted.

A chain of chain stitches forms the basis for knitting the first row, but it does not count as a row. This is what a chain of 10 air loops looks like in the diagram.
The chain of air loops should be knitted loosely, the loops should not be tightened.
How to hold the thread.
If the hook is in the right hand, then the flow of the working thread is controlled by the left hand. It is necessary that the thread is evenly tensioned. Place the thread on the index finger of your left hand, while holding it tight ring finger and little finger. When knitting, hold the chain of chain stitches with your thumb and middle finger.

If you want to receive the latest articles, lessons and master classes from the site to your mailbox, then enter your name and e-mail in the form below. As soon as a new post is added to the site, you will be the first to know about it!
 We make beautiful and festive garlands ourselves Cut out the letters Happy Birthday
 Royal Treasures: A Short Guide to Kate Middleton's Rings
 How to do makeup with golden eyeshadow?