Knitted toy: a mouse with knitting needles. Knitting toys for beginners: funny mice and an owl
How to knit a toy with knitting needles.
Beginning needlewomen will also be able to knit a funny toy with knitting needles, although at first glance this task seems impossible. The main thing in this business is to master the skills of knitting with front and back loops, as well as to understand the patterns.
From the article you will learn how to knit toys with knitting needles. Here are patterns for knitting a dog, a cat, a bear cub, a mouse, a panda and others. Using the presented schemes, you can connect another little animal. It is only necessary to arrange a different muzzle, ears, paws.
Knitting a soft toy bear with knitting needles with diagrams and descriptions: master class
A wonderful teddy bear will turn out for those who have mastered the “loop” seam and will be able to cross yarn of different colors.
A few tips for needlewomen:
- It is better to choose knitting needles of a smaller diameter than yarn, then the toy will turn out to be dense, and the stuffing will not be visible through the slots.
- Do not use scraps of yarn or fabric as stuffing. For this purpose, a synthetic winterizer, holofiber is suitable.
- If you decide to knit clothes for your bear, then take the yarn thinner than the one from which the toy is knitted.
Pattern for knitting a teddy bear:
This bear is knitted in one piece. And here is a detailed description of knitting a blue bear cub.

 blue bear cub
 How to tie a blue bear cub
  Patterns of a blue bear cub: the body and the lower part of the paw


Here is such a wonderful bear can be connected according to the scheme presented below. The muzzle of the bear is made using the technique of dry felting.


 How to knit paws
 Video: Baby bear. Knitting bear. Knitted toy. Part 1
Video: Baby bear. Knitting bear. Knitted toy. Part 2
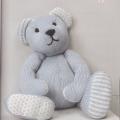
Knitted toy - Teddy bear
Teddy bears are loved by both adults and children. A knitted teddy bear, presented for a holiday or just like that, will bring warmth and comfort to your home. We invite you to knit a chic bear from yarn "grass". The principle of operation is not complicated, but you need to catch it, then the toy will contact quickly.

 Bear from yarn "grass"
 For work you will need:
- 1 skein of grass yarn 150m/100g
- knitting needles number 4
- regular blue yarn or leftovers
- small hook No. 1.5 (if you knit with a large crochet, then the feet and muzzle will not turn out as dense as they should, and will not hold their shape)
- nose threads
- eye beads
- padding
Torso and head:
- We start knitting with a garter stitch from the lower part of the body, gradually moving to the head.
- Cast on 11 sts on needles and add 10 sts for every 2 rows up to 51 sts (on needles).


- We knit garter stitch 3 rows without additions.
- We knit the next row with decreases of 5 loops: we make them on every 4th row, up to 21 loops on the knitting needles.
- We form the neck from 3 rows, and then proceed to the head: In each 2 row we add 10 loops twice. We knit 6 rows without additions, and then we knit with additions (after each 10 loops we add 5 loops.

- So we knit until the fabric is more than 4 cm long. Having closed 5 loops evenly, we knit the row to the end, and then we close 10 loops in each 2nd row three times. Through the loops that remained on the knitting needle, we stretch the thread and tighten. We stuff the toy and sew the edges.


Muzzle:
- We use a hook. We start with a set of 3 loops. In the 3rd loop, add 6 single crochets and close the circle.
- in the 2nd row we should get 12 loops: 1 single crochet, 2 single crochet in the next column
- in the 3rd row you should get 18 loops: we knit similarly to the second row, repeating 6 times
- in the 4th row you should get 24 loops, only we knit 6 times like this: 2 single crochet, and in the next column - 2 single crochet
- in the 5th row there should be 30 loops, we knit 6 times like this: 3 single crochet, 2 single crochet in the next column
- We knit rows 6-9 with ordinary knitting


Now the muzzle can be stuffed with padding polyester and connected to the head.


- We knit the front paws with the usual viscous, typing 10 loops. We add 1 loop in each 6 row along the edges. Thus, we should have 14 loops. We knit 6 rows, and then we begin to close 7 loops in the 1st row, distributing the decreases evenly. We wind the cut thread into the loops that remain on the knitting needle and tighten the thread.
- The second paw fits in the same way. We sew the paws stuffed with padding polyester with the body.
We begin to knit the lower paws from the bottom up, gaining 30 loops. - After 4 rows of regular knitting, we begin to make decreases:
we knit 13 loops, then 2 loops at the same time, we knit one front loop, again 2 loops at the same time, and 13 loops with regular knitting. - In the 7th row we knit all the loops in the same way, only instead of 13 loops there will be 12.
Next, we knit even rows of facial viscous. - We knit the 9th row in the same way as the 7th, but instead of 12 loops there will now be 11 and so we make decreases in each odd row: in the 11th row - through 10 loops, in the 13th - through 9 loops.
- 14-18 rows are knitted straight.


We proceed to adding loops according to the following scheme:
- In the 19th row, we knit 10 loops, make 1 increase, knit 1 loop with facial knitting, add one loop again and knit 10 loops again.
- In the 21st row, we make an increase not after the 10th, but after the 11th loop, in the 23rd row, an increase after 12 loops.
- In the 25th row we knit 2 loops together 7 times, then we knit 14 loops with knit (when we knit the second paw, we will start with 14 facial loops, then we will knit 7 times 2 loops each).
- On the 27th row we will close the loops.
- When the second paw is ready, we will tie the feet with single crochets. The diagram is shown below:


- We will collect the paws and sew the feet. Fill with padding polyester and attach to the body.
- We knit the ears, dialing 7 loops, and making a decrease in 1 loop along the edges of the next row. We knit another row and close the loops. Crochet the edges of the ears to give them the desired shape.


- Crochet the nose by typing 5 air loops. We make decreases in each row (on both sides, one loop). When we have a small triangle, we will begin to tie the edges. Sew the nose to the muzzle.

- It remains to tie patches for the head and for the body. After that, sew on the eyes and sew decorative stitches on the paws and on the torso.


Amigurumi toy with knitting needles - an owl: diagrams with a description
Here is a knitting pattern for an owl:

 Owl knitted in stocking stitch
 How to make an owl face
 And here is another owl:


The owl is crocheted with threads of three colors. White yarn is used for the body, gray for the wings and head, and black for the beak. In the diagrams, each cell means one loop. Each piece is knitted in the round. Decreases and additions are made according to the scheme.

 Description of work: torso and head
  Artwork description: wings

Video: How to knit an owl
Knitted toy - cat: diagrams with a description
Cats in love


Kitty Murzik

 Cat Murzik
  How to tie a cat Murzik: description
 How to tie a cat Murzik
 Video: The cutest hug cats!
Video: knitted cat with knitting needles!
Monochromatic balls of yarn leftovers can be of great use: to knit funny kittens. Knitting a kitten is not difficult if you know how to knit socks or mittens on five knitting needles. Can be used for knitting and ordinary circular knitting needles. We will knit from the lower part of the body, gradually moving up.
- We collect 12 loops, and in the 2nd row we double the number of loops. From the third row, we should get 30 loops with additions. Then we just knit without additions and decreases until we reach 32 rows.
- We sew a circle cut out of felt to the kitten's bottom. Now you can put the weighting agent in the bag and the filler inside.
- The crown is folded in half and sewn together. To highlight the ears, we sew the corners on the head obliquely.
- In the place where the kitten will have a neck, we also sew with a thread, pulling it together a little.
- We knit the tail and limbs by typing 6 loops. For the paws we knit 12 rows, we select the length of the tail at our discretion. Connected parts-tubes will be sewn to the body. We make out the muzzle, do not forget to embroider the navel.


The video provides a detailed master class.
Video: Knitted cat. Knit together (head-body)
Video: kitty knitting
Knitted toy - hare
Bunny knitted from soft yarn

For work you will need:
- mohair yarn
- knitting needles
- needle and thread for stitching details
The body of the bunny is knitted in one piece from the bottom up.


Ballerina Bunnies


 How to knit an outfit for a ballerina bunny
 More knitting patterns for bunnies:


Knitted toy - sheep

 Knitted sheep
 50 g boucle threads
20 g of smooth thread (for the muzzle and paws of a lamb)
black and brown threads for decoration
knitting needles, needle, synthetic winterizer or other filler, bell


We knit the head with the front stitch. It is necessary to dial 6 loops with a regular beige thread and double the loops in the first row. We knit the second row according to the pattern.
3 row: the first loop is doubled, the second is knitted as a knit, repeat to the end of the row.
4 row: knit according to the pattern
5 row: the first loop is doubled, the second and third are knitted.
7 row: the first loop is doubled, the 2nd, 3rd, 4th are knitted.
We add so many loops that there are 6 loops between the doubled loops.
After the additions, we knit 12 rows.
Now we need a bouclé thread. For her, we take 2.5 mm knitting needles.
The front side is knitted with purl loops, the wrong side with facial loops. We knit 5 rows.
We decrease the loops in the reverse order: we knit 2 loops together:
the beginning of the row - we knit 2 loops, and then repeat after 6 loops
the beginning of the row - we knit 2 loops, and then repeat after 5 loops
We should have 6 loops left on the knitting needle. We cut the thread, pull it through these 6 loops and tighten.


We begin to knit the torso with ordinary threads from 6 loops. In the second row we add loops in the same way that we used when knitting the head. When we knit three rows, we switch to boucle yarn. Again we knit with additions until reaching 10 loops between the added loops. After the knitted fabric reaches 7-9 cm, we begin to make decreases in the reverse order.
We knit 2 loops at the same time at the beginning of the row, repeat the decrease after 10 loops.
In the next row we make a decrease at the beginning of the row and after 9 loops. There should be 6 stitches left on the needle. We stretch the cut thread through them and pull it off.


We also use boucle yarn for the tail. We collect 8 loops. We knit in garter stitch, decreasing in each 2 rows, 1 loop at the beginning of the row and at the end. When there is one loop left on the needle, close it.
For the ears we collect 8 loops. We knit 8 rows. We make decreases in 2 rows: we knit all loops by 2. After that, we make decreases until 1 loop remains on the knitting needle. Close it and cut the thread.
For the legs we use black yarn. We start knitting with 8 loops. When 3 rows are knitted, change the thread to a light one and knit 10 rows. We fill the finished parts with synthetic winterizer.


We sew the muzzle to the head, not forgetting to leave a hole at the top. Fill with synthetic winterizer and sew.
We do the same with the body. We connect the head and body. We sew the tail, ears. We sew the legs, pulling them together. To do this, the thread is passed through the tummy. We make a muzzle and hang a bell around the neck.


Knitted toy - dog
Shaggy dog: job description


 How to tie a dog
 Knitted toy - doll


How to knit a doll with knitting needles you will learn from the video.
Video: Knitting doll
Video: Knitting doll. How to knit a doll with knitting needles
Knitted toy - hedgehog
The video presents a detailed master class on knitting a hedgehog with knitting needles. How to tie panda's hind legs? Completion of work How to tie a mouse
Similarly, you can connect other animals.
Video: A simple cockerel with MK knitting needles
Video: Children's knitting Beautiful knitted toy
Friends, I suggest you “switch” to the knitting needles and knit a wonderful mouse in pants))) The mouse is knitted on two knitting needles, it is not large, so working on it will not take you much time and effort, and the yarn consumption is not great) )) Materials:
- Yarn of two colors, I used the remains of BABY Nazar threads of pink (secondary color) and milky (main color) colors
- knitting needles, depending on the yarn you choose (I have No. 2) - 3 pieces
- synthetic winterizer
- eyes (beads)
Head (main color)
Cast on 8 sts and knit 2 rows
3 row- all facial, evenly add 6 p.
4 row- all loops are purl
5 row- all facial, we make an increase every two loops, i.e. edge, * increase, 2 persons. *, ** to the end of the row
6 row- all purl
7 row- all facial, we add every three loops - chrome., * increase, 3 persons *, ** repeat until the end of the row
8 row- all purl
9-14 - rows- front surface (or hosiery knitting)))
15 row- start decreasing, chrome, * 2 loops together front, 2 faces. *, ** knit to the end of the row
16 row- purl loops
17-18 rows- facial surface
19 row- chrome., * 2 loops together front, faces. *, ** repeat ...
20 row- purl 21-22 rows - front surface 23 row - chrome, * 2 loops together front *, ** to the end of the row, if you did everything right, there should be 8 loops on which you still need to knit 3 rows with front surface ... Loops DO NOT CLOSE, but simply pull it off with a thread, while tearing off a segment of 20 centimeters (we will later need it to stitch the part together)
Ears (2 parts) - main color
On the knitting needles, cast on 12 loops 1-2 rows - front surface 3 row - chrome, * 3 loops together faces., 1 faces. *, ** to the end of the row. Close the loops, cut off the thread, leaving a long thread for sewing to the head ...
legs (2 parts) - main color
Cast on 8 stitches and knit 10 rows in stockinette stitch. Pull the loops onto a long piece of working thread ...
Pens (2 parts)
Cast on 14 stitches (auxiliary color)
1-5 rows- front surface, BUT! start knitting from the wrong side)))
6 row- edge, * 2 loops together front *, ** repeat 6 times, front (8 p.)
7 row- FACE loops
Change the color of the thread to the main one
8 row- face loops
9-17 rows- front surface with a thread of the main color, pull off the loops ...
Corpuscle (1 part) - secondary color thread
Cast on 12 stitches and knit 2 rows in stockinette stitch.
3 row- evenly add 6 loops (edge, * increase, 2 persons. *, ** to the end)
4 row- purl
5 row- again we add 6 loops ... (edge, *increase, 3 persons. *, ** to the end) in total we get 24 loops ...
6 row- purl. we break the thread and put the knitting needle with this blank to the side.
We take an additional knitting needle and repeat on it from the 1st to the 6th row))), then we put loops on it from the delayed knitting needle and continue knitting
7-23 rows- front surface (17 rows)
24 row- chrome., * 2 faces., 2 loops together front *, ** repeat 4 more times, 6 faces., * 2 loops together front, 2 faces * - repeat 5 times, faces
25 row- purl
26 row- chrome., * 1 person., 2 loops together facial *, ** repeat 4 more times, 6 persons., * 2 loops together facial, 1 person * - repeat 5 times, persons
27 row- purl
28 row- chrome., * 2 loops together front *, ** repeat 4 more times, 6 faces., * 2 loops together front * - repeat 5 times, faces
ATTENTION!!! Here in the description, counting errors are possible))) Because I usually don’t count anything special when knitting ... but I just look and knit ... i.e. there is no head during the process))) therefore, describing the process requires quite a lot of effort for me))) Do not exact ... but help)))
29 row- purl, close all the loops. It remains to collect the whole thing in a mouse))) For stitching, use the long threads remaining in each detail)))
I completely forgot about the tail))) The tail is connected by type ... only on three loops. To knit such a cord, you need to dial 3 loops on the knitting needles, knit 1 row with facial loops, throw all the loops back onto the left knitting needle and again knit with facial loops, throw the loops again on the left knitting needle and knit again, etc.)))
And here is a mouse in pants knitted with two knitting needles)))
Knitted toy: knitting mouse
Knitted toy: knitting mouse
Knitted toys are made with double-sided knitting needles (a set of 4 knitting needles).
The author of this wonderful knitting mouse is Rachel Borello
You will need: yarn Lion Brand WoolEase (wool, 70g/148m) grey, black and light pink, 3.25 mm double-ended knitting needles.
Knitted toy with knitting needles, description:
Head: cast on 3 sts with gray yarn on double-sided knitting needles (distribute 1 st on each of 3 knitting needles), knit in a circle
1st row: knit each loop 2 times, first behind the back wall of the front, then behind the front front = 6 p.
2nd row: persons. P.
4th row: persons. P.
5th row: (2 persons, knit the next loop 2 times) - around
6th row: persons. P.
7th row: (3 persons, knit the next loop 2 times) - around
8th row: persons. P.
9th row: (4 persons., knit the next loop 2 times) - around
10th row: persons. P.
11th row: (5 persons, knit the next loop 2 times) - around
We knitted the nose. Then we distribute: 1st knitting needle the left half of the face, 2nd knitting needle: forehead, 3rd knitting needle: the right half of the face - 7 loops on each knitting needle.
12th row: knitting needle 1 - 6 persons., knit next. loop 2 times, knitting needle 2 - persons. p., knitting needle 3 - knit a trace. loop 2 times, 6 persons.
13th row: knitting needle 1 - 7 persons., knit next. loop 2 times, knitting needle 2 - persons. p., knitting needle 3 - knit a trace. loop 2 times, 7 persons.
14th row: knitting needle 1 - 8 persons., knit next. loop 2 times, knitting needle 2 - persons. p., knitting needle 3 - knit a trace. loop 2 times, 8 persons.
15th row: knitting needle 1 - 9 persons., knit next. loop 2 times, knitting needle 2 - persons. p., knitting needle 3 - knit a trace. loop 2 times, 9 persons.
16-18 rows: persons. P.
Fill your head with stuffing
19-20 rows: (2 persons together.) - around = 7 loops in total.
Cut the thread, pull it through the last 7 loops, pull tight and fasten off.
You can already embroider the eyes and nose when it becomes easier to navigate, but if you wish, the nose and eyes can be embroidered at the end.
Ears (make 2): cast on 3 sts with light pink yarn, knit back and forth on 2 needles
Rows 1-5: Knit in stockinette stitch (knit from the front side and purl from the wrong side)
6th row: remove p., 2 persons together., throw the removed one on the knitted one.
Sew the ears to the head.
Body:
2nd row: knit each loop 2 times
3rd row: (1 person., knit the next loop 2 times) - around
4th row: (2 persons, knit the next loop 2 times) - around
5-17 rows: persons. P.
18th row: (2 persons., 2 persons together.) - around
19th row: (1 persons., 2 persons together.) - around
Fill the body with stuffing
20th row: (2 persons together.) - around
Cut the thread, pull it through the last loops, pull tight and fasten off.
Sew the body to the head.
Paws (make 4): dial 3 sts with gray yarn, distribute them on 3 knitting needles, knit in a circle
1st row: knit each loop 2 times = 6 p.
2-10 rows: persons. P.
Cut the thread, pull it through 6 loops, pull tight and fasten off.
Sew the legs to the body.
Tail: cast on 3 sts with light pink yarn, distribute on 3 knitting needles, knit in a circle with facial loops to the desired length of the tail.
Cut yarn, pull through 3 loops, pull tight and fasten off.
Sew on a ponytail.
Using the leftovers of multi-colored yarn, you can do such an activity as knitting toys for children. The presented master class details how you can knit cute and cute mice, as well as a night owlet with your teddy bear toy.
Knitting toys for beginners involves a complete and detailed description of the entire process, which is presented here.
Let's start with two funny mouse friends: Fifi and Lola.
Pay attention to the selected colors of mice and their outfits. In general, you can stick to this example or choose your own interesting color combinations. As a result, you will get a toy measuring 21.5 cm, if measured from the ears to the legs of the mice.
Mice consist of the following separately connected parts: head, ears, torso of mice, tail, arms and legs. You should also separately knit shoes with a bow and a dress for Fifi, a topic and breeches for Lola.
Knitting mice is performed with knitting needles No. 2.75 and No. 3. Also for work you will need two darning needles, one special needle for wool, filler for toys, beads for the eyes and a pink thread for the spout.
The next interesting knitted toy will be a knitted night owl, which holds a small bear cub in its wings.

The size of the toy will eventually be 25.5 cm. Knitting is done with knitting needles No. 3.
An owl consists of the following separately connected parts: torso and head, nightgown, wings, tail, legs with claws. Eyes and beak are knitted separately. For the eyes, it is necessary to choose the right color scheme for all the details so that the owl has a kind and at the same time sleepy look.


Pay attention to the night cap, which should also be knitted separately.
It will also be necessary to tie the little bear cub separately, the full description of which is presented here. The bear can be made with yarn of any color, a black thread is used for the muzzle, with which all the details are embroidered with a needle.
Carefully assemble all the parts as described in the master class.

As a result, you will get a cute owl that will please not only children, but also adults.
Such handmade toys will be an invaluable gift for children who will enjoy playing with soft and pleasant creatures. Also, they can become an original decor element of any room, bringing comfort and harmony to it.
 Knitting toys for beginners: funny mice and an owl
 DIY Christmas trees
 Beaded Jewelry: Step by Step Tutorials for Beginners