Japanese technique shibori. Shibori: technique, methods and techniques of work
Shibori knotted batik is distinguished by attention to detail and requires many subtleties to be observed. Dyeing fabric with this method is affordable and a simple form of creativity.
Shibori technique even a child can master it, but the most beautiful work are performed by real craftsmen who have refined taste.
Knotted batik using shibori technique
Knotted batik allows you to create abstract paintings, neck scarves, jewelry,
To form unusual patterns using this technique, you can take any objects, thanks to which, when applying special paints, you can make the fabric in relief. Fruit seeds, shells, twigs and stones can be used as such items.

Materials required for dyeing fabric
The shibora technique is used when the following materials are available:
- base (it is recommended to use silk);
- litter;
- iron;
- bowl (deep with wide edges);
- water;
- , sponges and brushes for applying it;
- relief objects (shells, stones, etc.);
- stationery erasers, ribbons or threads;
- stand or jar.
Before you start working, you need to read the tips indicated on the paint packaging. Most likely you will need a water bath. You can use a saucepan or a double boiler. After carefully studying the material, you get an idea of how you can make a shibori ribbon, and the process of making it no longer seems so complicated.
Shibori technique: sequence of actions
Shibori ribbon is easy to make, let's look at the process of creating it. The sequence of necessary actions is as follows:
1.Spread the bedding on a flat surface, for example, on a newspaper, tablecloth or bedspread. Then place a bowl in front of you and lower the stand (jar) into it, base up.
2.The silk napkin is moistened with water (both white and colored napkin) and squeezed well, after which they are spread out on a protective mat.
3. Place a relief object in the center of the napkin. The material is folded in half and the object located inside is secured with an elastic band or thread so that a knot is formed.
Instead of knots, you can knit spirals, put pebbles and buttons inside, knit with threads of different thicknesses or elastic bands.


5.The napkin is placed on a stand (jar) and covered with paint using a sponge or brush.


6.It is dried away from sun rays and heaters. It is important to let the fabric dry on its own.

7. The dried napkin is straightened and left in this state or continues to work with it. For example, dyed fabric can be used to create clothing or stretched over a frame to create a painting or panel.

8.The napkin is ironed through gauze or newspaper, after which it is placed on the newspaper and covered with another newspaper on top, then rolled up. The edges of the roll are bent inward, resulting in small briquette, which is tightly bandaged to prevent it from opening.
9. The formed briquette is sent to a water bath (if you use the simplest method, it will be enough to wrap the briquette several times with cling film, this will help eliminate the possibility of moisture penetration and will allow you to hang the briquette in the multicooker). The product is exposed to steam for an hour and a half, no less.

Unique designs obtained using the shibori technique
After performing the necessary manipulations, the product is straightened and ironed again. The paint, which was fixed as a result of using a water bath, holds well, it does not wash out, and does not fade when exposed to sunlight. The drawings are always unique, and with the right combination of textures and colors you can get a real work of art.

Shibori - necklaces, bracelets and pendants, MK
Shibori (shibori, or, more Right, shibori) is a Japanese term for methods of dyeing fabric by tying, folding, twisting and squeezing and is translated from Japanese as knot.

How do they create such beauty?
A CRAFTSMAN reveals the secret of creating a necklace with shibori ribbons:
First, create a base from cardboard. Then the shibori fly is laid and secured.
4.
The result is amazing:

And more necklaces using the shibori technique


 1
1

3.
Pendants - hearts.

MK from OLGA GRUSHENKOVA heart pendant with shibori ribbon.

Here you go. I will continue today new topic. I got completely carried away and worked hard. I went headlong into shibori. Anyone who has seen jewelry with this silk ribbon will hardly remain indifferent.
I make shibori ribbon for my jewelry myself. That's pretty too exciting activity. Now I don’t even know what I like more: making ribbon or creating jewelry with it.
When creating jewelry, the shibori ribbon itself sets the tone of the work. The products are not difficult to make, but patience and accuracy are required. Today I will show you how I created my pendant with shibori ribbon - Heart.
For work we will need:
1. Shibori silk ribbon
2. Czech beads
3. Beads
4. Felt
5. Bead needles, thread
6. Leather or substitute leather.
7. Glue Moment Crystal
8. Accessories, beads, rhinestones.
We outline the contours of the pendant on felt. I immediately cut out the felt along the contour, but it depends on who’s convenience.
Using pins, we place the ribbon on our heart and carefully sew it on with small stitches.
I immediately glued the cabochon to the base. Well, most of our pendant is already filled.

Now we trim the cabochon with beads.

We sew the first row of beads to the base along the contour of the cabochon. We sew on one bead, go back and again thread the needle and thread through the sewn bead, add the next one to it. We sew the second bead to the base and go back again, thread the needle and thread through the second bead and add the third to it. So, step by step we sew the beads to the base.
We sew the next row of beads to the bottom row through one bead, according to the pattern.


I also sewed beads along the very edge of the entire heart. Now we can see the contours and outlines of the future pendant. All that remains is to fill in the empty part.
Well, it’s a matter of imagination and, of course, the variety of materials available.
I sewed on a small chain with rhinestones and beads.


The front part of the pendant is ready.
Next, glue the wrong side of the pendant to the cardboard and carefully cut out the cardboard along the contour.
And now we glue the leather or leatherette. We cut the skin not along the very edge, but with a small margin - 1 mm.

We process the edge with beads. Make sure that the distance between the beads is the same.


You can leave the pendant as is, I decided to modify the edge. Between two adjacent beads I sewed three more beads, similarly between two adjacent ones, thus getting “teeth” along the edge. I also wove a small loop into which you can insert a chain or ribbon.
The pendant is ready.


The ribbon itself is so beautiful that it can be used simply as a ribbon for a pendant


Shiborri pendants


 2
2


There are things that attract the eye like a magnet. They are able to create a festive look with the simplest clothes. These decorations are just that. Author of the competition work: Yana Berseneva Bracelet with shibori ribbon and bead embroidery. The master class is designed for craftsmen who know how to work at least a little in the Bead Embroidery technique. The level is moderately difficult. 1. We will need: felt, leather, silk ribbon (shibori is possible, but I didn’t have it, so I used a silk scarf), Mother of Pearl cabochon (Heliotis shell), beads pastel shades, green “light”, Swarovski crystals, pearls different forms and flowers, crystal beads, various beads to match the color of the cabochon, Moment-Crystal glue, nylon thread, sharp scissors, thick paper. 2. Glue the cabochon to the felt with glue. Outline the shape of the future bracelet. Sew on the silk ribbon, gathering the ends with an accordion. We trim the cabochon with “Mosaic”. 3. Sew the pearls to the ribbon, forming a beautiful drapery reminiscent of sea waves. 4. We glue and trim rhinestones and other large elements with mosaics, and trim the outline of the bracelet. 5. Fill the space between the rhinestones and silk with beads. 6. Cut out the felt blank as close as possible to the outer beads, but be very careful not to cut the thread of the outer row. Put it on paper and trace it. 7. Sew clasps to the wrong side. Since the product is wide, I have two of them. 8. Thickly coat the back of the bracelet and the paper blank with glue and glue it together. 9. Then glue them to the skin. 10. Cut out the leather as accurately as possible (closer to the bracelet). 11. The last stage is to process the edge of the product. There are two popular methods, I prefer this one - beads with holes facing outwards. 12. Hide the threads - our bracelet is ready! 13. 14. Such different shibori bracelets..
Bracelets
There are things that attract the eye like a magnet. They are able to create a festive look with the simplest clothes. These decorations are just that.


Bracelet with shibori ribbon and bead embroidery.

The master class is designed for craftsmen who know how to work at least a little in the Bead Embroidery technique. The level is moderately difficult.
1. We will need:
felt, leather, silk ribbon (shibori is possible, but I didn’t have it, so I used a silk scarf), Mother of Pearl cabochon (Heliotis shell), beads in pastel shades, green “light”, Swarovski rhinestones, pearls of different shapes and colors, crystal beads, various beads to match the color of the cabochon, Moment-Crystal glue, nylon thread, sharp scissors, thick paper.
2. Glue the cabochon to the felt with glue. Outline the shape of the future bracelet. Sew on the silk ribbon, gathering the ends with an accordion. We trim the cabochon with “Mosaic”.
3. Sew the pearls to the ribbon, forming a beautiful drapery reminiscent of sea waves.

4. We glue and trim rhinestones and other large elements with mosaics, and trim the outline of the bracelet.
5. Fill the space between the rhinestones and silk with beads.
6. Cut out the felt blank as close as possible to the outer beads, but be very careful not to cut the thread of the outer row. Put it on paper and trace it.

7. Sew clasps to the wrong side. Since the product is wide, I have two of them.
8. Thickly coat the back of the bracelet and the paper blank with glue and glue it together.
9. Then glue them to the skin.

10. Cut out the leather as accurately as possible (closer to the bracelet).
11. The last stage is to process the edge of the product. There are two popular methods, I prefer this one - beads with holes facing outwards.
12. Hide the threads - our bracelet is ready!


13.
14.
Such different shibori bracelets...
Jewelry using the shibori technique, even when made by beginners, not only transforms the image, but also makes it truly original and unique. This term, which sounds in the original “shibori”, means nodular staining. A pre-thought-out pattern of knots allows you to obtain fancy patterns and intricate color transitions on the fabric.
Emerald earrings made using the shibori method
But to create voluminous scarves, blankets and sweaters, the Japanese knitting technique of shibori is used.
The name “Japanese shibori technique” is not entirely correct, since the origin of this art happened in India and China.
In Japan, this technique began to be mastered in the eighth century AD. Initially, it was used in batik, allowing you to get unique designs every time. But shibori in felting was used to make three-dimensional figures.
Until the 21st century, craftsmen dyed only natural silk fabrics. Genuine knot dyeing was done in indigo, obtained from azurite.
But now a lot has changed, and with the help of the shibori technique you can create chic jewelry with your own hands, in which silk and other fabrics dyed in various shades are embroidered with beads, rhinestones, shells, beads and even semi-precious stones.
Features of jewelry
Works made in shibori are quite massive pieces of jewelry, which include bracelets, necklaces, earrings, hairpins and pendants.
The following is used as a base for dyed fabric:
- Genuine Leather;
- felt;
- suede;
- interlining;
- velvet.
These fabrics are dense enough to maintain the shape of the products, but at the same time it is easy to attach shibori ribbons and other decorative elements to them.
Some designers suggest decorating wardrobe items with such products. To do this, you can use the lapels of a jacket or coat, felt hats etc. Such techniques will transform already familiar things and the entire appearance their owners.
Shibori style jewelry can be easily recognized by the presence of:
- colored ribbons;
- multi-colored stones;
- scatterings of beads;
- pearls;
- ceramic and metal inserts.
All this creates a bright picture, in which the oriental style is clearly visible.

Decorative elements add extra luxury to the decoration
Nowadays, making shibori jewelry for beginners at home can be simplified. Those who have difficulty with the batik technique can attach pieces of draped fabric to pieces of costume jewelry and then paint them with spray paints.
Making such items yourself is quite simple. However, for those who want to follow the classical canons, you should take a master class and learn the techniques of batik, felting or making jewelry from shibori ribbons.
Technique for creating shibori ribbon
Using the knot-dying technique, before making batik, the fabric must be tied, twisted, crumpled in a certain way and dipped in the dyeing solution. You can sequentially immerse it in solutions with different colors to create a bright motif.
First you need to prepare the following materials:
- silk;
- wooden stick;
- coloring agent;
- iron;
- tools for applying paints.
Before dyeing regular silk fabric, it must be made crimped. To do this, you need to place it in a vinegar solution (5 ml of vinegar per 200 ml of water) and leave for 20 minutes. Then the material must be pulled out, wrung out, folded in a certain way onto a clean cloth and through gauze pad iron. This labor-intensive process can be replaced by purchasing already corrugated silk.

Tools required for work
- Moisten the material and fold it into a ribbon.
- Pass the thread along the bends.
- Wrap the silk around a wooden stick.
- Dye the fabric along the curve using foam sponge or brushes.
- Allow the tape to dry naturally overnight.
- Iron the dry tape along the bend lines.
- To fix the paint, you need to fold the silk into plastic bag and heat in a steam bath.
- Iron again.
The resulting batik can be used to make all kinds of jewelry by attaching decorative elements to it.
Anastasia Sergeeva
What is shibori? Master class on creating unusual jewelry
The art of shibori today is gaining unprecedented popularity even among a sophisticated audience of needlewomen and lovers of such hand-made jewelry that looks original and expensive. Therefore, we decided to tell our readers about the popular type of this Japanese technology coloring, and show a simple shibori master class that will allow you to repeat the creation of stylish earrings.
What is shibori?
Shibori, or shibori, is an ancient Japanese art of fabric dyeing that dates back to the 7th century. The term "shibori" comes from the Japanese verb 絞る (shiboru), which means "squeeze", "squeeze", "squeeze", "fold". Traditionally Japanese shibori was made from cotton fabric by coloring it beautiful color indigo. The transformed product is twisted, compressed, folded or fixed in the desired position with threads, rubber bands, paper clips, etc., and then painted with paint. At the same time, those areas that have been twisted are protected from paint getting on them, and as a result, due to the contrast and difference in colors, an unusual pattern remains on the fabric.
The art of Shibori is divided into many different techniques, with which the product can be folded, twisted, squeezed and stitched to obtain different patterns. However, although each type of shibori is designed to produce a specific type of pattern, it depends not only on what kind of processing the product needs to be subjected to in order to achieve the desired result, but also on the type of fabric used and its properties. The most interesting thing is that the same coloring technique, repeated over and over again, will give completely different results each time.

Known types of shibori include kanoko, miura, kumo, nui, itachjime and arashi shibori. However, we decided to dedicate this shibori master class to one of the most popular techniques - arashi shibori, with which unusual corrugated silk ribbons are made. And then they can be used to create amazing shibori jewelry.
How to make shibori ribbon with your own hands
Next, we will present a short master class on how to create a shibori ribbon with your own hands. Of course, they are also available in stores, but, firstly, they are not sold everywhere: they are more likely to be found on the Internet rather than in handicraft shops. And secondly, they are not cheap - on average 150 rubles for a 10-centimeter piece, plus delivery, so the option of hand-made ribbons should not be ruled out.
We will need:
- a piece of silk;
- a cylindrical stick, a thick tube, made of wood or plastic;
- fabric paint, you can take acrylic;
- threads;
- brush, sponge/wide bowl;
- water.

Let's get started:
- We wrap the silk fabric around the stick with a screw, as if diagonally, and then attach the ends with invisible tape, if necessary.
- We tie the stick with thread along its entire height.
- We assemble the fabric into a kind of accordion, moving the ends of the silk from above and below to the middle.
- We begin to randomly paint the silk with paint using a brush/sponge, or lower the stick with the fabric into the dye solution. You can use multiple colors to create a gradient ribbon.
- After painting, let the tape dry completely - batteries and bright sun are excluded.
- We iron the corrugated tape along the fold line. Then we wrap it in a bag so that it is hermetically sealed and keep it in a water bath for 1-1.5 hours. This procedure is necessary for the paint and corrugation to set.
Shibori jewelry - master class
Now let's learn how to make shibori jewelry with our own hands - for example, elegant and beautiful earrings. Using the same principle, you can create pendants for necklaces or bracelets. We will need the following materials and tools:
- shibori ribbon - 10 cm;
- a piece of felt;
- a piece of artificial leather;
- threads;
- rivoli - small convex rhinestones;
- bicone beads;
- round and angular beads;
- good glue;
- scissors;
- needle nose pliers;
- needle;
- one-piece ring for jewelry;
- wires for earrings.
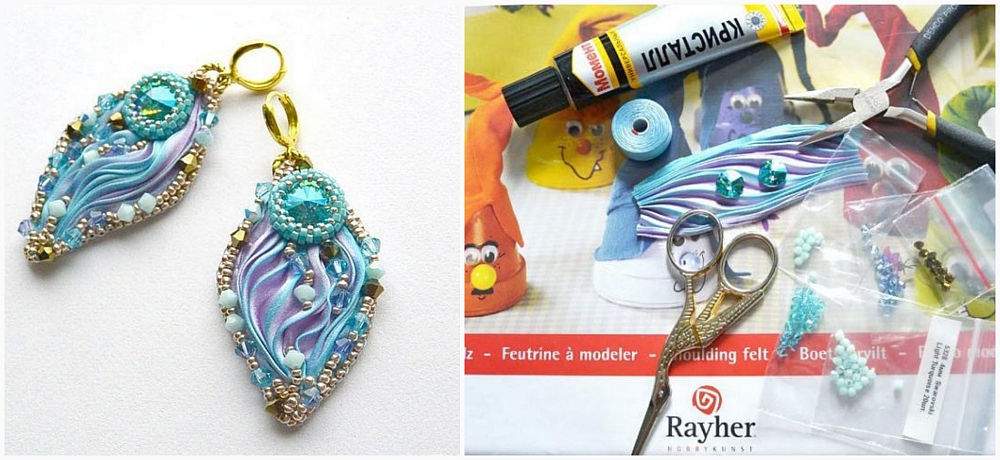
We have listed the materials that were used in this particular master class, but you can take other rhinestones, beads and seed beads, the color of the ribbon and even the shape of the earrings can also be anything - use your imagination!
The first stage is braiding rhinestones

The second stage is shaping the shibori ribbon.

The third stage - product design

Shibori jewelry is ready!
But that's not all: we invite you to watch next video and learn how to use one element to learn how to make other shibori jewelry - belts, necklaces and bracelets:
Take it for yourself and tell your friends!
Read also on our website:
show more
Today we will study the method of dyeing products using the technique of knotted batik "shibori" (or shibori). Let's start with Nadezhda Osadchenko's master class.
The video clearly shows that there is nothing complicated in this technique. Absolutely everyone can master it. And even beginners can very quickly learn how to create interesting and completely unique patterns on fabric.
The lesson shows well that drawing can be done in rich color palette. Such ornaments will ideally decorate your T-shirts, tunics, summer sundresses, tablecloths and towels. A bright multi-colored image shimmering with all shades of the rainbow is sure to attract the attention of others.
Let us note an important nuance. It is advisable to use liquid paints for dyeing fabrics using this technology. water based. With tight acrylic paints you may have problems, especially at first. Although it is worth clarifying that the above method is one of the simplest. There are many other methods using various paints and additional materials (soda, wax, vinegar, etc.).

Dyeing a T-shirt using the Shibori batik knot technique
Now we will show one of our first experiments in using the Shibori batik knot technique. For coloring a children's T-shirt that is far from new, it is conditional white Silk paints and acrylic paints were used.

Here are all our tools and supplies before we get started. In the process of coloring Active participation hosted by the son (the owner of the T-shirt and part-time “model”).

To create the knots, we used threads and an elastic band purchased for the occasion. First we wrapped the center of the T-shirt, then created knots in the shoulder area and at the bottom of the sides. As a result, we ended up with a hedgehog like this:

Now let's start coloring the T-shirt. Note that if the paints are thick, it won’t hurt to pre-wet the fabric. They took any colors, on a whim, whatever came to hand.

Initially, the idea was to paint the T-shirt with only two or three colors, making an image with a relatively harmonious palette. But the second participant in the process insisted on using the maximum number of different colors.

We diluted the acrylic paints heavily with water, otherwise they would not saturate the very thick cotton fabric well. Water-based paints soaked in just perfectly, but they are also more expensive, especially Silk and Yavana. As a result, we got this:

The completely dyed T-shirt was placed on the radiator to dry overnight. To see what we come up with, until we succeed, we need to wait until the morning.

So, take off the dried T-shirt. Cut and remove all threads and elastic bands.

After this, we iron the T-shirt from the inside out to fix the paint. Now the T-shirt needs to be washed to remove excess paint (dried on, not absorbed into the material, etc.). Then we iron again. This is what happened as a result.
Front view.

Our T-shirt on the back:

Based on the results of the work, the following conclusions can be drawn for the future:
- It is better to take things with thinner fabric, dense material is dyed worse
- When using topcoat paints for fabric, you must first wet the material.
- If you don't want big white bald spots, make knots smaller in size and don't tie them too tightly.
And this is what the T-shirt looks like on the model.


By the way, the owner of the T-shirt was very pleased and wears it almost without taking it off.
As you can see, the Shibori knot technique is not at all complicated. It’s quite easy to master, although of course there are many nuances here too. Well, first you need to get a little practice, and then it will get easier.
And now - a few examples of various things dyed using the shibori technique.
Examples of using the Shibori knotted batik technique

This is such a bright T-shirt with a heart in the middle.

And this is what it looked like during the coloring process. To dye the fabric in this case, powdered procion dyes were used, diluted at room temperature in water. The T-shirt itself was soaked in a solution of soda ash before dyeing.

An original napkin made in a monochrome (one-color) design. To color this “mini tablecloth” we used Gamma dye.

This is our napkin before we start coloring. All the knots are ready, now it is dipped in a warm solution of soda ash, then wrung out and dyed.

And a little more beauty. Here you see not only T-shirts, tank tops and bedspreads, but even trousers!

And this is what the “blanks” look like - T-shirts in the process of coloring.

Another T-shirt.

T-shirt in a similar design.

And this is such an original bedding set: a bedspread and two pillowcases.
And finally - some very beautiful things made using the shibori technique. You are unlikely to be able to do something like this right away, but it will be something to strive for.


That's all for today, good luck!
 Wife kicks her out of the house: advice from a psychologist Man periodically kicks her out of the house
 Tatyana has a lot to do. "Helper" Agnia Barto. Analysis of the poem “The Helper” by Barto
 How to develop memory in teenagers: turning problems into opportunities Development of attention and memory of teenagers