Application on the theme of February 23 in the middle. Master Class
Alexandra Roslyakova
Master class on making a greeting card for February 23 using technology tear-off applique for children 2–3 years old
Target: introduce children to one of the species appliques – paper cut-out appliques.
Tasks:
teach you to tear pieces of paper
develop in children fine motor skills, accuracy, perseverance, accuracy in work.
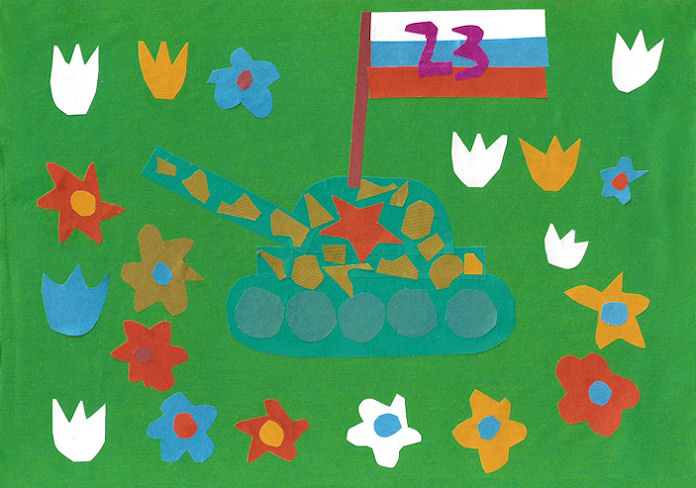
To make the postcard, we needed cardboard, colored paper in green black and yellow, glue, a glue brush and scissors, we also prepared wheels and red stars cut out of colored paper for decoration in advance tanks and stars for decorating the postcard. First of all, you need to prepare the base for the postcard. To do this, fold a sheet of cardboard in half and draw on one side with a pencil. tank. Next, use scissors to carefully cut out tank along the contour, what would happen as in the picture.

Next stage of preparation: the children are tearing out pieces of colored paper that we will use "paint over" our tank.

When everything is ready, on the inside of our workpiece we begin to glue pieces of paper in a chaotic order, but so that the area where we have cut out tank, was completely filled with pieces. Having finished, we decorate our tank a red star and wheels, and a postcard with stars. These are the cards our guys made.
Publications on the topic:
The technique of cut appliqué is very simple. If for a regular applique you need to cut with scissors, then the pieces are torn off.
Educational field: artistic and aesthetic development. Integration educational areas: cognitive, speech development, physical.
“Tattered applique Autumn” Purpose: to create a broken applique from paper, to develop artistic and creative abilities in children. Tasks:.
Receiving gifts is pleasant, but receiving gifts made with your own hands is doubly pleasant. There is not a single dad who is not a grandfather.
Homeland. Fatherland. Fatherland. That's what people call their motherland, my native land where they were born. There is no place more dear than a little one.
Group game with children: “making a snowman” We begin work. We all sit around the table. Before us is a Whatman paper on which it is drawn.
Broken applique in middle group“The snowball covered the tree” Objectives: - learn how to do work using the cut-out appliqué technique to create a simple one.
February 23 is not only a military holiday, but also the day of all men and boys - present and future defenders. Application for February 23 – good way for children to congratulate dad, older brother, grandfather. On a postcard or panel you can depict not only military equipment, but also flowers, a tie, a vest and other “male” attributes. The child will master the first basics creative work, will learn to compose a complete composition from individual elements, and dad will be pleased to receive congratulations from his baby.


The master class offers to make congratulations for February 23 in the form of an application. It's not difficult with this one, but interesting work both beginners and children can handle it kindergarten.
With children studying in the younger group you can do simple applications, consisting of several large parts. An example of such a craft would be postcards on the theme of military training. In particular, to congratulate you on February 23, it is proposed to depict a tank, plane, ship or soldier.
Making a tank is quite simple. To do this, you need to cut out the formal parts of the tank from green paper: oval, trapezoid, rectangle, circles. From simple geometric shapes you will get a real tank. Decorate finished work You can use flowers and the national flag.


Do not forget that there are other types of troops, not just ground forces. Therefore, using the same principle as a tank, it is easy for a dad who is a pilot or a paratrooper to assemble an airplane with paratroopers, and for a Navy employee it is easy to assemble a ship, a submarine or an entire aircraft carrier. To make all parts of the application look neat and beautiful, it is recommended to use ready-made stencils.


Video: Making a folding card for dad
Application “Soldier”
Children from the middle group can easily cope with the entertaining application of a soldier. The portrait of a soldier consists of small, complex shaped elements. Therefore, in the course of creativity, the skills of cutting and gluing together small parts will be useful.
To work you will need:
- thick cardboard as a base, for example, blue;
- sheets of colored paper;
- scissors;
- pencil;
- glue.
Step-by-step instruction:
Here are a few more soldier applique ideas. Defender of the Fatherland can be depicted as a schematic of geometric figures (work for junior group), and in more detail, from the machines in hand. The complexity of the task depends on the child’s initial skills and abilities.


Volumetric applique for February 23rd made of plasticine
The MK presents several options volumetric applique for preschoolers of different ages.
The simplest volume applique for children studying in the middle group is made from plasticine. The assembly instructions for such an application consist of several steps:
To make the applique look more interesting, it is recommended to imitate camouflage using plasticine. To do this, you need to use green and brown plasticine.
Volumetric paper cards
Children in the age of senior group. The paper parts are glued in several layers or using the origami technique. Children will be able to fold paper boat or an airplane using origami and use them for your application. You can also try to do voluminous congratulations for dad: a card with a surprise.
To work you need to prepare:
- colored thin cardboard;
- templates of a ship, plane, tank;
- scissors;
- pencil;
- stationery knife;
- ruler;
- glue.
Now you need to step by step follow the steps described below:

Congratulations for dad are ready!
Collective application for February 23
Children's group work is aimed at developing the ability to work in a team and communication skills. This type of work can be done with children in preparatory group. An applique made from napkins is suitable for this. Using twisted pieces of multi-colored napkins, you can assemble the overall picture like a mosaic.
For the application you will need:
- napkins of different colors;
- cardboard base;
- outline thematic drawing (tank, flag, number 23, etc.);
- PVA glue;
- pencil.
Detailed assembly diagram:
- cut out the paper parts and transfer them to cardboard (as an option: assemble a “mosaic” directly on the printed drawing);
- tearing small pieces from the napkin and rolling them into lumps of the same size;
- start filling the empty spaces of the image step by step: first the small parts of the picture, then the large ones and the background.
As you work, it is important to glue the pieces in even rows so that there are no “gaps” left. The smaller the lumps, the neater the composition as a whole will look. This is a very delicate and painstaking work, which is why it is recommended to do it collectively.
The photo shows several options for collective work that children can make with their own hands.


Good afternoon dear readers! On the eve of Defender of the Fatherland Day, we have prepared original and simple ideas for children, today we offer interesting options greeting cards. They perfectly express love and respect for a loved one. After all, the postcard is made with your own hands, it’s much more better than any another purchased in a store.
The child can make some of them on his own. To create others you will need your mother's help. But still, this is a very exciting and interesting activity.
DIY paper card for dad for February 23
This simple postcard can be made from colored paper in just a few minutes.

We will need:
- scissors;
- a simple pencil;
- glue;
- felt-tip pens (red and black);
- sheet of white A4 paper;
- a sheet of double-sided black A4 paper;
- a small rectangle of pink paper (for the bow);
- some green paper (for buttons).
Stages of work:
1. Adjust black paper to white. Align and bend in half.

2. Unfold and bend again. But now, we bring each edge only to the middle. This is where the first bend is located.

3. And fold it again. This way we get a sheet folded in four.

4. Using a simple pencil, draw half of the heart. Next, cut along our drawn line. As a result, we get a heart card. It is black on the outside and white on the inside.

You can write a holiday wish on a white background.
5. Fold the front black side of the heart (top). It turns out to be the collar of a black jacket.


7. All we have to do is decorate the card. Cut out two buttons from green paper. Their diameter is 1-2 cm. We draw holes on them with a black felt-tip pen. And glue it on the right side of the jacket.
8. Next, cut out a small rectangle Pink colour. Fold it in half and cut out a bow. The edges will be slightly wider than the middle. Unfold and glue the bow to one of the front sides of the white shirt.
9. The postcard is ready. All that remains is to write your wish inside.

You can also make a card and give dad a small gift

How do you like this card? I think it’s very original, and on the back you can write a wish for dad, he will be very pleased.

How do you like this postcard, with a real silk butterfly:

Here's a great idea with ties:

These gifts for dad from daughter:

And in this version you can write a message to dad:


In this card we draw a shirt and glue a bow from pasta, which we pre-color with paints

And here is another example, here you need to cut out numbers and stars from paper, color them with felt-tip pens and tie a bow from fabric, then glue all these elements onto colored paper.

Greeting card for kindergarten and primary school
This card can be made with children who have already learned to use scissors.

We will need:
- cardboard: white, green and red;
- colored paper: black and orange;
- a simple pencil;
- scissors;
- ruler;
- glue stick;
- multi-colored pens or markers.
Stages of work:
- We bend green cardboard in half.

2. Unfold and glue a sheet of white cardboard to it.

3. If cardboard sheets different sizes, trim the edges of the card with scissors.

4. Draw a star at the top of the card. Carefully cut out.

5. Draw a star on cardboard (red). It will be slightly smaller in size than on the postcard. The red star will be voluminous, so the template is presented below.

6. Cut it out and bend it along the dotted lines, and also fold the gray ears. As a result, we get such a voluminous star.

7. Glue the red star to the inside right side of the card.

8. Now you need to cut out three strips of black and two strips of orange colored paper. Each is about 5 mm. width. Next, glue them to the bottom of the card, in a checkerboard pattern. We cut off the excess edges.

We suggest cutting out numbers from red cardboard and gluing them to the card.
This is the greeting card we got. If you wish, you can write a beautiful poem inside it.
Here are more options for a postcard with a three-dimensional star:


How do you like this performance?

Here are some more interesting examples of pictures for younger children:

Airplane made of colored cardboard:

Tank - this postcard is not difficult to make, and dad or grandfather will be very pleased to receive it as a gift

This craft made from matches is also very beautiful:

In fact, making this card is very simple, but it turns out very cool. For this you need matches, cardboard base, glue, scissors and regular postcards (or printed on a printer) with the theme of February 23rd.
- Now we need to draw a square measuring 14*14 cm on paper and then divide it into 9 equal squares and glue matches on them, as shown in the picture. When the workpiece is dry, you can coat it with varnish. The base requires approximately 3 boxes of matches.

2. Then glue stickers or postcards

This is how beautiful it turns out:

An interesting idea in kindergarten for children 3-4 years old
This card is suitable for small children. It is not difficult to implement. The only thing the teacher needs to do is prepare all the details of the application in advance.

We will need:
- blue colored cardboard;
- brown rectangle (for the rocket body);
- one red star;
- two red rectangles;
- three yellow circles;
- glue stick.

Stages of work:
Glue the brown rectangle to the blue background.

Place a green triangle above it. This will be the top part of the rocket. Now our future rocket resembles a tall house. Next, glue red triangles on both sides of the rocket. In the middle we will place two yellow illuminated windows.

And finally, let's decorate our rocket with a red star.
The postcard is ready!
Here are some more examples with application:

The basis of this card is disposable plate painted with paints, but such a circle can also be cut out of plain paper, also painted with paints, glued on the sun and the ship.

But here’s an idea just for the little ones in the younger group:

A beautiful applique made of felt, of course, here you need the help of an adult to cut out the parts, and the child needs to carefully glue everything together.

An original gift in the form of a shirt and tie for dad and grandfather
An unusual, although very common, postcard-shirt using the origami technique. If you haven't made such a postcard yet. We recommend you try it.

We will need:
- colored paper (yellow and blue);
- double-sided tape or glue;
- ruler;
- blue cardboard.
Stages of work:
We bend a sheet of blue paper in half (along the longer side). Unfold and re-fold each edge towards the middle, as we did in the first version of the heart card. Next, we bend the two edges in the form of a collar.

We turn it over to the other side and the sleeves of the shirt come out.

On the opposite side we bend the edge by about 5 mm.

Turn it over to the other side and bend the corner with the tip towards the middle. We also do the same with the second corner.

Fold the card in half. We get this little blue shirt.

Now we glue all the parts with glue or tape.
Let's start making the tie. Cut out a yellow square 7 by 7 cm. Place the square on the table in the shape of a diamond. We draw a vertical line in the middle. We bend the upper corners towards the middle.

We turn the tie and bend the top corner by about 1 cm. Now we lift the small corner up again.

We turn it over again and make a clasp like this, bending the top of the tie a little. Let's fold the vertical halves. We glue everything well.

Now we decorate the shirt with a tie using tape or glue. The top of the tie should extend slightly under the collar.

Fold the blue cardboard in half. Glue the shirt to the front of the card.
Our holiday card-shirt is ready.
We write it inside holiday greetings. This card is suitable not only for February 23, but also for the birthday of your dad, brother or grandfather.
Here's a visual diagram:

And this is what the tie looks like on paper:

Shirt pattern:

Now let’s repeat it on paper:


And now I want to show you what beautiful variations you can make:


Here it all depends on the availability of colored paper and your imagination; you can make thousands of variations of this card, from the brightest and most cheerful to the official business ones, look here:


But what kind of tuxedo can you make with wishes on the shirt?

Here are examples of ties:

This beauty is not at all difficult to make - it’s fun for kids and fun for dads!
Detailed master class on beautiful design using quilling technique for schoolchildren
Quilling is very interesting and exciting activity for those who like to make all kinds of paper crafts. It is popularly known as paper rolling. And this is justified, because all crafts (using this technique) are made from twisted strips of paper.
Compositions made using the quilling technique can be voluminous or flat. This is not a very difficult activity that can be done with children. But to achieve beauty in crafts, you need to show a lot of patience and perseverance.

Let's start making a postcard for Defender of the Fatherland Day.
We will need:
- quilling paper in two shades;
- a sheet of green cardboard;
- special tool for quilling;
- small die-cut pictures (for wishes);
- PVA glue and glue stick;
- brush (for applying glue);
- yellow colored paper;
- scissors.

Stages of work:
Fold a sheet of green cardboard in half. Glue half a yellow sheet of colored paper inside.

Now let’s start decorating the postcard using the quilling technique. We insert a strip of yellow paper into the hole in the rod of the quilling tool and carefully wrap the paper around it.

Be careful not to let the paper roll fall off the stem.
In this way we wind the strip until it is completely on the rod. Now carefully remove it and shape it into a leaf. Glue the end of the strip with a glue stick so that the roll does not unwind back.

As a result, we should have nine yellow leaves. Next, we make one brown, flatter one. We roll six circles from burgundy paper. We arrange all this in the form of a tank.

We make a cannon from yellow, burgundy and brown stripes.
Now let's move on to the number 23. We slightly fold the yellow strip and bend it in the form of a two. Don't forget to wrap its lower tip. We also make number 3.

All we have to do is make curls to decorate the holiday card. Here it is worth showing your imagination. For example, if you bend half of the strip in one direction, and the other half in the opposite direction. You will get such a beautiful decorative element.

Using a brush and transparent glue, attach all the parts to the main card. We paste cut-out pictures onto the yellow background and write wishes.
The postcard using the quilling technique is ready!
How to make a three-dimensional 3D boat postcard with your own hands + templates and diagrams

We will need:
- white sheet of A4 paper;
- a simple pencil;
- red colored paper;
- scissors;
- blue felt-tip pen;
- sheet of blue cardboard;
- glue stick.
Stages of work:
We bend the white sheet in half and draw a steamboat, clouds and seagulls.

We bend the internal protrusions of the steamer.

We fold the cardboard in half. We straighten the steamer and paint it. Glue the very top part and sides to the middle of the card. Using a pencil, bend the middle of the steamer outward.


We decorate the clouds with a blue felt-tip pen. The ship postcard is ready.
What do you think of the idea of a ship with waves?

I really liked this card, isn’t it great?

The ship with sails is also very beautiful:

Together with your child, choose the option that you like best and create to the delight of your men!
Below you will find a variety of templates. They can be used to decorate and decorate your works dedicated to February 23:
Here is a template for an airplane postcard with a pilot:


Step-by-step video on how to make a gift using scrapbooking technique
Handmade postcards using this technique are simply amazing. They are so beautiful, unusual and original! And they can even serve as an interior decoration and fit harmoniously into the design of the apartment; such a gift will definitely not gather dust on a shelf; it will have a place of honor.
Therefore, I suggest you watch the MK video, where the author demonstrates the creation of such a super postcard step by step.
I wish you success in creating holiday cards for Defender of the Fatherland Day!
This is where my article comes to an end, I hope that you liked the cards and you will take note of the ideas and create your own for your men, and in order not to lose the article, do not forget to bookmark it and press the social network buttons!
Take care of your defenders!
Until new publications!
(function(w, d, n, s, t) ( w[n] = w[n] || ; w[n].push(function() ( Ya.Context.AdvManager.render(( blockId: "R-A -351501-1", renderTo: "yandex_rtb_R-A-351501-1", async: true )); )); t = d.getElementsByTagName("script"); s = d.createElement("script"); s .type = "text/javascript"; s.src = "//an.yandex.ru/system/context.js"; s.async = true; , this.document, "yandexContextAsyncCallbacks");
Congratulations on February 23 to all defenders of the Fatherland! May the sky always be clear and may there never be a reason to fight with anyone!
Of course, the children and I gave our dad a handmade gift for February 23rd - an applique tank. And although I am very far from all militaristic symbols, our dad really liked this gift. Because while serving in the army he was involved with tank forces. And he even drove a tank himself.
Applique tank, my daughter, 6 years old
Defender of the Fatherland Day gave us so many ideas.
Related posts:
© Galina Shefer, website "", 2013. Copying of the text is possible only with the written permission of the author. All rights reserved.
(function(w, d, n, s, t) ( w[n] = w[n] || ; w[n].push(function() ( Ya.Context.AdvManager.render(( blockId: "R-A -351501-3", renderTo: "yandex_rtb_R-A-351501-3", async: true )); )); t = d.getElementsByTagName("script"); s = d.createElement("script"); s .type = "text/javascript"; s.src = "//an.yandex.ru/system/context.js"; s.async = true; , this.document, "yandexContextAsyncCallbacks");Defender of the Fatherland Day is celebrated on February 23. And even if not all of your favorite men (no matter how old they are) served in the army, for you they will always be protectors, the stronger sex, so you must congratulate them. Simple and cute DIY crafts are just right for this occasion.
The main thing in the article
Crafts for February 23rd for dad
When helping your child make such a craft, convince him that it will not matter at all to dad to see small errors in the work, because the main thing is that the child put a piece of his soul into the work done.
Cardboard mug for February 23
This product can be used as a stand stationery, or interior decoration.
- Cut two rectangles from cardboard: yellow - 15x21cm, white - 10x15cm, as well as a handle.
- In a yellow rectangle draw lines 3 cm from the edge. Fold the edges along the lines drawn to the inside.

- For decoration, cut out colored stripes measuring 21x2cm and circles. Use glue to decorate the yellow rectangle.
- Glue a handle to the white rectangle.

- Now glue the folded edges of the yellow cardboard to the white rectangle.
- Attach a tea bag tag with a string to the inside of the mug with tape.
- Write your wish on the back of the cup.

Postcard with wishes for February 23
A postcard as a gift is a classic of the genre and will always be in place.
- Take light blue cardboard as a basis.
- Help your child make the blanks. To do this, print out the car and the sun on a color printer and cut them out. Templates can be downloaded on the Internet, or can be created in any graphics editor.
- Cut out clouds from a sheet of white paper.

- Glue the sun first, then the clouds and the car.
- Cut out the grass from double-sided colored paper, making the “bottom” longer.
- Then bend the lower part of the grass, retreating one centimeter from the edge, and glue it to the card itself.

- Print out a beautifully designed holiday greeting and stick it on a card.
- The inside of the craft is ready, this is how it will look when unfolded.

- Now decorate the front part, approximately as in the photo. You can choose a different design.

You can also make this interesting postcard:
Crafts for February 23rd for school
Gift ship for February 23

- Cut out the parts of the ship as shown in the photo and glue them together. Cover the joints with patterned paper, which will also serve as decoration.
- Glue the two parts of the ship's bow together and attach them to the ship.
- Cut out cardboard dividers and place them around the frame of the ship to serve as seating for the crew.
- Cut out circles from colored cardboard and divide them into segments. Then use the buttons to attach it to the ship.
- Glue strips of white paper onto the red one, this will be a sail. Pass it through a toothpick and stick it into one of the seats.
- Paint the front of the ship in the shape of a dragon.
- Make paddles from pieces of cardboard and toothpicks.

Crafts for February 23rd in kindergarten
Application “Airplane” for February 23
Such work will be feasible for children preschool age. Then such an applique can be given as a gift to your dad, uncle, brother, etc.
- The teacher must make airplane templates , which children will apply to colored paper, trace, and cut out.
- On a square piece of paper need to draw a frame .
- Then all parts must be cut out , as in the example in the photo. It is not at all necessary to make sun and cloud blanks, so each child will have their own special craft.
- You can make a window on an airplane by tracing the “bottom” of pencil glue.
- All that remains is to glue all the details of the applique.

Paper tie for February 23
Using the template provided, cut out a tie from colored cardboard. Next, you can glue it onto a sheet of paper and color it with felt-tip pens, or you can add a white collar to it.

Craft for February 23: ship on a postcard
Very simple and tasteful. You will need:

- Glue four wooden sticks to colored cardboard , for this use pencil glue (you can replace PVA).
- Cut out from cardboard of a different color ship sail details, glue a wooden stick to them on both sides.
- Using plasticine vertically attach the bottom of the sail to a wooden base made of sticks, that they glued to cardboard earlier.
Plasticine will hold wood together perfectly, because it is strictly forbidden to trust a child with a glue gun or super glue for safety reasons.
- From colored paper cut out the stripes , and glue them to the card with glue, this will be an imitation of waves.

Craft sailboat for February 23
Here you can take any available materials as a basis:
- For frame use an egg container , paint it with bright paint.
- Make a sail from scraps of unnecessary fabric , secure it with a skewer, and pull the jute thread.
- This boat already has seats, so quickly put passengers on it!
- Also An empty cardboard milk carton could be an option for the base of the boat , cut a small rectangle in its side - this will be the navigator’s place.
- What if you make a small boat? from a dishwashing sponge , but you can easily let it float freely, in a puddle, for example.

Interesting crafts for February 23rd for your loved one
- Prepare a beautiful heart-shaped box , put love notes in it, write how much you love and wait for your soldier .

- Print your general photos, or only your own, addressed to memory (service time).
- Second layer fill in gift box sweets so that the surprise is sure to be sweet.

- Also Write a letter to your loved one, tell him about your life, let him be aware of events. Design your message in an original way - fold the letter into a triangle, like the soldiers sent their letters from the front. This will complement the theme of the holiday.
 You can please your favorite soldier.
Crafts for February 23: master class
There is a type of gift that will come in handy and will be useful in every home. These also include photo frames. Here unusual idea for creating frames using quilling technique.
- To start prepare the base - this can be a fiberboard board with a cut hole, or already finished frame for photo.
- Use old magazines and colored double-sided paper . You can buy ready-made strips specifically for this type of needlework.
Adding such a color element will make the product very colorful and vibrant. While using only magazine sheets will give the frame a gray tint. The choice is yours.
- You can use special quilling tools, but simply rolling by hand will do.
For those who know absolutely nothing about this technique, we recommend watching the video for beginners:
- Cut long strips from magazine and construction paper , approximately one centimeter wide.
- Bend them in half and align them with your fingernail along the fold line.

- Now start rolling it into a circle, pressing the paper strip as tightly as possible with your fingers.

- Roll, alternating between magazine and colored paper in one such circle. When the braid runs out, glue its tip to the circle itself.
- In this way, roll circles of different sizes.
- Using a glue gun, glue these circles edgewise to the base of the frame.

- By the way, if you take an ordinary wooden board as a basis, you can paint it with spray paint.
 As an option, try creating this unusual craft - a photo frame from pencils.
Crafts for February 23: video
Show your imagination and congratulate your beloved men on February 23rd. And our advice will help you with this.
 How much fabric is needed for a dress: simple methods and basic calculation nuances
 Beautiful Christmas tree decorations made of plywood: we make decorations with our own hands using a jigsaw
 Manicure with acrylic paints at home