How to reduce the dress pattern by 1 size. How to change the size of the finished pattern
And is it possible to reduce the pattern from the size range of plus models? At 1-2 sizes, you can always make an adjustment to any Burda pattern in the direction of reduction. It’s quite simple, the principle is the same as in the case of increasing the pattern - to correct the pattern you like right on the pattern sheet.
: Master Class
You will need:
- Pencil;
- Square and ruler;
- Drawing pattern.
To get a smaller pattern, you need to draw new lines along the inner contours of the details of the pattern that you want to reduce. Draw new lines at the same distance as between the contour lines of the available sizes.
To achieve maximum accuracy, be sure to use a ruler.

In order to correctly transfer, for example, a shoulder mark on the sleeve ridge, it is necessary to connect all the marks of the size range with an auxiliary line. The new label will be at the intersection of the auxiliary line and the new drawn line of your size.
If you want to reduce the pattern of the size range 44–52, when drawing oblique lines through the corners and the contour line of size, focus on the distances between the contour lines of sizes 46 and 44.
Important:
If you doubt the changes that have been made to the pattern, sew a trial model, for example, from an old sheet. If necessary, make additional adjustments corresponding to the individual characteristics of your figure. Then transfer all the changes to the paper pattern and proceed to the cutting of the “clean”. And do not spare time for this. Mastery comes with experience.Appreciated at all times. Now that the store shelves are filled with a variety of sewing machines, and the kiosks are full of colorful fashion magazines, it’s hard to resist not to join this beautiful craft.
Novice dressmakers often encounter a situation when the selected model of trousers is smaller than the required size.
To help yourself in this case, take a few simple steps.
How to increase the pattern of trousers?
The considered method of increasing the pattern is universal for all types and styles of clothing.
It allows you to correctly change the finished patterns, if the required increase does not exceed two sizes.
Step 1
Prepare:
- Sheet of tracing paper in sizes: width \u003d 1m, length \u003d length of trousers +10 cm.
- Triangle long and short rulers.
- Soft pencil, felt-tip pens.
- Several flat weights for easy tracing.
Step 2
On a wide, flat surface, spread the magazine insert. Find the largest contours of the desired model and carefully examine them.
You will see that:
- patterns are applied on the sheet for several of the same model, which are separated from each other by small distances. They differ in the form of the boundary line (dashed lines, points, etc.);
- the pattern has well-defined angles, straight and rounded lines, auxiliary designations;
- in some areas, the contours of patterns of different sizes diverge significantly, and in other places they converge at one point.
Step 3
Spread the tracing paper on top of the insert sheet and secure with weights to avoid its displacement.
Get started with one half of your trousers:
- Connect with a line all the points of the given dimensions that designate the upper right corners of the patterns. Measure a distance equal to the distance between adjacent corner points. Let us designate it with the letter A. If the required size starts from 48 and above, then the value of A increases one and a half times.
- From the extreme point on the resulting line, postpone segment A as many times as you need to change the size. Mark with a felt-tip pen.
- Do the same with all extreme points.
Step 4
The most crucial step is drawing a contour of curved lines:
- Mentally divide the existing line into sections no longer than 3 cm long. In especially rounded places, the step frequency should not exceed 1 cm.
- Using the triangle to each point, restore the perpendicular and on the resulting line determine the value of A for this section. Set aside the required quantity A on a perpendicular line and locate the new point.
- Perform this operation sequentially along the entire length of the back and front seams, codpiece, pockets and other parts provided by the style.
The more intermediate points are indicated, the more correctly the pattern will be built, and the product will be impeccably
Step 5
Define the new lines of the side and interior seams in the same way.
Step 6
Circle with a felt-tip pen a contour of a new pattern. Mark the shared thread. Change the position of the knee line marks and other auxiliary signs as described above. Cut out the pattern.
Follow the same steps for the other half.
Attach the received patterns to yourself. If that turns out to be the next step.
Step 7
Lay the patterns on the table, joining the protruding points of the sciatic arch. On the front half of the trousers, mark three auxiliary lines:
- The first passes through the middle of the segment connecting the upper section and the lower point of the curve line of the middle seam.
- The second is 15 cm above the knee line.
- The third is located 15 cm below the knee line.
- Using a long ruler, extend them onto the pattern of the back half.
Step 8
Cut the paper according to the obtained auxiliary segments and paste additional strips of the required width.
The elongation of the pattern along the first line should not exceed 1 cm.
Skills for changing finished patterns help out not only novice tailors, but also experienced craftsmen. This allows you to save time and use interesting design solutions of famous fashion designers. Start with simple styles of classic trousers, and soon you will submit to the most interesting and sophisticated outfits. The ability to work with ready-made patterns creates the basis for the development of clothing design.
The same pattern can be used for three sizes. For example, if there is a pattern of size 46, you can sew a dress or blouse for two more adjacent sizes 44 and 48, after changing the patterns. It is simple and does not take much time.
Consider a simple example: a dress or a sleeveless blouse.
The difference between the sizes according to the main measurements (chest, waist and hips) is 4 cm, which means that between the SEMI-girths the difference is 2 cm. We are now talking about standard figures of the middle full group.
Basic measurements of adjacent figures
| The size | Units, cm | ||
| Half bosom | Half Waist | Hips | |
| 44 | 44 | 34 | 49 |
| 46 | 46 | 36 | 51 |
| 48 | 48 | 38 | 53 |
| 50 | 50 | 40 | 55 |
| 52 | 52 | 42 | 57 |
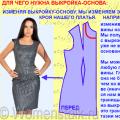
To increase / decrease the dress pattern (back and shelf) in width, it is necessary to cut the pattern (back and shelf) vertically from the upper point of the shoulder section as shown in the figure. With an increase in the width of the pattern, it is necessary to push the details of the cut pattern to the desired distance, and with a decrease in the width of the pattern, we impose the details of the cut pattern on top of each other.
In addition, when changing the width of the pattern, add or subtract a certain value along the side cut.
The distribution of the total difference is as follows: on the line of vertical sections accounts for 2/3 of the entire value and 1/3 falls on the side sections.
For example, if in the presence of a pattern of size 46 you need a pattern for the 48th size, then the difference between the sizes of 2 cm should be distributed as follows:
on the line of vertical sections of the shelves and backs 2x2 / 3 \u003d 1.3 cm, on the line of side sections 2x1 / 3 \u003d 0.7 cm.
Specifically, between the back and the shelf, these values \u200b\u200bare distributed as follows:
- along the cut line, slide the shelf apart by 0.7 cm, the back by 0.6 cm,
- along the side cut line on the shelf we give 0.4, on the back - 0.3 cm.
See picture.
Note: The proposed distribution of the size of the difference between the sizes concerns the methodology described on our website as a step-by-step instruction.
The typology of the female population provides for a gradation of clothing and, accordingly, patterns in 11 sizes - from 40 to 60. At the current level of technological development of society, however, it is difficult to imagine a magazine in which all models are presented in all sizes.
Nevertheless, modern fashion magazines already publish patterns in a range of four to six sizes (we do not take into account those publications where the pattern still exists in a single version). Despite such progress, it may turn out that it is your size that has remained outside the range presented.
What to do in this case? Pick up a ruler, scissors, scotch tape and tracing paper and follow our instructions!
Before proceeding with the adjustment of the pattern, let's first consider it from the perspective of analytical design. This will give you the key to understanding where and how to correct the pattern in order to fit it to your figure.
Figure 1 shows the conditional patterns of overalls and sleeves with division into structural sections along the lines of the chest, waist, hips, etc. Each section of the pattern is characterized by two parameters - length and width, which depend on the main four dimensions of the figure - height (P ), chest (Og), waist (From) and hips (Ob).
For example, the length of the trousers below the buttock line depends on the height (P), and the height of the sleeve ridge depends on the chest circumference (Og). This means that in order to correct the pattern in connection with the girth of the chest, changes will need to be made not only in the sections of the shelf and back from the shoulders to the chest, but also in the section of the height of the sleeve ridge. Similarly, adjusting trousers in connection with growth will require making changes in areas from the buttock line to the knee and from the knee to the bottom line.
To increase or decrease the pattern by size, you need to make changes to it related to the adjustment of volumes, that is, simply put, change the width of the patterns. Typical sizes differ from each other by 4 cm from 40 to 52 sizes and by 6 cm from 54 to 60 sizes. This magnitude of the difference is called the "dimensional step." For example, for size 48, the total width of the patterns will be 4 cm less than for size 50. It follows that the width of each quarter of the pattern needs to be changed by 1 cm. In Fig. 2, the correction value of each part in width is indicated by the letter x.
To make corrections, you need to draw vertical auxiliary lines on the patterns and cut along them. If the pattern expands, then the sides move apart by the desired size and a strip of paper is laid under the cuts. If, on the contrary, the pattern needs to be narrowed, then the sides overlap each other so that their overlap is equal to the amount of adjustment.
Please note that according to Fig. 1, a change in girth measures is reflected not only in the width of the patterns, but also in the length of some sections: the height of the okata, the height of the chest line and the height of the hips and buttocks (the latter is especially important for a good fit of trousers). In what respect it is necessary to make changes horizontally, shown in Fig. 2. 
Using the method shown in Fig. 2, you can change the pattern one size up or down. However, if the pattern in the magazine is shown in the form of moving contours, you can use another technique that allows you to get patterns that differ by 2-3 sizes.
In accordance with Fig. 3, draw guide beams through all the main vertex points of the curve: outward to increase size and inward to decrease. Guides can be easily drawn along a ruler through all points of one vertex belonging to different sizes.
Next, measure the distance between adjacent contours and set it aside from the last size as the beam continues. If you change the pattern to two sizes, then you need to postpone the doubled distance. Repeat this procedure for all points defining the contour of the pattern. Now, to get the desired size, you just have to connect the obtained points with smooth curves repeating the bending of the corresponding sections on other sizes. 
The trousers and sleeves of the jackets are long; the waist of dresses is too low. If your height is not more than 160 cm, these problems are familiar to you. Or vice versa, short sleeves, high waist. say that your height is above average. Standard pattern designed for an average height of 168 cm.
Adjust standard pattern according to the proportions of your figure is not difficult at all. Prerequisite for success: selected pattern should fit your chest / hips.
Extra tip:
In need of paper adjustment patterns it is easy to see by attaching it to a figure while standing in front of a mirror. Having determined in what places and how much the pattern should be shortened, spreading its details next to each other. as shown in the figures, and at the same levels, drawing correction lines.
Adjustment patterns it is given in 2 options: for low - height 160 cm and for tall height 176 cm. Usually in fashion magazines with patterns a table of sizes. If your height is 160 cm and the data given in the size chart for women of this height matches your measurements, then you can shorten the pattern by the number of centimeters that is indicated in this article.
When growing above or below 160 cm and your measurements do not coincide with the table data, the excess number of centimeters should be determined independently: for the front / back, the main measure is the back length, for the sleeves - the length of the sleeve, for trousers - the length of the step seam.
Shoulder products:
For dresses, blouses, jackets, coats adjustment patterns is made at two levels: at half the height of the armhole and between the waistline and armhole. To do this, auxiliary transverse lines are drawn along the line of the middle of the armhole and between the lower end of the armhole and the waist line (Fig. 1).
Remember the basic rule for blouses, cardigans and dresses: the difference in length is divided in half and introduced in half along the drawn transverse auxiliary lines.
Adjustment patterns the armhole consists in lengthening or shortening the sleeve ridge.
If the design of the sleeve has a low rim, then the height of the rim does not change, and the sleeve is narrowed / expanded from the ends of the line of the okata to the lower edge along the lines of the seam of the sleeve, nullifying the drawn lines.
Pants

Adjustment patterns trousers are produced at 3 levels:
The upper transverse line changes by 1 cm
Along the lines below and above the knee, it changes by half the remaining difference in length (Fig. 2)
When working on pattern trousers with a cutting barrel before marking the correction lines, the front half should be combined with its cutting side. Upper correction line on pattern trousers should go just below the entrance to the pocket, so that the changes also affect the pocket.
Skirts
Adjustment patterns skirts are performed at the hip level. If the style of the skirt has a narrowing or extension downward, the excess / lack of length is adjusted along the line above the knee: in the middle of the upper leg.
Dashed lines are drawn in the figures, along which it is necessary to shorten or lengthen the details of the paper pattern.
How to shorten the pattern
On the patterns draw correction lines, as described in detail above. These dashed lines must pass strictly perpendicular to the directional arrow of the shared thread so that the design “balance” is not lost. Then, draw two more lines above and below each correction line, the distance between which will be exactly the amount by which you should shortenpattern at this level (Fig. 3).

Now it remains only to lay on pattern fold, aligning both lines with each other. The “crease” can be pinned or glued.
How to lengthen a pattern
On the patterns draw correction lines, as described in detail above. Cut paper detail patterns on an auxiliary line, glue a strip of paper under one edge. On a strip parallel to the edge of the pattern, draw an auxiliary line, measuring the distance by which to extend the pattern in this place. Lower part patterns stick on the drawn auxiliary line (Fig. 4). On the other dashed lines, extend the pattern as well.
Important: in order not to displace parts on the sides patterns, draw the direction arrow of the shared thread on the extension strip of paper and, when gluing, make up a single line from the arrows on the pattern.
 Constructing a dress base pattern and design modeling
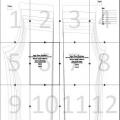 Patterns of children's trousers and sewing master classes Building the back half of trousers
 Building a pattern of vests for boys: the easiest way