New beaded bracelet pattern. Beaded bracelets for beginners - simple patterns
Today beaded bracelets They have ceased to be children's trinkets; they are chosen by teenage girls and adult women, emphasizing their style and lifestyle. In this article we will look at several common weaving techniques and techniques, designed for both experienced craftswomen and beginner needlewomen. Working with beads will be interesting for children too school age, and adults, moreover, for everyone age category there is some fascinating technology. In the future, having mastered the weaving technique to perfection, beaded jewelry will be able to bring you income, because handmade jewelry is in demand at fairs.
Beaded bracelets
If you decide to weave beaded bracelets, patterns the most different models you can find on the Internet, especially for complex techniques, for example, knitting bead strands or machine weaving.

We will look at the most popular way to create necklaces and bracelets from beads today - this is knitting strands, this technique represents a generalized knowledge of crocheting and working with beads. On the Internet you can find many various schemes, and once you choose the right one, you can move on to the master class. For the first lesson, you can choose a plain bracelet or use two colors to guide you on how to lay out the design.
In this case bead bracelet weaving patterns represent the order of placing beads on a thread, and then you start crocheting in the round, thus creating a rope. There can be 6-10 beads in a circle, then knitting is done in a half-column; for a rope with 11 or more beads, knitting is done in a column. The difference is immediately visible, looking at the product, you will immediately know which technique was used; if you knit in a half-stitch, the beads will lie evenly in a checkerboard pattern, and if you knit with a stitch, they will lie at a slight angle.

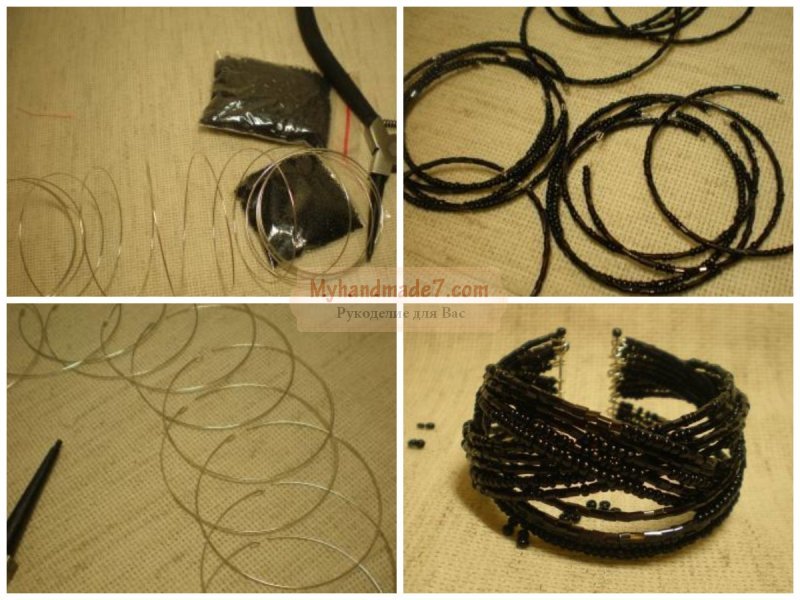
These methods also differ in the required materials, and we will start with a half-column. The easiest way to master this technique is to knit a plain bracelet or decoration with a color transition. For this product we will use Iris thread and a metal hook made in Japan by Tulip, number 0.75.
To string small beads onto a fairly thick Iris thread, you can use one tricky trick. Take a thin beading thread, thread it to a thin special needle and tie it in a knot to make a small loop, now thread the “Iris” thread into this loop. With this transition, the bead will freely pass into the eye of the needle, and then you can move it to the “Iris”.

You need to collect about 1000-1050 beads for a bracelet; there are approximately 1000 beads in one 10-gram bag. If you want to make a color transition, then divide the total number of beads into several parts, and between them add a mixture of colors, so you will get a smooth color transition.
Our strand will have 10 beads in a circle, so when the bead is ready, you can start knitting. To easily complete beaded bracelets, video Look at the lessons online, but be prepared for the fact that you may not get an even rope the first time, because a lot here depends on your knitting experience.
First you need to cast on ten loops and close the circle into a ring, but do not knit a connecting post, but move in a spiral. There should be a bead in each loop, when you knit the next row, the hook should be inserted under the bead, moving it to the right, and then make a half-stitch.

Beaded bracelets: patterns
Now you know, how to make a beaded bracelet half-column, but this option is suitable for thin products, you can also knit thick strands with a variety of patterns, but for this you should take a smaller hook, for example, number 0.55 - 0.6, but here it all depends on individual characteristics. Practice crocheting with different threads and different hook numbers to find your perfect combination.
As for the thread on which a thick strand is knitted, the absolute leaders here are “Jeans” threads, which are sold in regular spools, and Turkish Canaris threads, which are used by most experienced craftswomen.
The main difference between these two methods is that when knitting with a stitch, the hook is not inserted under the bead, it is inserted into the first piece of the loop, the one that is inside the strand.
When the harness is ready and you have tied a sufficient length, you need to attach the fittings; end switches are used for this; it can be an end switch with a magnetic fastener or you need to secure a pin. When you attach the end cap, you need to drip a little Moment glue inside, which will ensure reliable fixation. The clasp for the bracelet can be a regular hook or toggle.

Weaving beaded bracelets
Fascinating process - weaving beaded bracelets on the machine. This technique allows you to create original, unique patterns and ornaments; you can make such a bracelet with your name. The width of the product also depends only on your wishes, however, to create it you will need a special tool called a “Beading Machine”.
We can say that it is, but it cannot be called primitive. The machine itself can be made with your own hands, for example, for the simplest option, a cardboard box is used, say, from a shoe box. On opposite sides it is necessary to make cuts at the same distance from each other, about 3-4 mm. The sides should be cut a little so that it is convenient to carry out all the actions.

To weave, we need strong thin monofilament; we need to cut off so many pieces so that their number is one more than the width of the beads in the product. To make the base stronger, you can make a double warp thread, then you need to go through each slot twice. If the machine has the ability to adjust the thread tension, then you need to cut the appropriate number of pieces of monofilament.
Another piece of monofilament thread must be threaded into a thin bead needle. According to the picture, you need to string the beads onto the needle, moving in rows, then thread it under the stretched threads and distribute the beads so that each of them is located between two threads. Now you need to thread the needle in the opposite direction into the bead, but this time over the stretched threads. Learn more about how to do it DIY beaded bracelets you can look at the photo in the master class.
Thinking, many needlewomen come to the tatting technique, where they use different types beads, which creates a unique texture of the product.
The decoration made on the machine can later be attached to the base, for example, it can become a piece of leather. If you want to make a textile base, you can use a tin can to give it strength.

DIY beaded bracelets
There are others, more simple ideas, how to weave beaded bracelets which will definitely become stylish accessories in your wardrobe at any age. We can recall brick and mosaic weaving with one thread, classic “chess” with two threads. For this product, you can use thin fishing line or strong monofilament. Even when you weave, you can use large beads through which you need to thread elastic bands. Beads will become an original addition even to the most simple product from rubber bands.
Pins can also be the basis, and you will be interested in this interesting option for creating jewelry. Firstly, it is easy to perform and you do not need to have special knowledge, and secondly, you can create a steel jewelry that is daring and original.
Unlike strands, in this case we will need large beads, for example, size 8 or 6, because the needle of a pin must pass through their hole.
Let's start executing beaded bracelets for beginners from what we prepare necessary materials: medium size pins and beads, they can be different colors or one, for example, such a decoration will look interesting if you use only black beads. A thick rubber band should be used as a base to connect the pins, so you can put on the jewelry without a fastener. You will need two pieces of elastic, about the length of your wrist.
Now you need to string elements on the needle of a pin, in any color scheme, and then close the pin. You will need enough of them to completely cover the length of the rubber base. When all the elements are ready, they need to be strung on an elastic band, threading it into the ring of each pin from the bottom and top. In the end, all that remains is to sew up or solder the two ends of the elastic, and you can put the jewelry on your hand.

How to weave beaded bracelets
We can offer you another option, how to weave, this time on a thread basis. This simple decoration can be made using floss thread. To do this, cut three pieces, make a loop on top and tie a knot on one side. We will simply braid a braid, on the side links of which there will be beads. When you have braided the braid of the required length, you need to attach a small button to the other side, so the clasp for this simple bracelet will consist of a loop and a button.

Weaving bracelets from beads is available to children aged 8-9 years; at this age they will already be able to carefully handle small elements. For your very first weaving experience, you can choose a simple bracelet for two ends of a fishing line.

A lot of interesting ideas for a beginner master who is eager to try not only the simplest ideas, but also original ones. You must remember that even the simplest bead bracelet pattern for beginners Weaving will help you, but to make them look beautiful, you should choose the right main material. Don't be afraid to use bold colors in your products. color combinations, because at your disposal are matte, glossy beads, alabaster and with a silver-plated core. Naturally, it differs in quality, for example, Chinese can be used only for the most basic crafts, and for neat strands you will only need calibrated Czech or Japanese beads, although their cost is much higher.
Surely every jewelry lover has a lot of beautiful bracelets made of beads, seed beads and bugles in her jewelry box. These are simple and at the same time original accessories can liven up any outfit and give it a stylish accent. And many people don’t realize that with just a little effort and time, you can make such interesting decorations on one's own.
How to make bead bracelets with your own hands
Such a unique material as beads, which has long been loved by craftswomen, allows them to create real masterpieces in the form of paintings, wonderful jewelry, flowers and “beaded trees,” unique decorative elements. One of the most popular trends in working with beads- this is weaving all kinds of bracelets. Thanks to the selected accessible master classes, even novice craftswomen will be able to figure out how to weave a stylish and original beaded bracelet.
Patterns for weaving beaded bracelets
There are many patterns for weaving beautiful bracelets, but for beginners it is wiser to start with less complex options. Even if you are a master craftsman, you should start with simpler workshops to gain experience in making bracelets with original designs.
A selection of simple and understandable manufacturing schemes will help you choose the appropriate option:
- For example, weaving a braid from nine pieces of fishing line with multi-colored beads strung on them. It takes minimal time to make and the result looks amazing.


- Those who already know how to knit or simply crochet can use the bead weaving pattern. To do this, they are strung on a thread in the required color sequence and knitted in the form of a rope.

- Patterns using hand weaving are very popular among beginning craftswomen. The density of such beaded fabric makes it possible for various creative experiments. At first glance it resembles a technique, but the weaving principle and the material used are completely different.

- To facilitate the high-quality execution of this technique, a beading machine is used. This device is easy to make yourself. With its help, the weaving is denser and more even.

- Original twin bead bracelets are woven very easily and quickly according to the given patterns. Moreover, using various beads to your taste, you can create stylish and bright original works.

Bracelet made of beads and beads
We offer to make a luxurious bracelet that very easy to make.
To do this you need to stock up on the following:
- Beads.
- Beads.
- Lace.
- Rhinestones.
- Needle and thread.
- Super glue and fastener.
To decide on the design pattern, we lay beads and seed beads in different sequences on the lace.

Beaded name bracelet
This method of weaving is attractive due to the possibility of making not only personalized bracelets, but also beaded fabric with a unique ornament. Bead bracelets with a name are made on a loom according to the diagram, following step-by-step instructions.

- We wind several threads on the machine, but one more than in the diagram.
- We insert the thread into the needle and tie it to the first thread on the machine.
- String the required number of beads.
- We insert the needle under the threads on the loom so that each bead lies between them.
- We stretch the needle over the threads of the loom with beads and tighten it, forming the second row.
- We weave further according to the pattern with the name.
Simple bracelet in the form of a rope of beads
Despite the general complexity of making various, weaving simple but very beautiful bracelets - perfect option for beginner craftswomen. We offer you to master a simple step-by-step master class creating an elegant tourniquet on the wrist.
For this you will need:
- Twin – beads with two holes.
- Simple beads.
- Needle and thread.
- Lock and cone hats.
- Beads.
- Wax.
- Scissors, wire cutters and round nose pliers.

Master Class:
- We put 4 twin beads on a thread and tighten them with a knot.
- We stretch the needle and thread through the upper hole of the bead that follows.
- We put on 1 regular, 1 twin and again 1 regular bead and pass the needle and thread into the upper hole of the next bead.
- Then we put on 1 simple, 1 twin and 1 more simple beads, thread the needle into the top hole of the next twin and repeat the same thing.
- Next: 1 simple, 1 twin, 1 simple and thread the thread into the upper hole of the first, not the next twin of the second row.
- We tighten the workpiece and collect 1 simple, 1 twin and 1 simple bead, passing the needle and thread into the upper hole of the next twin.
- Having made the bracelet of the required length, we fasten it with cones, decorate it with beads and make a clasp.

Wide beaded bracelet
Now let’s look at how to weave a wide bead bracelet step by step according to the pattern for beginners.

You won't regret spending about an hour creating this. original decoration with your own hands.

To do this you need to stock up:
- Faceted beads (bicones) measuring 4 mm.
- Fine needle and thread.
- White and blue beads.
- Convenient clasp.
Bracelet width varies depending on the number of rows completed blue and white shades.
- Let's start weaving a spectacular voluminous bracelet, the bottom layer of which is made of beads, and the top layer of bicones.
- We string two white beads and one blue, two more white and blue, alternating them until the required number, and close with blue.

- We attach the low one to the blue bead of the first row, passing one, and repeat the weaving until the end of the row.
- The next rows repeat the previous ones, but for the arcs the blue beads from the previous step are used to create a mesh pattern.
- We put the bicones into operation after the bracelet reaches the desired length. We take the needle out of the blue bead, string the bicone and attach it to the next blue bead along the way.

- We also fill in all the mesh holes along each row.

- All that remains is to design the clasps, and the bracelet is ready.


Video with master class lessons on how to weave beaded bracelets
- The step-by-step detailed video shows an accessible master class on making a magnificent bracelet from beads and faceted glass beads. A simple weaving pattern was used in the form of an openwork mesh of beads, followed by beautiful stitching with faceted beads. The video tutorial will be useful for both beginners and experienced needlewomen.
- This video provides a master class on how to perform original and stylish bracelet from pins and beads. A detailed list of the necessary materials and tools for its manufacture is given. Proposed interesting options various color solutions.
- This video is dedicated to a master class on making a bracelet from beads and beads using the technique of making an openwork strand. This simple lesson will be clear and useful for both beginners and experienced bead weavers. If you stick to it useful recommendations It will take you no more than one hour to make this beautiful decoration.
Obviously, even simple bead weaving lessons help you make original accessories. And skillful products made by the hands of experienced craftswomen in the form of beaded flowers and other exclusive compositions are not inferior in beauty jewelry. Moreover, this exciting activity not only diversifies your wardrobe and generates income, but also helps many needlewomen unleash their creative potential.
It goes back centuries, and today weaving products from these small glass or plastic beads is one of the most popular forms of needlework. The best part is that you don’t have to spend a huge amount of time on this activity. You won’t need a lot of money to buy materials and accessories. And the main thing is that almost anyone can do beadwork.
What can be made from beads?
Despite its apparent simplicity, beads are one of those rare materials when working with which you can give complete freedom to your imagination. With its help you can create magnificent panels, embroider, make both flat and three-dimensional toys, flowers and trees. However, costume jewelry is especially loved by most craftswomen, and many beginners, looking at the work of their more experienced colleagues, ask the question: “How to weave bracelets from beads?” Practice has proven that this is not so difficult. And even someone who has never dealt with beads before can weave the simplest jewelry. How? Let's find out!
Variety of shapes and types - weave your own bracelet!
Any beaded jewelry that is made with your own hands is unique. And, as a rule, there is not a single one similar. This is not surprising, because despite the fact that they are woven according to the same principles and patterns, you can weave a variety of simple beaded bracelets, each of which will be combined with a carefully selected outfit for any occasion. Beginners are advised to start with simple patterns.
When weaving a bracelet, you are not limited in the choice of material. You can choose small or large beads, of any shape you like: standard round, square, oval, triangular and many others. You can not limit yourself to beads only, but also buy short sticks, called beads, or long ones - bugles. To create more complex products, craftswomen purchase large beads, sequins, cabochons - specially processed precious and semi-precious stones, which are widely used to make jewelry.
The choice of the shape of the bracelet is also yours: you can make a thin chain of beads or weave a wide bracelet from beads. It all depends on your preferences and on what product you ultimately want to see on your hand.
Weaving can be different: both openwork and solid, with various inclusions. Your imagination is not limited by anything except possibilities, knowledge, abilities and skills, and, of course, materials.
You don’t have to take one color at all if you are planning to make beaded bracelets with your own hands. Weaving patterns, which can be found in books on beading, completely free up your hands. Do you want a bracelet with a pattern? Nothing could be easier! With your name or the name of the person to whom you want to present your creation? No problem! Do you want to wear a bracelet on your arm with some inspirational saying? Please! Use your imagination and go ahead!
Tools required for work
What should those who decide to learn how to weave bead bracelets stock up on?
First, of course, you need the beads themselves. Experienced craftswomen It is recommended to buy material specifically for each individual product. In this case, you will know exactly how many beads and what color you need, and therefore you will not add too much. Beginners are advised to take a little more material, with a reserve.
Secondly, you need to buy the thinnest fishing line you can find. Some weaving patterns involve stringing beads onto a strong thread. However, it should be remembered that the thread may rot and break over time. Then the decoration you made will be destroyed.
Thirdly, no less important is where the beads will be located during work. It is not very convenient to take it out of the bag, so you should find some convenient container where you can pour it. The best and the most simple option is a plastic cover. You can also buy special containers for storing and working with beads in textile stores.
Fourthly, if you decide to work with thread, you will need a very thin and short needle. When working with fishing line, it is usually not used, since the fishing line itself is very rigid, and there is no particular need for a needle.
Fifthly, most products will require clasps, which can also be purchased at a specialty store, but some bracelets do not provide them.
Of course, any craftswoman cannot do her work without scissors. This is not surprising: you never know what needs to be cut or trimmed while working.
And finally, those who want to learn how to weave beaded bracelets cannot do without free time. It doesn’t have to be a lot, you can devote an hour or two to it exciting activity. You should also be patient and practice perseverance, without which you will never get the bracelet of your dreams.
The simplest bracelet
This simple bracelet is woven using a pattern called a “cross”. It is ideal for beginners; it is easy to master one of the techniques on how to make a bead bracelet with your own hands. Here you can use either one color or two.
In order to make such a bracelet, you should:
- Take a fishing line or thread with two needles, string 4 beads on its middle.
- Pass one end of the fishing line (thread) through the last bead towards its other end, tighten it to form a cross.
- Next, you should collect one bead on each end of the fishing line (thread), pass the third bead through both ends and tighten.

The result should be the chain you see below. You can make a simple, but very nice bracelet from it, if you collect two more beads, pass both ends through the first bead of the chain, and then, after tightening and securing the fishing line or thread, cut it.

Bracelet with flowers
This type of bracelet will also be suitable for beginners. Making it will be another good training for anyone who has started learning how to make a beaded bracelet. You will need beads of two colors. One (for example, red) will be the petals, the second (for example, yellow) will be the core of the flower. At your request, the flowers can be multi-colored.
To make it you need:
- Tie a knot, securing the end of the fishing line, leaving a small tip to secure the ends of the bracelet.
- Collect five red beads and one yellow.
- Pass the needle through the first bead.
- Pick up three more red beads, insert the needle into the nearest red bead and tighten.

The result of these manipulations should be a flower. To make a bracelet, make the required number of such flowers, secure the ends of the thread and cut.
Tourniquet
Those who have already mastered the simplest technologies of how to weave beaded bracelets will find it interesting to weave a rope bracelet that stretches as if it were made with an elastic band. To make it you will need a large amount of beads, since it is woven in a circle. To make it easier to master the technique, let's try to weave a single-color rope.
To do this you need:
- Fasten the end of the thread, leaving a small piece of it.
- Take 7 beads and close them into a ring, threading the thread through the first one.
- String one bead and thread the thread into the third bead.
- Take one bead again and pass the thread through the fifth bead.
- Continue weaving, putting on one bead at a time and passing the thread through the bead located one after the other. The weaving will go in a spiral.

Having weaved a rope of the required length, tie the ends together. Or sew a lock to one edge and a clasp to the other.

Name bracelets
A beaded bracelet with a name will be a wonderful gift for loved one. To make it you will need beads of several colors. The product itself is woven using a “brick” pattern, also called “mosaic”. If you don’t know how to weave a beaded bracelet using a similar technique, and you’re afraid that you won’t succeed, don’t worry: even beginners can make such a bracelet. In a similar way, you can make a product of any thickness and with any pattern, but the bracelet itself will turn out durable, similar to a strap.
To make it you need to do the following:
Draw a diagram of the future bracelet on a sheet of checkered paper, paint over the beads that will be the name. Also, if you want to make other similar beaded bracelets, weaving patterns can be found in special publications. For example, we decided to make a bracelet 10 beads wide. To do this you need:
- Fasten the end of the thread and put 10 beads on it.
- From the last bead, return to the previous one through the top so that the line points down.
- Thread the thread back into the last bead through the bottom.
- Continue weaving in this manner: take one bead, thread the tenth bead through the top, and the eleventh (last) through the bottom. And so on.

- Don't forget to follow the pattern and weave in beads desired color to get the desired name or word.

As you can see, learning how to weave a beaded bracelet is not that difficult. The proposed patterns are simple and ideal for starting to master the art of beading. Let making beautiful jewelry with your own hands not be a problem for you. I wish you creative success!
Beaded bracelets These are wonderful decorations that you can make with your own hands. There are several types of weaving bead bracelets. You can weave bead bracelets using one thread (wire) or two threads. Make bracelets in several steps (layers). Next we will look at several interesting and simple patterns for beaded bracelets.
The bracelet is made of nine beaded threads woven into a single pattern. For this bracelet we need 9 threads or pieces of wire with an approximate length of 40cm. The length depends on the circumference of the wrist.
Progress.
1. Tie the threads into a knot at one end. Fasten one part of the fastener. Attach to the pillow base with a pin (for ease of use).
2. String beads onto threads of three threads in a row of the same color. Tie the ends of each thread so that the beads do not fall off the threads while working.
3. We proceed to weaving braided braids from beads, dividing three threads of each color. The beads should fit tightly, the threads should be the same color, and should run smoothly.
4. We finish the woven braid with a knot of all 9 threads and attach the second part of the fastener to the end. We remove the excess beads and cut off the excess threads.
Our beaded bracelet is ready.
This bracelet is simple to make and is made using the parallel weaving technique. We will need beads of three colors: black, red and yellow or other color variations. Two threads or wires.
Progress.
1. We tie two threads in a knot, and attach one part of the fastener to this end.
2. We weave with parallel weaving:
1 row - 1 black bead
2nd row 2 red beads
3rd row 1 red, 1 yellow, 1 red bead
4 row - 2 red beads
3. Tie two threads into a knot and fasten a clasp to the end. Trim excess threads.
In order to make this bracelet we need beads of two sizes. Small beads for the base and large beads for the wave. The bracelet is made in two stages.
Progress.
1. We weave the base from small beads. You need to take 2 threads, tie them at one end with a knot and attach a clasp if the bracelet is detachable.
3. Take larger beads and decorate the base with wavy rows of large beads. To do this, you need to string beads onto threads. At the intersections with the base, pass the threads through it and fasten to it.
For this bracelet we will need large 1cm beads in light yellow or light Pink colour. Beads in contrasting black or other dark color. The bracelet is made in 2 stages.
Progress.
Stage 1. Take a thread of 2 lengths. Place one part of the fastener in the middle, tighten it with a knot, and weave a sequence in parallel weave. 1 row 1 large bead, 2 row for each thread 3 beads on both sides of the bead, pull through the large bead. Repeat the sequence of row 2 until the required length of the bracelet. Tighten the knot and attach the second part of the clasp.
Stage 2. Grow 1 thread from one end and entwine it with beads. To do this, string 4 beads onto a thread and pass a needle through each large bead.
We hope you liked the presented beaded bracelets. In the following articles we will talk about other techniques and techniques for weaving beadwork.
Beaded jewelry is a special type of accessory that you can create with your own hands. Having mastered the beading technique thoroughly, you can create real works of art. However, you will have to spend a lot of time and effort on training. In this article we will share with you the most simple techniques weaving beaded bracelets with photos. With their help, literally in one evening you can create jewelry for yourself to suit any look.
The ancient Phoenicians were the first to start weaving beads. They made glass beads themselves and created interior decorations from them. Of course, then they did not call their invention beads.
The word beads came into use only in the 18th century in Europe. Glass beads were already smaller in shape, they were painted in different colors and used for sewing clothes, wallets and bags. Only wealthy people could afford such things; the poor could only admire the luxurious outfits of noble people.
In the twentieth century, beads became available to everyone. Representatives of the “hippie” subculture began to use it to weave bracelets and other bright jewelry.
How to work with beads?
Today, beads are small flattened beads with small holes. It can be selected according to the following characteristics:
- by diameter (it can be 1-5 mm)
- in shape (beads can be elongated, with granules)
- by shine (beads can be glossy or matte)
Based on what kind of product you are planning to create, you need to select beads and other auxiliary materials.

For example, to weave a beaded bracelet with your own hands, in addition to the main material, you will need:
- strong, but thin line
- a convenient plastic container in which you can store beads
- a special needle (it must be short and very thin)
- stationery scissors and accessories (locks)
If you have never worked with beads in your life, then you should not try to weave complex products right away. Start with simple patterns for weaving bead bracelets which we have collected for you in this article.
Weaving wide bracelets from beads
Wide bracelets look very beautiful, but at the same time catchy. For romantic and sophisticated girls, this is not the best the best option. But if you love sports style or simply prefer to wear things that attract attention in life, then we offer you weave this beaded tapestry bracelet with your own hands:

We present to you detailed instructions, how to do it:
- Gather the necessary materials for work. You will need everything that we listed above and 5 types of beads in one color shade:

- Then you should prepare a weaving pattern. You can draw the pattern you want to weave yourself, or you can use the one below:

- Start weaving in this order:
- First, thread a fishing line through one bead as shown in the photo:

- In exactly the same way we type a whole row:

- We begin to dial the second row according to the scheme given below:

- Next you need to bring the beads of the second row into the first:

- We weave the entire second row in exactly the same way:

- We continue to weave the product until you end up with a bracelet like this:

You just need to attach a lock to it, and then use it for its intended purpose.
Beaded bracelets: mosaic weaving
There is one more easy option beaded bracelet weaving. It uses mosaic technique. We suggest you make this simple accessory with your own hands from single-color beads (although you can use as many shades as you like):

- We prepare a pattern for weaving an accessory. We suggest you use the one below:

- We take a thin fishing line and string one large stop bead onto it:

- Next, string 24 beads in a row into one chain:

- Take a thin wire (0.3 mm). If you have a jewelry cord at your disposal, use it:

- Using this cable you need to create a second row. To do this, you need to thread it through one bead in the chain of the first row:

- As a result of the previous step you should have the following:

- We do all subsequent rows in exactly the same way until we get a solid bracelet.
Bead weaving: name bracelets
A hand-woven beaded bracelet with a name can be a special gift for the person you love. You can take any diagram given above as a basis. You just need to weave your name into it:

Let's talk step by step how to weave personalized bracelet from beads:
- First, draw a diagram of your future product on a regular piece of checkered paper. Paint the cells that will represent the name with one color. Please note that the width of the bracelet should be approximately 10 squares.
- Choose any weaving technique (in this case, mosaic is perfect):
- attach a stop bead to the fishing line
- thread 24 beads into one chain
- thread a jewelry cane through the first row of the chain to create the second row
- in the same sequence weave the bracelet to the end
Bead weaving: strand bracelets
Modern girls enjoy wearing bracelets woven from beads. Such products look very beautiful. From the outside it seems as if they are made with an elastic band. However, before you start weaving a bracelet from beads using this technique, you need to know that you will have to use a large amount of material on it.
We tell you in detail how to weave such an original bracelet:
- We select a weaving pattern. As a rule, it is always the same when it comes to a bracelet-harness. We have attached one of the diagram options for you below:

- We string a stop bead onto the fishing line, attach it well, and then thread 7 beads of the same color.
- From this row we knit a ring. We thread the fishing line through the stop bead to secure the pattern.
- Next, string the next bead onto the fishing line (you can have a different color), thread the fishing line through the third bead of the ring formed before, collect 6 more beads and form the ring again. This is a rather painstaking process, but the result is worth it.
- We continue to weave in this way until a bracelet is formed, similar to the one shown in the photo below:

Beaded bracelets: brick weaving
Very You can make beautiful beaded bracelets by weaving them using the Comanche technique. Simply put, this technique is called "brickwork." In fact, it is not much different from the mosaic technique. Its main advantage and difference is that products made using the “Comanche” technique are flexible. In addition, they are not easy to unravel.
We will share with you the main points that everyone needs to know for beginners who decided to weave a bracelet from beads using the brickwork technique:
- Prepare a fishing line two meters long. Measure 15 cm on one side (you will not use this “tail” anywhere). Thread two beads to the measured point, passing the fishing line through them twice.
- Add the next bead so that a loop is formed: you need to thread the fishing line through the hole of the bead located on the left.
- Form the entire first row in this way. For clarity, we have presented to you detailed diagram what it should ideally look like:

- Then start weaving the second row. It is created in exactly the same way as the first one, but here you need to form loops not only on the sides, but also on the bottom so that the beads fit snugly against each other.
- Weave all the rows that you have in mind (the width of the future product depends on their number) according to the pattern presented below:

Beads can be used to weave not only original bracelets. You can create necklaces, earrings and other jewelry in exactly the same way. Any of the schemes we presented in this article is suitable for such purposes. When you get the hang of it, you will be able to make more complex accessories that will help you not only develop your inner creative potential, but also create a real, very profitable business. After all, today products self made very much appreciated!
Just don’t forget that you can’t do beadwork without labor and patience. Achieve good results, create beautiful jewelry and you can only achieve a professional level by focusing on results. We wish you good luck in this creative endeavor and inspiration!
Video: “Weaving beaded bracelets”
 How to wear a shirt under a men's sweater?
 Happy birthday greetings to your beloved man Happy birthday to your dear man
 Military pensioners for Russia and its armed forces