Easter wreath ideas. DIY Easter wreath: decorate the room for the holiday
Easter decorations are a very important and interesting component of the holiday fuss.
Among other things, Easter is a real spring holiday and I really want to decorate my house with warm, joyful and bright themed decor by this day.
The traditions of Easter decorations in our country and in Europe are almost the same. Perhaps the only differences are the Easter rabbit in the west, and we have our traditional Easter eggs.
How to decorate your house for Easter? We are ready to share a few ideas:
Floral bouquets with the addition of Easter elements - decorative eggs, embroidered toys will help to add bright spring colors. Easter wreaths and decorative branches, as symbols of warmth and spring, with artificial or fresh flowers perfectly complement the festive interior.
You can decorate Easter eggs not only with paints. It can be paper decor, decor of threads, buttons, with stickers and beads. Such eggs will look great on the table as decorative compositions or can be a wonderful gift for your guests!
Earlier, we also published an article on the topic “An unusual way to paint Easter eggs.”
A wonderful decoration idea is Easter garlands. They can be made both with elements of decorative Easter eggs, and with animals symbolizing Easter (Easter rabbit, hens, birds).
Original Easter decorations for the festive table can be made of small branches. In such improvised nests you can place beautifully decorated quail eggs, flowers or decorative toys.
Candles in the shape of eggs or self-made candles in egg shells are also perfect for decorating an Easter table.
Small flowers in eggshells will look very unusual. This design is perfect for the Easter table.
Create a festive atmosphere and home comfort, showing your imagination. And may everything be perfect on this day!
Easter egg decoration 


Easter wreaths on the door 


Easter trees 


Arrangements of flowers and Easter eggs 


Easter table decor 


The custom of decorating a door with decorative wreaths goes back a long way. However, recently this element of decor has confidently entered our life. Increasingly, the doors of houses are decorated with decorative wreaths, especially on the eve of the holidays. They are hung not only outside, but also indoors. Traditionally, the wreath has a round shape. The circle has long been considered a symbol of the sun, the infinity of life on Earth. Therefore, our long-standing ancestors believed that the door wreath was designed not only to please, but also to serve as a charm for the house, protecting it from the evil eye and all kinds of negativity. Moreover, it is believed that a wreath attached to the door will surely bring happiness, love, prosperity and wealth to the house.


How to make a decorative wreath on the door with your own hands, master class
Making a decorative wreath on the door with your own hands begins with the preparation of the foundation, which can be used as dry grass, flexible branches of trees, such as birch, willow, vine, etc.
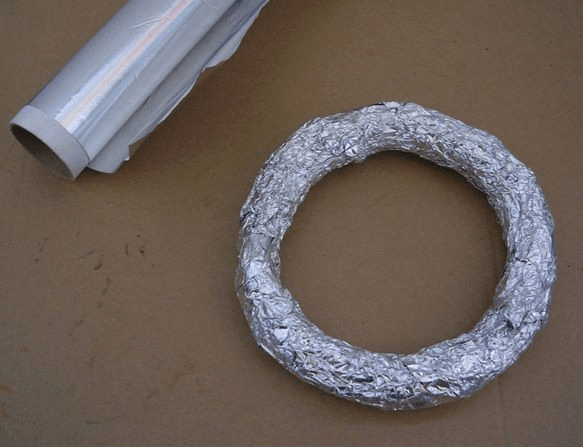
Also, the basis can be a regular circle cut out of cardboard or foamed polyethylene, an old watering hose, a fabric roller, wire, a piece of cable, corrugation, an embroidery hoop or just a finished ring. These materials are quite light and easy to use, which cannot be said about plywood or wood, from which you can also make a base. To fasten the elements of the composition, you can use glue, durable threads, double-sided tape.
Introducing a master class in the manufacture of frivolous wreath on the summer theme.

1. For work, we need not so many materials:
- twine;
- silicone glue;
- glue gun;
- base ring made of polystyrene foam;
- jewelry at your discretion.
2. Glue one edge of the twine to the base ring and carefully wrap the twine around it. Try to shift coil by coil as tightly as possible to each other so that there are no gaps between them.

3. If at the end of the wrapping there will still be gaps, cover them with small sections of twine.
4. Thus, the basis will gain integrity and accuracy.

5. The last thing left to do is decorate the “twine” wreath. Use what is always found at home with every housewife. It can be a bright ribbon, bow, large flowers, seashells and much more. Let every glued detail speaks of summer, sun, rest. Such a wreath will look good on any doors, both entrance and interior.
Stock Foto Christmas wreath on the door, 2 options


DIY Christmas wreath on the door with your own hands, step by step instructions
On the eve of the winter holidays, a decorative Christmas wreath of coniferous branches will serve as a wonderful decoration of any interior. Any branches of fir, pine, spruce or juniper are suitable for him. Whether they are live or artificial is not important at all.
With decor, everything is simple. For decoration, any bright winter-themed items are suitable: Christmas toys, tinsel, snowflakes, candies, ribbons, cones and so on.
Necessary materials that will be required for the workflow:
- the wire is thick and thin;
- coniferous branches;
- garden pruner or nippers;
- all kinds of decorations.
 Step number 1.The first thing to do is to design a frame to which coniferous branches and decorations will later be attached. The thick wire must be folded so that two rings are formed, slightly different from each other in diameter (one ring is inner, the other is outer). We fasten the rings together and rewind with a thin wire, as shown in the figure below.
 Step number 2. Now we need to divide all the needles that we have into equal parts.
 We will take turns attaching our branches to the base with a thin wire. You need to attach in such a way that each next bundle slightly covers the previous one.
 Step number 3. To make the resulting wreath neat, you must very carefully connect the last branch with the first. Do not make the wreath too heavy and bulky. Distribute the weight so that the maximum is up or down, and the minimum is on the sides.
 Step 4. Well, now it's time for your imagination! Feel free to experiment with jewelry and you will definitely get a wonderful work of art that will bring notes of a festive atmosphere and comfort to a boring life.

Wreath in the interior, photo 5 options


Wreath for a girl’s children's room, step by step do it yourself with a photo
The world of girls is filled with rainbow colors. And in order to have more positive emotions in it, let's try to decorate the girl’s nursery with a beautiful decoration. Usually our little ladies prefer everything bright and beautiful, painted in warm colors: red, pink, orange. Therefore, it is in such a color scheme that our wreath for the girl’s children's room will be made. To do it, you don’t need anything unusual, just get your existing Christmas toys and go! Snowflakes, stars and colorful balls will add playfulness to the product. You can add bright thread pompoms, paper accordions to the toys.
 For work you will need:
- scissors, glue, thin wire, needle and multi-colored threads;
- dense paper of bright colors for the base and harmonica;
- ready-made pompons or yarn to make them;
- thick cardboard sheet;
- christmas toys (snowflakes, balls, stars, figurines).
First, we will make accordion flowers. To do this, we will fold a rectangular piece of dense colored paper with an accordion and glue the edges together. Flowers made of corrugated paper will not look bad at all.
 If you do not have ready-made pompons, then they can be made from threads of colored yarn. Here is the easiest way to make pompoms with your own hands.

It's time to do the wreath itself.

1. The first thing to do is cut a circle out of cardboard with a hole of about 60-70 cm in diameter. It will serve as the basis for the future wreath.
2. The next step is pasting the base with colored paper to make such a cheerful circle.
 3. Then we wrap our circle with threads of bright contrasting colors.
The basis for the wreath is completely ready and now you can do its decoration.
To firmly fix on the basis of pompons, paper flowers and toys, you can use two ways.

4. The first way is to sew all the details. We insert a strong thread into the needle and sew pompons, paper decorations and balls to the fabric that wraps the cardboard circle.
 5. The second way is to fix the jewelry to the base using wire. To use this method of fastening we still need an awl. We insert small pieces of wire into the loops of the balls, mark the place where we will attach the decoration and make two holes with an awl at a small distance from each other.

6. The wire “antennae” is pushed into the holes and connected from the rear side of the base. In the same way we attach the remaining decorations: stars, snowflakes, pompons and paper flowers. Choose any method if it is convenient for you.
7. The last thing to do when all the decor elements are in place is to inspect the back of the wreath, as wire “nodules” can scratch you or the surface to which it will be attached. The easiest way is to stick another circle on the back of the base, which will cover all the "nodules", or stick them with tape.
 It remains only to find the optimal place so that the wreath made fits as harmoniously as possible into the interior of the children's room. With this wreath you can decorate the room of the young princess not only for the New Year holidays, but also for the birthday or any other important date. Invite the child to participate in the creative process, for sure the girl will be pleased to create such beauty with her own hands.
Wreaths for Easter, photo 5 options


Crafts for Easter wreaths with their own hands, step by step with a photo
When there is not much time left before Easter, people traditionally begin to restore order in their homes, and also try to decorate them. After all, I want everything on this spring day to bring only happiness, joy and kindness.
From time immemorial, everything connected with spring, the sun, the awakening of life has been considered a symbol of Easter. That is why the main attributes of Easter wreaths are: colored eggs, nests, decorative birds and their feathers, willow twigs, flowers and herbs. There are many ideas for creating Easter crafts with which you can decorate an apartment, office, country house.
 We offer one of the options for Easter wreath. For manufacturing you will need:
- vine for weaving baskets;
- rope - twine;
- decorative paper straws;
- glue;
- scissors;
- quail testicles;
- colored feathers.
 Step 1
To weave a wreath of vines, you must first prepare it. Willow rods, contrary to popular belief, do not have sufficient flexibility, so they must first be soaked. To do this, fill the branches with warm water (you will need a large capacity, since the willow branches have a large length) and leave it to be soaked for about 5 hours, maybe a little longer.
 Step 2
The soaked branches have gained the necessary flexibility and now they can be folded, but this should be done carefully so as not to break. First, we construct a circle of one branch. This will be the frame for the entire wreath.
Then, one by one, gradually, with the help of twine rope, we will tie the rest. We make the frame of the desired thickness and shape.
 Step 3
Having finished work with the base, we proceed directly to the decoration. Here we can use colored feathers (you can take an old boa), quail eggs and paper straws. First of all, we distribute the straw around the whole circle and attach it to the frame with pieces of twine rope.
 Step 4
Glue feathers on top of decorative straw, and several quail eggs on them. That's all! Your Easter wreath is completely ready! Having spent a minimum of effort, you received an original decor item that will decorate any room, and will also serve as an extraordinary addition to the festive table setting.

Video: do-it-yourself wreath for Easter
Everyone can make a wreath to decorate his interior. We hope that our ideas will inspire you. Indeed, a beautiful wreath made by yourself will certainly cheer up not only your household, but also friends and acquaintances who will visit you.
DIY Easter wreath is an integral part of the festive decor. It is created from various materials and placed on a door or wall. In addition, there are types of wreaths that are used both as a gift and for serving a festive table.
History of tradition
Easter wreath is an ancient symbol meaning eternal life and infinity. It is also associated with the image of the sun, giving life-giving warmth for all people. Easter wreaths are used as decoration for a family feast. They are placed in the center of the table, and freshly baked Easter cake and colored eggs are placed inside. Also often on the eve of Easter you can see a wreath on the front door. It symbolizes that the owners of the house will be glad to receive new guests and will welcome them with cordiality and kindness.
Previously, wreaths were used only for decorating rooms for Christmas, but now they have become an integral part of all possible holidays. It is believed that if you invest in them positive messages at the energy level, then they will become a real charm from evil influence.
What can you make an Easter wreath of
The basis for the Easter wreath, created by yourself, can serve as cardboard, branches, wires and even newspapers. Willow rods are often used. They bend easily and do not break, so it’s comfortable to work with them. A wreath made of willow twigs looks like a nest and symbolizes homeliness.
Also, foam rings are used to create the product with your own hands - this is an almost ready base for a wreath. However, to save money, you can make a circle of cardboard elbows designed for transporting and storing eggs. As a rule, during Easter they are always at hand.
Advice! To make the rods or any other branches used more flexible and pliable, they need to be soaked for half an hour in hot water.
DIY Easter wreath ideas from improvised materials
Creating an Easter wreath with your own hands, you need to be creative and accurate. Assiduity is also equally important, since the preparation of complex compositions, as a rule, takes a lot of time. Below are interesting ideas and variations of Easter wreaths of different complexity categories.


How to make an Easter wreath with your own hands: master classes
Below are master classes on creating Easter wreaths with your own hands from improvised, as well as purchased funds. At the end of the work, finished products are decorated with feathers, plastic eggs, fresh flowers, decorative figures, ribbons and eggshells.
Simple easter wreath of yarn
The list of necessary materials and tools:
- glue gun;
- lace;
- green yarn;
- plasticine;
- scissors;
- yarns for knitting three different colors;
- 2 brown dense threads of different shades;
- satin ribbon;
- foil;
- matches.
Step-by-step instruction:
- First you need to make a foundation. Mash the plasticine and lower it for 5 minutes in a container with hot water. This will make the material more pliable. Then they mold a ring, the diameter of which should be 22 cm.

- Plasticine can stain yarn, so the prepared ring is wrapped with foil designed for baking products.
- Next, yarn-grass is wrapped around the base. Threads need to be tightly arranged to each other. There should be no gaps.

- Lace ribbons are divided into separate flowers. They will need 12-20 pieces, depending on the size of the lace. It is advisable to use several different tapes.

- Next, the flowers are attached to the yarn with a glue gun and left to dry.

- While the base for the Easter wreath dries, you need to tie a basket and eggs. Using a colored thread, bind 2 air loops. In one of them knit 6 SC, and close the ring. The next row should consist of 12 of the same columns. In other words, each loop must be knitted with 2 columns.

- Next, knit 2-3 rows without adding loops. When most of the egg is formed, you need to gradually reduce the number of columns. At the end, the thread is fixed and pulled to the base. These eggs require 3 pieces.

- Sewing brown threads connect and make 2 loops. In one of them, 6 columns are knitted. Further, as you knit, the number of columns is increased. When the bottom of the basket becomes the desired diameter, knit 1 column with a crochet and another 1 without it.

- Eggs are sewn to the finished product.

- The tied basket is glued to the base using a glue gun.

- A satin ribbon is threaded through a wreath and tied in a bow. The excess is cut with scissors, and the edges are scorched.

Advice! If the foil is not at hand, then a cling film or a cut bag will be suitable as its replacement.
A wreath of twigs and eggs
The necessary materials and tools:
- dried or artificial flowers;
- hollow eggshell from quail eggs;
- hay;
- glue gun;
- birch or willow twigs;
- feathers;
- sprigs of willow;
- decorative wire.
Instructions for creating a wreath:

Easter wreath with paperclay eggs
List of necessary materials and tools:
- paperclay;
- skewers;
- birch twigs;
- aerosol spray can;
- acrylic brown paint;
- acrylic paint of different colors;
- brown pastel;
- a glass of water;
- decorative flowers;
- cotton lace ribbons;
- paint brush;
- cardboard;
- tea bag or teaspoon of coffee;
- glass beads;
- glue gun;
- newspaper.
Step-by-step instruction:
- First you need to make eggs from paperclay. It is a material for sculpting figures. Paperklyu moisten with water and form balls out of it, which are then shaped into eggs. All blanks are mounted on skewers or toothpicks. If cracks appear on the products, then smoothing them is not required. They will serve to create the effect of a cracked egg. Finished blanks are left to dry overnight.

- When the glue hardens, you need to start staining. You can color the eggs with gouache, acrylic or spray can. It is advisable to use gentle and soft tones. To create an Easter wreath, 8-14 pieces of blanks are required.

- The sides of the eggs are tinted using brown pastel, and the skewers are pulled out.

- Next, acrylic paints are diluted with water, sprayed onto the workpieces with a brush.

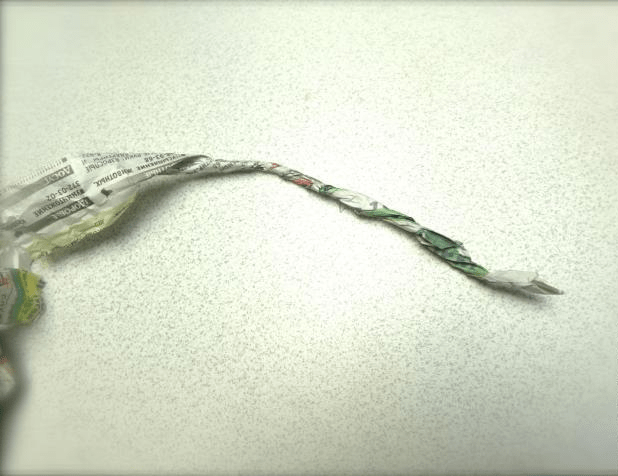
- At the fifth stage of work, you need to create a frame. Newspaper sheets are cut into strips 4-5 cm wide. Then they are wrinkled and twisted into thin bundles.
- A disk with a diameter of 24 cm is cut from a sheet of cardboard. Using a glue gun, blanks from newspaper sheets are attached to it. It is desirable to twist the harnesses together.
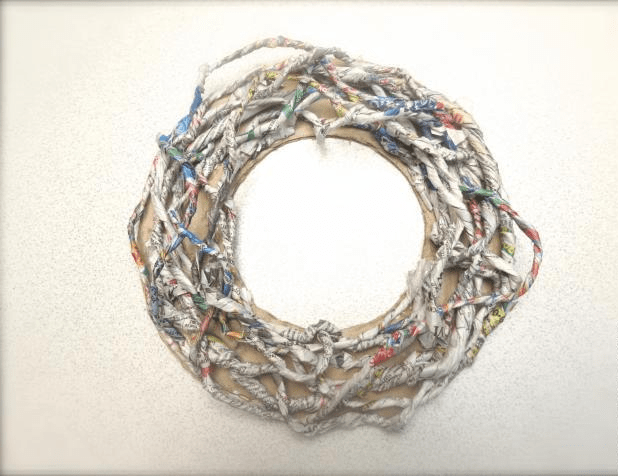
- The inner and outer edges of the cardboard disc should also be framed with a newspaper curled leaf.

- The base is coated on both sides with brown acrylic paint.

- Next, birch rods are passed between the bundles with the thick end forward. It is advisable to take the thinnest and most easily bending branches.

- Then proceed to decorate the basics. Strong tea or coffee is brewed and dipped in openwork ribbons. As soon as they become aged, they need to be dried and also woven into an Easter wreath. All manipulations are repeated with artificial flowers. To keep the blanks, they are coated with PVA glue.


- At the final stage, with the help of a glue gun, eggs, beads, moss and flowers are attached to the Easter wreath made by yourself.


Important! Paperkley can be replaced with ordinary colored clay or clay used for modeling
Do-it-yourself Easter wreath from egg trays
The list of necessary materials and tools:
- artificial or natural flowers;
- decorative wire;
- cardboard box from eggs;
- scissors;
- glue gun.
Instructions for creating a wreath:

How to decorate an Easter wreath of grass
The main symbol of the holiday is Easter eggs, so they must be present in the wreath. However, it is customary to use decorative analogues. Real eggs will make the wreath heavier. The easiest and cheapest substitute is eggshell. You can also decorate the product with figures or drawings of a rabbit, chicken and chicken.
On Easter wreaths made of grass, flowers and willow branches with unopened buds will look beautiful. They symbolize spring, as well as the resumption of life. In addition, it is customary to use satin ribbons. They cover the flaws in the form of joints and empty places on the wreath. Also, the tape will give the product a more festive and solemn appearance.
Paints used to use bright colors. The color prevailing in Easter wreaths is green. It is a symbol of the rebirth of nature. They also use red shades, which are associated with life that conquered death and blue. In general, the composition should include many different cheerful colors.
Advice! To get the eggshell, you need to pierce the egg above and below, and then blow out the contents. The finished base is coated with paints or decorated using decoupage technique.
Even having fully studied the master class, an inexperienced person will encounter a number of difficulties and questions at work. Expert advice to help simplify the task and avoid mistakes:
- When creating an Easter wreath with your own hands, it is better to use peeled willow branches. Some time after cleaning, they acquire a beautiful golden color. To clean the branches, they must be boiled for 2 hours, and then use a scraper or knife to peel.
- Foam elements and base must be painted. To do this, it is better to use paints, mascara or a marker. However, it is first necessary to coat the foam with a primer. It will prevent the absorption of paint, as well as make its porous surface smoother.
- Before piercing an egg in order to blow out the contents from it, it is necessary to glue a piece of adhesive tape or patch on its upper and lower parts. This will prevent the occurrence of many small cracks around the puncture site.
Important! You need to clean the rods while they are wet. In order to avoid drying, they are placed in water at room temperature.
Conclusion
Having made an Easter wreath with your own hands, you can get a beautiful and extraordinary home decoration that will not only surprise guests, but also create a festive atmosphere. Its manufacture will not take much time and will give a lot of pleasant emotions. Creating a wreath is a fascinating activity during which you can show your imagination and corporate identity.
There are only a few days left until Easter, so you need to start preparing for the holiday now. Easter holidays traditionally bring together the whole family and loved ones at the table. Therefore, greet the guests with an Easter greeting on the doorstep, decorating the front doors with elegant spring wreaths.
Our Easter wreaths are not as popular as in the West. It is customary for all holidays, including Easter, to decorate the door with a wreath. Now this item of interior decor is increasingly found in our homes. Therefore, the question arises of how to make an Easter wreath with your own hands, because it is much more pleasant to brag about the beautiful decoration of the house to friends when some elements are made with your own hands.
The rounded shape of the wreath is a symbol of eternity, the sun, giving life to all life on earth. Attributes of this holiday must be present in Easter wreaths: an egg, flowers, twigs of a vine, a nest, angels, rabbits, chickens, etc. And the whole composition should contain elements saturated with bright colors. The classic colors for the Easter wreath are red, white and green. They symbolize the awakening of nature, renewal and fertility. But do not limit yourself to these color standards, use all the bright colors and, most importantly, create with love!
Any wreath is very simple to make with your own hands. The main thing is to make a basis, which can be interwoven flexible branches, a vine, a wire, wires, or even simpler - a cardboard, foam or wooden circle. Further, it is only a matter of your imagination and the available decorative materials. Here's an example of how this wreath whipped up from what was. But it looks very cute and unusual!
I suggest you watch the Easter wreath master class for the door, you will surely like it, and you will be happy to make your Easter craft.
So, let's start making a wreath:
1. To begin, we will make decoupage of the testicles. Cut out the elements that will decorate the egg from napkins: flowers, leaves, curls. Then we take an egg, apply a flower and apply glue on top with a brush. Apply glue in a thin layer and smooth so that there are no bumps. So do with all the testicles and set aside until the glue is completely dry.
2. In the meantime, we will deal with the main part of the wreath. Cut the fabric into strips. The width of the strips should be twice the width of the rim of the wreath. Then we fold the strips in half and collect using a needle and thread, as if stringing. And we fix them on the basis of a wreath made of branches. So do with all the stripes. The quantity is determined by the diameter of the wreath.
3. When the wreath is completely sheathed, proceed to the decoration. From a bright ribbon, in our example, it is red, we form flowers and sew them on a wreath.
Also, the testicles have dried up and now, using the glue gun, we glue them symmetrically to the wreath. At the end, you can still decorate with decorative flowers. We make a loop on the back and the entire decoration for the door is ready.
Create your Easter-spring version of the wreath with flowers, eggs, toys, bunnies, ribbons and other decorative elements. And greet your friends and family on Easter with beautiful wreaths at the front door.
Easter wreath for Easter
Do-it-yourself original wreath ideas on the door
Source: dikmi.ru
DIY Easter wreaths
 Easter wreath will be a wonderful decoration of your door or an Easter gift with meaning. Want to know how to make an Easter wreath with your own hands?
A wreath was traditionally considered a Christmas decoration, but now everything has changed and wreaths began to decorate the door or windows for other holidays, including Easter, especially since the wreath is symbolically significant for this holiday.
 Easter wreath, symbolizes eternal life since has no end or beginning, the round shape of the wreath symbolizes the sun as a symbol of life on earth. Want more symbolism and meaning, decorate your Easter wreaths with nests with chicks, hens, Easter bunnies, Easter eggs and Easter eggs, spring flowers, etc.
Today I will share with you simple ideas on how to make wreaths, and already decorating the wreath will make it Easter.
Easter wreath of branches.
I like Easter wreaths woven from twigs.
For the manufacture of such wreaths willow branches are usually used, but birch branches can also be used. The main thing is to choose thin branches with which it will be easier to work.
- Before starting work, branches need to be soaked for a while in boiling water so that they become softer and more flexible.
- We carefully twist the prepared twigs together, gradually turning into a circle.
- We fix the resulting circle in a spiral with twine, which at first can turn out thin.
- In this case, you need to weave into it another twig.

 You can decorate the finished Easter wreath as you wish, use artificial flowers and eggs, bright ribbons, artificial birds for this, use burlap for decoration now it’s fashionable. traditional easter colors are green, white, red. The combination of these colors will make your Easter wreath bright, festive and spring.
 To enhance the spring effect, drop a few drops of essential oil on a wreath, I would suggest using essential oils: lemon, mint, lemon balm, mimosa, roses and others with the aroma of freshness and spring.
Easter wreaths can be made using a floristic circle and decorated with green grass, decorated with flowers carved from lace, etc.  An example of working on an Easter wreath based on a floral circle.

 Pin our flowers with decorative needles in random order

 And one more very simple idea of \u200b\u200ban Easter wreath with your own hands, such an idea is sure to please the children, bright and easy to make, you can also give it a gift.
DIY decoration ideas for Easter wreaths.


 .
.


 .
.
Everyone loves Easter, it is such a wonderful holiday, preparing for it is a real pleasure, my articles will help you make your Easter elegant and beautiful.
DIY Easter wreaths
Do-it-yourself Easter wreath will be a wonderful decoration of your door or an Easter gift with meaning.
Source: priroda-life.com
How to make an Easter wreath: ideas
to decorate the apartment with some unusual interior element, for example, a handmade flower arrangement in the form of a traditional Easter wreath. She will certainly give a good mood to you and your loved ones and will bring into the house the aroma of spring and the first greens awakened from winter sleep.
In Easter wreaths the attributes of this holiday must be present. The egg is a symbol of eternity, immortality, the awakening of life. A nest is an image of home, family warmth and comfort. The whole composition should contain elements saturated with colorful bright colors. They symbolize the awakening of nature, renewal, fertility.
Easter wreath can be hung on the door or on the wall in any room of the house. Such decoration of small children will especially please.
You can make an Easter wreath from a variety of materials. Here are some interesting ideas for creativity.
Easter wreath of tree branches
- branches
- dry hydrangea inflorescences
- wire
- threads in the color of branches
- ribbon
- pVA glue
 Chicken eggs are quite heavy, and it is inconvenient to suspend them, so it is better to use a dummy - a decoupage egg or an egg shell craft.
1. Twist the branches in the shape of a wreath, securing them in several places with wire, then for reliability wrap a thread.
 2. With flowers, mask the places of fastenings with wire by gluing them to PVA glue.
3. Use a ribbon to attach the egg to the top of the Easter wreath.

Easter wreath of grass yarn
 1. The basis of the wreath is from plasticine. We sculpt the ring of the right size.
2. In order not to worry that the clay will stain the threads in the heat, we wrap the ring with foil. I took the usual foil for baking, you can wrap the ring with cling film.
3. Take the “weed” yarn (for example, Samba YarnArt) and start wrapping the ring. All foil must be hidden under layers of thread.
4. For decoration, I used the remains of flower lace, cutting them into separate flowers. If there is no lace, you can crochet small flowers; dozens of patterns are easy to find on the Internet.
5. Glue the flowers to the wreath with PVA glue. The fabric adheres well to the weed, the main thing is to let it dry well. For a wreath that will hang on the wall, this is enough.
If you need to glue it more firmly, you can use superglue (such as “Moment”), or sew flowers on green yarn, or pin them with small pins with round heads that will become the middle of the flowers.
6. Now we knit small dye eggs. We knit 2 vp in the first of them we knit 6 tbsp. without n close in the ring. The next row - 12 tbsp. without n those. in each loop of the previous row we knit 2 columns.
7. Then we knit several rows without increases, when 2/3 of the eggs are connected, gradually we reduce the columns in a few more rows, giving a pointed shape. We fix the thread and stretch the tip through the entire egg to its base. Tighten a little so that the egg does not have too sharp tip.
8. Knit 3 multi-colored eggs.
9. I knitted a basket of two spools of thick sewing thread. We begin to knit the bottom just like an egg. In the first row we knit 6 tbsp. single crochet, in the second - double their number. Then in each row we make increments: in 3m - through 2 columns, in 4m - through 3 columns, etc.
10. Knit until the diameter of the bottom becomes suitable for three eggs.
11. We knit 1 row of double crochet and 1 row of single crochet.
12. Sew eggs to the bottom of the basket, hide the ends of the threads inside.
13. The basket can be glued to the wreath, but I just pinned it with a pin. After Easter, you can remove the basket with eggs, and a floral wreath can decorate the room for a long time.
14. We hang a wreath with the help of a satin ribbon tied to a bow.
 Step-by-step master class with a photo:
Styrofoam wreaths for Easter
Polyfoam is very good to use as a basis for wreaths, it is light and holds its shape well.
- styrofoam
- stationery knife
- pVA glue
- tassel
- jelly beans
- glue gun
- decorative tape
1. First you need to make a pattern of a large chicken egg. You can draw it yourself or print it using a printer.
 2. After the template is ready, apply it to the foam and cut out our base with a clerical knife. By the way, do not forget to put some board under a piece of foam, otherwise you will scratch the table.
 From the workpiece that we have, we need to cut the middle of the egg according to the same template.
 Then we cut off all the sharp corners of our workpiece, that is, round them.
 We apply PVA glue to the obtained egg with a brush and spread it over the entire surface of the workpiece. In this form, leave it to dry for 10 minutes.
 The final part of the manufacture of crafts. Using a glue gun, we begin to glue the foam blank with candy-dragees. Just keep in mind that you need to glue the egg from the middle to the edges of the product.
 It remains only to thread a decorative ribbon in our craft. DIY Easter wreath is ready!

And a few more photos of ideas for decorating an apartment with such a craft:
How to make an Easter wreath: ideas
The bright holiday of Easter is approaching - the greatest event for all believers. Traditionally, eggs are painted for this day, symbolizing the rebirth of
Easter is not just a holiday in the religious world, it is a great occasion to fill your home with a special mood and warmth. The aroma of fresh Easter cakes, a basket prepared for going to church, decorated eggs - this list is perfect, but it will not hurt to complement it with Easter decor. There are a lot of options for home decorations, but a handmade wreath will become a special symbol of hospitality.
Materials for making Easter wreath
An Easter wreath is a ring-shaped composition that is usually placed on the front door or on the wall at the entrance and serves as a decoration for a holiday home. Round shape This decor has a special meaning, symbolizing the infinity and image of the Sun, as one of the most important sources of life on the planet. To create an unusual decorative element, you have to take care of two things - the base and decorations. So, as a base for creating a wreath fit:
To decorate the wreath itself, you will need various Easter symbols, for example:

The technical side of the issue is as simple as possible, you only need a glue gun, glue sticks for it and scissors.
How to collect an Easter wreath
The process of collecting home decorations is not at all complicated, you do not need to have any special skills, just follow a simple algorithm of actions:
- The first step is to create the foundation. If you did not have a finished form, then it can be done by simply cutting out a circle from thick cardboard. If desired, willow twigs can be broken, soaked for a while in boiling water for elasticity and weaving, closing in a circle. To fix the wreath of branches, it is necessary to fix it in several places by rewinding with thread or decorative tape.
The steamed branches need to be folded around and tied with a rope
- Dressing the basics. Perhaps decoration does not require only one basis - from the branches, as it in itself looks very beautiful. But the foam, floristic ring, cardboard blank must be blocked with something. Here satin ribbons of the desired color or ordinary rope are suitable. On a flat cardboard blank you can glue a pigtail on top, which is made of bundles of thread. You can fix the selected decor with hot glue, simply wrapping the workpiece in a circle.
The base of the wreath must be decorated using a rope or tape and a glue gun
- It remains only to glue decorations on the decorated blank. It all depends on your imagination: you can fill the circle completely, you can concentrate all the elements in only one part of it, apply only a couple of colors and create a calm composition or add the maximum number of colors. The process of fixing jewelry is very simple - you need to put a drop of hot glue on the back and just press it to the workpiece in the right place.
At the last stage, it remains only to stick the desired decor on the base
Easter wreath: unusual ideas
There are many options for decorating a wreath, a small list of ideas will definitely inspire you to create your own Easter decoration:
- a wreath of eggshells and feathers - it looks very bright and will be a great solution for those who have their own birds in the household, because all the materials will be at hand;
One of the best ideas for Easter is a wreath with egg shells and feathers.
- with burlap - body waves from such a rather rough material will look very nice;
Burlap, despite its rudeness, will be an excellent decoration on a wreath
- with flowers. In an Easter wreath, flowers and green leaves will look very bright and fresh;
You can simply decorate the wreath with flowers, it will be beautiful in spring
- with wooden figures. The outlines of the hare or the little hens will well enliven any Easter decoration;
Wooden figurines of bunnies will come in handy just on the Easter wreath
- wreath with pendants. Enriching the composition is possible and going beyond its framework. So, on the form you can hang decorative elements at different heights, for example, wooden blanks of eggs;
You can expand the composition using Easter pendants.
- paper wreath - this option can be used to create jewelry even for small children. It will be enough just to cut out egg-shaped blanks from colored paper and glue them on a cardboard circle one by one.
A wreath of paper - a simple version of Easter creativity with children
Easter wreath will complement the festive atmosphere in the house. Make it not be difficult, the main thing is to determine the appearance of the product and prepare all the materials. After that, it remains only to collect the conceived composition.
 Decoration of bottles and vases for decorating the kitchen
 How to clean copper products
 Temperature labels, stickers Thermo strips TestoTerm