How to make chokers for your neck with your own hands. Chokers on the neck: photos of women's and men's
The choker is again gaining unprecedented popularity among modern fashionistas and even fashionistas. This decoration can complement the image of both a famous pop diva and a young lady. adolescence. The product is quite accessible to its many fans, since anyone can make a choker with their own hands.
Choker: how to wear jewelry correctly
If you have an irresistible desire to emphasize all the elegance and attractiveness of your neck, you can safely wear a choker, because this is precisely the functionality of this type of jewelry. It fits quite tightly to the neck without tightening the skin, and draws attention to the image of its owner.
In addition, a correctly selected product will help hide possible scars (or other small skin defects on the neck), which Queen Alexandra of England once took advantage of.
In order for a choker to harmoniously and effectively complement the image, you must remember simple rules how it can be worn:
- the jewelry should not put pressure on the neck or the skin on it, nor should it hang down due to excessive stretching or the wrong size;
- the choker is not worn over clothing;
- this fashion accessory draws attention to the neck, so it is inappropriate to wear it for those who have double chin or there are visible extensive defects on the skin in this area;
- The jewelry should be worn with clothing that does not cover the neck. Outfits with a deep neckline, V- neckline, with bare shoulders;
- In order to visually lengthen the neck, it is recommended to wear jewelry with elements or pendants hanging down. For these purposes it is possible to use a narrow choker light shades to match your skin tone (beige, golden, silver);
- A choker of the simplest modification can be complemented with several chains of varying lengths. Massive earrings and bracelets do not go well with this accessory.


What and how to make decorations from
Making a choker can be quite simple and quick. To begin with, you just need to select and prepare the desired material and accessories for decoration (if desired). The decoration can be made from lace, fishing line (choker tattoo), leather, velvet, metal rings, fabric. Beads, rings, fabric or ribbon compositions, pendants and even precious stones are used as decorative elements.
Thread choker
There are several options for how to make a fashion accessory from threads:
- for those who know how to crochet, it will not be difficult to create an elegant lace decoration that will go perfectly with a woolen dress;

- Using elastic spandex threads, you can weave an original decoration that will fit your neck without squeezing it. To do this, you can use the technique of weaving a choker from fishing line;

- The choker is most often made from floss threads, relying on the technique of weaving baubles. It is necessary to prepare 6 threads of floss of the same color and suitable length, tie the ends into a bun and secure to the surface using tape. Next, take a thread of a different color and attach it to the right on the surface at an angle of 90° relative to the main threads. Then, with a fixed thread, knots are tied sequentially on each of the 6 main threads. When the first row of knots is ready, take a thread of a different color, attach it again to the right perpendicular to the main ones, and repeat the steps. This way the desired length is achieved. IN finished product The excess length of the side threads is removed with scissors, leaving a small multi-colored fringe.

Beaded choker
A beaded choker looks elegant and impressive. Such decorations are woven according to the chosen pattern, and there are a considerable number of them, from simple to very complex. Here are just a few examples.
- First:


- Second:


- Third:

In order to make this type of decoration, you will need fishing line, beads, scissors, a clasp and maximum patience and attention.
Ribbon choker
To make a choker from a ribbon, you need to prepare a satin, grosgrain or velvet ribbon, a button, a pendant, a needle and thread, a seam ripper (or nail scissors), matches, and pliers. The further sequence of actions is as follows:
- measure the neck volume and add 2-3 cm for allowances;
- measure and cut the required length of tape;
- find the middle of the tape, make a hole in it and secure the pendant in it using pliers;
- make a buttonhole using a seam maker and overcast it;
- sew a button on the opposite side of the choker;
- char the edges of the tape (it is possible to use special clips that will hide the edges of the tape).


Headphone choker
You can make a choker using the simplest and most available means. For example, from an old charger or headphones. The main requirement is a round (not flat) cross-section.

Jewelry has always been the most important part of a wardrobe. Probably, the love for all sorts of “trinkets” is passed down from generation to generation, because even a small piece of jewelry makes a woman special and sets her apart from the crowd.
Not so long ago, the favorite girls from the 90s and forgotten by the girls From the 2000s, simple, at first glance, jewelry - chokers. Yes, these are the same necklaces made of thin wires, fishing lines or ribbons that fit very tightly around the neck and from a distance resemble a tattoo. This is where another name came from - tattoo choker. Do you dream of something like this, but just can’t find one that you really like and stands out from the rest of the crowd of similar jewelry? Let's learn how to make it yourself.
Who shouldn't wear a choker?
Yes, there are contraindications to wearing jewelry, especially when it comes to such a specific accessory as a choker. Although the list of contraindications is quite short, we still recommend that you familiarize yourself with it so as not to harm yourself, because beauty should never come before health:
- 1 Doctors do not recommend wearing such an accessory to girls with an enlarged thyroid gland. Since the choker should be as close to the skin of the neck as possible, this can cause additional pressure and worsen the outflow of lymph, which will negatively affect the overall health;
- 2 Do you have irritation on the skin of your neck or even small wounds or sores? Avoid wearing a tattoo choker for a while so as not to irritate your already vulnerable skin;
- 3 For asthmatics, it is also better to refuse such an accessory, or at least wear a choker that is not too narrow, so that nothing interferes with normal breathing;
- 4 and from an aesthetic point of view, chokers do not look very nice on short necks.
Learn how to make a choker with your own hands

Now let's move on to the most interesting part - the learning process. Even a person who has not previously done “handmade” can make such a decoration, since you will need a minimum of materials, a little patience and a couple of free minutes. We have prepared master classes for you, after studying which you will be able to weave a choker from materials that, in principle, can be found in every home:
- from satin ribbon
(this is a glamorous version of a choker. Similar versions of chokers are preferred by Hollywood stars and many celebrities);
- from ordinary fishing line(these are now very popular among tumblr girls and the world's most famous bloggers);
- from an old phone charger(this will be a more “brutal” version of the choker, which will perfectly emphasize the fragility of a thin woman’s neck).
DIY satin ribbon choker
 This is the easiest version of the choker to make, but at the same time the most feminine. It will look great on both a very young girl and a stylish lady who has a great sense of fashion trends.
We will need:
- black thick satin ribbon (give preference to a ribbon whose width will be within 1-2.5 cm, so the decoration will focus most of the attention on itself, but will not burden the image). Just 1 m of such tape is enough to make three chokers at once;
- clasp for jewelry with a short chain (so that you can adjust the length of the finished jewelry);
- a beautiful pendant stone, for example, in the shape of a crescent;
- flexible measuring tape;
- needle and black thread.
Preparation method:
- measure the circumference of your neck using a measuring tape. You should not add additional centimeters to the resulting figure, since we will adjust the length of the decoration using a clasp; 
— cut the ribbon to the required length and carefully sew the edges with a needle and thread so that they do not stick out; 
- we sew a clasp for jewelry on one end as securely as possible, and on the other - a short chain; 
Advice! If your tape is double-sided (Euro tape), then it doesn’t matter which side you sew the chain and clasp on, but if the tape has a front (shiny) and back side, adhere to this rule: right-handers are recommended to sew the clasp on the right end and the chain on the left, left-handers need to do the opposite. This will make the process of putting on jewelry much easier.

— fold the decoration tip to tip to find the middle and sew a beautiful pendant at the resulting point. If you have a pendant with a large enough ring for stringing, you can simply thread the ribbon through the pendant. 
DIY fishing line choker
 Now we will learn how to make a choker tattoo on the neck, one that from a distance will resemble a tattoo of neat weaving.
We will need:
- fishing line (“vein”, elastomeric thread or latex line) 3 m long; beading line should be discarded as it is too thin;
- scissors;
Preparation method:
- the simplest and most popular technique of weaving “snake” will be completely accessible even to girls who have not previously done needlework;
- find the middle of the fishing line, secure it with a clothespin on cardboard or a book; 
- make a knot so that the tip of the fishing line extends above the loop; 
- repeat the same procedure with the other half of the fishing line, again making sure that the end of the fishing line is above the knot;
- we try to do air loops approximately the same size; 
- after completing the weaving, tie the ends of the fishing line with a secure knot, and also tie the clasp. 
DIY choker made from charging wire
A choker decoration made by yourself from a wire from a phone charger looks very fashionable and unusual. The result will be rougher, but very interesting decoration.
We will need:
- old unnecessary charger;
- scissors;
- regular or stationery clothespin;
- a sheet of thick cardboard or a book (magazine);
- clasp for jewelry with a short chain or fixing ring.
Preparation method:
— we cut off the power supply and adapter, that is, we only need the cord; 
— the scheme is the same as for a choker braided from fishing line; after we securely fix the cord on a solid base with a clothespin, you can begin weaving; 
- in this case we do not make air loops, but tighten them tightly enough so that the decoration does not turn out to be too bulky; 
- We attach a clasp and a short chain to the ends. 
Tattoo choker- This is an unusual type of decoration, as it creates the appearance of a tattoo on the human body. The material that is used to create a choker is ordinary fishing line or elastic thread, which can be bought in the store at a very low price. Creating such a decoration with your own hands will not take you much time and effort, so let’s learn how to make a choker together.
What can a choker be made from?
Many people wonder what a choker should be made of, and we have the answer to this question. The main task is to choose the right material for the choker. This can be a fishing line, or a special elastic-stretchy spandex fishing line. Of course, spandex will be easier to work with and will look better, but if you have a lot of fishing line lying around at home, then why waste money? It is advisable that the fishing line be black, so it will look more attractive.
How to make a choker around your neck?
To create a choker we will need:
Lighter
Beads (optional)
These materials are not difficult to find on store shelves, and they will cost just a few pennies. Having prepared everything, we can begin.
1. We cut the fishing line 2.5 meters long. We bend it in half. To make it more convenient to make a choker, it is better to attach the clip to some book or board.

2. We insert the bend of the fishing line under the clamp, thereby fixing it. Next, take the left part of the fishing line and lay it on top of the right one.

3. Now, we push the end of the right part of the fishing line back under the right part (as shown in the photo).

This is the kind of loop we should get:

4. Now we pull this loop to the very top.

5. The next step is to take the left side of the fishing line and lay it down on the right side.

6. And again we make a loop, inserting the left end of the fishing line under the left part.

7. Pull the loop up again.

8. We continue weaving, thus first making a loop with the right part of the fishing line, then with the left.

9 . At the request of the creator, you can decorate the choker with beads, stringing them on a fishing line from time to time.

10. We braid the choker to the length we need, then cut off the excess edges.


A little history
The choker first appeared in Europe back in Victorian era. However, it came into particular favor during the time of the English Queen Alexandra, who tried to hide a small scar on her neck with a necklace of pearls and dark velvet. Such decoration, emphasizing the whiteness of delicate female skin, undoubtedly appealed to the fashionistas of that time. Yes, with light hand Alexandra chokers are now firmly established not only in Europe, but also in the USA.


In the 20th century, Coco Chanel gave this decoration a second wind. Chokers from her collection were made not only of velvet, but also of leather or silk ribbons and trimmed with a planchet (insert) made of precious metals.
Today, choker necklaces have firmly settled not only on the catwalks, but also in the wardrobes of many modern women. For example, Princess Diana preferred pearl chokers with inserts of large precious stones. The images of Matilda from Luc Besson's film "Leon" or Angelina Jolie from "The Tourist" cannot be imagined without a black ribbon choker that fits tightly to the neck.
Advice! You can wear this necklace with almost any outfit. Thus, couturier John Galliano considers chokers to be a universal decoration that goes well with both jeans and evening wear.
Types of chokers
All chokers can be divided into main groups:
- men's: have a minimum of details and decorations;
- tattoo chokers: made by weaving from elastic threads or fishing lines of any color, stretchable, ideally adjacent to the skin and outwardly indistinguishable from the pattern on the skin; can be supplemented with small decorations: beads, rhinestones, etc.;


- chokers on a cord, ribbon or chain with or without a pendant;
- jewelry woven from wire: unlike tattoo chokers, they are made more voluminous and have a larger number of decorations (beads, beads, stones, chains or rhinestones);
- chokers made of beads or beads;
- leather trimmed with buckles or metal decorations;
- made in the form of a small metal rim made of wire or precious metal;
- made in the form of a wide collar of velvet, lace, wool or metal strips;
- products knitted from yarn: soft and cozy, they are not only decoration, but also serve as protection from the cold.


Advice! The choker should be the main highlight of the look. You should not complement it with too many other decorations.
Materials used
Today chokers are optional jewelry. For their manufacture and decoration, wood, leather, metal, bone, stone, plastic, beads, beads, rhinestones, pieces of fur, floss threads, lace, fabric, including velvet, etc. are used.


The technology of weaving chokers is simple, so even an exquisite, elegant decoration can be made by yourself. They can be made in one or several tiers of any width - be thin and miniature or have the appearance of a fairly wide strip encircling the neck. Decorations can be strung on wire, fishing line, spandex (elastic polyurethane thread), or elastic bands.
Advice! A choker that is too wide will visually shorten your neck. To prevent this from happening, be sure to choose a blouse or dress with a sufficiently long neckline for this decoration.
Tattoo choker
Made from an elastic material (thread or spandex line), the necklace that fits tightly to the skin really resembles a tattoo applied to the skin. That is why this decoration received its name.
To create such a choker we will need:
- fishing line or elastic thread for weaving 2.5 m long;
- beads for decoration (optional);
- lighter.


To begin, the fishing line or thread should be bent in half and secured to a board or book using a paper clip. Then we begin to knit the necklace, making regular knots alternately with the left and right threads. If desired, beads are periodically strung on the thread in the right places.
When the length of the choker is sufficient and equal to 35–40 cm, the excess threads are cut off. To make a simple clip-clasp on one side of the jewelry, they are fused together into a ring using a lighter.

Advice! From the same material you can make a whole set consisting of a choker, a bracelet and a pair of elegant rings.
Accessory from old headphones
To make a tattoo choker, you can also use a long wire 1 mm thick from a charger or headphones. To get a quality necklace, don't just use headphones that are too worn and scratched. A choker made from flat wires will also look unattractive - it is better to use round ones to make it.


The most difficult step is making the fastener:
- The simplest option for her is to leave the ends of the threads to tie them in a bow or knot, but this method is suitable only for those who have long hair; in the presence of short haircut protruding wires will be conspicuous;
- You can also make a fastener by twisting the wires; to do this, they are stripped of the winding and tightly intertwined with each other so that there are no small ends left that can catch on clothing;
- You can do it from a microphone; To do this, the ends of the wires are tied into knots, which are inserted into the microphone and snapped into place.
If desired, this decoration can be painted with colored or metallic spray paint. You shouldn’t do this before you start weaving - it may wear off during the process.


Advice! Interesting option Necklaces can be made from two wires of different colors, for example, black and pink or white.
Metal choker
This original decoration goes perfectly with denim or leather clothing. To make it, you can use fairly strong decorative wire that can hold its shape, metal plates for finishing with holes made in them, or wire rings, rivets, beads, etc.


Jewelry in the form of a plate, open necklaces of irregular shape with stones or balls at the end, or twisted metal jewelry look very extravagant.
Advice!Massive metal products can visually shorten the neck. Overweight women with a small neck it is better to refuse them.
Ribbon collar
For this type of decoration you need to take:
- satin or velvet ribbon, its length should be selected with allowance for hems;
- ring for attaching jewelry;
- pendant or coins with a hole made in them;
- clasp (carabiner) for jewelry;
- glue;
- scissors.


A pendant or coins are threaded into a small ring, which is secured to a ribbon. To fix the decoration, you can gently press it with pliers or secure it with a drop of glue. At the last stage of work, the ends of the tape are bent, a fastener is inserted into them, and then the tape is sewn up.
Advice! You can also secure this choker around your neck with a small bow. To do this, the tape must be purchased with a small margin.
Choker made of velvet or fabric
Women have long noticed that a dark velvet bandage can favorably emphasize the whiteness and tenderness of the skin. To make this aristocratic decoration you will need:
- a strip of velvet of the required width, about 50 cm long;
- pendant, medallion, brooch or other jewelry for use as a pendant;
- iron;
- sewing machine;
- threads;
- scissors;
- clasp.


The principle of making such a velvet cloth is similar to the previous one. The only difference is that in order for the fabric not to fray and lie fairly flat, it must be sewn in half. To do this, cut out a strip of the required size, bend it in half with the wrong side out, iron it, stitch it, and then turn it inside out so that the seam is inside the choker. A clasp is attached to the ends of the decoration.
Advice!Velvet goes perfectly with lace. You can decorate such a necklace with a flower made of felt or finishing braid and thin chains to match.
A stylish tattoo decoration can also be made from beads. Beginners should choose the simplest scheme weaving.

You can make such a choker from both large and small beads:
- before starting work, the fishing line is attached to the eye of the lock;
- two needles are threaded through each side of the thread;
- beads are placed on the fishing line using a needle according to the chosen pattern;
- each bead is knotted with the help of a second thread, which is also first passed through the hole; in this way the beads are supported on both sides by two knots;
- after completing the work, the thread is tied in the eye of the carabiner lock;
- if necessary, the second row of the choker is knitted; after inserting the last bead, the thread is again secured in the carabiner.
Advice!You can decorate such a choker with pendants. Threads of beads can also be wrapped into strands, thus forming a more complex necklace.

 We will need a piece of unnecessary Choker-tatting jeans
 This technique is based on weaving lace fabrics using knots. The main elements of the pattern are rings and arcs. The technique is somewhat similar to the crocheting method. The only difference is in the way the threads are threaded through the knots.
Most simple method is tying ready-made rings or arcs made of plastic or metal using two knots - direct and reverse. Those who are more familiar with the tatting technique can use more complex weaving methods.
The necklace can be complemented with earrings woven using the tatting technique and elegant openwork rings made to match the main item. You can decorate them with fringe with beads.
Advice!When choosing a choker, you should carefully consider the entire look. An elegant necklace in combination with heavy, massive bracelets looks absolutely ridiculous. Wide chokers don’t look the best next to elegant, weightless brooches and earrings.
What to wear with?
There are only two restrictions when wearing this jewelry:
This necklace is designed to emphasize the beauty and shape of the neck, so when wearing it, it must be open; a V-shaped neckline in this case will be the most successful
- This necklace is designed to emphasize the beauty and shape of the neck, so when wearing it, it must be open; a V-shaped neckline in this case will be the most successful; the deeper the cutout, the more weightless and elegant the decoration will seem;
- With casual clothes - T-shirt, checkered shirt - a simple decoration that is not burdened with too many details will be ideally combined. For lovers of suede or leather clothes, as well as products made from coarse linen, you can choose chokers made of chains, stones or shells as decoration. An elegant choker made of lace or satin, as well as a product with an abundance of chains and studs in the “punk” or “rock” style, will go well with jeans and the same blouse. Little black dress or long one evening dress A “floor-length” look will be complemented by a short necklace made of gold or silver or a velvet choker with a precious pendant.


Advice! The choker should be the only decoration on the neck. The only exception is long metal chains, which go well with such a shortened necklace.
Women wore chokers back in the 2nd century. BC. But this does not prevent the accessory from occupying a special place in fashion trends today, as can be seen in many photos in glossy magazines. It was worn around the neck by ancient Indian tribes to protect against evil spirits. Nowadays it is considered a stylish decoration.
Choker (from the English “choker” - noose, strangler) is a short decoration that fits tightly to the neck with a device for adjusting the size.
Accessories are different:
- numbering 1 or several rows;
- made from various materials(fabric, leather, metal, etc.);
- complemented with jewelry, rhinestones, fur.
There is no age limit for wearing it - if chosen correctly, it will look impressive on both a young girl and an adult woman. There are also no restrictions based on gender - many different models Chokers are made specifically for men. The accessory is used in men's collections by world designers.
The main principle of wearing is that the necklace should fit tightly around the neck without cutting into it. The decoration is plastic and flexible, so it does not cause discomfort when worn.
What are chokers worn with?
A choker around the neck (the photo clearly demonstrates this) thanks to its manufacture from different materials can be combined with different styles clothes.
- Victorian, different precious stones and expensive materials will perfectly complement the attribute. A richly decorated choker is suitable for a special or festive occasion.
- A simple necklace that does not have massive details will complement your everyday design. For example, a neck belt will fit well into an outfit consisting of a T-shirt or a plaid shirt.
- Evening dress in black classic dress will complement a sophisticated decoration. This also includes long flowing dresses that go well with a choker necklace.
- Safari, ethnic style or hippie - leather, linen and suede short beads are most suitable.
It is important to remember that the choker is not worn with:

When choosing a buckle for your neck, you should avoid other jewelry. The exception is long chains made of gold or silver. The accessory is worn on a bare neck.
By correctly combining clothes with an attribute, you can make a simple neck belt a universal addition to your bow. On the contrary, the slightest mistake in the combination of things can result in a vulgar image.
One of the main conditions when wearing a headband is that the clothing has at least a small neckline. It is not advisable to complement it with heavy bracelets or an abundance of other jewelry.
Types of chokers for men and women
Choker around the neck, photos of which can be seen below, come in different types:
- Metal- a universal option, will fit into a daily and evening look. The only limitation is that a metal choker necklace can only be worn by girls with a long neck.
- Wide- resembles a golf collar. Decoration made from materials with light patterns looks better, which visually enlarges the neck and looks ideal with a dress or jacket with a neckline.
- From beads- looks neat and elegant. Variations can be different - made from small beads, in combination with large elements. Accessory additions with pendants are welcome. Wear them with dresses, tops, jeans.
- Lace- helps soften sharp lines and optically make the neck thinner. Airy white openwork will add tenderness.
- Velvet- fits any style. The material emphasizes the whiteness of the skin. You can complement the choker with a pendant or pendant.
- Leather- fans of all things natural will love this leather accessory. The strip can be thin, wide and different shades. Combines with rock, ethno-style and gothic.
Men's chokers generally have a minimum of additional elements, are plain, without voluminous inserts.
How to make a choker with your own hands?
To make a choker with your own hands you will need the following tools:

Additional materials:
- fishing line;
- small rubber bands;
- headphones;
- satin ribbon;
- threads;
- beads;
- lace;
- chains;
- metal.
Suitable for decorating the product:
- bugles;
- fur pieces;
- artificial flowers;
- pendants.
The neck belt generally has a length of 35-41 cm, and is attached with a carabiner, which allows you to set the length taking into account the diameter of the neck. If you make jewelry at home using a clip, it should be 1 cm shorter than the neck circumference. This is necessary to attach the clasp and rings.
To measure correctly, you need to tightly grasp the diameter of the neck with a sewing centimeter. If the measurement was carried out using tape, then by attaching it to a tape measure you can find out the size. When worn comfortably, the finished choker should not dig into the neck. 
Regardless of the material used (fishing line, cord or spandex), the technology for creating the most simple decoration one:
- Fold a piece of thread in half.
- Secure the fold to the book cover with a clamp.
- Place the right part under the left, and return the right end of the cord under the thread of the same side.
- Slide the created loop, tightening, towards the clamp.
- Perform similar actions with the left side. The loop will be on the other side.
- Continue alternate weaving. If desired, add beads or a pendant.
- Try it on, and after making sure that the product fits snugly to the neck, you need to thread the free edges into the starting loop.
- Tie the edges in knots and cut off the excess.
- Solder with a fire-producing device.
Velvet choker
Choker around the neck (a photo of the manufacturing process can be seen below) made of velvet:

To make an accessory with decor at the front, you need to cut a ribbon that will tightly fit around the circumference of the neck. Then hang the pendant and attach the clasps, which are attached one after the other.
Satin chokers
A satin ribbon choker is made in stages:
- Measure the volume of the neck and add 1.5-2 cm from each edge for allowances. If you intend to tie a ribbon, you should add at least 10 cm.
- Cut to selected length.
- Find the center of the strip using a centimeter, or folding it in half.
- Make a hole in the middle for the ring.
- Attach the desired pendant and press the ring with pliers.
- Using nail scissors or a seam ripper, poke a small hole for a loop at one end of the satin ribbon.
- Overcast the loop with suitable thread to prevent the fabric from unraveling.
- Sew a button on the other side of the product.
- Carefully burn the edges of the ribbon with a lit match to prevent fraying of the threads.
Lace chokers
The lace neck choker, which can be seen in the photo below, looks feminine and elegant. 
Step-by-step technique:

Original choker decorated with a flower:
- Measure the diameter of the neck so that the accessory fits snugly.
- Make 2 blanks for the flower from felt. Cut out 6 oblong petals and 2 rounded centers. Lay the parts so that the lower level protrudes slightly along the length, pin the parts together.
- Grab a petal from the top and bottom layers. Secure them along the fold with stitches and pull the thread a little until a fold is formed. Without cutting the thread, repeat with all other parts of the workpiece.
- Compactly collect all the petals into a flower and sew one of the circles on top, acting as the core. The middle can be decorated with sparkles, rhinestones, and beads.
- Weave a scarlet ribbon to the black piece of lace, sew on a black ribbon 1 cm wide to secure the ribbon. Decorate the width of the cut with black tape.
- Divide the choker into 3 parts, and at the first division point, sew the second cut out circle to the wrong side. Sew a flower made to it on the outside.
Suede chokers
Making jewelry from suede is not difficult:
- To work, you will need 2 pieces of suede cord, 15 cm each, a pendant that is empty in the middle, 2 small clips for the braid, 2 connecting circles and 1 carabiner clasp.
- Fold one of the suede pieces in half and place the entire top in the middle of the pendant. Pull the 2 free edges of the cord through the resulting loop.
- Perform the same actions on the other side of the key fob.
- Secure the unoccupied ends of the rope with clamps. Pull rings on both sides of them and attach a carabiner to one of them.
Leather chokers
Necessary materials for making a leather neck belt:

Detailed diagram:
- Make markings on the wrong side of the material, cut 2 strips of 1.5 cm each. Their length should be 2 cm shorter than the volume of the neck. The lock will fill this difference.
- Fold one of the leather parts in half and bend it in the middle.
- From the center in both directions, mark the points for attaching the rivets, retreating 1 cm between them.
- Attach rivets.

- Sew 2 pieces of leather to one another, sewing in beads at the same time.
- Thread the cord between the leather elements to provide volume and maintain shape.
- Insert beading in the middle large bead, to which the pendant will be attached.

- Attach the lock by clamping the edges with pliers, after placing a piece of fabric.
- Attach a pendant to a large bead.
Chokers with pendants
Making an accessory from fabric with a pendant step by step:
- If you make a pendant yourself, you need to take a setting with a loop, and use glue to attach chipped stones, multi-colored or of the same shade. Leave to dry for 12 hours.
- You can use thin leather as a base. Cut out a piece 1-2 cm wide and 25 cm long.
- Coat the wrong side of the material with glue and tuck the edges towards the center.
- Cut the resulting strip into 2 equal parts and use round pliers to secure the clamps on each side.
- String a stone on them and form a spiral.
- Then release the last link on the extension cord and attach the stone to it.
- Attach a ring to the clamp of one half of the fabric strip, and then an extension. On the other strip, attach a locking carabiner to the clip.
- Put on the pendant. Place a ring on the unoccupied terminal and attach a pendant. Perform the same actions with the remaining free tuck.
Accessory from old headphones
A neck choker made from headphones, which is shown in the photo below, can be easily woven yourself, but this will require a little time and imagination. 
Manufacturing technique:

Choker made of beads
Necessary materials:

The original decoration is made in the following way:
- Attach a piece of fishing line to the table with tape so that the product does not slip while working.
- Apply a drop of glue to it at a distance of 3-4 cm from the edge of the thread. While the drop has not dried, put a bead on the other edge of the fishing line, i.e. so that it fits onto the glue and attaches well to the base.
- In a similar way, string and fix all the other beads along the entire length of the cord, while placing them at a distance that corresponds to the measurement taken.
- When the required size of thread is filled with beads, cut off the excess fishing line. Place a drop from a glue gun at the very edge, and, without waiting for it to harden, place a special clamp on the glue. Repeat the procedure at the other end of the product.
- Pull the connecting ring onto the clamp on one side, and the carabiner on the other.
Metal choker
Required materials:

Method of making an exclusive metal necklace with your own hands:
- Measure the volume of the neck, subtract 2-3 cm and cut off the resulting length.
- Bend the future necklace in the form of a circle (using a plate, roller, or go around the neck).
- Carefully straighten if there are any unevenness or curvature.
- Glue the selected decorative element exactly in the center.
Unusual chokers
A choker around the neck (photos of each type can be seen later in the article) can be made original. To do this you need to show imagination. Some interesting ideas are described below.
Tatting is an elegant accessory. To complete it you will need:
- beads;
- thin wire;
- threads;
- rings - 13 pcs.;
- large needle;
- locks;
- hook.
Production in stages:
- The basis of the necklace is rings. Take one and braid it using a hook and thread.
- After wrapping, make a small chain and design the next ring.
- How many rows there will be and the length of the neckband can be chosen as desired.
- As you work, you can add beads or seed beads.
- After completing the weaving, attach a clasp at the ends.
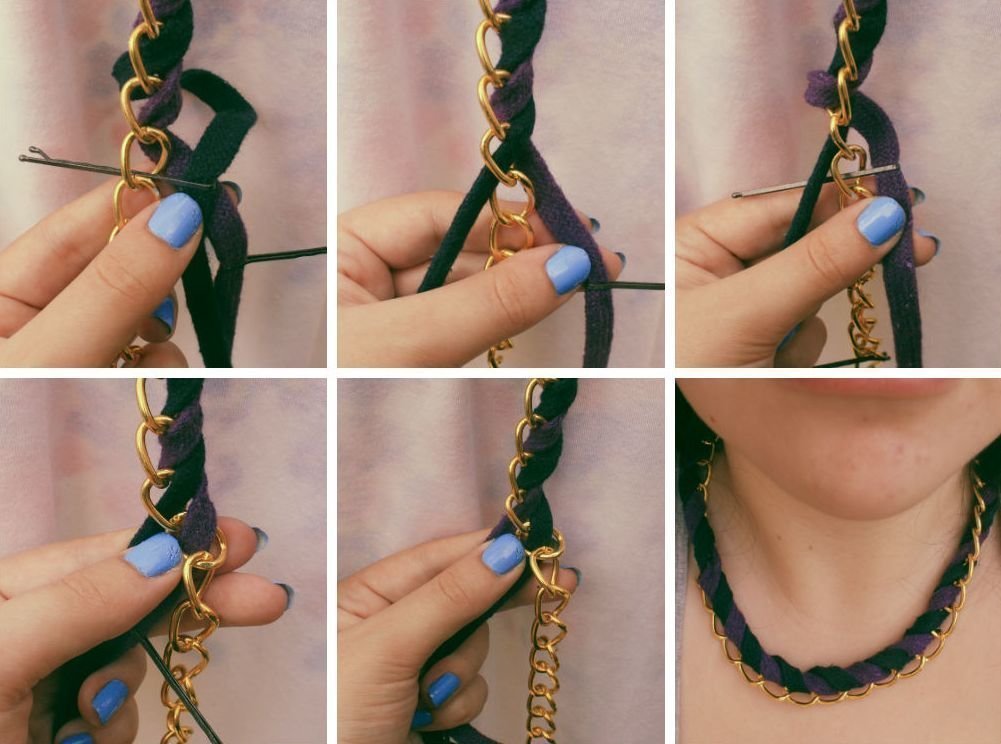
A braided choker is an elegant attribute. It is crocheted from thin threads interspersed with:
- stones;
- rhinestones;
- beads;
- chains.
Products have different lengths- if they are made from a chain, then the accessory falls below the collarbones.
Neck chokers made of warm yarn are warm enough, so in winter they can replace a scarf. To create them you will need knitting or crocheting skills. You can make beautiful lace products that will go well with woolen dresses. 
From openwork braid, lace and flounces you can create an accessory in the form of a stand-up collar. 
For brave girls, rock or punk style jewelry with spikes, pins and similar decor is suitable.
How to make a choker tattoo from beads?
To create an accessory you will need:

Execution in stages:
- Weaving is carried out from 2 bead threads. For them, cut 2 pieces of 1 m each. At the end of one of them, tie 5-6 knots in one place. The thickness of the node should be several millimeters.
- Place beads on the long edge of the thread.
- String 82 cm of glass beads. Leave 2 cm from the edge of the cord free. Tie the same knot as at the beginning of twisting.
- Assemble another similar piece of fishing line with beads.
- Fold the 2 edges of the segments together. Cut off the ends of the twine. Use a lighter to burn off excess.
- Place the knots you have made into the fixative. Press with pliers.
- Place the first ring on the clamp.
- Using a binder, secure the threads with the glass beads to the edge of the notebook. Attach the clamp at the very beginning of the fishing line.
- Start weaving the decoration. Its pattern will accommodate knots with different directions. Start tying from the right side around the left.
- Knit the second one in reverse.
- You need to knit alternating knots. Immediately tighten the loops to the required size.
- Weave knots along the entire length of the beaded fishing line. Make sure that the threads do not twist.
- At the end of the work, cut off the tails of the twine, melt them, put them in ribbon clips and press them with wire cutters. Using another ring, attach a carabiner to the loop.
- Straighten the product and make identical loops on both edges of the necklace.
Stylish looks with chokers
A fashionable and original look will be created by the following choker options:
- Black accessory decorated with pearls.
- There is a metal strip in the middle, leather cords on the sides.
- Instead of a necklace, a narrow scarf.
- Gold or silver necklace in the form of a chain.
- Decoration self made with various stones.
- Made from glass balls.
- A pearl necklace is a universal type of choker, suitable for different occasions. The right accessory can even be combined with a business style.
For men these are the following variations:

Choosing a choker based on your face shape
A choker is an adornment only when it goes well with your clothes and figure. Women who have a short, full neck should avoid this attribute. For representatives of the fairer sex with a long neck, you can wear any variety of it. The wider the necklace, the more attractive it will look.
To visually lengthen your neck, you need to wear a headband in a neutral shade (beige, black, gray), wear a blouse or dress with a large V-shaped neckline. An open accessory made of metal is also suitable (the girth of the choker should be 3-5 cm less than the diameter of the neck), which will visually add a few centimeters to the length of the neck.
A necklace will highlight facial features:
- Chokers add even more curves round shape faces.
- With an oval shape, jewelry of different thicknesses and styles is worn, but not monochromatic.
- Accessories look good on people with a heart-shaped oval face - they round out the shape and soften a narrow chin.
Interesting ideas for creating an original choker
Design suggestions original decoration on the neck:
- made of wire of various thicknesses;
- from ceramic beads or stones;
- acrylic;
- from shells;
- magnetic lock collar;
- denim belt;
- from the charger;
- from floss threads;
- cross-stitched or beaded strip;
- using elastic bands for weaving.
The technology for weaving an accessory from rubber bands is quite simple:

Double decorations look original, provided they do not cover each other. For example, a combination of a narrow black ribbon and a short leather cord with a medallion, or a thin strip of lace with a gold pendant pendant.
Men's chokers can be made from the following materials:
- beads;
- twine;
- various cords;
- rubber, resistant to water;
- natural stones;
- wooden;
- wire.
Both women and men can choose a choker for their neck from a photo. The decoration will add brightness to the image and focus on the neck. By following the tips for choosing it, you can emphasize your own sense of style.
Video about chokers
Tattoo chokers on the neck:
5 cool DIY chokers:
 How much fabric is needed for a dress: simple methods and basic calculation nuances
 Beautiful Christmas tree decorations made of plywood: we make decorations with our own hands using a jigsaw
 Manicure with acrylic paints at home