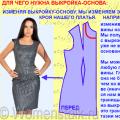
To sew the New Year's dress for a full woman. Dress for complete do-it-yourself
Topical this year dress shirt came to us from the men's wardrobe. His style looks good on girls of any height and with any type of figure. With it, you can create various fashionable images, putting it on with jeans or trousers.
This model is notable for its cut-out cut, unmarked waist and an elongated shoulder line. It can be worn on a date and at work only if your dress code is not too strict.
How to wear a dress shirt - photo
Women and girls with slender legs are recommended to wear a dress shirt as a separate thing, not complementing it with jeans, leggings or trousers. In spring, you can wear flesh-colored tights. If this is too bold an image for you, then you can complement the image with skinny jeans or skinny jeans. Here you need to focus more on accessories: chains with large pendants, bulky necklaces, necklaces, rings and earrings. Do not forget about clutches and take care in advance of choosing the right shoes.


What shoes to wear a dress shirt?
It can be worn with any shoesbe it sneakers, shoes, sneakers, slip-ons and so on. If it is midi or even longer, then high-heeled shoes or tractor-soled sandals are perfect. If you need an everyday stylish option, the most relevant choice is flat sandals or ballet flats. Massive high rectangular heels are also trending. And the photo below will help you choose a bow for your style so that you no longer wonder: “What to wear with?”


Popular articles:
Long dress shirt
Such a model may as fittedso and free. It is so universal that it fits almost any case. If you want to do the same with your own hands, but already on the floor, you should choose lightweight materials such as chiffon, silk, satin and fine knitwear. To follow the latest fashion trends - choose models in a cage.


Denim
What to wear denim dress shirt? It should be borne in mind that different shoes and accessories will suit different product lengths. Often, such models are sold with a belt in the kit, if it is not, then you can choose it in the color of the shoes. The photo shows several trendy images of this summer. 

1.If it is on the floor, put on white flat sandals and take large sunglasses. By the way, you can easily sew such a thing with your own hands, a pattern of which can be found on the page.
 2. Rolled up sleeves, a bag and brown shoes are a very trendy look this summer.
 3. A long product with rough brown fringed boots and a bag - bag.
4. For cool weather, fit high black suede boots, a black shoulder bag over a chain and a hat.

For pregnant
Dress shirt for pregnant women, in principle, are no different from the usual model, with the exception of the high waist, which covers the stomach. It should be made of natural material, such as cotton, for example. The photo below shows images for pregnant women, in which the main thing is comfortable shoes. And with what to wear it - with which accessories exactly, to your taste!


Black, White, Lace and Check
Dress shirt can be of different colors, but the most relevant these summer - black, white, pastel colorsand prints. Button models are very popular, they create a very feminine silhouette, emphasizing the waist. You can sew it yourself by combining different colors and materials.


How to make a dress out of a shirt?
Do it yourself very simple and easy. To do this, be patient and select the appropriate pattern. We will provide a few bows below.
And how to make it from a male model? Here is our answer! It can be sewn from any fabric, the main thing is to make you feel comfortable in it. Consider two options for sewing: from a male model and from a regular piece of fabric using a pattern.


Dress from a man’s shirt with his own hands step by step
Option One: without patterns from a male model. You will need an old men's shirt, scissors, a centimeter tape, a pencil, a sewing machine and a cloth, or a graph paper for a pattern.

Since you have already decided on the type and style, you need to measure all your parameters on the masculine stuff.
 Attach the made pattern to the product and cut the fabric.
Carefully cut pockets and sleeves from the product. And you can start cutting on the thing itself.
 Mark about 5-7 cm below the collar - this distance will serve you as a neckline.
You can stitch the resulting thing! Get rid of excess tissue and try on a thing on yourself.

 You can sew a long tape across the middle of the product
So you get a belt.
Your product is ready! And, with what to wear it, you already know!

The second option: not using a finished product. Examples of patterns and how to make a dress shirt with your own hands you will learn from the following videos:
https://youtu.be/wNnzSieUUjU
Children's dress from a man’s shirt
Do-it-yourself shirt dress for a girl is even easier! Look at a few photos and read the instructions - it’s easy for you to sew it! It can be worn with sandals or sandals!
 Remove the upper part of the collar of the finished product and cut the thing as shown in the photo:
 Old sleeves will serve as the basis for new ones - we cut out new ones from them. Lower hem process to get it neat and beautiful. We sew ready-made sleeves.
As the photo above in dashed lines we collect corrugation. You can decorate the finished product as desired! See how easy it is to do it yourself.
Models for complete


Greetings friends!
And finally, did I sew shirts before? No. Have I ever sewed items with sleeves? No. Will it work out for you (or maybe even better)? Definitely yes. So let's get started.
What we need:
- Cotton fabric (I used cotton stretch) - 1.5 m *;
- Flizelin and doubler (for a collar and a level);
- Buttons - 10 pcs (qty at your discretion);
- Slanting inlay - 4 m (number varies);
- Sewing supplies;
- Sewing machine;
* The amount of fabric will vary depending on the shirt dress model you have chosen, your size and its length.
As you can see in the photo above, the option I selected shirt dresses without coquette and tucks, fastens with buttons, just above the knee, has a belt, one chest pocket, a collar and short sleeves. On my 42nd size with a length of 87 cm (90 cm on the back), the fabric was enough for me. And do not forget that you may have to join the side seams of the shelves and the back so that you do not have ugly junctions at the joints. This means that tissue may need a little more. This is only if you choose a striped fabric.
The total dimensions of the details of the shirt dress:
Pocket - 14.5 x 15 cm;
Belt - 140 x 3 cm;
Sleeve length - 16 cm;
Number of buttons - 8 pcs;
I don't want to upset you, but sew shirt dressat all without pattern will not work. However, do not rush to get upset. With this option, you do not have to build abstruse drawings and resort to various mathematical calculations. All you need is an old (unnecessary) shirt of your size. I used a men's shirt that fits my size. I spread it and transferred all the necessary details to thick paper: a shelf, a back, details of a collar and sleeves. The size of the pocket I made based on personal preferences.


Voila shirt dress pattern ready!
Sew a dress shirt
So, before we start sewing, it is necessary to decorate the fabric, dry it and iron it well.
We fold the fabric in half along the lobar seamy side up, lay out the pattern, fasten it with pins and translate. When I transferred the pattern to the fabric, I added 0.5 cm allowances to the side cuts, armholes and neckline. Despite the fact that the necessary allowances were already laid in the pattern, I decided to play it safe. After all, the excess can always be cut off, but if not enough, then there’s nothing you can do.

We spread on the wrong side of the fabric along the shared part of the shelf. On the pattern of the shelf, I laid 2 widths (+ 0.5 cm) of the strap for loops and buttons. Strap Width \u003d 3.5 cm. I decided to make the bar not detachable.
Add the same allowances as on the back part.


Next, lay out sleeve pattern. We lay out all the details on the share. Fasten with pins and circle. And in this case, I added 0.5 cm allowances to the side cuts and armhole. In the future, I became convinced that this was unnecessary.


We repeat the same actions with the details of the collar, belt, pocket. In addition to these parts, one piece of doubler must be cut out.
As a result, you should be able to:
- 1 part for collar,
- 1 part for stand-up collar,
- 1 part for reinforcing the top of the pocket.
But for the belt and for slats for hinges use non-woven. I forgot to fix the bar under the buttons.
As for the pocket detail, I added to the top 2.5 cm for hemon the other three sides 0.5 cm each.
So, all the details are cut out, proceed to sewing.
Shelves.
We iron the part of the strap by 0.5 cm, and then by 3.5 cm. On the right part there will be loops, on the left button. Ironed, basting. We perform all operations with the second part of the transfer. From the wrong side, 0.2-0.3 cm, we lay a line to fix the bar.
Collar.
Duplicate the collar details. Fold the front parts and lay the line at 0.5 cm. We cut off unnecessary tissue by 0.3 cm so that it does not give unnecessary thickening after eversion.

Next, you need to fold the collar in half and in the middle, cut a small piece of fabric at an angle on the cut line. This is necessary in order to precisely match the details of the collar along this mark. By the way, on the details of the collar and the details of the back we do the same.


The collar is twisted, ironed. We lay the finishing line on the front, as shown in the photo below.

Add collar details like in the photo below. The only difference is that on the lower side of the collar you need to put the second part of the rack with the front side to the front collar. You will get something like a “sandwich”. We sweep away. Lay a line at 0.5 cm from the cut. Cut off the excess fabric 0.3 cm from the line of stitching.

Ironing. We turn it out and iron again. The collar is ready!

Back and shelf.
Getting to the details of the back and shelves. We sweep the shoulder sections, try on, and adjust if necessary. Now, you need to check how much the neckline length matches the collar length. Dock the middle of the rack and the middle of the backrest and bite the collar to the neck.
Finishing work with shoulder sections. We carry out a seam seam. Lay a line 1 cm from the slices. We cut one of the allowances by 0.5 cm, then the one that we iron longer by 0.2 cm and cover it with a shorter allowance, sweep and lay the line.

Now, you can finally sweep the collar into the neck. The sequence of actions is this: apply the lower part of the collar with the front side to the front side of the back. We sweep away. Lay a line at 0.5 cm from the cut. And then, you need all the sleight of hand that you can only do :).
Inside the collar, close the slice. It will be easier to lay the connecting stitch from the inside of the shirt dress. It will be 0.1-0.2 cm from the edge, but from the front you need to get directly into the joint of the collar and the details of the shelf and back. How did I achieve this? A little trick :).

We spread the upper part of the dress on a flat surface and stick pins directly into the seam every 4-5 cm from the front side perpendicular to the surface. They will allow you to see if the seam has closed on the inside of the collar and figure out where to sew the stitch. At the same time, from the wrong side, adjust the edge of the hem. And then, focusing on the pins, make a basting with contrasting threads or outline the line of the line with tailor's chalk. This is actually easier than it sounds. You will succeed:).


Pocket.
To place the pocket, I chose the left side of the shirt dress. We iron 3 allowances of 0.5 cm and the upper allowance of 2.5 cm, and then glue it on the underside of the pocket with a doublet strip. We take it. And then, 0.2 cm from the edge, we lay the finishing line on three sides of the pocket.


Sleeves.
Due to the fact that the dress-shirt line of the shoulder seam is shifted forward, first you need to clarify how many centimeters from the center line of the shoulder it is shifted. Just lay the shirt down on a flat surface in the way that it would look in final condition. Mark the resulting fold, which is visible from the front. You can make a small incision. Now fold the sleeve in half and also mark the place of the fold. Join the cuts by applying the sleeve detail with the front side to the front side of the sleeve armhole as shown in the photo below.


Buttons and loops.
We start with the loops that will be located on the right shelf shirt dresses. Usually on shirts and blouses, it is customary to place one button on the stand of the collar. I decided not to do this, because in the summer, I’m unlikely to fasten on the top button dress shirt. From the connecting seam of the collar with the main parts of the product, we retreat 6 cm and mark the place of the first buttonhole with a button. All subsequent loops I placed every 7 cm. There are 8 of them.


Well and, of course, we sew buttons.
Side seams.
I simplified the processing of the side seams. So, sweep the side seams and lay the line. And then we need a slanting inlay. I think there is no need for additional explanations here.


Bottom of the product.
Hem shirt dresses I also processed oblique inlay. We close the open section with an oblique inlay and bend the edge of the dress inward to the width of the inlay. Then from the top edge of 0.2 cm we lay a line along the bottom of the product.


Voila, your new thing is ready! Congratulations!
P.S. How successful do you think my first experience in tailoring a shirt dress? We meet, as always, in the comments 😉
P.P.S. Subscribe to blog updates, join our groups in

Modeling a back part
(2). We begin modeling backrest details by constructing a coquette pattern.
In the midline of the back from the neckline, lower down 8-12 cmdraw a horizontal line to the left.

(3). Further from the blue line along the armhole line we postpone 1 -1.5 cm, draw a new rounded line to the intersection with the line of the middle of the back. 
(4). Now we determine the length of the future dress-shirt. We have it just above the knee, about 10 cm.
(5). On the side seam and on the bottom line, we postpone along 8-10 cm and connect the resulting points on the pattern. 
(6). We get just such a pattern of the backrest and coquette detail. 
Simulation of the front part
(7). We begin modeling the front of the pattern by translating the chest tuck into the side seam (see the article “Translation of tucks”). 
Building a pattern for a fastener
(eight). From the line of the middle of the front, lay to the right half the width of the bar. 
(nine). To the left of the midline line we also set aside half the width of the bar. 
(ten). The plank is a double part or single with a fold.
Next, we determine the bottom line dresses - shirts, it is similar to the bottom line on the back part. 
(eleven). Thus, we get just such a pattern of the front of the dress. 
Sleeve
(12). We construct the sleeve in the same way as described in the article “Pattern of a two-seam sleeve” .http: //www.redcafe.ru/pairstitch-sleeve-pattern 
Collar
(13). We build the collar in the same way as described in the article “Pattern of collars for a woman’s shirt” in the method of constructing a pattern of a collar with a cutting stand. It has the following form. 
Shoulder Stitches
(fourteen). On the shoulders of the shirt dress are the so-called “stitches”. To build them, draw a rectangle with sides equal to the length of the stitch and its width. 
(15) .Section AB- the length of the pat is equal to Dpl. Section AA1- pat width equal 4 cm.
Divide the segment AA1 and BB1 in half, put the dots WITH and C1. We connect them together. 
(16). From T.A and t.A1 put off to the right 2.0 cmput the points TOand K1. Connect them with t.S. The stitch pattern is ready.
Stitches on the sleeves
The stitches on the sleeves are constructed similarly to the stalemate on the shoulders. The only change is the length of the stitch. She makes up 20-25 cm.
Pat mounted on the inside of the sleeve just above the elbow 10-15 cm, so that when the sleeve is turned up to the elbow, it can be fixed to a button on the front side of the product.
Belt
(17). A belt is a rectangle with sides equal to the width of the belt and the length of the belt. The width of the belt is 4 cmlength 180-200 cm.

(18). Now we make out the ends of the belt. A plaque for the belt will be attached on one side, and a corner on the other. 
(19). Here we get such a belt. Do not forget to cut it double! 
Side inserts
(20). Triangles with sides are inserted on the sides on both sides at the bottom of the cutout 6-8 cm.
Chest pockets
(21). Chest pockets are squares with sides 14x14cm.
(22). Pocket valve is at a distance 2 cmfrom the main part of the pocket and is a rectangle 14x5cm with rounded ends. 
(23). Thus, we have finished modeling the shirt dress! 
Whether you are going on a trip or to work, a stylish and comfortable dress shirt everywhere will come in handy. Want shorter sleeves? Just tuck them!

Go to the jungle of the big city! There you will appear in a dress with short sleeves and patch pockets in the best possible light. Numerous stitches and denim stitching are details that are characteristic of a safari style. 
Dress shirt - clothes that no modern fashionista can do without. Whatever the girl does, no matter how old she is, but with such a dress, she will always look light and airy.
Are you going to the sea? Want to take a break from the bustle of the city in the country? The office is stuffy and you do not know what to go to work? Then a dress shirt made of natural materials that are pleasant to the body - this is just what you need. It does not stick to the body and does not cause irritation. It is easy, free and comfortable. Even on the hottest day, in such clothes nothing can ruin your mood.
"Nothing is more beautiful for a woman than a man’s shirt." This is known to all. But now a girl can look beautiful and attractive not only at home, but also at work. To do this, she does not need to put on her husband’s shirt. After all, there are things that, thanks to the female ingenuity and resourcefulness, were able to borrow in the men's wardrobe. But at the same time, fashion designers introduced a primordially female soul into this thing. Moreover, the shirt dress goes well not only with jeans and dress pants, but also with full skirts. Although, they can be worn without anything. It all depends on the style and type of fabric that you prefer. Yes, there is something original about it. But a girl should always attract attention. So, this is not surprising.
1.
11.
Oh, this dress is a shirt! It is so amazing and unique. With it, you can come up with the most original and unpredictable images and combinations. You may not be a fan of glamor, you may not be accustomed to stand out from the crowd, but wearing such clothes, you certainly will not go unnoticed. All employees will pay attention to you, make a compliment and even envy the fact that you can afford to dress like this. Although, everyone can afford such an outfit, regardless of physique. Of course, on thin and slender girls dress shirt will look a little more attractive. But, choosing the right model, and the chubby girl will be able to adjust her figure, hide some of the flaws and feel welcome.
Each girl can make herself beautiful and desirable with the help of clothes.
Surprise your loved ones and be surprised yourself with your reincarnations and new images!
Dress-shirt - a thing is very simple, but very necessary and multifunctional. In another way it is also called a safari dress, however, in order for it to fully and completely correspond to the style of the safari, you need to sew it from materials of sand, beige or khaki flowers. In general, depending on the texture and color of the fabric, this product can become clothing for any occasion. Today I want to offer patterns of dress-shirts of the simplest style. Download patterns at the end of the article.
How to sew a shirt dress
What is required:
- 1.65 x 1.50 m of striped cotton
- 0.10 x 1.50 m of white cotton cloth,
- 13 buttons
- Lightweight adhesive cushioning material.
Cut
Cut out of striped material:
- Front - 2 details (allowance on the bottom, with the exception of the section of the curly slots, should be 4 cm)
- Front clasp fastener - 1 item
- Back - 1 item (the fold runs in the middle, allowances at the bottom and at the edges of the slot should be 4 cm)
- Flirty back - 1 item with a bend in the midline
- Collar - 2 details with fold
- Stand Collar - 2 details with fold
- Sleeve - 2 details
- Grinding curly slots in front - 2 details (copy from part 1)
- 2 rectangle 12 x 17 cm plus allowances (for patch front pocket)
- 2 rectangle 8 x 24 cm plus allowances (for cuffs)
- 2 inlay 2 x 16 cm plus allowances
(for fringing the sleeve fastener) Cut out from white material:
- Cut part 2 along line D-E and cut it out 1 time (clasp strap on the left side of the front)
- Two rectangles 4 x 20 cm plus allowances (for pat sleeves)
Sewing shirt dresses
Duplicate the fastener strips, the cuffs half wide, the stitches of the sleeves also up to half wide and one piece of the collar and the collar stand each with adhesive material.

Handle breast tucks.
Handle patch pockets at the front.
Fold and sweep the creases along the upper cut of the back. Sew the yoke back to the upper cut, iron the seam on the yoke and sew on the hem.
Work the bottom of the back and the edges of the slot with a seam to hem with a closed cut, cut off the side allowances. sections at the end of the slot.
Treat the curly front splines: iron the cross sections of the inside out. Place the edge on the faces. side of the front by marking down faces. side and grind the curly front slit, laying a line along the seam line. Trim the seam to 5 mm, cut the allowances at regular intervals in the curly section. Notch the seam allowance at the end of the sewing line at the side. lines. Bend the inside out, straighten the edge you have finished. Iron the inner cut of the inside out and grind the fold, while at the same time building up the open section of the bottom before sewing the hem with the closed cut.
Work on the right side of the secret fastener and the stitch on the left side of the fastener.
Process the shoulder and then the side seams of the shirt dress. Cross-tighten at the upper ends of the slot.

Process the stitches of the sleeves: bend the part with the front side inward and cut one end of the stitch in the form of an angle. Grind the longitudinal and one transverse (in the form of an angle) sections of the stitch. Cut the seam to 5 mm, turn the part on the faces. side, straighten the edges, fold open across. cuts inward and sweep the folds. Sew the stitch along the perimeter of the stitch, stitching the noticeable folds. Sew a loop at the curly end of the stitch.
The next step is to sew stitches on the wrong side of the sleeves. Sew a button on the front side of the sleeve at the point where the stitch is sewn.
Now process the longitudinal seams of the sleeves.
Proceed to the processing of sleeves with cuffs and fasteners: fasten on each sleeve: cut the sleeve along the intended line and process them with a piping seam (you can stitch the fastener sections inside out). If necessary according to the model, pick up the sleeves in the lower sections or lay the folds in the lower sections of the sleeves. Fold each cuff with its face inward and grind the ends (or according to the model: fold the details of each cuff of the faces. Side inward and grind the bottom side and ends); twist, straighten seams, corners; iron The outer sides of the cuffs are sewn to the cuts of the sleeves, fold the slices of the inner sides of the cuffs inward and sew in the stitching seams, iron.
Sew sleeves into the armholes.
Work on the turn-down collar with a cut-off stand (shirt type).
Stitch the loops at the right end of the collar (on the strap, the loops are sewn during processing), at the ends of the cuffs. Sew buttons according to the buttonhole.
Stitch loops on the side seams of the product at the level of the waist line for the woven strap.
According to the magazinePatrones 11-2016
Download dress-shirt patterns ⇓:
Patterns are made in the RedCafe program, I wrote more about how to work with it in. Print the pattern at a scale of 100%.
01:04 Unknown 4 Comments
Hello!
In this article, I offer a workshop on sewing denim shirt-dresses.
In denim clothes, parts are often connected with a seam and sewn in contrasting color with decorative stitches, this is the peculiarity of sewing denim products.
So, as you already guessed, for tailoring the dress we need denim material, the consumption of which will be from 1.5 m.

In addition, we will need: duplicate material (non-woven), buttons, matching threads and threads of two contrasting colors (for finishing stitches and for handicrafts) and working tools.

For work, we need shirt dress pattern which we modeled from the basic design of the shirt,


and patch patch with flap .

Cut fabric. Prepare the fabric for cutting and draw decathing , not forgetting that denim refers to cotton fabrics.
Fold the fabric in two layers with the face inward, equalizing the edges of the fabric. We impose paper patterns; we will attach only the back part, the back yoke and the collar details to the fabric fold. Fractional thread should run along all parts. The layout of paper patterns on the fabric looks like this:


We circle parts with allowances of 1.5 cm across all sections, and along the bottom line of the back and shelf parts, the allowance will be 4 cm
From the remaining material we cut out the details of pockets and cuffs for sleeves with allowances of 1 cm.

We also cut out the details of the strap for processing the fastener of the sleeve cut.

Using contrasting threads, we transfer control points or completely transfer the contours of parts with copy lines to the second layer of fabric.

On the allowances of parts cut from the fold of fabric, we mark the midline line with serifs.
In the end, we should be able to:
backrest - 1 part
backrest barrel - 2 parts
side shelves - 2 parts
yoke on the back - 1 piece
yoke on a shelf - 2 parts

sleeves - 2 parts
cuff - 2 parts

sleeve for processing a section of a sleeve fastener - 2 parts

detachable part of the collar - 2 parts
stand collar - 2 parts

pocket - 2 parts
pocket valve - 4 parts.

Getting to sewing the product.
Back processing. We will connect the details of the back in relief sections seam any of the three methods described in this article (I chose the third method). According to the technology, allowances for seams are ironed to the middle of the product, which means that we will iron allowances for the side parts of the back to the back. Therefore, the muzzle of the back barrel along the relief cut will be tucked to the front side by 5 mm and notice.

We sweep the back and side part along the embossed seam, folding the parts with the front side inward.

We start the details

and iron the seam on both sides.

We cut back allowances to 5 mm and iron allowances for the back part.

On the front side, on the back part, we will lay two finishing lines with threads of contrasting color, we will lay the first line, departing 1 mm from the seam cleavage,

we will lay the next line parallel to the first one at a distance of 7-8 mm, or from the wrong side along the bend of the allowance, departing 1 mm from the bend.

Be sure to iron the seams.

We connect the second side part with the back part in exactly the same way.
Shelf processing. We also connect the details of the shelf with a seam, ironing the relief allowances on the side of the shelf.

Now necessary handle patch pockets and stitch them on the details of the shelf. (Initially, my patch pockets were located from the yoke line, but as it turned out, the pockets were too high, so in the next I redid the pockets and placed them just below the yoke line. In the article on modeling the shirt pattern, I wrote that it is necessary to lower the yoke line to position patch pockets from this line)
Processing flirty shelves. Parts of the coquette are connected with the details of the shelf with a seam. According to the technology, the allowances are ironed up, that is, to the yoke, so we will bend the allowances on the details of the shelf. Bend and sweep the upper cut allowances on the front side by 5mm.

We impose the front side of the coquette part to the front side of the shelf, sweep the parts along the seam line of the coquette.

We sew parts and iron the seam on both sides.

The yoke allowances are cut by 5 mm and iron on the yoke side.
On the front side we will lay two finishing stitches with contrasting threads

and spend the WTO. That's what we have to get

We connect the second part of the coquette to the shelf in the same way.
Processing the yoke back. Coquette seam allowances are ironed on the side of the coquette, the coquette itself is connected to the back part with a seam, equalizing the midpoints of the parts.


For details of the sleeves, we process the section of the fastener

and connect the sleeves to the product again with a seam

(a workshop on the processing of sleeveless shirts you can see in this article)
Side cut processing. One of the peculiarities of shirt dress is that the side sections of the shelves, backs and sleeves are sewn together with one seam.

Oversizes are ironed and ironed on the side of the shelf. It is possible to process the seam only on the shelf and back, and cut the sleeves to grind and iron on the side of the shelf, or completely fill the entire side line with the seam, the only drawback of this method is the inaccessibility of processing on the sleeve. I chose the third option and completely connected the product along the side sections with a seam.

Then we process the lower sections of the sleeves with cuffs.


We duplicate every detail of the bar, duplicating parts should be without allowances.

On the underside of the shelf, to the front cut, we put the detail of the strip with the front side inwards and we take the strip to the shelf.

We sharpen the bar, while at the bottom line we leave a small section (3-4 cm) unstacked.

Iron the seam on both sides, and then iron the allowances on the side of the shelf.

We lay out the product on the surface with the wrong side up so that the plank and the shelf are on opposite sides of the stitching seam (allowances should lie on the side of the shelf). And we will make the sewing on the side of the shelf on the wrong side, retreating from the cleavage of the seam 1mm.

Thanks to the stitching line, we can not sweep the stitching seam and easily turn the bar on the front side of the product.
Iron seam

then unscrew the bar on the front side and iron it.

As a result, without a sewing out the seam, we got a small edging from the part of the bar and as a result, the connecting seam will not be visible from the front side.

Tuck the plank allowances on the wrong side and sweep, and then we take the plank to the shelf.

Stitch the bar with threads of contrasting color, departing from a 1mm bend. It is also necessary to lay the finishing stitch along the front cut, departing from the edge of the fabric 1mm (from the bottom, our bar is not stitched, so we will not lay decorative stitches in this section). The second part of the bar is processed in the same way. As a result, this is what we got.


Now we turn to the processing of the collar and the processing of the neck of the product (detailed master class in this article).

Buttonhole processing. First of all, we must remember that women's clothing is fastened on the left side, that is, the buttons should be located on the left side of the shelf (if you look at the product, the left shelf will be on the right hand), respectively, button loops should be located on the right side. Both the loops and buttons are located along the lines of the middle of the shelf, that is, along the middle of the planks. Draw on both parts the trims of the midline, extending the lines to the stand of the collar. On the right side of the shelf, note the position of the loops:
- the first button should be 1-1.5 cm below the neckline of the collar (neckline)
- the buttons should be on the lines of the chest, waist and hips +/- 1-1.5cm
- the location of the buttons from each other at a distance of 10-13 cm, depending on the diameter of the buttons and model of the product.
On the strap, the loops are located vertically, on the collar fastener - horizontally.
The size of the loops is equal to the diameter of the button plus 3-5mm.
In addition, in the model of our dress, the buttons are located on the flaps of pockets and on the cuffs of the sleeves. On the valves, the position of the loops is vertically along the line of the middle of the part at a level of 2-3 cm from the lower cut of the valve. On the cuffs of the sleeves, the loops are positioned horizontally along the midline, 1-2 cm from the side cut of the cuff.
Having noted the location of the loops, we sew the loops with threads of contrasting color.

After we lay out our dress on the surface with the shelf up and pin pins off the details of the bar, overlaying the right part on the left side, the lines of the middle of the bars should completely coincide. Now through the holes of the loops, note the position of the buttons, which should be located exactly in the center of the loop. And sew buttons manually.
We carry out the final wet-heat treatment and our shirt dress is ready!


 Constructing a dress base pattern and design modeling
 Patterns of children's trousers and sewing master classes Building the back half of trousers
 Building a pattern of vests for boys: the easiest way