How to sew a simple plush toy with your own hands. DIY soft toys
Useful tips
This is a soft toy good gift child, and if you make such a toy with your own hands, the joy and satisfaction will be many times greater.
Follow the tips, use your imagination and come up with your own soft toys that will delight you and your children.
DIY soft toys. Matryoshka.

This doll is very easy to sew, so it has become popular among those who like to make soft toy with your own hands. An experienced craftsman can make a tilde doll in less than an hour. You can involve children in the process - they will definitely be interested.
1. You can use tilde fabric to get a more colorful effect. But if you haven’t found a similar fabric, then two pieces of cotton of different colors, thick calico or satin will help you.
2. Sew one piece of cotton to another and iron it.
3. You can use a printer to print the pattern or draw it yourself to the desired size.


* In this example, the matryoshka doll pattern is shown for three sizes, namely large, medium and small.
5. Now you need to sew the fabric along the pre-drawn outline. In this case, you need to leave a hole at the bottom. All that remains is to cut and turn.


6. Prepare white cotton fabric to draw your doll's face on it. Now cut it out and glue it to the matryoshka on the web.
7. Using acrylic paints and a thin brush, you should paint the portrait, and after the paints have dried, sew the doll’s face along the contour to the main part, using a decorative stitch.


* If you sew this doll correctly, it will be able to stand on its own. Pay attention to the pictures to understand how to stitch and fold the bottom corners inward, thereby creating a stable rectangle for both toys.


How to sew soft toys with your own hands. Photo lessons.
Baby

As in the previous example, this doll can be sewn with your own hands quite quickly. Despite the fact that the soft toy is immediately dressed, you can come up with separate clothes for it so that you can change it.

It is advisable to use soft but durable fabrics. In this example, the toy is sewn using American flannel and knitwear. The height of the “Kid” is 27 cm. The arms and legs were attached using button fastenings.
Snake

The pattern of this toy is not at all complicated, and if you pay attention to the images, you can see how the toy was cut in a spiral and sewn using an external decorative seam.
The view from the back is beautiful and simple.

It is advisable to use bright fleece or felt. Next, you can decorate the soft toy with multi-colored circles, flowers, etc.


Elephant

In this photo tutorial you can learn how to sew an elephant from a sock. For this soft toy you will need 2 pairs of warm socks.


Sunny is a little animal

The name of the toy may sound a little strange, but there is no denying that the product itself is very cute and children will really enjoy making and playing with it.


DIY soft toys (video)
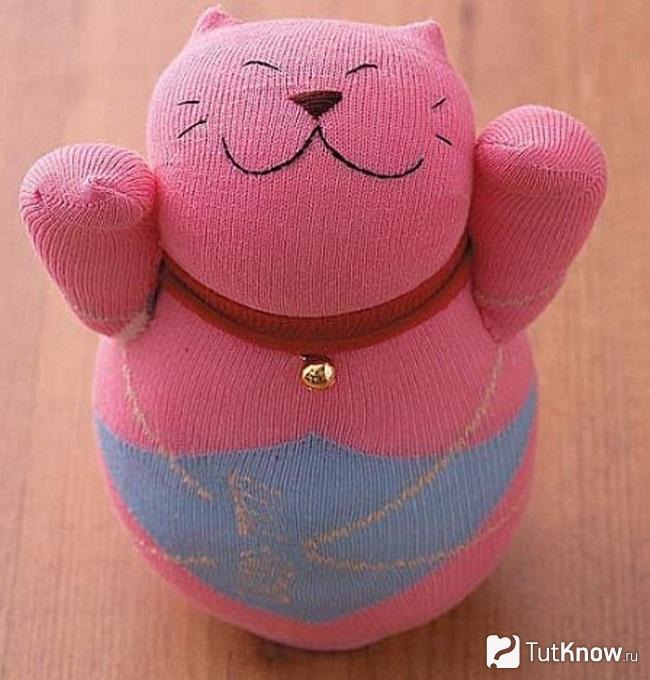
Make a soft toy with your own hands. Kitty.

Such a bright, soft cat can be used not only as a toy, but also as a pillow.
1. Prepare a special tildo fabric, or thick cotton that does not fade or shrink after washing.

The main part of this toy is easy to sew - just trace along the pattern, stitch along the outline and cut with zigzag scissors so that the fabric does not wrinkle when you turn it inside out.
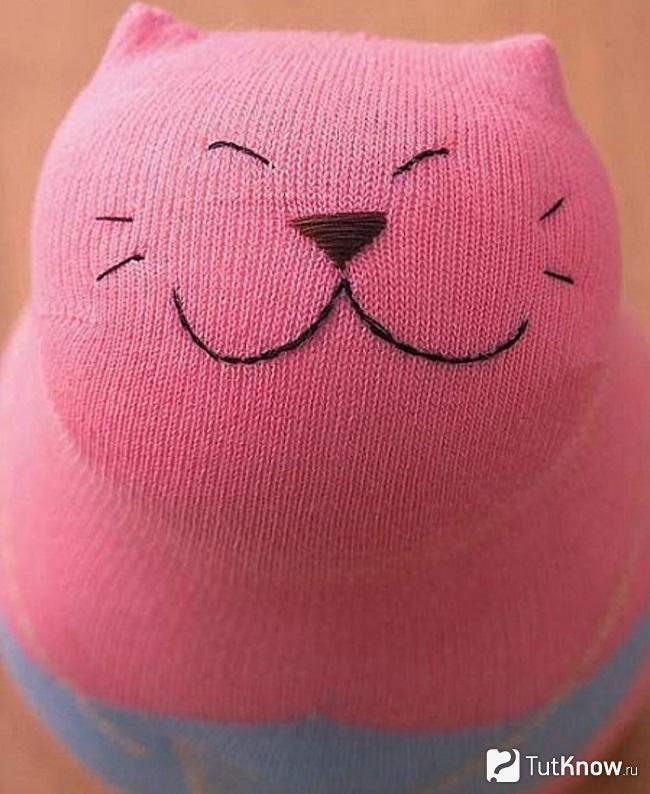
2. Making a muzzle

2.1 Take a close look at the image to see where you need to fill with filler. Next you need to sew and decorate.
2.2 Cut out an oval to make the face. Embroider the muzzle with threads and then make petals for the face, which then need to be turned out and sewn along the contour of the oval - this must be done from the inside.
2.3 The entire structure prepared in step 3 must be sewn from the main part of the toy cat.
3. Making a flower


3.1 First you need to cut out the petals for the flower.
3.2 The cut petals need to be rolled up, turned out, and a fold made at the base. After that, simply sew them together.
3.3 You need to attach a fabric-covered button to the middle and decorate the cat’s head (see picture).
* To make the ears more voluminous, you can use thin synthetic padding.
This is how it should work out for you
This is a tilde pattern

This is the other half of the toy cat

How to sew a soft toy with your own hands. Bear is a midget.

Unlike previous soft toys, this bear is not entirely easy to make, but the result will pleasantly surprise you.
To make this toy you will need knitting needles No. 2.5 and 100% acrylic threads (100g - 230 meters).
1. Prepare a thread in the color of the toy dress (in this example, the color is red) and start casting on 20 loops. It is worth noting that the first stitch of a row should always be removed, and the last stitch should be knitted purlwise, while knitting tightly.


Structure:
Rows 1 and 2 - knit all - thread color: red
Row 3 - purl all, start introducing white thread and alternating colors: red loop - white loop.
Row 4 - knit all - thread color: red.
The next 6 rows need to be knitted in stockinette stitch.
Row 1 - purl all - thread color: beige
Knit the next 8 rows with beige thread (the wrong side - with purl loops, and the front side - with knit stitches).
2. Now all the loops need to be collected on an auxiliary thread. At the same time, pass another auxiliary thread where the red and beige threads meet (from the wrong side - see image).

3. The face should be embroidered with dark thread. Prepare the fabric for the backing and cut a circle of small diameter from it.
4. Prepare the ribbon on which you want to hang your toy. Tie a knot at the bottom of the ribbon and secure it to the toy. Next you need to tighten the upper auxiliary thread.

5. Making bear ears. First you need to cast on 3 loops. Knit once and bind off the stitches.
6. Attach the ears to the toy’s head. Use a needle and thread to tie a knot inside the toy.
* To make the neck, thread and pull the thread between the bear's head and his dress.
7. We make the arms and legs of the bear in the form of a cord. First, cast on 4 loops using two knitting needles, and then knit 6 rows in a circle.
* For those who don’t know how to knit in the round, watch the video tutorial below.
8. At the end, the loops need to be gathered onto one thread, namely the one you knitted with. Next, using a needle, pass through the limb to the first thread, thereby the two threads will be side by side. You need to make 4 similar blanks.
* If you want to make the handles more neat, try threading them tightly into the body and tying the threads together in a tight knot.
9. All that remains is to fill the head and body of the bear with stuffing, and sew along the back seam. The handles need to be attached to the dress and a knot should be made inside the toy, and the legs, along with the hem of the dress, need to be sewn at the bottom.
DIY soft toys. Flying cat.

A cat like this can be easily sewn and painted at home, using only a small amount of materials.
Prepare a piece of plain light-colored fabric (its size depends on the size of the toy).
1. The picture shows a pattern. You need to make a tail, a paw, half a muzzle, and a torso.


2. Using a simple pencil, trace all the details on the fabric, placing them on the fabric in advance. Small parts can be sewn directly on the main piece and then cut out. You will need: 2 legs, 1 tail, a back with a head, a belly without a head and the face of a future plush cat.
3. Sew the toy’s face in the middle and cut it out.
4. Sew the tail and legs, being sure to leave a small hole where you need to make a straight seam. Next, cut out the back and belly.
It’s easy to create original toys from socks and leftover fabric. See how to sew a pillow toy, Basik the cat, and make a development board.
Original DIY toys made from socks

Delight your children by making these dolls for them. To do this you will need a little, namely:
- socks;
- threads with a needle;
- scraps of light plain yarn;
- filler;
- narrow braid;
- dark colored beads;
- scissors.
Make these original toys Even those who do not know how to use a sewing machine can do it. Only possession of a needle will be useful.
- Cut the sock in half. One part is the foot. The second is the heel with an elastic band. You only need the first one. Fill it with filler, but not very tightly. Sew with a needle on the right and left to mark the sides. You also need to make legs by stitching at the bottom in the middle. Sew up the top hole through which the body for the baby doll was stuffed.
- Cut a small circle out of light fabric, gather it on a thread, tighten it a little, and stuff it with filler. Then you need to tighten the thread more tightly and secure it. Do not cut yet, but sew the resulting head to the body using the same thread.
- Sew beads instead of eyes. You can apply blush on your cheeks to make them brighter. Tie the junction of the head with the body with braid.
- Take the second part of the sock, cut off the heel, it will not be needed. You only need the top part - with an elastic band. Fold it in at the cut and sew along the edge on the arms. Put the cap on the doll’s head, sew it at the top so that you get a “tail” at the end.
To make such an adorable cat, you will need:
- 2 socks;
- threads;
- needle;
- scissors;
- padding polyester;
- Marker is better water soluble.

Sew the hole in a straight line to create two ears.

Using a marker, draw the facial features of the original toy.
If the marker is too bright or not water-soluble, then it is better to use a simple pencil.

Now you need to embroider according to these marks, taking a thread of the appropriate color.
In order for such original cat toys to acquire front paws, you need to make them from a second sock. To do this, first cut it in half crosswise, and then as in the photo.

Now these paws need to be sewn up, stuffed with padding polyester, and sewn to the body of the toy.

This is such a wonderful animal. If you like him, make him a friend.
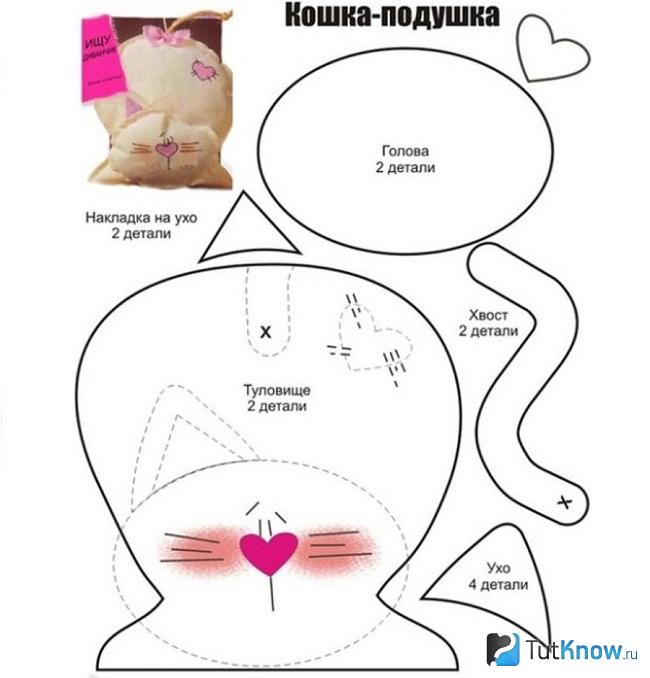
DIY soft toy cat

This character is very similar to the cartoon character. The pattern clearly shows how such a soft cat toy is made. It will require:
- soft dense fabric beige and dark Brown;
- filler;
- threads;
- eyes for toys.
- Cut out two parts of the abdomen and stitch them in the center. Two side pieces need to be sewn on the back. You have 2 parts. Sew them together in the area of the paws, tail, and sides.
- Using the appropriate parts, create the kitten's head. Cut out his muzzle from a dark cloth and sew it onto the character’s face. Fill your head with filler through the bottom. Place it around the kitten's neck and sew it with a hidden seam on the arms.
- Each ear consists of two parts - brown and beige fabric. These triangles are sewn in pairs and turned inside out through the as yet unsewn bottom. Then the ears need to be sewn to the head, making a fold on them.
- All that remains is to sew on the eyes, embroider mustaches, eyelashes, mouth and nose with light threads, and the soft toy, which is so interesting to create with your own hands, is ready.

How to sew an original pillow toy?
Kids love these items very much. They first play with these soft toys, then when they get tired, they use them as cozy pillows.
Before sewing a pillow toy, prepare:
- fabric that is pleasant to the touch;
- filler;
- scissors;
- pink fabric for decoration.
- 2 pcs. for the head;
- 4 - for the ear;
- 2 - for the body;
- 2 - for 2 tails;
- 2 - for ear pad.
Stuff the body and tail with stuffing. Sew the tail to the body, where the markings are. Stitch the head, after filling it with a small amount of filler. Attach the pad to the ear with pins, stitch it, tucking the edges. Design the second ear in the same way.
From pink fabric, cut out a nose, a heart, and decorations for the tail. Sew them on too. It turned out to be a wonderful product. If you want to know how to sew a pillow toy so that it looks like a funny teddy bear, then watch another master class.

For this you will need:
- beige and white fabric;
- a piece of black leather;
- filler;
- threads;
- needle;
- scissors.

As you can see, they are oval, straight on the bottom. Sew the pieces in pairs. Sew a light face and a black nose onto the front of the bear. To make it, cut a small circle out of leather, gather it on a thread, and stuff it with filler. Sew toys onto your face.

Now fold the front and back right sides together, placing the sewn tabs between them. Sew along the edge, leaving a gap. Turn the workpiece out through it. Fill it with filler and sew up the hole.
You can make such original toys from leftover fabric. If there is a solid color, you will get the muzzle of a dog and a cat, and if you have a colored one, you will get their bodies.

The following pattern will help you sew a toy pillow in the shape of an owl. It is created from the main fabric, and from colored fabric - a beautiful bird skirt.

If you want your child to like the toy even more, then sew small owls too. Sew a wide strip of fabric onto the owl's belly and stitch it vertically to create pockets. Place the owls in them. To keep them well, cover them with the wings of the mother bird. Button them up.

Pompom toys
They turn out warm and cozy.
To make them you will need:
- cardboard;
- pencil;
- round templates with a diameter of 2.5–7 cm;
- multi-colored yarn;
- sharp scissors;
- felt;
- glue gun

Using the lids, draw circles. Place coins of a smaller diameter in the center and outline them. Cut out the resulting cardboard rings. Make a cutout on the side of each.

Combine two pieces of cardboard of the same size. Wind the yarn tightly around them. Separate the cardboard. Cutting the yarn in the center, insert the thread in the middle, tighten it, and tie it.

For each animal you need to make two pompoms different sizes. The smaller one will become the head, the larger one will become the body.

Connect these elements by tying them with threads. Cut out ears, eyes, nose for a charming animal, attach them with a glue gun.

The sheep is made from white threads, the eyes are cut out from black fabric, the nose from pink, the ears from white.

Create a chicken using yellow pompoms.

These are the original toys you can make with your own hands.

If you have kids at home, make useful things for them from leftover materials.
Original DIY educational toys

Soft books are an indispensable thing for a baby. It is interesting to make such developmental aids with your own hands, thereby saving considerable money. To make such educational toys, you will need:
- textile;
- threads;
- scissors;
- sheet filler;
- finishing elements.
If you don't have sewing machine, sew each sheet with a basting stitch on your hands, making long stitches.
Do the same for the rest of the pages. Everyone should teach their child something. You can sew a sneaker onto one and attach a lace to it so that the child can practice tying it.
Let the girl learn how to braid her hair. To do this, sew three ribbons onto the top of the page.
It is useful for a child to become familiar with watches. Cut a circle out of light thick fabric and sew numbers to it. Cut out the clock hands from dark canvas. Secure them in the center of the dial.
To help your child learn geometry from an early age, cut out various shapes from scraps and sew them onto a book. The same pairs need to be created from fabric and Velcro attached to them. The baby will look for paired figures and compare them.
You don’t have to sew the book, but attach it to a thick drape geometric figures, let the child find pairs for them.

If you have cardboard boxes, use them to make a whole car complex for the boy, which will include:
- washing;
- gas station;
- garage;
- riser.

Cars can be made from the same material. You will make them from wood and plywood.

DIY educational board

You won't get bored with this toy! After all, there are so many interesting things here, you can scroll through the telephone dial, learn how to lock and open a real lock. Now you don’t need to click the door chain or the latch, since it will all be on the board. An abacus will help your child learn to count, and scales will help your child learn to weigh objects.
To make such “smart” original toys with your own hands, you will need:
- door lock, latch, chain, handle;
- abacus;
- scales;
- switch;
- buttons;
- textile;
- elastic bands;
- switch;
- glue gun;
- colored cardboard;
- self-tapping screws;
- MDF sheet;
- sneakers, etc.
- Lay out the items on the prepared board. See how to position the lock so that it closes well. The same applies to the latch and door chain.
- Screw one half of the lock to one plank with self-tapping screws, and the other and the door handle to the second. In the same way, attach these boards to the MDF.
- To keep the abacus in working condition, you can rattle it with “knuckles”; attach only the frame to the board.
- Glue scales, key holder, and other items using hot gun silicone rods. Cut out the base of the phone from cardboard, glue it to the board, and secure the dial in the center.
- Cut from fabric little dress, sew buttons and elastic to it in the form of loops. Let your child learn to unbutton and button clothes.
You can use various items that you have at home to decorate your development board.
Original toy - cat Basik
This toy is loved by both children and adults. The cute cat is made from a material that is pleasant to the touch.

If you want to quickly create such an original toy, then use a simple pattern.

At the bottom of the back and tummy you need to make an undercut, then these parts will become more voluminous.
On the Basik pattern, the undercut locations are indicated by triangles. You just need to match the opposite sides of each shape and stitch on the wrong side.
- The muzzle consists of two identical parts, cut in a mirror image. They need to be connected by stitching in the center.
- For each paw you need to cut out 2 pieces. In total, you will need 4 parts for the hind legs and the same number for the front legs.
- Sew the paired pieces on the wrong side, leaving the top unsewn. Turn the paws inside out and fill them with filler. Sew the muzzle to the tummy.
- Here's how to sew Basik further. To assemble this original toy, place the front part on the back part, insert the front and back legs between them, placing them in place. Turn the toy inside out through the hole left at the bottom.
- Stuff the animal with a small amount of stuffing and sew up the hole in the arms.

Here are the paws and toes. Don't forget to sew a tail on the toy. It is given on the pattern.

Sew a fish from a piece of colored fabric and place it in Basik’s paws.

You can dress up the cat at your discretion; clothes for Basik are also not difficult to sew.

If this is a winter option, a hat with earflaps and a scarf will do. You will sew the first one from the remnants of fur, and knit a scarf from yarn.
Here are some original toys you can create with your own hands. Choose the ones you like and start crafting. And to simplify the process of creating new things and get ideas for inspiration, watch the selected videos.
This popular soft toy in the shape of a cute little gray bear is unlikely to leave anyone indifferent. Anyone who has once seen a Teddy Bear will certainly want such a cute plush pet to live in his home. Many people know the fairly high cost of such a toy, but this is not a reason to give up on the dream. We offer Alternative option– sew a teddy Teddy Bear with your own hands.
How to sew a teddy bear with your own hands?
In the master class we will show you how to sew a Teddy Bear with movable legs and head from plush fabric at home, without special fastenings and accessories. So, we need this:
- plush fabric gray:
- light brown or beige fleece;
- black large beads and a piece of faux light brown suede for the eyes;
- floss threads;
- synthetic filler;
- wooden thread spools;
- needle and thread.
Now we can start working.
DIY Teddy bears - master class
- First of all, we will build a Teddy Bear pattern, shown in detail in the picture.
- Now we cut out the Teddy Bear blank parts from the fabric, marking the seam allowances.
- Before sewing, trim the lint from the seam allowances. This will make our work much easier. Let's start sewing our bear from the palms.
- Next, we sew together the parts of the handle, sew the palm to the handle, leaving a small hole for filling with padding polyester. Turn it right side out.
- Now let's take care of the legs of our bear. Sew together the leg pieces, leaving the feet open and a small hole in the toes for turning and filling.
- Now we sew in the feet and turn the legs right side out.
- Next, we sew the two halves of the tummy together, leaving a neck hole. We do the same for the tail of the bear. Turn the parts of the toy right side out.
- Then let's take care of the bear's head. Fold the two parts and sew the chin line.
- Now let's sew the ears to the head. Before this, we sew their parts together without filling them with padding polyester.
- We continue to sew the head along the intended allowance.
- Turn the finished head right side out.
- Now we fill all the details of our bear with padding polyester. We pay special attention to the nose and legs so that the toy is stable.
- Then, using floss threads, we embroider the toes and palms of the Teddy Bear.
- We hide all the holes with a hidden seam.
- Now let’s take care of the little bear’s face. First of all, we will embroider a nose and mouth using floss threads. Then we will sew two black beads as eyes. Cut out two small pieces of faux suede.
- Now carefully lubricate the narrowed side of the eyelid with glue and very carefully, using a toothpick, tuck the flap behind the eye. Now the eyes have become more realistic, even as if alive.
- Next, let's work on the articulation of the bear's head. To do this, take a wooden spool and a small piece of plush fabric.
- We coat the coil with glue, paste it around with a piece of fabric, and also hem it for reliability. The result is a neck for a bear.
- Now, using the neck, we connect the head to the body: we cover the holes with a strong thread in a circle, insert the spool hinge and tighten it tightly. For reliability, we fix the structure with threads.
- We ended up with a rotating head.
- Now let's move on to the legs. We fasten them using the so-called rope connection: we take a thick and strong rope, thread it through one leg and the wrong side, that is, the side adjacent to the body, then we lead the rope through the body and hook the second leg. Then we return to the first leg in the same way and tightly tie the rope into a knot.
- Let's check the bear's stability - he should be able to stand on his own.
- We attach the handles to the body in the same way.
- And lastly, sew on the tail.
- Now we beautifully comb our finished Teddy Bear.
- And for beauty, we’ll tie a bow around our neck. If you wish, you can also dress the teddy bear by sewing him a shirt, trousers, etc.
- You can sew such a beautiful Teddy Bear with your own hands. You and your kids will definitely like it.


 |
 |


Many people wonder how to sew a bear with their own hands using patterns. Today we will try to sew a bear with our own hands. If you are new to sewing bears, then this simple Master Class may be of interest to you; I will not reveal anything new to experienced seamstresses. I just want to talk about the main stages of sewing.
What you need to sew a bear with your own hands:
Let's dwell on the fabric, which fabric is better for a beginning craftswoman?
Viscose, plush (cotton and artificial), mohair. I want to write a separate article a little later about the pros and cons of each of these fabrics. For beginners, you can sew a bear from felt or fleece. The most important thing is that the fabric is thick enough.
The height of this bear is 12 cm. I would like to warn beginners, do not immediately go after miniature. How smaller bear, the more difficult it will be to sew it. Practice first and sew a bear at least 15-20 centimeters.
Sewing a bear body
Sewing a bear is different in that each part of the body is sewn separately.
To begin, we will print out the pattern and cut out the details.
The picture is clickable, click on it to enlarge

The pattern indicates how many pieces of each part need to be cut. The arrows indicate the places that we do not sew up and leave for stuffing.
Cut out two parts of the bear's body

And sew the two halves together

Then we sew the neckline with a thick thread using a basting stitch. We stuff the body with padding polyester very tightly so that the body holds its shape well and tighten the thread. Fasten the thread well.

Interesting articles on this topic:
Tailoring a bear head
Let's proceed to the most important and difficult part of creating a bear - sewing the head. We cut out the details of the head, two halves of the head, the frontal part, a nose from a piece of brown felt and ears.
The nose can be made not of felt, but embroidered with brown floss threads.

First, we sew two parts of the head from the nose to the chin, and then we begin to sew in the frontal part, align it from the side of the nose and carefully, slowly sew on the side of the nose, the frontal part, and the occipital part on both sides.

Then we turn out our parts

We fill the head with padding polyester and tighten the hole. The head was formed.

Then we make the nose. Blindstitch a piece of dark brown felt to the space between the two side seams. Or you can embroider with black or brown threads.

Let's embroider the mouth. To do this, we use embroidery thread or wool. We embroider according to the pattern below. Please note that we start the thread and at the end bring it to the bottom of the muzzle.

Sew on the eyes. First you need to find a suitable place for them on the face. We attach the eyes, pin them with a needle, and look at the result. We check whether it turned out symmetrically, if so, then sew them on.

In order to sew on the eye bead without the knot being visible, we start the needle from the bottom of the head, where we will subsequently sew it on.

We put on the bead and pull it with force so that the bead forms an eye socket (we tighten it so that the muzzle is beautiful and alive). We bring the thread to the same place at the bottom of the head and fasten it.

We sew the second eye using the same technology.

Make the ears. We sew the inner and outer parts of the ear from the inside along an arc using a basting stitch. Turn it inside out.

Sew the ears to the head with a hidden seam

We sew on the ears with a slight C-shaped bend, forming the shell of the ear, so we will give a more natural look to the head.

The head is finished!

We cut out the arms and legs of the bear.


Sew the two parts of the bear's arms together, don't forget to leave a small hole for stuffing

We also sew the leg parts together, not forgetting to leave a small hole for stuffing toys. Sew in the foot details.

We turn the sewn arms and legs inside out, stuff them with padding polyester and sew the stuffing hole.

Assembly
First of all, we sew the head to the body with a hidden seam in a circle.

And then we sew the limbs to the body.

In order to sew on arms and legs, it is better to take a special needle for toys. It is much longer than usual.
The pattern for sewing the paws to the body is as shown in the diagram:

As you can see, we do not pierce the paw all the way through, but pierce the bear’s handle from the body side with a needle, then we pierce the bear’s body at the top, as shown in the photo, and pierce the second handle from the body side.

Through the second paw

Having sewn both paws together and pulling them towards the body, go back and for the strength of the structure, sew them several times, the distance between the seams should not be more than 3-4 mm, this will allow our paws to rotate.

Then we sew the legs to the body, bring the needle out and fasten the rest of the thread well.
It is better to take a thick, artificial thread for attaching the limbs, because the legs will spin and a less harsh thread will quickly fray.
The connection of the paws can also be done using buttons. Buttons are attached to the outside of the paws suitable size and sewn on. This will allow the bear to sit, raise its arms and make it more mobile.

How do you like the idea of sewing a bear with your own hands? Admit what fascinates you!

In this article I tried to dwell on the main points of sewing a bear. Of course, now manufacturers of toy accessories produce so many different spouts, hinges, eyes, etc. After taking a look at the sewing master class and decorating it with beautiful live eyes and a factory-made nose, you will make the bear even more beautiful!
Soft toys are loved by all genders and ages. They return adults to carefree childhood, and children become best friends and companions in fun games.
Therefore, we have prepared for you a selection of simple lessons from which you will learn how to sew a toy with your own hands. Homemade dogs, bunnies and bears carry a powerful charge of love and positive energy. This is also a wonderful and bright element of children’s room decor and a win-win gift option.
Does your child love soft toys? Please him with a cute teddy bear who will become his favorite friend and partner in mischievous fun.

To work you will need:
- soft fleece;
- pins;
- needle and thread;
- a piece of artificial leather for the nose;
- 2 black beads for pupils;
- filler.
Print out the teddy bear pattern or redraw it in the required size onto cardboard. Cut out the part templates.
Cut out 2 blanks from fleece for the body, 4 for the legs. Prepare circles for the eyes from white fleece, and a nose from leatherette.

Attach the eyes to the body and secure them with pins. Sew by hand or using a sewing machine.

Connect the paw blanks in pairs. Sew along the outline, leaving the bottom unstitched. Turn out the resulting blanks.

Align the body parts with right sides facing inward. At this stage, insert Mishutka’s paws between them. Secure the workpiece with pins.

Sew the toy, stepping back 0.5 cm from the edge. Leave a hole at the bottom for turning inside out. Turn the product right side out.

Fill with filler. Sew the bottom of the bear with a hidden seam.

It turns out to be a cute little animal. All that remains is to turn it into the declared bear. Embroider the outline of the mouth with black thread.

You can start making a large nose. Go along the edge of the circle using a needle-forward stitch. Tighten the thread and stuff the workpiece.

Sew the nose to the muzzle. Sew pupil beads to the eyes.

Our sweet little bear is ready. He will be happy to live in the children's room.

Using the same principle, it’s easy to make him a whole group of cheerful friends: a mischievous kitten, a big-eared hare and a surprised dog. You will receive a whole troupe of artists for your home puppet theater.

We invite you to download working patterns funny toys right now, without putting this matter off indefinitely.
Kitty:


Bunny:

Doggie:


Volumetric hippo
Are the shelves in the nursery already full of soft toys? Are there hippos among them? If not, you need to urgently correct the mistake. A cheerful and friendly hippopotamus really wants to visit you. Thanks to step by step lesson even a novice handicraft lover can make it.

To work you will need:
- thick cotton fabric in two colors;
- filler;
- eyes or black beads;
- 3 small buttons for nostrils and tail;
- a piece of ribbon.
Print or redraw the toy pattern. By printing it on A4 format, you will receive a pet measuring 22*15cm. The details are drawn without seam allowances.
Cut out the resulting patterns and cut out the parts of the future toy from the fabric. It is better to take a material for the body that is dense and elastic, so the toy will look more neat.
The belly and back of the hippopotamus can be cut from the same fabric or made different color. If you settled on a monochromatic option, cut out a solid piece. To do this, connect the two parts of the pattern in the muzzle area.

First of all, sew the ears and paws, connecting the parts with the right side inward. Sew the foot circles to the bottom of the paws.

Turn the pieces inside out and stuff the paws, leaving free space at the top for sewing.

If you took a fabric that is not very dense, glue a piece of non-woven fabric on the back side where the eyes should be.

If using two parts for the body, sew them along the muzzle.
Sweep side details to the body, starting to sew from the ear to the back. Then again from the ear to the bottom of the muzzle. By the way, at this stage do not forget sew in the ears and paws themselves.

Where the muzzle bends, the fabric needs to be gathered a little. It is better to secure it with a pin and then stitch it.

The result should be a piece with one unsewn seam at the back (where the butt is).

Machine or hand sew all seams except the opening at the bottom of the back. Turn the toy inside out.

On the muzzle, make cuts in place of the eyes and secure them. You can make do with beads or glue half beads.

Fill the toy with padding polyester.

Sew up the hole left earlier. Sew a loop of braid in place of the tail and a button on it.

Don't forget about the button nostrils. As you can see, making this cutie is not at all difficult.

Unusual pet self made is ready to move into your home. It will also be an excellent gift for loved ones. They will definitely appreciate your efforts and care.

Gray bear in a vest
Want to do sincere gift for a child and more? Sew a cute voluminous teddy bear. This textile toy is sure to become a favorite - children on a subconscious level feel the positive energy from things made with love by their mother’s hands.
Thanks to our step-by-step guide for beginners, you can sew a cool bear yourself.

To work you will need:
- gray linen fabric;
- needle, pins and thread;
- filler;
- embroidery threads;
- beads for eyes;
- scissors;
- pattern.
You can choose any size of giraffe legs. When cutting out parts, allow 0.5 cm for allowance.
Sew spots on the body, and those that go on both halves of the toy, cut in half and place symmetrically on both parts. When combining the halves of the body, common spots should be obtained.
Stitch the legs together, turn them inside out and stuff them, leaving some free space at the top. Baste the blanks to the wrong side of one of the halves of the body.
Baste the rope tail and sew the giraffe's body, placing the halves right sides together. Be sure to leave an opening at the neck for turning.
Make notches in the convex places of the toy and turn the workpiece inside out. When stuffing the toy, fill the neck as tightly as possible so that the giraffe holds its head proudly. Sew up the remaining hole.
Embroider the eyes and nostrils of the toy. The new pet is ready. Make it your own: add decorative elements, tie a bow, use an unexpected combination of colors and textures. Any experiments are welcome.
Is it scary to start your toy making career with a giraffe? We need to make a bunny. It is easy to perform: no complex techniques or skills are required.
Cut out the parts for the toy. Sew a decorative heart onto the belly. Sew and turn the ears, sew them to one of the halves of the body.
Sew the workpiece, matching the parts right sides together. Leave some room at the bottom to turn it inside out. Make notches on the convexities of the toy. Turn the bunny inside out and stuff it with stuffing. Embroider his eyes and mouth with a nose.
The optimal toy for a beginner is a baby whale. It’s so easy and quick to do that you can trust even children to do this activity.
Cut out the pieces, place them right sides together and sew. Leave room for turning the workpiece inside out. Notch the fabric in the convex places and turn the workpiece inside out. Stuff the toy, sew up the hole left, embroider or draw eyes.
Such funny and cute animals will decorate a child's room or will be a heartfelt gift for your loved ones.
Master classes with photos
We present you with a number of other ideas for implementation. These crafts are so easy to repeat that they do not need additional description. Look at step-by-step photo instructions and take action.
Felt elephants will be an excellent Christmas tree decoration:
elephant diagram:
A cat and a cat in love will delight your other half on Valentine's Day!
Cat diagram:
And a little terrier is, in general,... Prepare gifts in advance and with love.
Coffee rates:
Animal patterns for downloading
Don't limit the flight of your imagination. We have selected patterns for a variety of toys for you. Download them, print them and create. With a little effort, you can create a whole zoo at home with your own hands.
Pattern of a cat and a cat:
Natalia Kostikova's bunny:
Little Frog:

 What is better: an electric razor or a razor: choosing the best shaving method for men What is better: a razor or an electric razor
 Style secrets: how to wear a beret
 A man left another girl for me