How to knit a coat for girls. Knitted coat for girls
If clothes are not comfortable enough, do not retain heat, and do not absorb moisture, then they are not suitable for babies. After all, little people, not yet spoiled by social prejudices and vanity, do not attach much importance to their appearance. The main thing for them is that their parents are nearby so that they can play, run and jump to their heart's content.
However, for parents the issue of fashion and style in their child’s clothing is still important. How you want to see your girl in an elegant children's coat with a handbag and shoes to match. Every mother perceives her child as a part of herself, that’s why she dreams of dressing him the best way. You also need to understand that a sense of style, the ability to combine colors and accessories is instilled from childhood.
Let's talk about outerwear for future fashionistas. In order for a child to feel comfortable in fashionable clothes, they must be made from natural materials. For example, children's knitted coats for little girls made from natural wool would be an excellent option.


If you know the art of knitting, then we can help you make just such a coat for a girl.

Below are instructions for making a knitted coat for a girl, which is easy to create with knitting needles, and even easier - to disassemble with a diagram and a detailed description of the work.


We knit a warm coat for a girl with patterns and a description of the work
It is possible that when you saw such a coat, you were eager to make it, but you do not know the art of knitting. It seems to you that only professionals can do this work. Yes, for starters, it’s better to try knitting a scarf or vest, which is much easier than a child’s coat. But today on the Internet and in magazines about knitting they talk about the knitting process in such detail and colorfully that it is unlikely that anyone will not be able to learn it on their own.
However, if you seriously decide to take up knitting, it is very important to learn how to work with patterns. All information and job descriptions are contained therein. If you read the diagrams like an open book, then it will not be difficult for you to combine all kinds of patterns and create your own models knitted clothes. Don't take on complex circuits mating, because If you constantly fail, you will lose the desire to learn.
In addition, the tightness of the knitting is important in knitting. So, if you knit a project for several days, you will see that the knitting density changes as you work on the product. To prevent this from happening, you need to train your hand.
These models will not be difficult to knit even for beginners.

Create a stylish poncho for every day


An interesting product option for babies


A child will be comfortable in a knitted coat in autumn, spring and cold summer. This is an excellent alternative to expensive warm jackets. To make your coat comfortable in both cold and warm weather, it is better to make it with a detachable lining. Without lining, the coat takes the form of a raincoat, in which the child will be comfortable in cool summer weather.
The younger the child, the more decorative elements can be added to the product. These can be knitted appliques, patterns of beads and beads, flowers, images of insects.
Another important advantage of the coat is that it goes well with all elements of the wardrobe: dress, skirt, jeans, leggings. Ideal option This coat will be suitable for combination with a school uniform.
In general, given today's fashion trends, the coat can be worn with both shoes and sneakers. Here's how to wear a coat today.


Another advantage of a knitted coat is that after it becomes too small for the child, it can be unraveled and knitted. If the threads are not worn out, then it can last a very long time.
The disadvantages of this type of clothing include the fact that it requires special care. If you wash wool in too hot water, the product will shrink because... will be 1-2 sizes smaller.
Besides, knitted product It's easy enough to ruin, so it's not worth playing.
If the coat model does not provide pockets and a hood, then accessories are necessary for it, because... The baby's head and hands need warmth.
We create a stylish children's product for more experienced craftsmen
If you have already gotten your head around, you can combine certain patterns from different schemes. In addition, you can already adjust the product to size, regardless of what the diagram shows.
On the Internet you can find a great many articles about a knitted coat that is ideal for a girl, made with knitting needles. However, many of them are aimed at an audience of experienced needlewomen, which means that it is quite difficult for beginners to understand the diagram and description of what’s what. For those who cannot yet confidently call themselves a master of knitting needles and crochet hooks, it is necessary to select simple patterns and simple diagrams. In this case, our article will be an excellent assistant for your “manual” creativity.
We knit a coat for a girl with knitting needles with diagrams and descriptions
It is very easy to master knitting for small children; coats for girls will be the first correct step in this. This thing is ridiculously simple to knit, but looks quite stylish. Even a craftswoman who has barely started knitting can handle it without difficulty. The main pattern is garter stitch.
The coat is quite versatile, as it may well suit both newborns and older children. You just need to choose the right size. The description of the work is presented for knitting things for a child aged 1 year.
The following measurements were used:
- Chest 61 cm;
- From the shoulder 28 cm;
- Sleeve, including roll-up cuff, 19 cm.
For a coat you will need one hundred percent wool yarn(about 8 skeins, 50g/104m), knitting needles No. 3.5 and No. 4, several buttons.
As for the density of work: 48 rows of 22 loops - 10 cm using needles of the fourth number. We start knitting from the back.
1) Back. Cast on 67 stitches on 4mm needles. Approximately 16 cm is knitted with knit stitches only, the final row is made of purl stitches. To complete the armholes, you need to close 4 loops at the beginning of the next two rows, a total of 67 loops will remain 59. Next, we knit according to the pattern until the length of the work is approximately 21 cm, finishing with a purl row. The shoulder bevel is performed as follows: close 15 loops at the beginning of the next. 2 rows, then the remaining 29.
2) Pockets. To prevent our coat from looking like an ordinary linen bag, we will decorate it with pockets. To do this, 16 stitches are cast on number four knitting needles, which are knitted face down for up to 34 rows. Then this part of the work is put aside and patiently waits in the wings.

3) Left shelf. In order to knit the left front, you need to perform 33 rows of 48 loops using knitting needles No. 4. After this, a pocket is placed. The next row is knitted according to the pattern: 3 "face", 16 loops before the edge close. Next we continue to process the pocket. We knit 29 knit stitches, perform the same loops along the pocket, finish with 3 knit stitches. After this, the work continues with the “garter stitch” pattern for the next 16 cm, the last row is performed with purl stitches.
Making an armhole: cast off 4 stitches at the beginning of the “first” (after purl) row, and in the next row – 44 stitches. You should continue straight until the length of the fabric reaches 28 cm. We do shoulder bevels, starting from closing 11 loops to the end of the row; then we knit 1 “front” row and set aside the rest of 29 loops.
4) Right shelf. 33 rows of 48 stitches using 4mm knitting needles. We place the pocket, knit 29 stitches face down, and close the last 16 stitches. The next row consists entirely of knit stitches: first 3, then working the pocket and knitting to the edge. We continue garter stitch up to 9 cm from the beginning, finishing with a purl row.
5) Button holes. Knit 3 stitches facewise, yarn over, combine 2 loops and knit stitches, knit 19, knit stitch again, yarn over and knit stitches to the edge. Next again, garter stitch approximately 16 cm, finish with the front row. To make an armhole, cast off the first 4 stitches in the first row, and 44 stitches in the next row, counting from the beginning. Then about 17 cm and purl row. Again, the diagram for the button “window” (it is performed in the same way as the first one). Next we knit 28 cm to the armhole. We perform a shoulder bevel by casting off 15 initial stitches and knitting the remaining (29) stitches. There is no need to cut the thread, just put the work aside.
6) Hood. But first you need to make a shoulder seam. To do this, take the right shelf, knit 29 stitches face down, cast on a new 34. We do the same with the left shelf. We got 102 loops, which we knit until we get 24 cm of fabric. Purl the last row, bind off the stitches.
7) Sleeve. Cast on 35 stitches using 4-number knitting needles and knit 17 rows of a “shawl” pattern. Knitting needles No. 4 are replaced with No. 3.5. Another 16 facial rows are made, and 4 mm knitting needles are taken again. Add 1 stitch on both sides of the next row, and then 8 each until the number of stitches is 53. Then 24 cm in garter stitch, purl row. The last row is marked with markers or pins and another 8 are knitted (for the cuff). The hinges are closed.
8) Assembly. The hood is folded in half and the top seam is sewn. Using the edge of a set of loops, we attach this part to the back, or rather, to its neck. The middle of the edge of the loop closure is aligned with shoulder seam, the sleeves are sewn into the armholes. The end of the row after the closed loops is connected to the edge of the closed armhole loops. Then finishing work, namely: processing the side seam and sleeves, pocket burlap, attaching buttons.
Children's coats and jackets are ideal clothes for spring and autumn. These are more aesthetic than practical elements of clothing. And at the same time, they do an excellent job with their direct functions: they provide warmth and protect the baby from colds.
Children's warm coats
The coats themselves are very beautiful and elegant. But if these are children's coats, all their aesthetic qualities are doubled. Knitted coats for babies are the very personification of charm and style. And the best thing is that now you can knit them with your own hands. For this purpose, you just need to go to our website, choose the item you like, purchase necessary materials. After this you can start working. With us you can make both a coat with crochet and knitting. We provide patterns for knitting with different tools, which is convenient for knitters.
Children's formal jackets
Children's jackets - clothing for festive and memorable events? Why? They look very impressive, strictly and instantly transform the baby. Knitted jackets ideal for primary school students. They look both strict and unusual. Here you will find patterns and descriptions for knitting a wide variety of variations of this clothing: from large knit and muted tones to the most unusual textures and colors. Children's jackets are quite easy to make. And the work will become even easier if you refer to the information from our website. We have provided descriptions that will help you make crocheted and knitted jackets.
 |
|
 |
 |
 |
 |
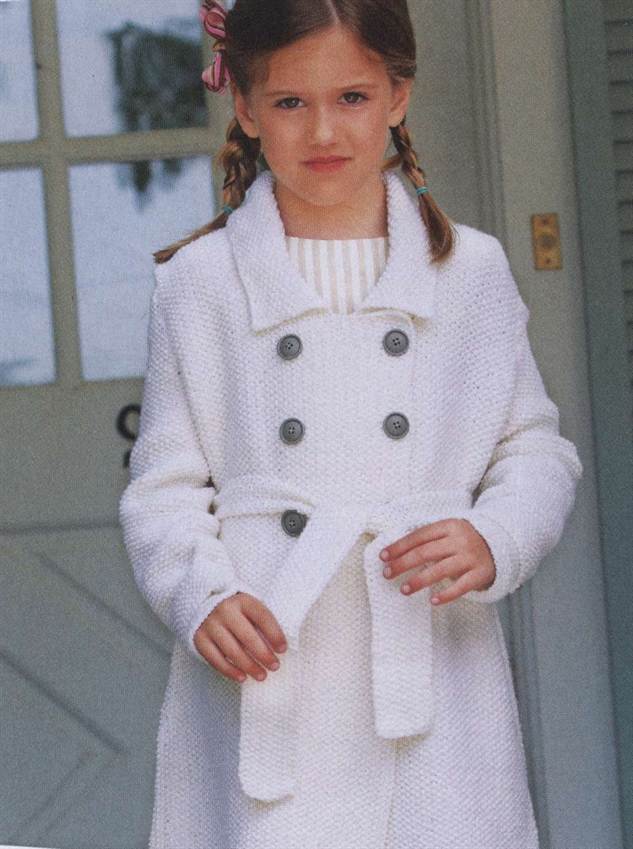
Knitted coat for girls

A coat for a little fashionista is knitted using cream yarn. Your daughter will be warm and comfortable in this coat.
To knit a coat with knitting needles
we will need 400 grams of Lanagold yarn (50% wool, 50% acrylic, 240m/100 grams), knitting needles No. 5.
Description of work:
Fronts: cast on 70 stitches on knitting needles and knit in a 2x2 tangle pattern, knit 6 stitches from one edge in garter stitch. At a height of 25 cm from the start of work, decrease loops every two loops until 32 loops remain on the knitting needles. Continue knitting alternately knitting 4 knit stitches and 2 purl loops, knitting 4 knit stitches in a 2x2 braid pattern, crossing it in every 4 rows. After knitting 30 cm, decrease 1x3, 1x2 and 1x1 loops for the armholes from the outer edge. At a height of 15 cm from the armholes, begin to form a neckline; to do this, close 1x6, 1x3, 1x2 and 1x1 loops from the inner edge and then knit separately. Make 3 holes for buttons on the strip of one of the shelves. Finish the work when the height of the yoke is 22 cm.
Back: cast on 125 stitches and knit in a 2x2 tangle pattern. At a height of 25 cm from the start of work, decrease loops every two loops until 63 loops remain on the knitting needles. Continue knitting alternately knitting 4 knit stitches and 2 purl loops, knitting 4 knit stitches in a 2x2 braid pattern, crossing it in every 4 rows. After knitting 30 cm, decrease 1x3, 1x2 and 1x1 loops for the armholes from the outer edge. At a height of 20 cm, close the central 13 loops for the neckline. Finish the work when the height of the yoke is 22 cm.
Sleeves: cast on 36 stitches and knit alternately 4 knits, 2 purl, 4 knit stitches in a 2x2 braid pattern, crossing it in every 4 rows. At a height of 14 cm from the beginning of knitting, increase by knitting 2 loops from 1 until you have 72 loops. Continue knitting with the tangle pattern. After knitting 9 cm, decrease 1x3, 1x2 and 1x1 loops from each edge. After knitting another 10 cm, close the loops.
Belt on the back: cast on 10 stitches and knit a strip 12 cm long using garter stitch.
Assembly: sew side and shoulder seams, gather sleeves along the cuff line and sew into armholes. Sew the belt with two buttons to the back. For the collar, cast on 55 stitches along the edge of the neckline and knit 10 cm in garter stitch.
Pattern:

Knitted coat and trousers


Double breasted coat knitted for girls - from here
 A lilac short coat will warm your girl on a cool evening.
For (2)4(6)8(10) years
Finished product dimensions: chest girth - (62)66(70)74(78) cm, total length - (46) 51(55)57(59) cm, sleeve length - (25)28(31) 35(39) cm.
For knitting fashionable coat for a girl we need: Sandnes Smart yarn (100% wool, 100 m/50 g) - (300) 350(400)450(500) g Pink colour, circular knitting needles No. 3 and No. 3.5, sock knitting needles No. 3.4 buttons.

Description of how to knit a coat for a girl
Pattern 1: 1st row (front) - knit 1 alternately. p. and 1 p. p. 2nd row - purl. loops. 3rd row - alternately 1 persons. p. and 1 p. p. 4-6th rows - knit faces. satin stitch (knit rows - knit stitches, purl rows - purl stitches). Repeat rows 1-6.
Pattern 2: 1st row (front) - knit 1 alternately. p. and 1 p. p. 2nd row - knit all the loops. (at circular knitting- all loops of faces.). Repeat rows 1-2.
Knitting density: 22 stitches of pattern 1 on knitting needles No. 3.5 = 10 cm.
Back and front: on circular needles No. 3, cast on (105)113(119)125(133) sts, knit 1st purl. row of purl loops. Next, knit in straight and reverse rows with pattern 1. At a working height of (32)36(39)40(41) cm, close the loops for the armholes as follows: knit
(17)19(19)21(23) p. (front), bind off 1 p., knit (69)73(79)81(85) p. (back), bind off 1 p., knit (17)19 (19)21(23) p. (shelf). Next, knit each piece separately.
Back: on knitting needles (69)73(79)81(85) sts. Continue knitting pattern 1 straight for another (12)13(14)15(16) cm. Then, for shoulder bevels, cast off on both sides in every 2nd row (7,7,8)7,8,8(8,8,9)8,8,9(8,9,9) sts. Transfer the remaining (25)27(29)31(33) sts of the neckline to add. knitting needle
Left front: on knitting needles (17)19(19) 21(23) sts. Continue knitting with pattern 1 straight for another (12)13(14)15(16) cm. Then, to bevel the shoulder, close on the right side in every 2nd row (7,7,3)7,8,4(8,8,3)8,8,5(8,9,6) sts.
Right front: knit symmetrically.
Left placket: along the edge of the left shelf, using knitting needles No. 3.5, evenly cast on (101)111(121)125(131) sts, knit 1st purl. row of purl loops. Next, knit with pattern 2. At the height of the bar (12)12.5(13)14(15) cm, close the loops.
Right placket: knit symmetrically, but knit 2 pairs of buttonholes. Knit the first pair of loops at a height of 3 cm: knit (25)25(27)29(29) sts, bind off 2 sts, knit (17)17(19)21(21) sts, bind off 2 sts, knit the row to the end. In the next row, in place of the closed loops, cast on new 2 p.*. Knit the second pair of loops in the same way at the height of the bar (9)9.5(10)11(12) cm (repeat.-*). At the total height of the bar (12)12.5(13)14(15) cm, close the loops.
Sleeves: sew shoulder seams, slightly catching the edges of the panels. Then, along the armhole, on toe knitting needles No. 3.5, evenly cast on loops (1 stitch from each edge loop, skipping every 4th stitch). Knit 1 row of knits in the round. loops, adjusting the number of loops to (45)49(53)55(57) sts. Next, knit in the round with pattern 2. At sleeve height (25)28(31)35(39) cm, bind off the loops.
Assembly: for the collar, using circular needles No. 3 along the edge of the front, evenly cast on (12)14(14)16(16) stitches, then knit the set aside (25)27(29)31(33) stitches for the back neckline, along the edge of the other pick up the fronts evenly (12)14(14)16(16) sts. Knit in straight and reverse rows (5)5(6)6(6) cm with pattern 2. Cast off the loops. Sew on the buttons.


Poncho with ponpons, muff, hat, leg warmers, knitting
|
Dimensions: 104/110(116/122) 128/134 You will need: 250 (300) 350 g beige melange yarn York (30% wool. 40% polyamide, 30% acrylic. 70 m/50 g) and 100 g white Bolero yarn (27% royal mohair, 22% polyamide, 50% acrylic, 1% elastane, 145 m/50 g) ; set of stocking needles 6 and No. 7; circular knitting needles No. 7. Elastic band: alternately knit 1, purl 1. Knitting density: Cross elastic, knitting needles No. 7 and beige melange thread: 12 sts and 22 circular r. = 10 x 10 cm; persons satin stitch, knitting needles No. 7 and beige melange thread: 14 sts and 19 circular r. =10 x 10 cm; braid, knitting needles No. 7 and beige melange thread: 8 sts = 4.5 cm wide. PONCHO: CAP: COUPLING: GAITERS:
|


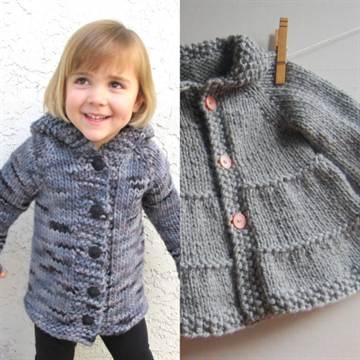
The coat is knitted.
Age: 3 years
Materials:
- 280 g of fine acrylic yarn and 250 g of viscose, all pink;
- 8 buttons in tone;
- knitting needles No. 6;
- additionally hook No. 3.
Fantasy pattern: according to the diagram.
Hook. Single crochet (st. b/n): insert the hook into a stitch of the chain or lower row. and pull out a new stitch, grab the thread and knit 2 stitches on the hook in one step.
“Crawfish step”: knit like st. b/n, but from left to right.
Knitting density: 10x10 cm = 16 p. x 29 r.
Description of work
Attention: before starting work, wind together 2 threads of acrylic yarn and 1 thread of viscose.
Back: cast on 71 sts on knitting needles, knit 1 p. purl and continue the pattern according to the diagram, decreasing on both sides in every 2nd r. 5 times 1 p. = 61 p.
At a height of 30 cm, close the armholes on both sides with 6 stitches and knit straight. At a total height of 45 cm, bind off 13 stitches for each shoulder, 23 stitches for the neckline and finish knitting.
Right shelf: cast on 43 sts on knitting needles, knit 1 p. purl and continue the pattern according to the diagram, making decreases and armholes from the side seam, as on the back. At a height of 38 cm from the beginning of knitting, on the opposite side, close 9 stitches for the neckline, in every 2nd row. 4 p., 3 p., 2 p. and 1 p.
At a total height of 45 cm, bind off 13 stitches for the shoulder and finish knitting.
Left front: knit symmetrically to the right front.
Sleeves: cast on 31 sts on knitting needles, knit 1 p. purl and continue the pattern according to the diagram, adding on both sides every 6th row. 7 times 1 p. = 45 p.
At a height of 23 cm, close the sleeves on both sides in every 2nd r. 3 times 4 p. and the remaining 21 p.
Total height is about 28 cm.
Pockets: cast on 17 sts on knitting needles, knit 1 p. purl and continue with the pattern according to the diagram.
At a total height of 7 cm, close the stitch and finish knitting.
Assembly: perform shoulder, side seams and the seams of the sleeves, leaving the top 4 cm open before the roll.
Sew the sleeves into the armholes, connecting and sewing the remaining 4 cm of sleeves. For the collar, pick up a st along the edge of the neckline, leaving 9 sts of each front free, and knit in a pattern according to the pattern.
At a height of 8 cm, close the p. Crochet the collar, bottom edge, front, sleeves and three sides of the pockets with double acrylic thread 1 p. Art. b/n and 1 r. Art. "crawfish step"
Sew pockets. On the right shelf, make 3 pairs of holes for buttons (overstitch 1 stitch): the first pair - about 23 cm from the bottom edge, the second pair - about 2 cm from the top edge and the third - between them.
Sew 6 buttons on the front and 1 button on each pocket.
Ready product moisten and let it dry.

Yellow jacket and hat for girls 5-11 years old. Knitting needles and hook

Sizes: 104-110 (116-122) 128-134
See size chart below.
You will need: 450 (500) 550 g yellow yarn (50% merino wool, 50% polyacrylic; 80 m/50 g); knitting needles No. 5.5; short circular knitting needles No. 5.5; hook No. 5; 3 buttons; 1 auxiliary needle.
Knitting technique:
Facial surface: faces. R. - persons p., out. R. - purl P.
Knit stitch in circular rows: knit all stitches.
Purl stitch: knit. R. - purl p., out. R. - persons P.
Purl stitch in circular rows: purl all stitches.
Double pearl pattern: alternate knit 1, purl 1. In each purl row/2nd round. R. knit the loops with an offset.
“Braid” pattern on 24 loops: knit according to the pattern. It shows facial rows. In the purl rows, knit loops according to the pattern. Knit stitches before rapport, repeat repeat constantly, finish with loops after repeat.
1-40th r. repeat constantly.
Flowers: crochet a chain of 6 chain stitches. and close it in a ring. * 1 connection tbsp., 1 p/st., 1 tbsp. s/n, 1 p/st. From * repeat 4 more times, 1 connection. Art.
Knitting density:
Pattern “Braids” - 17 p. x 22 p. = 10 x 10 cm;
Double pearl pattern - 16 p. x 20 r. = 10 x 10 cm.
Back. Cast on 86 stitches on the knitting needles and knit between the edges in a “Braid” pattern. Next, to give shape in every 14 (20) 30th r. inside the rapport at each site purl stitch knit 4 (3) 2 x 2 p. together purlwise = 62 (68) 74 p. After 27 (31) 35 cm from the initial row, knit double pearl pattern, while in the 1st r. decrease, evenly distributing, 9 (7) 7 p. = 53 (61) 67 p. After 18 (19) 20 cm from the beginning of the double pearl pattern, close the middle 11 (13) 15 p. for the neck. Finish the shoulders separately, while 2nd r. close 1 x 4 stitches along the edge of the neckline. After 20 (21) 22 cm from the beginning of the pearl pattern, close off the remaining shoulder loops.
Right shelf. Cast on 43 stitches on the knitting needles and knit between the edge stitches in a “Braid” pattern, starting the row with 5 purl stitches. Next, to give shape in every 14 (20) 30th r. before the repeat and inside the repeat on each section of the purl stitch 4 (3) 2 x knit 2 stitches together with the purl = 31 (34) 37 stitches. After 27 (31) 35 cm from the initial row, knit with a double pearl pattern, while in 1- m., evenly distributed, decrease 4 (5) 4 p. = 27 (29) 33 p. After 14 (15) 16 cm from the beginning of the pearl pattern, close for the neck along the right edge 1 x 4 p. and in each 2- m r. 1 x 3 p., 1 x 2 p. and 1 (0) 2 x 1 p. At the height of the back, bind off the remaining shoulder loops.
Left shelf. Knit like the right front, but in a mirror image.
Sleeves. For each sleeve, cast on 25 (27) 31 sts on knitting needles and knit between the edges in a double pearl pattern. To bevel the sleeves, add according to the pattern every 6th r. on both sides 5 (4) 5 x 1 p. and in every 4th r. 6 (9) 9 x 1 p. After 29 (32) 35 cm from the initial row, close all loops.
Assembly. Lightly moisten the parts. Stretch according to the instructions in the pattern, pin on the pattern and leave until completely dry. Sew shoulder seams. For the clasp and neck straps, crochet along the sides and neck 2 cm st. b/n, while making 3 holes for buttons with a width of 3 tbsp on the bar of the right shelf. b/n. Sew in the sleeves so that the middle of the sleeve matches the shoulder seam. Sew sleeve seams and side seams. When finished, lightly steam all seams. Sew buttons. Crochet 10 flowers and sew them on as in the photo or randomly.
CAP
Crochet a chain of 52 (56) 60 chain stitches. and close it in a ring. Knit for the strap 2 cm st. b/n.
Cast on 88 stitches on circular needles and knit with a double pearl pattern. After 12 cm from the bar, evenly distributed, knit 11 x 3 stitches together. Repeat 2 more times in every 2nd r. In the next r. knit 11 x 2 stitches together. Tie the remaining 11 stitches tightly with a working thread. Crochet 3 flowers and sew them onto the hat.
Size: 1.5-2 years, 86-92 cm.
You will need: 450 g YarnArt Charisma spinner (200 m/100g) 80% wool, 20% acrylic; white fleece 1.45 m*1 m; 4 buttons with holes for buttonholes, 45 cm chocolate-colored velvet ribbon, knitting needles 2.5 and 3, hook 3.
Rubber
Row 1 - *K2, P2. * repeat from * to *. In even rows according to the pattern.
Garter stitch
Knit all rows with facial stitches.
Knit chess pattern according to pattern 1
Rice pattern
Rows 1, 3 and the next odd rows – *k1, purl 1 *repeat from * to *. Rows 2, 4 and the next even rows - knit all knits with purls, and purls with knits.
Knit braid pattern according to pattern 2
Knit the “braid” and “medallions” patterns according to Figures 3 and 4, respectively.
Back
Cast on 98 (96 +2 edge) stitches on 2.5 knitting needles and knit 11 rows with an elastic band. Next, switch to needles No. 3 and knit 4 rows in garter stitch. Then knit 9 rows with a checkerboard pattern (it should be 3 squares in height). After this, 3 rows of garter stitch, 12 rows of rice, 4 rows of garter stitch. Then we knit 7 rows in stockinette stitch and in the last purl row we make increases - we pull out a crossed purl between the loops after every fourth loop. We knit 3 repeats with a braid pattern. In the last purl row we make decreases - we knit the 4th and 5th loops together purlwise. Then we knit 4 repeats with a braid and move on to the “medallions” pattern. After we have started the “medallions” pattern, we make decreases for the armholes - 1 time * 4 loops, 4 times * 2 loops in every second row (12 loops in total) Having knitted 2 repeat “medallions”, we knit 4 rows of garter stitch, then we knit “ rice". After 16 cm from the beginning of closing the loops, we close the middle 18 loops, in the next front row we close 8 loops on each side. After 18 cm from the beginning of closing the loops, we close the remaining 20 loops of the left shoulder and 20 stitches of the right shoulder.
The trapezoid is obtained ONLY due to the drawing, no reductions on the sides are required.
Right shelf
Cast on 60 (48 +10 per placket + 2 edge) stitches on needles No. 2.5. Knit all patterns on 48 loops, and on the outermost 10 loops on the left, knit a garter stitch placket all the time.
For 48 loops + 2 edge stitches: Rib knit 11 rows. Next, switch to needles No. 3 and knit 4 rows in garter stitch. Then knit 9 rows with a checkerboard pattern (you should get 3 squares in height). After this, 3 rows of garter stitch, 12 rows of rice, 4 rows of garter stitch. Then we knit 7 rows with stockinette stitch and in the last purl row we make increases - we pull out the shifted purl between the loops after every fourth loop. We knit 3 repeats with a braid pattern. In the last purl row we make decreases - we knit the 4th and 5th loops together purlwise. Then we knit 4 repeats with a braid and move on to the “medallions” pattern. After we started the “medallions” pattern, we make decreases for the armholes - 1 time * 4 loops, 4 times * 2 loops in every second row (12 loops in total). Having knitted 2 repeats of “medallions”, we knit 4 rows of garter stitch, then we knit “rice”.
After 13 cm from the beginning of closing the loops, we close the neckline on the left in every second row - 10 bar loops, then 1 time * 4 loops, 2 times * 3 loops, 4 times 2 loops. After 18 cm from the beginning of closing the loops, we close the remaining 20 shoulder loops.
We knit the left front symmetrically.
Sleeve
Cast on 44 (42 +2 edge) stitches on needles No. 2.5. Knit with an elastic band for 17 rows. Next, switch to the knitting needles and make increases in the purl row - we pull out the crossed purl between the loops after every fourth loop. We knit 2 repeats with a braid pattern. Then we knit 2 repeats with a braid and move on to the “medallions” pattern. At the same time, after the elastic we make increases on the sides - 1 loop on each side in every 5th row.
After we have started the “medallions” pattern, we make the following increases on the sides - 1 loop on each side in every 3rd row. Having knitted 1 repeat “medallions” (we get 4 loops), we begin to form a round sleeve cap. To do this, in every second row we make decreases on the sides - 1 time * 5 loops, 3 times * 4 loops 4 times * 3 loops, 4 times * 2 loops, 1 time * 5 loops, and then cast off the remaining 10 loops.
Knit the second sleeve in the same way
Hood
Cast on 3 44 (32 placket stitches + 2 edge) stitches on knitting needles. Knit all patterns on 32 loops, and on the outermost 10 loops on the right, knit a garter stitch placket all the time.
For 32 loops + 2 edge stitches: Knit with a “rice” pattern for 12 rads. At the same time, increase on the left in every second row - 1 time * 3 loops, 3 times * 1 loop. Then knit 12 rows with a checkerboard pattern, 2 rows of garter stitch and continue with a rice pattern for 8 rows. Next, we move on to the “medallions” pattern - we knit 2 repeats. Knit 8 rads with a “rice” pattern and on the next 8 rows make symmetrical decreases in every second row on the left - 3 times * 1 loop, 1 time * 3 loops. Next we knit a symmetrical part of the hood. We knit 16 rows with a “rice” pattern. At the same time, increase on the left in every second row - 1 time * 3 loops, 3 times * 1 loop. Then knit with a “medallions” pattern - knit 2 repeats. Continue with the “rice” pattern for 8 rows, 2 rows of garter stitch, and the “checkerboard” pattern for 12 rows. Knit 6 rows with a “rice” pattern and on the next 6 rows make symmetrical decreases in every second row - 3 times * 1 loop, 1 time * 3 loops.
Lining
Wash all knitted parts of the coat on the wool cycle at 30 degrees, then dry everything on a towel, steam the sleeves and the bottom of the back and buttocks. Next, place the knitted parts on a sheet of paper and carefully trace them. At the same time, take into account the folds of the lining at the bottom of the back, shelves and sleeves and on the sides. The lining parts are shorter than the knitted parts by the width of the elastic and trim. Then we cut out the fleece parts, sew along the shoulders, the sides of the back with the buttocks, sew in the sleeves, sew the hood and sew it along the neck line. It is advisable to first fasten the middle of the hood to the middle of the back.
Pockets and loops
Cast on 23 loops. Knit 2 repeats and 5 rows with a braid pattern stockinette stitch. Knit 2 parts.
For the loops, crochet 24 loops and tie them with single crochets. Knit 8 pieces. For 4 parts, sew 2 ends with thread white, leaving a loop. Thread the remaining 4 strips through the button, and then sew the 2 ends together.
Assembly
We sew all the knitted parts of the coat along the shoulders, the sides of the back with shelves, we sew in the sleeves, we sew the hood and sew it along the neckline. It is advisable to first fasten the middle of the hood to the middle of the back. We decorate the pockets with bows made of velvet ribbon. Sew pockets to shelves. Then connect the seams of the shoulders of the knitted part and the lining and sew them together. Repeat the same with the side seams, the middle seam of the hood and the neckline. Next, carefully baste the lining along the edges. Sew loops to the strips. Wrap the placket on the hood and sew it to the hood with white thread. Sew a velvet ribbon bow onto the hood. 

 Do you want to be right or happy?
 Crochet Christmas potholder
 We make beautiful and festive garlands ourselves Cut out the letters Happy Birthday