Card made of colored paper for 23. Postcard with a butterfly
Good day everyone! Following February 14 comes another holiday, which is celebrated in our country annually on February 23. Last time we talked about what, and also did with the children
Today we continue and will, together with the children, congratulate our defenders and make them interesting and original postcards.
This type of work is the most common for school students or kindergarten students. Because it is not so difficult to make such a miracle, you just need to listen to the teacher’s instructions and everything will work out.
So, if you haven’t yet decided to do this and give it as a gift, then perhaps you will stop at this option.
On this day, all mothers, daughters, grandmothers, and indeed the entire female half of the population congratulate the male half on this celebration. It is so customary that the symbols of this holiday are state flags, military equipment and other vehicles, as well as stars on shoulder straps.
Therefore, all drawings or pictures are directly related to this. I propose to make the first option out of paper - this is a tie, using the origami technique.

I also really liked the idea with a dollar bill, or you can take our rubles and roll them up, like this, it looks pretty cool, and as they say, a small stash at hand.

For the youngest craftsmen the second junior groups In kindergarten you can make work from plasticine.

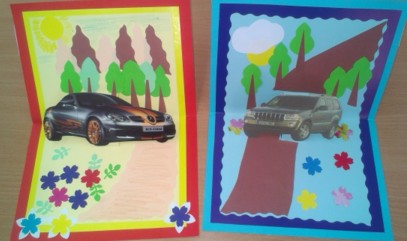
Now we will make a postcard with a car depicted on it. You can make such a charming and funny creation with children in the senior and preparatory groups, or use it in primary school.
Stages of work:
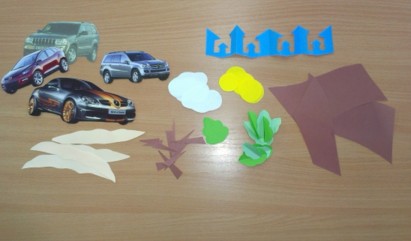
1. Prepare everything you need for work, this is paper, glue, scissors and pictures of cars.

2. Cut out the necessary details to complete the plot.
3. Then, to make the machine seem three-dimensional, make a cut, while folding the sheet of paper in half.

4. This is such an interesting and cute plot.

5. You can decorate the outside as you wish, using various decorations and decors.

6. You can either make an applique or simply draw with colored pencils or felt-tip pens.

Cool design using scrapbooking technique
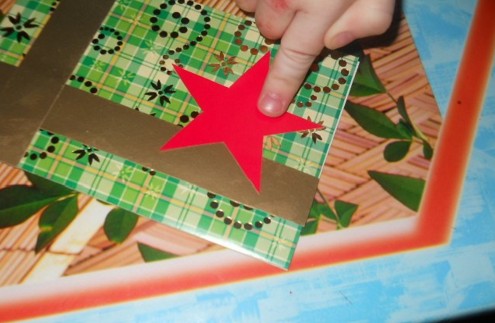
I’m giving you a few ideas that impressed me, you can take them as the basis for your work and create your own plot. See how bright you can make a star.

The cutie is very talented, even the flower is not at all out of place.

Wow, a message or a little surprise).

In general, it looks wonderful and not primitive.

So, create for the joy of everyone!

And surprise, in general, act.

I also offer you step-by-step instructions that you can take for your creative work in the scrapbooking style, here:
Original ideas for greeting cards for schoolchildren on February 23rd with templates
I would like to make and decorate a card in a special way, I know that many are interested in options for volumetric products, because they look great and amazing. Moreover, if there is step by step instructions, then you and your children at school can do such a miracle.
Or you can create this creation at home, and then your son or daughter will give it to dad.
Stages of work:
1. First of all, you will need to find double-sided cardboard, preferably blue or light blue, this will be the background of the sea. Then fold the blue sheet in half and glue a boat-shaped base to it.

2. Accordingly, in order to glue the base from the ship, you first need to make it, to do this, find an image of the ship or ask me for a template, I will send it to you for free by email. So, print it out on A4 sheet and cut out the desired image along the contours using a stationery knife.


4. Carefully glue the white one to the blue base.

5. This is how it should work out for you.

6. Looks simply fantastically beautiful and charming.

Can be done simple applique from colored paper and geometric shapes, to do this, draw templates, and then glue the composition together using them.


You can take another simple route, print this sample and then color it or applique it.

I liked another type of postcard, I’m happy to show it to you.
We will need:
- colored paper or cardboard
- scissors

Stages of work:
1. Draw templates, approximately how you should get it, I showed you in this picture, it’s nothing difficult, even a beginner can handle it. But what color to make for each blank, decide for yourself, this creative work which can be done in a labor lesson.

2. For the base, it is best to take colored cardboard, either double-sided or plain. Fold the sheet in half and cut a circle on one part.

3. Now all that remains is to design the product. Find a suitable text or write your own by hand.

4. Glue the greeting inside the card.


6. And the front side will look like this. It's like a ship floating on the waves.

I also saw this cute guy yesterday, I suggest you build him too.

To create such beauty, cut out the blanks with scissors.

Glue everything you have planned onto the background you need. The flag can be made from satin ribbons and a match, or use a cotton swab instead of a stick.

If you really want a masterpiece, take a look here, it’s stylish and a very cool idea for children of any age.

We make cards with children in kindergarten from paper for dad and grandfather
An excellent option would be a fairly simple postcard with a picture of a bear cub in military uniform. You need to make such a background on a sheet of paper using a printer.

Cut out the stencils according to the sample.
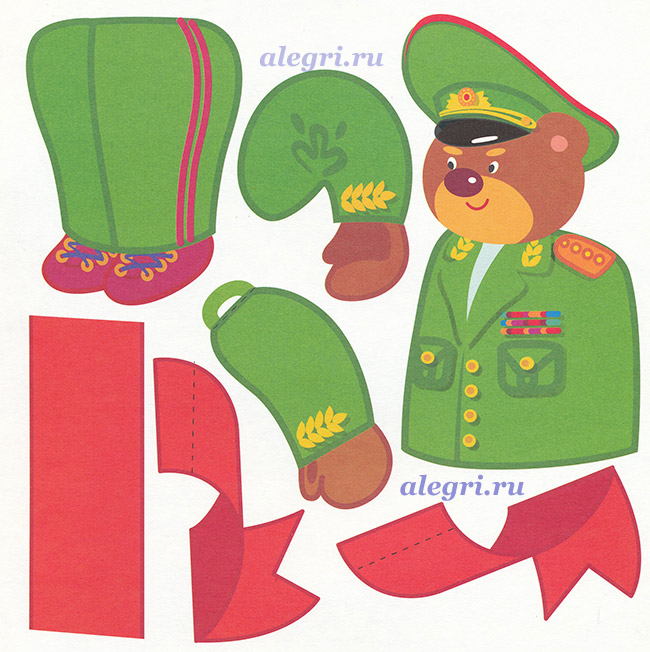
Then glue them onto the background.

And on the reverse side write or print a congratulation.

Well, I also found such a simple idea for very small young talents.
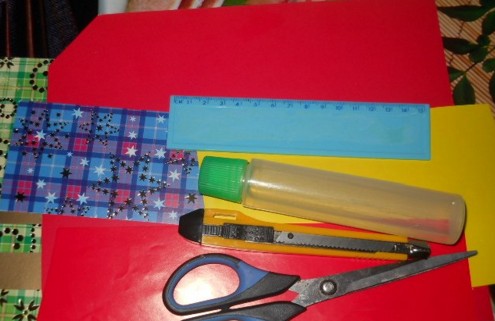
We will need:
- multi-colored cardboard with embossing
- colored paper
- scissors
- ruler
Stages of work:
1. Print the stars on A4 sheet, or make stencils, and then draw them on colored paper and cut them out.

2. Fold a sheet of embossed cardstock in half. Cut two strips from colored paper and glue them overlapping. And also decorate with a star.
3. Such a very beautiful and sweet result, write your wishes on the other side.

Unusual gift in quilling style Tank
It will be really cool if you make a postcard and, in addition to everything else, give it a small souvenir in the form

Anyone familiar with this technique can easily create any plot).

And for those who are not familiar yet, I found a video from which you will learn how to do this:
You can deviate from the topic and make it out of numbers, but in the same style.

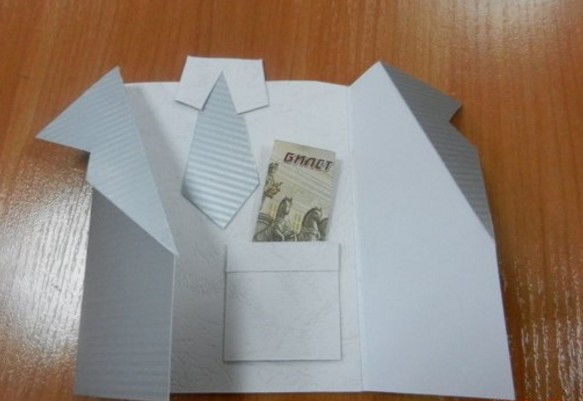
Master class on how to make a shirt with a jacket
The most easy option can become a souvenir using the origami technique, using colored double-sided paper or a white A4 sheet.

It turned out to be a small shirt with a tie.

In addition, since this is a postcard, you will need to come up with a poem or congratulation and read it with expression.
Or you can also go another way by first making a tie from a blue or light blue sheet, and decorate it with all kinds of stickers, sequins, rhinestones, etc.

And then glue it and you get the simplest gift option.

And if you want to do something more serious, then use these instructions.

It is necessary to make a mock-up of the product as shown in the figure.

Then use a ruler to fold along these lines. Of course, draw the lines with a pencil, not a felt-tip pen; a felt-tip pen is shown here to make it easier to see.

This is how the jacket looks like.

All that remains is to make the collar, make it according to the diagram.

Then cut and roll.

Finish the job by gluing the necessary finishing touches, this is a tie from satin ribbon or papers and a poem.

You can also make a card with a little secret.

Take a piece of paper and make marks as shown.

Plus there will also be a vest.

The result can be anything you want, the main thing is to try to do this work with great love, and then what could be nicer to give to your grandfather or father on the long-awaited day.

If you are original, you can put in a banknote or something else more impressive.
You can even glue a calendar.

We are creating a three-dimensional postcard together with children for the holiday of Defenders of the Fatherland
Such products are usually in great demand because they look impressive and beautiful.

Look how cool they designed an ordinary photo frame. Make a boat or steamship first.
A diagram of such a craft is presented here.

You can use another option, like this one, you have to glue the necessary images onto a sheet of paper.
And then color with paints or markers. The blanks can be downloaded and printed.

 You can do other work using this principle.


Every boy or guy doesn't dream of good set tools, right? So let's give him a dream.

For the next job you will need 2 pieces of paper. different colors, a pencil, a glue stick and a stationery knife, because the protruding style will be applied.

It will turn out very stylish and tasteful.

You need to print the template on a printer, request it from me. And then combine the white base and blue images.

From corrugated paper or thick cardboard, carefully cut out 3-4 stars and glue them to the base.

That's all, dear friends and subscribers. If you were interested, share this note on in social networks or leave your feedback on this post. Good luck to all! And to our defenders of good health, success in everything! Bye everyone!
Sincerely, Ekaterina Mantsurova
For every child, his dad is the strongest, bravest and most courageous. A true hero, the head of the family. And a defender, even if he didn’t serve in the army. Therefore, the idea of congratulating dad on February 23 by making an original postcard with your own hands is for a preschooler or junior schoolboy will be received with a bang.
Even the simplest drawing drawn by a child's hand will touch the hearts of parents. But there are some really interesting and unusual cards that you can make with your child for Defender of the Fatherland Day.
Ideas and templates of cards for February 23rd in kindergarten
As a rule, by February 23, children in kindergarten prepare surprises for dads, grandfathers and brothers - greeting cards. Their complexity depends on the age of the kids and the creativity of the teacher. For the holiday, kindergarteners make:
- drawings
- appliqués
- plasticine crafts, natural material, improvised means

IMPORTANT: Children in the nursery and junior groups draw simple cards with two or three colors of gouache paint, and make appliqués according to templates prepared by the teacher. You can also print out sketches of cards for the whole group and let the children color them.
With secondary and preparatory groups You can make postcards for February 23rd in the form of medals.
For the most simple option postcards - medals will be needed:
- sample
- white and colored cardboard (or colored paper)
- ruler
- pencil
- scissors
- paints, colored pencils
- satin ribbon

Template for a postcard - medals.

Decor for the postcard - medals.
- Templates for medals and decorations are transferred to cardboard or colored paper and carefully cut out.
- Children glue decorations onto the medal. These decorations can be very different, from a five-pointed star and the number “23” to various military equipment, a suitcase with tools, or attributes of various male professions.
- You can translate templates to white paper and ask the kids to color them.
- A satin ribbon folded in half is glued to the back of the medal.

A three-dimensional medal - a photo frame - turns out to be very beautiful; it is more difficult to make. But with the help of a teacher, the children will succeed. Children will need:
- colored paper 2-3 colors
- cardboard
- pencil
- scissors
- ruler
- item round shape, for example, a glass
- ribbon


- At the first stage of making a postcard, the teacher gives the children 10 squares of colored paper measuring 10 by 10 cm.
- Children should try to fold each of the squares according to the diagram that the teacher shows. This is very good workout fine motor skills.
- Children repeat the folding procedure for all 10 squares.
- The resulting parts of the “frame” are joined together and glued.
- Children attach a round-shaped object to a sheet of cardboard; this will be the base of a medal - a postcard.
- The teacher invites the kids to decorate the medal on one side, for example, by gluing the number “23” cut out of colored paper or some ready-made template onto it.
- On the second side there should be a photo of dad.
- The final step will be gluing the ribbon.

Congratulations on the postcard - medals.

VIDEO: A simple card for dad on February 23
Ideas and templates for postcards for February 23rd to school
A schoolboy can please the men in his family with a card in the form of a shirt. Most likely, he will cope with this task himself, but let his mother be nearby and help if anything happens.
For the shirt card you need:
- colored cardboard
- colored paper
- pencil
- scissors
- ruler

Template for a tie for a postcard - a shirt.

- The tie will be cut out of colored paper. The child can draw its outline himself using a pencil and ruler or transfer it from a template.
- A sheet of colored cardboard is folded in half.
- The child marks the middle on the top of the left half of the sheet and puts 3 cm down from it.
- The child bends the corners of the cut to the side and outward, creating a shirt collar.
- A tie made of colored paper is placed slightly under the collar of the shirt and glued there.
- Inside the postcard, the student writes congratulations on February 23rd.

If desired, the postcard-shirt can be “dressed” in a jacket or military jacket.

Scheme for making a postcard - shirt.

Postcard - a shirt in a military uniform.
If a student is interested in origami, it will not be difficult for him to make a three-dimensional postcard - a shirt. This diagram will help.

Postcard - origami shirt: stages 1-4.

Postcard - origami shirt: stages 5-8.

Postcard - origami shirt: stages 9 - 12.

Postcard - origami shirt: stages 13-16.
And here is a diagram for folding a tie.

VIDEO: How to make a “SHIRT” CARD?
How to draw a postcard for February 23 with a pencil and paints together with your child?
If the child is small and goes to kindergarten, it will be very nice if he draws a portrait of his dad or grandfather on a postcard for February 23rd. With a school student you can already think through the “design”. The attributes of Defender of the Fatherland Day should be placed on the postcard:
- inscription “From February 23”
- five-pointed red star
- St. George's ribbon
- soldier's carnations
- airplane
- other military equipment
For drawing you will need:
- album sheet
- pencil
- ruler
- compass or star pattern
- colored pencils, markers or paints


- A sheet of paper is marked. The postcard will have: a five-pointed star, St. George Ribbon, carnations, signature “Happy February 23!”
- The most difficult thing is to draw a five-pointed star. Ideally, a child can do this with a compass and ruler, using a diagram. If this is too difficult, the star template is printed, cut out and traced on paper.
- At the bottom of the star, from one of its “legs” a wavy St. George ribbon is drawn.
- Inside the star, from its center, the edges are drawn.
- Start drawing flowers. They will be behind the ribbon, in the corner of the sheet opposite from the star. There will be three colors.
- Above the flowers, thinly, in a sketch, lines are drawn on which the text of congratulations is written.
- Decorate the drawing with additional lines.
- Color the card at your discretion with pencils, felt-tip pens or paints.
You can draw a tank on a children's card for dad or grandfather for Defender of the Fatherland Day.

- They start, as always, by marking the sheet.
- First, the child draws a blank for the tank tracks. They will be almost the entire length of the lower half of the sheet. The tracks are a straight line at the top and a half oval at the bottom.
- The fall, flattened on top, is repeated inside. Next, the child draws wheels - large circles, inside of which there are smaller circles.
- The child begins to work on the tank’s turret and draws a rectangle on top of the tracks, slightly rounding its corners. The length of the rectangle should be slightly less than the length of the tracks.
- A trapezoid of shorter length and greater height, also with rounded corners, is drawn above the rectangle.
- The barrel of the tank is formed by two parallel lines, which the child draws from the barrel of the tank. At the free end, the lines are connected by a flattened oval - the barrel.
- The child decorates and paints the tank at his own discretion.
How to make a voluminous postcard with congratulations on February 23?
To make a voluminous card for February 23, a child will have to make an effort, show imagination, and spend time. But it's worth it: the men in his family will be very happy original craft. The postcard will be with a ship at sea.

First you need to download and print the templates for the voluminous ship and postcard decor.

Ship template.

Decor template.
You will need:
- White paper
- colored paper
- scissors
- pencil
- ruler

- First they work with a sheet of white and a sheet of colored paper. The white sheet is cut so that it is 1 cm smaller than the colored sheet on all sides.
- Fold both sheets in half.
- The ship template is transferred onto a white sheet of paper.
- Cut straight lines. Fold the boat along the dotted lines.
- Unfold the sheet and straighten the lines to make a boat.
- Glue the white sheet onto the colored one, one by one: one side, the middle, the other side.
- The closed postcard dries under pressure. At this time, transfer the templates of decorative elements onto colored paper and cut them out.
- The dried postcard is decorated inside and out.


What card to make for grandfather and father for February 23rd?
You will need:
- sample
- colored paper
- simple pencil
- markers or gel pens
- scissors
- ruler


- The template is printed in two copies: one will be used for the box, the second – for the tools.
- Card elements are cut out from paper of different colors. The box will be one color, its handles and corners will be another. You can make rivets at the corners.
- The tools will also be multi-colored: metal elements and handles. The outlines of the instruments are drawn with markers or gel pens.
- Tools are either glued to the card.
- A wish for dad or grandfather is written on a rectangular piece of paper. This piece of paper is glued to the suitcase.
- Here are a few more options for designing such a postcard.

What card should I make for my brother for February 23?
By February 23, you can make an elegant postcard with a carved boat for your brother. For it you will need:
- sample
- colored thick paper or cardboard
White paper - scissors (small, perhaps nail scissors)

- The template of the ship and waves is transferred to colored paper
- The pattern is cut right through, very neatly.
- The card is folded along the fold line.
- A rectangle equal to half the postcard is cut out of cardboard of the same color. It is glued on the side where the slots from the ship remain.
- Decorate the card with a congratulatory inscription and a dotted line.

Click Class
Tell VK
Initially, February 23 was still considered a holiday for those men who are associated with the military sphere. Now, this is a holiday for all males, so everyone needs to be congratulated: grandfathers, fathers, brothers. And, most importantly, put a piece of your soul into this congratulation, so I want to come up with something original and solemn.
Of course, more often such cards are made by children; mothers only supervise the progress of the work. But you can turn it into a masterpiece if you use different techniques and call on the entire reserve of your accuracy. By the way, there is one for this holiday.
I want to inspire you with different ideas so that you can put your business aside and get creative.
In our kindergarten, children are not yet given homework; they try to make themed greetings themselves, but sometimes the child himself asks on the weekend to make an applique or a postcard. Then you also have to look for ideas that are not difficult to repeat, but also show the child how aesthetically pleasing the result looks.

Of course, most often children remember that they need to make a postcard when they go to bed, and it needs to be submitted tomorrow. So let's look at a few easy ideas that will take no more than half an hour of your time together to implement.
For example, create a greeting with a three-dimensional Russian flag. I know that at this age kids still cannot cut straight along the lines, so you will have to prepare the blanks in advance.

Use scissors with jagged edges.
The cardboard is folded in half and a backing is glued to the front side.
A black strip is glued diagonally, which will serve as the basis for the flag.
Three stripes of the same size (about 4 cm) in the colors of the Russian flag are cut separately: white, blue, red.
These strips are glued only at the ends, creating a small arch.
If it is difficult for a child to explain how to make such a flag, then use a simplified version.

Take red paper and toothpicks.
Cut a small strip of paper measuring 3*1 cm and fold it in half.
Make two cuts near the edge that did not become folded and glue this flag to the toothpick.
It's very easy to replicate the following idea.

You will need two strips of cardboard of the same width, but different lengths. A number is cut out from one edge. Next, glue both halves at the beginning.
I also liked one idea. The execution results in a very mature and strict design. But it is also done quickly.

We roll up the cardboard - the base.
We take smaller paper and cut out a star and a slot in the middle for the inscription.
Before gluing the two sides, write text in the place where the slot is.
You can mark this place with a pencil.
How to make voluminous cards for school with your own hands
Volumetric congratulations always look more original than the usual flat ones. But it also takes more time to create them. They have more details, so these options are more suitable for schoolchildren.
For example, the idea with a boat and an anchor looks very nice.

To do this, you can print a template, cut out the ship, waves and anchor according to the internal diagrams.

Transfer the drawing to colored paper and carefully use a stationery knife to repeat the inner lines of the drawing.

Then you need to bend the cardboard in color and place it with the fold up.
Glue paper with a cut out ship onto the front side of the cardboard. You can use contrasting cardboard.

Paste a white sheet of paper inside on which you can write a congratulation.
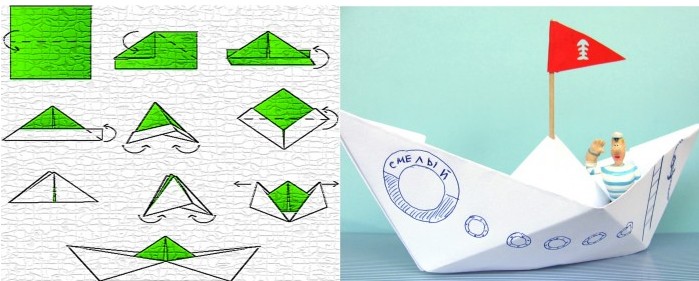
Interesting options with three-dimensional images balloons and ships.
For example, on this postcard a boat is made using the origami technique. And on the basis of it the entire composition is created.

Here detailed diagram, in what order the sheet should be folded.

Or such an interesting option with a 3D ship.

I would also like to show you a sweet version of a three-dimensional congratulation.

I think that our defenders will definitely appreciate this!
Beautiful congratulations from paper for dad on February 23
I would also like to congratulate dad in a very unusual way. For example, giving a card that requires very painstaking work.

To create it, you need to take a sheet of cardboard and bend it in half.
Then draw 3 squares, measuring 2.5 * 2.5 cm. Inside which you can draw thematic objects: anchor, steering wheel, balloon, plane, ship, watch or star. You can draw it yourself, but I’ll give you a template.
Then carefully cut along the contour with a sharp blade or stationery knife.

Paste a congratulation printed on a white sheet of paper inside.
You can make a card in the form of a shirt and tie.
They are different, for example, those with a drawn tie.

Or with a jacket.

You will see a template for such a postcard just below in the corresponding section.

Let's create such an orange, bright postcard ourselves.

For this we need double-sided cardboard and one sheet of colored paper.
Fold the sheet in half. On the front side, at the fold, we make a cut at a distance of 3 cm from the edge.
On the back side of the sheet we completely cut off a line 3 cm wide. This way the collar of the shirt will protrude above the postcard.
Now we also retreat 3 cm from the sides and make horizontal cuts 3 cm long. We bend their ends inward.

It's time for the tie.
We need a square of double-sided colored paper, measuring 15*15 cm.
We fold it diagonally.

Then we turn the ends to the resulting fold.


Turn the tip up.

Now we turn the end inward, as in the photo.

We bend the edges towards ourselves and push them inside with our finger.

Now we reduce the width of the free edge of the tie by tucking the sides.

We glue the resulting part onto the postcard.

Contrasting colors look very nice: black and white.
Also, to achieve greater similarity, use a sheet of velvet paper as a basis.
DIY greeting cards using scrapbooking technique
Congratulations created using the scrapbooking technique are very rich and unusual.

When used a lot various parts different in texture. Anything will do here: wallpaper, twine, buttons, wood. Of course, it's better to choose color scheme, which combines well with different colors.

You can even sew it on sewing machine some decoration elements.

I also like the option of wooden cards. But due to the fact that not everyone knows how to cut from it and does not have a special milling machine, let’s take this design as a basis. And we will replace the wood with thick cardboard, which is sold in stores for handicrafts and creativity.

Or such a cool idea.

Because this card looks very noble and expensive.
Schemes and templates for postcards for February 23
I have prepared several templates with congratulatory inscriptions. Which you can print and use in your creativity.
Template for creating a star for this greeting.

Take a sheet of paper and stick two strips on it for the St. George ribbon.

Then cut out the star according to the template.

You tuck its edges using your finger and a ruler. Then, using the same ruler, we bend each ray of the star in half.
You need to start along a line from top to bottom. As in the photo. This will make 5 lines from each end.

Now we make these lines more visible with our fingers and begin to glue the star to the blank with St. George ribbons.

All that remains is to cut out only one star and find the right place for it in the overall picture.
Now I want to show the inscription options.

This template can be printed on colored paper.

Another idea for congratulations.

Set of fonts.


Also a diagram for cutting out an airplane.

Template for unusual cards. Figures in squares need to be cut out.

Scheme of a small postcard.

Template for a postcard - a jacket. 
Take note of ready-made solutions.
Original applications for Defender of the Fatherland Day
Nowadays, applications with congratulations using the origami technique are very popular.
Here is a diagram for creating a greeting in the form of a shirt.

Here is another very cute idea for an applique in the shape of hands.

We will need two sheets of cardboard.
Trace your left arm and cut it out.

And we fold it in half, then in half again, to make a small accordion. We tuck the ends because we will glue them to our palms.

Now you need to decorate the front side of the applique.

Glue the edge of the accordion to one palm, the other edge to the other palm.

The applique is not at all complicated, but it will be very interesting for children to make.
There are a lot of options for original postcards for men, the main thing is to choose the one that best suits the character of your men.
For example, our dad perceives this holiday purely in the colors of camouflage and vest, so we choose the color background of the cards accordingly.
If you do not want to focus on the military past of the holiday, then you can create such interesting options with stylized features of a man: hat, monocle, mustache or cane.

I would like to know your opinion on the entire selection of ideas. Bookmark the article to repeat your favorite illustration with children.
Tweet
Tell VK
Approaching men's holiday and I want to please the stronger sex with pleasant surprises and gifts. Crafts for February 23rd are an opportunity to show your imagination and please your loved ones. Involve your child in creativity, make a gift for dad or grandfather with your own hands. Any father would appreciate a touching craft or a children's card from his son or daughter.
TO
drink in the store a gift for February 23rd - no a big problem. Each store puts out the appropriate products before the holidays. It seems to us that a gift made with your own hands will be much nicer and more memorable than just a purchase. And your men, be it dad, husband, brother, will definitely appreciate the efforts of you and your child.
It's a good idea to give dad a photo frame as a gift on February 23rd. Only one child cannot cope with this work. If you take part in creativity, it will work out.
To work you will need:
- Colored cardboard.
- Thicker cardboard (you can take any color).
- Colored applique paper or colored cardboard.
- Scissors.
- PVA glue.
- Ruler.
Take cardboard Green colour, stepping back from the edge 4-5 cm with a ruler and pencil, draw a frame for the photo. First, we figure out which photo will fit here; all our calculations depend on this. Drew it and attached a photo. If everything works out, carefully cut out the frame.

We cut out the details to decorate the frame, drawing them by hand or printing them on a printer.

Glue it color applique to the frame and begin to make the frame itself. We cut out a rectangle from thick cardboard, the area equal to the frame, to form the back part of the product. Glue two pieces of cardboard and glue the leg for stability. The gift is ready.

You can decorate the frame by gluing a shell, a beaded fish, an anchor, a steering wheel - on the theme of the sea.
If you don't know what to give young man on February 23, there is a good option, here's a tank:

It is assembled from corrugated paper, double-sided tape or glue.

This makes for an interesting gift:

Another tank, but with different “contents”.

The same materials are used, only here there is more sweetness.

The result was an original gift:

Crafts from salt dough, made together with the child on February 23, can be presented at home and at work, at school and in kindergarten. These gifts do not require large expenses, but will delight you with care and attention.

Salt dough is easy to prepare. You can use the dough to make a figurine, a keychain, or a refrigerator magnet.
One of many salt dough recipes:
- Flour - 300 grams.
- Regular salt, coarse - 300 grams.
- Water - 200 grams.
- Vegetable oil - 1 tbsp. spoon.
Knead the dough, adding water gradually. When it’s ready, roll it out on the table and squeeze out the parts using molds. Even small children can cope with such simple work. Dry the pieces in the oven. You can color it either with paints for food purposes or acrylic paints. It's up to you to decide whether you give for food or for beauty.


Our next craft for February 23rd is a keychain made from salt dough. We make it for fathers, grandfathers, brothers and mothers (after all, there are military mothers).

We collect all sorts of little things: coins, nuts, buttons, screws, nails - all this will be useful to us for working with the dough.

We cut out letters from cardboard: “P”, “M” or the initial letter of the name, for example, Sasha. Make a hole in the corner with a hole punch or scissors.


Place the “sausage” of dough onto the cardboard, distributing it evenly over the surface of the letter.

Use an awl or scissors to make a through hole for the ring.


We paint the keychain in any color, preferably with acrylic paints. If the paint is not waterproof, coat the top of the keychain with varnish (you can use nail polish).

Leave to dry or dry in the oven. When it dries, we put the ring through the hole and you can give it as a gift.
We have created an original keychain in the steampunk style. What is "steampunk"? Science fiction and mechanics, a very interesting style.

First, let's come up with the design of our paper postcard. It will be simple to implement or complex - you decide. The main thing is that she is beautiful congratulations from February 23.

Volumetric postcards in kindergarten and school:
Let's start with an original postcard on which we will write congratulations and wishes. We will make postcards in different techniques. You can make a card like this using the origami technique. For the postcard you will need a rectangular sheet of colored paper. Try it out plain paper A 4 format, fold according to the instructions, you will understand which sheet size is most suitable.

Fold the rectangle in half along the sheet. The paper folds like a book, there is nothing complicated in the work.

Unfold the sheet and fold it again, from the sides to the center.

We have a rectangle: on one side there is a sheet, and on the other there is a vest.

The photo shows that you need to bend it inward, this is a mistake. Bend the corners outward so that the corners protrude slightly beyond the fold. We made “sleeves”, turn the work over and bend it 2 cm in the opposite direction.


This is how the “collar” turns out; we will direct the square of the shirt into the corners of the collar.


A tie or bow tie can be cut out and glued to the “shirt”, or you can make a tie, as in the video.

Don't forget to write congratulations and wishes inside the sheet. We hope that your man will be satisfied. And if you add a small gift (for his hobby), it will be just wonderful.
Like this an interesting postcard you can do it together with your child. Very interesting technique, requiring only perseverance and patience.

To work you will need:
- A set of paper ribbons (you can cut it yourself).
- Cardboard.
- PVA glue.
- Tweezers.
- Scissors.
A special tool for twisting ribbons (you can make it yourself).
How to make a twisting tool: into a wooden stick (pencil, stick from artistic brush) insert a needle with a large eye and bite the eye in half.

Scheme of working on a postcard:

Cut out the base from cardboard, cut thin strips, winding them onto the tool, fix the edges, and then glue them to the base.
Any CDs are also suitable for postcards. For this card, cut out a star from red cardboard, paste a CD on top of the star and add inscriptions and clippings from magazines or drawings.

Very soon our country will celebrate the holiday, dedicated to the day Defender of the Fatherland. But few people know for sure that in 1995 February 23 was called the Day of the Red Army's victory over the Kaiser's troops of Germany in 1918 - Defender of the Fatherland Day.
This is the complex name this holiday had. And only in 2002 they decided to shorten it and leave only the last few words. And so it happened that February 23 is called Defender of the Fatherland Day.
By the way, on this holiday it is necessary to honor not only men, but also women. After all, representatives of the fairer sex also serve, risking their lives.
This was just a small part of the background, and now we return to the preparation of this event.
It just so happens that on any holiday, including February 23, children prepare gifts and congratulations to their fathers, grandfathers and other relatives. They create crafts and cards with their own hands. Adults accept them with pleasure, and some even keep them. A paper postcard for dad on February 23rd is the kindest and most sincere gift.
Today I just want to help the kids cope with this task. Today I will tell you how to make postcards for February 23rd with a description.
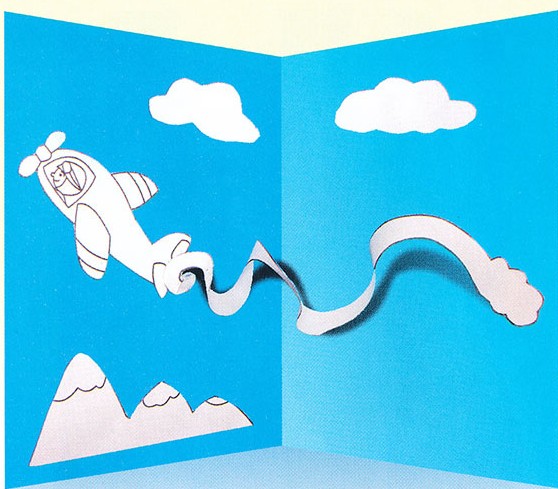
DIY postcard for dad on February 23rd
First of all, I'll show you how to do it Airborne Forces postcard. Why did I choose paratroopers and not pilots and sailors? Because our dad served in the airborne troops, and we are proud of it.
Every year we dress in vests with the whole family and go to the city procession with the flag, honor the memory of those who died and then get down to celebrating.
Last year we were even able to attend international events, and there were a lot of impressions.
So for February 23, we decided to give dad a gift, and to include a postcard with the gift.
In order to make an Airborne Forces greeting card, you will need:
- Colored paper;
- Glue;
- Scissors;
- Sheet of cardboard;
- Pencil.
We need cardboard for the base of the card; it is better to use a pencil for glue, because the parts are not large and it will be easier to use. You will need a pencil to draw clouds and a parachute, and scissors to cut out these details.
Let's get to work and start making an Airborne Forces greeting card.
The first step is to fold a sheet of cardboard in half, this will be the base of the postcard. You choose the color yourself.
To simplify the task, I can suggest this template. It can be printed if you have a printer.

In exactly the same way, you can either draw a parachute or print it. Here's another template for you.

It doesn't matter if you drew it all or printed it out, now you just need to cut it out.
We bend the resulting clouds and parachute exactly in the center. Lubricate one half of the parachute with glue and connect it to the half of the other parachute. Look, I made them in different colors, in combination they will resemble a paratrooper’s vest. As soon as our parachute is ready, we grease its edges and glue it to the cardboard in the place you like.

You can draw the slings, you can make them using threads, or you can cut them out from the template that I offered you just above. I used the last option.
Now we need to make the clouds. We deal with them in exactly the same way. Just remember to be careful, because the postcard should not be stained with glue. In the end I got something like this greeting card Airborne Forces

In my opinion, it’s not at all difficult to make such original cards for February 23rd with children.
Postcard for 23rd
Master class postcard for dad with numbers 23
In this work I will not provide templates, so you need to rely only on yourself.
To make a card for dad with the numbers 23, you will need:
- White cardboard;
- Cardboard golden color;
- Colored paper;
- Scissors
- Glue;
- Pencil.
When we have all this, prepare the surface and get to work. The first thing you need to do is bend a piece of white cardboard like this.

From blue and red paper, cut strips 2 centimeters wide and as long as cardboard. We glue the strips as shown in the photo. It turns out to be a wonderful tricolor. Glue a green rectangle into the middle of the card.

Now we take golden-colored cardboard, draw a twig with leaves on the back side and cut it out. It needs to be glued on top.
You can also use colored paper, but it will quickly wrinkle, because we only glue the twig in the middle.
In conclusion, you need to cut out two numbers from cardboard or colored paper. I decided to take the scarlet color. Draw the numbers with a pencil and cut them out. Glue one on one side of the card, the other on the other.
 Basics of the Reiki system - the method of natural healing by Mikao Usui
 How to make a ball from CDs, DIY master class Toys from old CDs for the New Year
 How to wear a shirt under a men's sweater?