Pattern of snowflakes made from paper templates. DIY snowflakes made of paper
Paper snowflakes are the easiest and most fun way to make new Year decoration for home, office or store. As children we just folded white paper for a snowflake, four or eight times, and then cut out the rays of the snowflake in the way you imagine. It was always interesting when you unfolded paper - what snowflakes would you make from paper with your own hands? They were always different. Today dom-v-sadu.ru wants to offer beautiful ideas how to make a paper snowflake and new printable paper snowflake templates.
How to fold paper for a snowflake
The easiest way to fold paper is to take a square sheet of paper and fold it in half 4 times. Then, holding the corner - the center of the fold - in your hands, cut out triangles along the diagonal sides. You can also decorate the edges - cut with curly scissors. Expand and get openwork snowflake rectangular shape.
To cut snowflakes from paper in the shape of a star, you first need to take paper round shape and fold it in half. Divide the semi-arc into 3 equal parts and bend each edge towards the center. Draw any of the proposed patterns on the resulting blank, cut it out and unfold it.
Another option is how to make a paper snowflake with your own hands using a different folding pattern. To do this, fold a square sheet of paper diagonally, mark the middle, folding the sheet. From the middle, divide the entire workpiece into approximately equal parts and make folds in this place. It turns out to be folded paper with two tails from which you can make a lot of interesting things.

Beautiful paper snowflakes - original cutting patterns
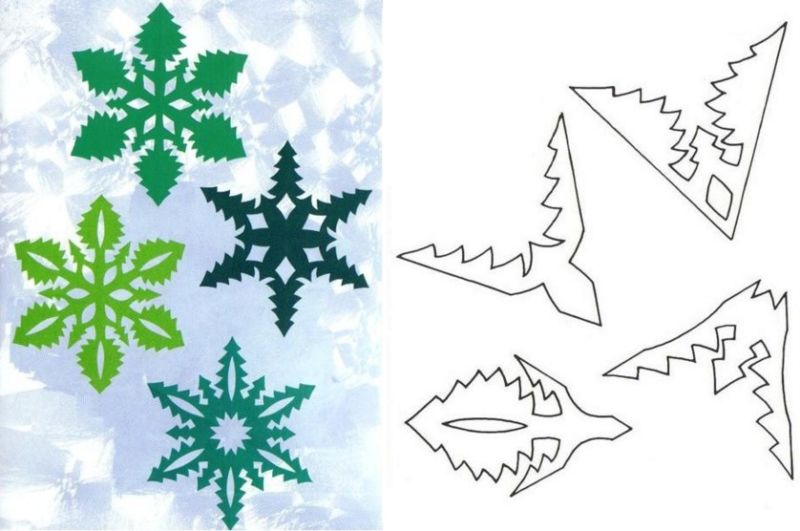
On the resulting blank using the method described above, we draw any pattern, you can even draw a snowman and cut it out, you get snowflakes with snowmen. We suggest you make more delicate New Year's crafts from paper. To do this, you need to strive to draw a very detailed pattern consisting of thin lines. For example, you can take one of the proposed cutting templates. Snowflake templates can be used not only for white, but also for colored paper to create multi-colored snowflakes.

Paper snowflakes cutting templates
The most beautiful and original snowflakes are made if you print a template or stencil and then cut it out.
We suggest you use ready-made ideas and print out templates for cutting out snowflakes from paper. Here is a paper snowflake design to print and cut out.


Snowflake ballerina
The snowflake cutting patterns can be used to make a ballerina's skirt for another cute room decoration that hangs from the ceiling by a string. Making ballerina snowflakes is very simple. To do this, cut out the silhouette of a ballerina from paper. For the skirt, we make New Year's snowflakes from paper with our own hands, trying to make it as openwork and beautiful as possible. You must cut a hole in the center, but not a very large one, and preferably one with sharp edges. This way the snowflake will stick better to the ballerina. Then we insert the ballerina into the center and glue the parts together if necessary.
You can use the following ballerina stencils with snowflakes.

Such ballerina snowflakes will dance beautifully if they are hung by thin threads.

- You can use office paper, colored paper for children's creativity, or origami paper for cutting out snowflakes.
- It is convenient to use ordinary stationery scissors to cut out relatively large sections of the pattern, for example along the edge of a snowflake.
- To cut out small details and complex patterns, it is better to use hairdressing or manicure scissors.

Hello, dear guests and blog readers!
It's somehow cold and frosty in Barnaul today. There was such a strong wind this morning, wow... Although you know, nature does not have bad weather, all weather is grace. Although, on the other hand, this means that the greatest and long-awaited holiday for all residents of Russia and not only will soon come - this New Year. Yes, he is rushing and everything will definitely happen soon! Imagine what the memories will be like, Santa Claus, fun and jokes.
But for all this to happen, you need to create the right atmosphere. To do this, we decorate houses, entrances and everything around with various winter decor. The most common option is to make it from . To do this, you need to take your favorite stencil or template and cut out the desired image using it. There is nothing easier friends))). This is exactly what today’s post will be devoted to.
In the previous article, I showed you master classes on a different topic, where we did work in the form of . By the way, did you manage to do it, do you have any questions? I hope there are no difficulties.
Take ready-made blanks and create, I want to wish you that this type of work will only be a joy for you. Create with your children as a family, or cut out snowflakes at school during labor lessons, or in kindergarten classes. The main thing is to remember a simple truth, because initially a sheet of paper is folded in a certain sequence in the form of a triangle, and then the desired design is applied and scissors are used.
Paper snowflakes: beautiful and simple templates for cutting out for windows 2020
Friends, prepare in advance to meet winter. And if it’s already in full swing, then even more so. When I was preparing for this article, honestly, I didn’t see anything, such an atmosphere was created inside me, you know, I immediately wanted a holiday in my soul. Therefore, you know, first I want to show you samples of work for children. After all, most often children sit and cut out snowflakes using printouts with templates and stencils. And then together with you they decorate the windows and rooms.

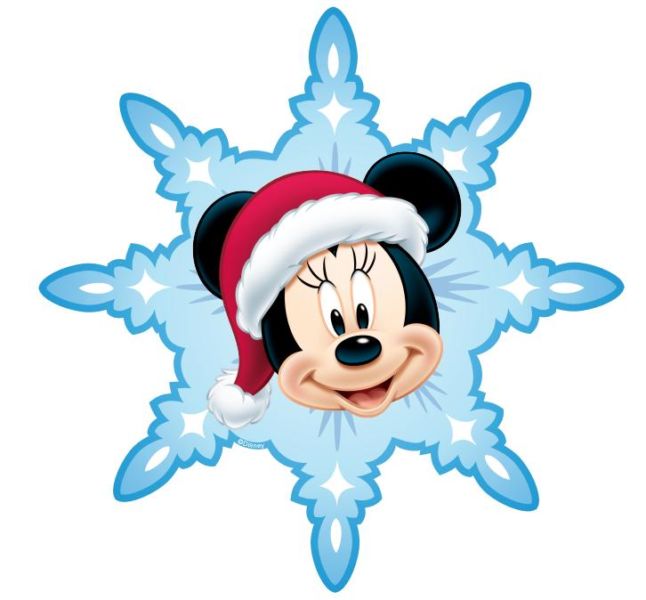
So, to make the work go quickly, take ready-made blanks, print them on a printer and voila, there will be beauty and order in the house. Look what wonderful children's fluffs I found with cartoon characters, you need to make them double-sided. To do this, print out the layout in two copies, cut out along the contours and then connect them from the wrong side with double-sided tape.


Little fluffy ones might also come in handy, if it’s small, decorate it with them. Or make a garland out of these beauties.

But we can still do the work, and even dress up our fluffies. Do you want the same masterpieces for yourself?

Take this template as a basis and create.

Look at the work done by children from the Country of Masters. Cool, isn't it? But you are weak, I think not.

But the work made of cardboard is also based on the samples that I gave above.

Well, I suggest adults make these crafts.
Remember that a sheet of paper is folded using the origami technique in a special way, cut, and then a template is applied, according to which a new masterpiece is obtained.


Here are a dozen more stencils, please use them.


Among other things, you can also make a three-dimensional snowflake using the accordion technology using a template. Remember how we did this last time, if not, then feel free to go, or look here:
1. Take a landscape or A4 sheet of paper and fold it in half. Then divide with scissors into two equal parts. Make an accordion out of each one. In the middle of the accordion, make a clamp in the form of a stapler with a stapler. Then attach a stencil or draw your own. Moreover, you need to circle it twice and in a mirror image. This is clearly visible in the last picture. Cut out the workpiece.

2. Now fluff the snowflake and glue the resulting parts together, placing two accordions next to each other. Thread the thread and hang it somewhere.

Your souvenir is ready! Congratulations!

How to make paper snowflakes for the New Year? (step-by-step diagrams for cutting)
Yes, it’s absolutely easy and simple, especially when you have such instructions in front of you with tips and ready-made sketches. To get started, do the following. Fold a sheet of A4 paper into a triangle and cut off the excess with scissors.

And then draw the outline of the design on it. The illustration shows where to cut (where the black color is).

Visually it will look like this.


Thus, you can take absolutely any blank that you like and create! Good luck with the creative process.
By the way, they can be made from newspaper and painted in any color.


Video master class of volumetric snowflakes
If you want to create a snow beauty so that it is unusual and beautiful, a video from the YouTube channel will help you with this. Or take a look at mine, there are so many ideas and new products on this topic. Don't miss it if you haven't watched it yet.
DIY carved and openwork snowflakes for the New Year
If you do not want to use ready-made options, then you can take note of the following option. Fold a triangle on a regular notebook sheet using the origami technique, as shown earlier in the article. And come up with a suitable drawing yourself. For example, like this, use your imagination and get weird.

Look at this idea.)

Or use these sketches to give you an insight.

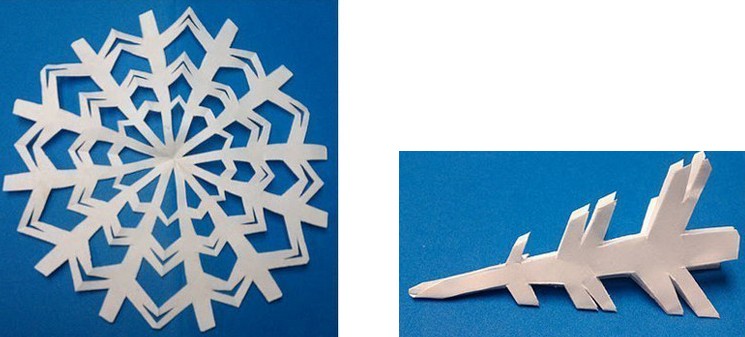
Just grab a pen, pencil or felt-tip pen and immediately come up with interesting snowflakes. Look, this is how the author depicted it. On the right is the finished product.


There are a lot more ideas that you will definitely like:


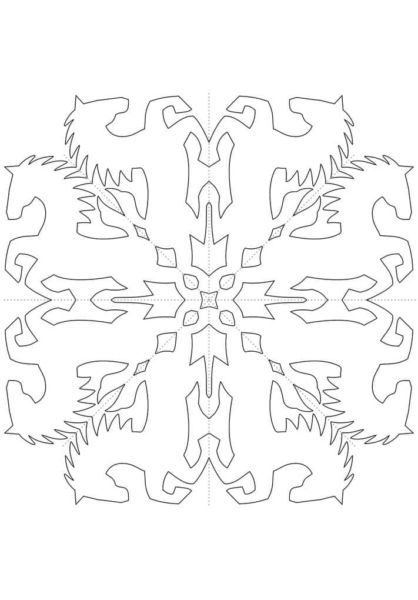
And for those who are fans of Star Wars, I suggest the following (we also have diagrams, ask if necessary):

Paper snowflakes with templates for the printer: easy and beautiful
Well, now ladies and gentlemen, I suggest one more job that you can do directly on your printer. But first, make paper blanks from a landscape sheet or colored double-sided paper. That is, there must be a triangular base.

As soon as you have built it, immediately start printing it. On the right you see a stencil, take it, cut it out and trace it. And on the left, the finished result.


Stencils of snowflakes made of paper of different sizes with a fold
I think that everything is clear here too. Depending on what sheet of paper you take, this will be the size of the fluff. It turns out there is no need to invent and rack your brains. The largest ones come out of newspaper sheets, and then are painted with multi-colored paints.


New Year's snowflake-ballerina (can be downloaded and printed)
How wonderfully the fluffs swirl when you walk home, and the lanterns are shining and you catch them with your palms. It's like they're dancing a waltz or playing with you. Let's make these cute ones at home too. To do this, you first need to cut out a blank in the form of a girl who is soaring or spinning.


And after cutting, make a skirt. It can be absolutely any snowflake from this article. Just make a cut in the middle and put it on the dancing ballerina. And your beauty will be ready.

This is how you can decorate your apartment or any room, hang ballerinas on tinsel or a thread and let them float in the air.

A4 size snowflake stencils for New Year 2020 for winter window decor
Now let's move on and I want to immediately show you a video from which you will also learn how to cut beautiful snowflakes. If you still don’t know how this is done, then this story is just for you. Go for it. 


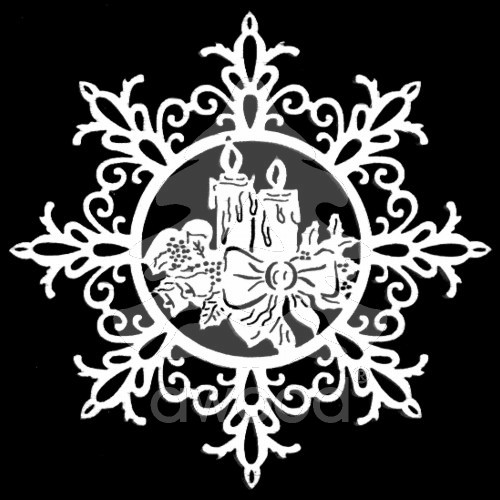
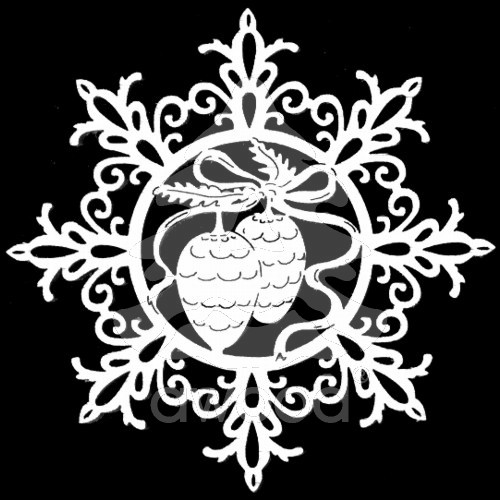
How to cut out snowflakes using the punching technique (large pictures for Word)
And now, friends, we’ve reached another chapter, which is dedicated to cutouts. Well, if we say according to modern vytynanka. Take these drawings and use a utility knife to cut along the marked lines. You need to cut off everything black. And then turn the blank over and glue it to the window or door.
Interesting! In China, this cutting activity is called jianzhi.
I tried to find the coolest and coolest stencils for you. Here the sides are openwork and carved, but the middle, as they say, is a surprise. It can also hold a snowman, a bell, New Year's balls, candles, cones. In general, there is so much, it’s impossible to list everything. I really like the idea with Christmas trees, deer and Santa Claus.


Paper snowflake angel (cutting templates included)
And you know, I was also struck by this new product, which, it seems to me, is insanely magnificent. Take a look at all the work steps in this photo. It turned out to be a real angel inside a snowflake. Cool, isn't it?

You can also build such a voluminous angel by cutting out two samples and sewing them in the center.


And here’s another wonderful composition, also take it to your piggy bank.


Look how cool it looks in music hall at an event or group.


Well, how do you like this note, friends? Did you find what you were looking for? I hope the answer will be positive. I was glad to help you with this. Let your fluffy snowflakes decorate your home in an unusual way and become a highlight in the New Year's interior.
I wish you a great mood and positive mood. Happy holiday everyone. Bye.
Knowing how to cut a snowflake out of paper can be useful for both children and adults: paper snowflakes are a good basis for many winter crafts and room decor. How to make snowflakes out of paper?
Using interesting templates, you can make the most unusual snowflakes from an ordinary white paper sheet.
Snow... Adults say that this is frozen water, but children know better: these are little stars with the magical taste of the New Year.
Simple paper snowflakes: cutting templates
Choose a suitable pattern, print it out and cut it out along the outline. Print out the templates and cut out the snowflake.


Paper snowflake 4


Paper snowflake using origami technique (fold and cut out)
Before making, you need to fold the paper simple blank, on which the cutting diagram will be applied in the future.
To do this, we take a white square sheet. You can use blue, dark blue and even colored paper - depending on what your imagination tells you. We select the density of the sheet taking into account the purpose for which the snowflake is made. Thus, it is better to use thicker paper to create snowflakes - pendants: they will retain their shape well and will not tear from an accidental touch. Thin airy snowflakes are convenient for decorating windows and various crafts.

Carefully fold it diagonally and point the top of the resulting triangle down.

Fold the triangle in half again. We get a smaller triangle, the top of which we again point down.

We align the sides of this triangle with the central line, which divides it in half. We get a narrow triangle with an uneven base, the top of which is directed upward for convenience.

We align the base of the triangle by carefully cutting it with scissors in a straight line.

Look at the video detailed instructions: how to fold and cut a snowflake out of paper?
That's all! We made a base for cutting out paper snowflakes! Now we will apply the templates for cutting onto such bases to obtain different types snowflakes. For convenience, print out the template and trace it onto the prepared paper sheet. If you get the hang of it, you can print the template on the sheet from which the snowflake will be cut out in the future; to do this, you need to place the drawing in one of the corners of the sheet, choosing the optimal print scale.
By cutting out the paper along the drawn contour and unfolding the base, you will see in front of you an openwork snowflake of a unique shape. To cut out small contours, use the smallest scissors, including those with a curved edge. You can also use a sharp stationery knife; in this case, the workpiece is placed on thick cardboard, a wooden or plastic board, the surface of which you do not mind damaging.
Snowflakes made from paper turn out especially beautiful, the cutting patterns for which are a symmetrical pattern.
Snowflake using origami technique (video):
Snowflakes - ballerinas: templates for cutting
Ballerina snowflakes turn out incredibly delicate and elegant. They can be hung on a lamp, Christmas tree or decorate a window with them. We fold a sheet of paper and apply a template on it according to which we will cut.

Cut according to the selected template.

Now we need to cut out the silhouette of the ballerina. Select one or more silhouettes.

Print out the silhouette of the ballerina and cut it out.

We should get a silhouette of a ballerina and a snowflake.

We put the snowflake on the ballerina like a tutu and fix it with glue.

We tie a thread to the ballerina's arm.

An elegant and delicate paper ballerina snowflake is ready!

Many snowflakes can turn any room into a real one. winter's tale, and any window looks like a picture painted by a wizard - frost!
Watch how to make a ballerina snowman in the video:
Volumetric snowflake made of paper - best decoration for a large hall or room. It’s not at all difficult to make, you just need to carefully follow our instructions. Best for crafts colored paper medium thickness.

Cut out a square from paper. We took a square measuring 10*10 cm.

Fold it diagonally.

Then fold the resulting triangle one more time.

On the double side of the triangle we make three cuts at the same distance from each other. Don't cut it all the way.

We straighten the snowflake and glue the first two inner ends together. Can be glued with glue or tape.

Turn over and glue the next two ends of the snowflake.

Turn over and glue the next corners.

Glue the last layer of corners together.

We make six such rays.

First we glue together three rays.

We cover our snowflake with glitter gel.

Volumetric beauties paper snowflakes are ready!

Watch how to make such a snowflake in the video:
Cutting pattern No. 1 - “spider web”
This snowflake resembles a light cobweb.


Cutting pattern No. 2 - “snowflake with stars”
Scheme for cutting out snowflakes with stars.


Cutting pattern No. 3 - “frosty snowflake”


Cutting pattern No. 4 - “wavy openwork snowflake”


Cutting pattern No. 5 - “snowflake with zigzags”


Cutting pattern No. 6 - “snowflake with herringbone”


Cutting diagram No. 7 - “Santa Claus’s staff”


Cutting diagram No. 8 - “straight arrows”


The larger and straighter the lines of this design, the easier it is to cut it out. This must be taken into account when choosing patterns that will be used by children.
See how to cut an openwork snowflake step by step? The video clearly shows the process of applying a cutting pattern.
Samples of snowflakes for cutting No. 1


Samples of snowflakes for cutting No. 2 - “geometry”


Samples of snowflakes for cutting No. 3 - “round dance”


Samples of snowflakes for cutting No. 4


Samples of snowflakes for cutting No. 5


Stencil for cutting snowflakes No. 1 - “round rays”


Stencil for cutting snowflakes No. 2 - “sharp rays”


Stencil for cutting snowflakes No. 3


Stencil for cutting snowflakes No. 4


Stencil for cutting snowflakes No. 5


Stencil for cutting snowflakes No. 6


Stencil for cutting snowflakes No. 7


Stencil for cutting snowflakes No. 8


Stencil for cutting snowflakes No. 9


Stencil for cutting snowflakes No. 10


Stencil for cutting snowflakes No. 11


Stencil for cutting snowflakes No. 12


Stencil for cutting snowflakes No. 13

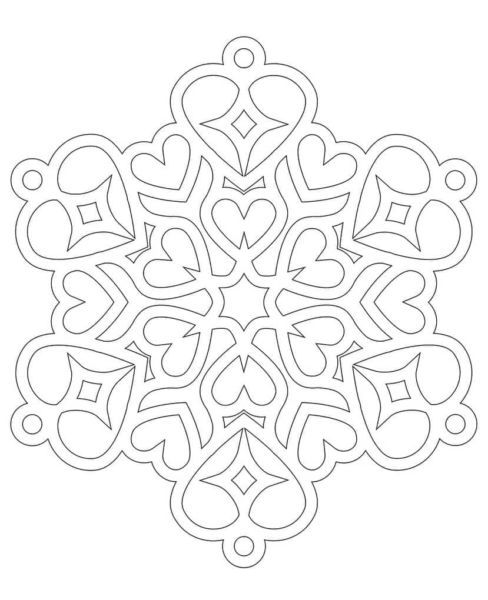
This snowflake is decorated with tender hearts.

Snowflakes using the quilling technique turn out very delicate and airy. In order to make such a snowflake, we will need quilling paper and an awl for winding paper curls (rolls). Making from paper free rolls white.

Flatten the rolls, giving them the shape of droplets.

We make a heart out of paper tape by twisting its edges inward.

We will need six of these hearts.

We glue together “droplets” and “hearts” made of paper.

From paper turquoise color We make free rolls.

Flatten them into a droplet shape.

We glue two turquoise “droplets” at the base.

Glue the turquoise “droplets” to the snowflake.

We make a “lamb” shape from white paper, twisting the edges of the ribbon outward.

We will need six of these “lambs”

Glue the “lambs” to the snowflakes, laying out the outer layer of them. A paper snowflake using the quilling technique is ready!

DIY snowflake garland
You can make beautiful ones out of paper snowflakes New Year's garland. To do this, cut out a circle from colored paper.

Fold the circle in half.

Fold the workpiece again.

Once again.

We draw markings on the workpiece for future cuts.


Let's make a few of these snowflakes different colors. We glue them together.

Straightening paper garland. We got a very elegant New Year's decoration.

Craft ideas with snowflakes
Small and big snowflakes can be decorated New Year's card- a mitten! We wish you happiness this winter!

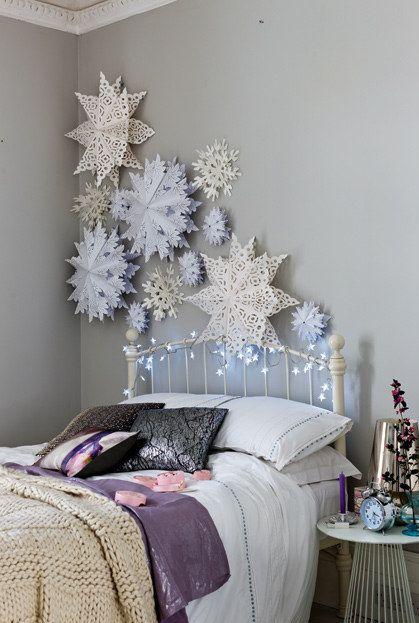
Paper snowflakes are the best decoration for windows. From paper snowflakes you can make a luxurious New Year's composition. Such decoration will bring warmth to the hearts of people both on one and the other side of the window.

Snowflake - window decoration
Another way to make a snowflake is this. There are a great variety of design options, because each snowflake is unique and inimitable.

Paper snowflakes (reviews):
I love making snowflakes))) (Alice)
Download New Year's snowflake stencil: Sn-w009
Downloads: 12850.
Added in 2010.If you want to draw your own snowflake, you can download a free blank template with numbered lines for folding paper.
Say thanks to the artists!
If you like the downloaded snowflake patterns, then you can say Thank you by writing a message in the Guestbook or downloading the general archive with all the snowflakes from the “ Classic snowflakes », « Specific snowflakes" And " Baby snowflakes» (Total 95 pcs.) for only 24 rubles. through our New Year's online store. Also, by downloading the specified archive, you will additionally receive bonus patterns of paper snowflakes, which are impossible to obtain in any other way:
Snowflake stencil with cobwebs and spiders. A fairy-tale snowflake with an image of a frog princess sitting on a lily... more precisely, six frog princesses... :-) A stencil of snowflakes with aliens standing on a flying saucer with flags in their hands. Mesmerizing snowflake with Egyptian wall paintings. Snowflake stencil with a picture of a turtle. Snowflake template with butterflies. Snowflake with the image of fish skeletons (fish bones) - a reminder of the New Year's herring under a fur coat;) :))) Pirate snowflake - Jolly Roger. You will receive a general archive with bonus schemes automatically to your e-mail immediately after payment.
Any information posted on the site in the public domain is intended solely for personal, non-commercial use; any use of it for commercial purposes is prohibited. It is permitted to copy and/or quote materials posted on the site in the public domain only on the condition that they are used in compliance with the relevant provisions of the current civil legislation, including copyright provisions, and only with the obligatory indication of a backlink to the “New Year's” website Snow” (http://www.site).
Download the archive with miniatures of snowflakes
After you have downloaded snowflakes in doc format on this page, you can also download an archive with miniatures of the same name for all snowflake patterns available on the site (except for the “Snowflake of the Year” section):
Unpack the contents of this archive into the folder in which you saved the free downloaded snowflake patterns. These miniatures will help you see what cut out snowflakes look like and subsequently choose which patterns to print at one time or another.
How to make your own classic snowflake
If you want to make your own New Year's snowflake stencils from paper, you can look at the pictures and with comments for instructions on how to correctly fold and cut a six-pointed paper snowflake(for free):
How to make a six-pointed paper snowflake step by stepHandmade New Year's paper snowflakes for the New Year will create the atmosphere of this most important holiday like nothing else! And ready New Year's schemes(templates, stencils) of paper New Year snowflakes will help you with this.
Happy New Year!!!P.S.
Absolutely everything, patterns (templates, stencils) of snowflakes from this section can not only be downloaded for free, but also unpacked! All archives without registration, without passwords and SMS confirmations!Hello everyone! Today I want to continue the theme of crafts and show you how you can easily and quickly create wonderful toys in the form of paper snowflakes at home. The other day my sons and I made such a beauty that now this wonderful creation makes us happy. Watch and do with us.
I remember how I sat and cut out snowflakes as a child; it brought me so much joy and pleasure. And then she ran and glued it to the window. Time has passed, but nothing has changed until now, I still love this activity, only now I do them with my kids.
I'll start, as always, with the most simple options manufacturing, and along the way there will be more and more complicated options.
In order to create a snowflake, you only need one tool - scissors and a sheet of paper and a good mood.
Then you need to correctly fold the paper into a triangle, and then draw a suitable pattern and cut it out. You will also need a simple pencil))).
The main thing is to take a square-shaped sheet, fold it in half (1), then in half again (2), repeat steps (3, 4), almost done! Draw with a pencil what you will cut out, for example like this in this photo:
So, from this triangular blank I propose to make these magically beautiful and light versions of winter snowflakes, which you can use everywhere, even bring it to kindergarten, school and decorate the rooms in the apartment, in the entrance and windows with them.
If you like everything openwork, then this look is just for you:
If you love more classic options, then choose these wonderful snowflakes:
The following layouts and diagrams will be a little more complicated:
In general, I really liked this selection of all kinds of decorations on snowflakes, which I saw on the Internet:
Look how picturesque and patterned they are, it’s just super beautiful, and most importantly, it’s accessible to anyone, even a child. preschool age, even for a schoolchild and for us adults.
For the little ones, you can offer this craft in the form of curls made from stripes.
Cutting snowflakes from napkins or paper
Have you ever seen those, such that the cutest snowflakes appear from napkins that absolutely everyone would like? I found these and am sharing them with you, the method is simple and easy, and also budget-friendly, you will need glue, napkins, scissors, a pencil or pen and cardboard.
Interesting! Napkins can be replaced with any other type of paper, such as corrugated paper.
The stages of work themselves are not complicated, but these pictures outline the entire sequence, so watch and repeat.
The final result of the work will be incredibly beautiful and will be remembered by everyone, and if you decorate it with colored sequins or something like that, it will be absolutely cool.
Or this way, depending on how someone decides to decorate the original sample.
Well, now I’ll show you a rather primitive one, old way, before, everyone used to make such cute snowflakes in labor lessons or in art kindergartens. You will need paper and good mood, of course, scissors and glue. You will need to cut long strips of paper from a regular A4 sheet, the width of the strip should be 1.5 cm and the length approximately 30 cm.
You can make these multi-colored stripes and you should get 12 plain stripes.
This is how you glue these strips together step by step.
It turned out incredibly original, you can hang it on a Christmas tree, on a window or on a chandelier))).
Another similar option made from paper strips.
At my friend's house I saw a snowflake made from regular newspaper, then you can cover it with shiny varnish or glue meshurki.
Or you can roll cones out of paper and glue them in a circle, alternating colors.
Do-it-yourself volumetric snowflake with step-by-step descriptions
To begin with, I want to offer you this way of working, maybe you will like it better than the following:
This type of work is a little more complicated, but it is the most interesting in my opinion, because it looks Such a snowflake appears as if in 3D form. Of course, it’s time-consuming, but it’s worth it, my child and I made such a masterpiece in 1 hour. We are happy to share step by step wizard class with you.
Stages of work:
1. You will need 6 squares of paper ( blue color and 6 of another, white color), we took ordinary squares that we already had, they are sold as notes for notes. If you don't have these, then make your own.
Fold each square in half from one end to the other.
It will turn out something like this, and the last figure lies on the table, this is the result of the work.
2. Then fold the two ends of the paper to the fold line on both sides.
Turn the finished templates over to the wrong side.
Now turn the craft over to the other side again and push out the parts that stick out.
4. This is how it should work out, it’s absolutely not difficult.
The next step will be to prepare 6 white squares, from which we will make the following blanks.
5. So let's start, this work is even easier than the previous one, let's make origami out of paper again.
This is how it should turn out, there should be 6 blue blanks, and also 6 white ones.
6. Well, after you have cut the white squares, fold each leaf in half by taking one end and placing it on the other.
Do it after the envelope.
7. Now turn all the envelopes over to the other side.
My youngest son also helped, and the eldest joined a little later.
8. Fold the sides.
Flip it over and fold out the sides, then fold them toward the center. Cut out a small circle from paper and attach all the modules.
9. Now start gluing.
Take your time, do everything carefully. Use a napkin.
10. Almost everything is ready, all that remains is to decorate and cheer up yourself and those around you.
So I called my eldest son for help, and this is what we did to him.
11. We glued a photo in the middle, it turned out to be such a funny and mischievous modular paper snowflake. Tomorrow we will hang this beauty on a booth in the kindergarten. It looks simply amazing and much brighter live). So be sure that absolutely everyone will like this miracle!
In fact, there are quite a lot of three-dimensional options; they can be made using the origami technique, or in the most ordinary way.
I found these on the Internet, I hope you find them useful, take paper, scissors and glue:
Here is another similar option.
If you have a lot of time, then you can do volumetric snowflakes more complicated, I know that they usually decorate the halls of kindergartens, schools, universities, universities and even shops.
Interesting! You don’t have to glue the parts together, but use a stapler to do it faster.
Video on how to cut out a New Year's paper snowflake for children
First I wanted to show you a primitive video, and then I thought that you can easily do the most ordinary thing yourself. So I thought, I thought and... I propose to cut out an unusual snowflake in the form of an angel:
Simple snowflake patterns for beginners in origami technique
As far as I know, origami is also divided into subspecies, for example modular origami from paper. Which one do you love the most? I have some interesting ideas.
Or the simplest and easiest to do, even school-age children can figure it out:
Modular origami is already more difficult; here you initially need to learn how to fold the modules correctly, and then everything will go like clockwork.
You will need to make quite a lot of modules to put together such a composition, but fine motor skills will develop)))
Each such module is easily inserted one after another, so you can come up with any options on the go.
All I can do is wish you good luck and creative success.
Schemes and templates for cutting snowflakes from paper for the New Year
As for the various ready-made patterns, I offer you these types of snowflakes. The main thing is to remember that first you need to fold the sheet correctly, as I showed you at the very beginning
Now outline what you want to see and cut out along the contours.
If you want to make the snowflake more voluminous, use ready-made templates, like this one:
Then for this purpose you will need to cut out 3-4 templates, and then stitch or glue them in the center, and press them down with a stapler. Who needs such ready-made blanks and diagrams, write a comment below, I will send it to you by email absolutely free, I have quite a lot of them in my piggy bank, I will be happy to share a whole bunch.
By the way, you can create your own pattern, look how it looks, try it, it’s a creative activity:
I once thought it was last year, and I imagined such beauty:
For those who like openwork and very complex options, although there is nothing complicated, I can suggest watching this video, by the way, in it, paper is folded differently, take a look, there is something to learn:
Master class on snowflakes in quilling style for beginners
This type of toy is quite difficult if you have never made it using such a well-known quilling technique before. But this is at first glance, because the main thing is to understand the essence.
The most simple circuit and even a beginner or a child can get a snowflake:
And also this video will help you with this, everything is accessible and described and shown step by step. All you have to do is repeat all the actions after the presenter and you will get a masterpiece.
Snowflakes using the quilling technique, this one is stunningly beautiful and charming. Try it.
Well, I gave you a whole bunch of ideas for realizing the festive mood, decorate your house, apartment. It will look simply great, especially with your own hands, such crafts will always bring warmth and comfort to every heart))).
See you! Have a great day everyone, sunny mood! Come visit more often, join my contact group, write reviews and comments. Bye everyone!
Sincerely, Ekaterina Mantsurova


 How much fabric is needed for a dress: simple methods and basic calculation nuances
 Beautiful Christmas tree decorations made of plywood: we make decorations with our own hands using a jigsaw
 Manicure with acrylic paints at home