Do-it-yourself sports complex for your dacha. How to prepare a playground with your own hands for use
As you know, almost all little children love to play pranks and fool around in the most inappropriate places for such fun, which greatly complicates the lives of adults.
Therefore, so that the kids do not interfere with important matters or allow them to relax peacefully, you will need to take care of their comfort.
The role of the playground in the development of a child
By deciding to set up a playground in your summer cottage, you will allow your child to fully feel parental care and love.
Believe me, the child will not only be happy with such a surprise, but grateful. Your own personal space will allow you to develop your child’s intuition, sociability, teach him to better understand his peers, and play in company.
In addition, the child will become more independent and will not bother his parents over trifles.

And at that time, the mother will be able to calmly do household chores, without worrying that the child is wandering around the street unattended or playing in an abandoned yard, where you can bump into dishonest people or get hurt by sharp objects or broken bottles.
A children’s playground on the backyard is really very cool, especially since not only children in groups can play there, but parents will also be interested.
When decorating a playground at your dacha with your own hands, you don’t need to think about perfection, just give in to your instincts and personal childhood memories.
Probably every adult in childhood built various huts and rope “bungees”, made simple and “climbing ropes” on wood.
In order to build a children's playground with your own hands, it is enough to turn your own children's ideas into reality, and use ordinary improvised means as materials.
How to choose and prepare a site correctly
Before you set up a site, you need to think about where it should be located.
So, the area allocated for children's games should be located as close to the house as possible, of course, if the kids are small and require constant parental supervision.
For older children, the area can be arranged in a sports style and located at some distance from the house.
It’s good if children can not only play in the sandbox or ride on a swing, but also play outdoor games. True, this will require a large area.

Choosing a place for a children's playground is a primary task
If there is a garden near the house, then you can arrange a children’s area in it, where kids will play hide and seek, catch and other similar games.
When starting to arrange a children's area, it is better to first ask the children what they would like to see on their territory than to play.
You can invite your child to build a hut from willow twigs, a special bicycle track, the same “bungee” and much more. Let the child decide for himself what is more interesting for him to play with.
There is no need to design the site to match the style of your summer cottage, the main thing is that it is bright, colorful and cheerful. You can take your child’s favorite fairy tale as an idea. In addition to the fact that it will give a feeling of fairy tale and magic, the site should be safe and comfortable for any games.

Since children spend more time outside in the summer, part of the children's area should be hidden in partial shade. If that doesn’t work, then make a homemade canopy from a durable fabric awning or install a large, bright umbrella.
If the playground is being built for very small children, then it should be clearly visible from the window of the house, and there should be no reservoirs, wells or ponds on the area nearby.
You will also need to smooth out elevation changes as much as possible in uneven areas.
The site must be protected from wind and drafts. To do this, you can plant green vegetation.
Besides everything, not very good place for arranging a children's area in low-lying, constantly windy or cold areas.
Safety is key
To ensure that the playground is safe, should only be surrounded by plants that do not have thorns, you need to constantly pull out nettles that can sting the child.
Also, among the vegetation there should be no poisonous plants, sea buckthorn, rose hips, castor beans, bittersweet nightshade and other similar vegetation.
Such safety measures will help avoid dangerous injuries, burns, and blisters. If, however, some plant cannot be removed from flower bed, then you need to carefully monitor the small child, when he grows up, tell him what danger lies in the plant.
All elements that will be located on the playground must be strong and reliable, without sharp corners or protruding bolts.
All joints must be thoroughly cleaned. After everything is done, the playground is ready; you will need to fully check the serviceability of the swing and similar structures every six months.
Children's slides must be equipped with protective elements. And most importantly, don’t forget to decorate all the details with bright and cheerful colors.
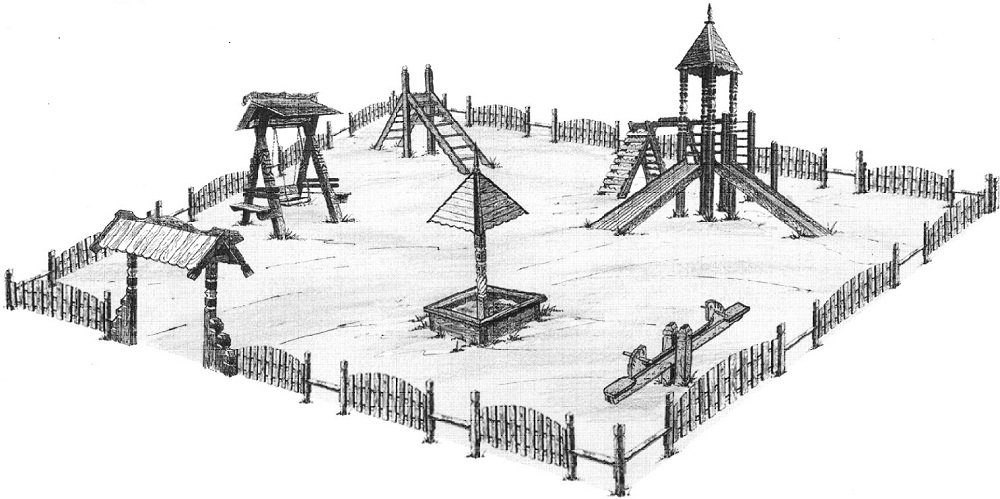
Popular diagrams and drawings of playgrounds
A play area for a child can be designed in the most different options. A small sandbox is perfect for little ones.
Here the child can prepare shortbread culinary masterpieces, like those of his mother or grandmother, thereby developing fine motor skills.
After some time, large castles will be built in the sandbox, special forms will be filled out, and the child will even show his writing abilities. A small swing is also perfect; over time, you can build a larger structure.
The wooden house will especially appeal to boys who will play hide and seek or military headquarters there. Although there is something for girls in the house interesting activity. There is no material for a house, build a hut with your own hands.
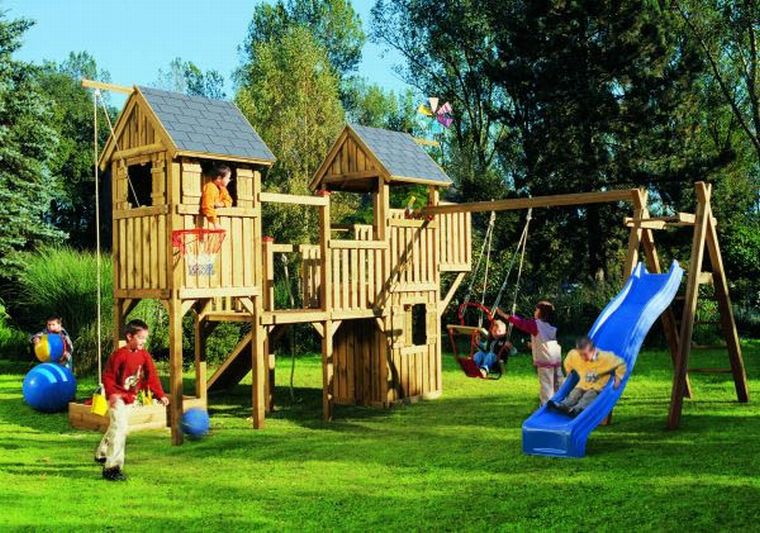
Various sports facilities are more suitable for children school age. You can equip the site with a bicycle track, an area for playing volleyball or football.
In the summer, when the sun shines very strongly, you can put a small pool and a tent next to it. There are many options for layout of the playground and interesting elements for its design.
Here the main thing is to give in to your imagination and not forget about the safety of the child.
Drawings, diagrams and ready-made versions of playgrounds made of wood and other available materials that are suitable for DIY construction are in the photo selection below:


The sandbox is a must-have element for children's fantasies
So, the main thing is that there is a sandbox on the playground. Both small and larger children, even schoolchildren, can play in it.

Moreover, it is not at all difficult to build such a structure, and not a lot of material is required.
So let's get started. Where the sandbox should be located, you need to remove the soil to a depth of about 30 centimeters, then make a depression in the center of the structure, the bottom of which will need to be filled with material for drainage, you can take crushed stone or pebbles.
The diagram shows a sandbox built from 10 not very thick boards, the length of which is 1.8 m. To build the sides, you will need two boards on each side.
To fasten them you need to cut out grooves according to the pattern. For reliability and strength, you will need to install 30 cm bars at the ends of the structure.

The remaining boards need to be attached to the sides in a horizontal position, thus creating a comfortable bench for a child or a shelf for his sand products. To complete appearance The sandbox will need to be decorated with bright colors.
The slide is the main element for entertainment
It’s a good idea to install a slide on the playground.

Of course, making such a design will not be very easy, but in order to see sparks of happiness and fun in the eyes of a child, I think it’s worth trying.
So, first of all you need to prepare the boards. It is necessary to treat the wooden surface well, thoroughly clean it from splinters and rough places.
The safety of children playing on the slide depends on the quality of the work performed.
Therefore, the wood is not only well cleaned, but painted with high-quality paint or varnish; the nails must be driven in carefully so that they do not come out during the operation of the structure.
And of course, you will need to think about how to cover the area so that landing from the hill is as safe as possible.
Lawn grass, well-sifted sand, or artificial material based on synthetic materials may be suitable as a covering.
If the slide is intended for children over 6 years old, then it can additionally be equipped with ladders of different heights, horizontal bars, etc.
Can you imagine a playground without a swing, of course not. It will be easier to build such a structure than a slide.

The main thing is to follow the drawing and everything will work out. According to the drawing, the swing should have a height of 3.5 m. For strength, the support needs to be deepened into the ground by 50-70 cm, and then filled with concrete.
Six 5*5 beams are used as load-bearing elements. The work must begin by connecting the swing beams and racks on both sides using bolts. Thus, the supports will be sufficiently reinforced and durable. They also need to be connected from above with timber.
The nests will need to be prepared as shown in the drawing. A staircase that needs to be made on the side can serve not only for servicing the structure, but also for children's fun.
Setting up a children's area is very easy, the main thing is to know the interests of the child and have a wild imagination.
As a rule, the main element is a sandbox, especially since it is very easy to set up. This will only require a few boards.

You can pour sand into a large rubber wheel from a tractor.
If there are extra thick logs in the yard, for example for heating a stove, that have not had time to be chopped, then you can make a sandbox of this strange material, and then decorate the logs with all the colors of the rainbow.
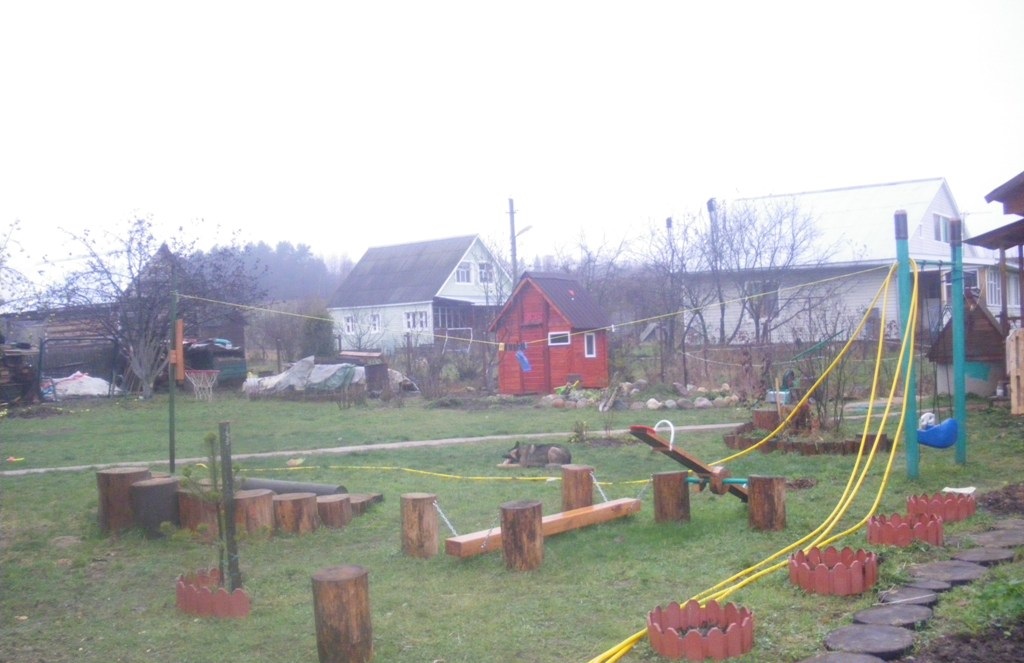
The second main element of the children's area is the swing. To make them you will need durable material. You can install ready-made swings or homemade ones.

In extreme heat, the child will not be able to play in the sun all the time, and they will refuse to sit in the house. To make your child’s leisure time colorful, place a pool for him in the children’s area.
Of course, it’s unlikely that anyone would want to deliberately dig a real pond, and it’s dangerous for a child. But this is exactly what the little naughty girls need.

You can buy ready-made or try to make it yourself. If there are no wooden boards, strong rods are quite suitable. This will create a decorative hut.

Little children love to sculpt from plasticine and play with children's dishes. Therefore, you can build a special table for them on the site from large logs.

In addition, you can put structures in the children’s area in the form of labyrinths and climbing frames:

And also other equally interesting children's elements:
For bright colors and exoticism, you can install decorative elements from improvised means, in the form of a firebird:

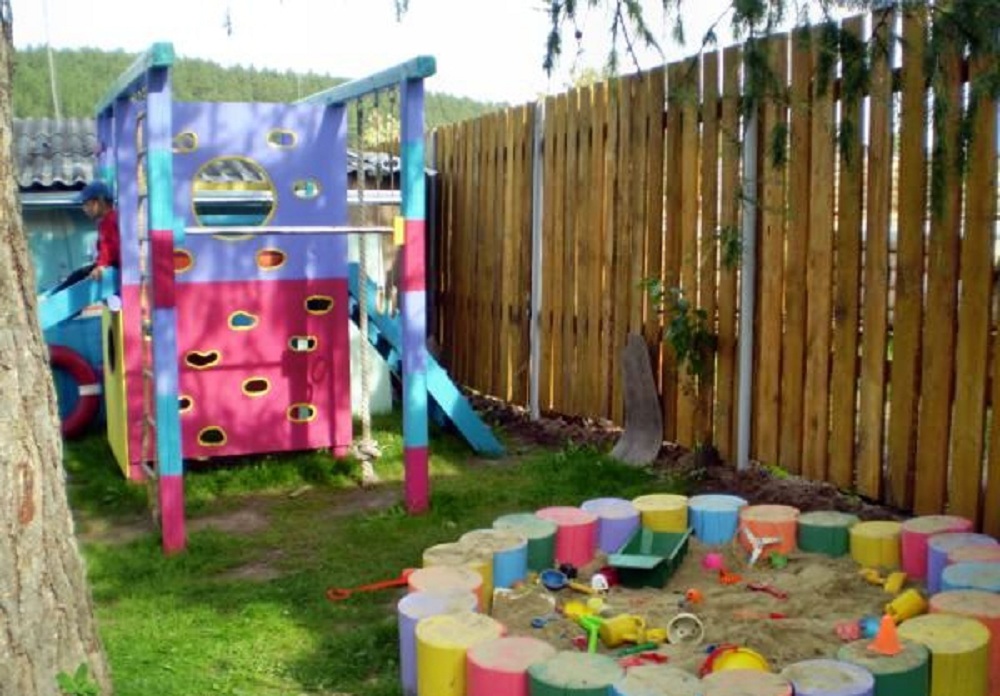
In addition, for greater interest, the sandbox can be made in the shape of a sports car, figure eight, oval or other geometric shape.

If there is a tall and strong tree growing in the yard, you can use it to install a swing. This option will save on material.
Playground layout
If you decide to build a playground at your summer cottage, then first of all you need to determine what area can be allocated for it.
After all, not everyone has a large dacha plot; there are medium and small ones. But, regardless of the area, the area for the playground must first be prepared, cleared of debris and leveled as much as possible if you want to build a high-quality fence between the children's area and the flower beds.
On a small area you will definitely need to install a sandbox, a swing, a house, and a pool for the summer.
If there is space left, it can be equipped with other equally interesting elements, including a small slide, a table for fakes, spring horses or lambs.

For older children, you can build a sports corner by installing labyrinths and climbing frames from boards and car tires:


To understand in more detail how to set up a children’s playground at your dacha with your own hands, we suggest watching videos that will help you understand what you will have to face and what can be achieved:
Important Details
When arranging a playground, you need to remember that all the elements that will be installed on it must correspond to the age of the child.
As he grows up, children's elements are replaced with more interesting ones for the child's age. After all, if a child played in the sandbox at three years old, he is unlikely to need it at 12 years old.
But a swing on a tree will definitely suit the interests of teenagers. In addition, it would be a good idea for a teenager to get a medium-sized trampoline.
It is advisable to coordinate the elements for the children's area with the child. But you shouldn’t indulge everything; the main thing is to take into account the child’s physical capabilities, his level of development, and temperament.
In addition, a lot depends on the financial capabilities of the family, and this fact can also be decisive in the choice of elements for the site. But the most important thing is the parents’ desire to please their little miracle and see his joyfully shining eyes every day.
When a pack of little pranksters appears in a family, the question arises of what to do with the children at their summer cottage during the summer. In addition to “socially useful” works and bicycles, children can be offered a playground. You can set one up right in your backyard. The new review presents examples of just such playgrounds.
1. Carousel

If the yard area and finances allow, you should think about building a large children's carousel. To implement such a project, you will need wooden beams, a rotating mechanism, cables, durable wicker baskets and, of course, construction skills. The main thing is to take care of the reliability and safety of the structure, and the joyful faces of the children will be worthy payment for their efforts.
2. Childhood territory

Fence a small piece of your backyard and create a playground there. This can be a very modest corner with bright paths, a table, a bungee and a makeshift house, or a full-fledged amusement park with swings, carousels and slides.
3. Mini-garden

Let your child feel like a real gardener. Separate a small area of land with stones or wooden blocks, plant flowers, herbs and any other plants there and teach your child how to care for them. Such a garden will teach your child work and responsibility, and a harvest grown with his own hands will be an excellent reward for his efforts.
4. Sports ground

Wooden stumps and bars are perfect for building a small sports ground in your own yard. Children will definitely enjoy such simple attractions and will not let them get bored during a family vacation at the dacha.
5. Slides

A wooden structure with slides is an idea that is suitable for those who have a lot of space. You can buy slides, or you can make them yourself, but in any case, the children will be happy.
6. Trampoline

A trampoline is a wonderful attraction that will delight both children and adults. Unfortunately, you won’t be able to do it yourself, but the costs will soon be worth it.
7. Signposts

Come up with fabulous names for all the structures in the yard and make bright signs with your child. Such signs will help children better navigate the area and allow them to turn their stay at the dacha into a fun game.
8. Chessboard

You can build an excellent chessboard from wooden boards or plywood, which will appeal to adults and children, and will also become original decoration backyard
9. Swing

Unneeded car tires can be turned into an adorable swing. In addition, creating such an attraction does not require any special skills or special expenses.
10. Slate board

To prevent children from getting bored while their parents are working in the garden or sunbathing in the sun, hang a large slate board on the fence or on the facade of the house.
11. Bowling

An ordinary concrete track can easily be turned into a bowling alley, and from plastic bottles Makes great skittles. Instead of a bowling ball, you can use a tennis ball or any other heavy ball.
12. Target

It turns out that noodle bundles can be useful not only in the pool. You can use them to make a bright and colorful target for throwing balls. Such an attraction will not only amuse children, but will also help develop speed, dexterity and coordination.
13. Waterbed

From plastic film you can make a large, cool mattress filled with water, which will bring a lot of joy to adults and children.
14. Twister
Backyard obstacle course.
The backyard can be turned into a small obstacle course for active children's fun. From scrap materials you can make a rope maze, islands, a bungee jump, a cable car and much more. Such a platform will become not only a field for fun games, but will also help to significantly improve the physical fitness of children.
Continuing the topic, we present more that definitely need to be implemented this summer.
What to give a 4 year old child? Our grandparents decided not to waste time on trifles and build a sports complex at their dacha. Fortunately, our grandfather can do carpentry work with his own hands. I (Lena Pavlova) got involved as a designer, drawing on the experience of the complex that Oleg Skripalev built two years ago at our home. Well, we had to do some supply work: we collected cuttings from shovels for the wall bars and monkey bars from stores all over the area. We found a metal rolling stock to buy galvanized steel for crossbars and poles. Neighbor Volodya helped weld the crossbars. Later, we waited for Oleg Skripalev himself to visit us in order to properly “equip” our frame with shells and create “multiple climbing routes.” So we built our structure “from scratch.” Here's what we got:
Friends, this post aroused so many responses that in 2019 we made a separate website dedicated to the Skripalev sports complexes https://kids-complex.ru/ where we posted a lot of materials about this sports complex, which we called the Chistov-Pavlov complex and others like it, as well as history of complexes and sports corners, individual equipment and a more detailed overview ready-made solutions On the market. Now this site has become official for Skripalev’s sports complexes. There you can order a sports complex based on an individual project for your home or cottage, or buy individual equipment to independently build a complex similar to ours.
Why weren’t standard sports complexes suitable for us?
The very first question that arises is: why didn’t we just buy a ready-made one? Below is a picture of a typical representative of finished structures. The only advantage (in my opinion) of such (not cheap) complexes is their declared safety. The fastenings are hidden, the corners are smoothed, the tops are inaccessible - you don't have to fall too far. 
It’s cool, of course, the manufacturer won’t have to sue the parents, but the child is unlikely to learn to climb here, there’s nowhere to climb. The shells are inconvenient. A climbing frame with a slope, minimal height and uninteresting (monotonous), a gladiator net - similar. Rings are not useful to any gymnast in any gym - they are small in diameter and plastic (and this is not the worst option seen in our yards). The rocker is also not inspiring - it is not stable for little ones, and not interesting for big ones. There are no questions only about the sailor's ladder - in itself it is normal, but for some reason it does not lead anywhere. It is not clear whether it is possible to move from it diagonally to the house, but since it rests on the climbing wall, you cannot swing on it. It seems that the option of “swinging on a sailor’s ladder” has been excluded by the manufacturer for safety reasons: it is fixed with a support at the bottom (this is often done with ropes). The small (about 5 steps) Swedish ladder leading to the house (at the back) is inclined and insufficient for full climbing. Again, it’s not the worst - usually the rungs of such ladders are so thick that it’s uncomfortable for a child’s hand to grasp, and they are made with such a large step that you can’t really climb on them - only up or down. The house could have been a springboard for climbing if it had been made of pipes rather than timber (of course, then it would not have been made of wood and the complex would have dropped in price by four times). And for a house where you can sit and hide, it is too “lighty”. Everything was done for the control of the security service, and not for real children, not on the street, not seriously. This is interesting only to a three-year-old. And our daughter is already 4 years old. Where will it develop here?
Here is another typical representative, which has an almost convenient wall bars and a set of shells lined up in a row. This complex is far from so bad in terms of its shells (the hammock was not tested, but the rest, except for the rings, looks quite usable). Linear design problem is fundamental: this is a set of projectiles, they are not in the system, they practically do not allow routes (in this case, with the exception of the trajectory: the Swedish wall - the crossbars on its reverse side - the rings). This is one standard route. Even a rat gets tired of running in a circle with three stopping points, but a child has a more complex brain. The child needs to invent, experiment, implement. 
What to do? Should we abandon the line and build a square or other structure that will allow transitions from projectile to projectile? Make the shells “real”? Add heights?
If you are ready to give your child such a complication of his “climbing life”, then welcome to our club - “With Your Own Hands”. You will not find a satisfactory ready-made analogue. The aforementioned Oleg Skripalev will make you an excellent design for your house (ours, about 3 meters by 3 meters, cost us about 80 thousand in 2015 - we will write about it separately, when the summer season ends, we love it and it helps us out a lot on long winter evenings). For the house, the price tag suited us: the complex is practically eternal, in the sense that it will withstand the childhood of all our existing and potential children. But such a price tag for the street (where the shells and frame are destroyed faster) “bites” (a self-assembled analogue cost us about 20 thousand in 2017 with all the shells). That is, you should come to us again: “With your own hands.”
Specifics of the street (dacha): what will the frame be made of?
There are no walls on the street (although of course you can “attach” to the house, but for the street this is a limitation, not a benefit. At home we are forced to “cling” to the walls. Here the wall is an extra shadow (we have so little sun) and an opportunity ( unnecessary) to “smudge” into the house when rocking. An empty frame is much more practical. Then what should the frame be made of? Wood or metal? Well, here, of course, “all markers have different tastes and colors.” The tree is warm and alive. Equipment that cannot be tied on (for example, holds for a climbing wall) can be easily attached to it. It is easier to assemble a wall bars or monkey bars from wood with your own hands. Metal has an amazing advantage - it itself “works” like a crossbar, so the frame is built into the system of projectiles, and it will be possible to directly make transitions (climb) on it. A metal frame will not be expensive if you buy regular (not galvanized) pipes, sand them and paint them. We didn't bother with the price (we don't have many metal fragments) and bought galvanized pipes, which we also had to sand (but didn't have to paint). Compared to wood, metal is more convenient to use: it does not rot, is unpretentious and durable. But you need a person with a welding machine. In our case, this turned out to be a neighbor. If you don't have one, it will be more difficult. But there is always a third, in our opinion, optimal option - combined. Some are made of metal, some are made of wood. Then it is potentially possible to do without welding at all ("metal to wood" and "wood to wood" fastenings will be sufficient). The structure will be “living”, but will be enriched with unique equipment that only metal can fully provide - all kinds of crossbars for climbing.
Separate question: how to strengthen the frame so that it does not wobble. For the corner elements, we took a 100 by 100 beam and dug it in about 1 meter (with a complex height of about 2.5 meters). To make the structure “sit” more firmly, 70 cm transverse beams (cross-shaped towards the main verticals) and additional diagonal “slopes” were dug into the ground for each support. This entire foundation structure is not visible in our photographs; it is hidden underground. Above the ground, the structure is additionally “connected” by a wall bars and two metal poles vertically and three boards horizontally (from above). In general, the design turned out to be reliably “connected”, but when used by an adult it gives a slight wobble: apparently, the second time we will prefer to do it on screw piles so that it fits like a glove. We estimate the “potential” of our complex at 10 years (then the timber may begin to be pushed out by the earth), while we believe that this is enough, but again, screw piles increase the cost of the structure slightly - so, as they say, there is no limit to perfection. The main thing is to try.
Selection of shells
In their book “We, Our Children and Our Grandchildren,” the Nikitins talk about three crossbars (they called them “horizontal bars”), which became the first apparatus installed in the courtyard of their house, when their eldest child was one or two years old. The Nikitin horizontal bar system was simple and ingenious: the lower horizontal bar is according to the height of a 2-year-old child, the upper one is for an adult (the child will not practice unless he is shown an example), the middle one is between them. Then a child of any age chooses a horizontal bar according to his strength, and if the structure is connected by a pole, then he climbs a higher and more complex one in order to be “like dad.” We immediately decided that we definitely needed this. The height of the lower horizontal bar was measured for Fun, but it was made not for hanging, but for somersaults (for hanging and “standing up” it would be just right for a child of one and a half years old). 
We made the height of the upper horizontal bar maximum for the complex (here one of our adult friends is showing the children a master class on it). 
We modified the middle horizontal bar to suit the carpet exhaust system of my childhood: we added another high crossbar at a height of 2.4 meters above the crossbar at a height of 1.30 meters, so that there was an additional hook on top - as a transition to the monkey bars and as a support for mastering the “perch” , into which the crossbar at medium height has turned. Looking ahead, I will say that this projectile immediately became one of the most used for Fun and guests. Built into a large number of transitions (wall bars, monkey bars, poles, ropes, trapeze, rings and climbing handholds), it has become an invariable component of many routes. 
Fun later insisted that Grandfather add another “middle” bar to the pole that had previously stood idle (this improvement can be seen on the right in the picture with the three children). It was difficult for her to climb onto the pole, but the crossbar made the pole accessible and loved. I felt a little sorry for “spoiling” the pole, but I reassured myself that I knew the address of the metal rolling base and it was still possible to “repeat”. 
According to the diameter of the crossbars (horizontal bars) and poles: we made them different. For crossbars (horizontal bars) we bought pipes with an internal diameter of 25 mm (external - about 28 mm), for poles - with an internal diameter of 28 mm (external - about 32 mm). It was determined by hand fitting: the horizontal bar should be grippy and it should definitely be thinner than what is on most playgrounds (those horizontal bars are thick even for adults). The pole, on the contrary, should be thicker (32 mm is enough) to make it easier to master and more convenient to grip on the ascent and descent. A couple of months after the installation of the complex, we were surprised: such a “simple” (in manufacturing and installation) set of shells as a set of horizontal bars turned out to be truly the most “favorite” for our daughter and all her guests (if love is considered the incredible amount of time that they were ready to spend hanging on it upside down and doing all the possible tricks they themselves invented). We also made sure that we definitely got it right with the diameter of the crossbars - this size turned out to be convenient for both adults and children. It’s surprising that there are so few horizontal bars of a convenient diameter in our yards and none at all in children’s play complexes (where they are much thicker).
These are two shells that we made with our own hands. Why? Again, as a child, I had a wall bars, made by my dad’s hands from the cuttings of shovels. And (for some reason) I have never had anything more convenient. Even in gyms, not to mention outdoor structures. And I did enough sports.
What was so good about her? The "correct" diameter of the bars (32 mm, maximum 34 mm) for a child's hand. Not 40 mm, as in most street structures. The “correct” (not greedy) distance between the crossbars (180-200 mm). In most street designs they are made much further apart. You can climb (up and down) on any, but you can also climb on thicker and farther ones. And for oval ones, which are now very fashionable (and which are used in Belgorod wall bars of excellent quality - we have them at home). But hanging in all sorts of positions... Climbing over one, two or three bars (what a challenge!). Use them for stretching or abdominal exercises. No. So, for my taste, purchased wall bars and monkey bars are inferior (in design, not only in price). Therefore, Zabava’s grandfather (my dad who already did this once) remembered the old days and in one day, together with his neighbor Volodya, assembled both structures. In the left picture below, the same Volodya shows Zabava the “horizons” on the monkey bars, while simultaneously testing its reliability on himself. 
For the monkey bars, we took treated (painted) shovel cuttings, and for the wall bars - ordinary ones. Why? We decided to try how to survive the winter. The usual ones, of course, were coated with a protective varnish. And one more important thing: we build all our complexes (both home and country houses) for growth. That is, we didn’t even think that Zabava would master the monkey bars this year. But we are sure that she will easily master it in the next one. She has Strong arms(due to the lower shells), and older children who come to visit show what and how.
Another everyone’s favorite equipment, without which not a single sports complex can do. You can mock the long-suffering rings in different ways - make them plastic, ribbed, excessively thick or thin, and also “soldered” with an intermediate crossbar into a rigid coupling. You can see all this in our yards. It seemed to me that making an apparatus of normal quality on any site could not be easier - this is an Olympic apparatus and for it there are years-tested standards for gyms for children and adults. But for some reason, it is rings that still receive miracles of ingenuity from manufacturers of all stripes. I was lucky again as a child (a sports dad). I had standard gymnastic rings hanging on belts at home. They hung high (you have to get from the crossbar, you won’t jump), as it should be. They were very popular, not only for hanging, but also for all possible climbing (climbing into them with your feet, standing up, climbing from them to the ceiling on a crossbar, tumbling, etc., etc.) Of course, for Fun I wanted the same. I looked at the manufacturers - no problem, you can buy it. I looked at Zabavi’s hand, I honestly looked like that. And I realized that we would have time with the gymnastics adults. 
And I also realized that children love simple non-sports entertainment: hanging from rings (they should hang so that the child barely touches the ground), spinning as hard as possible, tucking their legs in or even throwing them up and... well, in general, to promoted. In my opinion, it’s amazing how useful this exercise is for a 4-year-old (and older). The child hangs for a long time, his arms become stronger, the vestibular system is trained. Why not? Why take away such joy? In short, I decided that this year is enough, next year we will hang two pairs of rings. Some are high (full-fledged), some are low (children's). Some are on the correct fastenings (belts + slings), others are on ropes (let them spin, like on a swing). On this we calmed down. This year, Fun doesn't pass by little children's rings. For the future we made a crossbar in good location, where there is room for the second pair of rings - “adult”.
Sailor ladders and expanding ladder (Skripalev ladder)
The sailor's ladder in the sports complex is an ingenious projectile. It costs three kopecks. Replaces a swing. Can be a projectile for lifting to a height (for example, into a “nest” or to another projectile suspended above). And it serves as a support (ha ha, it’s hard for an adult to see it as a “support”) for moving to any projectile suspended within a meter radius. 
Plus, the swing on the sailor’s ladder does have some kind of direction (more back and forth than sideways), so you can swing on it both in the middle of the complex and next to the pole (unlike a rope or disk swing, which work 360 degrees - suspension in the center is desirable). Actually, in the first summer we had two such ladders, and in 2018 we added a third (expanding) one - the Skripalev ladder. A sailor's ladder firmly suspended horizontally from both sides at a height can become a "dynamic monkey bars", and fixed vertically - a "dynamic wall bars". Having seen how deftly Zabava climbs the sailor’s ladders vertically, we decided not to attach any of ours. Fathers of smaller children who come to visit us simply “secure” it with their feet for a while to allow the child to climb comfortably. 
- a completely unique projectile, one of our daughter’s favorites, no matter how it was hung.
A complex and interesting projectile (rubber strand with reinforcement inside, resistant to outdoors and stretching, springy). Unfortunately, it is very little widespread (you will be tired of searching for it on Google), so we are sending everything to the same Oleg Skripalev (the link to his website was above). It costs a little over a thousand. The vine is hung so that the child can barely reach it with his hands. Next are the jumping options: holding with a wide grip with your hands, armpits, sitting. We have two of these at home (thicker and thinner, for adults and children), but they work worse because they are suspended somehow separately from other equipment (there will be a reason to rethink this when we return from the dacha). At the dacha, we hung only one vine, but provided an accessible “approach” to it (from a sailor’s ladder). The child cannot sit on a vine from the ground on his own (if you hang it so low, then when it swings, he will sit with his butt on the ground), but jumping while sitting is the most interesting thing. The child tries to get on it: or asks an adult (we usually don’t fall for it, why - read below). Or climbs over from somewhere. 
The entire design is dynamic and requires dexterity. It can spring up and “slam” the body if you get awkward (this is upsetting, but not dangerous). But the “bonus” for successful climbing is the monkey effect. In general, the 4-year-old managed to master this apparatus in 2-3 days with minimal insurance, learned to climb onto it without insurance, and learned to spend some time on it, jumping, swinging and inspiring other children. For guests, the apparatus turned out to be difficult: obviously, in order to get the hang of climbing on it, a little practice was required, and climbing in guest mode with the whole company diverted attention to the apparatus, where it was possible to “depict” something right away.
Another dynamic apparatus that can be used both as a horizontal bar (in the case of a hang) and as a swing (if you sit on top of it). This projectile costs literally three kopecks and can be used several times in combination (we are planning to add one more). The trapezoid allows you to “fly” from projectile to projectile and is therefore valuable for inclusion in complex climbing routes. There will be no repetition, if you hang the trapezoids at different heights, the trapezoids will then “work” differently. We hung the trapeze so that Zabava could not reach it from the ground, but could easily jump from the trapeze to the ground. 
In our complex, the trapeze is accessible from a sailor’s ladder, horizontal bar and wall bars, as well as from one of the upper monkey bars, and a disc swing is also available from the trapeze. Older children try to swing harder on the trapeze to reach the rings with their feet. It must be said that the suspension of the equipment depends on height and, of course, we made it for our child. Observing children of different heights (the way they use our equipment), we admire their imagination: if something that is difficult for Fun turns out to be too simple for them, then they find some other way to use the equipment and the task as a whole does not become easier for them.
The rope in the complex is used in two three main ways: as a swing (for this you need to tie a loop at the bottom of the rope), as a way up or down (to a monkey bars or a nest and, accordingly, a way to quickly “slide” down from them) or as an intermediate projectile for moving along horizontally (for example, from the rings to the sailor’s ladder). Initially, the rope is difficult for a child. Even a child can climb up a pole only when he has already “gained” some dexterity and hand strength, and the rope, unlike the pole, is also dynamic. 
Whether the rope will be used and loved by a child depends on several parameters. Firstly, the material from which the rope is made. In most outdoor playgrounds, the ropes are synthetic - they are not very pleasant for the hands and are not very grippy (slip). Like sailor's ladders, ropes have their roots in ship's rigging, where they were made from hemp. In construction stores we were able to find hemp rope of large diameter - it is rigid, but does not slip and is quite grippy. In our complex, we used two ropes made from large-diameter cotton rope, also purchased at a hardware store. The price ratio to the finished rope is approximately 1:4 (the rope is obviously cheaper finished product). Ready-made rope for children's complexes exists in our diameter (about 30 mm), it can be thicker (32-34 mm) and, in our opinion, thicker would be better. But, knowing that our “homemade” ready-made rope is still poorly used, we decided to experiment. We tied one of the ropes at the end with a loop like a swing, the other with knots along the length for climbing. I myself am against knots, it seems to me that they are more likely to get in the way (after all, a special pleasure in using a rope is sliding down it), but the men of our family convinced me. Another important parameter: where exactly the rope is suspended. From my point of view, since the projectile is complex (requires mastering), its place should be indispensable. That is, it should be included in some route where its use provides many advantages, and not using it creates difficulties (forces you to take a detour). The logic is obvious: if there is something to replace the rope, then it will be replaced. This is what happened with one of the ropes. It hung on one side of the middle crossbar as a "way down" and as such was regularly used. But as soon as we made an alternative path on a nearby beam - climbing holds - the rope stopped being used. Going down the holds may not be easier, but it is more interesting. Older children began to use this rope as a support for jumping down. It was scary for a child about a meter tall to jump from a 1.30 meter crossbar, but when he picked up the rope, he did it easily. Finally, with regard to the rope as a swing, everything is even more obvious. Such a rope should hang away from the support posts, then its main advantage - the ability to swing all 360 degrees - will be used to the maximum.
At the top of our entire structure there is a nesting net, which we also received to order from Oleg Skripalev (to our sizes). The source of the idea was a small net stretched at our house (there it is the size of a hammock, here it is about 1.30 meters by 2.50 meters). The home nest has become our favorite: the children (Fun with Guests) carry toys into it, and Sasha watches movies in it. At the dacha, the idea was similar, but we implemented it, as they say, fundamentally “for growth.” 
The fundamental purpose of this net, suspended at a height of about 2.5 meters, is obvious: it is the destination of high-altitude projectiles. You can get into the nest through the side of the wall bars (the path for adults) or into one of the two openings of the manholes from some high-altitude equipment: both sailor ladders, a short auxiliary monkey bars (made specifically to complicate possible paths), climbing holds on poles. Potentially, a gladiator net and an expanding rope ladder will be added, we are waiting for them. In general, so that there is a reason to climb up. The second purpose is also clear. The net is large (several children or an adult with a child can climb in), you can sit in it (grab a blanket and pillow) and read a book or play. At a height overlooking the surrounding area and garden. This, of course, is not a “tree house” (we are going to have one), but nevertheless, it is quite a comfortable nest in which you can relax and retire. At the age of 4, we did not provoke Zabava to climb there, at that time her tier was middle and lower. She is careful and neat with us, and we appreciate that. Some children are put online by their parents, but we were in no hurry. But at the age of 5 she began to climb into the nest with everyone accessible ways(from all the rope ladders, nets and wall bars), even those that already seem inaccessible to us (adults).
Climbing holds
The idea of the “inappropriate” use of climbing holds came to the mind of my mother (Zabava’s grandmother) when she watched Zabava holding on to a pole while standing on the crossbar and trying to reach the rope: if only she had something extra to cling to... How What's this for? There are special things for this, resistant to moisture, winter, weather changes, made to be used anywhere, including outdoors. We were stunned and decided to implement the idea. 
We bought about 20 hooks and placed them on the posts: here and there. Somewhere to help, somewhere to complicate the route. We looked at where our daughter was trying to push off the posts with her feet or hold on to them with her hands: on the way to the rope, nest or pole. Around a pillar near the wall bars, which she tried to “peel off” in order to find herself in another plane. At the rings, in order to hold on to them, move your feet along the post, lift your legs onto the crossbar, as an alternative “path” to the middle crossbar. In general, we experimented. So far, the simpler shells have “won,” but here and there, now one child, then another, will grab onto these hooks. In general, having studied the market for holds, we realized that for a price close to our complex (about 20 thousand in today’s times) you can make an excellent country climbing wall with your own hands, using an empty wall of the house (naturally, a street wall). The topic is cool, and manufacturers of holds provide advice on creating your own climbing walls, and not just sell ready-made ones (the price of a ready-made and your own climbing wall will be comparable, but it’s more fun to make your own). We decided that this is our perspective for a couple of years in the future, when Zabava will develop his body and master his sports complex to perfection.
Does a sports complex even need swings (as such)? The question is controversial, because any child over two years old will be inclined to use anything that can swing as a swing. The favorite “swings” of our sports complex are sailor ladders, vines, a rope with a tied loop and even rings. Anything, anything that is dynamically suspended. Children love to swing: we have hammocks hung all over the garden; a magnificent swing-plate with a diameter of about a meter, which we bought at IKEA a long time ago, never sits idle on the veranda (it entertains our daughter when the adults sit too long at lunch or tea , she wants to be close, but she doesn’t want to sit still) and, of course, there is something to swing on on each floor of our house (in case of bad weather). Key moment: all this (for swinging) hangs separately: at home or in the garden. Why sculpt a swing into a complex if they can be used perfectly separately (by themselves), but it is difficult to integrate them into climbing routes? We decided to leave only two swings in the complex, mercilessly throwing away the excess. We left a regular wooden swing for the “little ones” and a disc swing. For what? 
The purpose of the “baby” swing is obvious: it is mostly needed for babies (and ours hangs very low, so that a child of Funny height (93-94 cm) can climb on it and swing, pushing off the ground with his feet). The argument is clear: many of our guests come with several children, and while those who are already able to climb are climbing on the top of the complex, the kids need to be occupied with something nearby and below. Separate, so to speak, different children into different zones. With a disc swing the situation is different. 
The disc swing is an extremely simple and cheap projectile to manufacture. It's just a disc on a string. The disc is not very large (although my adult butt fits on it quite well and I was even surprised that it was quite comfortable). On a rope that is not very thick (it should not replace a rope). Swinging on such a swing turned out to be like nothing else. Firstly, the disc is not stable - you can fall off it, although the height is such that there will be no harm from falling, that is, you need to balance and hold it with your buttocks (in general, not only the vestibular area develops, but the legs and butt). Secondly, like a rope with a loop, this thing has a swing range of 360 degrees - complete freedom to fly. And thirdly, the projectile is so minimalistic and hangs so low that it does not intersect almost anything in its path: having crashed into a hanging rope, you simply deflect it, do not hit, and the disk remains below the point of collision. Hanging a disc swing in a house or on a tree is more difficult: it is necessary that the trajectory does not intersect with either walls or the trunk. It is clear that the place for such a swing is somewhere in the center of the complex. Can it fit into climbing routes? It's difficult, but most likely yes. It’s not that it’s comfortable to climb onto, but the kids are constantly trying – it’s a challenge. 
Difficult climbing routes
We have already written so much here about difficult routes that I think everything has become clear. Let's just summarize. The complex will live every day and not get boring if it provides high variability of climbing. Not only equipment for arms and legs, but also “food for the brain.” When the child comes up with a plan (“Mom, come watch me climb from the ladder onto the trapeze, spin there, and then, like a monkey, climb onto the horizontal bar” - this is a level of planning that is already accessible to a 3-year-old). Such small victories, small connections and elements of routes add up over time into an integral system; if you provide 3-4 possible transitions from each projectile, then such a system remains “open” - infinitely variable, not closed. Then you don’t get tired of climbing, even if the child is alone at the complex. As the child grows (and the complex, with modification of the projectiles, height and distance of their suspension, can remain relevant up to adolescence), routes will of course change to provide the required challenge. Oleg Skripalev talked about the great “Magellan Journey” of his childhood: when he had to go around all the projectiles of the complex in a circle, without ever descending to the ground. All these tasks that the child sets for himself become more and more complex. This is the development of the level of aspirations and the development of dexterity and strength. In general, in order to create such a system, you need to think about it, and when the child uses it, he will develop not only muscles, but also thinking, as well as planning and setting adequate tasks. Needless to say, the attempt to simply hang the apparatus in a row is a systemic mistake in this regard: it simplifies the whole idea, reducing it to the level of simple repetitions and motor skills. What attracts us most about the performances of gymnasts and circus performers? Of course, the flow of movements, their connection into a single number, the flow of some elements into others. It's like a dance! I always admire the work of the one who invented this “dance”. Where do such inventors appear? This ability to make a single integral “flow” from elements of movements is not given from birth, it also needs to be developed. Of course, in an environment that allows for variability.
Security at the complex
1. When to start? Many parents are afraid of falls and keep young children away from projectiles. In the picture below, a 2-year-old girl is hanging on our rings; no one hung her there. She came up herself, took out the rings herself (standing on her toes from the ground), hung herself, raised her legs to the rings herself, hung and lowered her legs down herself, safely descending from the apparatus. She repeated this cycle dozens of times. This girl’s mother allowed her to climb as early as she wanted, and since she is growing up with a 4-year-old brother, she had someone to “trace” behind. If you ask me: who has a higher chance of injury (not only on equipment, but also in life), this girl or those whose mothers do not allow them to climb on their own, then the answer is obvious: this girl is remarkably dexterous, knows her strengths, knows how to do it correctly fall. 
Pseudo-logical judgments of mothers of 2-year-olds: “Oh, there’s a swing here, it’s just for us, the rest is too early for us!”, “Why does this swing hang so low? Is the child clinging with his feet?”, “My daughter is too heavy.” for this lasagna (about a massive child)." There are hidden contradictions in these judgments. First, if it is too early, how will she know that the time has come if the baby does not develop gradually? It’s easier to start at 2 years old than at 6 (it’s easy to fall lower). Secondly, if a child is always only pushed on a swing, then how can he learn to swing on his own? Of course, a child can and should be pushed higher on a swing. For this purpose, we have hammocks in which it is convenient to both swing on your own and swing from outside. But the skill of swinging, pushing off the ground, is difficult to obtain on a yard playground, because the swing must be adjusted to the height of a particular child. Children just have to learn to swing by moving the center of gravity (which is great in summer conditions, but difficult to do in bulky winter clothes). Thirdly, if a child is loose and (or) heavy, then he just needs to climb (and move more), otherwise how will he become more balanced and stronger? It will be difficult to make him move at 3-4 years old, but at 1.5-2 years old, when he is interested in everything, he is a little upset by falls (from the height of his height, of course) and his natural curiosity has not yet been repulsed; he perceives his (possibly excessive ) weight as a given and tries to cope with it. If you give him this opportunity, then by 3-4 years overweight and there will be no looseness left, or, if the constitution is still such, it will be balanced by the gained strength of the arms and legs. Manufacturers of Early Start complexes suggest starting at 7 months. We bought an “early start” at 8 months and realized that they were right (it could have been earlier), despite the fact that we did not rush our daughter to walk early, there were just some equipment (for example, a slide) that she really loved crawl, and my arms were well trained on the first horizontal bars. The question is that by the age of 2 she had outgrown this complex. In less than 2 years (approximately 1 year 8 months) we We made a full-height (to the ceiling) complex in our apartment. Of course, it began to be fully used by the age of three (Zabava had no accelerating provocations), but by this time she had already mastered the lower tier well: her hands were strong and her brains were careful. So, we believe that we need to start early.
2. Less provocation from adults and more good examples of your own.
The second fundamental question: does the child need help at the complex? The answer to this is very subtle. You can help a little, but you just need to try not to provoke the child to do something for which he is not yet mentally and physically ready, and you shouldn’t relieve him of responsibility for his safety. Good example: children were shown how to hang on the crossbar upside down, holding on with their hands. 
The result was the complete mastery of this technique by Zabava and her guests, which was repeatedly shown above in the section on horizontal bars. A bad example: with the same hanging, they provoked the child to let go of his hands ahead of time (until he himself realized that this was possible and did not understand how to fix his legs). The result was a fall when trying to let go of them on their own (well, if the child is trained, then he manages to twist out of this fall and land on his haunches, and not on his back or head). To avoid such “unpreparedness” and “provoked falls,” I generally avoid helping the child physically. As a last resort (in the case of a direct insistent request from a child who himself came up with this element in advance), I stand and belay nearby (without touching the child) or substitute my shoulder or arm as additional support, without taking on the child’s center of gravity (weight). The best way to show a new technique is actually to do it yourself - as in the example with the three Nikitin horizontal bars (or for older children to do the technique). Children pick up techniques from each other very quickly, but when they do it themselves (without provocation), they usually feel their limitations and capabilities. More precisely, initially children are able to sense them, if this sense is not disrupted.
How can you knock down this natural sense of your strengths and capabilities? Elementary. We all constantly see mothers on the playgrounds lifting their one-year-old son up a two-meter slide in their arms, and then catching him at the bottom with hooting. This is accepted everywhere. When a child is lifted, rolled and caught like a thing, he gets used to the fact that he will always be caught, the instinct of self-preservation breaks down. If a child a year learns to slowly climb the steps of this same slide on his own (two steps up - one down, often he just climbs up and down endlessly), then at every moment he feels what is available to him. Thus, the fun of riding from high slides came at the age of 2, and I never pushed her up, I waited until the ascent and descent from the stairs became accessible to her and when she wanted to slide down herself. Several times I caught myself with envy when I saw that Zabavina, who was the same age, was boldly climbing somewhere up. And she immediately realized her mistake when the same girl the same age fell from a height on the descent and, for example, twisted her ankle. Then I was glad that my daughter was not “without brakes,” although her brakes were internal: we not only did not provoke her to climb to heights, but also did not “cut us off” when she finally decided to do so. 
Thus, we did not relieve our daughter of responsibility for safety. Now she is more careful than most children; for example, in our complex she does not climb into the nest or on the monkey bars. We don’t provoke: when the time comes, she will climb on her own, let her first train on the bottom.
This principle would seem obvious. The swing should not crash into anything hard. If possible, several swinging projectiles should be allowed to be used at the same time. Apparently those who designed linear complexes thought about this (children will not crash), but they underestimated the needs of the child and the capabilities of the complexes. There is no need to try to ensure that the trajectories of the projectiles never intersect; you need to think about where 3-4 children can climb or swing at the same time without crashing into each other, while other projectiles (requiring space) wait their turn. 
Many things, for example, whether the trajectory of a swinging vine will intersect with a sailor's ladder suspended diagonally, are visible better in place than in the sketch. Our design was three-stage: sketch, implementation (checking), adjustment. Several shells were moved by us as we used them.
All this concerns, of course, more shoes than clothes; children's country clothes are usually quite comfortable. Above there are photos of Zabava swinging on a disc swing in rubber boots. This is definitely an exception. It was a rainy day and Fun just swayed as it passed by. On a home complex, the principle of “climbing barefoot” is obvious. In 99% of cases, we adhere to this principle at the dacha. If children come in sandals with thick straps, this is still acceptable, but, of course, no rubber slippers like Crocs or flip-flops. By the way, there is almost never a need to talk about this: as a rule, children themselves take off their slippers and run to climb. It is more difficult for them if the weather outside is cold and rainy and they are still wearing socks and tights under their boots. In this case, of course, sneakers or boots are better than rubber boots(we cut the grass lower under the complex). The child should feel his feet well and the shoes should not slip on the apparatus. Well, on a normal warm summer day, comfortable clothing at the country sports complex is minimal. As our Zabava says: “Today the circus performer forgot to put on her costume, but that’s okay, the performance will still take place!” 
6. If whims begin, it is better to change your occupation. All parents know that sometimes children play, and sometimes they flirt. This is especially noticeable when several children are playing at the same time. Any parent feels that the happy screams have given way to hysterical ones: just a little more and they will start to hurt themselves and each other. At this moment, children need to be distracted from the complex and switched to another activity, this is obvious to us.
7. Learning to fall. The Nikitins wrote about this so well that I don’t even want to repeat it. When is a child best adapted to falling (from their own height)? Oddly enough, at the age of about a year, when he learns to walk. His body is set up for the fact that he will have to fall many times every day and endures falls without injury, his psyche is also set up for this, he hardly gets upset, he just gets up and moves on. Similarly with low implements, such as low horizontal bars or low-hanging rings: when a child is 1.5-2 years old and he does only what he can do, he will fall, but will not be injured (I do not consider cases when the child “flies away” "from the slide that his mother put him on 80% of the time). The child will gradually discover heights on his own and gradually train in the correct falls. If my daughter falls off the horizontal bar at 4 years old (from an average age, she doesn’t climb high ones), then she bends in the air and lands like a cat. This may be followed by tears, but these are tears of annoyance, not pain: she doesn’t like it when something doesn’t work out for her (of course, 3-4 year olds are already very suspicious in this regard). Similar to heights, speeds increase very slowly and gradually. When a child learns to fall, he only walks, when he jumps, rushes and runs, his falls, as a rule, are already physiological. Moreover, jumping from heights, which older children love so much. We cannot isolate, protect or prohibit (some parents can - we cannot, I would be scared, then he will not be prepared for the amplitudes of adult movements and falls from adult height). But we can allow you to train from scratch. Is it obvious? Unfortunately no. Otherwise, we would not see children on playgrounds who are led by the hood (so as not to fall) or constantly pulled by the hand (it is not the child who holds his mother’s hand or finger, but the mother who holds him tightly with her girth so that he does not stumble or slip). The Nikitins (“We, our children and grandchildren”) also have a lot about this, but all of this was clear to us even without the Nikitins. Do you need a soft mat in a sports complex? Controversial question, but the answer is similar: “As a rule, no.” The ideal surface for country sports complexes and their “working radius” is grass or sand. Naturally, this is not stone, crushed stone or concrete. A coating that you won’t get caught on and won’t scratch. The covering of urban playgrounds does not seem ideal to us for a summer residence: in the city it performs other functions; there it is necessary to maintain an oasis of cleanliness during the dirty and slushy season. The summer season, as a rule, ends long before the autumn dirt and winter slush. We chose grass.
Kindergarten in our dacha
Of course, the complex attracted neighbors and friends to our dacha. " Kindergarten“In our case, the concept is figurative, because schoolchildren also climb with great pleasure at the sports complex, thus expanding the social environment of our Fun. 
As for me, it seems to me that dacha children rushing around the territory and from site to site: here is a sandbox, there is a “climbing room” (that’s what they themselves call the sports complex), here is a house, there is a pond or a trampoline - this is childhood . So come, friends, before the warm summer days are over, we’ll show you, tell you, just relax together and let the kids climb! Fun and I will be delighted!
Sports complex at the dacha: second season (continued, summer 2018)
A year has passed. The shells, packed in a container for the winter, were again taken out and hung on the sports complex. We also bought a trapeze, rings, an expanding ladder and a gladiator net. Optimized suspension. We added a parent hammock to the side (not inside the structure) to spend time nearby while the children climbed. 
As a result, we have a design for at least 24 projectiles (if we count the climbing holds scattered across the supports as one projectile, and each crossbeam or pole separately). So now we have: five crossbars, two poles, two monkey bars, one gladiator net, one wall bars, two monkey bars, two ropes, two trapezes, two rings, two swings, one expanding ladder, one large nest net, at least 20 climbing holds and on the side hammock. Our daughter turned five and a son was born. The games have also become more complex. Today, my daughter has mastered all the apparatus and the full height of the complex, with the exception of the monkey bars (she hangs on them, but is still afraid to go through the monkey bars, although she has already begun to pass the monkey bars on playgrounds - she has enough arm strength, but ours hangs higher and she is cautious).
We currently have two favorite “long-playing” games:
1. Voyage of Magellan. Alone and in company. This " trip around the world"during which you need to go through all the apparatus without ever going down to the ground. The difficulty lies in the fact that the complex is, in principle, better passable for the child for whom the apparatus is suitable in height, and for taller children it is difficult to pass the rings, for example, which are suspended lower and “provoke” them to touch the ground. That is, Zabava easily copes with this task (but only after she was able to rise to the maximum height of other projectiles), and the older children actually get pierced, although they can pass some other projectiles. An easier solution is either to hang the projectiles at a compromise height, or to end with a low-pass projectile. You can complicate the problem endlessly, for example, by introducing conditions that the projectile cannot be reused more than two times, or that the projectile can be reused no more than 5 times. -ty projectiles, or nothing can be reused. Or that you need to leave each projectile in a different way than you came in. Perhaps in some of these types the problem will not be solvable, but the children will find their own loopholes or optimize its rules.
2. Circus. You can play alone with spectators. Tickets are being sold, seats and desserts are being prepared. We sit and watch our daughter climb, who must hold out certain time without getting off the ground or stopping. For some reason she likes the hour time. Surprisingly, for her this hour passes quite unnoticed, and we have time to calmly drink tea nearby if we have stocked it in advance. The daughter has her favorite paths and has new numbers (calls), which she is not too lazy to shout about in advance in order to attract our attention. If I need to “add some courage,” then I turn on the commentator mode (as in Magellan’s Voyage). Instead of a “commentator,” you can turn on music for movement improvisation; this goes well with us after dance classes. Overall, there is a feeling that the daughter has made a dramatic leap in her agility and climbing ability and that there is still a lot of room for improvement. And, so that she has room to grow endlessly, from time to time we go to a real circus and show her real gymnasts and acrobats.
Links
- Skripalev V.S. Our family stadium
- Pavlova E.N. Do-it-yourself home sports complex or to order
- Skripalev sports complexes. Sports complexes based on individual projects. Do it yourself and to order
Individual consultations
Summer, holidays. How to organize leisure time for children in nature, in a country house, in a village?
We make a playground for children ourselves!
In the summer, most parents try to take their children out of dusty, polluted cities into nature. If you spend the summer months at the dacha with your children, then you need to make sure that their summer vacation is not only beneficial for them, but also enjoyable. To prevent your child from getting bored at the dacha, make a playground for him with your own hands. This will require very small financial investments plus your time and imagination. Be sure to involve the children themselves in creating the playground. Firstly, joint work helps to unite the family and strengthen the relationship between parents and children, and, secondly, the design of the playground - creative activity, which will be useful for the overall development of the child.

- 1. DIY playground. DIY sandbox
All children get a lot of joy and pleasure when playing with sand. Playing with sand provides unlimited opportunities for a child's development. You can make Easter cakes from sand, build castles and tunnels, cook “soup” for dolls, and it can be transported in cars. Another fun thing to do is bury various objects in the sand and then dig them up. You can sprinkle dry sand on the beetle, and then watch how it gets out of it. It is interesting to draw pictures and write letters on damp sand.
Making a children's sandbox with your own hands is not at all difficult. First of all, you need to choose a suitable place for it. The sandbox should not be in the sun, but at the same time, a too dark, damp place is not suitable for it. If the child is still small, the sandbox should be near the house so that the baby is always in sight.
You can fence off the sandbox using logs, stumps, and boards. If the sandbox is large enough, you can divide it into several play areas (see photo below).

To protect from the sun, you can make a canopy.

2. Children's playgrounds for the dacha. Swimming pools
Just like with sand, children only like to play with water. Most the best option- combine games with water and sand. Make sure that your child always has a source of water near the sandbox. Even a small bowl of water will be enough.

Of course, any child will be delighted to have a pool at their dacha.

Another good fun is to spray each other with water from a hose on a hot summer day.
Or you can ask your dad or grandfather to make an outdoor shower from PVC pipes.


3. Children's playgrounds. Children's playgrounds photo
When creating a playground with your own hands, you cannot do without all kinds of logs, stumps, tree cuts, and boards. You can make tables and chairs from stumps and surround the sandbox with them. Stumps and logs can be used as sports equipment: it is useful for children to learn to walk on them while maintaining balance. The tree cuts will make a nice path.
A child's imagination can turn a simple log into a bridge spanning an abyss, into an airplane, a car, a horse, etc. Such games with object replacement are very useful for developing children's creative thinking.


4. Decoration of the playground. DIY playground photo
A prerequisite for a good playground is the presence of greenery: trees, shrubs, grass, flowers.
Large trees provide protection from the sun on a hot summer day. They are fun to climb.

Sometimes by various reasons trees have to be removed. However, you should not cut down the tree to the very roots - turn it into an interesting decorative element - a fairy-tale “house”.

The base of large trees is the most suitable place to create “fairy houses”. Make one like this fairytale house made from any available material will be of interest to every little girl.


Be sure to help your child make his own flowerbed, which he will take care of on his own.


Even if you yourself prefer not to plant anything in your dacha, make sure that your child has his own small garden. Just a couple of beds where he can grow unpretentious and tasty plants, for example, green peas.

5. Crafts for the playground. Decorating a playground with your own hands
Decorating children's playgrounds is an interesting and creative activity. Handmade crafts made from wood, tires and plastic bottles are suitable for decorating a children's playground. Here are some ideas for decorating a playground with your own hands. Be sure to involve children in the process of creating crafts for the playground.


6. How to make a playground. Playground ideas
When creating a playground with your own hands, be sure to give your child a secluded corner where he can be alone or in the company of his friends, dream, play, read, and finally take a break from you, the adults. This can be purchased children's playhouse or a tent. Or you can make a children's house (tent, pavilion) with your own hands. Here are some interesting ideas.
DIY children's house made of wood

Children's houses for the dacha. Children's houses tents.
The easiest way to make a children's house with your own hands is to stretch a rope between two trees, pillars, between a tree and a fence (see photo below) and throw a thin blanket over it. The ends of the blanket must be tied with ropes to pegs driven into the ground, or pressed with stones.


DIY children's house.
The most interesting way to make a children's house for a summer cottage is to “grow” it on your own plot. Any climbing plants with lush foliage, such as beans, are suitable for this.

Using the same principle, you can “grow” a children’s house from sunflowers. Sunflowers are a good plant to grow with children. They have large seeds, grow quickly and are very unpretentious. Plant sunflowers around the perimeter of the circle at a distance of 10 cm from each other. When they grow to 1.5 meters, collect their tops and tie them together - your sunflower house is ready! Yes, don’t forget to leave room for entry when planting!

7. DIY playground. Children's playground made of wood
As we already mentioned at the beginning of the article, be sure to make sure that the child has natural materials available for play: sand, water, large stones, small stones, twigs, pine cones, plants. Games with natural material are of great importance for the development of sensory perception, motor skills, creative thinking of the child, and have a beneficial effect on the physical and mental health of children.


8. DIY playground ideas.
Concluding our review article “DIY Playground”, we will share with you a few more useful ideas on the design of children's playgrounds.
Plexiglas easel.
Many mothers know how useful games with paints are for young children. But most do not very often allow children to draw at home, because... After such activities, you have to wash both the child and the apartment.
Games at the dacha in warm weather have one great advantage - a child dressed in only panties, no matter how dirty he gets, can be very easily washed right on the street, by watering, for example, with warm water from a hose. And at the same time, you don’t have to worry about the cleanliness of the carpet, furniture, or floor. Let the children at the dacha have plenty of fun with dirty materials, with the same paints, for example. A homemade plexiglass easel, which can be washed using the same hose, will provide you with invaluable help.


It's a good idea to hang a chalk board on the fence. Don't forget to give your child crayons, a bucket of water, and a rag.

Taking care of physical development children, you can make a rope bridge and bungee for them. And from an old chair you can make a comfortable swing.


 How much fabric is needed for a dress: simple methods and basic calculation nuances
 Beautiful Christmas tree decorations made of plywood: we make decorations with our own hands using a jigsaw
 Manicure with acrylic paints at home