Knitting a bag with a large knitted crochet. Crochet a bag - simple tips
Crocheting is not just a hobby for retired grandmothers; it is a skill and even an art that is becoming increasingly popular. Crochet is not only practical, but also creative activity, and it's also a great way to do something useful on cold and rainy days while sitting in front of the TV. In this article you will find instructions on how to create a simple bag using only basic crochet techniques. This pattern can easily be modified to create any size and style of bag.
Steps
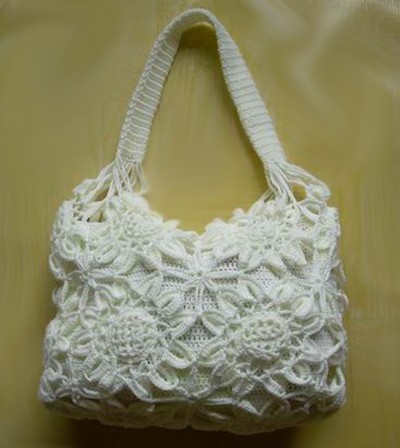
Simple clutch bag
- For this job you just need to know how to knit air loop(conventionally designated “vp” or “vp”) and a single crochet (“st. b/n” or “sbn”).
-
Decide what kind of bag you want to knit. This pattern can be modified to create a small clutch bag, tablet or laptop case.
- If you plan to carry a specific item in your new bag, measure it in advance (like your laptop) or measure the size and style of bag you want so you already have an idea of the basic dimensions and shape.
-
Choose your yarn. If this is one of your first crochet projects, you'll be better off working with a simple, regular twist yarn in cotton or soft acrylic. It is also better for you to take plain yarn so that you can easily count the stitches and immediately see the quality of their execution.
Pick up a hook. Choose a crochet hook. Almost all yarn manufacturers will indicate on the label what hook size will work with that particular yarn, so for now it will be easier for you to stick to these recommendations.
-
Knit a sample. As in any other business, it will not be superfluous to make a sample of the final product. You may be itching to start knitting your bag, but taking a little time to knit a small square (about 10x10cm) will save you time later.
- By knitting a test pattern, you will measure the tightness of the knitting (how loose or tight the stitches are) and find out how many stitches fit into a centimeter of knitting.
-
Cast on a chain of air loops, the length of which will be equal to the width of the bottom and top of your bag. Since this is a beginner's project, you will be knitting a rectangle or square (the bottom and top of your bag will be the same width, and the sides will be the same height).
- More complex jobs can be the most different forms- for example, in the form of an isosceles trapezoid, in which the upper part gradually narrows. To make a bag of this shape, you will need to learn how to decrease the number of stitches in the rows.
- For a small or medium bag, a chain of 30-60 chain stitches should be enough.
- Be sure to remember how many chain stitches you knit in this initial chain. It will be easier to write down this number, and if your chain is quite long, insert markers every 10-20 stitches to avoid losing count.
-
Turn the knitting over and knit a row of single crochets (1 sc in each ch of the starting chain). Once you have cast on the initial chain of chain stitches, its length will determine the width of your future bag, so to get started new row, you need to knit in the opposite direction, and not continue this chain. You will need to turn the knitting over each time you get to the end of the row.
Continue picking up rows until your knitting is the same height as your bag. Now that you've gotten the hang of single crochet and turning, simply continue doing the same steps until the bag reaches your desired height.
- You will need to fold the top of the bag in half (the top edge will fold down like a pocket flap). Keep this in mind as you knit and don't make the piece too short.
- If you want the height of the bag to be 30 cm (when the flap is down) and the flap to be approximately 16 cm, then you need to knit a product with a height of 76 cm.
-
Secure the thread of yarn. Once your project reaches the desired height, you will need to cut a strand of yarn and secure it. This is quite easy to do if you crochet.
-
Place the knitted fabric in a bag and sew the edges together. Fold the bottom of the fabric to form an envelope.
- Check if you have folded the product wrong side out: if you like the way one side looks knitted fabric, fold the product so that this side becomes the front.
- Take the thread suitable color(the same yarn you knitted the fabric with is best, unless you like the look of contrasting stitches) and sew the sides of the bag together. Stop at the height at which you would like to close the loose lapel.
Tote bag
-
Repeat steps 1-5 of the previous section. Instead of a simple clutch, you can try making a tote (or bag). Since in this case you will need to knit two separate fabrics and then sew them together, the bag will be more spacious, so it will be suitable for shopping or a good wallet.
- The first steps when making a tote bag are the same as when knitting a clutch. You must be able to confidently knit basic stitches and stitches, carefully select your yarn and hook, and decide how you want the final product to look. Once you've completed these steps, you're ready to start knitting your new bag!
-
Decide if your bag needs a closing flap. You will knit two fabrics and sew them together. If you don't want a closing flap at the top of the bag, the two canvases will be exactly the same. If you want to make such a lapel, the fabric that will become the back of the bag will need to be made higher.
- For example, if you want a bag with a height of 30 cm with a lapel, one fabric should be longer - knitting it with a height of 45 cm will result in a lapel of 15 cm.
-
Cast on a chain of chain stitches. Carefully counting the loops, pick up a chain of air loops until its length is equal to the width of the top and bottom of your future bag. You will knit either a rectangle or a square, it all depends on the desired shape of your bag.
- If your chain is quite long, insert markers every 10-20 stitches to avoid losing count.
Repeat the basics of crochet. This bag will be a good job for beginners. If you haven't read about how to crochet, be sure to read the article.
A bag is an integral attribute of a woman's wardrobe. However, the choice of accessory largely depends on the style of clothing chosen. color range and aesthetic preferences of the woman herself. Unfortunately, most of the models offered by modern manufacturers are not original and cheap.
In this case, knitting can be a real salvation. In this article we will look at several simple master classes, thanks to which we will learn how to tie beautiful bag crochet without much difficulty.
Benefits of knitted handbags
Despite the apparent complexity of the knitting process, you can assemble an original item in literally one day. At the same time, even novice craftswomen may not be limited by the choice of very simple models. Often, knitting a bag does not involve a large amount of work, so the finishing is already semi- finished product You can do it in just one or two hours.
Knitting patterns are always very easy to read, even if they are presented in a foreign language. The designation system for various types of loops, whether in Japanese or English magazines, is the same.
Therefore, even novice needlewomen can easily understand how to assemble this or that model of handbag.
Simple master class
How can you quickly crochet a bag for beginner needlewomen? In this master class we will look at one of the most simple methods assemblies with detailed description process, thanks to which even beginners will conquer the art of crochet.
But before you begin the process, it’s worth finding out how certain types of loops are designated in knitting:
- V. p. - similarly designate an air loop;
- Art. b./n. - single crochet.
How to crochet a bag?
For this you will need the following materials:
- 200 g of light-colored yarn;
- fabric for lining;
- decorative ring;
- hooks No. 4 and No. 7.
Conventionally, the whole process can be divided into four stages: assembly of the side parts, handles and decorative tape.
A detailed description will allow you to understand most of the intricacies of the knitting process, thanks to which all subsequent work will be much easier for you:
- Assembling the side parts:
- Using a smaller hook, cast on 40 in. p. and at a height of approximately 12-13 cm, finish knitting;
- then, in the transverse direction, assemble a chain of 45 v. p., in this case you should knit st. b./n.;
- Having knitted one row, continue the second row in the same way, but with yarn of a different color;
- row by row, alternate the color of the threads and finish knitting at a height of 60 cm.
- Assembling the decorative tape:
- It is advisable to assemble the ribbon from beige or light gray yarn;
- First, dial a chain of 10 v. p., then continue knitting st. b./n.;
- Connection of parts:

- the first step is to connect the edges of the upper parts;
- after this, a leather insert is sewn to the bottom of the product (if desired, it can be tied according to the principle described above);
- then a decorative ribbon is sewn onto the semi-finished product, into which a decorative ring is inserted;
- At the final stage, the lining fabric is sewn into the bag.
How to crochet handles for a bag in this case? To do this, simply knit a cord from dark yarn, and its length can vary from 40 to 60 cm. In the photo, the length of the handle is 50 cm.
Master class on assembling a string bag
The proposed knitting pattern will allow you to assemble an original string bag from leftover yarn. The more multi-colored threads there are, the more interesting the product will be. This design option is simply ideal for beginners, because the scheme itself is not replete with complex patterns and finishes. Despite this, you can assemble an original and practical item in literally 3-4 hours.
What is needed to assemble a shopping bag?
- Approximately 200-250 g of multi-colored yarn;
- Hook No. 2 for assembling the main parts;
- Hook No. 2.5 for knitting handles;
- Basic scheme.
Master class on assembling a shell bag
The proposed diagrams and description of how to quickly crochet a shell bag are very simple, so any novice craftswoman can cope with the task. The product itself is assembled using the fat bag method, while the handles can be made either from decorative chains or from beads, as shown in the photo.
If the product is assembled in a more compact size, the bag can easily turn into an elegant clutch that will suit a romantic outfit. If you assemble the product large sizes, you will get a practical and roomy beach bag.
By and large, this option is almost universal and to assemble it you will need:
- 150-200 g of blue yarn;
- Hook No. 2 for assembling the bag;
- Hook No. 2.5 for knitting lilies;
- Scheme.
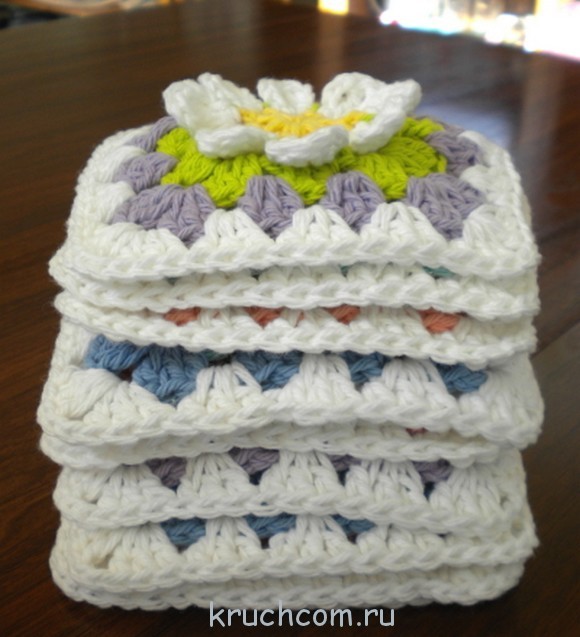
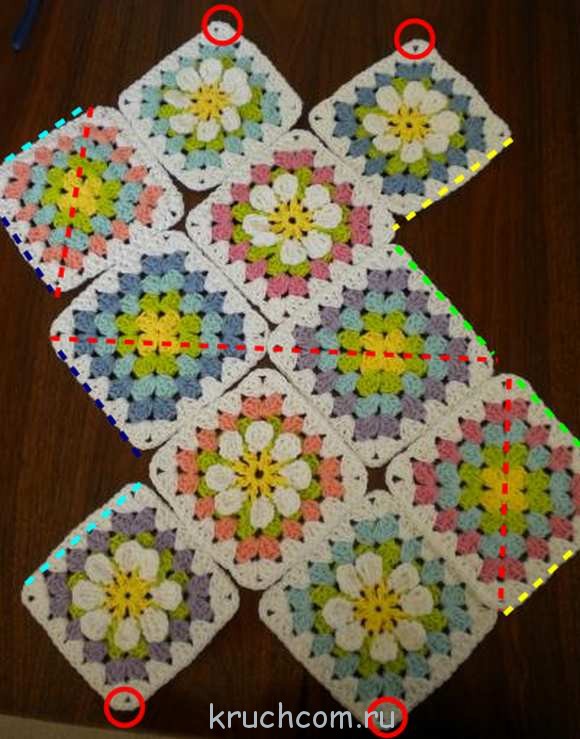
Beautiful bag made of colorful squares
How to knit a multi-colored and original bag?
This master class will allow you to “use” the remains of multi-colored yarn, which is a pity to throw away, but is not enough to assemble a whole product. But since this bag is knitted from individual colorful squares, you will be able to make a non-standard, but very stylish accessory.
So, for knitting we need:

- 70 g each of pink, orange, green and mustard yarn;
- 40 g each of beige, red, lilac, violet and yellow yarn;
- hook No. 4 and No. 5;
- leather ribbons for handles;
- beads for finishing handles.
Knitting process:
- According to the diagram, knit 26 multi-colored squares;
- Tie each of the elements 2 circular row ami of the same color;
- The third and fourth row can be knitted with yarn of a different shade or color (optional);
- To prevent the squares from unraveling, make one row of st. b./n.;
- To assemble the bottom of “composite” bags, it is better to knit the loops with double thread.
To diversify your wardrobe, you need to know how to crochet a bag, disassemble the patterns for them, pick up the threads and pick up the hook.
I especially want to look stylish and varied in the summer. Knitters have the unique opportunity to have the kind of couture handbag they want. Created with your own hands. And you don't have to pay a lot of money.
Taste, plus skillful hands, and you're done - you look stunning. And on handbags and phone cases, for example, you can teach your daughters how to knit. And it’s a useful thing and the skill of crocheting in life will not hurt.
Crochet bags with knitting patterns
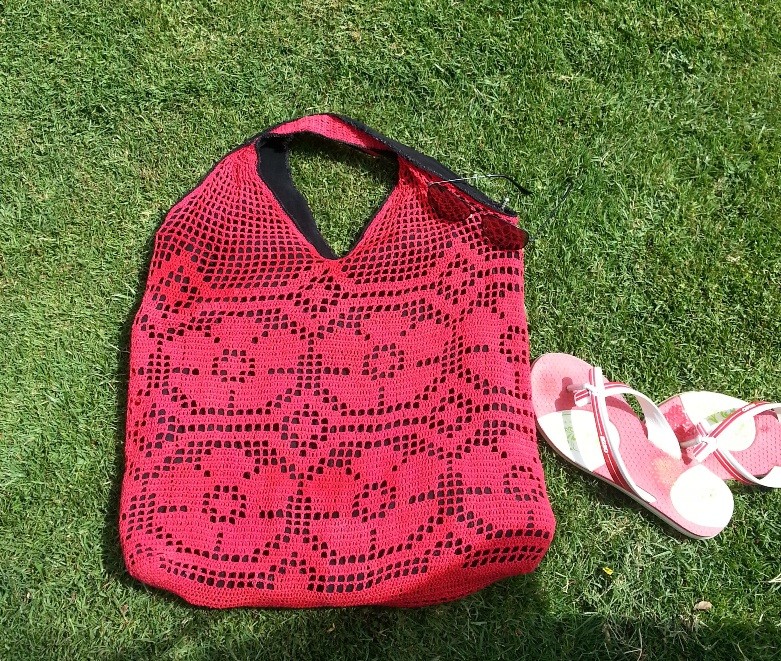
Dense background pattern. A bag made of cotton or viscose is good and not only for going to the beach. As an accessory it will suit any summer-spring suit or dress.

Crochet bag with multi-colored stripes
This model of bag will suit several outfits at once - just match the color of the stripes to match existing dresses. So much for your updated summer wardrobe.


Clutch handbag
This handbag is an elegant addition to your going out outfit. Several patterns of a fan type pattern in a checkerboard pattern for your attention. Choose a design that you like or seems more suitable. And make yourself a designer item that will make your going out outfit complete.


Handbag with ruffles
This bag is shown here as an option. I wouldn’t knit it for myself, because the ruffles would make the bag heavier, and Everyday life it is not comfortable. But it's a beautiful bag! Maybe someone will be inspired and write down how convenient or inconvenient this crocheted bag is to use.


The diagram shows that it is very easy to knit. In fact, on a lattice of double crochets, the same double crochets are knitted in a zigzag. This is how you get waves of ruffles all over the bag.

Bag with sunflowers
This handbag is a downright joyfully summer take on the leisure bag. Sunflowers with motifs, combined into a canvas bag, will create a summer mood even on the most stormy day, especially if you tie the whole chicken motifs in yellow or make the centers of the flowers yellow.
Although this way they will probably look more like daisies. Then the bag will be chamomile. And what? Also very good.


Two phone cases
Well, in addition to the handbag, a phone case. Or rather, two handbags and phone cases. An excellent opportunity to learn to crochet under the guidance of a more experienced knitter. In general, there is only one difficulty - sewing in a zipper.
But if you get creative, you can do without zipping. Make the screen open, for example. But the case will be softly protected, and it will turn out to be a nice little thing.


If earlier crocheted bags were relatively rare, then in last years fashion has changed. Nowadays, many catwalks are firmly occupied by hand-knitted items, especially for jewelry and bags. Now the trend is a simple beach bag, a sack bag, a bag, a mochila, and so on. Crochet bags made of thick acrylic are very popular for every day. Knitted bags should not stretch much - it is better to crochet them using thick yarn and a hook that is not too thick. Knitted bag DIY crochet with patterns - a great option for the summer.
How to crochet a bag? The first master class with a description is designed for those who are not very good at crocheting. Beach bag crochet for beginners, in which the openwork strip is repeated all the time - it’s not at all difficult. This crocheted bag made of yarn with acrylic in a simple style resembles mochila in its shape. This summer crochet beach bag can be carried in your hand or slung over your shoulder.
To work you will need:
- Yarn 100% acrylic (100 m / 50 g) - 100 g each. blue, yellow and white.
- Hook 4.5 mm thick.
- Rope 95 cm long, 0.9 - 1 cm thick.
Cotton is also suitable for a summer handbag, but acrylic yarn is much lighter and cheaper. We take the knitting density: 18 p. / 7 r. equals 10/10 cm. We knit alternately all the time: with yellow, white, and blue yarn.

Half column (PST): knit 1st r. VP, then we start with the 2nd row. insert the hook only at the rear. walls of section 1 of the river Each row begins with 2 VP lifts and ends with one half-column. in the second VP of the rise of the previous river.
Main (main) pattern:
The number of loops should be divisible by 5, plus two edge loops. Let's look at the diagram: repeating rapport of 6 points. Start with VP and end with it. We do it once from the first to the fourth rows, then repeat the 3rd and 4th rows. And then just knit the pattern with the 3rd and 4th rows.
Bags, crocheted, they usually do this: first the bottom of the bag, then the top. It is better to knit from strong twine or nylon thread: this way the bottom will be solid and stronger. You can knit this pattern:

Or like this:

Or any structural one. We begin to knit the bottom with yellow yarn from a chain of 18 VP and 2 VP rises. To make the shape of the bottom beautiful, add 1 PST on both sides at a distance of 2 cm from each other. The total should be 22 sts. We knit with a pattern of 33 cm. Next, after 33 cm from the beginning of knitting, decrease 1 pst on both sides in two rows. As a result, 18 stitches should remain. We finish the bottom 38 cm from the beginning of knitting.
You can make a semicircular bottom like this in a circular row. from SSN.

Choose any option.
We knit the walls
For the top of the bag, we tie the edges of the bottom with the main pattern (see the alternation of colors). Beginning of the river should be in the center short. sides.
1st row: perform 33 repeats (198 sts) + start and end sts.
Pens
We need the knitted handles for the bag to be non-stretchable - the best option— insert a thick cord or rope into the handle. Using yellow yarn, make 1 chain of 9 VPs and 1 VP rise. We carry out p. RLS, despite the fact that each subsequent p. start with 1 add. initial VP. We finish 1 sc in the 1st sc of the previous row. We finish knitting after 47 cm from the beginning. We cut the rope into two parts, insert it into the knitted strips of the handles and sew them along. We sew the base of the handles to the wrong side of the product so that the distance between the handles is 19-20.5 cm.
Knitted bags are very popular now. I present to you a master class on knitting such a bag from nylon threads, thick acrylic yarn, and even garbage bags. If you take black bags and , then you will get a bag made from crocheted bags, and no one will guess that such a bag is made from garbage bags! Tie yourself cool thing— diagrams and descriptions are attached.

Nylon, cotton, jute threads of any colors are suitable for this handbag. The pattern is called curvy columns. Look how cool knitted bags look:

In this model we will need one, or better yet 2 thin straps for the handles - they are cut, pierced with an awl and sewn with threads to the handbag. Each strap has a length of 65-67 cm. Let's begin our master class.

To work you will need:
- Yarn (nylon, bags, threads, jute).
- Metal hook 3.5 mm thick.
- Hand strap.
- The pin is colored.
- Fabric for lining (any).
To tie the bottom, you need to dial 43 VP. The bottom is knitted in the round, in the pattern you end up with 9 rows of sc (dc/no)


We begin to make the bottom of the product: we tie 43 VPs in a circular sc.

We make increases in the corners (in the diagram pink). The video below will help you tie the bottom.

The end result is the bottom of the product. For those who don’t understand, there is a video below from the author, everything in it is detailed and clear.

We knit the bottom in a circle, following the arrow in the diagram. Knit 12 rows according to the pattern. The result should be 66 sts. The bottom will look like a round bowl.

And this simple diagram shows how to knit the main part from RLS. The video from the author shows everything in more detail, and although the language is Japanese, it is not difficult to understand.

On video: detailed knitting small crocheted summer bag.
A bright bag is knitted from motifs; the brighter the yarn, the more positive your bag will be.


Competition entry No. 52 – Spring set: bactus, mitts, headbands and handbag (Ksenia Shcherbakova)
Hello! My name is Ksenia. I learned to crochet during a craft class at school. Since then I have not parted with crochet. I can’t imagine life without my favorite hobby :) I knit for myself, my relatives, my friends, and I take orders.

This bag will be an excellent storage place for toys or tangles. Or perhaps you can come up with your own version of how to use it profitably.
Finished product dimensions: height - 38(48) cm, width at the top -132(140) cm.
You will need: Novita Tuubi yarn (50% cotton (recycled), 50% acrylic, 500 m/150 g) - 2000 (2200) g gray, hook number 10.
Knitting density: 5.5 tbsp = 10 cm.

Do you love this tote shopping bag? it is crocheted and decorated with a pattern of cones. Stylish and uncomplicated.
Size: 41 x 41 cm
You will need: 450 g light green yarn Paradiso Lana Grossa (100% cotton, 65 m/50 g); hook No. 4,5,1 pair of handles.
Single crochets: start each circle, row with 1 air. p. rise instead of 1st st. b/n, finish 1 connection. Art. in air lifting point.
Knitted handbag-mesh- a real gift for everyone who is interested in handmade fashion. Knitting such an accessory is a pleasure.
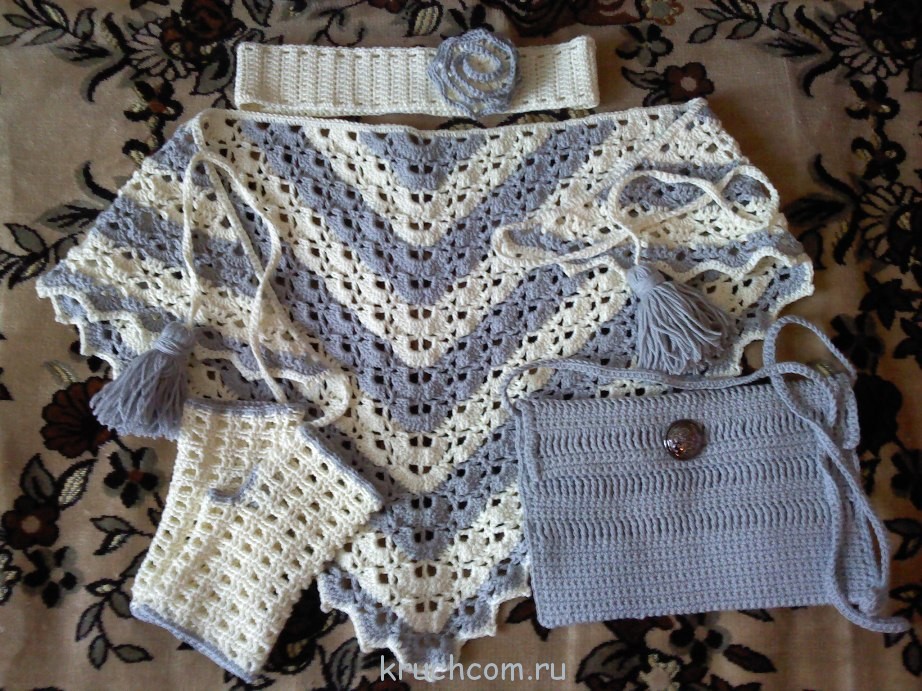
A bit of 70s mood and the sea positive emotions: Colorful crochet shorts and a matching bag are made for summer.
Shorts size: 36 (38/40)
To knit shorts you will need: 100 g beige and 50 g each of turquoise, green, lilac, red and gray Elastico yarn (96% cotton, 4% polyester, 160 m/50 g), hook No. 3.5
Bag dimensions: 32*32 cm
To knit a bag you will need: 50 g each of beige, turquoise, green, lilac, red and gray Elastico yarn (96% cotton, 4% polyester, 160 m/50 g), hook No. 3.5

Going to the store with such a bag will be a real pleasure; it is roomy, bright, soft and, of course, exclusive. This can only be in a single copy, which means it is priceless.
Knitted bag size: 53*36 cm

Competition entry No. 34 – Beach bag “Memories of Summer”
My name is Anna Verbovaya.
I live in Ukraine, in the beautiful ancient city of Kyiv. I love to create and bring different things to life interesting ideas– clothes, accessories, bags, napkins, tablecloths, bedspreads, blankets, toys and souvenirs.
I've been knitting for as long as I can remember. For me, Knitting is not just a hobby, it is something more. Knitting is a way of life.
Competition entry No. 31 – Knitted bag using the broomstick technique
Hello! My name is Anastasia Selenina. I'm 18 years old and I've been into knitting for about 2 years. I am studying at the University of St. Petersburg to become a biologist. Often during lectures, while I am listening and taking notes, I manage to knit. I really love crocheting!

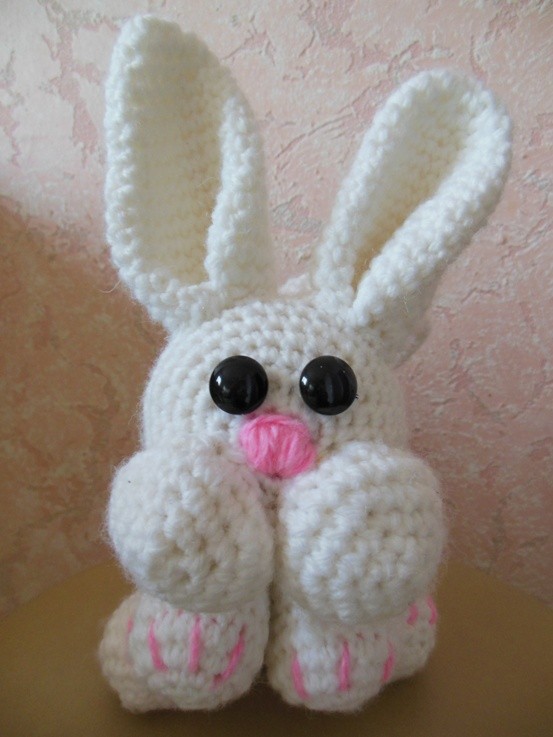
Competition entry No. 26 – Knitted bag – bunny
Hello, my name is Polina Vasilchenko. For my daughter Nastenka, I decided to knit a bag like this - a bunny.
Knitted bag - bunny.
Materials:
Yarn Medium Weight Yam (1 skein -198 g/333 m) white - 1 skein, a little pink yarn. Hook No. 6 or the number required to obtain a sample of the desired density. Filling, 2 black round buttons measuring 16 mm - for the eyes, 1 button measuring no more than 12 mm Sewing needle and thread. Needle for yarn. Tape - 1m. (I knitted: Semyonovskaya yarn (Chelsea) - 50 g (100 m) - 2.5 skeins, hook No. 5)
 We make beautiful and festive garlands ourselves Cut out the letters Happy Birthday
 Royal Treasures: A Short Guide to Kate Middleton's Rings
 How to do makeup with golden eyeshadow?