Pattern children's shirt for a boy. Pattern of a shirt for children
Sewing a shirt for a boy with his own hands is not so difficult, it is enough to have a pattern and a detailed description with step-by-step photos on hand. You just have to stock up on a cloth, and everything else you will find in this article. The simplest things - and we already learned to sew, now it's time to move on to the product more complicated.
The article suggests several patterns of children's shirts for different ages and sizes. Patterns are also distinguished by the presence of a short or long sleeve. However, in general, they are very similar, because the sewing process is identical for everyone. In order not to duplicate the assembly description, at the very end of the article a detailed master class is presentedwhich can be applied to any of the presented patterns. Let's start with the smallest.
Shirt pattern for boys: 9 months, 1 year and 1.5 years
The patterns of this shirt correspond to American sizes (see the table below - USA), European sizes are indicated next. In order not to be mistaken, it is better to focus on the sizes from the first column, which correspond not to age, but to the height of the child, for example, the smallest size is 68 cm tall, in the folder with the patterns this will be a file with a template for 9 months. Also next to each size is the fabric consumption.


Shirt patterns for a child 4, 6 and 8 years old
This pattern is designed for older children. In addition to size, it differs from previous models by the presence of a short sleeve.

Shirt for 4 to 8 years
Necessary materials:
- 1.1 x 1.4 m cotton fabric,
- b buttons.
- Material for laying.

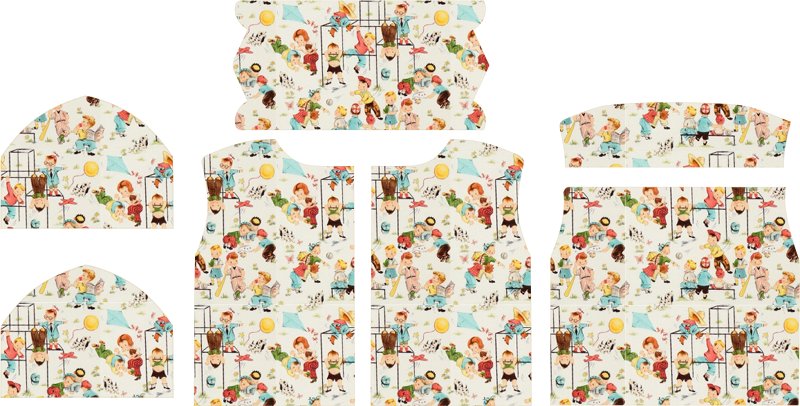
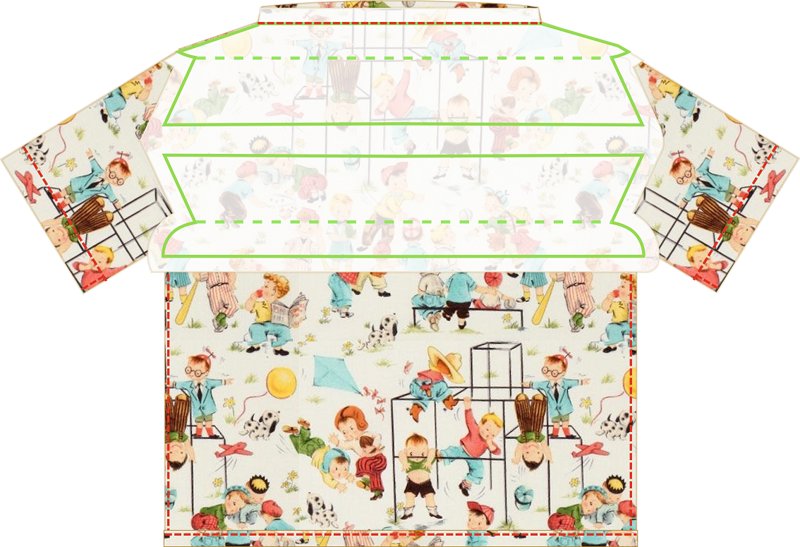
Cut out the details of a children's shirt
- Before consists of 2 parts: the first part (left side) - in its entirety, the second part (right side) - after laying the fold along the edge of the fastener;
- The back consists of the first part with a fold;
- The yoke back consists of 2 parts with a fold;
- Sleeves - 2 parts;
- Patch pocket - 1:
- The collar consists of 2 parts with a fold:
- The stand collar consists of 2 parts with a fold.
How to sew a shirt for a boy: master class
Duplicate one piece of the collar and its stand with adhesive cushioning material.

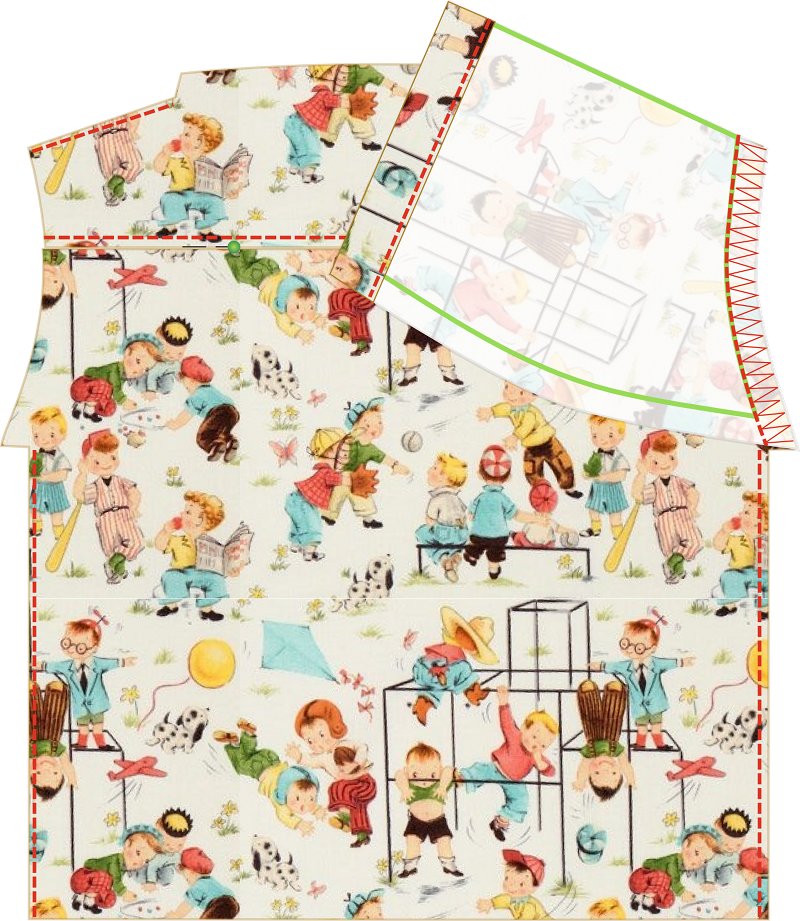
Stitch the outer yoke to the upper section of the back, and then to the shoulder sections of the front parts; iron the seams on the yoke. Then iron inside out the allowances for the lower and shoulder sections on the inner yoke of the back. Place this part inside out of the outer yoke with the seam facing down and stitch the folds at the seams of the seam. Sweep open sections of coquette parts.

On the left side of the front of the shirt, work on the patch pocket.

Work on the edge of the fastener on the left side: cut the seam allowance along the front cut of the left side to 7 mm, iron the fastener allowance along the line A inside out and plan it. Stitch the crease along the marking by stitching a section of the fastener between its allowances. Press the crease towards the armhole. Lay the finishing stitch along the edge of the plank at a distance of 7 mm.

Treat the side seams of the shirt.
Treat the longitudinal seams of the sleeves. Stitch the sleeves in the armholes and stitch the seams along the armholes.

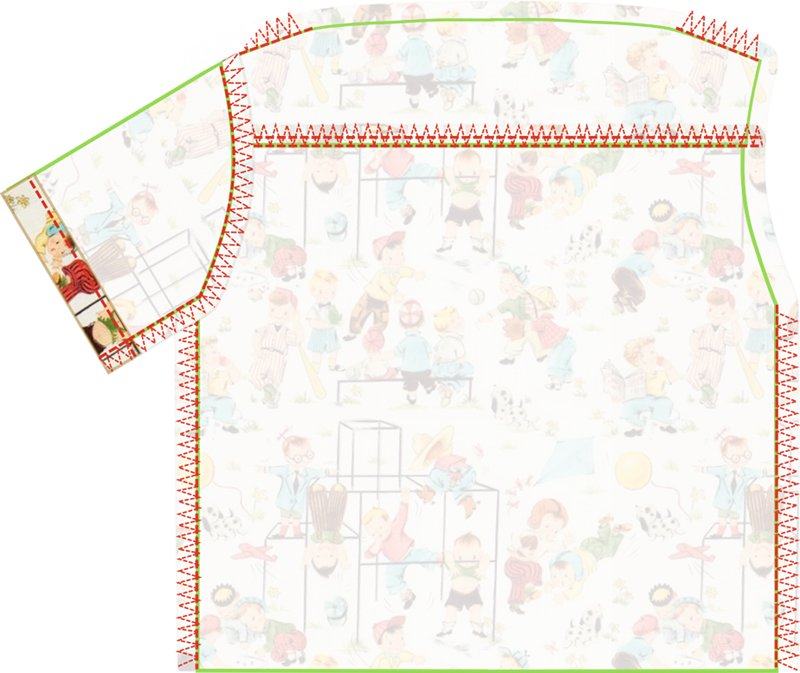
Work the turn-down collar with a stand (shirt type). Sew the hem of the product and sleeves.

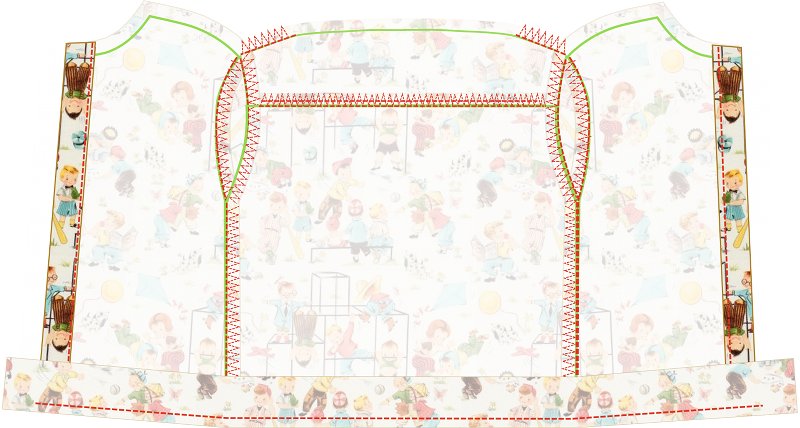


Sew loops on the left front bar and on the stand of the collar; sew buttons according to the buttonhole.


A white dress shirt should be in the wardrobe of every young gentleman. Sew such a shirt to your boy and he will be the most stylish among peers! To build a shirt pattern will help our step-by-step instructions.
Modeling patterns
To start building, you need to take measurements (in our case we use the model for size 36):
- Shirt length for a boy 65 cm
- Shoulder length 11 cm
- Half neck 16.5 cm
- Bust 36 cm
- Sleeve length 50 cm
Drawing grid
Fig. 1. Pattern of a shirt for a boy
Draw a rectangle ABCD.
Shirt length: The lines of the rectangle AD and BC are equal to the length of the shirt by measurement \u003d 65 cm.
Shirt width: AB \u003d DС \u003d 40 cm - half-bust according to the measure plus 4 cm for all sizes: 36 + 4 \u003d 40 cm.
Armhole Depth: Postpone 18 cm from point A downwards - the letter G (1/3 of the chest circumference by measurement plus 6 cm for all sizes): 36/3 + 6 \u003d 18 cm. From point G to the right, draw a straight line to the intersection with the BC line - the letter G1.
Sideline: From point Г to the right, put ½ ГГ1 - point Г4.
From point G4 down draw a vertical line to the intersection with the line DC - point N.
Armhole width: The width of the armhole of a shirt for a boy is ¼ of the semicircle of the chest by measurement plus 2 cm for all sizes: 36/4 + 2 \u003d 11 cm.
Set aside 5.5 cm (1/2 of the armhole width) from point G4 left and right - points G2 and G3.
From point G2 and G3 upward, draw vertical lines to the intersection with line AB - points P and P1.
The auxiliary lines of the armhole PG2 and PG1 are divided into three equal parts.
Building the back of the pattern
Neckline shirt for a boy. From point A to the right, set aside 5.5 cm (1/3 of the half-circumference of the neck as measured): 16.5 / 3 \u003d 5.5 cm. From point 5.5 up, put aside 1.5 cm and connect point A with a concave line. Tilt the shoulder of the shirt for the boy. From point P down, lay 2 cm.
Shirt shoulder line: From point 1.5 (neck) through point 2 (shoulder tilt) draw a shoulder line 12.5 cm long (shoulder length by measure plus 1.5 cm for all sizes) - 11 + 1.5 \u003d 12.5 cm.
Shirt armhole line: From point G2, dividing the angle in half, lay aside 2cm. draw the armhole line from point 12.5 through the upper and lower division of the PG2 line through point 2 to point G4. Bottom of a shirt for a boy. Set aside 2 cm from point H upward. Draw a curly line on the back of the bottom of the shirt for the boy.
Coquette backless shirt: Set aside 6 cm from point A down. From point 6 to the right, draw a horizontal line until it intersects with the armhole line of the back of the shirt. 1 cm is laid off from the point of intersection down the armhole line and connected with a smooth line to the yoke line.
IMPORTANT! On the back of the shirt you can simulate the oncoming fold, for this make an increase on the fold in the center of the back 4 cm. The back is cut with a fold in the center of the fold.
Additionally, it is necessary to build
Build Front Shirts
Neckline in front of shirt. From the point B to the left, postpone 5.5 cm (1/3 of the neck half-measure by measure): 16.5 / 3 \u003d 5.5 cm and down 6 cm (1/3 of the neck half-measure by the measure + 0.5 cm). Connect the resulting points with a concave line.
Shoulder tilt: From point P1 down lay 2cm. draw a shoulder line from point 5.5 (neck) through point 2 with a length of 12.5 cm - shoulder length by measure + 1.5 cm: 11 + 1.5 \u003d 12.5 cm.
Armhole line: From point G3, dividing the angle in half, lay 2cm. Draw the armhole line through points 12.5, the lower division point P1G3, through point 2 to point G4.
Side Seam Line: From point G4 down, lower the perpendicular - point N.
Shirt bottom line: Set aside 2 cm from point H. Draw a curved bottom line.
One-piece bar: To the front of the shirt add 4.5 cm to the bar as shown in Fig. 1. Along the back, add 6 cm to the crease.
The master class for the website "Casket" was made by Svetlana Skorokhodova
The shirt is sewn for a boy of 5 years (height 110-116)
Where do we start work? First of all, we will determine the material for the future product. For my model, I used an old men's shirt. As you can see in the photo, the thing is almost new, but, unfortunately, is not in demand by the owner.

To the question: “Why?”, He replied that he didn’t like the monotonous “cell” - they say, it looks “collective farm.” Therefore, my task was not only to sew a shirt for my son, but also to diversify the thing. Therefore, I made a duet with denim.To work you will need the following:
· Men's shirt (b. 46.) or fabric - 0.8 cm with a width of 0.7 cm
· Denim fabric (very thin or cotton imitation “under the jeans”), size 20x30 cm
· Buttons - 9 pcs., Threads No. 40 of suitable color
· Scissors, ruler, meter, crayon, dressmaker pins
· Patterns
Preparing for work and cutting fabric
The patterns are taken from the “Casket” site as a basis. We print out patterns of patterns on paper in full size, glue them using adhesive tape. Unzip the men's shirt, prepare the fabric, iron the necessary parts with an iron.

We lay out the patterns of the shelves, backs and sleeves on the fabric, fix with pins, - ALWAYS make allowances for the seams of 1.5 - 2.0 cm! - circle, cut out. You should get 5 details:
· Back - 1 pc.
· Shelf - 2 pcs
· Sleeves - 2 pcs.
· Sleeve turning - 2 pieces
From jeans fabric we cut out:
· Collar - 1 pc.
· Pocket - 2 pcs.
· Cuff - 2 pcs


Operating procedure
1. Combine the shelves and the back with the front side, so that an overlap of 0.5 - 0.7 cm is obtained along the shoulder and side sections of the back. we build them on the front side. Thus, a closed, durable seam was obtained.

2. We make a double hem of the strip on both shelves, we sew. Then we bend the planks on the front side of the shelves, we cut a corner by 1.5 cm on the bottom of the product, we turn it out, iron it and make double bending of the entire bottom of the shirt. The edges of the planks are removed with a seam of 0.1 cm from the edge.


3. Stitching the sleeves. We process the seams with a zigzag. With the help of pins, we lay the folds (they should “look” towards the cut). Iron the trim parts according to the marks and sheathe the section of the sleeve.


4.Because for the cuffs I used denim, dublin for gesturei did not need bones. Using a hot iron, we make 0.8 mm bends along the edges of the cuff, fold them along, iron again, fix with pins and sew along the front side at a distance of 0.1 cm from the edge. Then we attach the lower part of the cuff from the wrong side of the sleeve, turn it on the face and adjust the upper part of the cuff at a distance of 0.1 cm.


5. We sew sleeves into armholes. We process the seams with a zigzag. On the front side, we sew seams by 0.1 cm.


6. We make the hem of the pockets: we sew the upper part at a distance of 2 cm from the edge, the sides and the bottom - iron it by 0.5 cm. Make markings (3 cm from the armhole, 10 cm from the shoulder seam), pin it with pins and attach it.

7. At the collar on the seamy side, grind the side seams, turn them on the face, smooth and sew along the edge by 0.1 cm. We sew the lower stand of the collar into the neck with a seam 1.2 cm from the seamy side. Then we adjust the upper rack on the front side of the neck with a seam of 0.1 cm.


8. We make button loops at a distance of 7 cm. Between the two upper buttons is 2.5 cm. The upper loop on the collar and two loops on the cuffs are horizontal, the remaining loops are vertical. The distance from the edge of the product to the loop will be equal to the radius of the button plus 0.4 cm.

Loops are cut with a steamer.

Do the marking of the loops

Shutdown
Iron the finished shirt, sew buttons. Everything. From my dad's unfashionable shirt, I got a new outfit for my son.
Front view
Back view

Valentina Nivina Alexander Nivin
Shirt for a boy of 8-10 years old.
This method of constructing a shirt pattern for a boy is recommended for the age group of 7-10 years with a half girth of 32-38 cm. In subsequent publications, we will offer you other methods for constructing patterns of children's clothes, including more universal ones.
The pattern built according to this technique can be used not only for sewing a shirt, but also as a base pattern for modeling other types of children's clothing, taking into account the style, the increase in free fitting, etc. For example, this base is suitable for a blouse or sports jacket. In this case, you need to make an allowance for the drawstring on the bottom, into which you can stretch an elastic band or lace.
To build a drawing of a shirt pattern for a boy, the following measurements must be taken. As an example, we use the measurements of a conditional client with a 36 cm bosom.
Shirt length Dr - 65 cm
Shoulder length Dpl - 11 cm
Half neck N- 16.5 cm
Half chest SG - 36 cm
The length of the sleeve Dr- 50 cm
The free fit allowance along the chest line is 9 cm for all sizes (from 32 to 38).
As usual, we start by constructing a right angle with the vertex at point A.
Shirt length. Down from point A, we postpone the length of the shirt in accordance with the measure taken. In our example, this is 65 cm and we put the point N. From point N we draw to the right a horizontal line of arbitrary length - this is the bottom line of the product.
Shirt width.From point A to the right, postpone 45 cm (half-chest by measure plus an increase of 9 cm for all sizes) and set point B.
AB \u003d Cr + Pg \u003d 36 + 9 \u003d 45 cm.
From point B down we draw a straight line to the intersection with the bottom line and put the point H1
The depth of the armhole. From point A down we postpone 18 cm (1/3 of the half-circumference of the chest by measurement plus 6 cm for all sizes) and set point G:
AG \u003d 1/3 Cr + 6 \u003d 36: 3 + 6 \u003d 18 cm.
From the point Г to the right we draw a straight line to the intersection with the line ВН1 and put the point Г1. This is the chest line.

The width of the back. From the point G to the right, we postpone 17 cm (1/3 of the half-circumference of the chest by measurement plus 5 cm for all sizes) and put the letter G2:
GG2 \u003d 1/3 Cr + 5 \u003d 36: 3 + 5 \u003d 17 cm.
From point G2 up we draw a vertical line to the intersection with line AB and put point P.

Armhole width. From the point G2 to the right, we postpone 11 cm (1/4 of the half-circumference of the chest by measurement plus 2 cm for all sizes) and put the point G3:
G2G3 \u003d 1/4 Cr +4 \u003d 36: 4 + 2 \u003d 11 cm.
From point G3 up we draw a straight line to the intersection with line AB and put point P1.
The auxiliary lines of the armhole PG2 and P1G3 are divided into three equal parts.

Side line. Divide the distance G2G3 in half and set the point G4. From point G4 we lower the straight line down to the intersection with the line HH1 and set the point H2.

Backrest construction
Neckline.From point A to the right, postpone 6 cm (1/3 of the half-circumference of the neck by measurement plus 0.3-0.5 cm) and set point A1:
AA1 \u003d 1/3 N + 0.5 cm \u003d (16.5: 3) + 0.5 \u003d 6.0.
From point A1, we lay aside 1.5 cm and set point A2.
We connect points A and A2 with a smooth line and get neckline.
See picture below.

Back shoulder line.
Shoulder tilt. From point P, down, lay 1.5 - 2 cm (depending on the height of the child's shoulders) and set point P2.
Shoulder line. From point A2 through point P2, draw a shoulder line 12.5 cm long (shoulder length by measure plus 1.5 cm for all sizes) and put point P3:
A2 P3 \u003d Dpl + 1.5 cm \u003d 11 + 1.5 \u003d 12.5 cm.

Armhole line of the back. We divide the angle at point G2 in half and lay 2 - 2.5 cm along the dividing line, put the point and mark it with number 2. We draw the armhole line from point P3 through the lower point of division of the line PG2, through point 2 to point G4.

Side seam line can be located strictly vertically and correspond to the line of the drawing G4N2. In this case, the width of the shirt along the bottom line will correspond to the width of the shirt along the chest line.
If necessary (or desired), the width of the shirt along the bottom line can be changed (narrowed or expanded). In our example, we will consider the last option.
To do this, from the point H2 to the right we postpone 1-3 cm, put the point H3 and connect it to the point G4.

The bottom line of the back. Usually the bottom line runs strictly horizontally, but since we have expanded the shirt a little, we will correct the bottom line as well.
From point H3 upwards along the side seam line, set aside 0.5 - 1 cm and connect to point H with a smooth line, thereby forming backline.

Flirty back. From point A down, lay 5 cm and set point A3.
From point A3 to the right, draw a horizontal line to the intersection with the armhole line.
Then, from this intersection point down the armhole line, lay 1 cm, set point P4 and connect it with a smooth line with point A3, thereby forming yoke line.

Fold. If a fold or assembly is provided for on the back of the model, in this case it is necessary to expand the back (give an increase in the fold or assembly under the yoke).
To do this, from the point A3 and the point H to the left, lay the width of the fold (assembly), in our case it is 4 cm, put the points A31 and H10 and connect them with a straight line.

Construction of the front.
Neckline in front.The width of the neck of the front is equal to the width of the neck of the back. The depth and width of the front neck have the same meaning.
From point B to the left and down, we postpone 6 cm (1/3 of the half-circumference of the neck by measurement plus 0.3 - 0.5 cm) and put points B1 and B2:
BB1 \u003d BB2 \u003d 1/3 N + 0.5 cm \u003d (16.5: 3) + 0.5 \u003d 6.0.
We draw the neckline of the front by connecting the points B1 and B2 with a smooth line, as shown in the figure below.

Front shoulder line.
Shoulder tilt. From point P1 down, lay 2 - 3 cm (depending on the height of the child's shoulders) and set point P5.
Shoulder line. From point B1, through point P5, draw a shoulder line 12.5 cm long (shoulder length by measure plus 1.5 cm for all sizes) and set point P6.
B1 P6 \u003d Dpl + 1.5 cm \u003d 11 + 1.5 \u003d 12.5 cm.

Front armhole line. From the point G3 according to the bisector, we postpone 2 cm, put the point and designate it with the number 2.
We make out the armhole line by connecting points P6, the lower division point of the line P1G3, point 2 and point G4.
See picture below.

Side seam line of the shelf bring in line with the side line of the back. To do this, lay 1-3 cm from the point H2 to the left, set the point H4 and connect it to the point G4.

Bottom line front. Correct the bottom line. From the point H4 upwards along the line of the side seam we postpone 0.5 - 1 cm and connect to the point H1 with a smooth line, thereby forming the bottom line of the front.

Clasp. The clasp may be different. In our case, the fastener is through, located in the midline of the front.
From point B2 to the right horizontally, continuing the line of the neckline, lay 1.5 cm and put point B3, from which down, parallel to the middle line, draw a straight line denoting the edge of the side.
The intersection point with the continuation of the bottom line is denoted by the letter H5.

Subboard can be detachable and one-piece.
We are building a one-piece board, and you proceed from your desires or tasks. In our example, the width of the whole cut is 3 cm.
From the point B3 horizontally we postpone 3 cm and from the obtained point B4 we draw down a straight line parallel to the midline of the front line. The intersection point with the continuation of the bottom line is denoted by the letter H6.
See picture below.

Pick Width, design and, accordingly, processing technology may be different. Be guided by your tasks and don't be afraid to experiment. We show you one of many options.
Hingesshould be located along the midline, in our case, along the B2H1 line, 1.5 cm from the edge of the side.
On this, the construction of the back and front of the shirt for the boy is completed. Below in the figure you see how the details of the cut of the coquette, back and front look.

This drawing of the pattern, in this form, can be used as a basis for modeling various types of boy’s clothes, taking into account the style, the increase in free fitting, etc. For example, this basis is suitable for a blouse or sports jacket. In this case, on the bottom you need to make an allowance for the drawstring into which you can stretch an elastic band or lace.
How to build collar pattern for this shirt we will tell in the next article.
I was looking for a pattern for a baby shirt - embroidered shirt, but, on such a large Internet, I did not find anything. I had to get the "ancient Talmuds" and build a shirt pattern on my own. I want to show you how to build a pattern of embroidered shirts - shirts - shirts for your boys, maybe someone will come in handy.
We construct a pattern in size of a 2-year-old child.
Pattern is given WITH ALLOWANCE on seams, except for allowances for hemming sleeves and the bottom of the shirt.
Do not look that there is so much text and lines in the drawings, in fact it is simple. Everything is described in detail and sequentially, follow the instructions in order and everything will work out, even for those who are building a pattern for the first time.
We will need the following measurements:
Og (chest circumference: horizontally at the level of the shoulder blades through the armpits and along the most convex points of the chest)
Osh (neck circumference: around the bottom of the neck)
IMPORTANT! Half chest and neck circumference , since the body is symmetrical (if the circumference of the baby’s chest is 52 cm, then we take Og \u003d 26 cm and from it we push Og / 8; Og / 3, etc.)
Di (product length: on the back from the 7th cervical vertebra to the bottom of the product)
Dr (sleeve length: on the outside of the arm bent at the elbow, from the shoulder to the level of the beginning of the thumb)
CONSTRUCTION Grid Patterns:
- Spend neck line (AB) equal to Og + 11 \u003d 26 + 11 \u003d 37 cm
- From the left point of the neck line we draw perpendicularly down mid-back line(AA 2) It is equal to the length of the product. Di \u003d 35 cm.
- From the right point of the neck line we draw perpendicularly down midline(BB 2). It is equal to the length of the product. Di \u003d 35 cm.
- Spend mesh bottom line connecting the lower points of the vertical lines (A 2 B 2).
- Spend armhole recess line(A 3 B 3)parallel to the neck line and spaced from it at a distance of Og / 3 + 6 cm \u003d 26/3 + 6 \u003d 14.7 cm.
- From the line of the middle of the back along the line of the deepening of the armhole measure Og / 3 + 6 cm \u003d 26/3 + 6 \u003d 14.7 cm (A 3 C). From the obtained point, draw up the line back width before crossing the neckline (CE).
- Measure from the line of the width of the backrest along the line of the deepening of the armhole to the right armhole width Og / 4 + 3 cm \u003d 26/4 + 3 \u003d 9.5 cm. (CD)
- From the right point of the width of the armhole, draw up armhole protrusion equal to Og / 8 \u003d 26/8 \u003d 3.3 cm. (DF)
- We divide the half in half and draw down from the division point the line side seam to the intersection with the bottom line of the grid.
BUILDING A SHIRT'S BACKGROUND PATTERNS - SHIRTS:
- From the left point of the neckline (A) we measure to the right sprout width equal to Osh / 3 + 1 \u003d 12/3 + 1 \u003d 5cm
- From the right point of the width of the sprout, draw up sprout height 2cm (G)
- Connect the points with a smooth concave line (AG).
- Spend shoulder line: from the neck line down the back width line we measure 1.5 cm (this will main point of shoulder tilt ) We connect the height point of the sprout with a straight line with the main point of shoulder inclination and extend it by 0.5 cm. We measure the resulting segment (GH) - shoulder width(I have 11 cm).
- Spend armhole line: Conditionally divide the line of the width of the back in half. The angle between the lines of the width of the back and the deepening of the armhole is also divided in half and on the bisector we lay 3 cm (CH 1 \u003d 3 cm). Connect the anchor points of the smooth curve (HH 1 H 2).

BUILDING A PATTERN IN FRONT OF A SHIRT - SHIRTS:
- From the right point of the neck line we measure to the left the neck width equal to Osh / 3 + 1 \u003d 12/3 + 1 \u003d 5cm. (VK)
- From the main point of inclination of the shoulder of the back we measure down the distance Og / 8 \u003d 3.3 cm down the line of the width of the back. This will be the main point of the shoulder (L). We connect it by a straight line with the point of the width of the neck (LK). On this straight line we postpone the shoulder width (as much as on the back (MK \u003d 11cm)).
- We conduct a smooth armhole line: Divide the angle between the deepening line of the armhole and the protrusion of the armhole in half and lay 2 cm on the bisector (DM 2). We draw an auxiliary line between the end of the shoulder and the protrusion point of the armhole (MF), divide it in half and lay the perpendicular \u003d 0.5 cm (M 1). We connect smoothly 5 points MM 1 FM 2 H 2.
- From the right point of the neck line down the neck depth (which one is needed) and draw a smooth neckline. Shirt implies the presence of a cut in the neck with ties or fastener. Or you can make a V-shaped cut so that the head passes.

CONSTRUCTION OF THE GRID FOR PATTERN OF THE SLEEVE OF THE SHIRT:
- Draw horizontally top lineequal to three times the width of the armhole 9.5 * 3 \u003d 28.5 cm.
- Spend side grid lines equal to the sleeve length Dr \u003d 27 cm.
- Spend mesh bottom line .
- We divide the top line in half. It will be high point (A). From it we draw a line down to the intersection with the bottom line of the grid.
- From the high point of the okat, measure down in a straight line okat heightequal to Og / 4 - 2 \u003d 26/4 - 2 \u003d 4.5 cm.
- Spend sleeve bottom line (BC), which is parallel to the top line and spaced from it at a distance of the height of the okata.

BUILDING A SHIRT OF A SHIRT:
- Spend okat line. To do this, connect the left end of the bottom line of the okat with a smooth curve with a high point of okat with a deflection of 1.5 cm (AB).
We connect the right end of the bottom line of the okat with an auxiliary line with a high point of okat (AC) and divide it into 4 equal parts. At the extreme points of division, we restore the perpendiculars (one - up, the other - down) equal to 0.5 cm. Connect 5 points of a smooth curve (see the drawing).
- Spend seam lines: from the ends of the bottom line of the grid we measure 3 cm and connect the points obtained with the extreme points of the bottom line of the okata of the sleeve.

Now we have a pattern of the back, front and sleeves of a baby shirt, such as your baby needs it.
I WILL REMEMBER that the pattern is given WITH ALLOWANCES on the seams, except for allowances for the hemming of the sleeves and the bottom of the shirt.
If you have questions, ask.
This is how the shirt looks live:

We look a pattern of a cap for a beach.

At the request of readers, I add a pattern stand collar for a children's shirt.
So, on the pattern of the shirt with a soft centimeter tape, measure the neck (in the figure - segments ab and vg). We add the obtained centimeters and get half the length of the collar - the rack. The pattern will be for half the collar (we fold the fabric in half, put the pattern to the fold and get the whole part). 
1) We build a rectangle with sides: length \u003d the sum of the lengths of the necks that we measured (DE \u003d ab + vg); width \u003d desired collar height. The dashed line is the bend point.
In principle, you can leave it that way, then the collar will be spaced from the neck, and if we want a more fitting one, then we move on.
2) DE is divided into 3 parts (points 1 and 2). From point E upward, lay 1.2 cm (point G). Connect the point G and 1 with a smooth line.
3) From point Ж at an angle (as in the figure), we build a segment \u003d the height of the collar and connect it with a smooth line parallel to the J.
4) The corner can be left as it is or rounded. 
Collar - the stand is double. Therefore, after cutting on the fabric, these should be the following 2 details:

Seam allowances of 0.5-0.7 cm.
We will be glad to see you again on our website.
 Crafts from candy wrappers: step-by-step instructions on how to make stylish jewelry with your own hands
 Beautiful ideas how to create knitted clothes for dolls, schemes with a description
 MK: knitting a sweater for a doll