How to make a pumpkin from fabric. Pumpkin crafts: step-by-step master classes, photos

Pumpkin. Just a pumpkin. But cute!)))
Pumpkin dimensions: Petal 9 x 23 cm, stem - see drawing.
If we take the ratio of sizes a to b equal to 1 to 3, then we get an even ball, an ordinary ball is round. And if the ratio is changed in the direction of decreasing the height, then a flatter product is obtained.
 Work order: 1. First, sew three parts together, alternating colors so that the pairs are opposite in the finished pumpkin. Then assemble the halves together, starting from one “tail” of the pumpkin to the other, leaving 4-5 centimeters short on each side. The hole will look like at the bottom of the pumpkin. You can do it on the side, but on the bottom it will be less noticeable. Through this hole, turn the pumpkin inside out and stuff it, after cutting off the seam allowance close to the seam. Where there is a hole, do not cut off excess fabric, otherwise it will be difficult to sew up. The numbers in the figure show the stitching order. We sew the green lines by machine, leave the red ones unsewn, and then finish them by hand with a blind seam after stuffing.


2. Now we need a long needle. Take the yarn suitable color(or cotton twine, or some other lace that suits your opinion), thread a double thread into the needle and begin to wrap around the pumpkin. The algorithm is like this. Where you have the bottom of the pumpkin, stick a needle, if it’s long, then immediately bring it up through the pumpkin, if it’s short, flatten the pumpkin as best you can, pierce it so that the needle appears, and grab it with pliers to pull it out. If you have a short needle, you will need an assistant, because it will be difficult to cope with the task alone.


Wrap a thread around each slice in the middle, returning to the bottom and tying the ends of the threads. When all the slices are tied, gather all the ends of the threads into a bundle and trim. trim it - you get the same dried flower that the pumpkin bloomed with in the spring.))
3. Cut out the stem and manually stitch along the dotted lines using a needle-forward stitch as follows.


Fold a thread of a suitable color into four times.2. Start sewing from the wide part to the narrow part.3. First iron the tucks along the dotted line with your finger on the table - this is enough to see where to sew the stitching. The tucks face OUT!4. The stitch width is small - approx. 0.25 cm.5. Just leave the ends of the threads dangling without tying a knot - we will need them later.


4. Then sew the stem with a blind seam, tucking the seam allowances inward. Take a double thread, but you can also fold it in four - so that it doesn’t accidentally break when pulled together. Sew from the narrow part to the wide one - then simply pull the thread up to the narrow tip, so that you can then tighten the seam and gather it.


Fold the seam allowance along the widest part of the stem and baste it onto a live thread so that it does not dangle and become distracting. Place the stem on the pumpkin, pin it in place, and blind stitch it to the pumpkin.


5. Stuff the stem through the narrow upper hole, distributing the holofiber along the entire length. And here we need the threads that we left hanging on each seam. Take these threads, including the thread from the hidden seam, which are closer to this very seam, and begin to pull them up, gathering the stem and giving it as curved a shape as you want. Once you have achieved the desired look, tie each thread into a knot to secure the shape and cut off the tip. Then fold the seam allowance of the top hole inward, shape it flat, and blindstitch the edges. The stalk is ready.


We invite you to decorate your house for Halloween with your own hands. This project is not as simple as, but by doing it, you will not only gain cute decorative pumpkins in your home, but also confidence in your decorating abilities!
You will need:
1. Fabric (it is not necessary to use orange fabric, you can use absolutely different colors and patterns)
2. Scissors
3. Rope (thick thread)
5. Thread and needle
8. Filler (you can use synthetic filler or any other)
Instructions
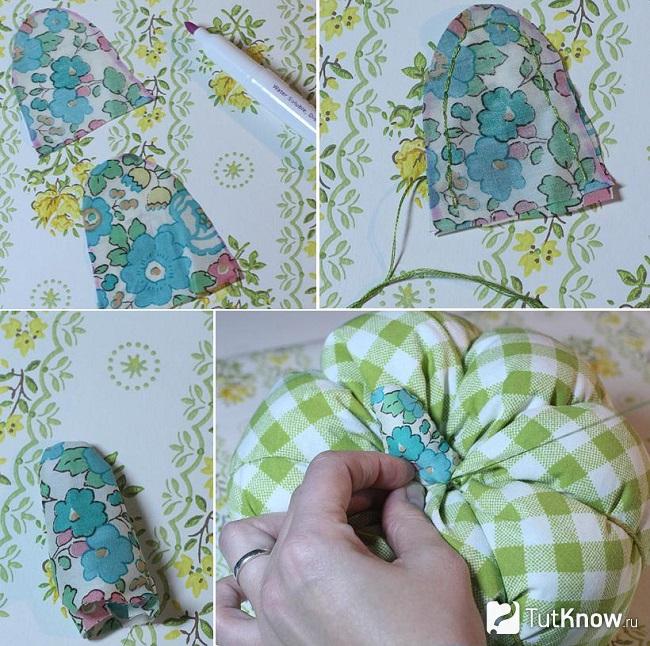
Step 1: Using scissors, cut a piece of fabric that will soon turn into an adorable decorative pumpkin. A simple rule applies to the size of this piece of fabric: the width of the piece should be twice the length. You can make a composition from both identical and different sized pumpkins. Fold the fabric in half, right side inward. At a distance of 1 cm, draw a line from the right and top edge. Make seams along the lines.  Step 2: When you sew to the end of the top line, do not cut the thread. You need to pull the thread, tightening it and gathering the seam. Make a few stitches to secure it in this position. Turn the resulting pouch out.
  Step 3: Fill the bag with filler. It is desirable that the filler be homogeneous. Make another seam along the edge of the bag, which will also need to be tightened. When tightening the thread, guide the edge of the fabric inward. Once the thread is pulled tight enough, secure it in that position with a few stitches.
  Step 4: Take a thick thread or rope and a large needle. Insert the needle into the bottom base of the pumpkin and pull it up. This will give it a more flattened shape, and also make the first turn in wrapping the rope around the bag to give shape to the sections of the future pumpkin. The number of sections depends on the size of your pumpkin, as a rule, it should be about 6-8.
  Step 5: Secure the rope.
  Step 6: All that remains is to make a cutting to make the pumpkin look more natural. To do this, cut out 2 identical oval-shaped pieces from fabric (you can take fabric with a different pattern).
Fold them right sides inward and sew along the outline, leaving the bottom edge open.
Turn the fabric inside out and place the filling inside. Sew up the bottom edge. Next, sew the stem to the pumpkin.  Step 7: That's all, your decorative pumpkin is ready!
  1
1
Other interesting articles
Do you know how easy it is to make home decorations and crafts from pumpkins? kindergarten and to school? Learn how to sew pillow pumpkins with our step-by-step tutorials.
How to easily make home decorations out of pumpkins?

Here are some elegant decorative items you will get. To make your pumpkin so irresistible, you will need:
- dye;
- artificial flowers;
- wire;
- pliers;
- scissors;
- primer;
- shine;
- brush;
- pumpkins.

It’s better to buy a small vegetable; now they sell portioned varieties. Having purchased these pumpkins, you will need to paint them with a primer and let them dry.

Wrap the wire around a pencil or branch and cut off the excess with pliers. Screw artificial flowers to the opposite end, which can even be cut out of paper. Fix this decorative element on the tail of the vegetable, cover the peel with glitter.
Decorate several fruits like this and place them in beautiful flowerpots.

These pumpkins would make a great gift! an unusual gift. You can give it to friends on Halloween, when this vegetable is the center of attention.
This is how easy it is to make an elegant souvenir from a pumpkin. This is a great gift for Halloween or any other holiday.
Decorative pumpkin pillows for the sofa

To create this piece of furniture you will need:
- textile;
- scissors;
- threads;
- filler;
- a thread.

Cut a rectangle from the prepared fabric, the length of which is 2 times the width. Fold it right sides together and sew the sides on the wrong side.
Turn the resulting bag right side out and fill it with filling. Make sure that the internal contents are uniform. Sew along the edge with a basting stitch using strong thread. Tighten it and secure it in the center of the product.

Take a needle with a large eye and insert a thread into it. To sew the pumpkin-shaped pillow further, pierce the needle from the bottom to the top, giving it a flattened shape. Then, using the same thread, divide the resulting workpiece into 6 or 8 segments.

Secure the thread well by tying it in 2 knots. Make a cutting for this vegetable. To do this, you need to cut two identical oval-shaped pieces from the fabric and fold them with their right sides facing each other.
Trim the bottom edge of these blanks, it should be straight. Sew these two elements together, leaving the straight edge free for now. Fill the shape with filler through it and sew it to the pumpkin.
These are the beautiful ones you can make for your sofa.

You can make amazing items from this vegetable.
Pumpkin crafts - master class

To make such a beautiful house for a toy mouse, you will need:
- spacious pumpkin;
- newspapers;
- spoon;
- marker.

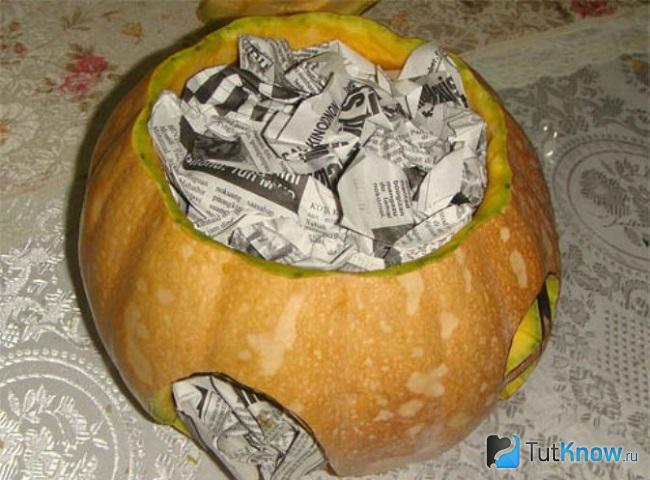
Now fill the pumpkin with newspapers, they will absorb excess moisture and allow the vegetable to dry out faster. When this paper becomes damp, remove it and add other crumpled sheets. You need to do this until the pumpkin inside dries out.
Put the dried lid back in place. Glue a porch made of thick cardboard where the entrance is located. All that remains is to sew this one funny mouse or another animal, and you can send the craft to a competition or decorate your room with it.

If you want to fairytale house looked like a real one, then place a candle inside. But the flame should not be left unattended.

See what other pumpkin crafts you can make.

In the top left photo you can see the figures, each made from two pumpkins of different sizes. Using pieces of wooden skewers, the small pumpkin is attached on top to the large one. It turned out to be a whole family. For dad you need to make a hat out of cardboard, for mom you need to make hair out of straw or yarn, and for your daughter you need to make a bow that is tied to the tail of a pumpkin.
All characters need to draw eyes and a smiling mouth, color their clothes or glue decorative stickers to these places.
No less cheerful characters are located in the top right photo. Some people need to put on a hat or glasses, glue on a mustache and attach a long carrot nose.
For pumpkin crafts (bottom left photo) you will need:
- straw;
- old hats;
- pumpkins;
- acrylic paints and brushes.
For the next DIY pumpkin craft (photo below right), you will need several of these vegetables of different sizes. From one you will make a head, from the other - a body.
- Transform small pumpkins or zucchini into bear paws. His eyes, ears and nose can be made from pumpkin scraps or squash. All this is secured with toothpicks or wooden skewers.
- A barrel of honey is also made from this vegetable. It is better to create an inscription on the surface so that it is clear what is inside. To do this, you first need to write the word “honey” on the pumpkin with a marker. in block letters, then cut out the peel at this place using a stationery knife.
- Cut off the top of the pumpkin and scoop out the flesh. Dry the pumpkin using newspapers, you will get an excellent craft, and a container for storing honey.
Pumpkin for Halloween
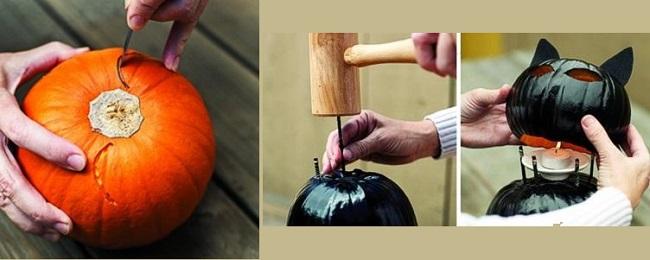
If you need a decoration for this holiday, be sure to use this traditional autumn vegetable. For pumpkin crafts (top left photo) you will need these vegetables. The lid of each is removed, the pulp is removed, and the top edge is cut into wavy lines.
You can also cut it into squares, like for a pumpkin craft - photo top right.

To make your house look cozy in the evening, place a candle inside the vegetable and light it. If you liked carving pumpkins, then you will definitely love carving vegetables and fruits. Armed with special knives and practice, you will be able to cut on it Maple leaves or such amazing chrysanthemums.

But you can make a funny cat even without experience. The main thing is that you have two pumpkins of different sizes. Attach the small one to the large one as a head. To make Matroskin the cat, you need to remove the skin from the pumpkin in strips. Also use a sharp knife to cut out his eyes and smiling mouth. The pupils will become raisins or buttons, and the cocktail straws will turn into his mustache. Cut out the ears from pieces of pumpkins and attach them to the head with toothpicks.

Here is a list of what was needed for the job:
- two pumpkins of different sizes;
- sharp knife;
- buttons or raisins;
- cocktail straws;
- toothpicks.
All parts are dried and then coated with black varnish. When all this is dry, the ears are attached to the head with toothpicks. On the upper part of the body, metal rods with threads or screws are attached in a circle. A bowl of candles is placed between it.
When the lamp needs to provide light, it is lit and a cat's head is placed on top.
You can make these beautiful lamps with your own hands, or you can simply cut out a mask from a pumpkin and hang this decoration on the wall.

This vegetable can also be used when you make crafts on the theme of autumn. Nowadays this is very relevant, since kindergartens and schools are asked to bring such handmade works.
If growing pumpkins in your garden has become your habit, then there will be no problems with the source material. But for residents of the metropolis, getting a pumpkin is not difficult, since these vegetables are sold in stores and markets.
Pumpkin box

According to the idea, a toy mouse will live in it, but at the same time you can store all sorts of little things in this vegetable. For this DIY pumpkin craft, you need to prepare:
- pumpkin;
- cardboard;
- paints;
- tassels;
- wire;
- a twig or wooden skewer;
- thick green fabric;
- scissors;
- glue gun
To help the pumpkin dry better when you remove the top, immediately make holes for the door and windows.
- Cut a leaf from thick green fabric big size, and the second one is small. Glue a small one on the side of the vegetable, and a large one on its lid.
- To make a canopy over the porch, cut a strip of cardboard and fold it like an accordion. Now straighten it a little, you will have a wonderful roof, to which you need to glue the decorative elements of the sidewall.
- Cut out porch decorations from cardboard. If the material is thin, then glue together several sheets of cardboard. In the same way, make a door and a handle for it.
- You can make steps using a base of this shape. The cardboard is wetted in a mixture of water and PVA, taken in equal proportions. Now this soft pliable material is placed on the mold. When it's dry, peel it off and cover it with brown paint. When it dries, coat the steps with varnish.
- Paint the other elements of the porch in the same way and bend the wire into a railing. Stick it one side into both sides of the step.
- Make a lantern out of cardboard and attach a wire to it on one side. Make shutters, cut out tulle for curtains.
- Wrap the wire around a wooden stick or skewer, remove it and paint it yellow. Attach these tendrils to a large pumpkin leaf.
- While you have made the elements, the inside of the vegetable has dried, you can start decorating it. Attach the steps by inserting the second ends of the wire railing into the pumpkin. Attach the flashlight to the side in the same way.
- Using a glue gun, glue the shutters to the windows and attach the tulle here.

If you want, place a ladder at the back. For the steps, you can use wooden skewers or twigs, cut them into equal lengths. Tie them on one and the other side with a rope, and also paint them with brown paint and varnish.

But this is a pumpkin box, you can put various objects in it. To add strength to it, a well-dried vegetable needs to be painted with varnish and allowed to dry. To make the pumpkin shine better, cover it with the same clear varnish her outside. The lid will fit better if you fold a strip of cardboard in half and glue it inside the lid, placing it on the end.

These are some wonderful pumpkin crafts you can make. If you want to quickly create a masterpiece, then make a vase from these vegetables. To do this, you just need to cut off the top and remove the pulp, dry the inside of the vegetable, and coat it with varnish. When it dries, pour water here and place flowers.

And the pulp is used in cooking. Take out the seeds, wash them, dry them and you will have a delicious, healthy treat.
Look what original gift It can be done if you use your imagination a little. Then the pumpkin will turn into a clock.

Also prepare its shell, coat the inside with varnish. Place the clock mechanism here and attach the hands to the outside. Place artificial flowers in the upper hole of the round-sided beauty, and an extraordinary present is ready.
After such inspiring work, it's time to have a tasty snack. Make pumpkin puree soup. It is done very simply.
- Remove the seeds from the pumpkin along with the adjacent fibers. They need to be thrown away, and the seeds should be washed and dried. Carefully remove the pulp from the pumpkin and cut it into cubes. Place in boiling meat broth or regular boiling water.
- Cook for 20-30 minutes - the pumpkin should become soft. Then turn off the heat, wait until the soup has cooled and puree it using a blender, add salt. To prevent it from being too liquid, it is better to remove excess liquid in advance.
- Heat the cream soup. Pour it into the pumpkin. Place a piece in the center butter or pour some milk. Decorate with greens.

After such a delicious snack, you will want to make other crafts.

You can carve flowers on the surface of this queen of beds or decorate it by taking:
- pumpkin;
- bush chrysanthemums;
- toothpicks;
It's quite easy to make a flower basket out of a pumpkin. You need to cut the vegetable as in the photo, remove the pulp, and dry the pumpkin. Now flowers are placed inside the basket, and if you wish, fruits.

How easy is it to make a pumpkin carriage?
If Cinderella knew what kind of carriage could be made from a pumpkin, she would probably want to ride in such a carriage.

Take:
- pumpkin;
- marker;
- spoon;
- gold paint;
- wire;
- foil.
- On the pumpkin, draw the outlines of the doors of the future carriage, cut along these markings with a knife. Use a spoon and knife to remove the pulp.
- When the pumpkin is dry, paint the monograms with gold paint.
- Twist wheels from wire and wrap foil around them. Pierce the pumpkin with a metal rod and secure these connecting elements to the wheels using wire. This is how you need to make the front and back pair.
If you have metal parts in your workshop, make wheels from round ones. Turn others into doors, windows and other elements of the carriage.

Here are some wonderful pumpkin crafts you can make. The main thing is desire and imagination. And to inspire you even more, we have prepared useful master classes on this topic in video format:
Here's a video on how to do it autumn vase from pumpkin:
Halloween is the oldest holiday in the world. Its deep history dates back thousands of years and extends through the Celtic festival of Samhain, Pomona Day among the Romans and All Saints Day among Christian peoples. It wonderfully combines the Celtic traditions of worshiping evil spirits and the Christian honoring of the Saints. But to this day, only a set of fascinating traditions and mystical symbols have survived from Halloween. On such an unusual night, it is customary to organize a masquerade in costumes of evil spirits. And in preparation for the holiday, pay special attention to the selection of bright decorations and the creation original jewelry for home, school and kindergarten (from pumpkin, plasticine, paper, cardboard, thread and other available materials). Using step-by-step master classes with pictures, photos and videos, adults and children make the most various crafts for Halloween with your own hands. In order to scare away all the evil spirits on the mysterious day of October 31... Well, or to summon...
DIY "Pumpkins made from threads" for Halloween crafts for children 3-5 years old

Pumpkin is an integral attribute of the Halloween holiday, so why not make a craft dedicated to it with your own hands with children aged 3-5 years. The resulting product will certainly be endowed with special magical properties. After all, since ancient times, the pumpkin head has symbolized not only the end of the harvest season, but also the eternal flame, which scares away evil spirits.
Necessary materials for crafts "Pumpkins made of threads" for children 3-5 years old for Halloween
- orange yarn
- decorative cinnamon sticks
- braid "flowers"
- felt green braid
- button (red, black or brown)
- themed craft tag (label)
- piece of cardboard
- glue gun
- scissors

Step-by-step instructions for creating a children's craft "thread pumpkins" for Halloween
- Take a small piece of thick cardboard (approx. 6cm x 10cm) and carefully wind several meters of yarn across it.

- When the skein is thick and weighty, trim the end of the yarn.

- Slowly remove the threads from the cardboard and pinch the middle of the skein with your fingers, as in the photo.

- Tie the workpiece tightly in the center with a thread of the same color, and cut through all the loops.

- You will get a small pompom. Using sharp scissors, trim the sides of the pom pom so that it is a nice oval shape, flattened at the poles.

- Take out the cinnamon stick. Grease one end with hot silicone from a gun and attach to the top of the pumpkin pom pom.

On a note! You can use decorative craft supplies or real spices. This time the craft will not only be festively beautiful, but also fragrant.

Holiday crafts for Halloween in kindergarten with photo instructions

There are many options for holiday crafts in kindergarten for Halloween with step-by-step photo instructions, designed for children to carry out independently. Our master classes are more suitable for joint work between parents and children. Not only do they bring the whole family together around the table, but they also include more complex techniques that produce amazing results in the end.
Necessary materials for festive crafts in kindergarten for an exhibition in honor of Halloween
- blank - white foam wreath
- black corrugated paper
- yellow eyes for handmade dolls and animals
- black satin ribbon from 5 cm wide
- glue gun
- scissors
Step-by-step photo instructions for creating a festive Halloween craft for kindergarten
- Start your Halloween craft by wrapping it in black ribbon. Cut the corrugated paper into 5-6 cm strips and wrap one by one around the foam wreath. Fix the ends firmly with a glue gun.

- It's time to get the kids involved in the process. Let the children cover the front side of the black circle with “eyes” for handmade dolls and animals.

- Let the kids first attach the largest eyes in a chaotic manner across the entire surface of the wreath, then fill the remaining space with smaller details.

- If there is a little free space between the elements (2-4 mm), there is nothing to worry about. Such gaps will not harm, on the contrary. A black background will highlight the yellow eyes even brighter.

- When the entire wreath is covered, tie a black bow on the top. satin ribbon. Leave a loop to hang your finished ornament.

- You'll probably end up with a great Halloween craft for kindergarten using our photo instructions. With such an interesting idea, your baby will win the thematic exhibition.

DIY children's crafts made from tangerines, paper and cardboard for Halloween

An excellent craft that is easy to create with your own hands in a children's group - a set of decorative Halloween pumpkins made from tangerines, paper and cardboard. Firstly, this option for holiday decorations is perhaps the easiest to implement. Secondly, all the guys love to cut out unusual details, which means they will be delighted with the creative process.
Necessary materials for children's Halloween crafts made from cardboard, paper and tangerine
- tangerines
- thin orange paper
- sheet of black cardboard
- green chenille wire
- scissors
Step-by-step master class on creating bright children's crafts from tangerines, paper and cardboard for Halloween

On a note! If the paper is too thick and unyielding, it is better to use plain colors. paper napkins. They are softer, which means they are perfect for this task.

On a note! If you can’t draw beautifully by hand, use templates from the Internet. But first, change the scale to make the details small.

How to make Halloween crafts for school with 10-year-old children

Hard to imagine school holiday Halloween without any scary details: bats, skulls, cobwebs, spiders and other crafts created by children of 10 years old without much difficulty. We offer you another unusual master class that will successfully complement your collection of decorations and decorations for the celebration of evil spirits on October 31st.
Necessary materials for Halloween school crafts for children 10 years old
- foam ball 8 cm
- foam ball 2 cm
- black corrugated paper
- orange corrugated paper
- skein of black chenille wire
- orange or black beads
- toothpick
- PVA glue
- scissors
Step-by-step instructions for 10-year-old children to create a cool DIY craft for school for Halloween
- Cut black corrugated paper into 4cm thick strips. Cut each strip into several pieces to make small rectangles.

- Coat a large foam ball with glue. In the same way, soak the rectangles with glue and cover the part with them. The ball should turn out completely black. Finish a smaller ball with corrugated paper in the same way.

- Using a thin wooden toothpick, attach the head of the future spider to its body. Or rather, a small detail to a large one.

- From a roll of black chenille wire, unwind and cut eight pieces of 12 cm each. Bend the parts so that it looks like spider legs. Bend it at the knees and wrap it into a spiral at the end.

- From yellow corrugated paper cut out several small circles. Cover the body of the spider with them. Stick in four legs on both sides (after greasing the ends with glue). Fix beady eyes on your head.

- Even if not all the details turn out perfect, don't be discouraged. For 10-year-old children, Halloween crafts for school can be a little careless, but they are always done with soul and complete dedication.

Original crafts from scrap materials for Halloween at home according to instructions with pictures and videos

Of course, the hallmark of Halloween is the orange pumpkin with twinkling eyes. But don’t forget about other traditional things: funny ghosts, hairy spiders, flocks of bats, a witch’s hat and so on. After all, most of these symbolic elements of Halloween can be skillfully combined in an original craft, created with your own hands at home from what you found at hand.
Necessary materials for an original Halloween craft from scrap materials at home
- gauze fabric
- thin wire
- Styrofoam
- thick orange cardboard
- thick black cardboard
- thick green paper
- PVA glue
- toothpicks
- themed craft tag (congratulatory)
- handmade eyes for dolls
- round candies on a stick

Step-by-step instructions with pictures and videos for creating an original craft at home for Halloween

On a note! You can use Chupa Chups as lollipop stands. They fit perfectly and will be a pleasant bonus for children for their efforts at the end of the creative process.
- Dip the gauze circles into the glue one by one. Then gently wring out and hang on the “stands”.

- Set this part of the craft aside for a while.

- Make a 3D pumpkin. From thick orange cardboard, cut out seven circles 6-7 cm in diameter. Fold the pieces in half.

- Glue the mugs in halves to each other using a glue gun or ordinary PVA.

- Draw silhouettes of bats on black cardstock and cut them out. To speed up the process, use templates from the web.

- Cut three pieces of 15-20 cm from a coil of thin flexible wire. Glue one “bat” piece to the end of each piece with hot silicone.

- Wrap the wire around a pencil or toothpick to create a spiral shape. Draw pumpkin leaf pieces onto green cardstock and cut them out with thin, sharp scissors.

- Insert a small wooden skewer into the middle of the pumpkin between the cardboard elements. Attach leaves to it, wind spiral wires with bats.

- Glue a cardboard craft track with a suitable inscription to the second toothpick. For example: “Halloween”, “Woooo”, “Happy Holidays”, “October 31st”, etc.

- Remove the dried gauze ghosts from the lollipops. Glue a pair of eyes on each ghost.

- Stick a flag with a congratulatory inscription into the main ghost's barrel. Make a small composition from all the elements.

- Such original craft made from scrap materials for Halloween at home (according to instructions with pictures and videos) will captivate all holiday guests. It combines the most popular symbols of the Celtic holiday and the most common techniques of children's and adult needlework.

October is inexorably approaching its end, which means it’s time to move from watching step-by-step master classes with pictures, photos and videos to turning them into reality. It's time to make Halloween crafts with your children from everything you can find at home: pumpkins, paper and cardboard, thread, plasticine, gauze, etc. You can decorate your home with these amazing handmade children's products or show them off at an exhibition at school or kindergarten.
 A man left another girl for me
 The child has a temperature of 39
 Relief knitting patterns with diagrams and descriptions Knitting patterns for dark yarn in leaf shape