How to knit a blouse with ribbon lace. Crochet ribbon lace: patterns and models for flirty new clothes
Materials and tools:
any thin threads that contain cotton, I specially took colored mercerized cotton (50 g. 330 m) to make it easier to see), hook No. 1.0.
Symbols used in the description and diagram: air.p. – air loop (.), treble crochet – double crochet (T), conn. dc. – connecting post (+)
Description:
knit 7 chain stitches and connect them in a circle. 
1st row:
3 air.p. lifting, 14 st.s/n 
2nd row:
4 air.p. (3 air stitches rise and 1 air stitch according to the drawing), then 1 treble s/n in each st. s/n of the previous row and 1 air. p. (you should get 15 treble s/n plus 1 air p. for each treble s/n) 
3 air p., 1 treble s/n at the base of this art. s/n. from these 3 air loops, a loop was obtained, then 3 air loops, 5 tbsp. s/n. into our sweat, conn. Art. in air.p. after 3 tbsp. previous row. Here is the first petal. 
Do this until the end of the row (you should get 5 petals) 
So we have knitted the first completed element of our lace.
We begin to knit the following lace element:
7 air n., conn. Art. at the last air. previous row. 
we knit as 1 row, only we knit 13 treble stitches, plus a connecting stitch. into the last (5th) petal of the first lace element. 
5th and 6th rows:
We knit the 5th row like the 2nd row, but it should turn out to be 14 st s/n. 
The 6th row is similar to the 3rd row. 
We have finished knitting the second element of our lace. We repeat all subsequent rows from the 4th to the 6th row. 
This is such a beautiful and uncomplicated ribbon lace...
And two more photos with ribbon lace 

MK-2 Ribbon lace
In today's master class we will learn to crochet another very beautiful and simple ribbon lace (LK). A T-shirt, skirt or jacket knitted with such lace long sleeve will decorate your wardrobe.
The intended product can be made entirely from ribbons, placing them lengthwise, across and even diagonally. Or you can combine elements of ribbon lace with other motifs (Irish lace, fillet knitting...). The LC looks very beautiful in the form of a border at the bottom of a product, the edge of a sleeve, a neckline, or used as a strap for a product, as well as to decorate very simple knitting. Decorate the interior with napkins made with ribbon lace or using LC elements. There are many options, plus your imagination. 
Materials and tools:
any thin threads that contain cotton (the sample uses “Iris” threads and a hook No. 1.0). The thinner the threads, the more spectacular the lace looks.
Symbols used in the description and diagram: air.p. – air loop (.), treble crochet – double crochet (T), treble. with 2/n. - double crochet stitch, joint st. – connecting post (
Description:
1st row:
we make a ring of 5 air. p. and knit 17 tbsp. s/n. in the remaining 17 air points. 
2nd row:
3 air.p. lift and 2 air.p. according to the drawing, 1 tbsp. in 3 tbsp. s/n of the previous row. 
Thus, knit another 5 tbsp. s/n with 2 air stitches, then 1 tbsp. s/n. without 2 air. p. and 1 more tbsp. s/n. (note in the photo there will be a letter L between these columns).
5 air stitches, 1 treble s/n at the base of the 3rd stitch. s/n of the previous row and 2 air. P. 
Thus, we knit another 5 tbsp. s/n. with 2 air etc. and make the connection. Art. 2 more air. p. and conn. Art. 
turn the knitting over and knit the entire row of treble stitches as follows: 
2 treble s/n in the first arch of 2 air stitches. previous row, 1 tbsp. s/n. at the base of the first treble s/n of the previous row,
2 tbsp.s/n. into the second arch of 2 air.p. previous row and 1 tbsp. s/n to the base of the 2nd st. s/n of the previous row,
3 tbsp.s/n. in the third arch of 2 air.p. previous row, 1 tbsp. s/n. at the base of the 3rd st. s/n of the previous row,
3 tbsp.s/n. in the fourth arch of 2 air.p. previous row, 1 tbsp. s/n. at the base of the 4th st. s/n of the previous row,
2 tbsp.s/n. in the fifth arch of 2 air.p. previous row and 1 tbsp. s/n at the base of the 5th st. s/n of the previous row,
2 tbsp.s/n. in the sixth arch of 2 air.p. previous row and 1 tbsp. s/n at the base of the 6th st. s/n of the previous row,
3 tbsp.s/n. into the last arch from the air. previous row. This is how we finished the 4th row: 
So we have knitted the first completed element of our lace.
We begin to knit the second lace element:
6th row:
5 air p, 1 tbsp. s/n. at the base of Art. s/n of the previous row, 5 air. p., connection station, 2 air. n., conn. Art.
Evgenia Smirnova
To send light into the depths of the human heart - this is the purpose of the artist
Content
There are a huge variety of crochet techniques. One of them is to make individual motives in the form of ribbons. Hence the name of the technique - ribbon knitting crochet With it you can create the most different models clothes or just household items. You will find several master classes on knitting them below.
Crochet ribbon lace models with patterns
If you plan to use a description for making any item of clothing, you should start with a pattern. Although you can take a ready-made item. For knitting ribbon lace, it is better to choose thin types of cotton threads. After preparing the tools, you need to decide on the design. Exist simple circuits for making thin ribbons and more complex patterns - to obtain wider elements.
Ribbon lace dress
Very often in various magazines you can find master classes on knitting dresses using this technique. For one of them you will need the following amount of viscose yarn:
- dark purple – 300 g;
- light purple – 200 g.
For an evening model, you can replace one of the colors with black. The master class describes the process of creating a size 42 dress. The first step is to make a pattern in life size. Next follow the instructions:
- For the back, make 2 light and 3 dark stripes 107 cm long.
- On the front, tie 2 light ribbons of 107 cm each, 2 dark ones, only 99 cm long, and 1 more light one - 91 cm.
- Using diagram 20a, connect the stripes on the back from the shoulder to the waist.
- Then use dark yarn to make wedges that are knitted with a fillet net alternating 1 single crochet (SC) and air loop(VP). Connect them with lace strips using diagram 20b. Join the front elements in the same way.
- Join the seams at the sides, leaving only the armholes. Using a knitted stitch, sew the fabric along the shoulders.
- Make a collar from 1 strip 60 cm long, sew it to the neck.
- Using the 12v circuit, make 3 flowers. Sew them along the horizontal neckline. Decorate the flowers with beaded stamens.
- Tie the fillet mesh around the armholes, making 3 rows.

Openwork bolero using ribbon lace technique
Using a similar technique, you can knit another element of a woman’s wardrobe, which is especially suitable for summer. This is a lace bolero. For size 46 you will need the following materials and tools:
- Ymart cotton yarn with a density of 600 m per 100 g - 300 g;
- hook number 2.
- Back. Using 1 pattern, make 5 stripes. Of these, connect 2 38 cm long (1 and 5) along the shorter longitudinal side, and 2 46 cm long - along the larger direction. Determine the size of the 2nd tape using the pattern by trying it on.
- Right half front. According to the 1st scheme, make 5 ribbons, connect them immediately as you work. All stripes except 3 should be made with an odd number of motifs. The length of the ribbons is also determined by the pattern.
- The left half of the front is easy to make. Perform it in a mirror way to the right.
- Sleeve. Using 1 pattern, make 6 ribbons and 2 more for the okata from 2 fan motifs. Place the latter in mirror image relative to each other, as Figure 2 shows.
- Assembly of elements. Connect the free edges of the motifs on all sides of the parts with air loops, which are attached to the RLS tapes themselves. Sew all the elements or form them into a product using a hook.
- Collar. Make 2 stripes, in which the 2nd motif will consist of 9 sc. Attach the piece to the bolero, then tie it along the edge according to diagram 2.

Ribbon lace jacket
Another lesson on crocheting ribbon lace describes how to make a jacket - a shortened variation of the jacket. Its length is approximately to the waist or slightly below. For the model described below you will need 400 g of 100% viscose yarn in the following colors:
- brown;
- mahogany;
- dark yellow;
- light green 2 shades.
The first step is to again make a pattern and a sample of the ribbon to check that it matches the specified width. Each detail is carried out according to the following instructions:
- Back. According to the pattern, make 9 strips of the specified length. You can determine the color of each ribbon from the photo of the back. Connect the ribbons immediately during knitting with RLS or with a hitch.
- Half front. Tie 4 strips of the length indicated in Figure 6, take the color from a color photo. When knitting the 5th ribbon, continue it 26 cm for subsequent stitching into the neckline, and then proceed to making the 2nd half of the front according to the same pattern, only this time it is mirrored.
- Sleeves. Make 7 strips of the specified length according to the pattern, connecting them together immediately during the knitting process.
- Assembly. Sew or crochet the shoulder and side seams, and sew in the sleeves.

Summer T-shirt assembled from individual openwork stripes
This lace is especially suitable for summer clothes, because it turns out to be very light and delicate. This can be a simple T-shirt that knits very quickly. You will need about 400 g of white yarn from 100% cotton with a density of 170 m per 50 g. To begin, according to Figure 13-1, make a life-size pattern. Then follow these step-by-step instructions:
- Tie 8 ribbons 65 cm long and 4 50 cm long according to the pattern of the main pattern. In the places where the arrows are indicated, fasten the strips together.
- Connect the shelves using lacing. To make laces for this, tie a chain of chain loops 170 cm long.
Patterns and patterns of ribbon lace with detailed descriptions
Ribbon lace has many different different patterns. In most descriptions, the basis for them is an openwork round motif, which is repeated several times. Such elements are connected horizontally, vertically or even diagonally. Ribbon lace is often combined with Irish lace. Another addition to it is loin mesh. Ribbon lace is crocheted according to different schemes, sometimes even in combination with knitting needles. A few basic patterns are as follows:
- "Pineapples." One of the most common patterns. Consists of individual elements similar to pineapples. To connect the ribbons, special arcs of air loops are knitted on the sides. In this way they get beautiful skirts, dresses and tunics.
- Narrow ribbons. They are more often used as straps for summer tops with a bodice or swimsuits. Those that are wider are also good for sundress hangers.
- On the base square motifs. The basis of ribbon lace can be not only circles. Such elements look no less beautiful and are often used to create knitted cardigans or jackets.
- Floral motifs. In the manufacture of women's and children's clothing, such ribbon patterns occupy one of the first places. They look much more interesting than simple drawings from curls or other small details.

This section of needlework is one of the most exciting, but also quite complex crochet techniques. Its essence is in the formation of ribbons from motifs, usually round and openwork. Intricate and exquisite pattern is achieved by tying one petal to another, and the petals themselves are formed as follows: two-thirds of the circle is knitted and attached to the next element. Below we will briefly introduce ribbon lace, crocheted, diagrams and models will help you navigate this fascinating needlework.
Knitting always starts with a complete motif, and the petal always has an odd number of rows. The ribbon can be made not only in the form of circles, but also square and hexagonal motifs.
Tape knitting is used to make clothing, trim elements, and also as a beautiful finishing border - to decorate the bottom of a product or correct a bad edge.


We combine ribbon lace motifs with crochet
It is important to connect the tapes correctly. Two connection methods are allowed:
- Sew the finished ribbons with a picot needle (the method is simple and convenient, although it creates a seam);
- Connect the ribbons at the moment of knitting (there is no seam, but the method is quite complicated due to the asymmetry of the edges of the ribbon lace).
Tip: Place the ribbon on the pattern from bottom to top, starting from the full (round) motif, to form a beautiful edge. It is better to start with the longest ribbon possible - say, from the bottom to the shoulder.
The narrowing of the ribbon fabric is achieved due to the fact that one of the ribbons is knitted shorter, and the next ones are connected to each other.
A small master class that covers many recommendations for ribbon lace, crochet, here:
Let's start with something easy to work with: openwork
The choice of pattern for ribbon lace depends on the skill of the knitter, but the technique itself offers almost unlimited possibilities for creativity.
For those who are starting to knit lace ribbon for the first time, we advise you to start with a simple border. It is knitted simply: starting with an air ring. loops, tie it st. b/n. Then continue knitting with air arches. loops and st. s2n, tied with st.b/n.
Ribbon lace patterns:


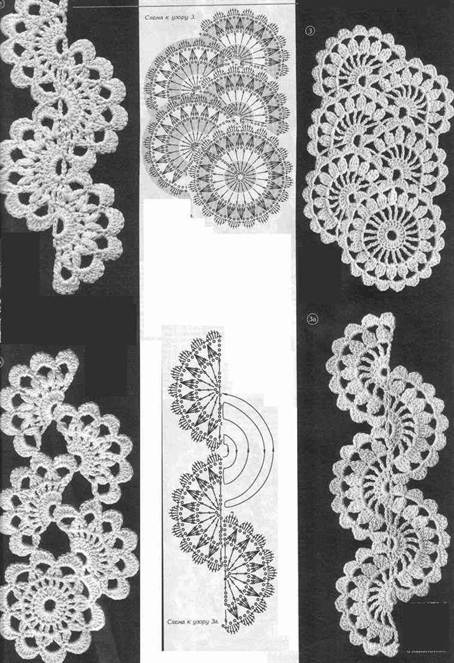

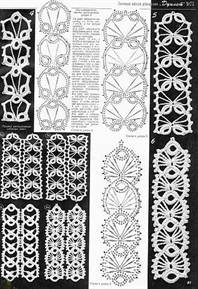

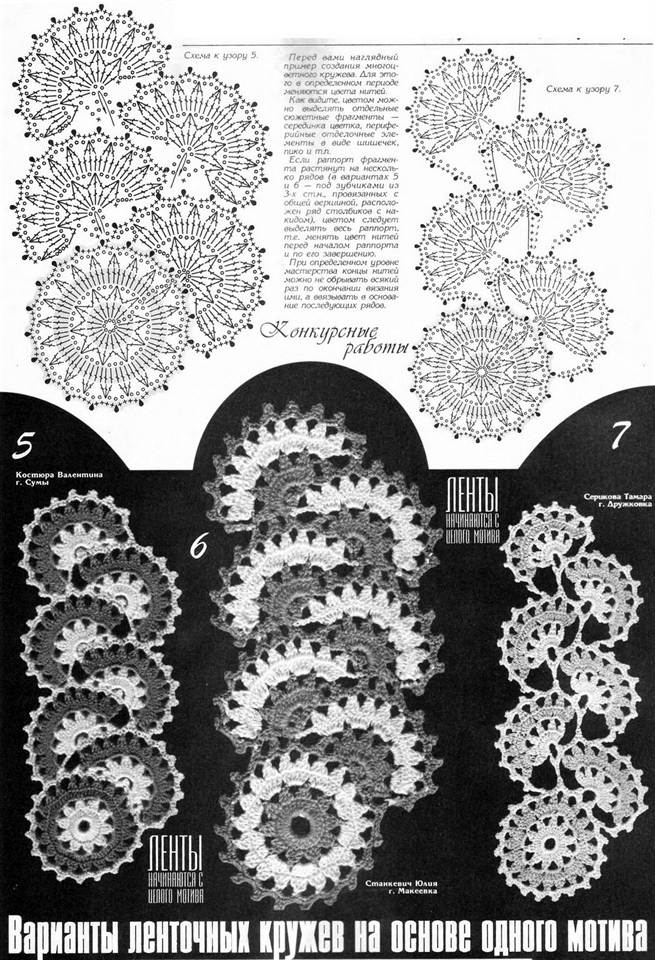


The presented diagrams are taken from the magazine “Duplet”.
Suitable models for working with diagrams and descriptions
Now that you know how to knit openwork ribbon lace using a crochet hook, photos and diagrams for them will help you decide on the models.
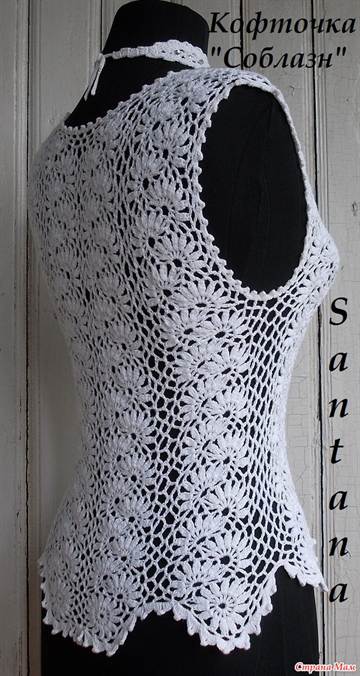
Blouse "Temptation"


Snow white suit

This suit with an openwork top and a tight-knit skirt of an asymmetrical cut is suitable for a young and slender girl. Before you start knitting, you need to make a pattern and make all decreases and increases according to it. Knit the skirt in the round.
You will need: 46 balls of white “Iris” (knitted in 2 folds), hook No. 2. Size: 38-40.
Scheme:

We start the top by knitting a strip according to the first pattern, consisting of a whole motif, six right and six left halves of the motifs. Next, we knit the strips according to the second pattern and connect them as shown in the third pattern.
Size: 38
Required:
- 400 g white yarn (50% cotton, 50% acrylic, 50 g/160 m),
- hook number 3,
- stitching needle.
Main pattern: scheme 11-1, 1st and 2nd rows are repeated. The diagram shows forward and reverse rows. On the pattern it is indicated by the number 1.
Ribbon Lace: Scheme 11-2, rows 6 to 15 are repeated. The diagram shows forward and reverse rows.
On the pattern it is indicated by the number 2.
Tape width 16 cm.
Description of knitting a pullover with ribbon lace elements
The dimensions, location of patterns and direction of work are indicated on the pattern (Fig. 11-1, Fig. 11-2).
The work is carried out in stages.
First stage (lower part).
First knit the bottom part of the product. Knit 2 strips of ribbon lace according to pattern 11-2, 76 cm long. Then connect the ribbon lace together according to the pattern (Fig. 11-1), connect the parts using a needle (sew) or a hook (single crochet). Sew the part into
ring. The connection line is located along side seam.
Second stage (bodice).
Next, knit the upper part of the product. Knit the front and back in one piece, without making side seams. Along the upper edge of the ribbon lace, knit with the main pattern according to pattern 11-1. Knit in the round in straight and reverse rows. Distribute 136 stitches along the entire length of the lace (a multiple of 2). Connect each row with. With. and knit 3 in. item for climbing new row. Place the lifting line along the proposed side seam. 6 cm from the cast-on edge, divide the fabric into 2 parts (back - 68 p., front - 68 p.), marks can be made with pins. Then knit each part separately.
On the back for the armholes on both sides, decrease 4 stitches in one row. Then knit evenly. After 19 cm from the beginning of the armholes, form a neckline. For the first shoulder at the beginning of the row, knit 10 sts. s/n.; for the neckline, average 40 p. knit st. b/n.; for the second shoulder at the end of the row 10 sts. knit st. s/n. Having knitted this row, you finish working on the back.
Knit the front in the same way as the back. Sew shoulder seams to a length of 5 cm.
Third stage (sleeve).
First, knit the first strip of ribbon lace according to pattern 11-2, 20 cm long. Then knit the second strip of ribbon lace according to pattern 11-2, 40 cm long.
The lower edge of the second strip and the upper edge of the first strip are tied with the 1st row of st. b/n. On the second strip, tighten the edge of the fabric, knitting as many loops in a row as were knitted on the first strip (in this version there are 40 loops).
Next, connect the parts together using a hook, alternating 1 tbsp. s/n. in the first page and 1 tbsp. s/n. to the second lane. Then along the upper edge of the second strip of ribbon lace you knit with the main pattern according to pattern 11-1. Distribute 77 sts across the entire width of the fabric (a multiple of 2+1 sts). Knit evenly and form a sleeve cap 26 cm from the beginning of the main pattern.
For an edging on both sides of the fabric in one row, decrease 4 sts, then in every 2nd row, decrease 2 times 2 sts. After 3 cm from the beginning of the okat, you finish working on the sleeve. Knit the second sleeve in the same way.
Fourth stage (assembly).
Stitch in and sew the sleeves.

 Lunar calendar of haircuts for February Favorable days for haircuts in February
 How to crochet a striped watermelon and a red watermelon slice How to crochet a baby handbag: connecting the flap and the back of the bag
 Do you want to be right or happy?