Manicure with a pattern on the thumb. Exquisite manicure with a pattern
Not everyone can afford to go to salons, but you can make a beautiful manicure at home. You can diversify the design with drawings. Consider beautiful and modern patterns on the nails.
Beautiful manicure is an important part of the image for any woman. After all, men often pay attention to women's hands and how well-groomed they are. Not everyone can afford to go to salons, but you can make a beautiful manicure at home. You can diversify the design with drawings. Today Manikyurchik.ru will tell you the ideas of drawings on the nails, which can be done without special skills.
What tools and materials are needed
The picture will not be neat if the nails are broken, have a different shape and a groomed cuticle. First you need to quality and tidy your nails. Next, you can begin to varnish and apply the picture.
Modern nail art involves the use of various kinds of improvised means, with the help of which beautiful pictures are obtained. Absolutely everything is used as decor materials, from stickers to rhinestones.
To create drawings you may need:
- Scotch
- Thin brush
- Needle
- Shiny powder
- Nail stickers
- Glue and foil
- Pebbles and rhinestones
- Varnishes and paints
- Toothpick
- Sponge
The selection of materials will be easy if there is an accurate outline of the future pattern.
Toothpick pattern
He needs a toothpick and colored varnishes. If everything is done correctly, the result will look neat, and a manicure is suitable for both a holiday and a weekday:
- Nails are covered with a plain dark varnish.
- A little contrasting varnish is poured onto a piece of paper.
- Using a toothpick, a drawing is applied.
- When it dries, cover with a colorless varnish.
It’s so convenient to draw a heart, flower, twig or any other pattern - it all depends on how much free time you have and what you want to depict on your nails.

Simple needle drawings
If you want to create a neat pattern, then to draw thin lines you can not do without a needle. The ornament with the help of a needle is created on nails of any length, constantly changing color and creating contrast.
To do everything right, follow this instruction:
- A transparent base is applied to the nails.
- Bright varnish put small dots with a brush. To make it more convenient, varnish can be poured into a small bowl or on a sheet of paper.
- A needle is used to draw a drawing - all points are connected or other patterns are drawn.
- After all this should dry.
- Fix the result with a fixing varnish, so that the pattern lasts on the nails for as long as possible.
In this technique, it is very convenient to draw butterflies, flowers, twigs because a thin needle is suitable for depicting small details.

Varnish drawings step by step
If you are not comfortable using a toothpick or needle, you can buy several varnishes with thin brushes and apply patterns to them.

For example, the youth figure “sneakers” looks bright due to the use of different colors. But it takes a little time and patience to apply it:
- Nails are covered with different colors of varnish.
- Using white draw a sock at the nail.
- The length of the line.
- All strips are connected diagonally.
- Black varnish put dots on top of the “sock” and draw them.
- Colorless varnish is used to consolidate the result.

Classic manicure became popular back in the 60s and since then it has remained relevant. Such a combination is suitable for both a young girl and a lady aged:
- Prepare your nails for applying varnish.
- Special stencils of manicure are glued to the base. They should form a semicircle.
- Apply 2-3 layers of varnish of the main color.
- Dry it.
- Peel off the stickers and paint the semicircle with a varnish of a different shade. You can also leave it unpainted.
- Apply a fixing coat of colorless varnish.


Brush drawings
In special stores there are many varieties of brushes for painting. They have different lengths, shapes and thicknesses. Using them, you can create all kinds of masterpieces of nail art.
If you like to experiment, buy two different brushes. So it will be convenient to apply large and small parts for decorating nails.


Scotch tape design
Using a simple adhesive tape, you can create a moon or French manicure, as well as apply complex geometric patterns to the nails. It is only necessary to think over the design in advance, and at the end to cover everything with varnish-fixative.


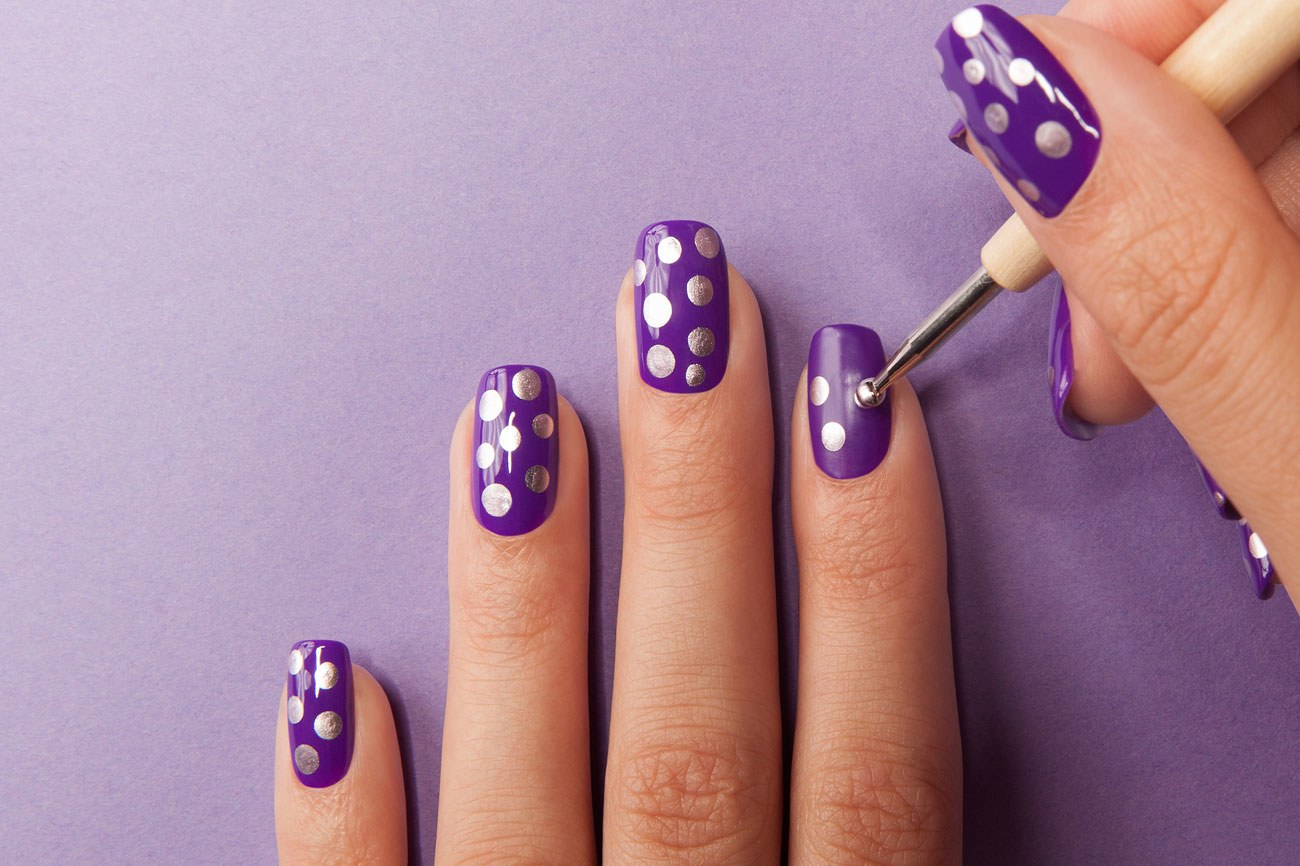
Dots and techniques for working with him
Dots is a manicure tool that looks like a pencil with a ball at the end. With its help any patterns are applied. The technique of working with it is that a different shade is applied to the main color applied to the nail - the dots are carefully dipped into the liquid and create patterns on the entire surface. It is convenient for them to create points and draw lines, and the main rule when working is applying varnish on a damp surface.


Acrylic Drawings
Not so long ago, acrylic paints began to be used to create a beautiful manicure. Their color scheme is diverse, in addition, the brightness remains for a long time, since the colors are resistant to steam and moisture.
This technique can be used to draw twigs, butterflies.


In conclusion, it is worth noting that the drawings on the nails are limited only by your imagination. You can safely experiment with color solutions, combine techniques and choose the method that is less labor intensive, but at the same time allows you to achieve better results.
Video “A simple drawing of a ladybug”
Have you already tried to show imagination and create an original drawing on the nails? Show your result in the comments!
Nail design with patterns is the apogee of femininity and sophistication. On any nails, such Nail-Art looks appropriate and luxurious at the same time. And do not assume that simple ornate patterns are no longer original and have long gone out of fashion - this is not so. But besides them, in the nail industry you can still find a lot of interesting ideas for manicure with patterns. We’ll talk about all this now.
Types of patterns
As such, the patterns on the nails are very difficult to divide into any subgroups. The only thing that is present here, as well as everywhere, is: simpler and more complex drawings, voluminous and classic, seasonal and universal. And, without delay, we’ll talk about most of them right now.
- Flower patterns. Perhaps this nail art can be called the most popular among all women. It is especially relevant, of course, in the spring and summer. Beautiful design, in which there are delicate color schemes, smooth lines and a variety of choices, will not leave indifferent any lady.

If you do not have serious experience in creating patterns on the nails, then just confine yourself to the simple outline of a flower on a plain surface of the nail. And do not be afraid, your manicure will not look rustic. On the contrary, laconicism is in fashion today.

Important! The most often depicted flowers in the form of patterns were: poppies, tulips, daisies, forget-me-nots. This is because they can be drawn using the simplest lines. Roses are no less popular, but some skill is required here.

Beautiful and easy to perform manicure with roses
- Animals.This is not about animal prints, as you might think, but about patterns in the form of the outline of animals. So many girls in this way show love for their pets. You can depict absolutely any animal on the nails.

As we already said, this can be a shape or a well-drawn muzzle of a beast. Here everything will depend on your skill, because the second will obviously be more difficult to do. However, it is allowed to use a stencil.

Important! The most impressive and realistic will look patterns in the form of animals, applied using airbrushing
.
Beautiful owl drawing using airbrushing
- Lace.Nail design with lace patterns - which can be more feminine and tender. Pay attention to the photos that are present in our collection.

See how sophisticated look nails, decorated with an openwork mesh. Naturally, the color palette here should be chosen in nude or pastel colors.

Manicure with lace in a nude palette
Perfectly lace patterns will also look at the jacket. If desired, they can be supplemented with a small amount of rhinestones. 
- Mehendi.Mehendi patterns on the body are known to fashionistas a long time ago. Young girls who are not afraid to stand out, willingly decorate with them pieces of their skin, especially in the summer. But this trend has recently migrated to the nails, so it can be considered a novelty in the nail industry.

Mehendi looks very original and catchy. And all because this design has not been hackneyed yet. He will find his greatest popularity in 2019. But, this does not stop you from doing it right now, if you have such a desire, because mehendi on nails is relevant for any time of the year.

Important! There are three ways to make mehendi: apply a pattern using a stencil, stick stickers on the nail plate, or draw a pattern with the finest brushes and needles. But, the latter method is incredibly complex and requires great skill. Therefore, you are unlikely to succeed in doing it yourself.

- Linear patterns.Perhaps this is the simplest type of design from our selection today. What are linear patterns? In simple terms, these are lines and curls drawn by ordinary varnish. Moreover, they are located randomly on the nail plate.

To create these patterns, you will not need a lot of material and time. Just cover the nail with the varnish of the desired color, and when it dries, apply any strips and curls that come to your head. 
- Ethnic motives.In 2018, ethnic patterns in manicure and pedicure beat all records of popularity. Fashionistas of all ages willingly applied intricate and not always meaningless drawings to their nails, which, however, fit well into the surrounding surroundings.

The best time for this nail art is summer. And you can create a high-quality ethnic pattern in the same ways as mehendi (we described them above).

Beautiful manicure in ethnic style.
Important! Ethnic patterns look best in the following colors: black with white, white with blue, red with black. Often, masters create deeper ornaments from three or more shades.

- Themed patterns.For example, a spider web for gloomy autumn nail art. Firstly, creating such a design is quite simple, and secondly, it will look incredibly impressive. Be sure to try it!

- Winter patterns. Intricate designs on the nails, designed for the cold season, look very beautiful. And of course, first of all, it is worth highlighting a surprisingly thin nail-art, which looks like a frosty pattern on glass. This manicure is performed in the most delicate blue and blue tones, and from the side it looks as if the frost really left its patterns on your nails.

- Gold on black. A manicure with golden patterns on a black background will look very unusual, rich and spectacular. Not to say that this is everyday nail-art. Rather, it is more suitable for parties and publication.

Recently, the design of nails in women is not a fake interest. In addition, the design of nails with a pattern in modern times can be considered as art.
Of course, most women monitor their appearance, while nails are of no small importance. Therefore, every lady wants to have very beautiful nails with an unusual and stylish pattern.

However, not every woman can perform high-quality decoration of her nails, since not everyone has a concept of where to start, and how to paint nails.
This article will help to solve this problem and will be a visual aid with various illustrated pictures.

It is worth noting that the design of the nails, as well as their painting is a very funny and creative event.

However, if you are planning to decorate your own manicure yourself, you will need to have various devices and the necessary materials that may be needed in the process.
Painting Tools & Supplies
The most important and basic thing that you will initially have to acquire is various chemical elements, as well as additional formulations and solutions: fixing agent and varnish remover and other liquids.


Next, you need to have acrylic paints in your arsenal. This type of paint has no harmful and side effects on the nails, while they have a very large color gamut. Their main advantage is that acrylic paints very well fit on the nail and dry out very quickly, while they have a low cost.

It is also necessary to purchase an important tool when working with nails, this is a set of brushes made of natural hair, it is desirable to have two different sets.

As decorative elements of the decor, you can use various items that are required to be available: a variety of rhinestones, stones, beads and other items. You can not do without glue, which is used when gluing various elements of the decor on the nails.


All newcomers need to study the theoretical materials for painting and decorating nails well, and only after that one can get down to business.

The simplest nail design with a design is made with a special brush with the finest tip.

They are designed to work with special paints based on acrylic, which it is desirable to apply small arbitrary shapes, it is allowed to supplement these lines with various points.

This work will have a very chic and unique look, but the work will not be very difficult.
The procedure for applying drawings on nails
Before you start decorating your nails using acrylic paints, you must:
- At the initial stage, it is necessary to prepare the nails for work, i.e. it is necessary to degrease them.
- Next, you need to apply a special nail plate, on the surface of which a transparent base is applied.
- After this, it is necessary to apply a special nail polish and wait until it dries well.


So, we pass to the most important and serious stage, this is the decoration of nails, in other words, painting of nails.

For those who are going to perform such an operation for the first time, and even on their own, it is recommended that you practice a little with the drawing on any surface. This is necessary so that the hand can get a little used to the brush.

After a short period of time, the hand will adapt well to the brush, and only after that you can apply a variety of patterns, as well as beautiful patterns on the nails and smooth lines.


It is worth noting that the easiest way to decorate your nails after painting with paint, to perform high-quality decoration with decor items, such as beautiful sparkles.

French manicure with a pattern
The design of manicure in this image is a classic style of nail design.

At the same time, the picture has a bright and saturated shade, in which there may be a small line or small plain lines of dark color.

Colored nails with drawings
If you add the colors of golden or gilded shades to the light and bright manicure, this will give the manicure more freshness and lightness.

Nail Art - Floral Motifs
This is one of the most difficult manicure design options.

The fact is that painting in this style requires a very thin brush, which in itself is very difficult.


In addition, the execution process will take a lot of time, and also require a lot of patience and perseverance.

Leopard print on nails
This is one of the most popular and popular styles of manicure design. The reasons for this phenomenon are very easy to explain. The fact is that applying the picture yourself is not difficult.

In order to perform a unique and stylish nail design, you will need to have all the special equipment and tools, as well as high-quality material.

Equally important is the condition of the nails and skin of the hands, as fingers that are not well-groomed can cause negative feelings.

Custom designs on nails - hieroglyphs
Today, a certain interest is shown in the eastern theme. I did not remain without attention to oriental themes and manicures.

The drawn hieroglyphics on the nails look very impressive and unique.

As a rule, the main color of this style is red, and black should be used as an additional color. This color scheme is typical for Japanese themes.

How to decorate drawings on nails with rhinestones and stones
Pretty interesting design this way. Today, a very relevant design of manicure has the presence on the nails of decor items, such as rhinestones or pebbles.


How to care for nails and hands
The condition of the hands and nails is of no small importance, since their untidy appearance will negatively affect their appearance.

Therefore, to prevent this from happening, you will have to follow the following rules:
- after you get rid of the old varnish it is not immediately advisable to apply a new layer, but it is necessary to give the nails a short break for a certain amount of time.
- finding nails in any chemicals is not recommended, and in case of urgent need to wear rubber gloves on your hands.
- periodically dip your nails in a special solution that makes your skin and fingers more beautiful.
- periodically wipe the nails with lemon or its juice, this will provide them a longer bright and saturated shine.
- it is recommended to carefully consider a healthy and proper diet. Include in your daily menu, dairy products, various nuts and even marmalade.

Thus, beautiful drawings on the nails with varnish can be done by yourself without resorting to the services of specialists, if you follow all the necessary recommendations in this article.

Also here there are many different samples from the photo drawings on the nails. Therefore, you can safely get to work, and the result will surprise not only you, but also your loved ones.

Photo examples of drawings on the nails


Nail design, especially if it is created with one's own hand, is an excellent undertaking in terms of self-expression and image creation. The easiest decorating method is simple drawings on the nails. Making them is not at all difficult, there are many ideas that have already been invented before. But there will be even more of them if you connect your own imagination. You should start from the simplest techniques, gradually improve your talent and capabilities.
Simple drawings for new masters
At first, everything will not be as smooth as we would like. It's because:
- firstly - you are worried, afraid that you will not succeed;
- secondly - you have not yet gained experience and skill - this is a matter of time and zeal;
- third - you probably do not quite understand how you can draw and how exactly this is done.

If you follow the main rules - the self-learning process will be more effective:
- Before work, you need to remove the cuticle from the nail plate. A simple warm bath will help in this, in which the hand falls for 10 minutes. So it will be easier to fall behind the marigold.
- With a wooden stick (you can use a toothpick) and manicure forceps cut off the coarsened dermis (skin) around the nail plate.
- Next, you need to polish the nail plate. By the way, this should be done not only before applying manicure, but also for prevention, at least once a month. Instead of polishing, if there is no special nail file on hand, a simple degreasing with a nail polish remover will suffice.
- In principle, the nails are ready for drawing. But there is one caveat. Before drawing it is necessary to put a basis. On it, drawing lays down more accurately, the drawing process becomes easier. The manicure as a whole will look neater.
- After applying the base, wait approximately 20 minutes.
Now for sure everything, you can safely proceed to drawing.

What tools and materials should be at hand
Before the drawing procedure, prepare the materials and tools for the work, their list and varieties will depend on what you plan to work on, what material you know how to use better, determine the theme and color parameters.
Nail polishes
In the work you will come in handy:
- clear nail polish;
- fortified;
- medical;
- lacquer fixer;
- sparkles;
- glitters;
- decorative powder;
- several different shades of varnish.

Instruments
Drawing is impossible to imagine without tools, so everything will be listed below, it may come in handy in one case or another:
- stickers
- ready-made stickers;
- pattern plates;
- brushes;
- needles;
- toothpicks
- ordinary or decorative tape;
- foil;
- dots;
- acrylic paints.
The simplest drawing ideas for beginners
Having prepared the nails for work, you can apply a picture to them with any tools, even handy ones - with those that every girl has absolutely at home.
Needle work
Original and even in some places simple drawings can turn out drawings from a needle. How to use it:
- You do not need to draw on the nail right away, try to do it on paper. Firstly, you will understand how it works, and secondly, you can choose the proportions as close to your fingernail as possible.
- Put the base (transparent base) on the nail plate, wait until it is completely dry. The base is always applied in 1 coat.
- After drying the first base layer, you will need to apply another layer - the background. Choose the color of the varnish that will be accented on the nail, for example, white.
- There is no need to wait until the second layer dries. You can immediately work on.
- Somewhere in the middle of the plate, drip on a white background, three small dots, for example, of red varnish, forming a triangle or alternately after each other along the nail.
- You can draw with a needle, immediately poking it in the middle of the highest point, stretching to the bottom, and so on to everyone, in turn. There will be such an ornament as in the photo.
- You can drop, for example, the same white varnish in the center of a red drop, then when stretching behind the needle, a white strip will go on a red background.
- You can stretch the varnish from side to side, then in general an unusual pattern is obtained.

The color palette in such simple drawings has no defined boundaries. The author himself decides what and with what to combine.
No need to work with all nails at once. Draw them in order from the very beginning to the winning finish. Otherwise, you will definitely fail.
Draw with a brush
This technology of drawing is a little more complicated, but having a great desire, any novice master will cope with this task.
Practice, for a start, no artificial nail plates - this will be a very good workout. If you don’t have them at hand, draw a nail on paper about the size and shape of yours.
Drawing technology:
- On prepared nails, first, as always, a base coat of colorless or therapeutic varnish is applied.
- Leaves a fingernail to dry. In this technology, all layers must completely dry as they are applied.
- After the base is completely dry, apply a background layer. The color in this technique should be chosen so that it contrasts with future painting. First, in one step, the brush is led from the center towards the cuticle, then the left part of the plate is painted over, then the right. If you notice, then you should get only 3 strokes with a brush.
- Further work will require a very thin brush. Soak it in varnish, be sure to remove the excess. And, as you did at school, start drawing an element of the pattern or the drawing itself.
- The final step should be the fixing procedure. That is, the nail is completely coated with colorless varnish, along with the picture.
Here for clarity, we give a photo of simple drawing ideas.

This technology uses a different number of colors. First, try to draw hearts, simple flowers, lines, and other geometry. If you feel the strength to draw a more complex ornament - feel free to get down to business.
Simple painting on nails with acrylic paints
These paints are respected by professionals, and those who know how to draw them. Their peculiarity is that they, in the process of work, do not spread, are easy to apply, dry out fairly quickly, and hold for a long time. In addition, human health is not dangerous. Go on sale:
- colorless;
- translucent;
- opaque (overlapping the previous layer);
- pasty.
Diluted without any problems with water. Easy to mix with each other. After drying, on top of them, you can safely apply another picture, without fear of damage to the original layer. The coating allows air to pass through and looks very attractive and bright.

According to the drawing technique, there are:
- Oiled. It is used in pasty and undiluted form. so called because I recall a painting made with oil paints.
- Pasty. The consistency resembles a batter. The composition is not diluted, it is used in the form in which it was acquired. You can only add pigments to it if the idea of \u200b\u200bdrawing requires it. Draw in the form of thick strokes. When the paint dries, in appearance it looks like gouache painting.
- Watercolor. Water must first be mixed with a binder, only then watercolors are added here. A pure drawing resembles a watercolor ornament. It is characterized by high quality.
- Sliding. You can mix this composition with a structural gel for nails. The difficulty here is that it will be quite difficult for a novice master to predict the final result. But after a few workouts, this can be learned.
- Glaze. Work with this material carefully. All layers to be applied must be very thin, almost invisible.

You can draw with any type of brush, which only you know how to work. For training, it is enough to acquire 6 basic shades and whitewash in order to correct errors in time. To understand them in the work, you must first draw on the paper a field in the form of a chessboard.
For 6 colors, 6 squares of approximately 2 × 2 cm will be required. On this field (alternately) apply the purchased paints - paint the whole square with one pigment, then draw them with horizontal rulers of a different shade, and finally vertical lines with a different color. You should end up with 36 colors.
Brush painting with acrylic paints
Draw a twig with acrylic paint:
- For the background, select a very light color (then draw a dark one) or vice versa. In our example, it is lilac.
- Draw the curved lines in yellow. Choose a location at your discretion, not necessarily exactly as shown in the photo.
- On this arc, draw, with curved lines, figures in the form of leaves in the same tone.
- Make the veins inside the leaves brighter.
- Fix the result with a transparent fixing layer.

If this drawing seems too easy for you, try to recreate these simple ideas. In the first photo, the drawing technique is depicted in pictures.

Learning to draw dots
From the simplest drawings to very complex ornaments, professionals draw dots. The simplest techniques are a combination of points of different sizes, commas, rulers, and so on. The tool needs to be dipped in paint or varnish and begin to paint with it, like an ordinary brush. In the process, the amount of coloring agent is reduced, this can be seen by the ingredient on the nail ornament, which makes the picture more natural and realistic.

You can draw dots with nails as you wish. Using it you can draw:
- flowers or animals;
- modify the traditional version of the French manicure;
- it’s easy for them to create New Year’s motives;
- personify the seasons on the nails;
- very stylish abstraction turns out to draw dots.
Drawings with ordinary tape
Conventional household scotch tape can greatly help in creating a nail design. With it, you can make very different shapes, drawings, and even compositions. The geometry is the easiest to do - it is based on lines, and it is very easy to cut their adhesive tape. Cut strips can be applied to the nail plate in random order or sequentially if you want to create a specific shape.
The technique of working with adhesive tape:
- As in all previous cases, a nail is prepared first.
- The first layer is the base.
- After drying, apply the background - as you wish.
- While the varnish will dry, cut some thin strips of tape from the adhesive tape (about 1 mm wide, it can be thicker if you want it yourself), the length should be greater than the size of the nail, so that later there would be no difficulty removing the strips.
- If the background layer has dried, stick the adhesive tape plates on the nail the way you yourself want it.
It is very important that it is thoroughly high. Otherwise, when strips are removed, you may damage the background layer if it does not dry well.
- From above, cover the entire surface of the nail with varnish of a different shade or several - this is also your prerogative in choosing.
- Allow a few seconds for the varnish to dry, but not to dry completely.
- Remove the glued strips and see what you get.
You can leave everything as it is, or you can still refine the drawing with a thin brush or dots. Adding sparkles, circles and other elements is also a different color of varnish.

Today, there are many types of decorative scotch tape on sale; it can also be used to create drawings. Here, the need to cut strips on your own disappears. It can also be used in terms of decor. The shine on the nails always looks beautiful, and with decorative tape, it is excellent and unique.
Toothpick drawings
Simple, but unique patterns on the nails can be done with a regular toothpick. She is an indispensable attribute of every home, always at hand, can always help in creating a complete image. If you have already learned how to work with a needle, then there will be no problems with drawing with a toothpick. The drawing technique and sequence are similar here, only the drawings are slightly different.

Other methods for creating simple patterns on the nails
In addition to drawing with your own hands, you can use ready-made drawings - stickers, stencils, stockers, pattern plates.
Stickers
Choose a varnish of a specific color for the base. Paint them the nail plates.
After drying completely, stick on top the selected sticker. They are glue-based.


There are also those that need to be placed before gluing in warm water. After 10 seconds, they take it out, gently grab the figure with tweezers and transfer it to the nail.

Another kind of stickers
A woman will always have a reason to look unsurpassed. For this, everything should be perfect - manicure, hairstyle, makeup, beautiful outfit. But at the same time, it is not always possible to visit a manicurist in time to get a high-quality nail design. But if you work a little, then you can independently make a beautiful and original manicure using simple drawings on the nails.
Where to start - essential materials and manicure tools
Any high-quality manicure begins with a good nail preparation. How to do this is a woman’s business. At the request, a trimmed manicure is done, and if there is the possibility of a special tool (milling cutter) - hardware.
In order for the nail plate to acquire a basic color, a coating is necessary - varnish, gel polish, gel. But further - this is already a creative matter. But it’s still difficult to do without such tools and materials:

At home, you can find many improvised tools that should be used to create a picture on the nails. For example, the replacement of dotsu is an invisible hairpin or a sewing pin with a different diameter of the ball-tip.
What draw patterns on the nails?
The nail art industry is developing so fast that it is very difficult to keep track of the technique of creating designs on the nails. Who would have thought that a watery method would be a popular method of drawing a pattern on a nail. But do not underestimate the more familiar ways.
You can create patterns on both natural nails and artificial nails. Learning to draw complex patterns and ornaments with simple tools is not difficult, you just need to have patience.
Using ordinary tape or foil
The essence of this method is to create an even geometric pattern or figure on the nails. But first, they cover the surface of the nail with a base varnish (any color that is needed is chosen). But it is worth understanding that the main layer will eventually become the color of the picture itself.

The drawing itself depends on how the adhesive tape was glued: thin stripes or wide, straight, zigzags, diagonally, or it covers part of the nail, forming geometric shapes.
For manicure, it is better to take masking tape. It has less adhesion to the surface of the nail and will not damage the varnish when removed. At the same time, its stickiness will be enough to make a beautiful drawing.
In addition to scotch tape, they also use special foil tape for design. It is easier to use, since you do not need to monitor the width of the strip. Finished tapes can have different thicknesses, but it is not necessary to remove it. It can become part of the design.
Ordinary needles
To make a drawing a needle, you need at least two colors of varnish (you can and more, depending on which pattern is conceived). One is for the base (this layer needs to completely dry before drawing), the second and onwards for painting. There are many options for creating simple but effective drawings. Designs of nails that are made with a needle do not require much time, additional costs.
The next effect on the nails can be made with a thin dots tip, but the easiest way to do this is to make it with the sharp end of the needle.
 The design option for nails with a needle and two colors of varnish
 The needle-drawing technique is available even to those who have never been involved in nail design before. The main feature is to have time to apply a beautiful pattern until the varnish on the needle is dry. And if the drawing is done pointwise, then until the nail drops of varnish dry.
If you paint with a needle, then the applied line will be thin. Also, a needle can outline the contours of the picture.

Using dots
The result on the nails, if painted with dots, will be similar to what is done with a needle. Only the use of dots for painting is more convenient - so much varnish is wrapped in the tip ball that it does not interfere with the work (it does not roll in large portions and it is more convenient to draw straight lines without “blunders”).
Selects a color for the base. The drawing is applied with a "ball" that dips into the varnish of the desired color. If you need to replace the color, you can simply wipe the tip of the tool with cotton or a napkin moistened with nail polish remover.
Thin brush
A thin brush gives more chances for high-quality painting of nails. With its help, you can perform an unusual floral pattern, neat thin lines. Especially you can "walk around" on long nails.
To start painting with a brush, you need to cover the nail with the main color (white, colorless, red, pink, black, multi-colored varnishes, including gradient manicure). The coating should dry completely. Then the pattern is applied with the finest brush. You can do this with ordinary brushes for painting, but it is better to use special brushes with nylon fibers. To achieve various effects when painting, you may need other brushes with different thicknesses.
It is most convenient to apply beautiful patterns with a brush. A sufficient amount of varnish or acrylic paint is held on its fibers to draw a long line without additional extras.
Regular toothpick
Toothpick is a great tool for drawing a picture on the nail. The technique of drawing a pattern with these tools requires accuracy, since a large amount of varnish is wrapped on the wooden base of the toothpick and then rolls unevenly, which interferes with the work.
Dressing nails can take place on a dried and raw basis. The effect of this will be different.
Toothpick leaves a significant mark on the nail. It is convenient for her to draw monograms, flowers, abstraction and so on, but it is almost impossible to achieve a thin line from her.
Using a toothpick, it is optimal to draw large elements, and then draw them with a thin brush. After finishing work, it is better to apply a protective transparent coating.
Using special stickers
To simplify the work of decorating nails can special stickers - stencils. With their help, you can create a wide variety of patterns and effects on the nails.
To use them, color is applied to the nail, which will eventually become a pattern. After this layer dries, stencils are glued. Varnish a different color. When this layer is completely dried, the stencil is carefully removed.
An interesting effect is obtained if you take gradient manicure as a variant of the foundation. Decorating nails in this way will help to make a manicure unusual and unique.
You can make the gradient yourself, for this you need at least two colors of varnish of bright colors and a wide flat fan-shaped brush. Perform actions as shown in the picture.
How to draw a simple drawing on the nails?
You can draw different patterns with different materials. The simplest and most affordable - colored varnishes. But for those who are seriously interested in decorating nails, it is worth trying other options for materials.
Gel polish
A variety of patterns and effects can be made with gel polish, which hold out until you have to repeat the procedure for coating nails with this material. The technique of drawing with gel polish can be different: on an un-dried coating and already on polymerized.
The technology of coating with gel polish is as follows:


Acrylic paint
Acrylic is a very convenient material for decorating nails. It dries quickly, has no smell, and retains pigment well. Apply acrylic paint to a dried surface (varnish, hcl varnish, shellac, even on a natural nail). To carry out nail painting, you need a brush, preferably with a pile of non-natural origin.

Also acrylic can be made into a jacket and decorated with an original floral pattern. The technique of painting with acrylic is convenient in that if the pattern did not work out, then you can simply wash it off with water until it dries and start painting again.
In order for the nail painting to last on the nail for a long time, a transparent fixative must be applied on top of the drawing.
With shellac
Just as in the case of gel polish, shellac, you can decorate your nails with the “wet” technique and the dried layer. As a basis, you can take a jacket, which is not a problem to make on short or long nails. If the nails are still short, then do not make too wide a "smile" in the jacket. If it comes to drawing, then it should not be too large so as not to visually enlarge the nail plate.
Using the pieces of tulle
An unusual manicure can work out if you use a simple tulle. Here you can use multi-colored varnishes for the base and pattern. A gentle effect will turn out if you use a light varnish.
The execution technique is simple:
- Paint the nails with the base color (it will act as the color of the final drawing). Allow to dry well.
- Lean a piece of tulle tightly against your fingernail. Gently apply a different color varnish on top of it. Let the layer dry. Remove the tulle.
- Coat with clear varnish.
With the help of a patch of tulle with a different pattern, you can get ready-made drawings, which is quite simple to perform.
Using decor elements
You can make your perfect manicure without drawing on the nails, but simply correctly applying decorative material for the nails. The color base in this design is necessary in any case, but there are no restrictions on the use of decor.
Rhinestones, stones, foil are able to give the nails a special radiance that cannot be repeated with any varnishes.
In order for the rhinestones to hold well on the nails, it is better to seat them on gel polish, which has not yet been dried. After finishing decoration, it can be safely dried. The top layer on top is required.
There is also a special foil that is applied gel varnish without a sticky layer or ordinary dried varnish. To get a picture on the nails, it is worth sticking the foil, iron it on top and carefully remove it. The pattern that was formed on the foil will be on the nail.
There is another design option with foil. For this, special thin pieces of foil are acquired (they come in different colors). They are laid out on the nail with an application, and then are fixed with colorless varnish or top (for gel varnishes). Only foil can create unique patterns on the nails.
Applying droplets and dots
To create an unusual, but painfully simple manicure, the technique of drawing with dots will help. They make such a manicure as varnishes of different colors, and gel varnishes, shellac, acrylic paints. Of the tools you need dots. Alternative - toothpicks, needle, ballpoint pen, etc.
 The design of the nail in the drip technique
If the varnish has not yet dried, then you should use the drip technique of applying the picture. Dried varnish of a different color is placed on the dried varnish and a stretch is made with a needle (dots, toothpick). Then let dry and cover with a colorless varnish.
 What shoes to wear a down jacket
 Types of men's trousers and their features Men's trousers without arrows are called
 How much does each type of building cost