Deer made from pine cones step by step. Deer from cones: how to make
Every year in all kindergartens and schools they ask to make products with their own hands. This is perhaps the most common puzzle for parents.
And you know, it's not even bad at all.

We have a lot of natural material, we need to add a little imagination.

Well, most importantly, you and your whole family will immerse yourself in the charming world of creativity.

Today, we will look at a natural resource - pine cones.
It is used not only in school crafts, but also for interior design, Hand-Made designers and others.

Below are photos and detailed diagram several crafts made from pine cones.

What crafts from pine cones can you make with your own hands?
Almost everyone can make a craft from real pine and spruce cones, the main thing is desire and a little imagination.

Using this amazing natural resource you can do:
- Decorative elements that will bring the stunning smell of the forest and a cozy atmosphere to your home.
- New Year's crafts: festive wreath, candlestick, Christmas tree, garland, New Year's ball and much more.
- Interesting crafts of funny animals with children.
Festive wreath
Hand over Christmas mood guests are welcome right from the doorstep. To design the New Year's wreath we will use:
- Cardboard
- Spruce or pine branches
- Cones
- Satin ribbon
- Not real snow
- Dye
- Glue gun
- Decorations for decoration, optional.

Many materials are used to make the base.

For example: plastic, cardboard, branches, bending wire, and even newspapers.

We settled on cardboard; it is quite simple and convenient to work with.

On cardboard we cut out the diameter of the circle that we need. Next, we attach the branches and cones, forming a symmetrical circle.

After the cones are glued, we continue to decorate our wreath. Take a can of artificial snow and spray the edges of the cones.
If you couldn't find snow, you can paint the scales with white or silver paint.

We tie it satin ribbon, choose the color yourself.
Note!


For a more interesting and rich wreath, you can add additional decorative elements: red beads, acorns, nuts, flowers.

Use your imagination and you will succeed!

New Year's garland
Fast and simple craft in production.
Material you will need:
- bumps
- glue gun
- rope
- dye
- glitter

Step-by-step instructions for the craft:
- We prepare the cones in advance and paint them with paint. You can choose the paint different colors. Or make it in one color that matches your interior design. You can also use glitter to make the product more elegant.
- We take a rope and mark the distance between the cones.
- We leave 10-15 cm from the edges so that there is room to attach the garland.
- Using a glue gun, attach the pine cones to the rope. Glue along the entire length.
- We are waiting for the glue to dry. And Voila! New Year's garland ready.

Note!

For kids and schoolchildren it will be easy to make crafts from pine cones and plasticine of funny animals: Teddy Bear, Hedgehog, Squirrel, Owl, etc.

Mishutka
We will use:
- Cones different types(pine, spruce, open, closed)
- Scissors
- Plasticine

Step-by-step instructions for making crafts:
Body. From the collected material, select an elongated pine cone. Apply glue to the connecting parts of the scales. We connect the parts so that the scales secure each other.

Paws. We choose 2 larger cones for the lower paws, and 2 smaller ones for the upper paws. Glue the parts to the body, pay attention to symmetry.

Head. We make the head from open pine cones. They perfectly convey the fluffiness of a bear's fur. We attach it to the base with glue.
Note!


Ears, eyes and nose. You can make it from plasticine, and the tip of the nose, for example, from black peppercorns.

If you want to surprise everyone around you, then you can make a big bear. You choose the size of the bear, the main thing is to collect the required number of cones.

You can make the base - the frame of Mishutka - from polyurethane foam, polystyrene foam or papier-mâché. An excellent solution for the stability of the product would be to attach something heavy to the bottom.

We cover the frame with pine cones, and make the ears and muzzle from plasticine or pom-poms.

Hedgehog
The simplest children's craft made from pine cones. To make it you need only two materials:
- Cones
- Plasticine

Step by step description:
Body. The cone itself is well suited for the base of the craft. If you look closely and rotate the scales correctly, they look like hedgehog needles.

Muzzle. Here we will need some plasticine. We make an oblong muzzle from it. And fix it on the craft.

Eyes, nose, paws, ears. We also use plasticine, only in a different color.

As you can see, there is nothing complicated, this craft from pine cones is suitable for kindergarten.

Experiment! Decorate your home with interesting design solutions which I prepared myself. Don’t forget about the children, they will also be interested in taking part in the creation of a small miracle.

Photos of crafts made from pine cones


DIY crafts made from pine cones will be interesting for both adults and children. Among the crafts from natural materials crafts made from pine cones look the most vibrant and original.
What kind of craft can be made from pine cones?
Most interesting option crafts from pine cones for children - this is some well-known animal or bird. The children treat the little inhabitants of the forest kingdom with special care.
Hedgehog from a pine cone on a plastic bottle
Such crafts made from pine cones will be relevant, because the hedgehog is the most favorite character in exhibitions dedicated to autumn. Take a small plastic bottle with a stopper. We use a black marker to color its upper part - this is the future face of the hedgehog.

Wrap the rest of the bottle with thick cloth. The threads sticking out at the edges can be set on fire - this will prevent the fabric from unraveling and give the craft a neat look. We fix the fabric on the bottle with glue.

Glue the pine cones onto the fabric in rows. Fill the entire surface of the fabric with cones.

All that’s left is to glue on the hedgehog’s eyes and ears! The finished look of the craft will be given by the gifts of autumn - apples, rowan branches and dried leaves.

Hedgehogs made from cones (ideas)
These hedgehogs are based on plastic bottles. You can play around with the muzzle by sculpting it out of plasticine.

You can knit a muzzle from yarn. This hedgehog will turn out to be very cute and homey.

Hedgehog made from pine cones and plasticine
One of the most simple ways to make a hedgehog from a cone is to use a pine cone for a craft.

Another option for making a craft is to make a hedgehog from a pine cone and felt. We make the eyes and nose from beads.

Hedgehog made from fir cone scales and salt dough
You can make a hedgehog out of fir cone and salt dough. We “disassemble” the cone into scales. We insert these scales into the base of salt dough.

Dry the hedgehog a little in the oven.

Draw the hedgehog's eyes and nose. Our hedgehog is ready!

Bird made of cones and fabric
The cones themselves suggest interesting images to us. For example, you can make a funny bird out of cones. To make it, we will need fabric of different textures, glue and factory-made eyes.

Glue canvas wings, beak, belly and felt paws to the pine cone. We put the eyes in their place.

Funny birds made from pine cones - ready!

Owls made of cones and cotton wool
You can use the pine cones to make adorable fluffy owls. We take cotton wool and insert it between the scales of the cones.

Glue two felt circles.

We attach factory eyes to felt circles. Glue the beaks.

Owls made from cones - ready!

Paint the cones with golden paint and place them on a small stand.

From the cones you can make a big one beautiful owl For autumn exhibition. The craft is based on two foam balls, into which pine cones are inserted and fixed with glue.

Autumn nest with chicks made from pine cones
From cones, chestnuts, leaves and twigs you can make a very impressive autumn craft. Using good glue, glue the pine cones and chestnuts together. This is the future head and body of the bird.

Glue the wing leaves to the blanks.
 Leaves - wings
 We intertwine the branches together. We should now have a small bird's nest. We weave leaves into the bottom of the nest.

Glue the birds' eyes and beaks. Our birds are in the nest - ready!

Bunny made of pine cones
From the cones you can make the favorite of all children - a bunny. For this craft you need very little - a piece of felt, a small pom-pom, factory-made eyes, a bead and good glue. Glue felt ears and a pompom tail to the pine cone. Glue the eyes into place.

Glue a bead in place of the nose and decorate the craft with mustache strings. The cone hare is ready.

DIY figurines made from pine cones
Children will surely like such funny figures and will decorate the autumn exhibition in kindergarten. By gluing pieces of felt onto the cones we will get an adorable little fox.

Or a squirrel with a nut.

If you paint the cones yellow and attach ball heads to them, we will get adorable chickens.

A pine cone, fluffy wire and a few factory eyes will make a funny spider.

You can make a wonderful winter snowman from pine cones, felt and felt.

Do-it-yourself arborist from a pine cone
You can make a funny old man forester from a pine cone, twigs and plasticine. We sculpt a head and a nose from plasticine, and attach the twig handles.

We attach the forest man's legs, eyes and hair.

You can wear a scarf made of leaves. The craft is ready!

From the gifts of autumn you can glue together the wonderful Serpent Gorynych. The walnuts are glued together. Glue a piece of red fluffy wire between the nuts. We glue eyes to the top nut - we get a head. We make three such blanks. We glue a stick to each head, which we then insert into the cone (be sure to fix it with glue). We glue the legs from walnuts, as well as the wings and tail from dry leaves.

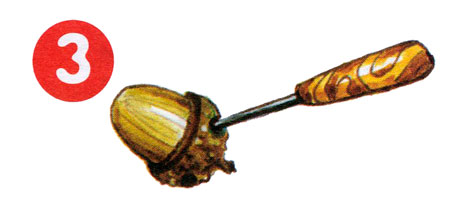
Very interesting idea- make proud deer from fir cones. We make the body and neck from cones. We make the legs from twigs. We make the deer's head from an acorn. We connect the parts of the craft using a glue gun. We make the nose, eyes, horns and hooves from plasticine.

You can also connect the details of the craft using plasticine.

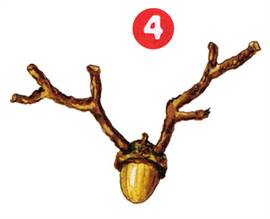
We attach the branches-legs, the head-acorn and branched horns.

Watch the video on how to make deer from pine cones:
A very beautiful autumn deer is made from a pine cone, twigs and an acorn.

DIY pine cone topiary
You can make a very beautiful topiary or tree of happiness from the cones. We insert a sharp stick into the pot of plaster.

Using a glue gun, attach the pine cones to the foam ball. We place this ball on a stick. We wrap the pot with rope.

It remains to decorate the topiary with ribbons and paper leaves. We decorate the pot with shot pebbles and shells. Cone topiary is ready!

DIY basket of pine cones
You can make a very original autumn basket from cones. This craft is suitable for an autumn exhibition in a kindergarten or school. Using glue, we connect six cones in a circle - this is the future bottom of the basket.

Now we also connect eight cones - this is the upper part of the basket.

Take the top part of the basket and glue the pine cones to it in a circle. We will have a blank of two rows.

On this blank we glue the bottom of the basket, which we made at the beginning. There will be a hole in the central part of the basket, which we will “seal” with a pine cone.

We connect the cones for the handle with wire. We attach the handle to the basket.

Decorate the basket with flowers and ribbons.

Watch how to make a beautiful basket of pine cones in the video:
Another option for making and decorating a basket of pine cones:
The bumps in the upper part of the basket and the handle can be placed outward rather than inward.

DIY bouquet of flowers from pine cones
You can make a lot out of pine cones original bouquet colors. To do this, we attach wire to the lower scales of the pine cone.
Each of us has seen the fruit cones of coniferous plants in the forest. Diverse in shape and color, fragrant and beautiful, they excite the imagination of craftsmen. There are so many great crafts you can make from pine cones! But they have found the widest application in children's creativity, because children of all ages can work with cones. This gift of nature develops fine motor skills in very young children and encourages imagination in older children. And what do true masters not come up with? In general, there is huge scope for imagination. In this article we will make a real forest dweller - a deer from pine cones.
We make a simple deer from pine cones with our own hands in a master class
Before you get started and do the cutest deer, you need to collect the cones. And for this you should go to the nearest forest or park. In general, the cone, like any plant fruit, undergoes various changes associated with the ripening of the seeds inside. And like any fruit, it contains many useful substances. Therefore, healers prepared decoctions and jams from green cones that had not yet become woody. They contain a lot of resinous substances, essential oils, phytoncides, tannins and vitamins. A true source of health. Of course, dry buds, which are used in crafts, have such a wide range useful properties do not possess. But they smell very pleasantly of forest and resin. The best time to collect cones is in the fall. It is better to choose a dry, fine day and combine a pleasant walk with collecting useful material for creativity. And when you get home, put the cones to dry in the oven or in a radiator, having first covered the drying area with parchment. It is best to take cones for crafts that are even, neat and slightly open. After drying, the cone will open. If you need a closed cone, then it should be placed in a container with water, the scales will close again. After this, it should be treated with wood glue or varnish so that it does not open again. You can also paint cones for crafts by soaking them in a dye solution and drying them, or using spray paint. And even bleach! To do this, the material must be placed in a solution of chlorine bleach under pressure for at least 5-12 hours, and then dried. Of course, you shouldn’t do this at home because of the pungent smell.

The material is collected, you can create a small miracle from the cones with your children. We suggest making a funny deer face from a fir cone using this master class.
To work you will need:- A spruce cone (it differs from a pine cone in its elongated shape);
- Eyes for toys;
- Mini pompoms for noses;
- Brown felt for ears;
- A little yarn in bright colors;
- Sintepon;
- Chenille (fleecy) wire or small twigs for horns;
- Satin ribbon;
- Glue gun.
To begin with, the prepared cones must be wrapped on top with any yarn, gluing with a gun where necessary. Attach a padding polyester edge along the edge of the future hat, and glue a small pompom or padding polyester ball to the top of the head. Now the cap is ready. If you know the art of knitting, you can make hats for deer in advance; all you have to do is attach them to the pine cones using hot glue. Now we glue the eyes and nose. Bend the chenille wire horns and attach them to the hat. If you cannot find chenille wire, you can use small twigs. All that remains is to cut out the ears from felt and glue them in place. Attach a satin ribbon to the finished face and the pine cone deer is ready!

It will be an excellent decoration for the Christmas tree. The process of making this toy is quite simple, but it will perfectly develop the child’s motor skills and imagination.
Let's look at another master class. In it we will tell you how to make a deer from pine cones and plasticine. Plasticine is a very pliable material, it is perfect for developing the coordination of children's fingers, which, in turn, stimulates the speech centers. In addition, the material is safe, and the abundance of colors also has a beneficial effect on the child’s imagination. We will make a family of deer in a forest clearing. To work you need:
- Cones of suitable size 6 pieces;
- Acorns for faces 3 pieces;
- Small straight branches for legs;
- Sprawling branches for horns;
- Plasticine;
- A piece of cardboard;
- Sunflower seeds for ears;
- A small ball of padding polyester for ponytails;
- Natural material for decorating a clearing (moss, thick driftwood, physalis, rowan bunches).
Using the diagram below, collect two large deer and one baby. But instead of a thin stick for making a neck, it is better to take a cone, it will be stronger.

All parts of the deer are held together using plasticine. Then you need to line the bottom of the box or piece of cardboard with moss and decorate it with natural material to your liking. All that remains is to install a family of deer in a forest clearing and the craft is ready.

Cones are an excellent material not only for children's creativity.
It is perfect for decorating a photo studio or a Christmas corner of your home. You can also use it as a garden sculpture, only the cones need to be treated with a special compound that will protect the figure from the influence of weather and pest attacks. To make such a figure, you need to create a frame from any materials (plastic bottles, sculptural plasticine, papier-mâché, plaster) and paste it with pine cones. All that remains is to attach horns from twigs and ears made from wood or other material.
Video on the topic of the article
A small selection of videos will add inspiration and creative ideas. Enjoy watching!
Needle-shaped forest trees delight people not only with their appearance and air filled with phytoncides, but also with other gifts. Such gifts include cones, common to the Russian eye, which are the basis for many excellent crafts. One of these simple but cute crafts is a deer made from pine cones.
Good old craft
A small figurine of a deer made from scrap materials can be created even by children. For such a deer you will need:
- spruce cone;
- five straight branches;
- two branches with branches;
- fluffy willow flower;
- two peppercorns;
- one rowan berry;
- one acorn with a cap;
- two sunflower seeds;
- brown plasticine;
- glue;
- awl;
- stationery knife.
The fir cone will play the role of the body. To one of its sides you need to glue four small balls of plasticine in a rectangular projection to attach the legs and one ball closer to the base of the cone, on the opposite side from the previous fastenings.
The legs and neck will be played by five straight branches, which are attached to plasticine balls on the pine cone. The tail - a willow flower - is attached with glue to the top of the cone.

In the acorn cap you need to make two holes for the horns in the front and one in the acorn itself on the opposite side for the neck.
The horns are made from two gnarled branches, and their bases are sharpened with a knife so that they fit freely into the holes in the acorn. They can be attached using glue or plasticine.
We glue ears from sunflower seeds, eyes from peppercorns and a nose from rowan berries, finally forming the head of a deer.

After the head is attached to the neck, the craft is ready.
Cute little deer
From the cones you can make a deer that looks like a good old cartoon character. For such a deer you will need the following materials and tools:
- closed cone;
- an open lump;
- bunch of rowan;
- plasticine brown, white and black;
- leaf of any tree;
- ruler;
- scissors.
The closed cone should be smaller than the open one; it plays the role of the head. The opened cone is the torso. From a bunch of rowan berries in the craft, it will not be the berries that will be used, but the branches to which they are attached, these will be the horns and legs. Plasticine will be used to connect the details of the craft, and you will also need to make the hooves, muzzle and eyes of the deer from it. Leaf - eyelashes.
First you need to sculpt the eyes by rolling out two balls of white plasticine, flattening them into small cakes, then rolling out two smaller balls from black plasticine and attaching them to the white parts. Drops of leaf cut out with scissors are attached to the back of the eye parts, forming eyelashes. The muzzle is rolled out with a ball of brown plasticine and crushed to an oval shape. On it, the outlines of the mouth and nostrils are pressed with a ruler.

The resulting details are located on the unopened cone: the eyes are on the sides, the muzzle is on the top of the cone.

We remove the berries from the rowan bunch, cut off two branchy branches for the horns, they can be trimmed with scissors to make them more similar in shape and size to each other. Two pieces of twigs from a bunch should be thick with one bend.

The horns are attached with the branches up to one ball of plasticine, which is located on the head above the eyes.

The finished head is attached to the body - the top of the open cone - onto a similar ball of plasticine.

The legs are also attached to this ball, at the ends of which the hooves are already attached. The hooves are rolled into two brown balls, crushed into trapezoidal pancakes, and a notch is made from their wide bases with a ruler.

A craft in the form of a fawn made from pine cones and plasticine can be decorated with a variety of autumn foliage.

Replacing parts
Most master classes on making deer from cones contain variations on how to design one or another part of the crafts.
The deer head is made from both a pine cone and an acorn, and sometimes from knitted threads in the form of a fluffy bubo. For deer ears, you can use the wings of maple seeds or scales from a pine cone.


For the horns, you can use any branchy twigs, even from bunches of grapes, but without berries, as well as modeling from plasticine.

Eyes are also made from beads on pins or without them, fragments cotton swabs with a black marker placed on the pupil.
The muzzle can be an acorn cap, colored and dried cotton wool, twisted into a ball, or a ball made of copper wire.
The legs, tail, and neck can be made from ordinary matches.

Connecting cones using plasticine can also be done with a glue gun.
The created deer are placed on a cardboard base, a board made of pressed sawdust, or a cut of a branch or tree.
Jewelry is made both from natural materials and through paper applications and artificial additions.
It seems that we can no longer imagine our life without cones. As children, we love to collect pine cones and make crafts from them. In schools and kindergartens, every autumn should be celebrated original crafts from natural material.
In this case, cones become our salvation. Which ones beautiful work are not obtained from cones. These can be complex compositions, small details and decorative elements.
Go to the nearest forest and collect beautiful cones. Rinse and dry them so you don't have to worry about giving them to children for crafts. If you want the open pine cones, they need to be put in a warm place or in the oven for a few minutes.
To keep the cone closed, put it in water for a while and cover it with varnish. Then it won't open.
A deer can be a wonderful decoration for a New Year tree or an addition to an autumn composition.
Necessary materials:
- Cone
- Five straight branches
- Two branches with branches
- Two peppercorns
- Acorn
- Two seeds
- Brown plasticine
We need a cone for the body. Glue 4 balls of plasticine to it to attach the legs and one ball of plasticine on the other side

We use straight sticks as legs and neck
They are just attached to plasticine balls.
Make a tail from a willow branch

Make 2 holes in the acorn cap to place the horns.

For the horns, find a couple of branches with beautiful branches.
Attach them with plasticine or glue to the acorn cap

We make ears from sunflower seeds, eyes from peas, and a nose from rowan berries.

Attach your head to your neck
Deer made from pine cones: step-by-step instructions


Creating a deer figurine is not difficult and it will only take a few minutes.
We need two cones different sizes, twigs, glue gun, scissors, red pompom for the nose.
For the body, choose an oblong cone bigger size, and the second bump should be smaller for the head.
For the horns we will need branches with branches, and for the legs we will need dense and even sticks.
Secure the head to the body with glue. Cut the branches for the legs so that it can stand steadily on the surface.
Attach the horns to the head.
Glue the red pompom onto the head like a nose.

 How much fabric is needed for a dress: simple methods and basic calculation nuances
 Beautiful Christmas tree decorations made of plywood: we make decorations with our own hands using a jigsaw
 Manicure with acrylic paints at home