Dish of autumn leaves. DIY leaf crafts
Autumn leaves are so bright, beautiful, fragrant - I want to collect more of them and certainly bring home. They can be placed in a vase or dried. These leaves are also great material for creativity. In this article, you will find a selection of ideas to inspire you.
What crafts can you collect from autumn leaves with your own hands? The first thing that comes to mind is a herbarium. Yes, this technique is very popular, and we have already introduced you to it. What else? Of course, head wreaths made of beautiful wide leaves, which are so popular in autumn photo shoots. However, there are still many ideas for a variety of crafts - we'll talk about them today.
Some of this will be useful for parents of schoolchildren and preschoolers, since children really like master classes on working with leaves. And some ideas can slightly transform your interior - add coziness, beauty, autumn mood. So get inspired, and then go to the park, collect beautiful autumn leaves and get creative!
Application
This is one of the most obvious crafts made from autumn leaves, but we tried to pick up ideas that are not hackneyed. If you have children, they should love these funny pictures. Look, remember, and then collect the appropriate pieces of paper.
Peacock

Well, or a chicken - whatever you like. The main thing is to collect a beautiful colored tail from the leaves. In the center, place a round, plain sheet of dark color and add blanks for the eyes. We fix everything with glue. Or on a stapler, and hide the paper clip under a piece of paper that imitates a beak.
Girl

For this applique, you will need a ready-made template or drawing. You can use children's coloring pages with princesses. From small neat leaves, you can make a hairstyle, a blouse or lay out the hem of a dress. Add a few more leaves to the craft to simulate leaf fall. By the way, such a picture can be laid out on a Whatman paper and hung in the room, inserted into the frame. Or decorate a notebook in a similar way.
Deer

And this leaf craft is for the little ones. Even a preschooler can handle it, if you help him. Paper, PVA glue, suitable leaves and a little creativity - that's the whole secret of this applique. Take a look at the drawing - it will not be difficult to repeat it.
Birds
Crafts from leaves in the form of cute birds are a very popular option. We invite you to look at not quite standard, but at the same time very simple ideas that even children can repeat with their own hands.
Lay out a family of chickens from several yellow leaves.

Only three bright autumn leaves - and you get a funny outlandish bird.

Of course, you need to make a parrot from bright leaves - how without it? Combine the most colorful copies, add a button instead of an eye, glue everything on paper - you get a funny character.

Hedgehog
It is very easy to make an applique in the shape of a hedgehog.

Even those who do not have artistic talents can draw a face, and the needles are collected simply by superimposing some leaves on others. The option looks very nice when all the leaves in the craft are dense and of about the same size.
Frame
With the help of autumn leaves, you can make unusual photo frames. You can completely decorate the finished one or create it from scratch. Whatever you choose, it will turn out great.

Take regular cardboard and glue a photo to it. Cut off the excess edges, and then start laying out the leaves, fixing them with glue. Add any decor. This frame can be hung on the wall using double-sided tape.
If you have a child, you can also do this craft from autumn leaves with him. Just take a wooden or cardboard frame without decor and glue the colored leaves on PVA glue. If smudges remain, apply a layer of dry glitter on top.

In addition to leaves, you can add other natural materials to the frame. Dried apples, berries, blades of grass, flowers, or whatever. Fix all this on superglue.

It is very convenient to make frames on thick cardboard. If you don't have one, glue several sheets together. True, most often the photos in such crafts are stained with glue around the edges, so when you eliminate the frame, you will have to crop it.
Baby crown
This leaf decoration is suitable for a children's matinee or can be used simply as entertainment. Assembling the crown is very simple.

The most popular option is the maple leaf crown. Cut out a strip of cardboard and glue it to fit the head. Glue the leaves vertically. To avoid gaps, add a layer of intertwined leaves intertwined with petioles. Wreaths are woven according to the same principle.
You can leave the leaves as they are, and just cut off all unnecessary ones. If you add glitter paints or any other decor to such a wreath, you will learn very beautifully.

Crowns of leaves, diluted with flowers, berries or blades of grass, look especially great. They can be attached to superglue. If the leaf layer is thick enough, you can also use a stapler to fix the craft.

Homemade crowns look very elegant. They can be additionally decorated with satin ribbons. If you wish, you can assemble the accessory not on cardboard, but on an elastic band.
Lamps and candlesticks
Autumn leaves look very impressive when there is a bright light source nearby. Such crafts are the most beautiful. One problem - this material for creativity is among the flammable. Therefore, it is better to keep it away from fire.
The best way out is to paste over the finished container.

There are no subtleties here. Take an unnecessary cup or bowl, apply a thick layer of PVA glue on it. Glue the leaves so that their edges barely protrude upward. Let the structure dry. Then apply another layer of glue directly to the leaves. Add another layer. Place a small flat-bottomed candle inside.
Another awesome option is jar decor. Take standard glass jars, free them from labels, wash, dry. Then take a small piece of sponge and blot it with PVA glue. Apply it directly to the sheet.

Glue the sheet to the jar. If smudges appear, immediately remove them with a sponge or cloth. Make three or four of these decorative leaves on each jar. Tie a straw bow under the neck. Add any decor.

Place a small candle inside. When you light it, you will understand how great your autumn craft looks.

Make some lights - together they look even better. We recommend using different leaves to make it even more interesting.
Vase
You can make a beautiful decorative vase from autumn leaves with your own hands. It can serve as a decoration or as a saucer stand.

You will need a regular balloon, PVA glue, and many different leaves. Inflate the balloon to the size you want the vase to be. Tie it up and cover with glue about the middle. Then attach the leaves.
Then leave the structure to dry out a little. After a while, cover a layer of leaves with glue. Glue another one. The structure can be removed after 5-6 hours. Just pierce or gently release the ball from the future vase. So that there are no white traces of glue inside, cover the entire surface with a fresh layer of PVA and put leaves on it.
When the accessory is completely dry, you can fill it with dried flowers or cones. And if you want to turn the vase into a stand, cover it with a non-toxic craft varnish. So it will be possible to store something heavier in it.

Saucer and decorative coasters
Are you fond of polymer clay modeling? Here's an idea for you: print a sheet. This decor is suitable for decorating saucers, hot coasters, or just picture pendants.

Roll out the mass into a thin layer. Place a sheet on it and press firmly. Choose the most embossed for a stronger print. If necessary, use a fine needle and add veins.

If you plan to make some polymer clay jewelry using the leaves (blanks for necklaces, earrings, brooches, etc.), roll the layer very thinly, and remove the excess edges with a chisel.

Bake polymer clay according to package directions. When the craft has cooled down, paint the autumn leaf with acrylics. Cover the finished craft with varnish.
Bouquet
How do you imagine a bouquet of autumn leaves? Well, the leaves gathered together and tied with a beautiful ribbon are the most popular option. But what if you make a rose from the leaves? Watch this short video tutorial to curl the leaves correctly.
Wind up more of these roses and put them in a bouquet. If you are lucky enough to find colorful leaves, it will turn out quite unusual.

Add some leaves around the edges, garnish with berries or something else.

Such a bouquet of maple roses can be presented to someone for their birthday or to your teacher on Teacher's Day. Any teacher will appreciate this unconventional approach.

If you add tape or craft paper, you get an amazing composition.
We hope you've been inspired by this collection of ideas. As you can see, from autumn leaves you can make really many beautiful things for your home, decorations, children's crafts. Your imagination here can be limitless. So stock up on leaves, dry them a little at room temperature before starting work (2-3 hours will be enough), and then get to work!
Views: 5 457
Summary: Crafts from leaves. Summer crafts. DIY crafts from natural material. DIY flower crafts. Summer games for children. Country crafts with their own hands. How to keep your child busy in the country. How to keep your child busy on vacation. How to keep your child busy in the summer. Summer fun.


We would like to offer you interesting ideas for summer crafts made from natural materials - leaves and flowers of plants. These are the original crafts you can do:
1. Beating leaves and flowers with a hammer
Let's start with the most unusual, in our opinion, crafts made from leaves and flowers - beating plants with a hammer on the fabric. To do this, you need:
Any hard surface
- cotton fabric
- plastic bag
- hammer
Lay the fabric on a hard surface, on top of it, compose a composition of leaves and flowers at your discretion. Cover everything with plastic. Now you need to carefully beat off the leaves and flowers with a hammer so that they stain the fabric with their juice. The resulting colored fabric can be used to make various crafts, for example, napkins, pillows, etc. You can also beat off plants on paper, from which beautiful postcards are then obtained.

The fairy in the bottom photo is made of pansies.

2. Embroidery on leaves
Why not! You can, for example, sew a smaller piece of paper and flowers onto a large sheet. Or embroider a pattern with colored threads on a sheet. After that, the sheet can be dried or covered with paraffin. See link \u003e\u003e\u003e\u003e


3. Applications of leaves and flowers
Use your imagination with your child, as well as paper and glue, to create appliques with leaves and flowers. Go for a walk together and look for leaves and flowers that remind you of something in shape. The missing details of the images can be completed with colored pencils or felt-tip pens.


4. Compositions of dried leaves and flowers
Everyone knows about the easiest way to dry flowers and leaves of plants - to put them under a press, for example, under a thick stack of books. You can create whole compositions from dried flowers, decorate with them homemade postcards, bookmarks for books. You can glue leaves and flowers to paper or cardboard with PVA universal glue.


The site of the Country of Masters suggests making very original postcards from dried flowers and leaves "floating in the air". For a master class on making this craft from natural material, see the link \u003e\u003e\u003e\u003e

5. Crafts from salt dough and natural material
Medallions made of salt dough or polymer clay and decorated with dried flowers and leaves look beautiful.

6. Decorations made of dried flowers and epoxy resin
Craftsmen make exclusive designer jewelry from dried flowers and epoxy resin. You can try to make such jewelry with your child with your own hands. This is a very exciting and creative activity. You will need: dried flowers, molds and epoxy. Place a flower on the bottom of the mold, fill it with resin on top. When the resin has set, remove the locket from the mold.


7. Crafts from flowers
You can also decorate homemade cookies, homemade lollipops, ice cubes and gift wrapping with flowers.


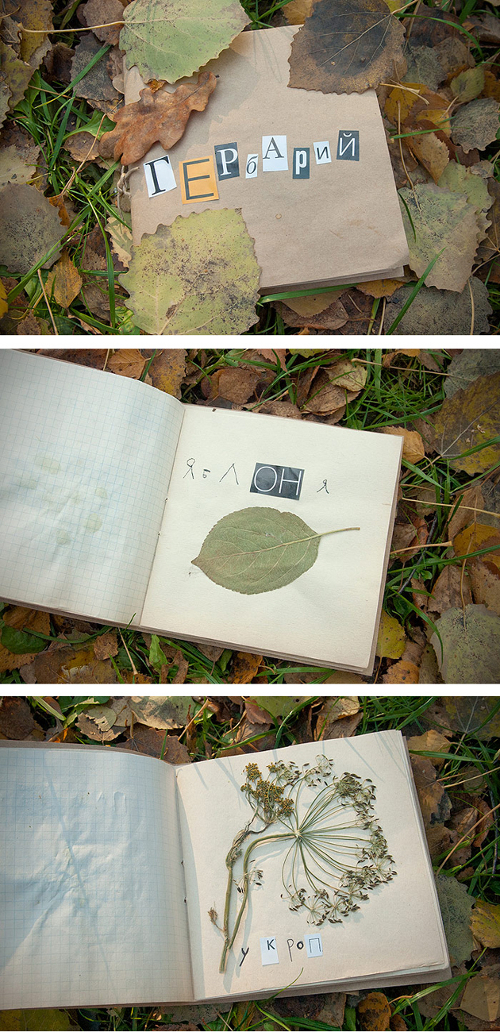
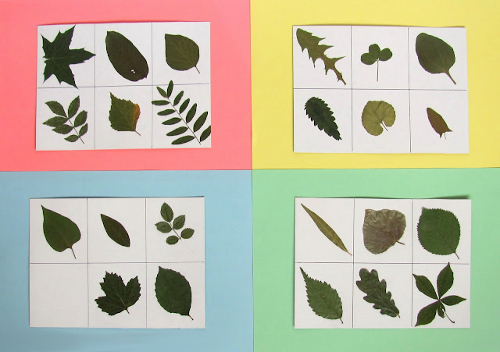
8. Herbarium
Do not forget to make a herbarium from dried leaves and flowers with your child. By participating in the process of creating a herbarium, the child gets acquainted with the world around him, he develops observation. In addition, the design of the herbarium contributes to the development of accuracy, composure, the ability to work with literature. And for us, adults, communication with nature will help to plunge into childhood, restore peace of mind.
To avoid disappointment, you need to collect plants for a herbarium in dry weather. Wet plants become more fragile, which means they can easily crumble when decorating a herbarium.
9. How to dry flowers with paraffin
To learn how to dry flowers using paraffin, read our special article at the link \u003e\u003e\u003e\u003e

10. Crafts from flowers. Leaf crafts

Such beauty will be taught to you by the famous site of the Country of Masters. The technique of making this unusual craft from flowers and plant leaves is very simple.
And another method similar to the previous one for creating crafts from leaves and flowers. See the photo below.


11. Emerging leaves
Very simple and effective at the same time. Place leaves of different shapes and sizes under a blank piece of paper. Gently shade the surface of the paper over the pieces of paper with crayons or crayons. As you do this, images of the leaves will appear, delighting your child.

12. Prints of leaves on paper
You can paint the leaves with paint and make prints on paper. And you can also trace leaves of different shapes along the contour and then paint the resulting silhouettes.


13. Leaf skeleton
Skeleton leaves are a great material for making cards and scrapbooking.
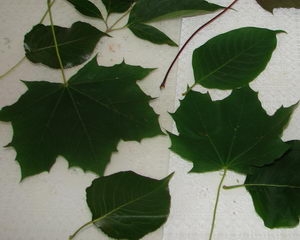
 Leaves of oak, laurel, maple, ivy, poplar, magnolia are suitable for skeletonization. The easiest and fastest way to make skeleton leaves is as follows:
 Collect fresh leaves.
Dissolve 10-12 teaspoons of baking soda in 1 liter of cold water.
- Heat the resulting solution over a fire. Once it boils, place the leaves in it and cook for 20 minutes. Add water if necessary to keep the solution from boiling.
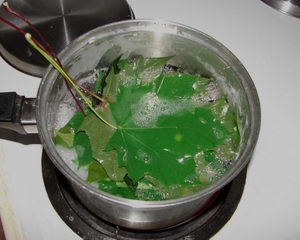
Rinse the boiled leaves in cold water.
- Gently scrub the greens off the leaves with a toothbrush.


Rinse the leaves again in cold water.

Put them to dry between books for 1-3 days.
- If desired, skeletonized leaves can be dyed with food colors.
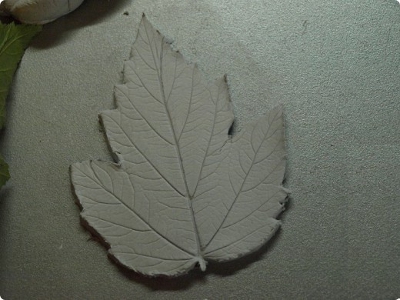
14. Prints of leaves on plasticine
Above we talked about how you can leave leaf prints on paper. See point # 9. It is even more interesting to make prints of leaves on plasticine. To do this, roll out the plasticine with a rolling pin, attach a leaf from above with protruding veins down, slap it lightly, and now roll it again with a rolling pin with some pressure. Peel off the leaf carefully.


But such beautiful leaves can be made by using JOVI or DAS modeling paste instead of plasticine. For a master class on making this craft from leaves, see the link \u003e\u003e\u003e\u003e
15. Crafts from plaster. Plaster leaves
The process of making gypsum leaves is a logical continuation of the previous craft - leaf prints on plasticine. You will learn how to make them by reading a detailed master class on making this original crafts from plaster on the Country of Masters website. See link \u003e\u003e\u003e\u003e

You can make a panel from plaster leaves, decorate a frame, a wall with them, and make a housekeeper from a large sheet of burdock.

Here are some more links to leaf and plaster crafts:
16. Chocolate leaves
Chocolate leaves are an easy and fun way to decorate a dessert like ice cream.

The method for their manufacture is as follows:
Take a few leaves, wash them thoroughly. Poplar, apple, currant leaves are well suited.
Melt the chocolate in a water bath and apply it to the leaves with a brush. Do not put chocolate in very thick layers, but the sheet should not show through the chocolate either.

Place the chocolate leaves on a plate and place in the freezer. Let them freeze for half an hour.
When the chocolate is frozen, carefully remove the leaves, well, that's it, you can decorate them with ice cream, cake, etc.

Chocolate leaves melt quickly in your hands, so transfer them to the item to be decorated with a knife.

17. Dolls made of flowers
Many mothers remember how in childhood they made dolls from twigs and flowers for a walk. It's time to teach this to your daughter, and maybe your son.


If you have forgotten how to make these crafts from natural material, then we will share with your several useful links:
18. Leaf loto
To make it more interesting to learn the names of plants, in addition to the herbarium, which we wrote about above, you can make a loto from leaves. For instructions on how to make this leaf craft, see the link \u003e\u003e\u003e\u003e

Prepared by: Anna Ponomarenko
Autumn is a time of bright colors. Walking through the park, even an adult sometimes cannot resist collecting a lush bouquet of elegant leaves. But what to do next with all this beauty? You can create a variety of tree leaf crafts. So they will delight the eye for a long time.
Leaf preparation
If you collected the leaves in wet weather, the first thing to preserve them will be to dry them thoroughly. Spread the leaves out on paper in a well-ventilated area. Remember to turn them over from time to time to ensure they dry evenly. You can no longer work with wet material, please be patient.
In order for the leaves to retain their bright colors and pristine shape for a long time, we need a large thick book. Choose an old folio no one needs, the book may deteriorate. Lay out natural material between the pages. Put only one piece of paper at a time, but you don't need to fold everything in the middle, try to distribute the blanks evenly throughout the book. If a thick talmud is not at hand, take any other book, and put another pile on top to strengthen it.
If you walked in the forest, you might have noticed among the fallen leaves old, half-rotten ones, which could only retain a thin cobweb. In a park where cleaning is carried out regularly, you cannot find such, but you can achieve this effect with your own hands.
Soak the prepared natural material in the baking soda solution. After that, lay out on paper and gently tap with a toothbrush. With the help of a brush, all the pulp is removed from the sheet, and only a cobweb of veins will remain. It remains only to dry the workpieces in the same way.
It often happens that at school or in the kindergarten, a craft contest is announced too late, and there is no time to dry everything using the correct technology. In an emergency, drying can be done with an iron, as shown in the photo below.
Applications
A wide variety of animals can be made from prepared materials.
a lion
To make a lion with your own hands, as in the photo, a few maple leaves or any others will come in handy, only much more. You also need a base, glue, scissors and the muzzle of the future king of beasts. From the blanks we make a lush mane and glue the face on top. You can hang this applique on the wall, or decorate a jar of pencils.

Cock
Take whatever you find, the brighter the better, you can even use dry blades of grass.
Small details like eyes and eyebrows can be cut out. When the rooster is ready, put a book on it at night so that everything sticks together well and retains its original appearance for a long time.

Peacock
A lush-tailed handsome man - a peacock with his own hands - easily. To make the chic ponytail even more spectacular, add dried flower petals to the composition. It is better to take a white background for a peacock, so it will look brightest. The eyes on the feathers successfully come out of two petals of different sizes, as shown in the photo below.

Autumn wreath
A bright wreath can quickly create a festive mood, but what to do in the fall, when all the flowers have already faded. This time of year you can make a great wreath of leaves. A wreath of maple leaves looks festive and elegant. Surely everyone knows how to weave braids, the wreath shown in the photo should be braided like a classic French braid. Intertwining three branches, with each transfer, add a new leaf on a long leg. You can fix the wreath with a thread or a flexible twig.

Maple Roses
DIY maple roses are a beautiful and unique gift. You don't need to dry the leaves for this job. Go in good weather to find material.
Immediately check the material for flexibility, they should fold, not crumble, but dry already in the finished craft.
The rose is done like this:
- Fold the sheet horizontally and twist it into a tube;
- Fold the next one in the same way, and bend the edge slightly outward, wrap the tube obtained earlier;
- Continue to grow the flower in the same way until you get the desired volume;
- The bouquet can be diversified with buds. 3 leaves are enough for a bud;
- Secure the flower by tying with a strong thread at the base.
MORE ABOUT: DIY felt crafts on the theme of "autumn": the best ideas
The photo shows the detailed steps.

Maple roses make beautiful bouquets and topiary. Complement the composition with open leaves, dried rowan berries, thin graceful twigs. You will receive a wonderful hand-made craft, which is not a shame to give to friends and acquaintances.

Maple rose tree
This unique and exquisite piece of furniture is also handmade. The work is carried out in several stages:
- A snag for a trunk can be found in a park or in a forest, choose only a dry tree, otherwise the craft will quickly lose its presentable appearance;
- We install the snag in a flowerpot of a suitable size and fill it with cement or plaster mortar, this will give the structure strength and stability;
- We decorate the flowerpot with wood crumbs, and glue the previously dried moss around the trunk;
- We make roses from maple leaves and insert them into the oasis for bouquets to make an even beautiful ball of flowers - this will be the crown of a tree;
- We fix the bouquet on the trunk and proceed to decorating;
- We paint over the entire structure with silver spray paint;
- Lightly tint the protruding parts with golden paint using a sponge.
Here you have made a magnificent decoration for the living room with your own hands.
A tree made of maple leaves, decorated in such an interesting way, looks like a real jewel.
The proof of this is the photo:

With the onset of autumn, kindergartens and schools hold holidays dedicated to this time of the year. We have collected maple leaf craft ideas and will be happy to share them with you.
Important: Autumn nature is rich in materials from which you can make real masterpieces.
It would seem that maple leaves ... Is it possible to make an interesting craft from this simple raw material? It turns out you can.
Here's what you can make from maple leaves:
Herbarium... Beautiful, colorful maple leaves will work well in tandem with other leaves. bizarre shapes form a beautiful picture.
Herbarium of autumn leaves
Bouquet of flowers... The leaves folded using a special technology can turn into an original bouquet of flowers. Bunches of viburnum or mountain ash, dried flowers will add color to your bouquet.

 Bouquet of autumn leaves
 Applications... Stick a maple leaf on a white or colored sheet of paper and make a face out of scrap materials. You can also make an applique in the form of a still life or landscape.

 Maple leaf appliques
 Crafts from maple parachutes for children: photo
Important: The imagination of the creative is limitless. In the process of creating crafts, not only maple leaves are used, but also parachutes, or earrings, they are called differently.
Craft "Dragonfly"
A very simple craft that even the smallest can cope with (not without the help of their mother, of course).

 Maple parachute dragonfly
 For manufacturing you will need:
- Maple parachutes
- Paints
- Brush
- Small twig
Paint the parachutes with paints, then let the paint dry. Then glue the parachutes onto the twig. The craft is ready!
You can make a whole collection of colorful butterflies, dragonflies and other insects this way.

 Maple lionfish insects
 Maple parachute crafts
 Maple Seed Appliques
It's easy to make a hedgehog from maple seeds. Draw a hedgehog on a piece of paper, you can also print the finished picture. Instead of needles, there will be maple parachutes.

 Maple seed hedgehog
 In addition to the hedgehog, you can make any other application. For example, owl.

 Maple seed owl
 How to save maple leaves for crafts, how to process them?
Important: Autumn foliage is a short-lived material, the leaves quickly darken, curl. Therefore, many are wondering - how to preserve the leaves? It turns out there are several ways.
Method 1... Dry the leaves in a book under pressure.
Method 2... Iron the leaves with an iron between two sheets of paper. You need to put a solid foundation down.

 How to save maple leaves for crafts
 Method 3... Dip the leaves into molten paraffin. The temperature of the melted paraffin should be medium so that the leaf does not turn black. This is done as follows:
- Melt the paraffin in a wide bowl
- Dip the sheet in warm paraffin
- Place the maple leaf on a piece of paper to dry
Method 4... Soak the leaves for several days in a solution of glycerin and water. The solution should be in this proportion 1 part of glycerin, 2 parts of water.
Video: How to save leaves for crafts?
Bumps are a common material for children's crafts. If you combine cones with maple leaves, you can get an interesting little thing.
For example, such a cute owlet can be made from a pine cone, with dried maple leaves as its wings.
 Crafts from pine cones and maple leaves
 Craft: a bouquet of maple leaves
Important: Maple leaves can turn into a luxurious bouquet if you work hard.
First you need to learn how to twist a rose.
 How to make a rose from maple leaves step by step
 And here are the bouquets that can ultimately turn out.

 Bouquet of maple leaves
 Maple leaf craft
  Maple leaf roses
 Video: Roses from Maple Leaves
Craft: Maple Leaves Wreath
A wreath made of autumn leaves can become a spectacular decor element.
You can combine a wreath of maple leaves with many other natural materials:
- Bunches of rowan
- Cones
- Spruce branches

 Autumn wreath
 Autumn material wreath
  Maple leaf wreath
 To create such a wreath will take time and perseverance, as well as materials at hand:
- Willow rods, wire or any other available basis for the frame
- Scotch tape or thread
How to make a wreath of maple leaves:
- First, make a round base with willow twigs or hard wire
- After that, twist each maple leaf with its tail onto the base.
- To keep the leaves, secure them with a thin wire or thread
- Add decorations while weaving the wreath

 How to Create a Maple Leaf Wreath Step by Step
 Another option bases for the wreath - cardboard:
- Cut the ring out of the cardboard
- Gently wrap the circle with knitting thread
- Then you can start decorating the wreath with leaves, fixing them with PVA glue


Video: Decorative leaf wreath
Maple Leaf Crafts: Vase
In order to make a vase from maple leaves, you have to tinker.

 Maple Leaves Vase
 You will need:
- PVA glue
- Brush
- Balloon
- Maple leaves
Preparation method:
- Inflate the balloon. Note that the vase will eventually take the shape of your ball.
- Dissolve PVA glue with water in a 1: 1 ratio. Cover the ball with glue.
- Glue the leaves in a random pattern.
- Leave the ball to dry. When the glue is dry, you can pierce the ball with a needle and remove it from the vase.
Craft: Maple Leaf Plate
As mentioned above, the leaves take the shape of a balloon when you stick them on it. This way you can make narrow vases or flat plates as you wish.

 How to make a plate of maple leaves
 The plate is made in the same way as a vase. First, you inflate the balloon, then spread it with glue, glue the leaves and voila - the plate is ready.

 Maple leaf plate
 Diy maple leaf crown
Important: If your daughter will perform at the autumn festival in kindergarten or school, and you do not know how to decorate her themed outfit, make a crown of maple leaves.
 Crown of leaves
 - Collect even beautiful maple leaves
- Use scissors to trim the tails of each leaf
- Pull the tail of one sheet through the other, as if you were making a stitch


Fold the leaves in this way until the chain is the desired length. At the end, secure the sheet in front.

 Making a crown of leaves step by step
 The crown at the matinee can be replaced with a wreath of leaves. Decorate it with bright bunches of mountain ash to make the wreath shine with colors.

 Maple leaf wreath
 Craft: maple leaf hedgehog
We have already talked about how to make a hedgehog from maple leaves. Here are some more options for the Maple Leaf Hedgehog crafts.
Maple leaf hedgehog is a simple craft, it will take you very little time. Such an activity will captivate the kid for a long time.

 Leaf applique: hedgehog
 Maple leaf hedgehog
 Kids crafts: hedgehog
 Craft from maple and oak leaves
Important: Oak leaves can also be used for crafts. If you combine oak and maple leaves, you get an interesting combination of colors and shapes.
Oak leaves are perfect for appliqués.

 Craft from oak leaves
 Take the following interesting idea as an example. Any leaves can be glued, including oak and maple leaves.

 Craft from oak and maple leaves
 More options for applications from various leaves:
 Crafts for kindergarten and school: leaf applications
 Leaves application: squirrel
  Leaves applique: cat
 Craft: Maple Leaf Tree
An original tree can be made if you show your imagination. For the Maple Leaf Tree craft, you will need the smallest leaves so they can fit on a small piece of paper.
 Craft tree
 Craft maple tree
 Crafts from chestnuts and maple leaves
Important: Chestnuts grow in many cities, towns and villages. Finding a chestnut for crafts and finding an application for it is not a problem, there are a lot of ideas.
By the way, you can use not only chestnuts, but also the prickly peel from them. See what cute hedgehogs in the meadow turned out from the dried chestnut peel.
 Craft from maple leaves and chestnuts
 You can make a whole autumn composition using chestnuts, maple leaves and other materials.

 Composition from autumn natural materials
 Maple Leaves Sun: Crafts
Making a sun out of maple leaves is a simple task.
You will need:
- A4 paper sheet
- Paints
- Markers
- Yellow maple leaves
Draw a circle on a piece of paper. Paint it with yellow paint, when the paint dries, draw the eyes, mouth and nose with a felt-tip pen. Or stick it out of colored paper. Maple leaves will be rays, so choose bright yellow leaves.

 Maple leaf sun
 Craft sun
 Crafts with children
Important: Red rowan goes well with leaves. The color scheme is bright and juicy.
Rowan can be added to bouquets.

 Combination of rowan and maple leaves
 And again the hedgehog. Only on his back he has a bright bunch of mountain ash.
 Crafts from rowan and maple leaves
 Rowan in bouquets looks gorgeous.

 Autumn wreath with rowan and leaves
 Autumn is not the time to be sad and depressed because of rainy weather. Do not forget that autumn also gives us the time when you can fully admire the beauty of the multifaceted nature.
Video: Children's autumn leaf crafts
Roses from maple leaves. Master class with step by step photos
Handicraft workshop: in the technique of "working with natural material".Master class name: "Flowers from autumn leaves".
The author of the work: Nikolaeva Natalya Anatolyevna, teacher of additional education MBOU DOD "House of children's creativity" Osinniki, Kemerovo region.
The master class is calculated for children and teachers of additional education.
The purpose of the master class: with the onset of autumn, I want to show and tell how you can make a bouquet of roses from bright autumn leaves. I am ready to tell you how you can get pleasure not only from a walk in the park, when you collect autumn leaves of extraordinary beauty, but also aesthetic pleasure from the resulting bouquet from the same leaves. This unusual decor will decorate your home, and most importantly, it will remind you of a pleasant outdoor recreation.
Purpose: decoration of a wicker basket with roses from autumn leaves of hazel.
A task:
- to acquaint with the opportunity to use fallen leaves to create roses with your own hands;
- to foster a love of creativity, constructive work.
Materials and tools:
- natural material (hazel leaves),
- jute rope,
- scissors,
- scotch tape,
Wicker basket.
- an oasis.

Step by step manufacturing process:
1. Take a yellow or green hazel leaf and fold it in half (across, not along!)

2. We roll it into a tube (roll)

3. We take the second leaf of hazel and put the first folded on it

4. We wrap the second sheet into the third sheet

5. We take the fourth sheet and as in paragraphs 3.4

6. Wrap the base of the resulting rose with a thread or jute rope and tighten it tight

7. And here is our first rose! Thus, we make the desired amount

8. In the same way we make a few more roses (preferably an odd number)

9. To decorate the basket, take a maple leaf and lay the base

10. We lay a floral brick, and insert roses from leaves into it

11. When all the buds are ready, we put them together, and then everything depends only on your imagination. You can "wrap" them with the same maple leaves, you can take the leaves of chestnut, hazel.
Here's an eco-composition.

Advice for needleworkers:
Flowers from autumn leaves will stand and please the eye, but after a couple of days the leaves will start to dry. They will take on a different look, no less beautiful, but different. Therefore, for those who want to keep the flowers in their almost original form, there is a piece of advice: as soon as you make your roses from the leaves, cover them with varnish (just do not use nail or hair varnish in any case). Parquet varnish or plastic varnish works well. You can also paint the roses with acrylic varnish and then they will always be the way you want.


 Rules for the selection of haircuts for a full face: photos, stylist tips and general recommendations for choosing winning hairstyles
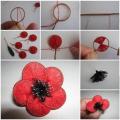 DIY gift for mom - original surprises for Mother's Day
 Wedding makeup for brown eyes