DIY holiday flags. We make beautiful and festive garlands ourselves
In this article you will learn how to make several different types paper garlands yourself. Making a garland can be quite fun and easy task. Perhaps the simplest tool in a craftsman's arsenal, paper is full of possibilities and purposes. You can turn it into anything. I use it for Christmas home decor, this year the priority has become round ones with sewn stitches. You can use them as decorations for a party, event or just. Everything will be discussed in more detail later in the article.
Making a garland
First of all, prepare lots and lots of paper circles for work. I cut my circles using a scrapbooking punch (in our opinion, a hole punch). But you can also find more fancy gadgets for these purposes, of which there are many on the Internet. I chose several shades of pink to create a romantic appearance. I also added some gold medallions, which provide an interesting contrast and make the decoration more interesting.
First, I laid all my circles one by one in a row in the order in which I saw them, and my goal was to achieve an ombre effect. Then I started sewing.
Sew down the center of your first circle, then take the next circle, placing it in front of the presser foot and sew immediately after the first. Continue until you have a chain of circles of the desired length. I used a fine stitch on my sewing machine.
Make as many rows for the round garland as you need. To design mine, I needed about 15 sheets of double-sided thick colored paper measuring 20x30 cm. I installed the finished product on regular double-sided adhesive tape, adding a couple of strings of decorative light bulbs for a festive mood, which were held on a nail, and placed the battery packs right there - at the top of the window sill, also using double-sided tape.
Consumables
- double-sided thick paper in several colors;
- metallic paper;
- ponch with a diameter of 5 cm;
- sewing machine
- double sided tape;
- decorative light bulbs.
Once you hang it all up, all you have to do is enjoy it, since paper itself is inherently festive. Place it near other holiday decorations, such as Christmas decorations, for a festive touch.
You will also need a garland for special occasions. If you have children, they will appreciate this approach and be grateful to you.
Light elements add a special atmosphere that is inherent winter holidays. I really love everything shiny, glowing and shimmering, especially during the holidays.
Some may find the round option boring, or you may not have all the tools at hand. Therefore, I have prepared for you a few more ways to decorate using paper garlands. So let's get started.
Method 1
Geometric
Fold each sheet into a triangle. Start by folding the sheet in half. Then fold the triangle in half to make an even smaller triangle.
Consider making small cuts along the edges to make your garland more interesting. Do not make any cuts along the folded edges.
Staple the two triangles together in the middle. Do the same for the remaining triangles so that you have six triangle shapes held together.
Pin the two triangle shapes together at the corners. Take two triangles and overlap the dots 1/2 inch (1.27 cm). Sew the corners down.
Pin the molds together to hold them in place. If you don't want the staples to show, you can only staple the inner layers and leave the top layers free.
To make a garland from individual triangles, connect the parts together by the edges.
When finished, secure the garland to the wall using thumbtacks.
Method 2
And again the round garland (they are so funny). This time it is a method that does not require the presence sewing machine. A scrapbooking hole punch works the same as regular hole punches, except that the first one is different forms and sizes. It can cut circles, hearts, squares, stars and even snowflakes. You can buy a shaped hole punch for scrapbooking at any office or art supply store. You can also find it on the Internet.
If you don't have a figured hole punch, you can use a regular compass. It will take a little longer, but your persistence, I am sure, will overcome the routine.
Step by step guide
- Take colored paper. The best option There will be a choice of a special one for scrapbooking or cardboard. Craft or origami paper will also work, but in this case the finished garland will not be durable.
- Try using two to three different colors or shades. For example, try light blue, blue and navy blue.
- Make circles of different colors using an affordable method.
- If you are making a garland for a nursery, use patterned and bright colors. For example, half of your pieces could be bright blue and the other half of your pieces could be white with bright green polka dots or stripes.
- You can use one punch and thus get figures of the same size.
- Or follow my path - I made two versions of a round shape in different sizes. One is 5 cm and the other is 8.8 cm in diameter. This trick gave my garland some variety.
If you can't find the punch, draw circles using a compass!
- Cut out your shapes. If your paper is thin enough, you can cut two or three sheets at a time. The cardboard, however, must be punched or cut one sheet at a time. If you try to pierce too many at once, you will end up with fuzzy edges on the shapes and may damage the blade.
- Align the shapes in a straight line. If you are using different sizes, try alternating them. You can alternate them randomly or in a specific pattern.
- Draw a line of glue down the middle. Make sure it flows continuously through all forms.
- Apply the ribbon over the glue. Make sure that the braid has a tail 30-50 cm long at the end. This way you can hang your garland.
- Lay similar circles with glue on top of the figure with the braid, making a “sandwich” out of each shape with twine in the middle. Now our garland becomes like the real thing, acquiring the features of a double-sided design.
- Repeat the process with the remaining forms. They can be either at a distance from each other or close to each other. Make sure you have about 30-50cm of rope left at the end of the garland, otherwise you won't be able to hang it later.
Let the glue dry before hanging the garland. Depending on how much glue you used, this could take anywhere from two hours to a day.
Method 3
How to make a garland of flags
Step 1
Prepare 20/30 cm scrapbooking paper. You can use any color or pattern you want. To make your flags more interesting, consider using multiple colors, shades, or patterns. For example:
- If the garland is intended for a children's room, use pink and blue white paper with pink/blue polka dots.
- If the garland is for an ocean-themed party, consider using blue and blue color schemes.
Step 2
Fold in half lengthwise. If the paper has a pattern or is single-sided, make sure the design is on the outside of the fold. The empty/white part should be inside.
Step 3
Cut in half down the middle along the fold line. You should get two copies of the folded sheet of the same size.
Step 4
Cut a triangle out of each sheet. To do this, fold the rectangle with the colored side up twice at right angles. Then cut the corner to create a diamond shape on the spread. The middle of the triangle should be at the angle of two folds:
Step 5
Measure the cord on which the flags will hang; in addition to the space for the garland, it should have a margin of at least 30 cm at each end for ties so that it can be easily hung ready product where required.
Step 6
Open one triangle and cover it with glue along the edges and in the center. You can also add glue in the middle of the triangle.
Step 7
Place the rope along the fold and close the triangle. Run the heel of your palm over the flag to smooth it and seal it.
Step 8
Repeat the gluing process for the remaining triangles. You can place them as close to each other or as far apart as possible. However, be sure to leave at least a few centimeters of space between the triangles so that the garland looks beautiful when hung.
Step 9
Consider leaving a message on your banner by placing a letter on each triangle. You can cut out colorful letters and glue them to one side of each flag. You can also draw the letters using a stencil or acrylic paints.

A garland of flags will fit perfectly into any holiday, as it is universal. You can decorate any weekdays, birthdays, and other holidays with it. And what’s most important is that making a garland of flags with your own hands is very simple and cheap. The right skill, mixing colors and other factors creates a great atmosphere in your home. Try making this decor, you definitely won’t regret it. Below we will discuss the methods of making and the advantages of such jewelry.
Advantages:
- Financial benefit. Paper is inexpensive, and a large ream of paper can produce a huge number of counterfeits. If you take balls as an alternative, they cost much more.
- As mentioned above, one of their advantages is versatility. Flags are definitely suitable for both birthday celebrations and corporate events. Let's compare, for example, balls made of threads; they are not suitable for all corporate events and would be inappropriate at the birthday party of an elderly person.
- Possibility of use in large-scale events. If you have the ability to make such a product, you can decorate any event, even a wedding for a thousand people, they will not get eaten and look monotonous if you do high-quality and conscientious work.
- The speed of production depends not only on the amount of work. Perhaps you already have prepared flags, you can make a garland in a few minutes without much effort. As an example, again, there will be balloons, they cannot be bought in the evening, but you can take and print the flags.
- The ability to quickly change them. If something goes wrong, you can quickly and easily replace them.
Important! In addition to all this, young children, and everyone, develop handicraft skills during production, which also cannot be a bad result.
You can use garlands of flags with your own hands absolutely everywhere - apartment, vehicle, railway transport. The right look at this irreplaceable thing will definitely make the holiday brighter and more fun.
Material
How to sew a garland of flags? First you need to decide on the materials for work:

Important! There are also many minor elements, but the main ones have been listed here. By manipulating various colors, patterns, shapes, you can create unusual combinations of shades and patterns, resulting in beautiful jewelry for all purposes for which they can be used. Typically, thick paper or laminated material is used for this.
Types of flag garlands
Depending on your purposes of use, the method of their manufacture will also change. Before you make a garland of flags with your own hands for your birthday, decide where it will hang and how.
The following types are distinguished:
- Sewn - during production, flags are sewn to the braid. You can sew them tightly together, then you won’t see their bases. You will get a solid line of flags. Usage sewing machine will quickly make several such rows.
- With holes. These types of flags have holes - one or two - through which fishing line, cord or wire is passed.
- On the eyelets. This is probably the most durable option in terms of durability. The holes in the flags are reinforced with eyelets - these are special bushings, they can be plastic or metal. The bases are also threaded through them.
Preparation
Before we start making flags, we will look at what you need to have on hand and what blanks you will need:
- Flags - you can either buy them or prepare them yourself. For example, make templates and print them, then using stencils, you can make the number of flags you need.
Important! The shape of your flags does not have to be the usual triangular - the shape of a heart will only look more original.
- For flags made from fabric, you will need a template to use to make the pattern. Of the tools you will need sewing needle and threads.
- The basis. As mentioned above, the basis will be fishing line or wire, tape, cord or braid and any other available material of the same kind.
So, having discussed everything that was necessary, we move on directly to the production itself, so that the garland of flags with your own hands turns out to be bright, colorful and appropriate for your celebration.
Creating a garland
Oddly enough, even such a simple interior decoration has several ways to create it. Let's look at them.
Method 1:
- Take your prepared flags, size - A5 format, as it is optimal for use at home.
- There are two ways to form a garland. The first is to glue the blanks onto paper tape. Or make a high-quality and reliable foundation, which won’t take much time, but nothing will happen to them.
- Next, string your shapes with a needle onto a thread or fishing line, or the top edge is folded and stitched. In the second case, the fishing line is threaded through the hole formed along the upper edge of the flag.
Method 2:
This method involves the use of pre-prepared material. This means that you don’t have to bother and make preparations. Garlands are sold with holes already made, complete with any base - all you have to do is assemble and place the garland.
Important! However, this option will be more financially expensive than the first. Besides, you can’t always find what you like, but it’s nice to make something with your own hands, because it will turn out the way you see.
Let's look at one more example.
Method 3
For clear example Happy birthday to Katya:
- We get the following numbers Katyusha - 6 flags, Happy Birthday - 16 flags. We conclude that a total of 22 flags are needed, you can add a couple more to make it more magnificent.
Important! One A4 sheet gives us 6 flags, take 24 flags and divide by 6, it turns out we need 4 A4 sheets.
- Next step. We cut out the triangles in this way: place the sheet vertically, make two marks at the top at a distance of 10 and 20 cm from the corner, and do the same at the bottom. Connect the marks with straight lines. You do the same thing, just in a different direction. Next, connect the crosshairs of the lines.
- Third stage. We cut out our round pieces in which the letters were printed. Good, high-quality glue and without lumps.
- We make holes, lay them out in the right order, let's start decorating as your heart desires.
- Now we string our flags onto any base, divide the letters so that the same distance remains at the ends of the base.
That's it, making garlands with your own hands is so easy and simple!
Video material
The basic principles, advantages, and types of garlands were discussed here. A garland is an irreplaceable part of the celebration; perhaps it seems to you that this is not so, but believe me, everything is exactly like that. With some time and a little effort you will have a real treat - children, adults, seniors, everyone will be absolutely amazed by your design and approach. Everything is very simple and inexpensive, so be sure to try making this craft.
Very little remains until New Year's holidays. And although Metal White Rat will take effect only on January 25, we need to prepare for the meeting now. Think over the menu that should include. Think about how to decorate a house, apartment,...
The totem likes everything original, so hand-made or garlands are perfect. The rat loves shine and soft colors. She will especially like gold and silver, white, shades of the pastel spectrum, orange, purple. You shouldn’t use everything in one decoration at once; it’s better to give preference to one.
I offer you several interesting options, which everyone will surely like and will decorate your home. Many jobs can be done with children or even offered to do something during labor lessons at school.
How to make New Year's garlands with the symbol of the year with your own hands - Rat (Mouse) templates
Themed decorations are the simplest and most original way appease the symbol of the year. Cute, almost cartoonish, images will surely delight children. Therefore, such garlands will decorate a children's room and groups in a kindergarten.

To work we will need:
- thick paper;
- scissors;
- hole puncher;
- braid.
Operating procedure:
Download animal templates. The images are mirrored. This is done so that the garland looks the same from any side. Carefully cut out the shape and glue it together. Use a hole punch to make holes in the animals' ears and thread the ribbon through them.


The finished decoration can be mounted under the ceiling. You can also make simple flags with images.

Catch the flag template and single images of animals. Right-click, download, and then simply enlarge to the size you need. You can also draw the blank by hand.


Another option is to fix it in a spiral on the Christmas tree. You can place the same or different images on one garland.
And try to create another decoration in Japanese technology origami. This work can be entrusted to children 9-10 years old. They will surely love how a simple piece of paper turns into a very cute mouse.

To work we will need:
- paper (regular or special for origami) 15x15 cm;
- rope;
- wide ribbon.
Operating procedure:
Fold the sheet diagonally twice. Make sure that the corners meet clearly, the fold lines are clear and even. Position the workpiece so that the square becomes a diamond. Bring the bottom vertex on the left and right to the center line. Repeat the same steps from the top.
Expand. Fold along the folds, creating a triangle fold in the center. These are future ears. You should get an elongated rhombus. Immediately determine where the mouse’s muzzle will be (in this master class it’s on the bottom) and where the tail will be. Take each triangle-ear by the top point and lead it to the base. Iron all folds carefully.
The diagram looks like this.

Lead the lower part of the workpiece with its apex to the triangle, which is formed by the bends next to the “ears”. The vertices should touch. Iron the fold, bend it back. Turn the workpiece over. Fold the halves towards the middle on both sides. Turn inside out. The result is a muzzle.
Grasp the top point of the remaining part of the workpiece. Lower it down, folding it in half. Mark the fold. Carefully unfold and fold the middle inward. Then bend the tip so that it fits slightly inside the first fold. Hide any excess by simply folding it under. This will create the tail and back.
Return to the ears. Fold the top so that it lines up with the back. Take pencils, felt-tip pens and draw a mustache and eyes for the mouse. Attach the finished symbols of the year to a rope with some distance from each other. For this I use decorative clothespins or brightly colored paper clips.
I suggest tying bows from a wide ribbon between the mice. Its color should match the tone of the central design elements.
Garland of flags made of paper and paper clips for the New Year 2020
It is not difficult to imagine that such multi-colored chains can become the basis of beautiful garlands. You can hang them in this form on a small Christmas tree, they will look bright. But you can also make children’s favorite flags. And come up with your own version of decoration.

What you need to prepare to create a craft:
- a box of multi-colored paper clips;
- colored paper (you can use leftovers from previous creative works, since you will still need to cut the paper into thin strips);
- glue;
- a snowflake-shaped hole punch for decoration (or stickers, printouts of snowflake designs, pens to draw them on, etc.);
- scissors.

How to do
To create the frame, take colored paper clips, coated with enamel or painted in another way. For the flags themselves you will need colored paper. Cut thin strips from it. The width should not exceed the length of the paperclip. Draw a bird on one side so that you can later cut out the corner of the flag.

Thread one side of the strip through a paperclip and pull through. Fold the strip in half crosswise. Glue the ends together. Cut out the bottom part with a birdie shape to create a flag.

Prepare many strips of the same size for decoration.

Insert a different color of paper into the hole of each brightly colored paperclip and turn it into flags in the same way. Use glue and scissors.

Using a shaped hole punch, make a snowfall using not only white, but also colored paper. This way you can mix 3 colors in each link.

Glue snowflakes on both sides of each flag (or use another decoration method, such as adding snowmen, penguins, bullfinches, or other winter objects).

All that remains is to fasten the paper clips using the standard method to form a long chain of flags. The result is a wonderful New Year's garland that will become an unusual holiday decoration.


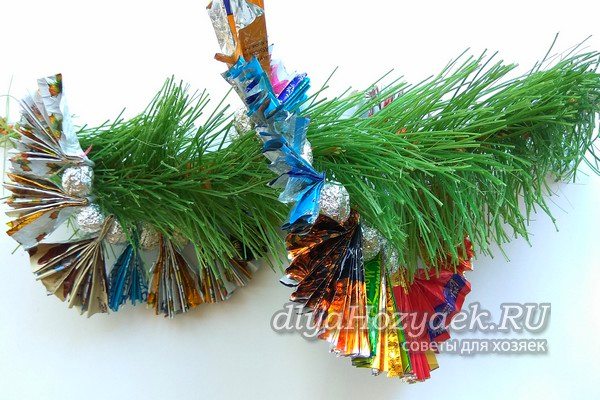
Homemade garland from candy wrappers
You can collect a huge number of candy wrappers of different colors, patterns, textures, you shouldn’t throw away this wealth, because you can make New Year’s crafts from it. It is enough to come up with some fragments that can be endlessly alternated and assembled onto a thread, and you will get an interesting decoration.

To work you will need:
- mix of candy wrappers and foil;
- thread and needle;
- stapler if necessary;
- scissors if necessary.

Prepare different wrappers. It is advisable to use different shades, and the sizes can either be the same, or cut them with scissors. All completed parts will be attached to a strong thread.
Step by step work
Roll the silver foil into balls of approximately the same size. They, like beads, will be strung on a thread.

To make fan-shaped pieces to create alternating links, fold each candy wrapper like an accordion. Then bend the resulting strips in the center. Use your fingers to press down on this area to secure the bend.

Take a long thread and thread the needle, tie a knot at the end of the thread. Thread the first foil ball through, then thread the folded part of the fan through.

Thus, alternate the details. Thread the balls and then the wide pieces. You can use a stapler to fasten the side parts, and the garland becomes one whole.

Assemble a snake from a large number of segments. If you use the original wrappers of different colors, then the whole structure will turn out to be colorful.

I suggested a great way to utilize the wealth that children collect after each candy they eat. And after the holiday, you will have even more such raw materials, so you can come up with other options for decorating the Christmas tree.
Craft Stars in the form of a garland for the New Year for kindergarten
You can create this beauty with your own hands using glitter foamiran (preferably with an adhesive base). Be sure to involve children in such creativity, because it is for them, by and large, that the room and the Christmas tree are decorated before the fabulous night. Glitter foamiran with an adhesive base is an inexpensive material for children's creativity, which is sold in sets. You can buy yourself such sparkling wealth, then make a lot of stars different sizes to fill the garland to the required length. Let's look at a master class on how to make it.

What was used:
- glitter foamiran (thick, sticky on the back side);
- 2 star templates printed on a printer;
- scissors;
- strong thread (knitting yarn, but can be replaced with nylon or other thread, thin tape).

How to do
Choose 2 sheets of different colors or use the entire mix included in the set for a colorful effect. Print on paper and cut out the stars, you can use parts of two sizes or more. For convenience, stick the templates onto cardboard. Trace the outline of the stars on the back side of the selected sheets of shiny material.

Cut out all the stars along the outline. Make 2 servings if you only choose 2 sheets to work with.

For one star on the garland you will need 2 blanks, since they will be glued together with their back parts. Take a strong thread. Remove the protective paper. Stick on sticky layer thread in the center.

Cover the top with a second similar star, trying to clearly align the corners to create a symmetrical figure.

Assemble a long garland at random, alternating parts by color and size. This adhesive-based material adheres well.

A beautiful interior or Christmas tree decoration is ready. It sparkles and sparkles, looks very beautiful, and is easy to do if you work together.


An easy master class on making a garland from colored paper
The name speaks for itself. The work will take very little time, but the result will please you. Such decorations are suitable for home, kindergarten or even school. The idea can be implemented in school labor lessons.
 Source: https://www.youtube.com/channel/UC5ULDV816GiEvfgvrC4hNsg
 To work we will need:
- double-sided colored paper;
- scissors;
- ruler;
- pencil.
Operating procedure:
Fold the paper in half lengthwise. Then again from the blind side. Iron the folds carefully. Place the workpiece with the fold down. Draw a strip 1 cm wide on top. Place marks on the fold line in increments of 1.5 cm. Draw lines. Slice the “noodles” to a horizontal line.

Turn it over. Make cuts between the cuts, also not reaching the edge 1 cm. Carefully unfold the sheet and stretch it. There should be a “network”.

Make a few more blanks in other colors. Glue them together, bringing them to the desired length. The garland can be hung on the window, secured to the tulle with pins.

DIY garland of paper snowflakes for New Year's Eve
I really like the paper analogues of winter precipitation. But I also love garlands. In this master class I propose to combine them. You will get one original decoration.
 Source: https://www.youtube.com/channel/UCWqcfwUxk9a7qGqt7892FFA
 To work we will need:
- white paper;
- scissors;
- pencil.
Operating procedure:
Divide a sheet of paper in half lengthwise. Then cross each half by two more stitches. Fold the resulting rectangle along its width. Each wing is brought to a fold. Fold in half again.

Starting from the fold line, draw the outline of the future snowflake. Carefully cut and then unfold.

Repeat steps 1-3 with the remaining paper. Fasten all parts of the garland together with tape. Add elements until you reach the length you need.

Snowflakes don't have to be white, they can be colored.

How to make a garland of pine cones and bows to decorate a room
Look how beautiful it is! Natural material can be painted with golden paint and bows, beads or Christmas balls can be added. A version of such a craft is presented in this master class, and you can easily reproduce a similar copy with your children to decorate a room or even an entire classroom. The more cones you collect in the park or forest in the fall, the longer the garland you will get.

What you need to prepare for work:
- twine or thin brocade ribbon for the base;
- cones;
- golden acrylic paint with a brush or other paint to cover the surface of the pine cones;
- beautiful satin ribbon with lurex;
- glue;
- half beads;
- Christmas balls.

How to do
Take everything to work necessary materials. You can keep bows and balloons in one color scheme, you don't have to use balloons if you have enough pine cones to fill the decoration. Cover the surface of natural material with golden acrylic paint. If you use a brush, this coating will be uneven. Full coloring can be achieved using spray paint.

Prepare the base of the garland, such as twine or thin brocade ribbon. Attach the cones at some distance from each other using a glue gun.

For additional decoration, prepare bows from satin ribbon, and decorate the middles of the bows with beautiful half-beads.

Glue each resulting bow to the top of the pine cone to hide the places where it is attached to the twine. This way, you will already have a beautiful garland modeled, but you can also decorate it additionally.

Between natural materials stick small balls. There you have it, something wonderful is ready. Christmas decoration, which can be hung on the Christmas tree or on the wall. It is unusual, looks elegant, festive and lifts your spirits.


Step-by-step production of the New Year's garland “Snowmen” for windows
On New Year's Eve, glass surfaces are often painted in my family. But how difficult it is to wash them later. And I found an alternative. Making such a decoration is not as difficult as it might seem.
 Source: https://www.youtube.com/channel/UCfUNn0nNcM35FBKL11tB1Iw
 To work we will need:
- A4 paper;
- stationery knife;
- pencil;
- scissors.
Operating procedure:
Divide the paper along the long side. Take one half. Fold it in half. Then fold each wing again, towards the fold line. Draw a snowman. Carefully cut along the outline. Open it up.

Repeat step 1-3. Then we color our characters, draw the nose, eyes, buttons and hat. We connect all the parts with tape. Or you can do all this using the applique technique - it will be even more beautiful.

Making a garland from plasticine for a wall or Christmas tree with the children
Candy decoration is popular at all times. Who among us has not made long chains of sweets and hung them on the Christmas tree or on the walls? How nice it is to gradually remove the candies from the branches and enjoy such delicious and favorite treats. This lesson also shows how to make a simple candy garland, but these will not be real sweets, but lollipops made from ball plasticine. Such a craft can be considered as a practical joke, because friends will probably want to eat delicious candies, but it turns out that they are not real at all.

What you need to prepare to make a New Year's craft:
- ball plasticine;
- stapler;
- file or tight plastic bag;
- golden ribbon or serpentine;
- thread (optional).

How to make a decoration
Prepare plasticine for work. Candies reminiscent of candies will be made from it. You can tie “treats” to the thread or simply staple them together. First, prepare these small pieces.

Turn each into a small triangular-shaped slice. Connect them together, alternating colors. These slices should be approximately the same size.

To make each lollipop round, fasten together about 4 pieces of two colors around the circumference. You will get two-color caramels. Then continue working the next day, when the plasticine has dried well.

Cut the prepared file or thick plastic bag into squares. Wrap a piece of candy in each one. Also have a golden ribbon ready to tie the ends.

Twist the candy wrappers, the candies will be clearly visible through the transparent plastic, they will be in no way inferior to the real thing. Tie bows at the ends with gold ribbon.

Using a stapler, assemble a garland or tie each candy onto a thread. The result was a beautiful New Year's decoration - bright and believable.


Ideas for making garlands with your own hands from all sorts of things
Shortly before the New Year, all housewives begin to sort through all the boxes, boxes, bags in search of what is high time to throw away. But I ask you not to rush. I offer several master classes in which I will tell you how you can easily turn unnecessary objects into a real masterpiece. I'll start with the original, very fragrant garland. Such eco-friendly jewelry is in trend today. And the Metal Rat likes them too.

Birthdays made from paper and cardboard are as easy as shelling pears. A maximum of an hour of work - and the elegant decoration for the holiday is ready. In our master class you will learn how to make such flags with minimal time and materials.
To make your own birthday flags, you will need:
A4 colored cardboard;
printed letters for the inscription (can be drawn by hand);
any bright stickers - in our case - these are stars made of foamiran on an adhesive base;
soutache or any ribbon suitable length for hanging flags (we use twice 3 m of soutache);
glue stick;
pencil;
How to make birthday flags: job description
Calculation of the amount of cardboard
To start, I cut out some letter circles to determine what size flags I would need. The diameter of the circle is 6.5 cm. Accordingly, in burgee(isosceles triangle with a base of 10 cm) such a circle fits. The height of the flag is half the long part of the A4 sheet.
I double-checked the theory on a piece of A5 cardboard and at the same time found out that such a sheet would fit three flags.

Therefore, there will be as many as 6 of them on the A4 sheet.

I made the flags one-sided so that I could hang a garland on the wall. If you want to hang flags from the ceiling, then the flags must be double-sided. There are two options: either use double-sided colored cardboard, or glue the flags in pairs.
So, let's calculate how many flags we need in order to place the intended inscription. We count spaces between words.
So I have:
KATYUSHA = 6 flags;
HAPPY BIRTHDAY! = 16 flags.
Those. in total you need 22 flags plus a few additional ones - as many as you can - to hang them around the inscriptions. So, let's count. There are 6 flags on one sheet. 22 is not divisible by 6, but 24 is divisible (rounded to the nearest larger number that is divisible by 6). Total: 24:6=4. We will need 4 sheets of A4 cardboard.
I took 4 different colors: yellow, blue, green and pink. They are quite bright and festive - and go well with each other.
How to draw a sheet of cardboard for birthday flags
We place a sheet of A4 cardboard vertically in front of us. We make two marks on the top: at a distance of 10 and 20 cm from the upper left corner. From the lower left corner we also set aside 10 times twice and put marks.
We connect our marks as shown in the next photo.

We connect the marks in pairs in the other direction.

We connect the places where the lines cross.

We also connect the upper and lower marks 20 cm from the left corner, i.e. the line will run parallel to the long part of the sheet.
In this way, we draw out all the prepared sheets, and then cut the cardboard along the drawn lines.

Pay attention to the "clippings".

If you add them two at a time, you get several more multi-colored flags.

Connect the halves of the flags on the reverse side with a piece of tape.

The flags are ready. Let's put them in the order they are supposed to be used. I kept it in order, laid out the colors strictly in order: yellow, blue, green, pink. So I took them in order to stick on the letters of the inscriptions.
We cut out circles with letters, coat each one on the inside with glue stick, liberally and evenly, without lumps, and glue it onto the flag.

We press.

Use a hole punch to make two holes.

The flag is almost ready.

We do the rest of the checkboxes in the same way, not forgetting to leave a checkbox for spaces between words.
We lay out the inscriptions in front of us and decorate.

If you have ready-made stickers, then decorating will take just a few minutes.

Assembling a garland of flags for a birthday with your own hands
To distribute the flags evenly throughout the garland, leaving the tails of equal length for fastening, it is best to fold the pendant in half, and also divide the inscription “in half”, defining the middle.
We move the first flag from the middle of the inscription to the center of the ribbon or soutache and string the entire half of the inscription. We do the same with the second part of the garland.

Don’t forget to use our “half” flags.

Before the holiday, it is convenient to store the garlands folded, like this.

An elegant garland of birthday flags made with your own hands is ready!


What else can you do?
- letters from circles can be carefully cut out with a stationery knife, leaving the circle itself intact, and in this form it can be glued to the base of the flag; the letters will be colored;
- letters can be cut directly from the flag, then the wall will shine through it;
- Such garlands are appropriate even for an 18th birthday: instead of letters, you can paste photographs of the birthday person by year.
Eva Casio specially for the site
Isolina Chubukova
Dear Colleagues!
Nowadays it is difficult to surprise anyone with ordinary checkboxes. But it turned out that such checkboxes, which would be suitable for our children to organize physical education activities, games and holidays, are not sold anywhere. That's why we decided to make these DIY flags. I looked through various MKs on the Internet, but didn’t find anything suitable! But in our kindergarten in middle group teachers Lyudmila Nikolaevna and Natalya Valerievna have just such checkboxes, as we need! So I consulted with my colleagues, agreed with my parents about help, and this is what we got!

For such checkboxes you will need Oxford cloth

Tailor's sharp scissors, furniture stapler with paper clips and

also wooden sticks. The cross-sectional diameter of such a shaft is 1 cm; we bought the wooden part in the LEROY MERLIN store.

We first wanted to do sushi stick flags. But the sushi sticks are a bit thin. In this photo I showed you ours for comparison. flag and chopsticks for sushi. First, let's cut the fabric according to this pattern.

For this we will need scissors. At first I tried to cut the fabric with a soldering iron, but it was long and tedious. My colleagues fabric for their checkboxes cut with regular scissors and checkboxes After several years of use they have not become frayed at all.

We also decided to cut the fabric with scissors. Then, in accordance with this drawing, we fasten the fabric onto sticks with a furniture stapler.

For each checkbox three paper clips wasted.

Look how they look flags in the hands of a child. I think this size is for the most optimal flags.

This quantity checkboxes there should be enough for all our children! Ulyana's dad helped us make checkboxes! Thank him very much!

And thank you all for your attention!
Publications on the topic:
Master class at a conference for parents “What is paper for?” Author: Kushnerova V. N. 04/24/2014 Borodino Problem: What kind of paper can you use to get beautiful blooming flowers? Goal: Consolidate knowledge.
Summary of a drawing lesson for a general developmental group for children 3–4 years old Beautiful flags on a string municipal budget preschool educational institution « Kindergarten No. 1" of the city of Orenburg Synopsis of joint educational.
 Topic: “Multi-colored flags” Tasks: Continue to teach children to draw square, triangular, rectangular shape. Call
 Goal: To consolidate the techniques of careful gluing, the ability to alternate images by color. Develop a sense of rhythm and a sense of color. Move.
 "Basket with flowers from plastic cups" Goal: Exchange of professional experience with teachers and use of manufacturing technology.
Master class for teachers “Games to relieve psycho-emotional stress” Master class for teachers “Games to relieve psycho-emotional stress” Psycho-emotional stress is a psychophysiological state.
 Master class for teachers “Making the symbol of the New Year - dogs” from scrap materials. Compiled by: Myasnikova E. A., Rashitova G. M.,.
 Crochet Christmas potholder
 We make beautiful and festive garlands ourselves Cut out the letters Happy Birthday
 Royal Treasures: A Short Guide to Kate Middleton's Rings