Embroidery with ribbons "Irises": the simplest of instructions. Photo and video tutorials on embroidering irises with satin ribbons Ribbon embroidery irises diagram
Let's learn to embroider satin ribbons Dutch irises. Let's study detailed master classes for beginners with a description of the process of embroidery with satin ribbons. Let's look at diagrams and stencils of irises and work out the technique of making stitches.

To work on irises you will need the following list of materials: linen or cotton fabric, then satin ribbons of different colors. These can be cream colors, dark yellow, green in different tones, lilac and bluish. You can also prepare blue and violet. You will also need to prepare a set of threads that will match the ribbons and paint.
 Irises will be embroidered using a single loop stitch, and foliage will only be embroidered with a straight stitch. You need to transfer this schematic drawing onto the canvas, and only then start needlework.
 Take two shades of satin ribbon and start embroidering a group of tall buds, and then low flowers. The bud should be decorated with three straight stitches in dark yellow and green. Take a double thread and make straight stems, grabbing them with a transverse seam. Then you need to embroider green foliage.
An iris flower can have different colors, such as in the following photo. First embroider the buds themselves, and then those that have bloomed. In order to depict irises of different sizes, you need to choose satin ribbons of different widths. In this case, it is necessary to change the stitch length. Let's see how you can embroider an iris that has not bloomed, and then one that has already done so. So, for the top petals of the iris, use a muted mauve satin color, and for the bottom petals, use dark pink ribbons.

Attach the edge with the lilac shade at the point indicated under the letter A, then bring the main material to the wrong side, but also in the same place. Pull the ribbon through the fabric so that you get a loop from place A to place B. Bring the satin to the faces. side to side B, passing it through the buttonhole.
Use an extra needle to hold the ribbon in place. Having grabbed the loop, you should take the main material to the wrong side to point B. The ribbon should be held in a taut position with an auxiliary needle, and then pulled through the fabric so that a flat seam is formed. Secure the first buttonhole and ribbon. The dark pink material needs to be attached where the place is indicated by the letter C. After this, direct it under the upper petal and stick it into the place indicated by the point D. Again, bring the fittings to the wrong side until an arc is formed that needs to be attached.

The opened iris is embroidered a little differently. Take and fasten the pink-lilac satin ribbon where the letter A is indicated on the diagram, and bring it to where the letter B is indicated. The loop should reach point C, where it is secured with a short seam. Repeat the previous manipulations that you performed before. We fasten the product again, but only dark pink, etc.
After this, you need to use a needle to pass the material through a small stitch, and fasten it to T. C. Bring the fittings to the wrong side to T. K, then pull it up to form an arc, which is fastened again. When you embroider irises with a satin ribbon, stretch it under the petals to avoid the formation of unwanted bumps.
Video: Lesson on embroidering irises for beginners
Photo of MK embroidery of irises with satin ribbons


We can definitely say that the floral theme occupies a leading position in such needlework as ribbon embroidery. All the diversity of the floral world can be displayed on canvas using satin ribbons of different colors. Today we will talk about embroidering a flower like the iris. Many beginning needlewomen have difficulty embroidering this representative of the floral world. Therefore, using the example of several schemes, we will analyze the methodology of such work.

For iris embroidery, novice craftswomen will definitely need a diagram that shows the entire sequence of actions.
 Paper is used as the basis for this master class. You can use any suitable fabric for embroidery.
First of all, before work, according to the diagram, dots are placed on the surface of the base or, as in this case, punctures are made.
 First, the needle and ribbon are removed from the first mark and a loop is made. Next, the needle goes to the wrong side to the first point. The loop remains on the outer part.
The next step is to bring the needle onto the face at the second mark in the loop area. Now, the tape is passed to the wrong side at mark No. 2 behind the loop. This seam is called a “loop”. This should form the top of the iris flower.
After this, the ribbon is pulled to the outside at the third mark and passed under the loop. The needle is inserted into the fourth point and pulled to the wrong side.


This is the simple way to embroider an iris.
The remaining leaf-shaped elements are stitched with green ribbons and stitched with straight stitches, as in the photo.


Please note that the tips of the ribbons must be singed with the tribe to avoid them falling off. At the moment when you bring the working material to the wrong side, do not grab or stitch with a needle the ribbons located on the wrong side. In this case, the embroidery will deteriorate due to the tightening of the front loops.

Pattern for embroidering a composition of irises
Another clear example with diagram and step by step photos, will tell you how to embroider flower arrangement and beautiful irises.
 In this case, the irises are embroidered using a single loop stitch, and the foliage is embroidered using a simple straight stitch.
Use interesting combinations of shades of the base material in your work to get beautiful ribbon shimmers.
According to this version of the scheme, you can embroider:
 Work on the composition consists of several stages, where you will need to embroider opened and unopened irises, as well as buds. To obtain flowers of different sizes, use ribbons with different widths, varying the length of the stitches.


In addition, the photo of the finished work uses an interesting technique of painting the base with blue paints.
The process of creating irises from ribbons will help you in more detail. visual video with a master class, after studying which you will certainly be able to embroider this wonderful flower yourself.
Video: Lesson on embroidering iris with ribbons
The variety of colors and textures of the material allows you to create very beautiful products(miniatures, paintings) and decor. The most popular theme of ribbon embroidery is flowers. After all, there are no absolutely identical plants in nature, and by adding a bit of imagination, you can create a unique pattern. The main thing in this matter is to “see” the ribbon, choose colors, correctly develop the composition and apply effective embroidery techniques.
Ribbon embroidery of irises (single flowers or as part of a bouquet) allows you to try your hand at the initial stage of learning this type of needlework.
Materials and tools
To create embroidery you will need the following:
- "Aida".
- Satin ribbons for petals 8 mm wide - white (if coloring is intended) or colored.
- Green satin ribbon for stems and leaves, 5 mm wide.
- Linen fabric for the base.
- Sewing threads in the color of the ribbons.
- Embroidery hoop or frame.
- Scissors.
- Needles - "chenille" No. 18 and sewing.
- Paper and pencil (for creating a sketch).
Using the example of embroidery with “Iris” ribbons, you can see how stitches different lengths and directions interesting shapes are created.

Stages of embroidering a flower
In the process of working on a composition, you must be able to use a ribbon stitch (simple and offset), a twisted stitch and a seam “wound” with ribbons. Before you start embroidering, use paper and pencil to transfer the flower diagram onto the fabric. The material on the hoop should be stretched as tightly as possible, without sagging.
The process itself consists of the following stages:
1. Stems and leaves.
- The stems are made with a “winding” seam from green threads and ribbons. The resulting workpiece should be attached to the fabric using hand-blind stitches.
- The leaves are made from green ribbon using curl stitches or twisted ribbon stitches. Additional attachments are made at the ends of each.
2. Flowers. Always start with the top petals. Different size inflorescences give the embroidery with Irises ribbons a harmonious feel.
- First, make 2 symmetrical tape stitches with an offset with the base at one point, after which the same tape is used to make another one between them slightly on top. The result is a voluminous upper part.
- Using a ribbon of a different color, similar stitches are made on the left and right of the base and the last one - between them in a downward direction.
Coloring an iris flower
"Iris" can be made from colored ribbons of any combination. But many craftsmen use simply white material, onto which they apply the desired combination of acrylic paints or batik pigment.
Coloring can be done in 2 ways:
1. The ribbons are given an individual shade before work begins. Moreover, in order for the color to stick after the paint dries, they need to be ironed with a hot iron.
2. A flower made of white ribbons is covered with a cloth and paint is applied with a brush. This method requires decent craftsmanship skills, as one wrong move can ruin the whole job.
Experienced craftsmen often organize master classes in ribbon embroidery of irises, poppies, bells and other flowers, where constantly repeating shapes are encountered.
Floral arrangements with irises
Embroidered irises are usually used to decorate interior items - bedspreads, sofa cushions, tablecloths, wall miniatures. They are arranged with other flowers (poppies, calendula, bells, etc.) or laid out in the form of an independent composition. When creating a bouquet of irises, you must adhere to a number of simple rules:
- No more than 7 flowers in embroidery.
- Peduncles should be located at different levels, and stems should be at an angle to each other.
- The ends of the stems should be “rested” against the base in the form of a vase, basket or ribbon.
Flowers can be aged in different color scheme or made of different materials.

IN last years The art of ribbon embroidery is experiencing a surge in popularity. The variety of materials, very detailed master classes and the opinion that embroidery relieves stress have given this needlework a rebirth.
Embroidery of irises with satin ribbons looks gentle and unobtrusive. The favorite position in the theme of ribbon embroidery is probably still occupied by the floral theme. Its diversity allows all the fantasies of needlewomen to come true. And today we will talk with you about an outwardly strict and proud flower - the iris. It never merges with the general mass of other colors, it is always individual. The iris flower, in the language of flowers, means good news. So, I have truly good news for you! Since living flowers are short-lived, today we will embroider wonderful irises with satin ribbons.
Preparatory stage
For work we will need:
- Hoop (plastic or wooden, so that the material used is well secured)
- Fabric (strong enough to hold the stitches well, but also strong enough for the needle and ribbon to pass through easily)
- Satin ribbon (25 mm, dyed, white-violet, for flowers)
- Satin ribbon (5 mm green, for grass)
- Satin ribbon (12 mm light green, for the second row of greens)
- Felt pen or marker
- Needles (chenille or tapestry)
Iris embroidery technique
The first thing we need to do is pull the fabric tightly onto the hoop and begin the entertaining process of tinting our material. To do this you need to have acrylic paints for fabric, but if they are not available, then you can use ordinary ones - watercolors.
We moisten the fabric generously with water and cover the lower part with emerald green, carefully spreading the paint over the surface. Apply paint to the top of blue color and paint it exactly the same way. Dry the finished canvas with a hairdryer. But it is worth remembering that after drying the colors will fade. Therefore, try to apply more to maintain the brightness.
We begin to schematically depict the future composition.
And now, according to our schematic drawing, we begin to sew ribbons with a stitch seam, which will serve as leaves. You can lay the ribbon the way you want, but don’t forget that it needs to be sewn with a twist.
Ribbon stitch example

The number of petals is arbitrary.
And now, our petal row is ready:
To make our composition look brighter and more attractive, we’ll add a few more light green loops. We work with the same ribbon stitch and place the greens in a random order.
Our second final row of sheets is ready:

Embroidery of iris buds
At the expected place where the bud will appear, draw a dot, and from the wrong side, insert a needle and ribbon and form a loop
And next to the first needle insertion, we make a second insertion, and thereby shape the loop. It is important to remember that there is no need to pull the tape too hard. Always stretch it out carefully and do not forget to adjust the petals with your fingers.
Insert a needle and ribbon into the middle of the loop from the wrong side and slightly tighten the loop, securing it. You should pull the ribbon little by little, sometimes by one edge, sometimes by the other.
Important! Burn the cut ponytails to prevent them from unraveling!
Lower petals
In the middle of the bases of the upper petals, thread a needle and form the lower petal
Be sure to twist the ribbon and insert the needle into the very edge. And you should pull very carefully on both ends on the wrong side.
The middle petal is made very simply - with an ordinary stitch.
A bag is an important accessory in our wardrobe. Without it, life is impossible: where will numerous little things and trifles fit? A bag complements our image, decorates it, and gives our appearance individuality. You can sew a handbag yourself, or you can simply decorate a finished one. If you chose the latter, paintings printed on fabric will help you.
The portrait of a young lady, created in the 19th century by the French artist Paul Cesar, looks very gentle. Print it yourself, or contact a specialist and just sew it on finished work on the bag as an applique, and trim the edges of the fabric with braid or lace. This unique gift will be kept in your collection for a long time.
Materials:
fabric with printed pattern 21 x 29 cm;
large eye needle, size 18 chenille needle, regular embroidery needle;
silk threads: brown and light brown;
decorative threads: “Sapphire”;
Silk ribbons:
- “purple iris” 13 mm wide;
- “lavender” 13 mm wide;
- “green grass” 7 mm.
How to embroider iris with ribbons.
If the fabric with the printed pattern is thin, reinforce it from the inside with doublerin.Stretch the fabric onto a rectangular hoop. Determine the position of the flowers.
Irises are embroidered using ribbon stitches with a curl. Work the top petals first - make 2 ribbon swirl stitches, placing them very close together. Start stitches from one point. Pierce the ribbon on the right (for a left ribbon stitch) and on the left for a right ribbon stitch.
 1
1
Embroider the lower petals in the same way. The side petals are embroidered using twisted ribbon stitches with a curl.
 2
2
 3
3
The Lavender Ribbon Iris is made as follows: At the top of the iris, make five ribbon swirl stitches. The stitches should lie freely and start from nearby points. Sew the side petals of the iris using a twisted ribbon stitch with a curl.
 4
4
 5
5
 6
6
Using Green Grass Ribbon, embroider the stems of the irises using twisted stitches. Attach the stems with small stitches of green floss. Sew the leaves with Green Grass ribbon using long ribbon stitches. The lower right iris is embroidered in the same way as the top flower, just make it more magnificent.
 7
7
Embroider a small iris onto the hat using 4mm wide Lavender ribbons. Sew the crown of the hat with Sapphire threads and satin stitches.
 8
8
Embroider the young lady's hair with silk threads in brown shades. The direction of embroidery should correspond to hair growth.
 9
9
When you have finished embroidering, remove the fabric from the hoop, lightly spray it with water and stretch it on some surface (you can use an ironing board). Let it dry. Fold the edges of the fabric under and carefully sew onto the front of the bag. Sew braid around the perimeter.
Advice.
All iris petals are embroidered from one point, so start the stitches of the upper, lower and side petals very close to each other, at a distance of 1-2 mm.
 We make beautiful and festive garlands ourselves Cut out the letters Happy Birthday
 Royal Treasures: A Short Guide to Kate Middleton's Rings
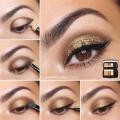 How to do makeup with golden eyeshadow?