Square braid weaving pattern. How to weave braids at home
Olya Likhacheva
Beauty - how precious stone: the simpler it is, the more precious :)
17 Mar 2016 g.
Content
Even our ancient ancestors braided their braids. Surprisingly, this type of hairstyle is still relevant today. A simple composition suits everyone: children and adults, girls and grandmothers. Weaving braids at home is an opportunity to create an individual image on your own. This hairstyle goes well with different styles of clothing and looks good at any event. The modern choice of weaves is amazing. Learn to braid your hair in different ways different types simple, even more so if you have phased scheme this process.
What types of braids can be braided at home
Light hairstyles at home are gaining popularity among a large number of women. Braiding a braid also belongs to such experiments. You can come up with new hairstyles every day using different kinds weaving. A little time is spent on creating braids; with their help, any image is obtained - from romantic to business. Any girl or woman has a great chance to transform without visiting expensive beauty salons.
Classic three-strand braid
Weaving braids at home is a very simple process that any girl can learn. Description of the simple classic braiding method:
- Comb your hair.
- We divide them into three equal parts.
- Without tightening the strands too much, we shift the left part over the central one, and then the right one too.
- We fasten it to the ends, fasten it with a hair clip.
- For a more lasting effect, you can fix the braid with hairspray.

French braid
It is advisable to use this type of braiding at home for thin hair... The French technique of weaving strands visually adds volume to the hair. The scheme for creating a simple but beautiful hairstyle will be understandable even for beginners:
- At the top of the head, select one strand of medium-sized hair, divide it into three identical parts.
- We weave these 3 parts together into a classic pigtail.
- We take a strand on the right side, pull it to the base, which is in the left hand. Weave a new strand with the central part of the main braid.
- We do the same with the strand taken from the left side, but the main braid should be in the right hand.
- Using your left hand, select a new strand of hair on the left.
- Repeat this process until we reach the back of the head. From now on the hair is braided in the classic way... End finished French braid fix with an elastic band, tape, hair clip.

Plain braid harness
Another simple option for weaving braids at home is a tourniquet. Thanks to this hair styling scheme, you can create a variety of unusual hairstyles. A braid made from two strands will turn out to be more effective and voluminous than the same hairstyle with three or four parts. Hairstyles from braids for medium hair and long curls made with the help of weaving-plait, are relevant for an outfit of any style. Method description:
- We collect the hair in a ponytail and fix it.
- We divide it into two parts. We twist the strands one by one with a tourniquet in one direction.
- We intertwine the "bundles" with each other, but we do it on the opposite side from the initial twisting.
- We fix the finished hairstyle.

Spikelet
The next type of hairstyle is a spikelet pigtail. It is not difficult to do it, but the result will definitely please. The spikelet is suitable for young girls and older women. In any case, the hairstyle looks stylish and gentle. Weaving Algorithm:
- We collect the hair in a bun, divide it into two identical halves.
- Separate a thin strand on the right side of the bundle, put it under the main part of the hair on the left. After that, take the hair on the left and put it down under the right base.
- We repeat the braiding process one by one until we reach the ends of the hair.
- Secure the hairstyle with a hair clip or elastic.
- Tip: to get the perfect hairstyle, you need to separate very thin strands, tightening them as much as possible.

Spit " fish tail»Looks great on thick, straight hair. Such original technique weaving creates a shimmering effect in the light. The hairstyle can be done for a special occasion, such as a prom or wedding, by decorating the braid with beads, rhinestones or a ribbon. It is also suitable for business negotiations or a walk with friends. Fishtail weaving pattern:
- Comb your hair well, treat it with any special styling product.
- Devide into two parts.
- We choose from which level the weaving will begin (from the back of the head or crown, in front of the level of the temples, on the bottom of the hair).
- Select a small strand on the left side, shift it over the left side of the base, combine it with the right main part.
- In the same way, we combine the right strand with the left.
- To make the braid strong, it is better to tighten the strands a little while shaping the hairstyle.
- We weave the "fish's tail" to the end, fix and slightly stretch out thin strands for the volume of the hairstyle.

How to make unusual weaving for yourself
There are many non-trivial variations for those who prefer to direct beauty on their own, without resorting to outside help. Hairstyles created with a variety of types of braids take up a bit of free time but give amazing results. Every fashionista gets a chance to stand out thanks to unusual, fashionable and individual hair styling. Here are some fun ways to do your braids at home to help create a look for any event.
Reverse French braid
A variation of the French braid, woven on the contrary, is also called "dragon". It runs identically classic version, but with the only difference - the method of crossing the strands when weaving is slightly different. So, the French braid is the other way around:
- We select the area from which weaving will begin.
- We take hair from this part of the head, divide it into three parts.
- We put the left part under the central strand, and then do the same with the right one.
- Again, separate the new strand to the left of the bulk of the hair, connect it to the left strand and put it under the middle part.
- We connect the new right strand to the right part and also shift it under the central one.
- We create a braid further, braiding new parts to those strands that are from the edges, placing them under the middle strand.
- When we get to the neck, we need to switch to a standard three-piece braid.
- We take out the strands from the sides to make the "tail" more voluminous.

4-strand square braid
A pigtail made of four strands always looks interesting and trendy, but it is very simple to do. This hairstyle goes well with many styles of clothing and is suitable for women of all ages. Algorithm for weaving a "square" braid:
- It is necessary to wash your hair, apply a volume fixing agent to the hair, dry with a hairdryer.
- We comb the hair back, "hide" the parting.
- We divide our mop into four identical parts.
- We take the extreme strand on the right side, transfer it to the adjacent part.
- We perform the same action in relation to the third strand, throwing it to the left from the edge.
- We cross the central strands.
- To securely fasten the weaving, we cross the strands located at the edges (1 from 2, 3 from 4), as stated in paragraphs 5 and 6.
- We continue to work, focusing on the alternation of points 5, 6, 7.
- All that remains is to secure the hairstyle.

Voluminous 5-strand braid
An irresistible image will help to create a unique braid, which is woven from 5 parts. If you follow the advice from the instructions exactly, you will get a beautiful and original hairstyle. The weaving pattern is as follows:
- Comb your hair well, moisten slightly with water.
- We will weave at the back, so it is necessary to comb the hair to the back of the head and divide it into five parts.
- We start forming from the left side.
- The right strand from the edge (5th) must be drawn over the central (3rd) and fourth strands.
- We hold this section of hair tightly. We start braiding on the left side: draw the outer strand over the 3rd and lay under the 2nd.
- You need to go back to the 5th strand in order to put it on the 4th and run it under the 3rd.
- We carry out the manipulations described above until the braid is completely ready.

How to braid an openwork braid on your side
The "lace" braid is created on the basis of different braids that are braided from the side. Openwork hairstyle can be given by pulling individual tufts of hair. The lace weaving technique depends on the number of strands in the braid: a base of 3, 4, 5 parts. Here is the simplest and beautiful option, in which 3 strands will be involved:
- We divide the hair into a side parting.
- We separate the first strand next to the parting, the one that is located closer to the forehead. We divide it into three equal parts.
- We weave a braid, according to the principle of a reverse spikelet, slipping locks of hair under the bottom.
- We take additional new strands from one side (along the hairline).
- When the braid is ready at the crown of the head, then we choose new hooks from the free hair on the back of the head. Carefully weave the strands that are located on the other side of the parting.
- At the time of the formation of the hairstyle, we pull out some strands, freely holding the braid (we do not pinch the ends).
- After all the loose hair has been collected, we braid an openwork braid using the "down" method, not forgetting to sometimes pull the strands.
- We fix the finished hairstyle with a hairpin or ribbon.

How to weave a braid around your head
The headband, made with a neat braid, looks very delicate and elegant. It is also called the Greek braid. This type of weaving is always relevant and suitable for a variety of appearances. Algorithm for creating a braid-rim:
- Wash your hair, dry your hair a little.
- Comb thoroughly.
- The creation of a kind of wreath is similar to the pattern of weaving a spikelet. New strands are added exclusively from the side of the bangs, because otherwise the bezel simply won't work.
- Select three thin strands from the side next to the temple.
- The first strand on the back of the head fits into the second. You need to carefully separate them with your fingers and hold them, gradually adding a new portion of the material to the pigtail.
- We repeat these movements until the second temple. The braiding should be loose, no need to pull the hair tightly.
- Starting from the second temple, weave the braid down, adding strands on both sides.
- When you get a braid of the required length, we fix it with hairpins or hairpins. For a long-lasting effect, you can fix your hair with varnish.

The scheme of weaving a braid-waterfall with a ribbon
With the help of an extraordinary braid-waterfall, every girl or woman can create an easy, romantic image... This hairstyle looks like a snake braid. Weaving with a ribbon is performed according to the following simple scheme:
- We make a classic parting.
- Separate the “square” next to the parting, divide it into three equal parts.
- We tie the ribbon to the central strand, and its short end must be hidden in the process of creating a hairstyle.
- We begin to form a braid of the standard type, laying the side strands under the middle one. The right strand and tape must be at the top.
- The main "trick" of this method is wrapping the central strand with a tape. We leave the lowermost part of the hair free, replacing it with a new strand and continuing the braiding process.
- So we move down to the other side of the head.
- After the waterfall braid reaches the ear level on the other side, we finish the weaving with the classic braid without adding new strands.
Find out in more detail how to braid uncomplicated for long, medium and short hair.

Step-by-step video instructions for weaving braids at home
Simple yet stylish and original hairstyle can be done without visiting a beauty salon. Weaving braids at home is a good chance to create an interesting composition on your head using your own strength. Learning with the help of accessible and detailed, free video tutorials from YouTube, posted below, will help you learn how fast step weaving different types of long and short hair... As a bonus it is offered detailed master class weaving of afro-braids.
Long hair
Before starting to weave braids at home, every female representative would like to know the approximate result. Such an opportunity exists: everyone can familiarize themselves with a selection of photographs, which depict diverse hairstyles with the use of braids on a side parting, on a straight line or the other. There are compositions for every taste and every occasion. How to braid a voluminous, thick braid?
Braiding is becoming more and more popular every day. More types of braiding appear, thanks to which the owners of any hair can choose for themselves suitable option... To learn how to weave pigtails, you need to know the patterns with which it is easiest to master their weaving.
- Separate a section of hair behind the ear and divide into 3 sections: bottom, top and middle. Start weaving a French braid, just the opposite. Place the top strand under the middle, bottom under the middle, etc.
- Separate a small strand from the loose hair on top and place on the middle one under the top and bottom strands.
- Put the top strand on the bottom, then under the middle one and draw it around the fourth: first under it, then up. Then release the fourth strand.
- Again, separate the strand from the loose hair and run it under the top, above the middle and below the bottom.
- With the top strand, wrap the lower, middle and additional strands, release the fourth.
A plait braid can be braided in two ways: from the tail and from the head, as when weaving a French braid.

- At the crown, separate a section of hair and divide it into two equal parts.
- Twist each strand in one direction around you. You should have 2 harnesses.
- Now twist the bundles with each other, but in the opposite direction to the one in which they were twisted. For example, if you braided the strands clockwise, now braid them counterclockwise.
- Separate the strands from the free hair on the head to the right and left, connect them with bundles and twist.
- Repeat step three until all loose hair is braided into the bundles.
- When the loose strands run out, secure the ends of the bundles with an elastic band.

- Part a section of hair where you want the braid to start on your head. Divide it into 3 parts.
- Place the right strand and then the left strand under the middle strand.
- Place the right strand over the left strand and then into the loop between the two remaining strands.
- Separate the loose strands on both sides and add them to the outermost strands in the braid.
- Now again put the right strand and the left one in turn under the middle one. Right - to the left and between the two strands.
- Continue braiding your hair, adding loose hair to the strands. Add loose hair to the fixed section to add volume.
This type of braiding can also be done from the head or from the tail.

- At the crown, separate a section of hair and divide it into 3 sections.
- Divide the left strand in half.
- Thread the middle strand into the split left strand. Connect the halves of the strand together.
- Now divide the right strand in half and thread the middle strand into it, connecting the halves.
- If you chose the option of weaving from a ponytail, then repeat steps 2 - 4 until you run out of hair.
- To braid a square braid over your head, divide the leftmost strand in half, add a strand of loose hair to it on the left to the outermost strand, which you put under the middle one. Then connect the halves.
- Braid while continuing to split the outer strands in half and add loose hair to the outer half, braiding the middle strand and connecting the halves at the end.
- When finished braiding, slightly pull the strands of your braids.
This fishtail braid is made using the French braid weaving technique.

- At the crown, separate a section of hair and divide into 2 sections.
- Separate the thin part from the first strand to the right.
- Transfer a thin strand to the left strand and connect them.
- Separate a thin section of hair on the left from the left side.
- Transfer the thin section to the right and connect to the right side.
- Repeat steps 2 and 3 again.
- Separate a thin strand from the loose hair on the left and throw it to the right too.
- Repeat steps 4 and 5 again.
- Now separate the strand of loose hair on the right.
- Toss this strand to the left and connect to the left strand.
- Repeat steps 6 through 10. Separating a thin section of hair on each side, add loose hair and join with the other section until you run out of loose hair. After that, weave an ordinary fishtail braid.

- Take a strand from the forehead and divide it in two.
- Twist the resulting strands clockwise, placing one strand on top of the other.
- Separate a strand of loose hair from above and place it between the top and bottom strands, then release.
- Place the bottom strand on top of the top strand again and twist again.
- Separate the loose strand and place it between the bottom and top, then release.
- Continue braiding until you run out of loose hair. Braid an ordinary braid by adding a bright ribbon to it.

- Part a section of hair and divide it into 3 sections.
- Place the right strand under the middle one.
- Place the left strand under the middle one.
- Separate a thin section of loose hair on the right and add to the main right section, then place it under the middle section.
- Then separate a thin section of hair on the left and join it to the main left section, and then place it under the middle section.
- Braid until you run out of loose hair. Next, braid the braid to the end.
- To add volume to the hairstyle, pull out the side strands as far as the length allows.
The braid is a real pride for any girl. Happy owners of long and thick hair, with luxuriously braided braids, they look elegant, stylish and feminine. A square braid is a spectacular hairstyle that will not leave you without prying eyes. will tell you how to weave a square braid with your own hands. Based on the diagrams and instructions, you can easily repeat weaving at home.
The square braid combines the outer and. In fact, all the explanations and schemes are much more complicated than the weaving itself, live. A square braid can be braided either from the tail or over the entire head.
How to weave a square braid - patterns and options
The square braid has several types of weaving. This hairstyle requires a comb, an elastic band, a few invisibility and, if desired, hairspray.
Tail braid
- Collect a high ponytail from all hair.
- Divide the tail into three strands.
- Divide the left strand into 2 strands. Indicative and thumbs grab the middle strand and thread it through the left, divided part. Connect the left strand.
- Do the same with the right strand.
- This is how the braiding is done to the required length, and then the braid is secured with a hair elastic.

Square braid over the head
- Divide the upper part of the hair into three strands.
- Weaving is performed in the same way as in the previously discussed version, but each time a new strand is added from the head.
- The braid is braided down to the required length and secured with a hair elastic.

Square braid with chain
- Collect a high, strong ponytail from all hair.
- Divide the ponytail into three strands.
- Divide the middle strand in half and stretch the left strand through it.
- Merge the middle strand.
- Do the same with the right strand.
- Connect the split strand.
- Weave to the desired length and secure with a hair elastic.
As a result of each of these weaving variations, an original and spectacular braid is obtained, looking from four sides and attracting attention. If your hair is thin, then the braid can be fluffed a little, and neatly, to make it much more voluminous. The braid looks gorgeous when fluffing only the extreme strands of the braid. To consolidate the result, you can reinforce the hairstyle with hairspray, slightly. 
Who is this hairstyle suitable for?
- The best hair for a square braid is 20 centimeters or more.
- It is suitable for all ages.
- As a rule, such a braid is an everyday option, but you can also go for a walk, to the cinema, on a date with it.
- A braid will give freshness to an ordinary, banal tail, especially one that wraps around the base of the tail.
If you understand the process, then in fact it is very simple to weave such a braid. Before braiding, you should comb your hair well and moisturize it a little. Hairstyle can be decorated beautiful ribbon braided or just a cute hair tie. 
Square braid in the fashion industry
The scythe will never recede into the background. It is always relevant. More and more various options for weaving braids are coming into fashion. Any girl can find a braid that will emphasize her personality. In general, the square braid appeared not so long ago. But she does not go out of fashion charts. Do not be afraid to experiment with, enliven your images, stand out, be effective and unique, choose what is right for you. Good luck.
Square braid video instruction weaving
In this article, you will get acquainted with the basic techniques of braiding with a step by step photo.
After reading it, you will be able to independently create both everyday simple and the most sophisticated and extraordinary designer hairstyles.


Weaving braids step by step photo: varieties
The braid is not only one of the most feminine but also practical hairstyles. With braided hair, you can safely walk through the whole day without the fear that it will get tousled. Moreover, such a hairstyle is quite versatile and looks natural and harmonious both in a business setting and at a youth party.


There are several main types of braiding:
- classic Russian;
- European: Swiss, Greek, English, Dutch and the famous French weaving;
- eastern: harnesses ( side braids), ropes, threads, braids, zizi, curly, rastas, etc.; the last three types can be used for short hair;
- designer: "French waterfall", braids of knots, Lino Russo, "basket", "dragon", "fish tail", "eight", etc.
The best way to master any of the techniques is to watch video tutorials on the topic or study pictures of step-by-step braiding. Moreover, for any of these weaves, you can use not only your own hair, but also overhead strands or hairpieces. Their color can either be combined with your own hair color, or contrast with it: the main thing is not to use more than three colors at the same time.


Advice! Recently, the so-called careless styling has become very popular, which can be used for any type of weaving. But even in this case, the strands should be pulled evenly and not knocked out of general style... Otherwise, the hairstyle will look just messy.
Classic braids
The traditional Russian braid has long been a frequent guest on many famous catwalks: the Valentino fashion house, theatrical shows of Victor & Rolf, Emerson, etc. Today it is presented in various variations: from weaving on the back of the head, sides or crown to creating the most intricate hairstyles out of two and more braids. However, to master even such complex types of braiding with the help of step by step photos not difficult.


The traditional Russian braid consists of three equal strands, which are intertwined alternately. It can be not only smooth, but also voluminous, slightly tousled, multicolored, asymmetrical, or used in combination with other types of hairstyles. At the same time, the hair can be divided into a straight or oblique asymmetrical parting or not at all. The density of the weave and the number of strands used can also vary.
One of the varieties of the Russian braid is weaving "spikelet": a technique that allows you to achieve volume and splendor of the hairstyle. In this case, only two strands are used with the sequential addition of new ones. The order in which they are added can be different. However, in order for the hairstyle to look neat, the thickness of each new strand added must be the same.


Advice! Perfectly smooth braids look too strict, so you should allow individual strands to knock out a little.
Straight from Europe
Designers distinguish between several options for weaving that came to us from Europe:
- Swiss braid: braided according to the Russian principle, but before that, each of the strands is twisted into a tight braid, due to which the hairstyle looks more voluminous; this kind of weave goes well with any style and looks great as with jeans or open summer dress and with a business or cocktail suit; the step-by-step weaving of such braids for medium hair or hair of the maximum length can be seen below;
- French weaving: unlike the "spikelet", the strands are not woven one on top of the other, but are laid inside; the braid begins with a small bun, divided into 3 main strands, with the gradual addition of additional ones every 2-3 cm so that at the end of the weaving all the hair is collected; strands can be taken from one or two sides; weaving can be direct (towards yourself) or reverse (from yourself); start from the top of the head or run over the entire head in the form of a wreath;


- English: its only difference from the Russian version is that weaving begins with a "horse" tail, fixed at the back of the head or closer to the crown; similar braiding on long hair shown in the step-by-step photo;
- Dutch: braid "inside out"; the braided strands do not hide inside the hair, but rise above them;
- Greek: combination smooth hair and a braid that resembles a rim that runs over the entire head; in this case, three small strands are taken closer to the parting, the rest of the hair is stabbed for a while; small strands are gradually added in a circle, with the help of which such a braid rim is firmly held on the head; There may be two braids, in which case they start from two sides of the parting, and then split into one at the back of the head.


Advice! Stylists advise to make a small bouffant at the roots before weaving. It will make your hair more voluminous and your hairstyle more feminine. This technique is especially relevant when creating evening hairstyles.
Oriental tales
A distinctive feature of such hairstyles is intricate shapes and the presence of large, eye-catching ornaments:
- plaits (Sinhalese braids or twisted braids): hair is divided into two equal strands, each of which is twisted in one direction; then both strands cross and twist in the opposite direction; harnesses can be used in combination with loose strands, tail, side braids, etc.;

- braids-rope: a side parting is done on the hair, and weaving (twisting two small strands) begins from the side where more hair; when passing such a braid around the head, new small strands are added; at the level of the back of the head, it intertwines with the bulk of the hair in the direction opposite to the main weaving;
- Afro-braids (braids): many small braids weaving from the back of the head to the temples; you can dissolve them freely, create one or more thick braids out of them, make a tail out of them, twist them into a shell, etc.;


- zizi: a variety of braids, ultra-fine artificial hair braids created using machine weaving; are woven into each individual strand of their own hair;
- curly: the method is similar to zizi, but the curls are twisted into a tight spiral; can be used for building.
With the help of step-by-step photos for beginners, braiding can be mastered quite quickly. The main thing is patience and utmost attentiveness.


Advice! Unraveling small braids is quite problematic. To facilitate this procedure, before creating a hairstyle, you should thoroughly rinse your hair with a cleansing shampoo, and then apply any quality balm to it.
Modern design techniques used in weaving
V last years hairstyles from braids received the most unexpected renditions. However, any design techniques are, in fact, improved ethnic versions of the Russian, European and Eastern options:
- "French waterfall": resembles the usual one or two braids, starting at the temples and ending at the back of the head; however, each lower strand is released to "free float" and falls freely on the back. The hairstyle can have all sorts of variations: be asymmetrical, pass over any part of the head, sag, etc. Can be used even on short hair;


- braid of knots: two strands are connected together using a series of knots; at the same time, both part of the hair can be intertwined (one or two small knots are used as a kind of decoration), and their entire volume;
- Lino Russo: a combination of knots and spikelet technique. After each knot, new hairs are added to the already selected strands; for such a hairstyle, the hair should be cut evenly and be the same along the entire length;
- "Snake": the usual French braid is not located along one line, but wriggles over the entire surface of the head; may have 2-3 or more reversals;
- "Basket": part of the hair on the crown is gathered into a high ponytail, then a regular French braid is woven from the temple, alternately adding a strand of ponytail and loose hair;

- weaving "cornrow": classic Afro-braids are located all over the head in the form of a geometric pattern resembling rows of corn (from the English corn - corn and row - a row); to obtain such a pattern, each miniature braid is woven in the manner of a classic French braid.
Advice!To facilitate braiding, when creating a hairstyle from braids, you can use any styling means: foam, varnish or gel.


Braiding for short hair
Thanks to improved weaving methods and the availability of modern fixation tools, you can decorate yourself with braids even with short hair:
- "Headband": two braids are braided at the temples, and then fastened with hairpins at the back of the head;
- parting from braids: a plexus of side strands located on one or two sides of the face;
- bangs with a double oblique: the upper part of the face is framed by two small pigtails;
- a pigtail around the head: it can be located in any part of it, run over the entire head, or located to the left, right of the face, or braided only at the back of the head;
- "French bangs": long bangs can be removed to one side in the form of a French braid; since in case short hair the hairs will invariably stick out on the sides, you should beat and tousle the rest of the head of hair so that it looks as organic as possible;
- a combination of punk style and a French braid: some of the curls are combed in the form of a mohawk; the side strands are braided.
 How to make clothes for a cat with your own hands, detailed instructions
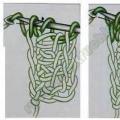 How to crochet loops, the beginning of knitting a set of loops - crochet for beginners Method of a set of crochet loops
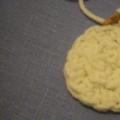 Crochet in a spiral Crochet spiral ball pattern