Japanese shibori technique. DIY Shibori Ribbon
Many interesting and unusual types of needlework come to us from other countries. for example, the shibori technique. Jewelry for beginner craftswomen and professionals in this area of creativity is very interesting and incredibly beautiful.
Charming confusion
Due to the fact that many unique types of needlework came to us from other countries and cultures, having gone through centuries of improvement and development, we often confuse their names, terms, and features. Now the same thing is happening with shibori. For modern needlewomen, shibori is the manufacture of jewelry using silk ribbons dyed in a certain technique, beads and beads. But in fact, shibori, or, if you still speak correctly, shibori, is precisely the technique of batik - a method of dyeing those ribbons from natural silk, which are then used in the manufacture of jewelry. A little confusion in terms, but most needlewomen who are not in contact with the Japanese art of dyeing fabrics using the shibori method believe that shibori is the art of creating jewelry with ribbons.
What do you need for shibori jewelry?
There are many ways to create jewelry, and one of these areas is the shibori technique. Jewelry for beginner craftswomen who want to learn this type of creativity allows you to plunge into the world of shibori, as they say, with your head. After all, at first glance it seems that there is nothing complicated in such creativity - buy the material and create as you like. But you need to start with the fact that shibori jewelry handmade- this is the finest creation of silk ribbons and decorative elements for them, assembled by hand with a thread and a needle. Therefore, a lot of materials will be required for work:
- shibori ribbons;
- beads and beads;
- decorative elements - cabochons, medallions, pendants;
- accessories for jewelry - bails, earplugs, cuffs, settings and much more.
- genuine leather or suede as the wrong side;
- adhesive, transparent and reliable;
- threads in tone and a thin needle.
Another element that is often used in the creation of jewelry is soutache.

The price of creativity
Those who are truly engaged in creativity, any kind of needlework, striving for mastery and perfection, know how expensive it is. And it's not about time, but about the cost of all the materials and tools needed to create beauty. Any kind of needlework is an expensive occupation, and the shibori technique is no exception. Decorations for novice shiborist masters initially imply cash costs. After all, the silk ribbon itself is an expensive material. Natural the finest silk, cut into thin strips, manually crimped with a special composition that allows the ribbon to keep its shape, then hand-dyed - this makes the shibori ribbon a truly semi-precious material. In addition, all fittings and decor are used high-quality, often with precious coating, cabochons - semi-precious or precious stones, beads, beads from reputable manufacturers at the appropriate price. Even for the inside of the decoration, you must use genuine leather or suede, in extreme cases - high-quality artificial leather, which is also not cheap. So it's expensive Japanese technique shibori. Jewelry for beginners is no exception.

The bigger, the more beautiful
The shibori technique, including decorations for beginner craftswomen, requires a scale. Why? All the beauty of the source material - the ribbon will be visible only if the ribbon itself is visible, dyed with shibori, corrugated into small folds, bordered with beads and beads, complemented by soutache tracks and cabochons. Therefore, this needlework - an ornament in the shibori technique - is quite large-scale compared to jewelry, for example. The manufacture of such products allows the imagination to unfold, because the shibori ribbon itself is a unique material that simply requires help to reveal its full amazing potential.

Where to begin?
Any creativity begins with an idea, every master will say this. Even if the idea changes direction in the course of work, the initial idea should be clear enough, best of all fixed on paper. A sketch is the basis of any kind of needlework. The shibori technique is no exception. Jewelry for beginners, made step by step from the very beginning, will be beautiful and unique, despite the inexperience of the master. And the beginning is a paper sketch. It is necessary to provide everything on it, if possible - the dimensions of all the main elements, their location relative to each other, the transitions and bends of the tape, its fastening and opening. Therefore, the sketch should be done in life size, directly on a sheet of paper, applying all the components of the future masterpiece. In addition, the sketch can be corrected if new ideas appear during the work, and in accordance with it it will be easier to make a beautiful work.

Small work - high-quality result
The whole process of creating jewelry using the "shibori" technique comes down to several main stages:
- sketch creation;
- placement and fixing on the basis of shibori ribbon, cabochons, basic decorative elements;
- filling the product field with soutache, beads and beads;
- ribbon decor (if necessary);
- the device of the wrong side and fasteners;
- decorating the edge of the decoration.
Any master class on making shibori jewelry will include these stages of work. Each of them requires accuracy, because the shibori ribbon, cabochons are expensive materials that are attached to the base either with glue or thread. But silk is a thin fabric, the puncture site on it will be noticeable if the thread is removed. And semi-precious cabochons should be glued in place, even if settings are used to attach them. What can we say about working with beads or soutache, when small stitches are the basis of a quality work. So the whole shibori technique is very thin and

Uniqueness is an advantage
Undoubtedly, each type of needlework allows you to create unique products. But some types of creativity make it possible to copy, for example, the same knitting or embroidery, but some do not. And it is to the latter that the creation of jewelry using the shibori technique belongs. The shibori ribbon itself is unique - the source material for this type of creativity. There are no two identical pieces of tape, dyed not only by hand, but even with the help of technology. If you look at the work of experienced shiborists who create jewelry, and not the silk fabrics themselves, then paired products will differ from each other, for example, earrings - they will be similar, but will never be completely identical. After all, this type of creativity does not tolerate copying, it is simply impossible a priori.

Shibori jewelery makes each owner feel their unique charm - the unique color of the ribbon and high-quality decorative elements make each piece a real masterpiece.
Knotted shibori batik is distinguished by attention to detail and requires compliance with many subtleties. Fabric dyeing by this method is affordable and simple art form.
Shibori technique even a child can master, but the most beautiful work are made by real masters who have a refined taste.
Knotted batik in shibori technique
Knotted batik allows you to create abstract paintings, neck scarves, jewelry,
To form unusual patterns using this technique, you can take any objects that, when applying special paints, will make the fabric embossed. Fruit pits, shells, twigs and stones can be used as such items.

Materials needed for fabric dyeing
The shibora technique is used in the presence of the following materials:
- base (it is recommended to take silk);
- bedding;
- iron;
- bowl (deep with wide edges);
- water;
- , sponges and brushes for its application;
- relief objects (shells, stones, etc.);
- stationery gum, ribbons or threads;
- stand or bank.
Before starting work, you need to read the tips indicated on the paint package. You will most likely need a water bath. You can use a saucepan or steamer. After a careful study of the material, an idea appears of how to make a shibori ribbon, and the process of its manufacture no longer seems so complicated.
Shibori technique: sequence of actions
Shibori ribbon is easy to make, consider the process of its creation. The sequence of necessary actions is as follows:
1. Spread a bedding on a flat surface, for example, on a newspaper, tablecloth or bedspread. Then they put a bowl in front of them and lower the stand (jar) into it with the base up.
2. Moisten a silk napkin with water (both white and colored napkin) and wring it out well, after which they straighten it on a protective litter.
3. A relief object is placed in the center of the napkin. The material is folded in half and the object located inside is fixed with an elastic band or threads in such a way that a knot is formed.
Instead of knots, you can knit spirals, put pebbles and buttons inside, knit with threads of different thicknesses or elastic bands.


5. The napkin is transferred to a stand (jar) and covered with paint with a sponge or brush.


6.It is dried away from sun rays and heaters. It is important that the fabric dries itself.

7. The dried napkin is straightened and left in this state or continue to work with it. For example, dyed fabric can be used to create clothes or stretched over a frame to create a picture or panel.

8. The napkin is ironed through gauze or newspaper, after which it is placed on the newspaper and covered with another newspaper on top, then rolled up. The edges of the roll are folded inward, resulting in small briquette, which is tightly bandaged to avoid its disclosure.
9. The formed briquette is sent to a water bath (if you use the simplest method, it will be enough to wrap the briquette with cling film several times, this will help eliminate the possibility of moisture penetration and allow you to hang the briquette in a slow cooker). The product is exposed to steam for one and a half hours, no less.

Unique drawings obtained through the use of shibori technique
After doing the necessary manipulations, the product is straightened and ironed again. The paint, the fixing of which occurred as a result of the use of a water bath, holds well, it does not wash out, and does not fade when exposed to sunlight. Drawings are always unique, and with the right combination of textures and colors, you can get a real work of art.

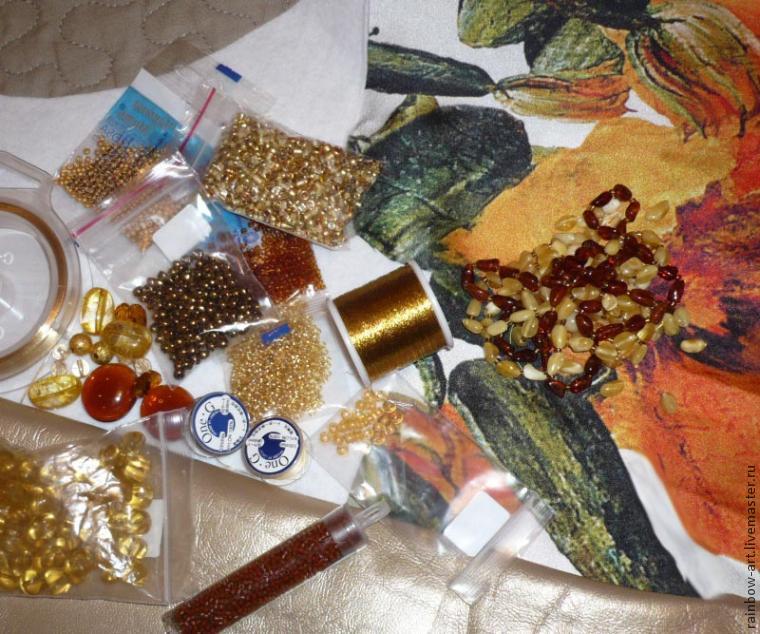
Having seen enough of the miracles created by the masters using silk shibori ribbon, I ordered it and tried to portray the pendant. At that time, I didn’t have much knowledge, I managed to find only a couple of normal master classes on the Internet ... Now I’m an advanced craftswoman, after :)
In general, I collected the materials available at that time:
- shibori ribbon, 7 cm
- Czech seed beads Preciosa 10/0
- soutache of three colors
- glass cabochon
- beads and cutting
- felt, cardboard and artificial leather for the inside
- glue, thread, monofilament, scissors, pencil.
- a lighter is here to melt the ends of the soutache, you can do without it, smearing the ends with glue so that they do not bloom.

First, I sewed the edge of the ribbon to the felt, with regular stitches.

The beauty of the shibori tape is that it fits in beautiful waves, can be bent in different ways and even twisted (the reverse side is also good).
Therefore, I attached the ribbon as it should lie in the finished pendant and circled it with a pencil.

After that, with simple stitches, I sewed along the contour.

Look how she puffed out ... Well, it will get better later).

Next to the felt "Moment" glued a cabochon. He also has divorces, as if continuing the waves of the tape.

You will need a little soutache, so I was not too lazy and sewed the cords together - it’s easier to sew them on later - you don’t have to mess with each one :) By the way, I was very pleased with the metallized soutache - it stiffened and, in my opinion, it became much more convenient to work with soutache. I was directly tormented in the previous microns with soft cords - it is difficult to lay them evenly ...

We wrap the cabochon and sew the soutache to the felt. You need to try to sew as close to the cabochon as possible, so as not to cut the thread later. I was "lucky" to do this on another pendant, I'll show you later what a disaster looks like.

Now you need to close the seam from the tape. Beading around the perimeter.


Cut off the excess felt. I left about a millimeter to sew on another row of beads. Because not the entire edge of the silk was covered with beads.

Now the edge of the shibori is hiding:


We bend the ends of the soutache to the back of the product and sew. It is necessary to evenly distribute them so that they lie as flatly as possible, not in a bunch.

Front view. I also sew the folds of the soutache to each other. And where the felt is visible, I sew on a bead.

And now - the most interesting! We sew on a cabin, beads, beads over silk. They press down on the shibori tape, and it fits as we need it.


Since a pendant is planned from all this, you need to make a loop. Almost forgot. Accessories are not yet suitable, eh ...

And now the wrong side. The pendant needs to hold its shape, so I put cardboard inside. But if the felt is dense, then you can do without it.

Cut and paste.

Now another layer of glue - and on the wrong side of the material. I've got faux leather here.


Cut along the contour. The main thing is to leave a little material so that there is something to sheathe the edge for.

Here, by the way, is a side view - the pendant turns out to be rather flat.

Now we sew the edge with beads.

The method seems to be called "American", here is the diagram:


I must say right away that I myself am not delighted with the combination of shades, but my hands were itching to try handicraft with shibori :). A more suitable soutache and beads were not at hand.
Did you like the master class? Save it for yourself:
 By the way, cheap
 Here's another one
.
Here's another one
.
 .
.
beautiful decorations handmade are popular with peoples all over the world. In Japan, the word "shibori" called painting. With us, it has taken root in a different form - shibori. This is often supplemented with another Japanese word - jome (knot). The style itself has changed from the mainland from Indian and Chinese needlework. On the island, all this was formed around the 8th century.
Characteristics
The technique for making jewelry with a description for shibori beginners is based on the fact that they try to protect fabric areas from staining. Pigmentation should either not occur at all, or be partially produced. Everything else can be easily twisted, tied into knots and pulled with bundles.

As a result, very often patterns are obtained that are similar to those that are so fond of among hippies. These are such psychedelic motifs, as everything is placed unevenly on the fabric. At the release, works of art in the style of abstractionism are obtained.

In America, you can often find similar products called Tai Dai. All this has already taken root among hipsters and other people of a similar orientation. Recently, global brands have again paid attention to this narrow specialization in the world of fashion, where everything is very cyclical.

The new collection again shows us all kinds of polos with themed patterns. The thing is that Japanese designers are again setting trends. This can be seen in such brands as Lacoste, Levis, The Hundreds and many others. They all carefully prepare cool works for us with caps, shirts, jeans.


Previously, there was an instruction on how to make shibori jewelry, and now it is not only silk products, but also other materials. Nowadays, this is not difficult to do. And even the naturalness and type of fabrics are not even important, the main thing is that the buyer immediately understands what style the thing in front of him belongs to.

In those distant times, they took only indigo. The paint was obtained from the minerals blue and purple, which was found in azurite. It was impossible to do otherwise in the Asian states then. It somehow adorned their clothes in Everyday life. It was often the clothes of the poor and middle class, since everything could be obtained with improvised means.

Now such robes belong to exclusive brands and original things. Mass production is not appropriate here. Usually these are small batches from collections that diverge among the real fashionistas.

Shibori tape is now more expensive than many natural ones. precious stones. It is an accordion, which is stained with uneven layers.

Decorations
A lot of people began to ask more often how to make jewelry with their own hands? Now this is a very massive thing. Space is vital for applying all the beautiful elements to the dyed fabric. Shibori is not easy to stick everywhere. Luxurious felt hats are very well suited for such purposes.

Circular ribbons do not look very pretty now, but such elegant products are very personal. The human eye quickly clings to these elements. Shibori are complemented by bright and rich colors with loose beads and pearl inclusions.

Colored fabric and bright elements make the overall picture rich and unique. Oriental notes are elegantly emphasized, but without unnecessary oversaturation.

A master class on making shibori jewelry very well demonstrates to us that this is an item from an eastern country. This starts with the preparation of the shape of the product and ends with what is shown on the face of a geisha. Often they are also hung on skirts, umbrellas.


The most important thing is to make the overall composition with good volume and contrast. Silk weighs almost nothing. Very light material. The thing becomes heavier from inserts of metal and crystals. It is recommended to change stones for beads and glass, and to use light metal alloys in everything. Then no weighting will be noticeable.

New-fangled shiboris of the 21st century are rarely 100 percent natural. There are tons of goods on the market with the supposedly nodular method. First, the drapery is glued to the necklace, and then only all this is painted. This can be done by almost anyone with due skill and perseverance, but how to prepare a sample close to the original? This is the task of the master!

Manufacturing
The photo of the shibori decoration shows us a huge number of ornaments that are practically never repeated. This is where your imagination can run wild. The technique is honed and improved on simple classical patterns.


First, try to make a diamond print. You will need to take plain paint, silk, thread, pin, pencil and needle. Do not forget to prepare a template - a rhombus. Silk is folded in two layers. All this will be fixed on pins for the convenience of further work.

Attach a square template to the sides - this can be a disc box, if any are left in your house. A triangle remains on the fabric. Outline them, and then stitch them. The threads are tightened, not cut off.


Then the experts move on to coloring. Aniline is the real master of the situation here. It perfectly conveys colors and saturation. Read the instructions, choose colors and create.

The fabric then dries for a long time. After that, the thread can be removed. When buying pleated silk, everything is much simpler. Experiment!

Photo of shibori jewelry


Shibori - interesting decorations, embroidered with beads with the addition of dyed silk.
Shibori is a Japanese word that refers to a method of dyeing when the fabric is crumpled, tied, twisted and it is unevenly dyed. different shades which gives a lot of room for creativity.
Every ribbon is different, it's just not possible to make a perfectly identical color.
The first to use ribbon in jewelry with beads was such a beading master as Shery Serafini at the end of last year.
First photo for inspiration:


Pendants are hearts.


Bracelets


And again hryvnias and necklaces 
4.
5.
6.
7.
8.
Mini master classes on how to make jewelry using the shibori technique:
4.
5.
6.
7.
8.
9.
10.
11.
12.
And detailed master class Natalia Machneva
Shibori ribbon jewelry is very popular these days. But it is not always possible to purchase it, but you can always buy a piece of silk fabric. I bring to your attention the decoration “shibori without shibori”.
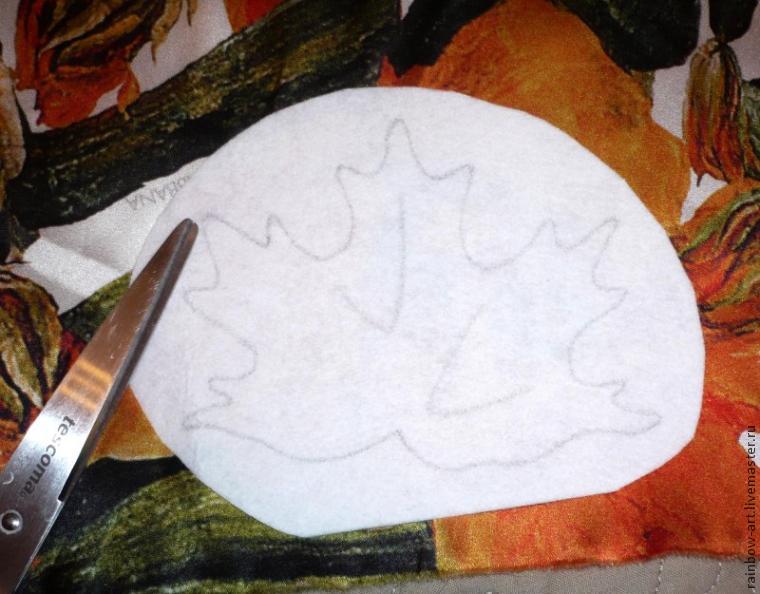
To create a maple leaf, we need:
- paper, pencil (for a sketch)
- small piece of silk fabric
- thread, needles, scissors
- leather (suede, velvet)
- beads of autumn colors of various shapes and sizes
- beads
- a piece of felt (or non-woven fabric), a piece of thick paper or cardboard and glue (I have a “moment-crystal”)
The first thing we need to do is draw a sketch. If it turned out to be difficult to just draw, then you can bring home a suitable Maple Leaf and trace it on a piece of paper.

I decided to paint this sketch a little. And I transferred the already finished version to felt.

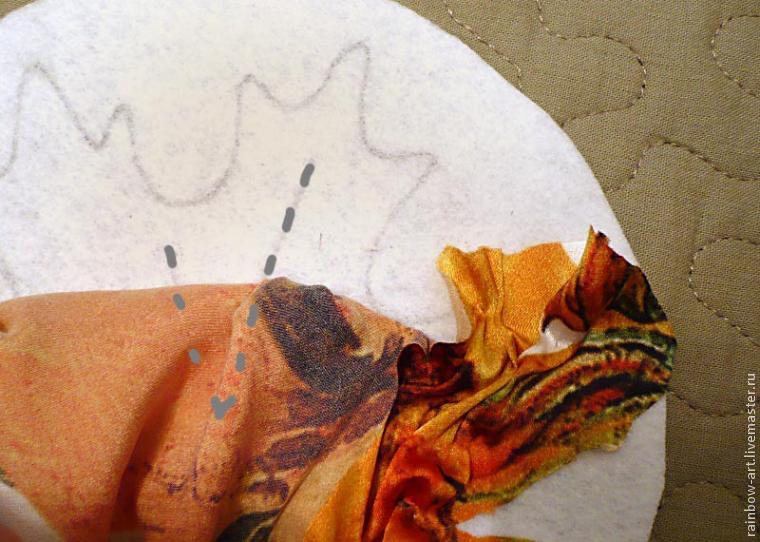
Next, we place the embroidery blank on the fabric and cut off the required amount of fabric. The cut size should be about 1/3 larger than the future sheet. On the felt blank, I marked 2 corners where the beads will be located after we sew the fabric.
We fix the fabric on the felt so that the silk does not crawl away at the beginning of our work. This can be done with a pin. Fasten in the center (this is the most convenient way).

We can see the first corner. First we fix the fabric on it.
Since shibori is corrugated tape, which means that we will need to simulate folds. Silk is a very grateful material for this work, the curves are beautiful. The main thing in our business is not to spoil these bends when sewing.
So, our corners must be smooth in order to place the beads there.

We make the stitches very small (I even specially marked them in the photo) just to attach the material and make the stitches as invisible as possible. We got such a smooth corner. Now you need to lay the first fold.
There are 2 options for working with silk:
- We quilt the entire material with a basting seam and steam it a little with an iron to imitate corrugation. Then we get a material similar to shibori tape. The folds should not be large, ironing is not necessary, otherwise very sharp folds will look sloppy.
- We leave the material in its original form and lay the folds manually.
I chose option #2. It is more laborious, but also more creative.
We fasten the first fold, as shown in the photo:

We lay the folds around the triangle so as to cover the stitches.

You can use 2 options for securing stitches

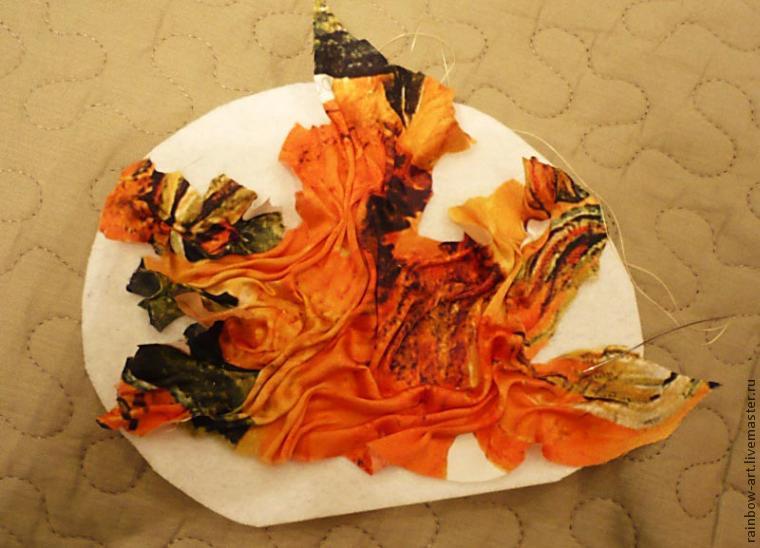
Next, we sew the folds according to our creative intuition and vision of beauty. In the process, we get carried away, but not very much, remember that the sketch has edges, and the extreme folds must be sewn so as to leave 2-3 mm to seal the edge.

It is best to lay the leaf pattern in the directions shown in the following figure. So the sheet will look more alive and reminiscent of the real one.

Figure 1 shows the direction of embroidery. We begin to lay the folds on the right. This means that our rectangular piece of fabric will “wrap” in this direction. To fully work with the fabric throughout the sketch, we will cut the fabric as each beam is ready. Like this:

do not forget that we have 2 corners for beads on the sketch. As soon as we reach the corner, we also sew the material smoothly, and then again we make folds.
When this part of the work is done, we get the following blank sheet:
Now you need to shape the embroidery, process the edge. I chose the option:
- we tuck the fabric along the edge of the sketch so that folds are again obtained and sew with small stitches over the edge. We do not stitch very often, so as not to stretch the material too much.

Thus, we sheathe the entire sheet.

Now it looks like an autumn maple leaf. Next, decorate the sheet with beads and beads. We solve 2 problems:
- Should be beautiful and not overloaded
- It is necessary to close those stitches that are not covered with folds and are striking


Let's move on to the next step. It is necessary to carefully trim the edges of the embroidery so as not to cut the threads at the edges.

The embroidery is quite soft. You can leave it like that. The fabric compensates for the curves of the base. I need the sheet not to deform and be tougher. To solve this problem, I take a sheet of thin cardboard, apply embroidery, draw around. I remove the embroidery and draw a contour 1.5-2 mm less than the resulting pattern.

This stage of work is decisive in order to make some kind of decoration out of just a piece of paper. Depending on your decision, the sheet can turn into earrings, a brooch, a necklace, a bracelet, or maybe a decoration for a bag.
My leaf will be part of the necklace. At this stage, I sew on the rings for the necklace.

Now it's time to strengthen the sheet. We cut out a sheet of cardboard along the outlined smaller contour, grease it with glue and glue the embroidery.


Let dry for 1 hour.
After the glue has dried, we take our almost finished work and glue on a piece of leather, previously cut to the required size.

Carefully cut along the contour, leaving about 1 mm more.

It remains to process the edge. We will sheathe it with beads. I took several shades of beads so that they match or complement the color scheme in the fabric as much as possible.
So, we fix the thread between the embroidery base and the skin. We collect 1 bead, pierce the embroidery with a needle from the side of the skin and bring the thread to the front side. Now we insert the needle into the resulting loop, tighten it so that the thread is behind the bead.
 Dachshund crochet: description and knitting pattern Dog dachshund crochet
 Cap-helmet for a boy and a girl (knitting)
 Crochet Uggs (diagrams and description)