Passepartout for do-it-yourself painting. How to make a mat for photos
The desire to decorate your home characterizes both our ancestors and our contemporaries. Images that are usually chosen for decoration are framed if they have obvious artistic value. Our ancestors had, simply, an ornamental border on the wall or page of an illustrated book. Depending on the significance of the masterpiece displayed for the show and the taste of the owner, the frames are made of a regular wooden or plastic profile or a baguette, rich in decorative pattern with gilding and inlay.
What is a baguette suitable for?The baguette harmoniously frames the oil painting on canvas; tapestries and full-length satin stitch and cross stitching; panels made of suede, leather, fur; batik; artwork from plaster and salt dough. For photographs, watercolors, painting with gouache or pastel, frame graphics will be cramped. They will need air around the image and protection from external influences. Here you can't do without a mat!
What is a passepartout
If, literally, from French - "passing everywhere." If we proceed from the decoration function - a piece of paper or cardboard, which, framing the image, separates it from the frame. Passepartout can be classified according to the manufacturing method:
- simple (a photograph or drawing is glued onto a larger piece of cardboard inserted into a frame);
- cut out (the image is inserted into the hole cut in the middle 5 mm smaller than the size of the picture that is glued behind the cardboard);
- volumetric (thickening of the edge of the cutout of the mat creates the illusion of depth and perspective).
- classic, made in white and gray with a strict frame, according to the principle of contrast or similarity;
- french, made of medium density paper, colors of the main tone of the background of the picture; a special detail - the outline of the window in two or three lines;
- english mat, characterized by an increase or decrease in the thickness of the cardboard due to the build-up from the drawing to the edge or vice versa.
What are the artistic merits of the mat?
Passepartout, expanding the visual space around the image, favorably emphasizes its merits, enhances the brightness of colors due to the neutral white field. Creates a mood, focusing on the grace of the graphic design. Brings a work of art to the fore, or gives us the opportunity to look at it as if through a window. Passepartout helps to combine the works of different authors into a single composition, or to highlight the features of each work on the wall. Passepartout successfully corrects the deficiencies of our vision, which makes the lower part of any image heavier. Therefore, by increasing the bottom margin, when creating a vertical composition, or lateral, with a horizontal one, we make a visual correction to the perception of the work.
Why can't you get by with purchased frames with a mat?
Simply because there is no standard mat for each of our ideas. Creativity breeds creativity. We made an interesting photo collage - we needed a special mat, conjured with pieces of fabric over the applique - make a suitable mat. So there was an urgent need to make with your own hands what could be ordered in the workshop, but for a lot of money. And in the process of amateur performance it turned out that the mat itself can be decorated, giving it a childish or romantic flavor, using fabric and threads, the technique of blending and embossing.
How to make a mat for a drawing with your own hands
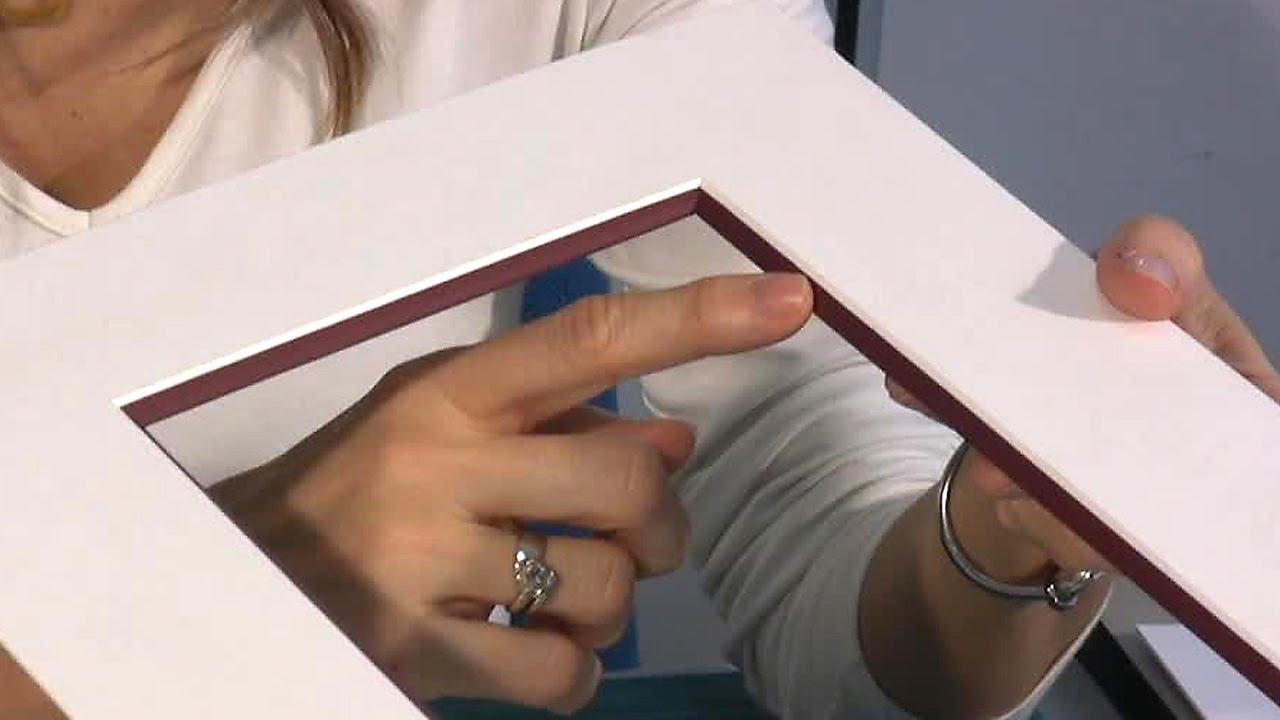
For manufacturing, you need a sheet of cardboard 3mm thick, preferably white (having mastered the technique, you will already choose the color to taste). Rubber glue, photo corners, or tape. Paper knife, pencil, ruler (metal). Fine-grained sandpaper or just a nail file. The algorithm of action is as follows:
- We prepare the mat from a sheet of cardboard, calculating it by the size of the picture: h + 5cm and S + 5cm, if you want the field between the frame and the picture to be 4cm wide. (h- height and S- width). We focus on a suitable frame.
- In the prepared piece of cardboard we find the middle and, based on the starting point, we build a rectangle with sides 1 cm less than your drawing.
- Gently with a paper knife, sliding along a metal ruler, cut out the middle and sand the roughness of the cut inside the window.
- We measure 0.5 cm from the sides of the window and draw a rectangle with a thin line.
- Cut the corners of the window at 45 degrees to the corners of the drawn rectangle.
- Along the pencil lines around the window, using a ruler, with light pressure, barely touching, draw with a knife, trying not to cut through the cardboard.
- Bend the edges of the window along the incised lines. We get the lapel of the cardboard inside.
- On the reverse side, we substitute the drawing and attach it to the cardboard (glue, corners, tape).
- You can start decorating the mat, or better, just insert it into a suitable frame.
In order for a photo to be noticed, it is not enough just one fact that it was shot with high quality and well. As with any painting, photographs need appropriate decorative design. If to give more depth and expressiveness to the picture, it is usually framed in a beautiful frame, then in the case of photography, a mat is used for this purpose.
This is a kind of interlayer between the frame and the photograph, which helps to focus the viewer's attention on the photographic image, visually increasing its volume and perspective. Correctly selected, the mat allows you to facilitate the perception of the photograph, give it additional charm and emphasize the beauty of the color scheme.
Currently, many photo printing centers provide a service for the design of photographs in mat. This service is often used by photography enthusiasts and professionals preparing to participate in photo exhibitions. But there is a possibility of making a mat for photographs and at home.
What is a mat?
Perhaps not all novice photography enthusiasts are familiar with what is hidden under the word mat, but in fact, almost all of them have seen photographs decorated with a mat on the Internet or at exhibitions. In general, a mat is a small space between the frame and the image itself. With the correct design of this space, you can focus the viewer's attention on the color scheme of the photo, as well as place individual accents. Passepartout has both a dividing function, separating and giving "air" to the image, and a decorative one. In addition, a mat can protect a photographic image or a painting from adverse environmental influences.
In photography, a mat is a multi-layer cardboard of various thicknesses used as a frame or frame for photographs. When framing, cardboard is placed between the frame and the photographic image, thereby solving decorative tasks of decoration. The photograph becomes the focus of the viewer's attention due to the fact that it is separated from the surrounding environment. Professional graphic designers skillfully manipulate the passe-partout to create a sense of depth in an image in two-dimensional space. Any photo made with a mat becomes more effective.
In fact, the history of using a mat in photography dates back to the days of the first daguerreotypes in the 19th century. Pictures of that time are difficult to imagine without the appropriate frames with a mat. In the old photographic editions, special attention was paid to the selection and production of the mat, since even then it was widely believed that the perception of the viewer depends to a large extent on the correct design of the photographic image.
The mat margins for exhibition photography have always been wider than for ordinary family photographs. It was recommended to use only thick gray or cream-colored paper for making the mat. In pre-revolutionary photo studios on the mat, which served as decorations for photographs, information about the photographer, the awards he received and the location of the photo studio were necessarily indicated. Today, by ordering a mat from a photo studio, you thereby expand the boundaries of your photographs, visually enlarge the images and draw additional attention to them.
Passepartout for photographs at home
Another method of making a mat at home is more laborious, but a photograph made in this way looks more attractive, since it creates the effect of a smooth transition from a photographic image to a mat. This is the so-called mat with a window. To make it, we need not only a ruler, pencil, corners for photos or double-sided stickers, but also a knife for cutting a mat. In this case, we are planning the mat in such a way that a thick sheet of cardboard will go to the window, and a thinner one - to the substrate of the photo.
On a thick sheet of cardboard, we first have to mark our window - we take into account the sizes of the fields that we have chosen for a particular photo. With the help of a pencil and a ruler, we mark out an even rectangle of a given length and width. Next, using a mat cutting knife, we carefully and slowly cut out the window, making sure that the corners remain exactly 45 degrees. After the cut, you can sand the bevel slightly with sandpaper. Then we need to make a substrate, for which we should place our image in the optical center of the mat of the substrate.
The photo can be attached to the mat using corners or double-sided tape. It remains only to connect the bottom substrate with the mat with the window. This is usually done by means of paper tape on the top, back side of the cardboard. Our passe-partout with a window is ready and now, in order to hang a photo designed in this way on the wall, it is enough to find an attractive frame for it.
In photo studios, standard types of mat are often offered, which are used only for the usual framing of work, but they do not in any way emphasize the beauty of the photograph itself. Therefore, it makes sense to independently make a mat for your photographs at home in order to provide them with a decent decorative design to your liking.
Passepartout is a colored cardboard that fills the space between the artwork and the frame. You may need it for graphics, watercolors, embroidery, as well as photographs and other creative work that you would like to frame.
Passepartout for drawing or embroidery - a neat decorative element, carefully selected in color and texture, can accentuate your work or place a small text inscription. In addition, with a mat there is no need to select a frame according to the size of the work being executed.
Features of choosing a mat
It is important to choose the right mat so that it looks harmonious. It is important to pay attention to the color, it should contrast with the main work and support the color scheme of the frame. In addition, it must have a certain ratio in width between the frame and the size of the lettering.
The double passe-partout looks spectacular, as well as the version with different widths of the upper and lower frames. But it is equally important and neat to cut out the mat. Following simple instructions, you can easily make a mat with your own hands.

To create you need:
- Cardboard or a piece of thick paper of the selected shade. They can be matte or shiny. It all depends on which design you have chosen for yourself.
- You also need sharp scissors or a stationery knife.
- Ruler, preferably metal
To work with the knife, be sure to use a special backing that will not damage the table during cutting.
How to cut a mat correctly?
First, decide on the size of the frame. It should be 5-7 centimeters larger than the finished painting on each side and fit in shape (proportional rectangle, square, elongated shape).

- Before you start making a mat with your own hands, be sure to measure the inner size of the frame. The underlayment and cardboard from which you will cut the mat should be a few millimeters smaller than the frame itself. But do not overdo it, otherwise the work will fall out of the frame, since it will not be possible to secure it tightly
- Next, you need to decide on the internal dimensions. Measure the width and height of the pattern (embroidery), adding 2-4 centimeters from each edge, depending on the size of the work
- Now you need to calculate the width of the embroidery mat. Just measure the inside length and width of the frame, subtract the length and width of the painting from it, respectively, and halve it. This will be the width of the mat along the long and short sides of the picture.
- Set aside the required dimensions on the blank mat, draw with a pencil, cut along a metal ruler with a sharp knife, using a mat
- Next, you need to glue the work to the passepartout from the inside, carefully observing the location (stepping back 2-4 centimeters from each edge). It is better to use double-sided tape for gluing.
It remains only to place the work in a frame. The problem of how to make a mat is solved.
Unusual solutions for paintings
In addition to the classic mat for paintings, there are non-standard solutions. For example, it can be a mat made of paper with a pattern or ornament, both floral and curly.
In addition, photographers and embroidery lovers are wondering how to make a double mat. To do this, it is enough to cut out two mattresses, one 3-5 mm wider than the other, and lay them on top of each other and glue them with double tape. However, care must be taken to ensure that both sides of the inner mount are the same size. Only then will the decoration of the picture look neat.

Stylish passe-partout allows you to give your painting a truly complete look. It is not difficult to make it, but a lot depends on how harmonious the color and texture of the material you choose will be. It also needs to blend in with the frame of your work.
Only after trying several options, you can be fully confident that your painting will look like a real masterpiece.
Passepartout is a colored cardboard that fills the space between the artwork and the frame. You may need it for graphics, watercolors, embroidery, as well as photographs and other creative work that you would like to frame.
Passepartout for drawing or embroidery - a neat decorative element, carefully selected in color and texture, can accentuate your work or place a small text inscription. In addition, with a mat there is no need to select a frame according to the size of the work being executed.
Features of choosing a mat
It is important to choose the right mat so that it looks harmonious. It is important to pay attention to the color, it should contrast with the main work and support the color scheme of the frame. In addition, it must have a certain ratio in width between the frame and the size of the lettering.
The double passe-partout looks spectacular, as well as the version with different widths of the upper and lower frames. But it is equally important and neat to cut out the mat. Following simple instructions, you can easily make a mat with your own hands.

To create you need:
Cardboard or a piece of thick paper of the selected shade. They can be matte or shiny. It all depends on which design you have chosen for yourself.
You also need sharp scissors or a stationery knife.
Ruler, preferably metal
Glue
To work with the knife, be sure to use a special backing that will not damage the table during cutting.
How to cut a mat correctly?
First, decide on the size of the frame. It should be 5-7 centimeters larger than the finished painting on each side and fit in shape (proportional rectangle, square, elongated shape).

Before you start making a mat with your own hands, be sure to measure the inner size of the frame. The underlayment and cardboard from which you will cut the mat should be a few millimeters smaller than the frame itself. But do not overdo it, otherwise the work will fall out of the frame, since it will not be possible to secure it tightly
Next, you need to decide on the internal dimensions. Measure the width and height of the pattern (embroidery), adding 2-4 centimeters from each edge, depending on the size of the work
Now you need to calculate the width of the embroidery mat. Just measure the inside length and width of the frame, subtract the length and width of the painting from it, respectively, and halve it. This will be the width of the mat along the long and short sides of the picture.
Set aside the required dimensions on the blank mat, draw with a pencil, cut along a metal ruler with a sharp knife, using a mat
Next, you need to glue the work to the passepartout from the inside, carefully observing the location (stepping back 2-4 centimeters from each edge). It is better to use double-sided tape for gluing.

It remains only to place the work in a frame. The problem of how to make a mat is solved.
Unusual solutions for paintings
In addition to the classic mat for paintings, there are non-standard solutions. For example, it can be a mat made of paper with a pattern or ornament, both floral and curly.
In addition, photographers and embroidery lovers are wondering how to make a double mat. To do this, it is enough to cut out two mattresses, one 3-5 mm wider than the other, and lay them on top of each other and glue them with double tape. However, care must be taken to ensure that both sides of the inner mount are the same size. Only then will the decoration of the picture look neat.

Stylish passe-partout allows you to give your painting a truly complete look. It is not difficult to make it, but a lot depends on how harmonious the color and texture of the material you choose will be. It also needs to blend in with the frame of your work.
Only after trying several options, you can be fully confident that your painting will look like a real masterpiece.
Passepartout will allow you not only to elegantly place the painting in your home, but also to give it a finished look. But resorting to the services of framing workshops is very expensive, so it is better to make a mat with your own hands and arrange it in accordance with your tastes.
In general, a mat is a piece of cardboard that has a round or rectangular hole in it that overlaps the painting and frames it for work.
What do we need to work?
- Embroidery.
- A frame with a back panel.
- Glass.
- Stapler.
- Thick cardboard.
- Knife for cutting paper.
- Corrugated cardboard.
- Glue.

Video lesson on making a passport
Collecting the mat
Step one.
First, you need to cut out the cardboard frame of the required size, using the back panel as a sample. Then we determine the conditional center of both the mat and the picture itself, the desired rectangle.

Step two.
We retreat from our square by 2 centimeters on each side of it (both inward and outward). Then we draw a couple more squares, and one of them will be smaller than the original, and the other - larger.
Step three.
Using the internal marking with a clerical knife, cut out a rectangle, while substituting a metal ruler.
Step four.
We take scissors and push them with a blunt edge along the internal marking of the line, make special cuts in the corners, and bend the resulting fields inward.
Step five.
Move on. We take glue or a stapler (optional) and fasten our embroidery behind the frame. Most craftsmen want to make a voluminous mat. To achieve this, it is necessary to fidget a few strips of corrugated cardboard, the width of which will be slightly less than the width of the mat. After that, we lay them out and fix them on the seamy side of our mat.
Step six, aka Concluding.
We combine the resulting structure, fixing all the parts together with small studs. Following these instructions, each of you can make almost any shape.
A little about the Swiss frame
In addition to all of the above, I would like to describe another curious design - the Swiss frame. Despite the fact that it is very easy to make it, it looks extremely curious. Its only drawback is that it can only be applied to relatively small embroidery.
At first, this design played the role of a hoop, but which was embroidered with monogram scarves. And what we saw in the image (severe thick threads) is in fact the frame. A scarf is attached under it, fixed with pins on a wooden frame.

Stages of making a Swiss frame.
Step one
We take a strip of fabric with a size of 25 by 15 centimeters and sew a square (10 by 10 centimeters) to it. In this case, the edges are bent inward, and the resulting rectangle is stretched on the same thick threads, if possible, as evenly as possible.
Step two.
After that, cut a hole in the center of the square, corresponding to the size of your embroidery. This embroidery must be swept with dense stitches, after having baited them on pins for even stretching.
Step three
Then you need to wrap the ends of our dense canvas on the vertical edges of the structure, fixing them with pins. So, the Swiss frame is ready!
When creating a mat, you need to not only follow our instructions, but pay attention to certain tips.
When deciding on the width of our frame, we must take into account that each small size embroidery will look much better in a narrow frame. In addition, the embroidery looks neater if the top margin is slightly narrower than the bottom one.
Substrates should fully correspond to the general mood of the composition, its color. However, it should not distract the viewer's attention. It is also worth noting that to add depth to the picture, double mat is often made.
At the same time, its outer part should correspond to the general shade, and the inner one should focus your attention on details. Visually, the mat is exactly 2 times wider than the embroidery itself. In this case, it is not at all necessary that all sides of the frame are the same - everything depends only on the taste of the master.
It is advisable to make cardboard and a mat a few centimeters smaller than the frame so that they fit freely into it.
The underlay should be made of solid cardboard so that the embroidery does not bend.
It is necessary to make the frame so that it can easily withstand the load of the weight of the glass.
Regarding the inner mat, its outer sides are five to six millimeters smaller than the same sides of the outer mat. On the back side, double-sided construction tape is fixed. And only after everything is centered, you can safely put the internal mount and fix it.
We take two pieces of adhesive tape (each about 2.5 centimeters long) and fasten half of these pieces at the back, at the corners.
The exposition of exquisite embroideries can be slightly decorated with ribbons or openwork lace.

Stencils, the use of metal, dried plants and flowers can be a great addition to a painting, while emphasizing its main advantages.
And finally, if you decide to make a French passepartout, you can use marbled paper strips for this.
We sincerely hope that our step-by-step instructions and tips helped you a lot in making a mat on your own, because this process will not only save your money, but also give you real pleasure.
 Rules for the selection of haircuts for a full face: photos, stylist tips and general recommendations for choosing winning hairstyles
 DIY gift for mom - original surprises for Mother's Day
 Wedding makeup for brown eyes