Construction of a basic pattern of size 42. Building a base pattern is the most understandable way (for beginners)
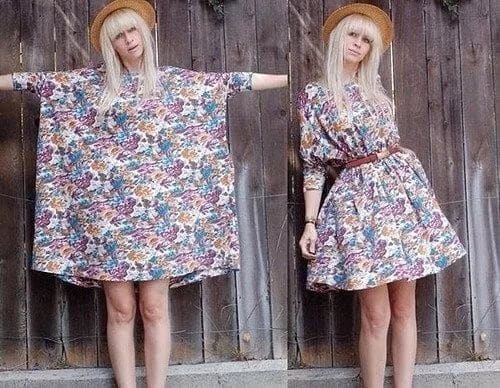
Looking at glossy magazines, sometimes there is a feeling of regret that a dress you really like from a fashion show or from the red carpet, even if you can try it on in a boutique, can only be worn to a party in your dreams. Unfortunately, this dress will remain an unrealizable dream if you do not arm yourself with a basic pattern and model exactly the same model.
Modeling stages and rules
The design process begins with a technical drawing and modification of the top or bottom of the main pattern:
- the selected model is divided into correctly constructed parts as accurately as possible taken measurements;
- body features are taken into account;
- Increases are made for seams or loose fit, depending on the chosen style and material.
The modeling ends with cutting and sewing.


Modeling the bodice by transferring darts
The first step towards modifying the dress is to move the upper chest dart. There are many ways to transfer, for example, into the armhole cut, into the waist or neckline, into the middle of the front, or into the drapery.
To do this, you need to outline its new position so that it is directed to the highest point of the chest. Further along the lines, the pattern is cut and the old dart is closed, revealing a new one.
Below are common options for transferring a bust dart.

To transfer the dart in the shoulder seam to two soft folds, draw two lines on the pattern (in the example indicated by a dotted line) at a distance of 2 cm. Connect the top of the dart with the drawn lines. Close the dart by cutting the pattern along the lines.

Here is an example of a dress with a cutout on the shoulders, where the dart is transferred to the neckline. Then the sleeve is completed and the skirt is lengthened.

Creating draperies
It’s a little more difficult to transfer the dart into the drapery. This is done like this:
- On wallpaper or a piece of paper, use a pencil to trace the outline of the unfolded front bodice pattern.
- From the tops of the two bottom and top right darts, draw lines to the left shoulder. Close the darts, leaving only the left breast piece uncovered.
- Having moved the darts apart, trace a new outline of the bodice, smoothly connecting the top points of the left shoulder.


You can translate both darts at once:
- On the unfolded front bodice, apply shaped bold lines and drapery direction lines.
- On the left half, move the tops of the darts to the upper end of the shaped line (i.e. F) and circle their new position.
- On the right half, raise the top of the second waist dart to the top of the chest dart.
- First cut out the pattern along the outline, then cut it along the drawn lines.
The shaded areas on the pattern are fabric allowances when cutting, which are needed to create draperies.

Swing collar
You can create a beautiful drapery on the neckline different ways, but they begin with closing the dart.


- Measure the length of the shoulder seam, then draw the shaped lines. Cut them, leaving 1 cm uncut along the shoulder line.
- Expand the resulting parts, draw a horizontal line from the highest point of the shoulder line.
- Create a one-piece lapel.

A few more examples of modeling a swing collar.


Modeling a fluffy dress
A short dress with a voluminous skirt and an asymmetrical cutout on the bodice will allow you to be a queen at any celebration.

- On the front bodice, move the left breast dart to the side seam, and the right one to the waist line.
- Move the left dart at the waist 2 cm to the center.
- Reduce the shoulder length to 7 cm and make the neckline higher.
- Make the armholes 2 cm deeper.
- Draw a petal-shaped cutout and cut the pattern along the modeled lines.
- On the back, as on the front, shorten the shoulder and deepen the armhole.
- Draw a triangular cutout, leaving 23 cm along the middle line.
For the skirt, draw a rectangle of the required length, the width of which will be equal to two hip circumferences. If the width of the fabric is not enough, cut the skirt out of two pieces.
The petticoat consists of two parts:
- 1st – top, 25 cm long and one and a half waist circumference wide;
- 2nd – bottom, width equal to two hip circumferences.
The entire length of the petticoat is made 2 cm shorter than the skirt.

Construction of loose dress patterns
Dress loose fit- this is the option that is created in haste, because it is suitable for a beginner in sewing. It does not require a zipper, it simply leaves an unstitched area along the back for sewing on a button.

- Mark the back with a dotted line and spread it 12-14 cm. The splendor of the folds will depend on the angle of inclination.
- Round the hem line and make the armhole and neckline deeper.
- On the front of the dress, move the chest dart to the waist. The front should be a little more flared, so add 4 cm to the bottom line of the back and front.
- The side lines of the two parts are straight segments.

If you want a dress that is short in front and long in back, on the back pattern created above, measure the desired length in the middle of the fold and draw rounded lines to the side seams.

Modeling short dress– the sun is similar to a real flower, since it allows you to create a volume with many coattails.

Having drawn a rectangle, create a pattern for the front and back with a shoulder length of about 5 cm. Cut out the parts with a fold.

Dress from Dior
Unusual fitted dress from the podium, decorated with a cord and with two pockets will appeal to many.

When modeling this dress, you need to take into account some nuances:
- The relief from the neckline smoothly extends to the back through the side seam.
- There is a zipper inserted in the side sections.
- The sleeve is made with two seams, one of them will hide the cord.
- Sleeve cuffs are stitched. If the fabric is very dense, the sleeve flap on the inside can be made from lining fabric.
- Patch pockets.
- If the fabric frays, immediately process the cuts, for example with an overlocker.
- The cord is sewn by hand, with hidden stitches, on both sides.
Currently, products have gained unprecedented popularity self made, and it doesn’t matter what it is: soft toy or a woman's dress. Many people ask the question: why sew clothes when you can either buy them in a store or seek help from a professional tailor? The answer is simple: An item made with your own hands will definitely be of high quality and unique, you can be 100% sure that no one has a second dress like this, which means the chances of meeting a double on the street are zero.
Sewing a dress with your own hands is easy and simple
At first glance, it may seem that sewing a dress is an incredibly difficult task that not everyone can do. However, taking a closer look and typing the phrase in the search: We sew our own dresses for beginners patterns you can make sure that there is nothing difficult about this and in just a couple of evenings you can easily sew a beautiful and stylish dress. Simple patterns for beginners will turn the process into a fascinating game, and the sewing process will seem not as scary as it was perceived before!
Pros of a dress made by yourself:
- Truly exclusive
- Can make custom design
- Your creative abilities develop
- Opportunity to make money from your hobby
- Significant savings in time and budget when buying new clothes.
As you can see, a dress, and in general clothes sewn with one’s own hands, has more advantages than disadvantages than store-bought ones.
How to sew a dress with your own hands for beginners? Patterns below
There is nothing better in the heat than a beautiful, bright, weightless dress. What if you sew it yourself?
But before taking on this difficult task, the amateur will have many questions: how to create a dress pattern for beginners? How to make a base pattern for beginners? Which fabric should you choose for your first product? How to sew a summer dress? We are ready to answer these many questions in order. Any dress model is a “sheath” perfectly tailored to your body, and small changes (like lowered sleeves or a slightly looser waist will make your look more interesting) don’t be afraid to experiment, because now there are a great many master classes online. However, there are several general rules that should be strictly followed:
- The fabric is always marked on the wrong side
- You can use tracing paper or plain paper as material for the pattern.
- Before tracing the template, you should pin the cutout with pins so that everything turns out neatly.
- Spread the fabric on a large, flat surface (for example, a huge table, a large floor) this will help you carefully cut the desired piece.
- Don't forget to trim the hem and edges of the product at the end of sewing.
Taking into account all these simple rules You will end up with a light and simple dress, just what you need for hot weather.
The shops offer a wide variety of beautiful summer clothes. But the best solution would be to make the outfit yourself and get incredible pleasure from the process. The first and most important step is choosing the fabric. It should be light and flowing. Cotton or silk work great (however, silk is more difficult to work with)

- Take measurements of your figure properly (this will affect how the dress will fit you in the future). The following parts of the body are required for measuring: waist, shoulders, hips and, if desired, arms.
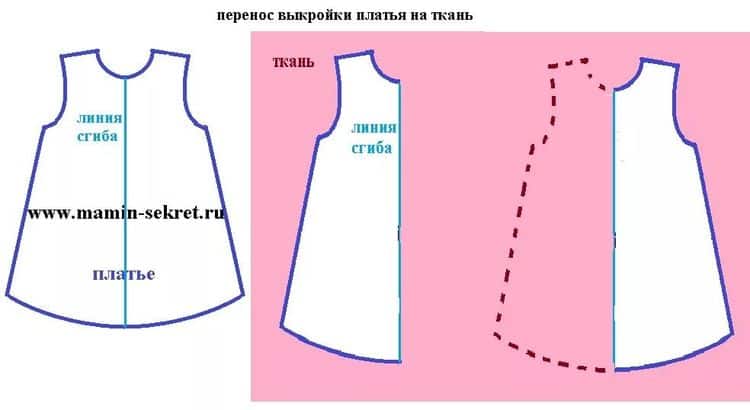
- Draw the pattern according to the measurements taken on the fabric. Building a base pattern is the easiest way for beginners = look and choose the most suitable one
- Cut out carefully.
- Sew the parts together on a sewing machine, but you can also sew by hand, in which case the process will take much longer.
- Finish the edges finished product, steam.
This is a general algorithm for sewing a summer dress with your own hands.
Blouse patterns for beginners, easy DIY patterns?
What is it like? the simplest dress? That's right, two sewn rectangles of fabric, with slits for the arms and head.

However, even this miracle can be made carefully and beautifully if you take standard measurements from the model, which will serve as the basis for the future masterpiece.
How to make a base pattern for beginners
BASIC MEASUREMENTS (WITHOUT THEM IT IS IMPOSSIBLE TO SEW THE PRODUCT)
- OG – 96
- OT – 75
- OB – 101

BACK MEASUREMENTS
- Dst (back length to waist) – 41
- Shsp (back width) – 35
- Shoulder width – 12
Front measurements.
- Dpt (front length to waist) – 43.5
- VH (chest height) – 26.5
- CG (centre of chest) – 18
- Vhk (oblique chest height) – 24
- SH (chest width) – 37
- Gp (armhole depth) – 20
Remember that the side seams must completely match, only then you will get a neat and beautiful product.
How to sew a baby dress with your own hands for beginners patterns
If our visitors have little princesses, then it gets closer to the holiday season topical issue how to dress young beauties. Typing in any search engine patterns for children's dresses for beginners, simple DIY patterns You will be surprised by the abundance of all kinds of styles, patterns and master classes; choose the most suitable option for yourself.

The algorithm for sewing dresses for girls is exactly the same as for adults, although their delicate skin requires only natural and high-quality fabric.
How to sew a floor-length dress with your own hands for beginners patterns
A floor-length dress looks beautiful and romantic; it is the best choice for young girls, because such clothing allows you to emphasize grace and lightness. For sewing, you can use absolutely any elegant fabric.
For beginners perhaps best choice There will be viscose knitwear and, of course, a standard needlewoman’s set, as well as an overlocker, so that the edges of the finished product look as smooth as possible. Many of these models do not have a pattern, but beginning craftswomen should use a template in their work.
How to sew a sheath dress with your own hands for beginners patterns
A sheath dress is nothing more than a second skin, which must be sewn to the unique measurements of each. This work requires a lot of diligence and diligence from the fashion designer and tailor, because it is quite difficult to get a dress to fit perfectly, but a beginner can try his hand at sewing a simple, straight dress based on exact measurements.

Dress patterns for beginners, simple DIY patterns ALL THIS is a great opportunity to try a new craft, find your hobby and possibly a new source of income, because all girls and women (and sometimes young princesses) love to dress up in beautiful clothes. Now you have expanded your knowledge base, which will allow you to produce truly exclusive and good clothes both for yourself and for your friends. Summer dress patterns for beginners - simple DIY patterns
Ten years ago, we could not even imagine that we would again sew our own clothes, rather than buy them in stores and supermarkets. However, the number of people who prefer homemade items is growing.
If you are not in the mood to spend money on magazines, or prefer electronic sources of information to paper ones, you are not losing at all. By entering the following queries into the search engine:
Why sew your own clothes?
Reasons why women are sitting down again Sewing machines, as in the 90s and earlier years, the mass. Yes, as before, some housewives do this in order to save money: to use fabric that has been lying idle for a long time or to alter an unfashionable item from an even stronger material. As a rule, this is relevant for those whose budget has suffered significantly due to the economic situation in recent years.
Luckily, saving money isn't the only thing motivating women to sew in 2016. A much more common reason for this now is to create something special for yourself, not like others. Someone places an order for such an exclusive professional craftsmen, and someone copes on their own. The last option, of course, carries risks, but if successful, clothes made with your own hands become truly loved.

A considerable part of beautiful ladies resort to independent sewing in order to be able to wear dresses, skirts and blouses that fit exactly to their figure. After all, modern stores offer customers a variety of clothing models ( different color, texture, style), but all of them, as a rule, are tailored for women with standard body types “ hourglass» ( thin waist with approximately the same volume of the chest and hips) and “rectangle” (the waist is not clearly expressed, the difference between the main volumes is minimal). It is more difficult for pronounced “pears” (hips much wider than shoulders), “inverted triangles” (hips much narrower than shoulders) and “apples” (have a noticeable tummy) to choose something that does not focus attention on the disproportions of the figure.
Where to start if you want to sew clothes?
Once you are convinced of the seriousness of your intentions, take care of the means of production, the main one of which is sewing machine. If you have one, check that it is working properly and, if necessary, contact a technician. If you don't have a car, buy one. It is better to be guided not by the principles “the more expensive, the better” and “the more more famous brand, the longer it will serve”, but with technical characteristics and reviews of real people.

For example, when purchasing a sewing machine, it is fundamentally important to understand what types of fabric you will be processing on it. Not every machine can handle thick coat fabric or leather. Also, not all devices are suitable for sewing knitwear, thin tulle fabrics, and so on.
Then, having selected a number of machines that suit your characteristics, read reviews about them. They can be found on specialized review sites, handicraft forums, as well as on resources like Yandex.Market.
You also need to take care of purchasing such things as tailor's scissors, measuring tape, pins, chalk, and so on.
When all the funds are ready, you should move on to purchasing materials: fabric, threads, necessary accessories. If you decide to sew for the first time, you should not take the most expensive thing. Start with budget options.
What to sew first and where to get patterns?
Perhaps, novice needlewomen should not immediately take on products with a complex cut, made from capricious fabrics: coats, shirts, trousers. Relatively simple items, such as straight or pencil skirts, as well as casual dresses, are better suited for debut.
Patterns for future outfits can be found in several sources. For example, in cutting and sewing magazines, the most famous of which is, of course, Burda. As a rule, such publications contain not only intricate models, but also detailed instructions About, how to sew a simple one summer dress do it yourself for beginners. Here you will find materials about how to sew child dress DIY for beginners, patterns men's clothing, in general, having accumulated several years' worth of magazine issues, you can get a full-fledged textbook on cutting and sewing.

Traditionally, books devoted to handicrafts are also popular. A significant part of them is dedicated to inexperienced seamstresses. Thus, on the shelves of bookstores you can find publications containing recommendations for a specific type of product: “ We sew a dress with our own hands, patterns for beginners», « DIY dress: easy and simple to sew. For beginners" and so on.
There are also thick books, almost encyclopedias, in which you can find tips on how to sew any thing from an apron to a coat. They may be called " We sew ourselves. For beginners. Patterns and recommendations" or "We dress the family ourselves: a guide to sewing all types of clothes."
If a book contains not only a description of the algorithm for making a product and small illustrations of the parts that need to be constructed, but also full-size patterns, this is usually stated right on the cover. Pay attention to the publications with the titles “Patterns of summer dresses for beginners”, “Simple patterns. Now you can sew everything with your own hands”, “How to sew a dress with your own hands? Patterns and models”, “Simple patterns for summer dresses and sundresses for beginners” or, for example, “Patterns for children’s clothing for beginners. Simple DIY patterns."
To make sure that the book actually contains patterns, you need to leaf through it. And when ordering books online, choose those stores that add photos of the contents and sheets from it to the page of each publication. By the way, such advanced trading platforms often allow you to leave reviews of books. It will also be useful to read them so as not to make a mistake with your choice.
If an article from any resource turns out to be successful about, for example, how to sew a dress with your own hands for beginners, patterns were also quite applicable to reality - don’t be lazy, save the link to the site in your bookmarks. By following this rule every time, you will be able to accumulate a whole selection of links, following which you will receive high-quality “recipes” for clothes.
Summer dress pattern for beginners
Of course, within one article it is impossible to provide as much information on cutting and sewing as a specialized website, book or magazine file can provide. However, after reading our text, you are guaranteed to benefit from it. And it will be not only theoretical, but also practical. So, we present to your attention instructions on how to how to sew a summer dress with your own hands for beginners, patterns We'll give it to you too!
Beach clothes have always been considered the simplest cut. On vacation by the sea or river you don’t need much. Pleasant colors, a loose or semi-fitted silhouette, and the presence of a small sleeve to cover shoulders that are prone to sunburn - these are the basics for a successful beach dress.
In our example, a stylish dress with V-neck and the drawstring at the waist are made in rich yellow, but you can choose another. Turquoise, red or the color of young greenery are perfect.
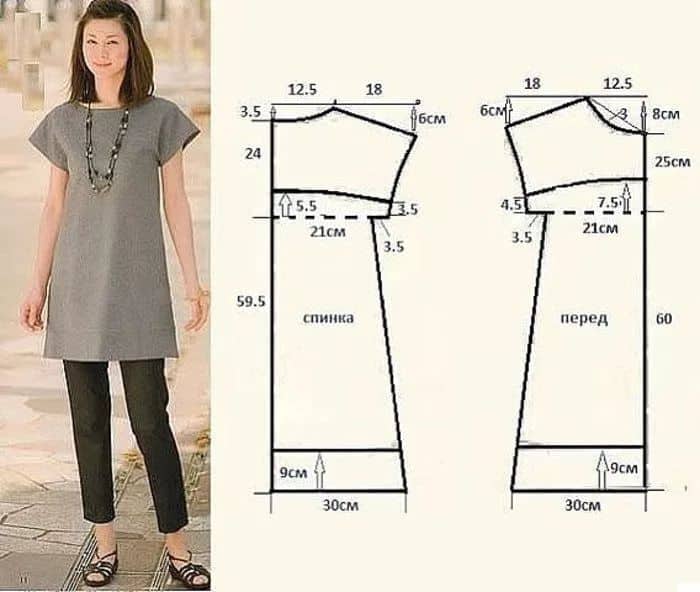
The first thing we start with is constructing a base pattern. The easiest way for beginners- construction according to the model. In the diagram below you will see a reduced pattern of a beach dress for size 46-48 and height 160-170 centimeters. Whether you're shorter or taller, slimmer or plumper, it's difficult to how to make a dress pattern for beginners, should not arise either.
To ensure that the dress fits your figure exactly, remember that the length of the bust line (on the pattern it is 25 cm) should be a quarter of the circumference of your bust. So, a girl with a chest volume of 90 cm should set aside 27.5 cm in the drawing. The same principle applies to the waist and hip lines: their length on the pattern will be equal to a quarter of the actual volume + allowance. If you want the dress to be more spacious in the lower part of the body, instead of one centimeter, add two or three.
Try not to overdo the depth of the cutout. You can always increase it, but decreasing it can be problematic.
To make a drawstring, take a piece of fabric equal to the circumference of the dress at the waist. Sew it on the front side, tucking the edges inside, and iron it. Then make holes for the cord and stitch them. After this you can thread the cord.
When making shoulder seams, leave room for the cords and pull them through as well. This will allow you to play with the shoulder line and change the character of the dress depending on the conditions and mood.

We hope you are now convinced that sewing a dress with your own hands is easy and simple. Having successfully completed sewing a beach dress, you learned that creating a basic pattern for beginners is not so a big problem. This means that you should look for “how to make a basic pattern for beginners”, “how to sew a dress with your own hands for beginners”, “how to sew a simple straight dress with your own hands for beginners”, “how to sew a straight dress with your own hands”, “how to cut straight dress for beginners”, “how to sew a straight dress with your own hands for beginners patterns” will no longer be necessary.
It is enough to sew a dress with your own hands once - the patterns and models will no longer seem like Chinese writing. Simple dress patterns for beginners will not cause much difficulty, which means that soon you will be able to bring your wildest fantasy from the latest magazine or book to life.
After practicing on finicky fabrics and silhouettes, you can proceed to more capricious ones: silk, wool and others.
We wish you good luck in all your endeavors! Be unique in your own made outfits!
In this article you will not find ready-made patterns and patterns, but you will find something more useful: you will master pattern making dress basics. Sewing is one of the most enjoyable and easy forms of art, which, among other things, brings practical benefits. What? You do not believe me? I’m ready to say that the only reason why sewing skills seemed like an unattainable goal to you was the lack of relevant literature.
You can find it on the Internet a lot of ready-made sketches. But this state of affairs prevents craftswomen from improving their skills. After all, without basic knowledge it is impossible to learn how to masterly use threads and sewing needle. In sewing it is like in music - without knowing the musical notation it is difficult to play a new composition. Possible, but very difficult. But why these difficulties? Building a pattern is the very necessary basis that will help you advance in your sewing skills.
Many of you who tried to sew a dress yourself stopped at the very beginning of the journey, afraid complex circuits and calculus, and were abandoned at the stage of constructing the basic grid. And no wonder! Sometimes on the Internet you can find such complex creations that even experienced master thoughtfully scratches the back of his head. What can we say about a beginner, for whom even step-by-step construction causes sacred awe. But now you have the opportunity to start from scratch and learn how to build a pattern quickly and easily. Forget everything you've seen and read about pattern making. The basis of the method that will be discussed in the article will save you:
- from confusing calculations;
- incomprehensible formulas, more like alchemical symbols;
- from the scary and incomprehensible alphanumeric web that entwines most basic dress patterns.
Why did the last paragraph refer specifically to the dress? Because your training will begin with this elegant element of a woman’s wardrobe. And in order to finally dispel all your doubts and fears, let’s go on an exciting journey through the pattern.
Basics of basics or what is a pattern
 The construction of a dress pattern is very similar to making a cast. Subsequently, any product created according to your own drawing will fit perfectly on your figure. This kind of modeling follows your every curve and a feature of the body, becoming like a fingerprint. Of course, you can find on the Internet and download for free any pattern for any size - be it 40 or 52. But will it meet all the requirements of your figure? Therefore, if you want a sewn outfit to look impeccable, always create an individual pattern for each new client. All figures are unique - this cannot be ignored.
If you plan to sew clothes for yourself, then thanks to a correctly constructed pattern, you can sew absolutely any outfit for yourself. Whatever model you prefer, a kind of cast will help you in creating it. Now do you understand how important it is to learn how to create patterns? The basis of the dress for beginners is the trump card, which will allow you to very quickly create unique models.
The wonders of modeling
 Have you ever wondered how trendsetters come up with their designs? Does it really all start with building a basic pattern? Exactly. First, a basis is created and only then can the creator turn on his imagination and add his own ideas to the scheme. How it works? Let's look at it using a practical example.
Find a pattern for a classic sheath dress on the Internet. Pay attention to the style and how the material hugs the model's figure, reminiscent of a plaster cast. Having sewn such a dress according to your pattern, you will receive the same option, only suitable for your figure. But what what is the essence of modeling? I'll explain now.
Now pay attention to any other dress models. Surprised? It is the sheath dress that underlies the creation of absolutely all modified models. Take a closer look and you will see for yourself.
Still in doubt? Try experimenting on your own. I suggest you slightly change the top of the sheath dress and construct it in a new way. For example, let the top of the dress be held on the shoulders by a round yoke. The bodice will be made in the form of overlapping triangles. Now let's see what happened. Surprised? The dress is completely different, but the essence remains the same. All design innovations in the fashion world are based on this principle.
You can experiment in another direction, for example, make its cut straight or looser and lengthen the shoulder line. Such an experiment will help you create something radically new and stop being afraid of experiments. Now let's get to the fun part: we need to understand what does the pattern consist of?. And most importantly, how to build it.
What is the essence of the method
 My task is not to give you a detailed guide to the type: to pave a direct path from point A to point B, etc. No, I want to give you the opportunity to feel the pattern, to reveal the essence of modeling. This way, you can learn to see the essence of things, and this is one of the main skills of the sewing craft. You must realize and see how simple models patterns form the basis of complex fabric structures.
Now you don’t need to draw anything, you just need to be patient and follow the pattern all the way. We will understand the purpose of each of the lines, find out why it is in this particular place and not another, and why it is drawn this way.
What is it for? A detailed tour will help you get rid of all unnecessary fears and inspire you to new achievements and experiments. Understanding the basics gives you a huge leap forward to conquer new heights. Therefore, you should not neglect this.
The sages say: “We are afraid only of what we cannot understand and explain logically. But as soon as the thing that frightens us becomes clear to us, it ceases to cause fear in us.” Let's dispel all doubts, curb fears and with new ones let's rush into battle. So, you will need:
- 30 minutes to analyze the theory;
- 20 minutes to create a pattern.
Yes, after a detailed study of the basis, you will not need to pore over the pattern for long hours. This action will become simple and clear. Let's get started!
Pattern base: detailed inspection
 Where does the pattern for the base of the dress come from? Usually these are those same incomprehensible halves of dresses that can be found in abundance on the Internet. We will also draw something similar, but with a full understanding of the matter.
What's on the drawing:
- half of the back part;
- half front detail.
The halves of the front and rear parts, in professional language, are called “shelves”.
Additionally, the drawing contains:
- dart;
- armhole - the line of the opening for the arms.
When creating the base pattern, pay special attention to the armhole. It should not be too small and straight. Perfect size- this is when the armhole does not dig into the arm and does not pull so that the sleeve does not block movement. When modeling your designer armhole, do not reduce the size indicated on your base pattern. You can increase the size, add decorative elements, intricate sleeves and folds, but in no case reduce the acceptable minimum. This is the main rule that should be taken into account when modeling armholes.
The darts are as follows:
- Shoulder dart – necessary so that the material did not gather at neck level into a makeshift hump. When the shoulder ditch is constructed correctly, the fabric fits snugly to the body and follows the curve of the spine.
- Waist dart – helps to fit the dress. Contrary to popular belief, the dress fits on all sides, not just on the sides. To make this happen, the excess fabric is pinched and hidden inside the dart. After this, the edges are sewn up.
The shoulder dart is not always visible. In some models it is moved closer to the zipper or the edge of the armhole. And where it is necessary to make a sleeve, the corner is simply cut off. In this version, the armhole remains invisible, since the excess fabric is trimmed and not hidden. The fabric is sewn in near the front, in the area where the zipper is sewn in, or in the place where the sleeve will be sewn on.
Please note: if you are sewing from stretch fabric, then making darts is not necessary. This fabric is very flexible and easily follows the curves of the body. In addition, it shrinks independently in the area of the shoulders and waist and does not block the sleeve.
Darts on the front shelf
 If we are sewing a dress for an adult girl, then the silhouette of the upper part of the front front should have a convexity. The dart at the front of the shoulder provides this bulge in the chest area. Let's look at a practical example. Task: turn a flat piece of fabric into a convex one.
You need to start work by creating a dart. How to do it:
- Let's try to make a dart on a cardboard circle. To do this, draw on a flat geometric figure tuck.
- We pinch the excess paper inside.
- The top of the bulge will be in the place where the tip of the dart points.
- The bulge is ready.
For clarity, the same can be repeated on a cardboard sketch of the chest shelf. When working with fabric, the point of the bust dart will be where the dome of the bra or nipple is usually located.
If the dress was not made from your own pattern, the silhouette may shift in the bust area. This is due to the point of the dart pointing away from your bust. I think many of you have encountered this problem, choosing new outfit in the shop. Mass products are made according to standard patterns. Therefore, the silhouette of a dress made according to your pattern will always look more attractive than a store-bought one.
Please note that on most dresses the bust dart is not placed on the shoulder, but slightly below the armpit. This technique allows you to hide the dart and make the dress more beautiful. The dart located in this place is covered by the hand, so it cannot be noticed while wearing.
When constructing our pattern, we drew a dart on the shoulder only because it was more convenient and visual. But to model the dress, it must be moved below the armpit. You don't need to draw for this. new pattern, the transfer is very easy.
Let's look at the process schematically on a piece of cardboard:
- Cut out a cardboard pattern with shoulder darts. We put it in front of us.
- On the left side, 5-7 cm below the armhole we place a dot. From it we draw a line to the tip of the previous dart. We repeat the same action in mirror image on the right side.
- We cut the cardboard along the lines, leaving about 2 cm to the tip of the dart.
- In one motion we lift the cut part, closing the previous dart.
- Thus, we have opened a new underarm dart.
Basis about lines
 Why do we need need lines in the pattern? Primarily for reference purposes. For example, the bust line is the main reference point when modeling a dress. On this line we end:
- back dart at the waist;
- the front dart at the waist must be completed within four cm of the chest line;
- the front dart ends on the chest line;
- The lower edges of the armholes also pass through the chest line.
It is the main guideline when constructing waist darts on the front and back flanges. In this case, the widest part of the dart is also at the waist.
The hip line helps create a flared hem. IN classic version The hem widens 1.5 cm on the right and left sides. This construction prevents the dress from rubbing against the body when walking, and also eliminates possible distortions.
In some versions, the hem expands more than in classic model. This option is used in cases where the model’s hip circumference is wider than the chest circumference. In this case, the expansion is made based on the difference between the model’s hips and her chest. Knowing the basics, pattern making no longer seems such a difficult task. At this stage, you can already start modeling your first dress. And thanks to the knowledge gained, this activity will no longer be so tedious and time-consuming.
Among the popular pattern making techniques, the following should be highlighted:
- method of Gallia Zlachevskaya;
- construction method according to “Muller and Son”.
What are they famous for? Clear examples and simplicity of explanations. The method of Galia Zlachevskaya is considered the simplest and most understandable. We will consider this first.
Unlike most methods, Zlachevskaya’s method does not force beginning needlewomen to study all types of figures, as other sewing masters recommend. In Zlachevskaya’s method, the construction of a base pattern is done immediately according to the individual figure of the model being sewn.
The main difference of the method: in addition to the usual measurements, so-called deep measurements appear in the construction. This is a deviation of the convex points of the shoulder blades, chest, and hips. The deviation is measured from the waist horizontally and vertically. The method has a minimum of difficulties, and Zlachevskaya’s special ruler will simplify the work even more. It will help you accurately measure all the nuances of the figure being sewn.
The main task of a novice master in this method is to learn how to model a base pattern using measurements. However, the control is carried out on a model that fits tightly to the figure. Such a basis helps to see the size of the dart openings, the number of reliefs, as well as their direction. The method is suitable for creating models with a full-fitting effect.
Further work is to correctly use loose fit increases. This will help you quickly start modeling a dress for your chosen figure on your own.
Muller's method is more labor-intensive and difficult to understand. And also, it should be taken into account that this is a Japanese construction method, which is more suitable for modeling dresses for a slender or lean figure.
The method offers two construction options:
- for a standard figure (mass production);
- individual tailoring.
When modeling patterns for custom tailoring are used:
- individual measurements;
- calculated values.
Feature of the method: significant deviations from the standard figure are revealed by control of the calculation of auxiliary dimensional characteristics. The method pays special attention to the graphical method of changing the basis. This only applies to figures that deviate from the standard figure.
The technique is presented smoothly, from simple to complex. Therefore, with patience and diligence, even a novice seamstress can master the construction method. The methodology provides a minimum number of tables and a maximum amount of practical material.
Whatever method you choose to construct your patterns, knowing the basics will help you master the chosen direction in the shortest possible time. The main thing is not to be afraid to experiment and practice as much as possible.
(No ratings yet)
Half girths (we divide girth measurements in half and get half girths):
Rice. 1
Ssh - half neck circumference
Сг1 - half chest circumference first
Сr2 - half chest circumference second
Сг3 - half chest circumference third
St - half waist circumference
Sat - half hip circumference
Lengths:

Rice. 2
Di - product length
DP - shoulder length
Lts - back length to waist
Accident - shelf length to waist

Rice. 3
Widths:
Shp - shoulder width
Shg - chest width
Shs - back width

Rice. 4
Heights:
Vpkg - shoulder height oblique chest 
Rice. 5
Vpks - shoulder height oblique back

Rice. 6
Vg - chest height
We take measurements from the figure according to Figures 1−4. When taking measurements of the chest, waist, and hips, you need to pay special attention to the fact that the measuring tape should be positioned strictly horizontally at the narrowest/widest point (depending on the measurement). When removing the girths, you do not need to tighten the tape, as this may lead to narrowing of the product. The most difficult task at this stage is to correctly measure the height of the back and front, as well as determine the designed line of the shoulder seam.
Increases in looseness of fit
The increases depend on the type of fabric, its elasticity, as well as the desired freedom of the product, and this must be taken into account when constructing. For example, we will take average values. We also need to take into account that we use increments to build half of the product.For an example of how to build a dress, we will take size 48 (this is size 96.0 cm across the chest) for height 164.
Measurements:
Sh = 18.5 cmСг1 =45.9 cm
Cr2 = 50.4 cm
Cr3 = 48.0 cm
St = 38.0 cm
Sat =52.0 cm
Di = 90.0 cm
Dts = 42.9 cm
Accident = 44.4 cm
Shp = 13.3 cm
W = 17.3 cm
Shs = 18.3 cm
Vpx =43.2 cm
Vprz = 21.5 cm
Bg = 27.5 cm
Increases:
Pg = 6.0 cmFri = 3.0 cm
Pb = 2.5 cm
Pshs = 0.8 cm
Pshp 0.3 cm
Psh pr = 4.9 cm
Pdts = 0.5 cm
Pdtp = 1.0 cm
Pshgor = 1.0 cm
Pspr = 2.0 cm
Calculation for creating a mesh:
Mesh width (A0a1) = Cr3+Pg=48.0+6.0= 54.0 cmBack width (A0a) = Shs+Pshs=18.3+0.8=19.1 cm
Shelf width (a1a2)= Шг+(Сг2-Сг1)+Пшп=17.3+(50.4−45.9)+0.3=22.1 cm
Armhole width (aa2)= Shpr=Shset-(Shsp+Shpol)= 54.0-(19.1+22.1)=12.8 cm
Armhole depth (A0G) = Vprz + Pspr 0.5*Pdts =21.5+2.0+0.5*0.5 = 23.8 cm
Waist line position (A0T) = Dts+Pdts = 42.9+0.5 cm = 43.4 cm
Hip line position (A0B) = Dts/2−2 = 42.9/2−2 = 19.5 cm
The position of the bottom line of the product (A"H1) = Di + Dts = 90.0 + 0.5 cm = 90.5 cm (the length of the back should be set aside after constructing the neck of the back), but at this stage we will set aside the length of the product from point A1.
Meshing
Step 1

Rice. 7
The first construction point is point A0 and from it we set the width of the grid to the right - 54.0 cm, draw a line and put point a1 at the end of the segment.
To the right of point A0 on line A0a1 we set aside the width of the backrest and get point a.
To the left of point a1 on line A0a1 we set aside the width of the shelf and get point a2.
Segment aa2 is the width of the armhole.
Down from point A0 we set aside the height of the mesh and put point H at the end of the segment - the length of the product. Corresponds to the bottom line of the product (at this stage).
From point A0 downwards we plot the position of the chest line on line A0G and get point G.
Also, from point A0 on segment A0G, the position of the waist line is plotted and we obtain point T.
And we postpone the position of the hip line from point T on the segment A0G and get point B.
From point a1 down we also set off the height of the grid and get point H3. We close the rectangle.
From points G, T and B we draw horizontal lines and get points G3, T3 and B3 at the intersection with line a1H3.
In turn, from points a and a2 we lower the vertical to the chest line GG3 and get points G1 and G4.
The first and important stage of creating a mesh should look like shown in Fig. 7.
Drawing the backrest
Step 2

Rice. 8
From point A0 we put it to the left on a line of 0.5 cm - this is the outlet of the center of the back at the top. We get point A0".
From point A0" down along the line A0H we plot the level of the shoulder blades, which is 0.4*Dts = 0.4*42.9 = 17.2 cm and we get point Y. We connect point Y to point A0" with a time line.
We build the depth of the neck of the back A0"A = A2A1 = 7.2/3 = 2.4 down from point A0" on the line A0"U. We complete the rectangle and draw the line of the neck of the back with a pattern curve.
This construction stage should look like shown in Fig. 8.
Step 3

Rice. 9
From point T to the left on the waist line TT3 we set aside a bend along the waist line = 1.5 cm, for semi-adjacent products. We get point T1.
To construct the middle seam of the back, we put a bend from point H to the right equal to the bend along the waist line of 1.5 cm and get point H1. We draw the middle back seam through points A-U-T1-H1.
From the neck of the back, along the middle seam, we put the length of the back down and get point H (the correct length).
This construction stage should look like shown in Fig. 9.
Step 4

Rice. 10
We build the end point of the shoulder, for this we build a radius from point A2 equal to Шп + tuck opening = 13.3+2.0 = 15.3 cm, where the dart opening is equal to 2.0 cm. And also the second radius from point T1 equal to Vpk+ Pvpk, where Ppvk = Pdts + Ppn (increase on the shoulder pad, in this case = 0), and we get 43.2 + 0.5 = 43.7 cm.
At the intersection of the radii from points A2 and T1 we place point P1.
This construction stage should look like shown in Fig. 10.
Step 5

Rice. eleven
We begin the construction of the shoulder dart by determining the position of the dart along the shoulder seam. The dart should be located 1/3 - ¼ of the shoulder width: 1/3 * 13.3 - ¼ + 13.3 = 4.4 - 3.3, let's take the value 4.0 cm.
When constructing the shoulder seam, we took the tuck opening = 2.0 cm. We put point I1 on the shoulder from point A2 and point I2 in increments of 2.0 cm. Next, from points I1 and I2 we draw a radius equal to 7.0 cm and get point I. We connect points I and I1 and I2. To align the shoulder seam, it is necessary to increase the sides of the darts from the shoulder seam by 0.2 cm.
We connect the sides of the darts with the neck points A2 and the end of the shoulder seam P2. From point P2 to the vertical a1G1 we draw a perpendicular; we will need it to calculate the auxiliary lines of the armhole.
This construction stage should look like shown in Fig. eleven.
Step 6

Rice. 12
We build auxiliary points of the armhole based on the length of line P1G1 - the length of this section is 18.9 cm. To build point P3 = 18.9/3 + 2.0 cm = 8.3 cm. We set point P3 from point G1 from the chest line to segment G1a1.
From the corner G1 of the armhole we draw a bisector with length = Шр*0.2 + 0.5 cm = 12.8*0.2 + 0.5 = 3.1 cm.
Auxiliary point G2 is located in the middle of the armhole width, i.e. Шр/2 = 12.8/2 = 6.4 cm.
This construction stage should look like shown in Fig. 12.
Step 7

Rice. 13
The back armhole line is drawn with a smooth line, while point P2 should have a right angle.
This construction stage should look like shown in Fig. 13.
Building a drawing of a shelf
Step 8

Fig.14
To construct the chest center point, the distance G3G4/2 - 1.0 = 22.½ - 1.0 = 10.1 cm is set aside from point G3 to the right and we get point G6.
For products of the dress group, we draw up a descent of the waist line = 0.5 cm, for this we put 0.5 cm down from point T3 and get point T31. From this point we draw a horizontal line to the left with a length equal to the width of G3G6.
To construct the width of the neck of the shelf Ssh/3 + Pshgor = 18.5/3 + 1.0 = 7.2 cm, we move from point A3 to the left horizontally and get point A4. We calculate the depth of the neck using the formula A3A4 +1.0 = 8.2 cm and draw a radius from points A4 on the vertical A3T3 and get the neck point A5. In turn, from points A5 and A4 with a radius equal to the depth of the neck, we make serifs and obtain an auxiliary point A3" from which we draw the arc of the neck of the shelf.
This construction stage should look like shown in Fig. 14.
Step 9

Fig.15
Highest point position mammary glands we put it away from point A4 with a radius equal to Br = 27.5 cm and get point G7.
At the intersection of two arcs with the radius of the chest height from point G7 and the radius of the dart opening from point A4, we find point A9.
We connect points A9 and A4 with point G7 and get a chest dart for the front.
This construction stage should look like shown in Fig. 15.
Step 10

Rice. 16
To determine the auxiliary points, it is necessary to calculate the position of point P4 on the segment a2G4. To do this, the distance P1G1 (from the drawing) - 1.0 cm = 18.9 - 1.0 = 17.9 cm, we get the distance P4G4. Next, this distance G4P4/3 = 6.0 cm and we put this distance from point G4 up and get point P6.
Point P5 is obtained at the intersection of arcs from point A9 - shoulder width = 13.3 cm and from point P6 equal to distance P6P4 = 11.9 cm.
We draw a shoulder line through points A9P5.
This construction stage should look like shown in Fig. 16.
Step 11

Fig.17
To construct the armhole of the shelf, draw an auxiliary line, in the middle of which we set a perpendicular 1.0 cm long.
From corner G4 to construct the armhole we draw a bisector Шр*0.2 = 12.8*0.2 = 2.6 cm.
Through points P5 - P6 - G2 and the constructed perpendiculars we draw the line of the armhole of the shelf.
This construction stage should look like shown in Fig. 17.
Construction of lateral lines
Step 12

Rice. 18
We will start constructing the side lines along the chest line from point G4 - this is the middle of the armhole. From point G4 we draw a vertical line down, this is the center line side seam.
At the intersection with the line of the waist, hips and bottom we get points T2-B2-H2, respectively.
To design the side seam, take 0.4*R-r-t-tal = 0.4*11.5 = 4.6 and divide this amount by two, since this complete solution darts in the side seam. To do this, 4.6/2 = 2.3 cm and set aside in each direction from point T2. And we get points T21 and T22.
Next, we calculate the expansion along the hips, for this (Sb + Pb) - B1B3 = (52 + 2.5) - 52.5 = 2.0 cm. We also divide it in half 2/2 = 1.0 cm, in order postpone the expansion along the hips on both sides of point B2. And we get points B21 and B22.
In this example of construction, we will leave the dress straight silhouette below, so along the bottom line along the side seam we set aside the same values as along the hips. And we get points H21 and H22.
Through points G4-T21-B22-H22 and G4-T22-B21-H21 we draw the lines of the side seam of the front and back.
This construction stage should look like shown in Fig. 18.
Step 13

Rice. 19
To construct a dart along the back waist line, we determine the position of the dart along the waist line on the back, for this distance T1T21/2 = 21.8/2 = 10.9 cm and get point T4.
Next, we calculate the tuck solution along the waist line (R-r out waist - R-r out waist side) * 0.55 = (11.5 - 4.6) * 0.55 = 3.8 cm. We also divide this solution in half 3.8/2 =1.9 and set aside from point T4 and get points T41 and T42.
The height of the dart from the waistline up and down is 15.0 cm - we get points K1 and K2, respectively.
This construction stage should look like shown in Fig. 19.
Step 14
Rice. 20
To construct a dart along the waist line of the shelf, we use the position of the center of the chest on the shelf; to do this, down from the waist line from point T6, we lower the vertical to the hip line - we get point T5.
Next, we calculate the tuck solution along the line waist size vyt tal - R-r vyt tal side-R-r vytal sp = 11.5 - 4.6 - 3.8 = 3.1 cm. We also divide this solution in half 3.½ = 1.55 and set it aside from point T5 and we get points T51 and T52.
The height of the dart from the waistline up and down is the same as on the back, 15.0 cm - we get points K3 and K4.
This construction stage should look like shown in Fig. 20.
Step 15

Rice. 21
To build relief lines, it is necessary to transfer part of the chest dart of the front. To do this, with a notch equal to the distance from the neckline to the back dart = 4.0 cm, set aside 4.0 cm on the shoulder line of the shelf and get point A81.
We connect point A81 and point G7 - this is the length of the transfer radius of the chest dart = 26.3 cm.
Now from point A4 we set aside the radius A4A8, equal to the section A9A81 = 4.0 cm, put the first notch, and from point G7 with a radius equal to the segment A81G7, we make the second notch. At the intersection of the radii we obtain point A8. Then we connect points A8 and G7, as well as points A8 and A4 - we get a shoulder line to the shelf relief line and a section of the shelf relief.
This construction stage should look like shown in Fig. 21.
Step 16

Rice. 22
To design the bottom line of the product, you need to lower the line of the center of the shelf - the descent of the bottom line H3H31 is 1.0 cm.
We lower the lines of the shelf and back reliefs to the bottom line and get points H4 and H5, respectively.
This construction stage should look like shown in Fig. 22.

Rice. 23
The construction of the dress has come to an end and our drawing should look as shown in Fig. 23.
Step 17

Rice. 24
Next, you need to transfer the main parts of the shelf, the side of the front, the back and the side of the back onto tracing paper and add seam allowances.
This construction stage should look like shown in Fig. 24.
If these are your first steps in design, then the design needs to be checked, that is, sew the dress from mock-up fabric and try it on to be sure that there are no errors in calculations and construction.
Also, after construction, it is necessary to add details of the facings of the neckline and armholes of the back and front. And also, if desired, decorative elements - yokes, flounces, piping, etc.
Photo: website
Text and illustrations: Olga Kuznetsova
Material prepared by Anna Soboleva
There are separate and detailed articles on the site about how to make the basis of a dress, sleeve, skirt, trousers, shorts and other clothes pattern. An experienced tailor at the studio offers to create a pattern using his own simplified method, specially adapted for beginners. However, for beginners who decide to sew a skirt or trousers (especially a dress) with their own hands, it is important to know not only how to correctly make a pattern and sewing technology, but also many “little things” that are insignificant at first glance.
In this article, an experienced tailor will share some tips with you. You'll learn what aspiring tailors need to know before making a pattern and starting to cut and sew your own clothes.
Please note that in the VKontakte group there are many useful tips for beginner tailors. Sign up for the group. We constantly post various quick tips and links to useful articles.
Prepare a sketch of the future dress model

Tailoring, especially women's dress- this is creativity that requires not only the ability to make a pattern and sew on a sewing machine, but also the taste and imagination of the designer. You will need to draw a sketch of the future dress model, imagine what finishing elements and details will be on it, choose the color and quality of the fabric, and the silhouette of the dress. And finally, draw it all on a piece of paper. However, you don’t have to be able to draw beautifully to sketch a dress. You can use ready-made design solutions, supplement them or change them a little.
Do you like indoor or garden flowers? At the Green Gate nursery you can buy rooted cuttings and divisions of various domestic and perennial garden flowers. We have a constantly updated collection of anthuriums and hibiscus. Flowers and plants are sent by mail.
For beginning tailors, the pattern often comes first. They carefully and scrupulously enter their measurements into the calculations when constructing a pattern, trying not to make a mistake even by a millimeter. But, more often than not, the first result is unsuccessful, simply because there is not enough experience. Therefore, do not immediately try to sew clothes from expensive fabric, first learn the basics and gain personal experience. Even a teacher in cutting and sewing courses will not be able to give you the full amount of knowledge, not to mention articles on the Internet. You will have to learn many techniques and subtleties on your own, sometimes at the cost of your own mistakes.
Take, for example, an element such as the silhouette of a dress. Everyone knows that the silhouette can be close-fitting, semi-fitting and free. For the same size, beginners need to make three different patterns. For an experienced tailor, when modeling a dress, one but proven basic pattern is enough and he can make additions and changes to it with chalk directly on the fabric.
On our website there is original material, specially adapted and intended for beginners, on how to make the basis of a straight dress, as well as making changes to the basic pattern for a fitted and loose silhouette.
What tools are needed to make a pattern?

1. Cutting line. This is a special, transparent and wide ruler with convenient markings in inches and centimeters. Inches are used when constructing patterns taken from foreign magazines.
2. Paper tape. It is no coincidence that we placed it in second place. It will definitely come in handy when adjusting the pattern, gluing additional sections of paper, placing folds on the pattern, etc. It is not necessary to buy one with such a device; it is enough to buy ordinary masking tape in a roll, 3 cm wide.
3. This tool is used to transfer your pattern or magazine pattern onto paper. A gear wheel pierces two layers of paper with needles, accurately transferring the contours of the top sheet to the bottom. Using a copy roller you can quickly and accurately make a pattern.
4. An ordinary pencil, preferably soft. There are markings on the pencil shaft. A hard pencil is designed for thick paper, such as Whatman paper. For thin graph paper it is better to use grades M, 2M, TM.
5. You will often have to erase inaccurate or minor pencil lines, so choose a convenient and high-quality eraser.
6. Many people believe that beautiful and comfortable tailor's tape measures are better than a regular measuring tape. In fact, even professionals only use a centimeter in their work. Do not buy a centimeter that is too long, for example 2 meters. A regular centimeter, 150 cm long, is the most convenient size.
7. Tailor's scissors are considered the main tool of a tailor. They should be sharp and comfortable. Every seamstress should have at least three types of scissors in her kit: large ones for fabric; medium - for small projects and small - for cutting threads while sewing on a sewing machine. Do not use tailor's scissors to cut paper. You can buy regular office scissors inexpensively at a stationery store.
Experienced dressmakers use a special cutter to cut fabric. Don't rush to get one. For beginners, scissors are quite enough at first.
8. A rectangular ruler is simply an indispensable tool when creating a pattern, especially if graph paper is not used. This rectangle is also useful when aligning the bottom of a skirt or dress during fitting.
9. A ruler of this shape is a must have in your kit. Using it, you will create smooth lines for the armhole, neckline, etc. on the pattern.
10. And finally, graph paper. With it, you can easily make a pattern with your own hands, and then transfer its parts from the general drawing to separate sheets of thicker paper. It is sold in sheets and rolls. It is most convenient to use paper in a roll, but first you can try to make a pattern on sheets of A3, A2 paper glued together.

If you create a pattern yourself, then you practically won’t need the terms used by designers, except for the basic ones: back, front, lapel, armhole, etc. It’s a different matter when you use ready-made patterns from magazines. There you can often find a lot of unfamiliar words. We have a detailed article on our website that gives detailed description most terms and pattern details.
See Name of cutting details, cuts, terms
However, you should not put much emphasis on studying them, especially since they are most often explained in the drawing and are intuitively understandable even to an untrained person. But it is imperative to understand what the different symbols on the finished pattern mean.
1. An arrow with the inscription “DN” or “Lobe” means the direction of the grain of the fabric, taking into account which you need to lay out the pattern on the fabric.
2. “Fabric fold” means that this pattern piece needs to be laid out along the fold of the fabric when cutting, for example the back.
3. To ensure that the parts of the product do not move during sewing, it is advisable to divide them into sections and put marks. When sewing, these marks must be aligned and this way you will avoid strong displacement or stretching of the seams. Place short lines on the pattern (for example, waist line, chest line), and mark these marks on the fabric with chalk.
In this way, folds and tucks are marked, and you can even indicate with an arrow the direction of their laying.
4. If you have already sewn clothes with your own hands, then you know that some parts of the clothes need to be “shrinked”, while others, on the contrary, need to be stretched. For example, it is always advisable to cut out the sleeve cap a little larger than the armhole, and to raise the upper section of the sleeve a little. On the other hand, the buttock areas of the trousers (in some cases), on the contrary, need to be stretched with a hot iron with steam, etc.
You should pay attention to the marks on the pattern in the form of wavy lines or dotted lines with an asterisk. They indicate the area that needs to be planted or collected.
5. Professionals use patterns without allowances. But patterns for beginners are given with seam allowances. Outlines finished pattern are indicated by a solid line, and the stitching line by a dotted line.

Unfortunately, in a short article it is impossible to provide comprehensive information on how to make a pattern with your own hands, especially for those just beginning to sew. To do this, you need to complete a 3-4 month training course, at a minimum. However, it is possible to provide important directions for self-study. Some information can be found on our website, other websites, books and video courses. Here, for example, is how to take measurements.
Any pattern is constructed so that the fabric of the clothing does not fit tightly around the figure, but has a little freedom. Therefore, when constructing, various increases in freedom of fit are used. Their size depends mainly on the size of your clothing and the characteristics of your figure (fullness). Take this into account when creating a pattern.
See Tightness Increases.
Do not blindly trust patterns from various magazines and Internet resources. You should always check them before cutting your fabric. It is impossible to create a perfect pattern that fits any figure. Apparently this is why designers often give large allowances for freedom of fit. And to check you need to learn how to make patterns with your own hands. This is such a vicious circle.
When laying out patterns on fabric, the problem of pattern parts shifting often arises. You can use thin and sharp tailor's pins and pin the paper parts to the fabric. But, not necessarily. But you need to pin paired pieces of fabric with pins. This will allow you to avoid them shifting when cutting.
Don't repeat these mistakes!

1. You should not trail when sewing. Perform the work consistently and accurately, sweeping away difficult areas by hand. After completing the sewing of a part or a complex operation (stitching a side seam, etc.), you need to perform a wet-heat treatment, carefully ironing or ironing the seams. See How to iron clothes properly.
You should especially not rush when completing the work. It's better to wait until the next day to hem the bottom of your dress or skirt than to do it late at night.
2. Experienced seamstresses know that the most important stage when sewing there is a fitting. And the more of them you make, the better the work will be done, the more accurately the clothes will fit your figure. Be sure to do fittings when sewing any clothes. Experts even have a special term for this: first fitting and second fitting.
3. We have already said above that you should not trust patterns from magazines too much. They were made by experienced specialists, but even they cannot take into account all the deviations from the standard characteristics of typical figures.
4. Don’t think that making a pattern is something beyond your capabilities. In fact, everything is very simple. You just need to spend time and figure out what’s new to you.
5. Don't be afraid to make a mistake, but save your money. First make a skirt pattern from inexpensive fabric. Then you can try to sew shorts and trousers. Well, then make a pattern and a dress, just sew it from inexpensive, simple fabric.
6. Not all fabrics, but many, require special wet-heat treatment before sewing. Fabrics containing cotton, wool, and sometimes synthetic fibers may shrink after washing. Take this into account before cutting your fabric.
7. Since the sewing machine becomes your main assistant, keep it in order. A faulty or unconfigured machine can ruin not only your mood, but also the thing for which you worked so hard to make a pattern and spent not only time, but also money.
Skirt pattern - pencil. Very simple construction, accessible for beginners. The video is in English, but you can choose captions in any other language. If you like to sew, be sure to subscribe to this video channel. You will learn a lot of useful things. The channel was created by professional tailors.
 Relief knitting patterns with diagrams and descriptions Knitting patterns for dark yarn in leaf shape
 How to knit a tanker’s helmet: description and materials
 Wife kicks her out of the house: advice from a psychologist Man periodically kicks her out of the house