Pattern trousers for girls of different ages: the rules of construction. Patterns of children's trousers and sewing master classes Building the back half of trousers
Children's trousers are a must for both a boy and a girl. This is the most comfortable clothing for walking, games, trips, and just for everyday wear. And modern styling makes the trousers also very elegant. But just which ones to choose to be both convenient and practical at the same time? From my own experience I can say that trousers should be with a waist no lower than average and with an elastic band on the belt, the last detail is especially important for small children. Thanks to the rubber band on the belt, the pants fit snugly on the baby's body, do not puff, do not slip and do not crush.Well, for older children, you can already sew pants with a zipper and with pockets, like real jeans.
Pattern of children's trousers for ages from 2 to 10 years
The simplest and most comfortable pants are a model in a sports style with an elastic band. Children are very comfortable in such clothes, and mom, in turn, can easily and easily cope with sewing.
In MK, for this pattern, it is proposed to sew pants from double fabrics, the upper one is a mesh, and the lower one is an elastic synthetic fabric. But you can sew from any other fabric and not necessarily in two layers.


Pants details: orange - lining, dark - faces. side
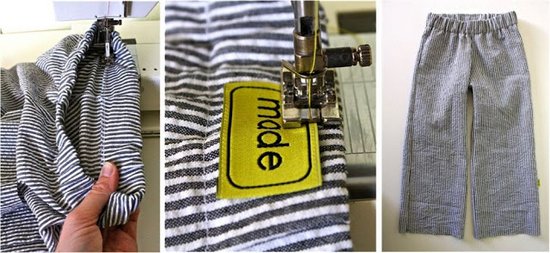
Download the PDF pattern, print and glue the sheets. Select the appropriate size (nameplate below) and cut. Transfer parts to the fabric. Cut and sew parts.

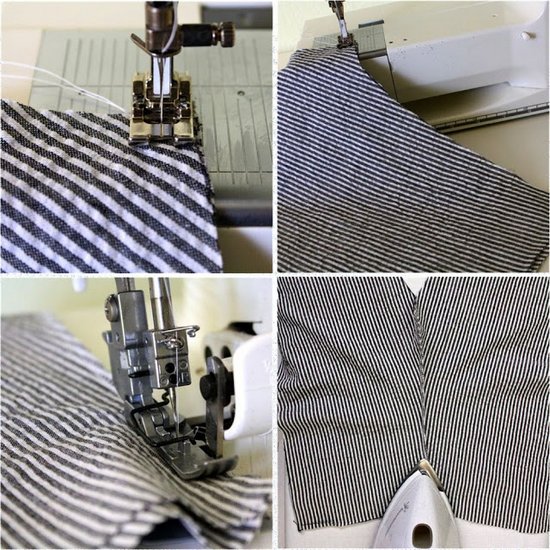
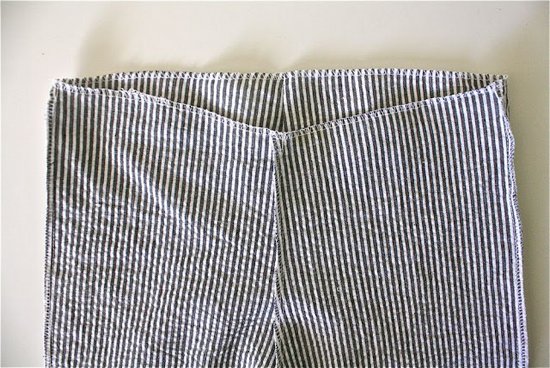
Fold the top cut and sew, insert the elastic. Work on the bottom of the trousers. on the sides, optionally, you can sew on stripes.

Master class: how to sew panties for a child

Step 1. Print a pattern and transfer it to the fabric. Cut, leaving 2 cm at the edges for allowances.

Step 2. Complete all seams.

Step 3. Measure the width of the belt of one leg. From the stretch fabric, make a belt and cuffs of the appropriate width. Sew and fold in half.

Step 4. Sew the parts to the pants.

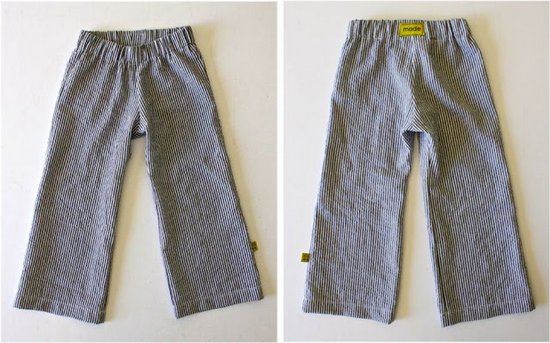
Pattern of children's trousers with an elastic band
This pattern of children's trousers is designed for babies 2-3 years old. Below you can download it and watch a master class on sewing these pants. The required amount of fabric is 90 cm.

Master class: elastic pants

Step 1. Print a pattern and transfer the details to the fabric. Cut out.

Step 2. Take all the seams one at a time.
Step 3. Overlock the slices.


Step 4. Tuck the top cut across the width of the elastic. Sew leaving a small area open. Insert the rubber and sew in the area left. Sew the belt with elastic.

Step 5. Overlap the lower sections. Tuck and stitch.
How to sew baby pants from a sweater: a master class
And one more master class with a good example of how to sew warm panties for a baby from an unnecessary sweater.


Pants are very comfortable clothes not only for boys, but also for girls. Therefore, today we offer you to sew stylish trousers for your girl. According to this pattern, you can simulate and sew a variety of models of trousers, you just need to make a fantasy.
Basic pattern of trousers for a girl of school age
Measurements that we will use when constructing patterns:
- The length of the trousers on the side ........... 80 cm
- Half-waist .......... 34 cm
- Half hips .............38 cm
- Seat height ... ... ... ... 21 cm
- Knee Height ..................... 44.5 cm
- The width of the trousers on the bottom ... ... 32 cm
Building the front half of the trousers

Fig. 1. Pattern trousers for girls
Start the construction from the upper left corner, stepping down a certain distance, put point A.
The length of the trousers on the side. From point A, draw down the segment AH \u003d 80 cm (the length of the pants is measured).
Width of the front half of the trousers. From point A to the right, postpone the segment AT \u003d 1/2 Hips half-circumference as measured by plus 1 cm: 38/2 + 1 \u003d 20 cm.
From point A down, lay ASh \u003d 21 cm (Seat height by measure). From point W draw a horizontal line. From point T, draw a vertical line down - at the intersection, point W1 is obtained.
From the point Ш1 put to the right the segment Ш1Ш2 \u003d 4.3 cm (1/10 of the half-circumference of the hips by the measure plus 0.5 cm).
Note: for tight-fitting trousers, the increase value is 0, for standard ones - 0.5-1 cm, for loose wide ones - 1.5 cm.
Step line and bottom line of trousers. From point Ш2 lower the perpendicular down, from point Н draw a horizontal line. The intersection point of the two lines, designate H1. HH1 - the bottom line of the trousers.
Knee line. From point A, put down the knee height according to the measurement: AK \u003d 44.5 cm. From point K, draw a straight line to the right to the intersection with line SH2N1 - point K1 is obtained.
Trouser bow line. Postpone 4 cm from point Ш1 upwards. Draw a bow line through points Т, 4, Ш2.
Waist line of trousers. From the point T to the left, put off 1/2 of the waist half-measure by measure and put the point T1: TT1 \u003d 34/2 \u003d 17 + 1 cm (increase in freedom of fitting).
IMPORTANT!A tuck in the front half of the trousers is not provided. If you want to make a tuck, postpone the TT1 \u003d ½ POT + 1.5 cm segment (tuck depth).
The line of the arrow of the trousers. Divide the ШШ2 line in half and through the division point draw a straight line down to the intersection with the НН1 line and up to the intersection with the AB line. Point the intersection of the waist line with the letter T2.
IMPORTANT! The width of the trousers at the bottom is determined based on the model. For wide trousers, it can be 36-38 cm, for straight and narrowed ones - less. In order to determine the desired width of the trousers by the bottom - wrap a centimeter tape around the child’s ankles, do not forget to make an increase in free fit.
The width of the trousers on the bottom of the front half. From the point Н2 to the left and right, set aside 1/4 of the width of the bottom of the trousers by the measure minus 1 cm: Н2Н3 \u003d Н2Н4 \u003d 32 / 4-1 \u003d 7 cm.
Step seam of trousers. Connect the points Ш2 and Н4 with a slightly concave line as shown in the drawing.
Side seam of trousers. Connect the points T1, W, H3 with a convex-concave line.
The construction of the rear half of the trousers
The back half of the trousers is built on the mesh of the front half of the trousers.
Trouser Width Transfer the width of the trousers of the back half from the front half of the trousers: AB \u003d DC \u003d SHSh2 (front half).
Length trousers. The lines of the rectangle AD and BC are 80 cm.
Step line. From point A down, set aside the height of the seat: ASH3 \u003d 21 cm. From point SH3, draw a line to the right to the intersection with the BC line. Mark the intersection point with the letter W4.
From point Ш3 to the left, draw a segment Ш3Ш5 with a length equal to 1/4 of the Width of the half of the trousers Ш3Ш4: 24.3 / 4 \u003d 6 cm.
Knee line. From point A, set AK3 \u003d 44.5 cm down (Knee Height Measured). Draw a horizontal line of the knee K2K3.
Waist line of trousers. From point B to the right, extend the line AB arbitrarily. Then divide the AB line in half and postpone 3 cm from the division point upwards. From point 3 to the right to the intersection with the elongated AB line, draw an inclined waist line equal to 17 cm and set point T (1/2 of the waist circumference by measurement): 34: 2 \u003d 17 cm. Waist line from point 3 to the left lengthen (along an inclined line) by 5 cm (2 cm to fit freedom + 3 cm to the tuck): TT1 \u003d 22 cm.
The line of sitting trousers. Divide the section Ш3Ш5 in half and postpone 0.5 cm from the division point down. Then from the point Ш3 lay 4 cm to the right and 4 cm up. Draw a seat line through points Ш5-1-Ш3-4-Т1.
The width of the trousers on the bottom of the back half. DC halve - point C1. From point C1 to the left and right, set aside 1/4 of the width of the bottom of the trousers by the measure plus 1 cm: C1C2 \u003d C1C3 \u003d 9 cm.
Side seam of trousers. Connect the points T and C3 with a dashed auxiliary line. Then draw a smooth line of the side seam, shape it as shown in fig. 1, performing a slight narrowing in the knee to the bottom.
Step seam of trousers. Connect the points Ш5 and С2 with a dashed auxiliary line. Then draw a smooth line for the side seam.
Tuck at the waistline. Divide the waist line in half and set aside 1.5 cm to the right and left, divide the tuck length 7 cm down at a right angle. Connect the points 1.5 and 7 with slightly concave lines.
The line of the arrow of the trousers. Divide the width of the back half of the trousers in the knee area in half and connect the division point with point C1, draw a straight line up to the intersection with line AB.
The basic pattern is built, now it needs to be checked. To do this, we recommend that you sew test pants from an inexpensive fabric. Any inexpensive cotton sheet is perfect for this. After the pattern is checked, it is possible to model and cut trousers on it. We will certainly offer you ready-made models in our subsequent newsletters.
Sew beautiful things to yourself and your children and be bright!
We are building a pattern of children's trousers for children from 3 to 16.
This is a very simple and easy to use technique. Such it will seem to those who have previously encountered other methods. And for beginners, to simplify the construction process, we offer step by step instructions. Step by step, following the instructions, you can easily complete the task and eventually come to the conclusion that everything is really very simple.
This technique can be used to build a pattern of trousers for both boys and girls (up to size 42). For older girls, the method of constructing a pattern of trousers for women is used.
To build a pattern of trousers for children preschool age you can use another technique that is
Preliminarily take measurements from the child. All measures are important, you need to take this process seriously. The more accurately the measurements are taken, the more successful the pattern will be. The main parameters that you can’t do without are waist circumference, hips and trouser length. If the measurements of the height of the seat and (or) the length to the knee cannot be taken, then these values \u200b\u200bcan be calculated by the formula. You should also determine the width of the trousers along the bottom line. For reference, you can take old trousers (of which the child grew up), measure the bottom of the leg and add a few centimeters. You can do the same in determining the length of the trousers.
To build a drawing of a pattern of children's trousers, the following measurements will be required:
| Name | Designation | Size cm | Options |
| Length trousers | Db | 88 | Measure from the side vertically from the waist line to the desired length of the trousers. Merck is recorded in full. |
| Knee Length |
Dbk | 50* | Measure at the same time as measuring the length of the trousers. From the waistline to the middle of the patella. Merck is recorded in full. |
| Half Waist | St | 30 | Measured at the narrowest point of the waist. The measure is recorded in half size. |
| Hips |
Sat | 38 | Measured horizontally by the most protruding points of the buttocks, given the convexity of the abdomen. The measure is recorded in half size. |
| Seat height | Sun | 23* | Measured from a person sitting on a chair. Sideways from the waist line to the plane of the chair. Merck is recorded in full. |
| Bottom Width |
Shbn | 18 | The width of the trousers in the finished form. It is determined independently depending on the style. |
| * This value can be determined by calculation (by the formula) | |||
The front half of the trousers.
In the upper left corner of the prepared sheet of paper, draw a right angle with a vertex at point T.
Length trousers.
From point T down we postpone the measurement of the length of the trousers (DB), put the point H and draw a horizontal line of arbitrary length to the right.
In our example, the length of the trousers is Db \u003d 88 cm, and you put off your measure.
TH \u003d DB \u003d 88 cm.
Step line.
The step line is determined by measuring the height of the seat (Sun). From point T down, we postpone the measurement of the height of the seat and put the point I.
If there is no measurement of the height of the seat, we use the calculation method for determining the position of the stride line: 1/2 of the measurement of the half-circumference of the hips (Sat), plus a value that varies from 2 to 4 cm and depends on the style of the trousers, on the physique and age of the child.
In our example, it will look like this:
TY \u003d 1/2 Sat + (from 2 to 4 cm) \u003d Sat: 2 + 4 cm \u003d 38: 2 + 4 cm \u003d 23 cm.
Choose a method of determining the step line that is convenient for you, put this value down from point T, put the letter I and draw a horizontal line of arbitrary length to the right of it.

Hip line.
In this technique, the hip line is not used to build a drawing of the pattern, but I would advise drawing it so that at the end of the work, compare the width of the pattern in this area with the taken measurement of the half-circumference of the hips and, if necessary, correct the pattern.
The segment YOU is divided into 3 equal parts, lower the division point is denoted by the letter B. From point B to the right, draw a horizontal line ( hip line).
YAB \u003d TH: 3 \u003d 23: 3 \u003d 7.7 cm

Knee line.
The position of the knee line can also be determined in several ways. You can divide the BN distance in half - this will be the approximate position of the knee line. Depending on the style, it can move up or down a few centimeters.
We are now using the simplest and most accurate:
From point T, we postpone measure the length of the trousers to the knee (DBK), put the point K and draw a horizontal line to the right.
In our example, TC \u003d DBc \u003d 50 cm.
Other ways to consider in the following articles.

The width of the front half along the waistline.
From the point T to the right, lay 2 cm (for all sizes) and put the point T1.
We calculate the width of the front half of the trousers along the waistline: 1/2 of the semicircle of the waist (St) plus 3cm.
St: 2 + 3 cm \u003d 30: 2 + 3 \u003d 18 cm
From the point T1 to the right we postpone 18cm and put the point T2, from which we lower the perpendicular down to the intersection with the step line and put the point H1.

Line bow. (mid-cut line of the front half of the trousers)
From the point I1 up, we postpone a value equal to 1/10 of the half-circumference of the hips (Sat) and put the point I2.
Once again from the same point (H1) we postpone the same value to the right (1/10 of the half-circumference of the hips) and put the point H3.
In our example, it looks like this:
Я1Я2 \u003d Я1Я3 \u003d Sat: 10 \u003d 38: 10 \u003d 3.8 cm.
We draw the middle line of the front half. See fig. 6.

Iron line.
The distance ЯЯ3 is divided in half, put the point Я4. Through this point up and down we draw a vertical line (perpendicular) to the intersection with the waist line and the bottom line. The intersection points with horizontal lines are denoted by the letters T3, H4 K1, H1, respectively. See fig. 7.
The T3H1 line is called iron line.

Width of the bottom of the trousers.
The width of the bottom of the trousers depends on the style of the trousers, that is, you determine this value yourself. In our example, the width of the bottom of the trousers in the finished form is 18 cm (for small sizes, you can take 14-16 cm). The total width of the trousers between the front and rear halves is distributed as follows:
18 - 2 \u003d 16 cm -
18 + 2 \u003d 20 cm - back half width
From the point Н1 to the left and to the right we postpone 8 cm (half the width of the front half: 16: 2 \u003d 8 cm) and put the points Н2 and Н3.
Н1Н2 \u003d Н1Н3 \u003d 8cm.

The bottom line of the front half of the trousers.
To finally draw the bottom line of the front half of the trousers, from the point H1 up, lay 0.5-1 cm and put the point H4. Connect the points H2, H4 and H3, we get the bottom line of the front half.
In very narrow trousers and in trousers of small sizes, the bottom line can be left flat.
Side cut line.
To draw the side cut line, we need one more additional point: from the point T we postpone 17cm down (for small sizes 15cm), put point B.
The outer section of the side cut from point T1, through point B, to point I is formed by a smooth line, as shown in the drawing.
Configuration lower section of the side cut, as well as a step cut depends on the style and width of the trousers along the knee line.

The width of the trousers along the knee line. Side and step lines.
The width of the trousers along the knee line can be different and depends on the style (fashion, purpose), but should not be less than the measurement of the circumference of the knee plus an increase of 2 cm for loose fitting.
Let's look at two examples:
1st example: When constructing a pattern of trousers for young children and / or older children, but free cut, making lines of the side and step sections, you can connect the points H H2 and H3 H3 straight lines.
2nd example:
Let's say the width of the trousers in the knee should be 20cm.
20 - 2 \u003d 18 cm - width of the front half of the trousers;
20 + 2 \u003d 22 cm - back half width (we need this value when building the back half of the trousers).
From the point K1 to the left and to the right we postpone 9cm (18: 2 \u003d 9cm), the points are denoted by the letters K2 and K3.
Connect the points I, K2, smooth line from K2 to H2 straight line.
For the line stepper the cut is similar: the Ya3K3 section — a smooth, slightly concave line in the middle, then a straight line to the H3 point.
Spy on the drawing.

Tucks of the front half of the trousers.
On the front half of the trousers, two tucks are marked along the waist line. From point T3 to the right we postpone 1.5 cm, from mid we draw this segment down a vertical line 5-7 cm long (depending on the size of the trousers) and draw the first tuck, connecting the dots with straight lines.
Second tuck: divide the T1T3 segment in half, lay 1.5 cm to the right, draw a vertical line 5-7 cm long from the middle of this segment and draw the second tuck.
Instead of tucks, you can lay folds (pinches).

Closure, pocket.
The main construction of the front half of the trousers is completed.
Additionally, if necessary (if provided by model), a pocket, codpiece (fastener in the middle of the front), etc. are planned.
We outline the location of the pocket: from the point T1 along the side cut down, we postpone 14-16 cm (for small sizes 10-12 cm). From the same point T1 to the right, lay 4cm and connect the resulting points with a straight line.
it pocket entry line.
To arrange the fastener in the middle of the front, from the points T2 and H2 to the right horizontally lay 3-4 cm and connect the points obtained with a straight line.
Look at the drawing. Construction lines are marked in red.
If the pants are elastic, this is not necessary.

Building front halves of trousers are finished.
The construction of the rear half of the trousers
And you will be the first to know about the release of the second part "Step-by-step construction of the back half of trousers for children from 3 to 16" and you will always be in the know.
spbutik89.ru
Models of children's classic trousers are universal. The designs of products intended for boys and girls are identical and differ only in the location of the zipper and the color of the fabric.
Pants for children from 3 to 16 years old are sewn on the same patterns, taking into account the increase in size. Even the 6-month age is considered the lower limit. On the basis of the main building, sometimes trouser models are made especially for preschoolers.
Features of children's trouser models

wbstatic.net
The standard pattern of children's trousers is suitable for sewing the bottom of the school suit, as well as models for everyday wear. Cutting means modeling.
Making changes to the design, you should remember about some of the features of children's trousers.
- A thing can be straight, wide or narrowed.
- The width of the model should be adjusted using a belt at the waist or a tie from the inside.
- The elastic waistband must not injure the waist or be too loose.
- On trousers pockets settle down.
- A low fit of styles is not recommended due to the possibility of hypothermia - the lower back is closed.
- The bottom of the leg is equipped with cuffs that prevent the ingress of cold air.
Required Parameters

nashaucheba.ru
According to this construction, a pattern of trousers for girls is also performed. Parameters do not exceed standard 42 size. Pants for girls mean a more complex fit.
Necessary measurements
- Product length with start at the waist. The length is marked on the side.
- Product length to the middle of the knee.
- Waist circumference in the narrowest section. The result is divided by 2.
- Girth of thighs horizontally along the most prominent places of the buttocks. The result is divided in half.
- Seat height. It is determined from the side, from the level of the waist to the seat of the chair.
- Lower leg width. May be arbitrary or appropriate to the finished garment.
Building a model for girls from 3 to 16 years old

tvoivykrojki.ru
A certain difficulty in creating this simple pattern is the construction of the front pants.
Front panel
- On paper, at the top, on the left, an angle of 90 degrees is plotted.
- Down, from the top of the corner, lower the straight line - the length of the product.
- From the received point to the right, draw a line of any length.
- To postpone the size of the seat height from the original point down is a step line. To the right of the obtained point draw a horizontal.
- From the beginning of the drawing, put aside the measurement of half the circumference of the hips.
- From the first mark, measure the length of the product to the knee. From the obtained point, draw a horizontal to the right.
- From the top of the right angle, retreat 2 cm to the right.
- Calculate the width of the front of the model at the waist. To do this, add 3 cm to half the value of the waist half-circumference. Put the resulting value to the right of the original construction mark. Move the perpendicular down until it crosses the stride line.
- From the resulting mark, lay down the cutting line of the front panel upwards. To do this, divide the value of half the circumference of the hips by 10. The same value is put aside to the right. The points are joined by an arc.
- Divide the distance from the lower point of the seat height to the edge of the arc by 2 and put the next mark. Up and down from this point draw perpendiculars until they intersect with the contours of the waist and bottom of the product. The marks obtained will be the ends of the line along which the trousers will be ironed.
- Divide the value of the lower width of the model between the front and rear panels. The back should be big.
- Put half the width of the front part to the right and left sides of the point on the bottom line.
- From the middle mark on the bottom line up, draw 0.5-1 cm. Connect the resulting point with a convex arc with the other two surrounding the bottom of the model.
- From the very first point of the drawing down, measure 17 or 15 cm. From the value up, make an arc to the second mark on the waist line.
- The width of the product in the knees should not be less than the circumference of the knee, to which 2 cm was added to allow free fitting.
- Draw straight or slightly curved lines of the step and side cuts.
- Mark two tucks at the waistline. To do this, measure 1.5 cm to the right from the center point on the line of the belt. Extend the middle of the segment obtained downward by 5-7 cm. Connect the points obtained with straight lines. The distance from the center of the obtained tuck to the edge of the arc at the waistline is divided in half - here will be the center of the second tuck. To issue it similarly to the first.
Additional constructions

grosir101.com
- Outline pocket outlines. From the center of the arc at the waist level along the side section line, postpone from 10 to 16 cm (depending on the size of the item). To the right of the same point is 4 cm. The line joining the points obtained will become a pocket slot.
- 3-4 cm are measured from the starting point of the seat line on the waist line and from the beginning of the arc to the right. The new points are joined by segments (if the trousers mean an elastic waistband, a fastener is not needed).
Back panel
The construction of the back of the trousers can be performed on the same sheet on which the front was drawn.
Working process
- The main marks and contours of the construction of the front trouser part are copied.
- An initial vertical line, waist lines, hips, a step line, the contours of the level of the knee and the bottom of the product.
- From the starting point to the right, postpone the size of the half-circumference of the hips, divided by 2. Another 6 cm are added.
- From the obtained point, lower the perpendicular to the very bottom.
- The upper segment is divided by 2. From the obtained mark, a straight line is drawn down. From there goes a segment 3 cm up.
- From the extreme mark on the belt line, set aside half the value of the semicircle of the waist. A line is drawn that connects to the extreme point of a 3-centimeter perpendicular. Continue the straight line to the intersection with the waist level on the left.
- Extend the slant line 5 cm to the left. The waist level of the back panel will turn out.
- Divide the straight line into three equal parts. From the points obtained, lower down 8-12-centimeter segments. Put 1 cm on the right and left sides. Two tucks will be obtained.
- On the step line of the back panel from the leftmost mark to the left, postpone an amount equal to half the segment from the extreme point to the next building perpendicular. Add to the result 1 cm.
- From the mark in which the previous constructions began, to the right, lay the value of the half-circumference of the hips divided by 10.
- From the received point mark up the same value.
- Combine the extreme mark of the step line with a hollow arc with the top of the perpendicular. Draw a straight line to the edge of the oblique line. Get the outline of the trousers.
- Make the lower leg width of the rear half wider than the same value for the front by about 2 cm.
- To the left and right sides of the central mark of the bottom line of the back panel, put aside half of the obtained value.
- Extend the center line down by 0.5-1 cm and combine the resulting points with a hollow arc.
- Draw straight (or slightly concave lines) side and step sections.
Product Processing

bookin.org.ru
- Cut out parts (2 front and rear parts, as well as 4 pocket parts, 2 of which are cut out of the lining material), leaving allowances of 1 cm on each side. Below it is recommended to leave 5-6 cm “for growth”.
- To process edges of all details, including pocket.
- Sack for pockets to put on the face of the front pants and sew along the line of entry.
- Bend the burlap inside out and lay the machine seam.
- Place a second pocket part on the burlap, combining the parts along the line of entry into the pocket. Go through the machine line.
- Close the tucks of the rear halves of the product.
- Lay the depth of the tucks of the front halves towards the pockets. Stitch them.
- Fold the front and rear panels face down. Sew on the sides.
- Connect step sections.
- Insert one leg into the other inward with the front sides. Pave the middle seams.
- Sew the clasp to the hem. Attach one side of the zipper to the hem. Start the second one without sewing a few centimeters to the fold.
- Mark on the material the contours of the codpiece and flash it with a finishing line.
- Cut a belt from a strip of material about 9 cm wide. The length of the belt is equal to the length of the trouser top with the addition of 5 cm.
- Sew waist ends.
- From a strip of fabric with a width of about 2.5 cm, folded in half by the front side and swept over, make 6 parts of 5 cm. They will hold the belt. Attach them in the waist, at the tucks, at the seams from the sides. Sew a belt on top. Fold the top of all the strip-holders under the belt.
- Attach a fastener button or button with a processed loop to the belt.

herotence.ru
The main pattern of a children's trouser model can be modeled by changing the configuration, length, width of the product, as well as the shape of the belt, pockets and cuffs.
If you outline the lateral and step sections straight, refuse tucks at the waist, expand the product and provide additional centimeters of fabric for elastic, you get panties for pajamas.
Using a basic trouser cut, you can sew children's shorts, cropped wide or narrow trousers, as well as overalls for boys and girls.
Pants for boys are made of suit fabric (if the model should be part of a school suit), of jeans or camouflage, of woolen cloths. Do not forget that the wool often sits after washing, so it should be washed and ironed before cutting.
Velvet, satin, silk, lightweight elastic materials (assuming a lining) are options for girl models.
The proposed construction is carried out according to the unified methodology of TsNIISHP.
Initial data
To build a drawing of the basis of trousers for girls, you need to know the measurements of the figure and the addition to the main measurements:
C t - half waist;
C b - half hips;
D sat - the distance from the waist line to the floor on the side;
D n - the length of the legs on the inner surface;
VK - the height of the knee point;
D b - length trousers;
W n - the width of the trousers along the bottom line;
W to - the width of the trousers at the knees.
Also in the calculations, use is made of increases in free fit to the semi-girths of the waist and hips P t and N b.
How to take measurements, what increments to choose - see.
Classification of children by age
The clear age group includes children aged 0 to 3 years.
Preschool age group - children aged 3 to 7 years.
The primary school age group includes girls aged 7 to 11 years old and boys aged 7 to 12 years old.
The senior school age group includes girls aged 11 to 14.5 years and boys aged 12 to 15.5 years.
Drawing baseline grid
The construction drawing of the trouser structure begins with the construction of the base grid (see the figure on the left).
(To view the enlarged drawing in a separate window, click on the drawing with the mouse).
The vertical is lowered from point T, at which the position of points I, B, K, N. is marked.
The position of the height line of the seat depends on the length of the segment TY, which is equal, cm:
D sat - D n) + 3 cm;
D sat - D n) + 1 cm;
D sat - D n) - 2 cm;
D sat - D n) - 3 cm;
D sat - D n) - 4 cm;
The position of the line of the hips is determined by the segment of the ulcer, which is laid up vertically from the point I:
The position of the bottom line depends on the length of the trousers:
TH \u003d D b + y r
where p \u003d 1 ... 1.5 cm is the fabric utilization during the technological processing of the product. Smaller values \u200b\u200bare used with shorter trousers, b aboutlshiye - at longer.
The position of the knee line of the TC is defined as the difference in measurements, cm:
for nursery girls: ( D sat - VK) + 1.5 cm;
for girls of preschool group: ( D sat - VK) + 2.5 cm;
for girls of primary school group: ( D sat - VK) + 3.5 cm;
for girls of the senior school group: ( D sat - VK) + 4 cm;
for teenage girls: ( D sat - VK) + 4.5 cm;
Through points T, B, I, K, N draw horizontal lines on which the segments defining the main widths are laid andus trouser details.
From the point H to the right and left lay the segments:
HH 1 \u003d HH 2 \u003d 0.5 * ( W n - 2);
HH 3 \u003d HH 4 \u003d 0.5 * ( W n + 2).
The segments H 1 H 2 and H 3 H 4 determine the width of the front and back halves of the trousers along the bottom line, and the rear half of the trousers is 4 cm wider than the front half.
From point K to the right, segments are laid:
KK 1 \u003d KK 2 \u003d 0.5 * ( W to - 2);
KK 3 \u003d KK 4 \u003d 0.5 * ( W to + 2).
The segments K 1 K 2 and K 3 K 4 determine the width of the front and back halves of the trousers at the knees.
Connect the straight points H 1 and K 1, H 2 and K 2, H 3 and K 3, H 4 and K 4.
The position of the middle front line determines the segment BB 1:
BB 1 \u003d 0.15 * C b + 0,25*(N b + 0.5) + 1 cm.
Through point B 1 draw a vertical intersecting the horizontal drawn through points I and T. Places of intersection of lines mark the points I 1 and T 1.
Up vertically from the point T 1 lay segment T 1 T 2:
T 1 T 2 \u003d 0.7 cm
Point T 2 is the upper end of the middle front line.
To determine the width of the front half at the level of the waist horizontally from the point T 1 lay the segment T 1 T 3:
T 1 T 3 \u003d 0.5 * C t + B + 0.5 cm
where B \u003d 1 ... 2 cm is the value of the solution of the front tuck.
Up from the point T 3 vertically lay the segment T 3 T 4:
T 3 T 4 \u003d 1.0 cm for girls nursery, preschool and primary school groups;
T 3 T 4 \u003d 1.2 cm for girls of the senior school group;
T 3 T 4 \u003d 1.7 cm for adolescent girls.
Point T 4 is the apex of the lateral line of the front half of the trousers. Points T 2 and T 4 connect a straight line. Line T 2 T 4 - the waist line of the front half of the trousers. Its intersection with the vertical drawn from point T is denoted by T 0.
To determine the step width of the front half of the trousers, calculate the length of the segment B 1 B 2, which is laid horizontally to the left of point B 1:
B 1 B 2 \u003d 0.3 * (0.4 * C b - 1,5).
Connect the points B 2 and K 2, at the intersection with the horizontal Ya 1 put the point I 2.
The position of the lateral line of the front half of the trousers on the thigh line is found by calculating the length of the BB 3 segment, which is laid horizontally to the right of point B:
BB 3 \u003d BB 1 + B 1 B 2.
Connect the points T 4 and B 3, B 3 and K 1. The intersection of the line B 3 To 1 with the horizontal drawn from point I, denoted as I 3.
The position of point B 4 is determined by the segment BB 4, which is laid horizontally to the left of point B:
BB 4 \u003d 0.5 * ((1.4 * C b + N b - 1) - B 2 B 3) + 0.5 cm.
Point B 4 is connected to point K 4. The intersection of the straight line B 4 K 4 with the horizontal Ya 2 is designated as I 4.
The position of point B 5, which determines the step width of the rear half of the trousers, depends on the length of the segment B 4 B 5, which is calculated and laid to the right of point B 4 horizontally:
B 4 B 5 \u003d 0.7 * (0.4 * C b - 1.5 cm).
Through point B 5 draw a vertical up to the intersection with the horizontal at point T 5 and down to the intersection with the horizontal at point I 5.
The position of the lateral line of the rear half of the trousers is determined by the length of the segment BB 6, which is laid to the right horizontally from point B:
BB 6 \u003d 0.5 * ((1.4 * C b + N b - 1) - B 2 B 3) - 0.5 cm.
Connect the points B 6 and K 3. The intersection point of the resulting straight line with the horizontal Ya 3 is designated as I 6.
Determine the direction of the midline of the back half of the trousers. It depends on the length of the segment T 5 T 6:
for girls of nursery and preschool groups - 2 cm;
for girls of primary school group - 3 cm;
for girls of the senior school group - 3.5 cm;
for teenage girls - 4.5 cm.
Connect the points B 5 and T 6. The resulting straight line determines the direction of the midline of the back half of the trousers.
The position of the horizontal lateral line T determines the segment T 6 T 7:
T 6 T 7 \u003d 0.5 * C t + B + 1 cm
where B \u003d 2 ... 3,5 cm - the size of the solution of the back tuck.
Point T 7 is connected to point B 6.
Drawing a basics of trousers

(To view the enlarged drawing in a separate window, click on the drawing with the mouse).
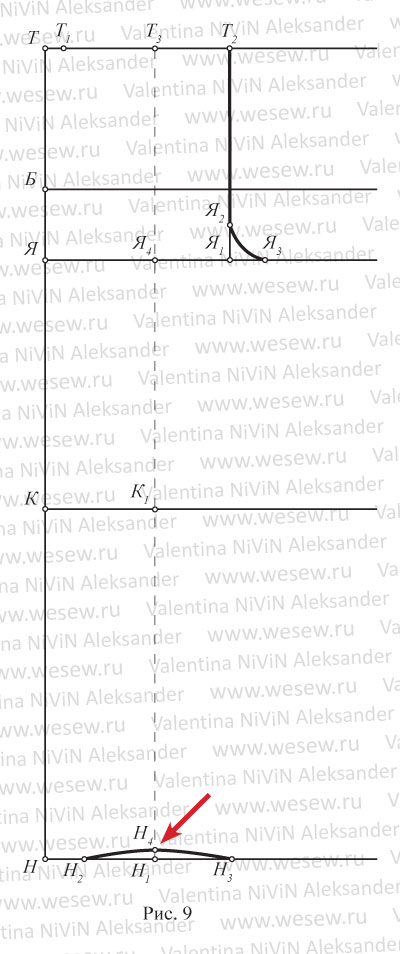
Draw the bottom lines of the front and rear halves. The bottom line of the rear half is a straight line Н 3 Н 4. The rise of the middle of the bottom of the anterior half HH 5 \u003d 0.5 cm. Point H 5 connect a smooth curve with points H 1 and H 2. Line Н 1 Н 5 Н 2 - bottom line of the front half of trousers.
Make out the step lines of the front and back halves of the trousers. For this, the sections K 2 I 2 and K 4 I 4 are carried out by smooth curves turning into straight lines K 2 H 2 and K 4 H 4, respectively. Line Н 2 К 2 Я 2 is a step line of the front half of the trousers. The length of the step line of the rear half of the trousers is made equal to the length of the line H 2 K 2 Z 2:
H 4 K 4 I 4 \u003d N 2 K 2 I 2,
where H 4 K 4 I 4 is the step line of the rear half of the trousers.
Build the midlines of the front and back halves of the trousers. To do this, determine the position of the auxiliary points lying on the bisectors of the angles B 1 I 1 I 2 and B 5 I 5 I 4:
I 1 I 7 \u003d 1.8 ... 2.5 cm;
I 5 I 8 \u003d 2.5 ... 3 cm;
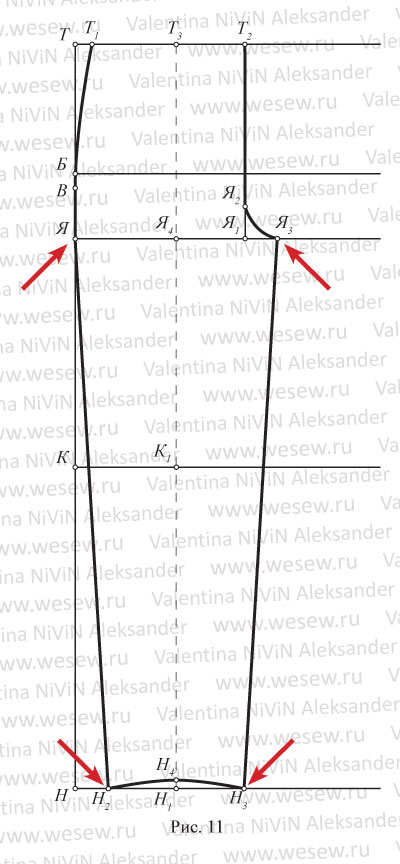
Connect the points I 2, I 7, B 1 and I 4, I 8, B 5 with smooth curves. Line I 2 I 7 B 1 T 2 - the middle line of the front half of the trousers. Curve I 4 I 8 B 5 continues along the inclined B 5 T 6.
Draw the side lines of the front and back halves of the trousers. Through the points H 1, K 1, 3, B 3, T 4, draw a straight line in the area from the point H 1 to the point K 1, passing further into a smooth curve. Line T 4 B 3 K 1 H 1 - side line of the front half.
The lateral line of the posterior half is drawn through the points H 3, K 3, B 6, T 7. On the plot N 3 K 3 this line is straightforward. Then it goes into a smooth curve. Equalize the length of the lateral line of the posterior half along the length of the lateral line of the anterior half. The upper point of the lateral line of the posterior half is designated T 8. Line T 8 B 6 K 3 H 3 - side line of the rear half:
T 8 B 6 K 3 H 3 \u003d T 4 B 3 K 1 H 1.
To determine the position of the upper point of the midline of the back half on an inclined B 5 T 6 from point K, a notch with a radius equal to CT 8 is made. The resulting point is designated as T 9:
CT 9 \u003d CT 8.
Connect the points of T 8 and T 9. This is the waistline of the back half of the trousers. Line I 4 I 8 B 5 T 9 - the middle line of the back half.
On the waist line of the front half place the front tuck. The middle of the tuck coincides with the vertical T 0 T. On both sides of the point T 0 lay half of the front tuck solution. The size of the solution of the front tuck is 1 ... 2 cm, the length is 3.5 ... 6 cm. The sides of the tuck are drawn in straight lines.
The back tuck is placed in the middle of the waist line of the back half. The midline of the tuck is perpendicular to the waistline. The solution of the back tuck is 2 ... 3.5 cm, the length is 5.5 ... 8 cm.
 Constructing a dress base pattern and design modeling
 Patterns of children's trousers and sewing master classes Building the back half of trousers
 Building a pattern of vests for boys: the easiest way