How to make a decoupage bottle. The first steps in decoupage bottles, different materials
Do-it-yourself New Year decoupage of bottles is simply obliged to decorate the holiday table. But not everyone takes up this interesting activity. Yes, it’s more complicated than a simple bottle design with a pasted pattern. But not everything is so complicated.
So, decoupage of a bottle of champagne:
- We close the neck with masking tape, remove the labels in cold water.
- Degrease, primer the whole bottle with champagne.
- Glue the file with a napkin.
- Paint the background by typing in the motive.
We suggest using a stencil or by hand to draw a light pattern, as on frosty glass.
- On the reverse side, free of decor, write: “Happy New Year!”, Sprinkle with sparkles.
- We cover with acrylic varnish.
- We remove the tape.
- We decorate with ribbons and snowflakes, add decor from cones and fir branches.
Important! Do not try to dry the champagne bottle to make decoupage quickly. The bottle may explode, and if not in your hands, then after a while - on the table.
The neck of champagne is painted over at will. But you can arrange it with a winding of satin ribbons of gold, red and blue.
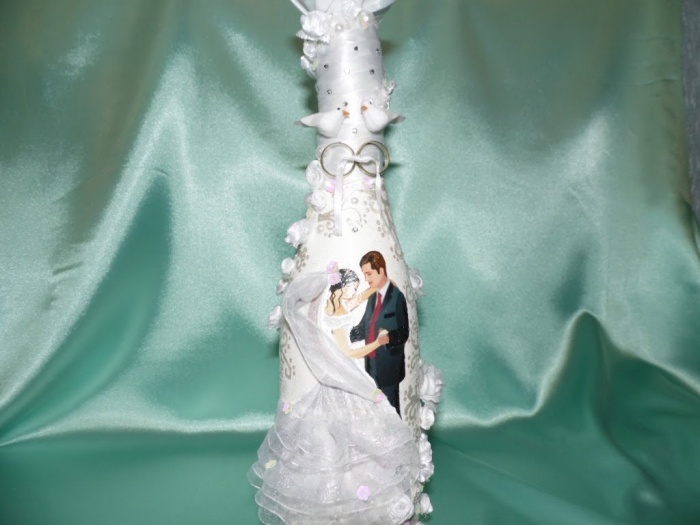
To decorate bottles and glasses for a wedding you need to use following scheme:
- The surface is degreased to begin with. To do this, wipe it with alcohol
- Then special primer is applied for decoupage, which is sold in stores for creativity. However, acrylic paint as a base is also perfect. The paint is applied with the most common foam sponge, which is usually used to create makeup.
IMPORTANT: Often there is a need for a second layer of acrylic varnish.

- As soon as the varnish dries you can treat the bottle with glue for glass, and then attach napkins. It is recommended to use a special pistol. Do not worry about the fact that the glue is formed in the form of ampoules - they melt in the gun
- After 60 minutes, the bottle should cover with several more layers of acrylic varnish
- After another hour, you can start painting the day of the bottle
- And now can be decorated to your taste with sequins, ribbons, flowers, lace, beads


Glasses are decorated according to the same principle as bottles. It is recommended to tie two glasses or two bottles with ribbons as a symbol of a strong relationship.

If you want something unusual, You can issue one bottle in the male theme, and the second in the female. It will also be quite interesting to look at things that capture the hobbies of the newlyweds.


Decoupage birthday bottles for men
A good option for decorating a birthday bottle for a man is design with a portrait of the birthday man:
- Be sure to degrease the surface with alcoholhaving previously removed all the stickers on it
IMPORTANT: The remnants of the old glue also need to be removed, otherwise it will affect the quality of the decoupage.
- Print two photos for direct and reverse equipment
- Pour a small amount of water into a container. Dip the photo face down in the water - this will help layering the sheet. Holding the image for a couple of minutes in the water, gently roll the extra layers with your fingers so that only one subtle color remains

- Meanwhile, on the bottle, in accordance with the size of the photograph, the place under it is indicated. This place is greased with acrylic varnish. From above the face is pasted inside the photo
IMPORTANT: Smooth the paper thoroughly - there should be no bubbles or wrinkles.


- After the photo dries, you should stick a second on it. Only this time the image will be addressed to the viewer. Smooth the picture

- In the most ordinary syringe, type a texture paste, which can be purchased at the store for creativity. Squeeze it on outline photos. Can also do the inscription


- To make the bottle look more elegant, you can use colored paste draw some patterns


Do not think that the design for a gift to a man can not be bright. Here are some examples of gift bottle decoupage:


Decoupage of birthday bottles for women
A rather interesting and unusual effect is obtained if done fabric decoupage. You can take some unnecessary tights:
- Degrease bottle surface
- Cut off part of tights soak with the mixture consisting of water and PVA
IMPORTANT: The proportion of glue and water should be 1 to 1.
- After soaking with solution pantyhose are laid out on the bottle in the form of waves, a fold. In this case, do not forget to leave a place for sticking napkins
- Wait completely dry material
- Primer acrylic paint or a special composition bought in a store for creativity
- It remains only tint to your taste, decorate


A very good option for decoupage bottles as a gift to a woman - p glue the lace. Small chains beads also fit.

Decoupage as a gift to fans of French charm


Egg shell decoupage on bottles
Such a decoupage will add volume to the patterns on things, making the bottle truly unique. You will need:
- Shell, peeled of dirt and films
- Wide flat brush
- Special napkin for decoupage
- Acrylic paint
- Toothpick
- The varnish that will be applied to the topcoat
Getting started:
- Crush the shell before applying to the bottle with your fingers into small pieces. However, adjust the size depending on the idea
IMPORTANT: Some craftsmen glue large pieces of shell to the surface, and then crumble them with a blunt object, placing them with a toothpick. However, for beginners it is better not to resort to this method.

- Glue the surface of the bottle. It is recommended to start with the neck. Shell pieces are applied to the glue and leveled with a toothpick. Do not forget to lightly crush the material

- Cover the entire bottle in this way, but do not touch the bottom. Top the entire workpiece with acrylic white varnish.

- Since cracks need to be identified, brown the surface of the bottle with a sponge. It is better to mix several shades in advance to get the desired

- Without waiting for the varnish to dry, wipe the bottle with a damp cloth. Thus, the varnish will remain only in cracks, as required
- Cut out the desired image from napkins. Separate the top layer from them.

- Now selected attach pictures to the bottle and apply glue on top
IMPORTANT: Spread the glue from the center to the edges with a wide brush.

- The final stage is applying acrylic varnish


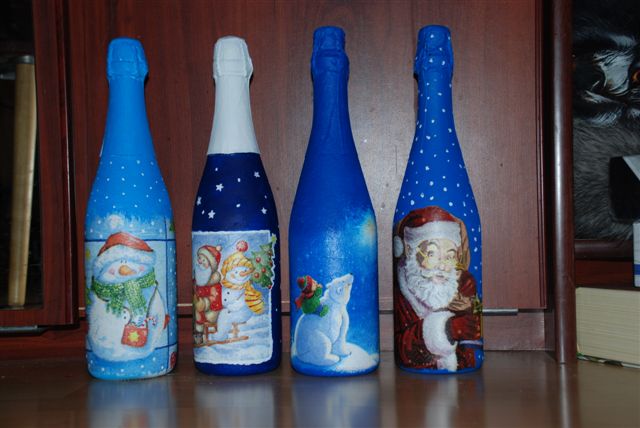
Decoupage bottles for the New Year
For this decoupage us will need:
- Bottle
- Acrylic White Primer
- Decoupage napkin
- Acrylic paints
- Crystal paste
- Topcoat for fixing the coating
- Golden red glitter
- Synthetic brushes
- Sandpaper with small grains
- Foam sponge
- Palette knife with which artists remove excess paint or apply soil
Getting started:
- First thing you need to clean the bottle of labels and traces of glue. To do this, it should be placed in a container with water at room temperature - this is how the labels are disconnected. But the glue residue is easy to get rid of with the help of baby cosmetic oil
IMPORTANT: Do not forget to rinse the bottle with dishwashing liquid if you used cosmetic oil.
- Then alcohol degrease the surface of the glass

- Sponge should be applied with soil. It is recommended to make the first layer thin, and then dry it with a hairdryer - so the soil will lie on the glass in the best way. The second layer should also be thoroughly dried.

- Tear off the images you want to stick from the napkin. Remove the two lower layers, leaving only colorful
IMPORTANT: Images are best torn off rather than cut out, because torn edges are easier to mask with the background so that they merge with it.
- The top layer must be placed face down on the file. Pour some water directly onto a napkin. Spread out all the bumps on the napkin. You can help yourself with a brush. After some time, remove excess water from the paper.
- T now attach the file to the bottle so that the seamy side of the napkin rests on the bottle. Gently smooth the creases
- Pulling at one corner of the file, remove it. The napkin will remain on the bottle
- Smooth folds again and cover the bottle with glue or acrylic varnish. Let the bottle dry
IMPORTANT: Move from the center to the edges.

- Small folds, which probably still remained, should be addressed separately. It is easy to remove them thanks to sandpaper with small grains. Sweep the sandpaper along the bumps
- The turn has come top coat

- Now you need to work on the main background. Apply white and blue acrylic varnish with a sponge, remembering to remove excess from the sponge

- Mix the shades that the edges of the drawing should work out - you can’t do without it if you want to achieve a natural image

- It should be toned and cork

- Take an unnecessary toothbrush and use it make splashes of white paint

- Apply again top coat
- Make with a syringe the inscription

- The image should be three-dimensional. To do this, a clear paste with glass pieces is carefully applied to the bottle - it will simulate ice. Silver color acrylic will also help.
IMPORTANT: This is where the spatula comes in handy. They are most likely to apply such a coating.


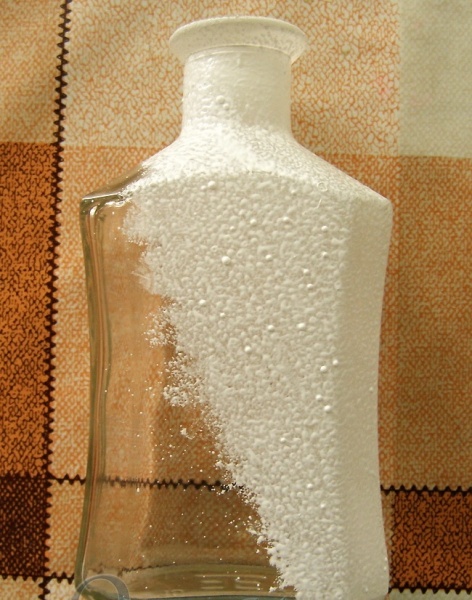
Another great way to decorate the bottle for the New Year is sprinkle it with large crystals of salt. The technique is simple - salt is attached to glue.

Decoupage bottles with napkins
Decoupage with napkins looks especially chic if it is used in the process of work craquelure varnish - It helps create the effect of antiquity. So, for such a case will need:
- Bottle
- Acrylic paints
- Craquelure varnish
- Napkins
- Glass degreasing alcohol
- Synthetic fiber flat brush

Getting started:
- So first thing to do degreasing the surface and removing old labels
- Now cover the bottle with acrylic varnish. Try to make the layer even. Apply best with a sponge
IMPORTANT: Regarding the color scheme, keep in mind that the base should be the color that is planned for cracks. Therefore, if the bottle itself is white, then it is desirable to make the base black or dark brown.
- Wait for the varnish to dry. You can use a hairdryer
- Now apply on top craquelure varnish. This layer is not necessary to dry
- Next, with neat strokes, close to each other is applied acrylic lacquer. This layer is important to dry properly.
- At this stage we start drawing a pattern from a napkin. Separate the top layer. Tear off all the excess, while trying to prevent smooth edges, which are then difficult to make natural
- Dilute PVA in water. Apply the solution to the surface of the picture attached to the bottle. Move from the center to the edges
- Varnish surface. Work out the details if you wish.

Decoupage of bottles with toilet paper
So, for decoupage of a bottle with ordinary toilet paper itself come in handy:
- Bottle
- Toilet paper
- Napkins
- Acrylic paints in various shades
- Salty dough
- Various items for decoration - for example, beads
Getting started:
- Of course, degreasing the bottle is an indispensable stage of work
- Now tear the toilet paper into piecesglue the bottle with these pieces
IMPORTANT: Glue in such a way as if forming a background.
- Now stripes should be made of paper. It is advisable to select the width within 1.5 centimeters. But the volume should be different - for this, some stripes are created by two-layer
- Pour some water onto the surface. Wet each strip lightly in some places, and then twist - so the liquid will be distributed equally, and the strip will not finally get wet

- Similarly, make toilet paper balls. However, the idea will only benefit from the use of salt dough. It is recommended to outline the outline of the pattern with a pencil.

- Let the work dry. After that can paint a bottle

- Add additional elements to the decor optional

Decoupage bottles with ribbons
There is an interesting way to decorate a bottle. ribbons twisted by rollers. Will need for this decoupage only a bottle, tapes and glue.
IMPORTANT: As for the number of tapes, you have to stock up 36 meters.
The principle of creating decoupage is simple:
- Cut the ribbon into small pieces. Twist each piece into a roll
- Glue the rolls onto the bottle. It is recommended to start work from below
- After the ribbons are glued, like a knitting needle spread them a little. Try to keep the bottle visible through the decor.
- The neck also needs to be decorated. You can choose the easiest way by wrapping it with ribbon and attaching a flower

But there is also many other ways beautifully and with imagination to wrap ribbons around the bottles:


Decoupage bottles of flowers
You can design a bottle not just with ribbons, but with ribbons in the form of flowers. AND the following things will be needed for this:
- Bottle
- Ribbons
- Beads
- Acrylic primer
- Acrylic paint
- Silver outline
- Glue gun
The process is as follows:
- To start a bottle degreases nail polish or alcohol
- Now soil is applied with a sponge
- Bottle is covered acrylic paint
IMPORTANT: You can apply paint with a sponge or a brush. However, the most interesting effect is obtained if you use a sponge - the surface becomes rough.
- While the bottle is drying, you can start making flowers. The easiest way is to simply string pieces of tape onto a needle and thread. The thread is pulled - the outlines of a flower are formed. Another way is to simply fold the corners and burn the edges. The last action will ensure soldering
- Once the bottle is dry can stick flowers. You can decorate them with beads and thin ribbons.
- The contour around the perimeter of the tapes patterns are looming


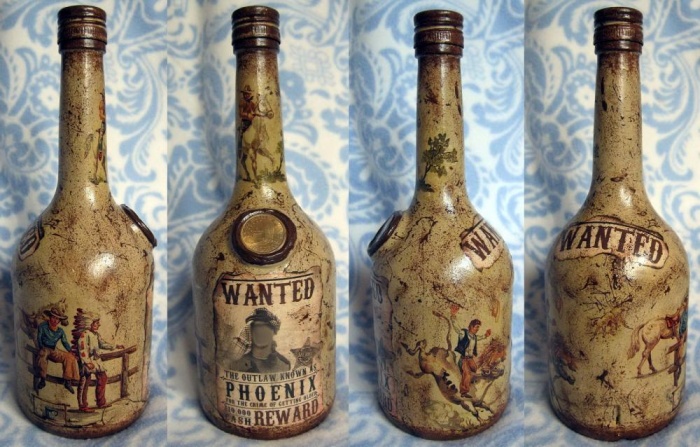
A bottle presented for some holiday is, of course, a good gift in itself. However, you must admit, it will be much more pleasant to receive a unique thing, carefully made by someone else’s hands. In this case, decoupage is able to help out even those who previously had no relation to needlework.
At the request of our readers, we prepared a master class in which we examined step-by-step decoupage of the bottle with do-it-yourself napkins.
The lesson is suitable for beginner craftswomen of all ages. A gift for a man is taken as the basis, hence the corresponding design. However, you can choose a different pattern and decorate containers of any shape according to the same principle. Give it a try! It is very exciting, beautiful and really simple and fast!
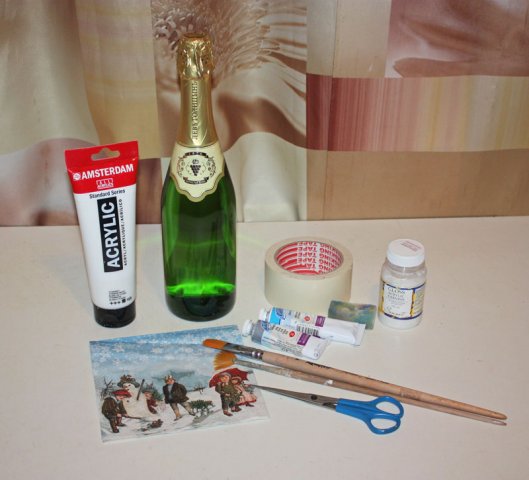
Material preparation
To do decoupage, prepare materials and tools:
- a half-liter glass bottle, the same as for the marine style and leather;
- a three-layer napkin with a thematic picture (it is better to buy a special one);
- white acrylic dispersion paint;
- pVA glue;
- glossy water-soluble varnish;
- a new dishwashing sponge;
- soft brush;
- decorative rope;
- large beads or pendants;
- scissors;
- nail polish remover;
- cotton wool;
- disposable dishes for glue.

How to make decoupage from napkins on a bottle
First, soak the discarded bottle in warm water for one hour to soak the label paper. Clean the glass from paper.
As a rule, glue remains on the surface, which is problematic to wash off with water. To completely remove residues, use nail polish remover. Dry the dish.

Cut the dishwashing sponge into two parts.

Before decoupage a glass bottle with a napkin, create a uniform background. This will hide possible errors when gluing the picture. Apply white acrylic water-dispersion paint to the surface.
Paint do not sponge, but make frequent tangential movements, as if “clinging.” Wait for the paint to dry completely.

Select a picture. A suitable option can be a photo of cities, cars, all kinds of maps, images of large and strong animals, fish. Consider the nature of the man, his hobbies and your relationship with him.
If this is a loved one, then romance is acceptable, if a colleague or chef, then everything should be in a strict style. Carefully peel off the top coat.

Wrap the bottle with a colored layer of napkins and determine which fragment is needed for decoupage. Gently tear it off with your fingers. You can cut it off, but then on the craft the edge will be clearly visible. Better cut with a margin, and then cut edges.

Dissolve one-to-one PVA glue with water in disposable dishes. Put the fragment face down on the clerical file. Gently stretching a napkin, apply a diluted PVA glue with a brush.

Attach the drawing on the file to the glass. Remove the file carefully. Using a glue brush, adjust the pattern where necessary.

While the glue is drying, prepare the pendant for decoration.
Since the image of one of the cities of Cuba, which at the beginning of the last century was the center of the gambling business, was selected, beads in the form of dice and chips were taken as pendants in this decoupage master class.

Coat the surface of the craft with varnish.

Tie the pendant by tying the neck in several rows with a rope.

Decorate the cork if you want. It also needs to be pre-coated with acrylic paint.


A master class in decoupage from napkins on a bottle for beginners was prepared specifically for the online magazine "Women's Hobbies." See other decoupage lessons. Needlework is ideal for those who do not know how to draw, but want to create masterpieces.
Visit us more often, and in order not to miss the release of new publications, subscribe to our news on social networks. We always have many interesting lessons and articles for women.
Today, the beautiful French word for decoupage is the technique for decorating various surfaces with the help of carved drawings. In fact, this is an application, by the way, and the term decoupage itself is translated as “cutting”.
The decoupage technique is quite simple in execution, but it gives an amazing effect - with the help of ordinary drawings you can transform not only old bottles, various containers, vases or bread bins. Craftswomen even decorate pieces of furniture or wooden doors with decoupage, making them no worse than vintage or antique interior details.
 1
1
The easiest way to learn decoupage is to start small. For the first experiment, you can use an empty container, and perform decoupage on bottles of glass or plastic.
What you need for decoupage
As a material for decorating the surface, the craftswomen use a wide variety of elements. It can be:
- clippings from newspapers or magazines;
- three-layer table napkins with a pattern;
- special decoupage cards that are sold in needlework stores;
- thin fabrics with an interesting pattern or texture.
Attention! To transfer a newspaper or magazine clipping to glass, you will need preliminary preparation of paper and the drawing itself.
To begin with, the picture is cut out, then it is covered with several layers of acrylic varnish. Now the paper needs to be soaked in warm water for 20 minutes. After swelling, the paper substrate should easily peel off, and the image itself should remain on the varnish layer. It is in this form that the figure is glued to the base.

The option with magazine clippings is quite difficult to perform, for this work you need good skills. Decoupage cards are not cheap, and needlework stores are not everywhere. It is a priori more difficult to work with fabric than with thin paper, it also requires practice and a certain skill of the master.
That is why it is best to start mastering the decoupage technique with table napkins. For these purposes, napkins already available in the house are quite suitable, or the hostess can specially buy material with a favorite pattern. The main thing is that the cost of napkins is available to everyone, in addition, the remains of material after decoupage will definitely be useful on the farm.
Important! The napkin for decoupage of the bottle must necessarily be multi-layered so that the master can separate the top of the paper with the pattern applied to it. The thinner the picture, the easier it is to stick it on, and the more inconspicuously the joints and other flaws of the decoupage work will be.
To work, you will need a number of tools, but it does not have to be purchased materials, they can easily be replaced with improvised means. So, for decoupage of a plastic or glass bottle you will need:
- The bottle itself - it is better to choose a volumetric container, it is more difficult to work with thin and narrow vessels, and the result will not be so bright.
- Degreasing agent: acetone, nail polish remover, alcohol, window cleaner and other solvents.
- Drawing for decoupage.
- Acrylic paint to paint over the entire surface of the bottle (a construction paint is suitable for walls or other surfaces).
- Colors for paint (if provided by the design idea).
- A special foam rubber brush for decoupage can be easily replaced with a regular kitchen sponge or a piece of foam held by a clothespin.
- Acrylic adhesive for decoupage is not much better than ordinary PVA diluted with water in a 1: 1 ratio.
- A wide brush made of synthetic fibers (so that hairs are not lost during operation) for applying glue.
- Glitter or acrylic marker, which is convenient to trace the outline of the picture on the bottle for greater brightness and effect.
- Various beads, ribbons, shells, twine or burlap - this decor is selected in accordance with the theme of the design of the bottle and must comply with the general concept of bottle decoration.
Advice! It is not necessary to buy special tools and materials for the first decoupage experience - they can easily be replaced.
But, if the master constantly works in this technique, it’s better to still get a professional set, then the finished decor items will be more accurate, and the decoupage process will become easier.

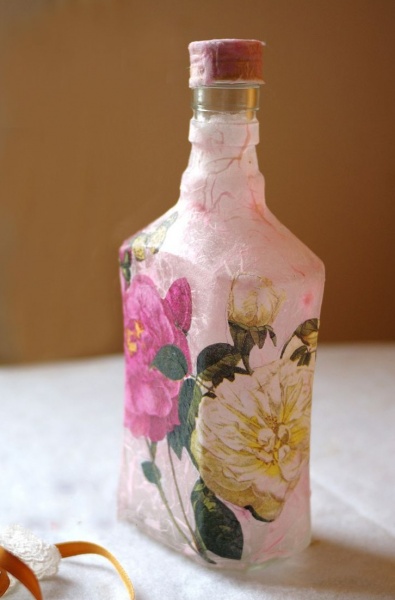
DIY decoupage bottles
The first thing a beginner should do is visualize the idea, that is, imagine what the bottle will look like after decoration. The beginner can be helped by numerous photos of finished works, various master classes or visiting a hand-made exhibition. In accordance with this, paints of the desired shade, pictures, various decorative elements are selected.
Now you need to find a beautiful vessel - a plastic or glass bottle of an interesting shape. Although the bottle will be painted during operation, for the first time it is better to choose a transparent container.
Armed with the necessary tools, you can begin to work.
Preparing a bottle for decoupage
First, you should try on the matched picture to the existing bottle - they should correspond in size. Applying the rest of the decor, you can understand how the bottle will look after decoupage, and how best to arrange all the details of the decor.
Now the bottle needs to be prepared for staining:
- first, the bottle is soaked in a warm soapy solution so that all the labels get wet and easily separate from glass or plastic;
- not only paper labels, but also all glue present on the surface of the vessel is removed from the bottle with a metal brush;
- the bottle wiped dry is degreased by wiping with a cotton swab dipped in alcohol or acetone.
After that, the primer should be applied to the bottle, which in this case is acrylic paint. But this is far from the only way to prepare the basis for transferring the picture. The bottle is often covered with various textural materials, it can be sand, eggshell, seashells and much, much more. However, it is easiest to work with smooth surfaces, so it is recommended that the novice decoupage master still paint the bottle with acrylic-based paint.

It is easiest to apply a dye with a brush, but with this technique, stains will certainly remain on the glass, and the paint itself will go unevenly. Therefore, experienced masters of decoupage offer to use a foam sponge.
In this case, the paint is tamponized, that is, applied to the bottle with short pressing movements. Such staining must be repeated 2-3 times - it depends on the ideas of the master and the desired degree of tinting of the existing base.
Advice! The color of the base should be one or two tones lighter than the selected decoupage pattern. It’s easier to hide flaws in the work, and the edges of the picture will be less noticeable.
Each coat of paint should dry thoroughly. While the bottle dries after the last stain, you can do the picture.
Preparing a decoupage drawing
It was decided to use for the first experiment a regular table napkin with a favorite pattern. From this napkin you need to very carefully separate the topmost layer - the one on which the pattern is applied.
Now it is necessary to somehow separate exactly that part of the picture that will be needed for decoupage. There are two ways to do this:
- small sharp scissors (often the craftswomen use a tool from a manicure set);
- just tear off the thin paper, highlighting the desired fragment of the picture.
As practice shows, the first method is more convenient to use on large patterns with clear lines and borders, for cutting geometric pictures or in the case when the background is very different from the shade of the picture.

The method of tearing off the pattern with your fingers allows you to better mask the line of the junction of paper and paint, but this only happens when the base is matched to the color of the picture itself. This method is best used by those who are just learning the art of decoupage. How to do it right is shown in the photo below.
Important! To facilitate the work, it is recommended to divide large drawings into smaller fragments. It is easier to glue thin paper to the glass, and the likelihood of air bubbles during decoupage will be less.
Bottle decoupage: process
Pasting a picture onto a base (in this case, a bottle) is called decoupage. In fact, this is a transfer of the drawing to the surface.

And it runs quite simply:
- A special glue for decoupage or a PVA stationery glue diluted with water is taken. The required amount of glue is poured into a container.
- The pattern cut out of the napkin is applied to the place allocated for it on the surface of the bottle.
- A wide and flat brush is dipped in glue and the cloth is smeared with quick movements. Here you need to be very careful, since the picture will be quite thin and will easily tear after getting wet, so you need to brush the surface no more than a couple of times. The movements of the hand of the master should be directed from the center of the applique to its edges. The main task is to prevent wrinkles of paper and to expel all air bubbles from under it.
- In this form, the bottle is left until the glue has completely dried.
- So that the bottle can be used, and the picture was durable, the surface is coated with acrylic varnish in three layers. Each coat of varnish should dry well.
Attention! Recently, PVA stationery glue has already been sold so liquid that it does not need to be diluted - you can work right away.
There is another option: use building PVA for decoupage, but such a composition must be diluted with water, choosing a proportion based on the desired consistency of the glue.
Finishing touches
You can create a decor in several ways:
- stick beads or sequins;
- tie a satin ribbon around the bottle neck;
- wrap the neck of the bottle with twine or thread for knitting;
- with the help of glitter (a dense acrylic contour of a contrasting color) or a special marker, circle the pattern, make thematic labels on the bottle, add sparkle;
- make decoupage brighter using art acrylics and a thin brush.

There are many ways to decorate a bottle after decoupage, and this is evidenced by photos of finished works by both novice masters and professionals. It all depends on the skills of the performer and the range of decorative elements.
More recently, in Russia people began to relax on New Year's holidays with the whole family. Not only schoolchildren and students, but also the working population has the opportunity to visit relatives, take a walk, play sports and devote time to their favorite hobby.
Decoration of interior items in technology is gaining more and more popularity among the fair sex. You can decorate in this way not only cutting boards, photo frames and other little things, but also bottles, for example, with champagne. These works will decorate the table, refresh it, make it special. Even if all year you did not have time in the bustle to master a new technique of creativity, you can do this just on New Year's days.
In this master class, we will consider the direct decoupage technique from a file, while we will put a picture on the bottle round, with the edge on the edge. When decorating directly with a napkin, champagne will stand, and not lie on its side, as when gluing a small motive.
It will be useful here to indicate the terms used by the masters of this technique.
A motif is a drawing from a napkin or a decoupage card, which will be located on the surface. Soil is an acrylic paint or a mixture of paint with PVA glue, which is applied to the glass with the first and second layer.
For decoupage, they usually use PVA glue slightly diluted with water. It is important to remember that when wet, the size of the napkin increases by approximately 0.5 cm on each side, which is very noticeable if you first apply a dry napkin to the surface to determine the boundaries where the motive will lie.
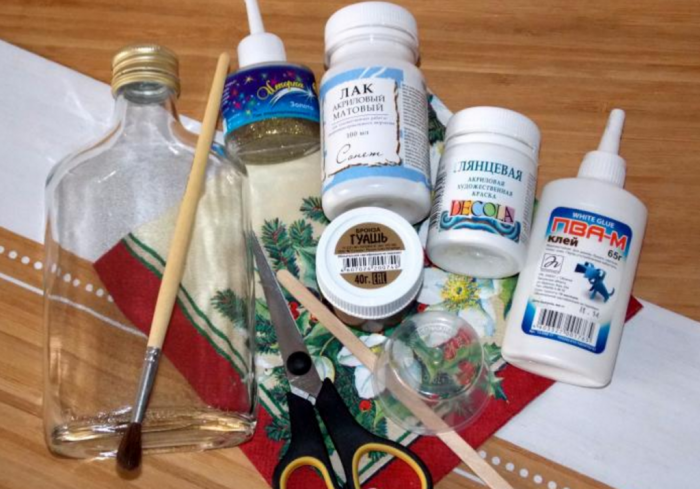
Materials and Tools
Always at hand at the craftswoman should have toothpicks, cotton buds, sheets of paper or newspaper, cotton wool. This is all found in every home. Pay attention to the reasonable arrangement of the workplace, to protect the hands, face (especially the eyes) from the effects of varnishes and paints. Therefore, it will not be amiss to purchase gloves, masks, etc. In addition to the above, prepare:- acrylic paints: white and pearlescent;
- ordinary brushes, as for watercolor paints;
- a sponge sponge or a piece of dry sponge for washing dishes, mounted on a clothespin;
- acrylic lacquer;
- the smallest sandpaper;
- acrylate putty for decorative work;
- napkins of suitable subjects, I took New Year's;
- artificial Christmas tree branches, real cones;
- for artificial snow, foam balls;
- pVA glue for paper and cardboard or construction;
- scissors;
- stationery file, better dense.
Also useful are inspiration, creative message and free time, as well as a good mood. In time, work can take several days, since it is necessary to carefully dry each layer, but when using a hairdryer, it can be accelerated up to several hours.
Beginning of work
Get good quality champagne.
As in the case of the old alteration, before applying any type of coating, you need to remove the old decorative layers. When decorating bottles, these are labels and excise stamps. First I soak the glass in water, then I remove the label with a brush. The remaining paper and glue can be easily removed with vegetable oil and sandpaper, vigorously rubbing the bottle.

Select a napkin in advance.

Before starting to prime the glass, degrease it with window cleaner or alcohol.
Add PVA glue to the paint and make a foam sponge.

Apply fine primer to the surface with small, point-wise movements.

Two or three layers is enough. Allow the bottle to dry or dry it thoroughly with a hairdryer on all sides.
Now grab some fine sandpaper and sand the surface.

During the grinding process, you will realize that the graininess is not removed until the end. In order to prepare the surface for decoupage from the file, take an acrylate putty.

Apply the paste on the bottle in the thinnest layer. To do this, take a plastic card of any bank instead of a spatula or simply use your finger. You can also remove excess with a thread. The bottle should lie on its side.

We use the hairdryer again. The paste dries very quickly.

Also cover it with the bottom of the bottle.

If necessary, walk over the surface with a nap, once more. This is how smooth the bottle ended up. Now she is ready to impose a motive.

Decoupage
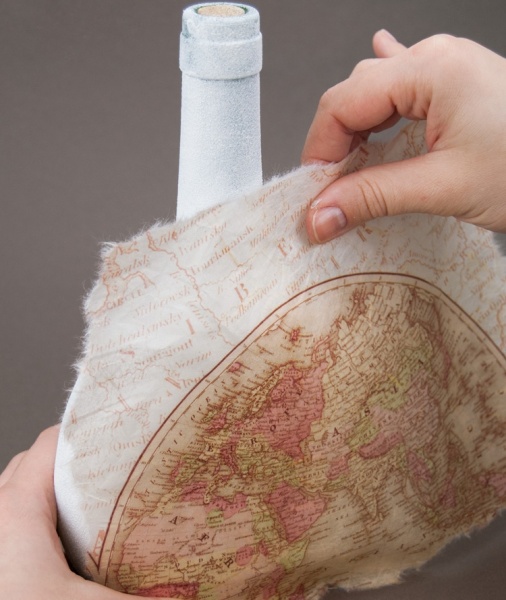
The easiest way to decoupage for beginners is decoupage from a file. I chose a motif with the image of Christmas balls, cinnamon, spruce branches. The drawing does not end on a quarter of the napkin, as usual, but is located on the half, as shown in the figure.
If you wrap a bottle with a napkin, it becomes clear that you have to reduce it a little. But let's not rush.
Make the edges of the motive jagged by cutting them off. Separate the napkin.


You may have to iron the motive from the inside out in silk mode.

Put the colorful layer of napkins on the file with the pattern down and start dripping water on top of it, from the middle to the edges. It is necessary that the entire napkin is in the water. In fact, by spreading it, you will not touch the paper with a brush, you will touch the water, and the napkin will be repaired by itself.

Flatten the motive, drive the air out from under it, the folds will straighten out. However, do not keep the napkin in the water for too long! The edges of the motif can be safely removed, as the paper has increased in size ..
The motive on the file can be raised in this way, as shown in the figure.

Lubricate the bottle thickly with PVA glue, while diluting it is not necessary in this case.


Now begins the most interesting and most difficult part of the work. Starting from the middle of the motive, lean the file against the bottle, but not all at once, but only the middle, and stroke the file with your hands up and down, as well as slightly to the sides.

Next, you need to put one edge of the napkin on the glue and slowly separate it from the file. If necessary, straighten with a wide brush with water, but it is better to glue immediately evenly.

The photo below clearly shows that one part of the napkin is still on the file, and the other is already on the bottle.

Now lap over the remnants of the napkin, adding a little glue. This whole process requires dexterity, attention and concentration. If necessary, gently cut off the excess part of the image.

Pay attention to the following photo. It shows that the last part of the napkin did not stick very smoothly, and when I tried to smooth out the motive, it began to tear. At this stage, if this happened to you, it is best to exhale. Let the napkin dry naturally, the hairdryer will only hurt.

Glue the top of the napkin, which previously remained just in the air. If creases are formed, they can later be removed with sandpaper.
Pick a color and paint the background with the same sponge.

While the paint is drying, make artificial snow. To do this, mix white paint, PVA glue and semolina, or foam balls like those in the photo.


 Fragrant flea market for frugal perfumes
 Fragrant flea market for frugal perfumes