DIY crocheted shoes on the sole. Knitted boots
Reading 17 min. Views 1.7k.
Recently, products made by one's own hands are becoming more and more popular. Handmade items can be home furniture, jewelry, toys, embroidered items, artificial bouquets, soap, decorative items for the home. Knitted shoes that can now be found not only on the catwalks do not lose their relevance. She quickly migrated to everyday life, and not for the sake of economy. Sandals, boots, and shoes look very interesting, sometimes they emphasize the outfit much better than the Prada louboutins or boats. Moreover, they can be done independently.
Advantages and disadvantages
Home tracks, booties have only one pluses: they warm their legs, quickly knit, and they allow you to use a variety of yarn. Even from the remnants you can make something interesting, bright. Models and schemes an incredible amount. A big question is caused by street types of products. Many people still consider them impractical, requiring special care, and this is partly true. Street knit patterns have certain disadvantages:
- Require washing. It’s not easy to brush off the dust with a rag or wipe the surface with a sponge. Therefore, drying will also take time.
- They can be stretched, which happens quite often. Shoes begin to dangle on the foot, and sometimes just fall off. Therefore, it is important to choose a suitable yarn, take a small size of knitting needles or a hook so that the fabric is less deformed.
- Not always suitable for walking. The knitted fabric is stuffed with dirt, loses its attractive appearance, it is definitely not worth it to walk along the clearing or dusty streets in such shoes. But this is a great option for clubs, going to the cinema, theater and parties.
It is very important to choose the right outsole. For street models, ready-made, for example, from old shoes is suitable. For slippers that are planned to be worn at home, the sole can be knitted from the thread used for the upper part of the product.
Warm your feetTo wear knitwear not only indoors, but also on the street, you need to think through all the details. It is necessary to take measurements correctly, to select materials. It’s just not possible to tie sandals or boots from the first tangle that comes across.
 Fast fit
  Allow to use the most different yarn
  Not always suitable for walking.
 Materials and Tools
Home slippers can be crocheted and knitted. It all depends on the skills of the craftswoman, the chosen model, personal preferences. For outdoor products, a hook is often used. The reason is the strength of the canvas. It is less deformed, not subject to stretching, it is easier to add the missing width or height of the part with a hook, the columns can be inscribed in almost any pattern, an additional strapping can be made, and some zest can be added.
As for the size of the tool, it needs to be selected for yarn. Manufacturers usually indicate the recommended range on the label. So that the fabric does not stretch, we knit a lower number. You will also need tools:
- a needle or an awl;
- scissors;
- tape measure;
- cardboard, oilcloth or pattern paper.
Additionally, glue may be required, sometimes you need elastic bands, zippers, fasteners, decorative straps, and beads. In many ways, the toolbox is associated with the selected model. Most attention is paid to yarn. It depends on her whether the boots will keep their shape, whether the summer sandals will be stretched, whether the slippers will rub on the child.
Shoes for the house can be knitted from different yarns. Acrylic, which does not cause allergies, is great. For warm slippers, wool is used pure or mixed with synthetic fiber. For summer options, you can take cotton. Outdoor shoes are not made from pure acrylic, since the feet will sweat, and the material itself often has a synthetic creak. The following types of yarn are suitable:
- cotton;
- silk;
- knitwear.
Cotton and acrylic “Jeans” from the Turkish manufacturer YarnArt is especially popular among knitters. He has many analogues. This composition is durable, pleasant to the touch, does not cause allergies, does not irritate the skin, does not rub. The cost is also pleasing. For summer sandals and sandals with ties, you can take stretch yarn. She will fit a leg tightly. In the manufacture of knitted shoes, you can mix several materials: flax or cotton for the main parts, elastic threads or elastic bands for fixing ties and straps.
 Knitting needles
  Types of hooks
  Cotton
  Silk
Silk 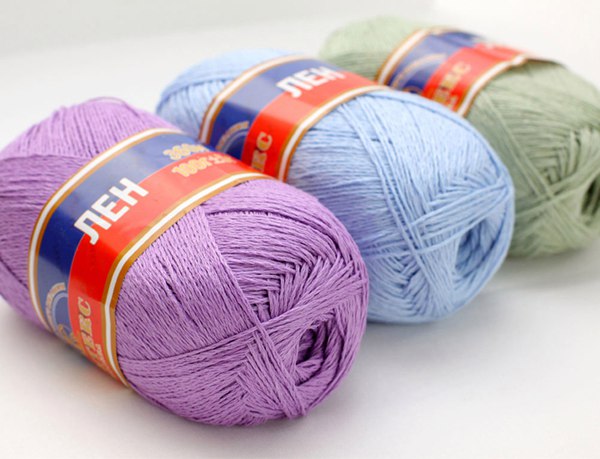 Linen
Linen  Knitwear
  Wool
Wool  Additional fittings
 How to take measurements
When knitting shoes, knowing only the size of the legs is not enough, but this is where you need to start. To take measurements, it is necessary to stand on a white sheet with your feet in a standing position (this is important, since in a sitting position the parameters can change). Next, you need to draw four lines with a pencil: two - to determine the length (perpendicular to the foot near the thumb and heel), the rest - for the width (on the sides of the foot). It will also be necessary to measure parameters such as lift and fullness. For boots and boots, ankle and lower leg girths will additionally be required. What is important to pay attention to:
- the width of the foot - taking into account this indicator, the sole is selected or made;
- sandals, shoes should fit snugly to the leg, measured to a millimeter;
- for slippers, you can add freedom of fitting;
- for children's shoes, 0.5 cm is added to the length.
The completeness of calves or ankles is not always necessary, it all depends on the model chosen. For ordinary open slippers, socks, tracks, sometimes only the length of the foot and width are enough. If knitted openwork boots, which are usually spacious on top, add 2-5 cm to the circumference of the lower leg for freedom of fit.
Outsole options
The easiest way to make a sole is to simply knit. But in this case, slippers or other shoes will be obtained exclusively for the home. It's not even the moisture resistance, but the strength of the material. Knitted fabric, regardless of the thread used, quickly erased on the street. Felt sole is quite popular, it is easy to attach the product to it, but it is also more suitable for slippers. Outdoor shoes, sandals or boots require special durability. Therefore, for such models it is better to use the sole:
- Of rubber, which is the most common option. For fastening, you need an awl, with which holes are made, and then they are tied with a hook. This option is considered the most suitable for beginner needlewomen. If the rubber is soft, you can make the first stitches with a thick needle or just stick a knitted fabric to the sole.
- Leather. Not the most practical option. You can pierce holes with the awl on the sole when knitting shoes, but there is a risk of stretching. For this reason, glue is most often used.
- Jute. It is great for summer shoes. Fastening is carried out by a needle, a hook, sometimes glue is additionally used.
Do not despair if you could not find in your city neither rubber, nor leather, nor jute soles. The times of deficits are long gone. You can always search for catalogs for needlewomen on social networks. Since knitted shoes are now quite popular, there will certainly be offers.
You can make a sole for knitted shoes with your own hands. For example, take old sandals, flip flops, boots and carefully cut off all the excess. You may have to change the insole. It can be cut according to the pattern from any material you like. But this method has a minus - worn shoes have scuffs, stains, against the background of a new top, all this will be even more noticeable. And to buy a new pair just for the sole is far from always profitable.
 Rubber
  Leather
  Jute
Jute  Knitted
 Model selection
You can endlessly view a photo of knitted shoes, look for interesting models, choose a master class on manufacturing. But there is one snag - the result does not always live up to expectations. Often, a handmade thing brings only moral satisfaction, but is not used in everyday life. It is worth immediately determining for yourself: are knitted boots needed, will the child wear such slippers, will a relative be delighted with such an unusual gift? The main criteria when choosing a model: practicality, compliance with gender, age and preferences.
Baby
The very first knitted shoes for children - booties. Pure wool or blended yarn is used to create warm patterns. It is important to make sure that the baby is not allergic to this material. The booties usually have ties or elastic bands to fix on the leg. There are also summer or fishnet socks. They are knitted from cotton, children's acrylic or semi-cotton, more have a decorative function. Often decorated with beads, flowers, berries, bows from satin ribbons.
For children over two years old, you can make slippers, closed tracks, loafers, boots. Knitted sneakers with lacing look interesting. This option is not only for boys, you can play with colors, decor. For a girl of 5-6 years old, boots and shoes will be an excellent choice. For home, you can make shoes on felt soles. For walks on the street, use the base from sandals and street slippers. All products can be crocheted or knitted.
 Booties
  Moccasins
  Tracks
 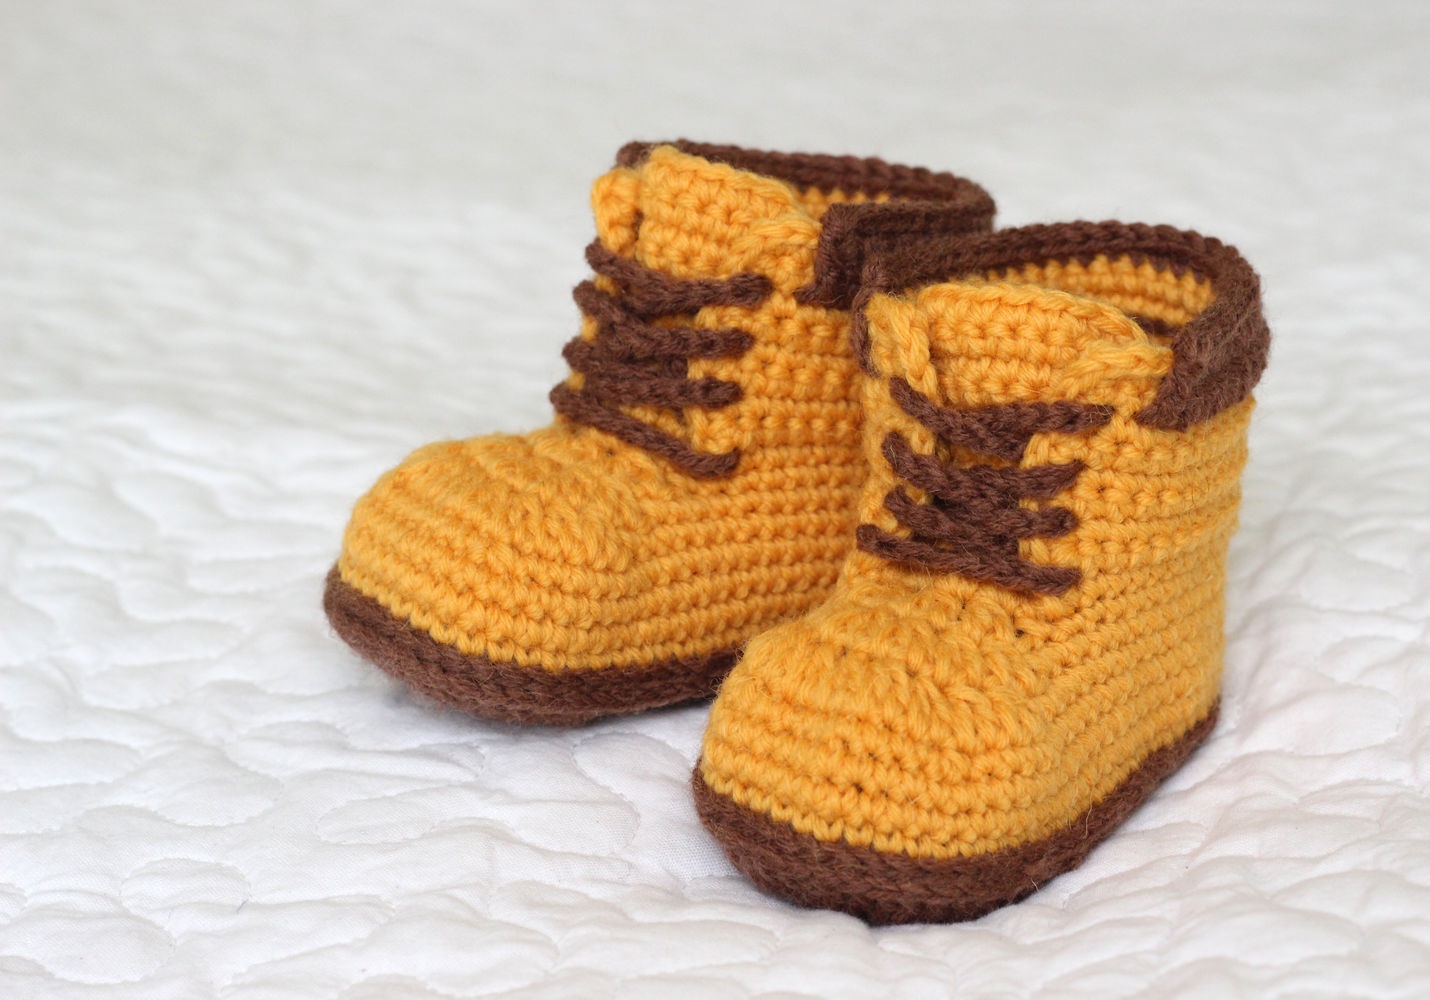 Boots
Boots Women
There are never too many shoes; they are needed for all outfits, and even better - for each bag or hat. The needlewomen have the opportunity to bring any fantasies to life, as well as save the family budget. Having completed one or two models and understanding the principle of creating shoes, you can invent something of your own. For women often knit:
- slippers;
- boots;
- shoes
- ballet shoes.
Most often, female models are crocheted, but you can knit shoes with knitting needles. In this option, it is important not to neglect the sample, wash it, dry it, calculate the number of loops in each centimeter and check if the yarn is stretched after wet-heat treatment.
 Slippers
  Boots
Boots  Shoes
Shoes  Ballet shoes
 Men's
The most common, comfortable and popular knitted shoes for men are socks. Although, it’s wiser to call them footwear. You can knit from an elastic band or sock, crochet and knitting, make a square, reinforced heel or boomerang. But the possibilities are not limited to this. For men, you can associate:
- slippers-galoshes;
- loafers;
- slippers.
The original solution is unusual slippers in the form of a car or some kind of equipment. The most common tank designs. A great idea for a gift for a man on February 23, grandfather on Victory Day or any other holiday.
 Socks
Socks  Galoshes
  Moccasins
  Slippers
  Slippers tanks
 Model-specific workflow
Shoes knit relatively quickly, unless it is an adult openwork boots or sandals made of thin yarn. They will require a lot of time, like prefabricated models of many motives. You should start with the simplest shoes (booties, slippers, shoes, boots), which is easy to associate with basic skills. Having understood the principle of execution, you can proceed to more complex models.
Booties
Despite the ease of manufacture, the knitted booties look very beautiful on the leg, they look like marshmallows, whence the name “marshmallows” appeared. For them, you can take any thread with wool, acrylic, cotton, mixed options are also suitable. For work you will need: 50 g of yarn with a meter of 150 m in two colors, knitting needles No. 3, a needle with a wide eye. Step-by-step description of knitting booties:
- dial 30 loops of the main color yarn. Leave a long tail, it will be needed for stitching;
- knit 79 rows with a garter pattern, then turn over, but do not touch the 80th, close the first 13 loops from the edge;
- then tie a thread of additional color. You need to start with the front row, alternate with the wrong two times. Get a strip of four rows;
- change the color again to the main one, knit 4 more rows. So repeat all the steps until you get 6 strips of two shades.
At the end of the work, it remains only to connect the booties. First you should sew open stitches to the side, then both edges of the sole. At the end, thread the top in the form of a marshmallow. The finished product can be decorated with ribbons, knitted or fabric flowers, beads.
 Knit 79 rows with a handkerchief
  Flip over
  Close the first 13 loops
  Tie a string of complementary color
  Knit 6 rows of each shade
  Sew open stitches to the side
  Combine both edges of the sole
  Build a Marshmallow Top
  Decorate the finished product
 Crochet Boots
It’s easy to make beautiful boots for your home. Shoes are warm, so it is better to use wool yarn. Such patterns of hexagonal motifs fit in. They look beautiful in different colors. In a similar way, you can make children's boots. For work, you will need a hook number 4. Description of the creation of the product (size 36-37):
- Knit five hexagonal motifs. In the first 3 rows, make a flower with a crochet, which is tied from 4 to 6. The result is a hexagon. Rows 1, 4 and 6 are tied with a thread of one color, 2 and 3 - of another.
- Sole to take the finished felt or knit according to any scheme.
- Next, you need to connect the obtained motifs with columns with single crochets.
At the end of the work, boots should be sewn to the sole, along the edge to make a harness. The finished product can be left unadorned, as it is itself bright and original. It is also recommended to decorate it with sequins, beads or decal.
 Knit five hexagonal motifs
  Motive assembly diagram
  Tie the sole
  Connect the obtained motifs between the columns with crochets, sew to the sole
 Shoes
For a little fashionista, you can crochet shoes. This is a great alternative to finished shoes. For work, you will need yarn with a meter of 280-300 m per 100 g. You can take the yarn in two folds with the same length for 50 g. You will also need a 2.5 hook and two buttons for decoration. Symbols in the diagram below: Art. with n - double crochet, c. p. - air loop. Step-by-step algorithm for creating the product:
- take the sole either ready-made or make it using any scheme;
- crochet three air loops and 15 tbsp. with n., get 10 times. Tie a row, connect with the beginning;
- dial 3 in again. item, but now knit 14 columns of 2 with a common vertex;
- make five connecting posts;
- expand the shoe, tie 3 in. p. lift and 27 tbsp. with n., make a backdrop;
- dial 20 in for the strap. item, knit art. with N., leaving holes for buttons.
If you need a large depth of the product, then you can make an additional row of columns. At the end of the work, you need to sew buttons on the straps. You can decorate your finished shoes with pearl beads and satin ribbon bows. Knit art. with N. leaving holes for buttons 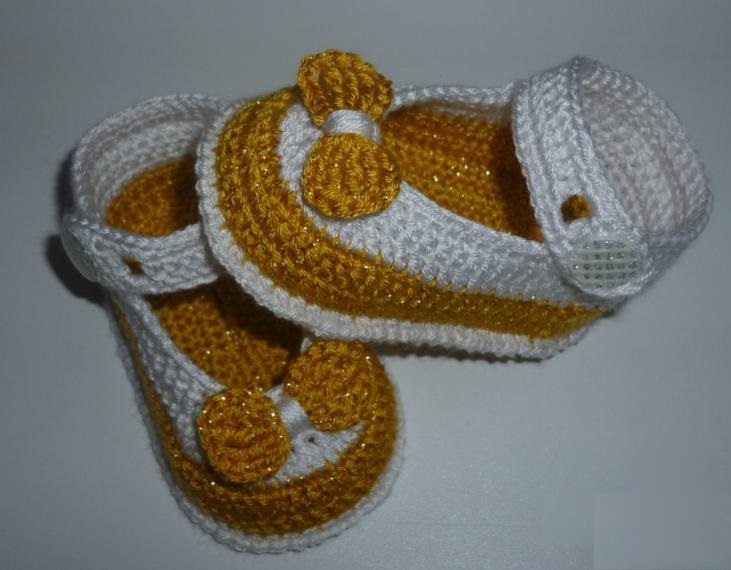 Add decor
Slippers
To work on the product you will need: woolen yarn of two colors and a hook No. 3. Legend: Art. with n - double crochet, c. p. - air loop, p. - row. Step-by-step algorithm for creating the product:
- To make the sole, you need to tie a chain of 30 in. P.
- Then yarn a different color from the middle of the heel to knit the upper part of the slippers. 1 and 2 rows in each column of the previous row, one article with n In the front part, reduce 3 columns, making 2 of one.
- Tie 3 and 4 rows of Art. with n., in the front part, removing 4 columns and 6 columns, respectively.
- In row 5, in each column of the previous row, knit st. with n., decreasing by 1 column. So continue until the middle of the shoe, then in front of the Art. with N., reducing 6 loops. Tie slippers also symmetrically on the other hand.
- Make a flower of 5 in. p. + 3 in. item lift. 1st and 2nd rows - 2 and 3 tbsp. with n in each loop of the previous row, respectively. 3 row knit as 1.
- 4 row - 1 tbsp. with n the first part of the work, the second - 2 tbsp. with n In the 5th row, tie the flower with a “crustacean step” with another color yarn.
- Gather product details, sew flowers to slippers.
- Decorate to your liking.
A variety of slippers can be crocheted, but they are all made according to the principle: the sole is made (usually the same pattern is used), then the upper part, then the binding and decor. Slippers are usually a classic model with a closed nose and heel, reminiscent of ballet shoes. Comfortable and soft, warm feet well, but do not fall off.
 According to the scheme, tie the upper part of slippers
  To decorate
 Deciphering schemes
Since shoes are often crocheted, the basis is ordinary columns, connecting, with one or two crochets. Schemes often go in a duet with models, you just need to learn how to read them correctly. Abbreviations are most often used in descriptions; these are the first letters: p. - row, Art. b. n - SC, c. p. - air loop, persons. - front, out. - wrong side, recall - auxiliary, trace. - next. What you need to pay attention to when reading the circuit:
- knitting always starts from the first row;
- on the designation of loops, that is, columns;
- on the decrease, on which the fit of the leg depends;
- in addition, they are the same;
- on arches from loops, they are used in openwork.
Some designations on the diagrams are very similar, it is important to be careful and not to get confused. Experienced craftswomen recommend first trying to make a small piece of the canvas, and then proceed to create the entire product. If for some reason it is not possible to count the schemes, the series go astray, difficulties arise with the description, then you can always look for video tutorials or turn to familiar needlewomen.
Video
Knitwear, especially shoes, always attracted attention. You can crochet wonderful boots or knitting. For beginners, there are lots of schemes with step-by-step descriptions that will help you make slippers, boots or shoes with your own hands.
Knits, especially shoes, have always attracted attention
Knitted by an experienced needlewoman home boots can not be praised. But the novice needlewoman is recommended to use detailed schemes for such work.
The “shoe” type of knitting cannot be called easy, which is why in order to make shoes like slippers or boots at home, it is important to follow the instructions step by step.
- First you need to prepare materials for work. We recommend using wool blend yarn. The product from it will not be rubbed for a long time and will be quite warm. You should also pick up the hook and insole. Any insole is suitable.
- The technique in this case is knitting with motives. It is necessary to tie hexagonal motifs of 5 for each boot. Total knit 10 motifs.
- The chain is made of 5 air loops, which then need to be closed in a row.
- Next, to raise work in each subsequent row, 4 air loops should be added.
- To make the shoes openwork, the loops must be knit with crochets. But there should not be too many of them, otherwise the product will not be warm.
- When 5 rows are knitted, you can continue knitting with a different color of yarn. So the work will look more attractive. But this is optional.
- To knit a regular hexagon, you should pay attention to the working scheme (below).
- Further, all 5 motives need to be combined. Stitching takes place on the wrong side to mask the seam. The columns are tied with a single crochet.
- On the sole should make circular movements with an awl. A total of approximately 50-55 holes should be made.
- Then the insole is knitted with yarn in two rows.
- Slippers are attached to the insole.

Crochet slippers for beginners
Such a product is very practical, especially in winter. If you wear such slippers at home, your legs will hardly freeze. The same children's slippers can be knitted in the summer.
Master Class:
- First you need to prepare insoles that will become the basis for future slippers. They are pierced by an awl. This is done in order to be able to thread through the holes and sew the insole to the product. About 50 holes are made.
- Then, yarn is threaded into each hole. In each hole, 2 columns are made. It is important to knit the second slipper symmetrically.
- A thread is threaded into the back wall of the loop and tying begins along a number of ordinary pillars. Nakida are not made.
- So it is necessary to knit 3 circular rows. Loops in the row are not added. The thread breaks after this.
- Then, a different color of yarn should be used in the work. This will decorate the product. With this yarn, the previous two steps are repeated.
- Next, straight rotary rows fit. The product should rise up. Knitting occurs on 8 front loops that are in front.
- Next, the yarn is connected to the edge of the slipper. All posts are crocheted. At this stage, it is recommended to try on slippers.
If desired, you can decorate the product, for example, embroidery.
How to crochet slippers (video)
DIY shoes on the sole: knit cute boots
Knitted shoes on the sole are considered as durable as possible. It is durable, since the sole almost does not rub.
Work on such a thing should consist of the following stages:
- At the first stage, the preparation of the necessary materials and tools should take place. Beginners are not recommended to knit boots on the sole of yarn of different colors, as this will be an order of magnitude more difficult. In addition to yarn, a hook is prepared, a large needle, an awl and, in fact, a sole. It is better to take a rubber sole as a basis. Why rubber? Firstly, it is durable, and secondly, it is easy enough to pierce it with an awl.
- In order for the product to be warm and dense, it is recommended to knit it in a double folded thread. Alternatively, you can use immediately 2 skeins of yarn.
- A chain of air loops fits. The chain should equal the distance from the toe of the slipper to the tongue. Beginners are advised to tie the chain 2 cm more than this distance.
- The row is knitted with ordinary pillars. Nakida should not be done.
- Then there is an increase in the number of loops due to the addition of 2 additional loops in a row. In the place where the sock is reduced, loops should no longer be added.
- The places on the product in which the loops will need to be reduced are pierced with pins. At this stage, it is recommended to immediately make the same part for another boot. They should be the same.
- The back of the product is knitted. Work begins with a set of chain of air loops. Then 2 parts are interconnected.
- With the help of a large needle, the sole firmware is made, in which the holes were previously made with an awl. Then the stitches are crocheted.

Knitted shoes on the sole are considered as durable
At the last stage, the knitted product should be attached to the sole-base.
What materials should be prepared?
- Yarn. Universal for knitting boots is half-woolen yarn. But if desired, the master can use another, for example, a maher or acrylic thread.
- Awl. They pierce a rubber sole or insole.
- The big needle. Needle made thread stitches on the sole.
- Hook. Crochet knitting pillars and motifs.

Universal for knitting boots is considered to be wool
Basic rules for knitting shoes
- Do not use low-quality materials in your work. A beautiful and practical product can only be obtained if the master preferred a good material. If he has a desire to bring boots, boots or slippers for a long time, then he should not save on yarn.
- For knitting openwork sections and motifs, it is recommended to use a small hook. Openwork knitting will allow the product to be well blown. But if the master has a desire to knit winter slippers, which he needs to warm his legs, then do not knit in an openwork way.

Do not use low-quality materials in your work
In order to tie shoes that fit well in size, it is important to first take measurements from the foot. Knitting "by eye" is not suitable here. Especially this rule is important to observe when knitting products that fit tightly to the leg, for example, ballet shoes.
- As the base sole, you can use not only the cut out bottom of the shoe, but also the insoles. On sale you can find insoles with sheepskin, which are perfect for winter products.
- To knit shoes better attached to the sole-base, it is recommended to use glue. Shoes should be worn only after it has completely dried.
- Do not sew shoes to the sole with ordinary threads. They are not durable enough. It is better to use a string.
- An awl should always be used in such work. This tool is very convenient to make holes in the sole through which the yarn is drawn.
For knitting winter boots, you can use the sole from the moccasins as a basis.
Crocheted booties (video)
KNITTED SANDALS “SUMMER”
On the size. 36-39
Required:
- Yarn PNK named after Kirov "Lotus". Composition: 100% cotton. Thread thickness: 250 mx 100 g. Color: 0103. Consumption: 60 g.
- Hook number 1.5
- Knitting markers
- Scissors
Knitting patterns. Legend
VP - air loop
Connect - connecting loop
RLS - SC
CCH - double crochet
SS3N - a column with three crochets
Work description
- Sole Harness
- Knit Upper Shoes
- Assembly: attaching the upper to the sole
- Sole Harness
1. Prepare the finished sole for strapping: make holes along the edge of the perimeter to a depth of no more than 0.3 - 0.5 cm and at a distance of 0.8 -1.0 cm from each other.
Sew the holes with a needle or crochet through the “basting” seam with the main yarn, starting from a point on the side equal to approx. 5-6 cm from the edge of the heel.


then another 5 rows of RLS from the knitting start point to the same level on the opposite side.

At the same time, in each next row, shift the row by 3 p. Towards the toe, knitting the first and ending the last in the row of loops in descending order of height * СБН + 2 will connect. P. *
In finished form, the height of the edge trim above the toe will be no more than 0.5 - 0.8 cm.
Mark the center of the toe with a marker.


2. Knitting the top
With the main yarn, dial a chain of 14 VP + 2 VP of lifting and knit RLS, while at the BEGINNING of EACH row, after 2 loops of lifting, perform 2 RLS with one center. At the end of a series of additions do not. Thus, in each row, 1 sc is added.
After 30 rows, the workpiece will be shaped according to pattern number 1


Knit as follows:
1 row of the bar: 4 VP lifting, perform a “Fan” of * 2 columns with three yarn (SS3N) with one center in the extreme first loop *, 1 SS3H in the next loop, 5 VP, RLS in the next loop, 2 VP, RLS in 3rd loop in the course of knitting, then the whole row * 5 VP (\u003d chain), RLS in the 6th p., 2 VP, RLS in the 3rd p. *, End row 4 SS3N in the last loop

2 row planks: 3 VP lifting, RLS to the 3rd loop (ie, to the “Fan” loop) of the previous row), then the whole row * 6 RLS under the “large” arch of 5 VP, RLS under the arch from 2 VP *, finish row 3 VP, RLS in the last paragraph
3 row planks: 2 VP elevations, RLS to the arch of 3 VP, then the whole row continuously * 7 RLS for each arch from the VP *, finish row 5 RLS under the extreme arch of the VP
4th row of plank: tie with a "crustacean step"

Leave a long ponytail for later sewing.
The second part of the top is connected in the same way.
Dimensions of the upper part in finished form:
height - approx. 13 cm
width on top - approx. 20 cm
The openwork strap is designed for a low rise in the foot!
Focus on your parameters and, if necessary, increase the number of loops when knitting arches from the VP and the RLS knitted in them to increase the width of the bar!
From the marker of the center of the toe in opposite directions count 2.5 cm.
Sweep the finished top to the soles and sew with a needle using a “machine” seam or a vertical knit seam with the thread of the main yarn. At the same time, “pull” and “stretch” the lateral parts of the plank (ie, the “Fan”) along the upper edge along the length of the extreme loops of the “Fan” itself.


On the heel of the knitted part of the sole, tie 1 next to the “step of the dog” or with a needle over the edge.
Even the world famous designers do not dare to challenge the popularity of knitted shoes. Every year it becomes even more interesting, more original. And this is no accident, because even our grandmothers used to knit slippers in addition to socks. Any new materials, opportunities for its creation constantly appear, therefore it is really not a shame to appear in public in it. To date, the sole for knitted shoes has become quite diverse. It’s not difficult to create such a product with your own hands, because the range of quality yarn is also quite large. We will tell you about different options in this article.
Features of knitted shoes
Shoes and handmade clothes occupy fairly solid positions in the modern world of fashion. Today, homemade shoes and street shoes can be knitted. Naturally, it is difficult to surprise someone with children's knitted sandals, but you can not often meet a girl in such homemade sandals. This is due to a certain uncertainty about how such things are convenient and reliable.
Important! Much here depends on the quality of the threads used, the density of knitting, the method of attachment to the sole of the knitted top. With all confidence, only one thing can be said: such shoes look incredibly impressive, original, not a single fashionista will be left without attention.
Now you will see that it will be very simple to do everything:
- It is best to use a ready-made sole, for example, from old sandals.
- The easiest way is to fix the thread to the place where it was sewn and start to knit from the base.
- Holes are made easily with a conventional sewing awl.
DIY knitted loafers
Even if you do not have such experience in needlework, with maximum effort, you can achieve a wonderful result. It is better to start with something simpler - it can be light knitted shoes on the soles. You can make crochets with your own hands, for example, moccasins.
Materials for work
Prepare for work:
- yarn;
- metal hook;
- unnecessary shoes to use its sole.
Workshop on manufacturing
The following manipulations will be required:
- Cut off the fabric from old shoes, pierce the sole for tying along the edge in a circle as close as possible to the upper edge.
- Take the main thread, tie the edge of the sole. Just thread the hook from the outside in to the hole, grab the thread, pull it out so that you get the loop.
- Next, drag another loop from the next hole, knit them together. Repeat this action in a circle, fasten and cut the thread.
- Take yarn for moccasins, tie the sole in a circle in a circle under the arches formed in rows to a height of 2 cm with a lifting loop.
- Cut and hide the threads.
- Measure the length of the sole, place markers on both sides on half the length.
- Also mark the middle of the front of the product.
- Measure the widest part of the foot on the sole, take half, measure on both sides in the middle of the marker. You will get a toe. This is approximately 9 loops or 4.5 cm.
- Knit further on the back halves of the loops, at the end climb to the next row. To do this, in the next two loops, knit 2 connecting posts and turn the moccasins with the heel towards you, in the opposite side, knit the second row.
- Again, in the next two loops of the sidewall, knit 2 columns, finish all the rows with them.
- Start adding from the third row in the front rows to expand the toe, knit 2 columns in each first and last loop. Knit a toe in this way to the markers.
- Getting to the tongue. Tie 2 cm without increase, this is about 4 rows. Start the reduction as follows: on both sides, cut the loops through the row three times, that is, only the loops in the front rows. The tongue will turn out to be about 7 cm wide, then knit another 7 rows without changes, close the loops, remove the threads. Tie the finished tongue with single crochet posts.
- We start knitting the backdrop. Measure 3 cm from the point where the toe with the sidewall connects towards the toe of the moccasins. Knit the front halves of the loops right along the tongue, then the heel is already in both halves of the loops in a circle, that is, around the heel, turn and knit another row in the opposite direction from one marker to another.
- Reduce one loop, make a single crochet, over the next two columns, knit 2 air loops, you get a hole for the lace. About 4 columns to the end of the row, tie 2 air loops, then another column through 2 single crochets, but do not knit the last one to make a reduction.
- Knit all loops in the opposite direction with regular columns. You will get two pairs of rows, with and without a hole. Alternate the pairs so that there are 3 holes on each side.
- Tie a 90 cm long chain of lace stitches, add Italian Lurex.
Your chic loafers are ready!
Original knitted boots
It is even easier to make knitted shoes with your own hands, something like boots that are firmly in fashion. Any girl dreams of such beautiful and light shoes. The master class below will help you create it yourself.
Materials for work
You will need to work:
- Sole from old boots.
- Felt insole.
- Genuine leather and high-quality skin substitute.
- Cotton fabric.
- Awl.
- Knitting hook.
- Threads of two colors, preferably hard and strong, so that they keep their shape well.
Sole binding and insole preparation:
- Cover the felt insole with cotton on one side and leather on the other.
- Remove the fabric upper from the boots, but leave the threads at the heel and toe points.
- Pierce the sole with an awl from the edge at a distance of 2 mm and 4 mm from each other, tie the holes obtained next to the single crochet posts.

Making the bottom of the boots:
- Attach the thread in the center of the sock, knit 2 rows with single crochet.
- Knit the third row as follows: lifting loop, 3 single crochet.
- Turn the knitting, starting from the second loop from the hook, knit 6 single crochet stitches.
- Check that the posts are clearly centered on the toe.
- Then knit 2 more stitches on the sole.
- Turn around again, starting from the second loop, knit the row to the end, knit 2 loops on the sole, turn the knitting again.
- So continue to work until the sock is completely fabric.
- Try a boot on your foot, maybe it's time to stop. You will get about 22 rows.
Toe knitting:
- Since you used to make an addition, starting from the next row, knit two rows without increments.
- The next row again with one increase, then two without increase, and so alternating another 10 rows.
Important! It’s better to record the whole course of work so that the second boot comes out exactly the same.
We knit the heel:
- Go down to the sole again, you will knit the heel with single crochet, skipping the corner loops, then knitting to the toe and sole, again skipping the corner loop.
- Expand the work, start knitting again from the second loop, tie the heel with ordinary columns to the angle between the toe and heel.
- A connecting loop will come out on your hook, start knitting further from the second loop of the row.
- Continue to the corner again, repeat the previous paragraph.
- Once the heel reaches the desired height, knit 4 single crochet in a circle. It is important that the boot fits tightly on the leg, so in some places you may have to reduce the loop.
Important! Tie the original flowers for decor, so that your boots sparkle with new colors.
Stock footage
Yes, you will have to work a lot, make efforts, spend your time, show utmost attention and accuracy, but your crocheted shoes on the sole with a do-it-yourself crochet will immediately kill everyone around you.
In the warm season, crocheted boots can often be seen on the streets. Thanks to a large selection of shoes of all kinds and types, knitted boots can now be bought in almost any shoe store or on the market. As a rule, such women's shoes are not very original, since all models either look the same or are not much different from each other. Therefore, fashionistas always follow the most fashionable trends.
Knitted boots 
But if you are familiar with the technique of knitting or crocheting, you can easily knit for yourself beautiful and original knitted boots. Knitting patterns for such shoes can be found on the Internet, and a pattern for knitted boots can be chosen as you like. 


Knitted summer boots
Another indisputable advantage of such shoes is that knitted summer boots do not require large material costs. All you need is knitting yarn and a hook or knitting needles. If you are not a very experienced knitter, you can simplify your work. To do this, you need a pair of old shoes (shoes can be with or without heels) or ballet shoes that just need to be tied with thread. In this way, you will not only knit new durable boots for yourself, but also solve the problem with old shoes, which you don’t seem to be wearing anymore, and it’s a pity to throw them away.

For experienced needlewomen, crocheting or knitting summer boots to order can be an additional type of income, because very often on the Internet you can see the ad “Buy knitted boots”.
You can tie fashionable women's boots in several ways, while the frame can be hard or soft. The sole for such shoes can also be tied with your own hands, or you can use the sole from old shoes if it is in good condition.

There are several types of knitted boots: openwork boots for warm weather, glamorous stocking boots, thick winter or comfortable house boots.
To crochet summer boots you will need: a hook or knitting needles, durable yarn (it is better to opt for linen, cotton or silk), the sole from an unnecessary pair of shoes, durable threads, an awl, a small skein of fishing line and glue.

Due to the fact that summer boots are knitted with an openwork pattern, they not only look beautiful, but are also convenient and comfortable in the warm season.

Crochet Knitted Boots
First of all, you need to take a measurement for future shoes by circling a foot on a sheet of cardboard and measuring the height of the lift. This is especially true for those who want to crochet knitted boots tightly fitting their legs. Knitting patterns and patterns of such shoes practically do not differ from knitting free-cut boots.

If you are knitting boots for the first time, it is better to spend a little time, study crocheting for beginners and prepare a pattern according to which you can make a pattern of boots. This will facilitate your further work, since nothing will have to be dissolved and re-bandaged.
If you don’t have a suitable sole for future knitted boots, you can buy it in a store or shoe repair shop.
When choosing a yarn, pay attention not only to its composition and quality, but also to the shade. Remember, the white color and all the light shades are very easily soiled, so that your boots look neat, you will have to wash them quite often, which can also affect their appearance. Of course, white boots look very elegant and beautiful, but if you wear them every day, they are unlikely to last you long. The size of the hook and knitting needles should correspond to the density of the yarn, but in any case, for a summer version of such shoes, you should not choose a large hook.
To determine the pattern and its density, you will need to connect a small fragment of the selected pattern and calculate the required number of loops. The upper and lower parts of the boots are knitted separately, and then connected to each other. In order for the fastening of parts to be reliable, you need to add a fishing line to the working thread. It should also be borne in mind that the upper part of the boots should be slightly larger than the circumference of the sole, otherwise wrinkles may appear that will ruin the appearance of the boots. To avoid such an error, consider this point when drawing up the boot template. Ready-made shoes will look much more beautiful if you starch them.
Knitted boots: master class
For boots of the thirty-eighth size you will need: one hundred grams of dense cotton yarn, a crochet hook and the sole from an unnecessary pair of shoes.

The knitting density of one sprocket is seven and a half by seven and a half centimeters.
The lateral part of the boots is knitted in the following way: the first row is knitted with crochets; in the second row, a single crochet is knitted over a column of the first row, an air loop over the second column of the first row, a single crochet over the third column of the first row. In this way, you need to knit to the end of the row.
To tie an asterisk you first need to make a ring consisting of eight air loops. In the front row, eleven single crochet knits in a ring. In the second row, a crochet is crocheted over all the columns of the first row, and three air loops are crocheted between them. In the third row, three columns, five air stitches and three columns (the first column fits without a crochet) are knitted twice in the next arch in the first arch. In this way, knit to the end of the row, where you should have one arch left.

First, you will need to tie individual stars, the amount of which will determine the height of your boots. For example, for low boots, four stars are enough. To make the top, the stars need to be connected together in a circular. After that, you can start knitting the top of the boots. To do this, circle your foot on paper. You also need to measure the height of the lift. In order for the boots to be neat and without wrinkles, the circumference of the sole should be two centimeters smaller than the top of the boots.

You will need one star for the top of the front of the shoe, only for it in the third row you need to knit two single crochet columns and four air loops in all arches.
To tie a toe, dial a chain four centimeters long. On the sides of the shoe, knit a pattern, adding loops evenly until the width of the canvas reaches fifteen centimeters. The cape of the boot should be seven centimeters in length.
When you are knitting the last row, instead of the three central patterns, knit one air loop and two single crochet, then connect the toe with an asterisk using two arches. When the height of the sides reaches six centimeters in the middle of every second row of the sprocket, you need to connect with three arches. When you have three arches left, continue knitting straight, without tying four centimeters to the heel. These four centimeters need to be knitted across. Connect the details of the boot to each other with single crochet and double crochet. Ready-made boots will look better if they are starched.
Those for whom knitted boots with patterns seem to be a difficult task, can try to knit original boots based on old shoes.

They are made completely uncomplicated, and thanks to the rigid sole the appearance of such boots will not spoil either a long sock or regular washing.
To tie such light fishnet boots you will need: ballet shoes or slip-on shoes with rubber soles (the color of the shoes must be selected in accordance with the color of future boots), one hundred grams of yarn, a large needle and a hook.
First you need to sheathe the base - the shoes are circular, and the chain stitch (it is also called the chain), try to place as close to the sole as possible. After that, you need to start crocheting with crochet columns, which are knit round the round in each of the links of the chain stitch. The base must be tied tightly so that it looks completely tied with yarn. If necessary, in certain places you can add and reduce loops. In this way, you will need to knit somewhere eight rows.
When you tie the toe and the heel of the base, with double crochets, you will need to knit the double crochet posts. After that, you will need to tie a pipe with an openwork pattern, which will be the boot leg. The finished boot should be sewn to tied shoes. The top of the boot can be decorated with a beautiful rim, and so that the boots do not slip, the top of the rim can be slightly narrowed. When the boots are ready, they need to be washed and made more rigid. To do this, after washing, soak the boots in a solution of water and PVA glue in a ratio of two to one.
Detailed workshop: How to crochet boots from square motifs:
Master class: Crocheted boots.
Now you know that crochet knitted boots can be tied to each and can be done quite quickly.
Knitted knitting boots look no less beautiful and stylish. Knitting such a cozy and comfortable shoes is easy. Of course, knitted boots will be warmer than crocheted boots, but they will perfectly warm your feet in cool weather.
Save so as not to lose.

 Fragrant flea market for frugal perfumes
 Fragrant flea market for frugal perfumes