The Complete Macrame Weaving Guide for Beginners. Macrame for beginners
Good afternoon!
I, with my four-year-old granddaughter, attend classes at the Baby Club children's development center.
And despite the large number of various developmental toys in the club, they urgently need voluminous toys made with their own hands in any needlework technique.
So the idea arose - to perform such voluminous toys using the macrame technique itself.
Found on the Internet a book by G. Ryabinin “Volumetric Macrame.” I downloaded, though far from completely, and decided to share not only the schemes and description of the implementation of the toys described in this book, but also advice on weaving such toys.
What is the value of these voluminous, soft toys made by yourself?
They are soft, fluffy, warm, tender and affectionate, made with love, that it is so important to get adults from us!
These toys can be “stuffed” not with cotton or sintepon, but with any cereal: peas, buckwheat, millet, rice, pearl barley.
You can put sand, straw, or other natural material inside the toy, and then these toys will acquire irreplaceable didactic developmental material or teaching aids, as teachers say.
With such toys you can organize a puppet theater, tell and show a fairy tale, beat a scene, and so on.
There is no limit to fantasy where and how to apply these soft, voluminous macrame toys.
description and weaving pattern of “Princess Frog”.
"Princess Frog". Macrame Volumetric Toy
To work, prepare:
1.150 m synthetic rope 3 mm thick,
2.15 m rigid rope 2.5 mm thick,
3. 12 m metal braid 2 mm thick for the crown,
4. 25 m hemp rope 3.5 mm thick and 10 m hemp rope 2.5 mm thick for a hummock.
1. On one thread 3 mm thick and 3 m long from the left edge, braid, directing the ends in different directions, horizontal rep nodes 8 threads, after finding their middle. Tie the ends going up.
2. Weave from the ends pointing down, 2 double flat knot.
3. Hang on the working threads of double flat knots way 2 one thread 3 m long in the middle and weave 3 double flat knots.
4. Hang 4 strings 3 m each in the middle: two on the central threads and two on the edges.
5. Weave 3 rows of five, four and five double flat knots, respectively.
6.Repeat step 4
7. Weave 3 rows of seven, six and seven double flat knots, respectively.
8. Repeat step 4. and weave 2 rows of eight and nine knots respectively.
9. Leave 16 ends in the center, and the end from the center for one eye. hang in the way 3 in the middle of 5 threads of 2.5 m.
10. Circle vertical rep nodes the next thread from the center is all 10 ends hung in clause 9
11. Next from the center of the thread, wrap 5 out of 10 ends (that is, after 1)
12. Next from the center, thread 3 threads vertical rep nodes.
13. Braid the guide onto which the eye threads were hung onto the outermost thread of the outermost double flat knot. Similarly weave the second eye.
14. Braid the ends hanging down on the sides of the triangle formed during the execution of items 2–8, left and right to continue the thread onto which the ends in item 1 were braided by horizontal rep knots in 3 twists.
15. Repeat the guide and weave it with horizontal rep knots into 3 twisting the second brida close to the first.
16. Go to the weaving of the abdomen, for which take 8 ends, which are discarded in paragraph 1, and weave them 2 double flat knots.
17. Hang left and right weaves, 1 thread 2.5 m long in the middle and make a row of three double flat knots, again hang along the edges along one thread 2.5 m long and weave a row of four knots, hang again around the edges along single strand and complete 5 double flat knots.
19. Weave the back of the head, for which, at the 16 ends between the eyes, make 4 double flat knots.
20. Weave another 4 rows, making in rows 5, 4, 5, 6 double flat knots, respectively, connecting in each row 2 threads on each side of those that were not woven in the second and third rows when making eyes.
21. Perform 1 row of double flat knots in a circle.
22.Take the 6 ends from the corner of the mouth to one and the other side and weave the bridges from the center left and right. Guides are the central threads .. After the brids are woven, tie the guides together weaving knot.
23. Cut 1 thread 2.5 mm thick and 3 m long, pin its end to the pillow, and braid 1.5 cm of vertical rep knots in a circle of 12 ends that are braided into bricks in section 22.
24. Add 2 ends of 50 cm to the guides, jokes them to weave for expansion, and weave 4 cm.
25. Remove 2 threads inside the weave and weave another 1.5 cm.
26. Take the 6 ends facing the back for the guides and weave 4 shortened rows with vertical rep knots, braiding them with the same guide, then follow the row in a circle on 12 guides. The result was an elbow.
27. Weave in a circle of 1.5 cm.
28. Add 2 threads to the work and weave 4 cm, then remove 3 threads inside the product, make 2 rows of vertical rep knots, remove 2 threads again and perform 2 more rows of vertical rep knots.
29. For the paw, leave the 11 longest ends, cut off the rest.
30. Select the longest end and braid it in the plane of 2 rows with vertical rep knots of 5 guides - in each guide 2 ends.
31. Make 1 row of vertical rep knots on seven guides, braiding around the edges of the paws at one end.
32. Perform fingers one-sided tatting knots at nine ends. Two shortest cut.
33. Repeat the work described in paragraphs. 22-32, for the second paw.
34. Turn the frog with its face away from you and weave in a circle 2 rows of double flat knots.
35. Cut 2 threads of 2 m and add them in the next row on the sides of the weave, hanging over the middle in the way 2. Weave another 5 cm in a circle.
36. Weave in a circle 1 row, excluding from the weave 1 double flat knot in the center of the back and 1 double flat knot in the center of the abdomen (remove the 4 ends inside the weave.)
Macrame classes are a great way to spend time with your children. This technique develops imagination and fine motor skills of hands, and crafts made by your children will please your eye for a long time. Children over six years old can be taught how to weave handbags for mobile phones, key chains or funny thread toys, and teenagers will like fine jewelry and stylish baubles. Some macrame products are so simple that in the short run, your wards will create beautiful crafts without your help.
In our age of computer technology, children spend a lot of time in the virtual world, so it is so important to captivate them with a useful activity, partially replacing communication with high technologies. A lot of different types of needlework, which you can do with small personalities. The simplest and most inexpensive is macrame. However, how to interest a child in this rather monochrome occupation?
Of course, children will not want to do just studying various nodes for a long time. They definitely need some goal that they can realize in a fairly short period of time, so we advise you to prepare to weave some simple crafts without preparation, explaining the knitting technique as you work.

To teach children to weave a chain of their flat knots in a playful way, invite them to make a frame for photos. To do this, cut a circle out of cardboard, and decorate it around the edges with a twisted chain of flat knots that the child has woven.
It is better that the first crafts can be made in a few hours, but at the same time, they looked bright and interesting. Then, seeing the result of their work, young needlewomen will want to create something more global.
Macrame keychain
One of the simplest products that even a child can tie with his own hands for a couple of hours is an interesting keychain. It can be made in the form of an ordinary multi-colored cylinder or be a figurine of some animal, for example, an owl or a turtle. An owl keychain is very simple. For its weaving, only three types of knots are used: square, regular and rep, and from materials, you will need two large yellow beads, threads of two colors, for example black and light brown and a key ring.

Master class weaving a keyring “Owl”:
- Cut four strands of black and light brown. The length of each of them should be 74 cm.
- From the first four threads on the left side, weave a column consisting of nine square knots.
- Take the four threads on the right side and make them exactly the same column.
- Put the bead on the two threads following the left column. According to this principle, put on a bead on the right side as well.
- Of the four central threads between the beads, weave six square knots.
- Separate the right thread from the group of black threads emerging from the left bead. And tie her a vertical rep knot on the nearest thread coming out of the central column.
- Make a rep knot of black thread on the tracking thread exiting the central column.
- Repeat these steps on the right side in mirror image. Two black threads should be in the center, and two yellow threads will be located on the sides of them.
- Now, take the remaining thread coming out of the left bead. Tie one vertical rep knot to it on two yellow and one black central thread.
- From the right ball, also take the remaining lace and knit three rep knots with it to meet the left thread. Tie these two working threads together.
- Separate the fourth thread from the left column of square knots from the edge and braid it with four threads to the right side. Do the same in the mirror image on the right side.
- Now take the third thread from the left column and tie five rep nodes to it on the right side. Repeat this action on the left side.
- Take the first and second threads on the left and weave from them a 2-3 cm long tourniquet. Weave a tourniquet from the two rightmost threads. Use ordinary nodes.
- Now take two of the four center threads and make a bundle of them. Weave into the bundle the other two threads from the center.
- Tie the four threads on the left side between the two bundles into a six-square-knot column. Do the same with the threads located between the harnesses on the right side.
- Take the three columns on the left side and tie a simple knot at their end.
- Now knot the right posts.
- Trim the excess threads under the left and right half so that the owl has tassels-paws.
Such an owl has an interesting appearance and, without a doubt, will be a great decoration for children. When the child learns to weave such a light keyring, you can switch to simpler products.
Volumetric macrame toys: the nuances of weaving
Volumetric toys, woven using the macrame technique, look very beautiful in pictures in books. However, to make such a craft, you need to have a good imagination and know the technique of performing a large number of nodes. Therefore, it is better for beginners to refuse to weave toys like a rooster or a monkey.
The weaving of voluminous toys is often done using a combination of square and rep knots.

Toys with a convex shape are assembled from several separately woven parts, which are first stitched together, and then stuffed with cotton, sawdust or foam rubber. Schemes with a detailed description of how to make such crafts at home can be found in specialized textbooks.
Before proceeding to knitting parts, it is necessary to make a pattern on a sheet of thick paper. For example, a monkey pattern consists of two parts of the muzzle, two ears, a trunk, four legs and a tail.
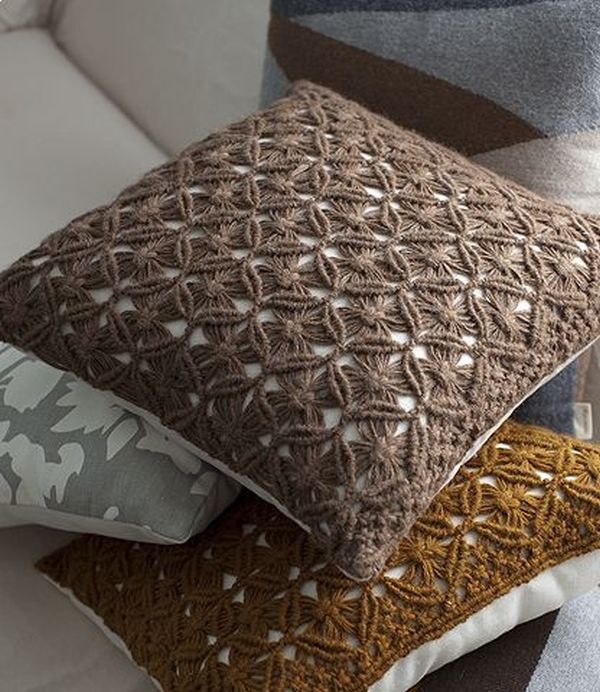
Macrame Phone Cases
When a child already knows how to weave a variety of miniature crafts, and he is interested in continuing his studies, you can try to knit the crafts more thoroughly, for example, a phone case. Of course, you can buy ready-made covers for such a technique, but it is much more pleasant to wear a thing made by yourself.
For a simple smartphone case, you will need only two-color threads. We will perform weaving with square knots (in order to weave such a knot, we need to double weave a flat knot in different directions). So, as the threads will be folded in half, the length of each of them should be twelve times the length of the phone.

Workshop knitting phone case:
- Attach to the pillow fifteen threads folded in half. Eleven of them should be the primary color, and four additional. Extra threads should be on the left side.
- Weave the first row of square knots. In this case, the upper flat knot should be right-handed, and the lower left-handed.
- We set aside the two first and last two threads. From the remaining threads weave a number of square knots.
- Check if the width of the smartphone matches the width of the rows. If not, we knit the required number of threads.
- After the width of one side for the smartphone has been found out, we tie to the previously completed two rows of square knots, the same number of threads for the back. If you did not knit additional threads to this stage, then you will need to add four more threads of additional color, and eleven main ones.
- After two rows of square knots will be woven from new threads, and two threads should be taken from the left and right edges to the sides, the old and new threads will be on the same level. You should get two common rows of square knots.
- Tie another thirteen rows of square knots, in each row pulling aside two more extreme threads. This pattern is called a checkerboard.
- Now wrap the cover with the resulting triangle. One of its corners should be braided. In the second row, connect between each other with a square knot two threads set aside. Finish the cover to the end with a checkerboard, in each row connecting the two first and last threads. In the last row, the threads of the additional color should be woven together, and the threads of the main one among themselves.
Finish the weaving of the canvas cover with a horizontal brid. She will allow to decorate them a cover with a volume cord.
Macrame products: we knit the bottom for a cover
To finish weaving the bottom, take the two central threads of an additional color and weave the rep knots with the left of them on the left side on all threads from top to bottom, and the right on the right side.
So that the weaving does not wear out over time, the bottom of the cover must be smeared with adhesive on the back.
Sew the resulting strip to the sides of the cover to make a bottom. Take the threads to the back and cut the excess. With a pattern made in this way, you can weave auto covers, an ottoman in the bathhouse or a new bag for headphones.
Macrame crafts: Christmas toys
Using the macrame technique, you can weave various decorations for the apartment during the new year. It can be snowflakes, flowers, snowmen and other interesting characters. If you introduce children to this activity, they will be happy to help you.

Boys will be interested in weaving a decor for Christmas trees in the form of a car, and girls will like products in a romantic style, for example, flowers and bows.
Christmas tree toys can be decorated with beads, rhinestones and gold threads. In thematic magazines you can find paintings with schemes of such crafts.
Products from macrame: schemes (video)
Macrame is a very useful technique for the development of children. Bring them to this type of needlework, and you will see how their imagination is changing for the better.
Macrame - needlework with a long history, based on weaving knots. Having mastered this technique, needlewomen begin to create products of incredible beauty. It can be either trinkets and bracelets, or longer voluminous works, including panels, flowerpots and even hammocks. For beginners, Macrame seems an incredibly complex form of creativity, but if you master the basics of this skill, the process is already causing interest, not fright.
Macrame - needlework with a long history
Macramé lessons begin with mastering the basic nodes. Only after the technique of their implementation has been mastered, you can begin to perform the first work.
Master class in pictures step by step. Main nodes:
Flat right. To complete this element, you need to take a couple of threads and attach them to the bar. The result is already four ends. Weaving is performed by the extreme threads, and the central ones act as the base. The fourth thread should be put on the main ones, and the first should be skipped under them, after which it should be pulled between the base and the fourth.

Flat left-handed. This knot is performed by analogy with the right-handed one, only in this case the work starts on the left side, and the fourth thread is skipped under the base.

Square. This is the main element of weaving. To perform it, you must first perform right-handed, and then left-handed flat knots.

Having mastered these knots, it is already possible to start weaving a twisted chain. It is it that is mainly used during the manufacture of flowerpots and other suspended structures.
Gallery: Macrame (25 photos)


How to learn to weave a keychain with macramé
To do such crafts as trinkets and baubles, the strength and beginners. Dealing with the intricacies of weaving a keychain in the form of a dragonfly is a matter of several minutes. Then it will only be necessary to follow all the points of the instruction.

To do such crafts as trinkets and baubles, the strength and beginners
Working process:
- Fold the lace in half and thread a pair of beads into it.
- Take the right tip and thread it under the center, then bring it over the left tip.
- Take the left part and hold over the center, tighten, not allowing the beads to move.
- Again, grasp the left element and draw it under the center, bring it over the right part.
- Tighten the knot that has formed.
- In order to form the wings, perform exactly the same element, just place it a little lower.
- To make the craft stronger, additionally make such a knot.
- According to a similar scheme, perform the second pair of wings, but a little smaller.
- Braid the body to the end, leaving only a small segment with a loop.
Hook the ends of the lace inside the craft.
Macrame technique for children 5 years: make a bracelet
Simple products using the macrame technique can weave even preschool children. Just a few simple steps and an unusual bracelet will be ready. The child will be happy to wear self-made jewelry.
Working process:
- Take a couple of meter long laces and put them together.
- From the edge immediately retreat the length corresponding to the circumference of the wrist and add another ten centimeters to it.
- Make a loop in this place.
- Tie shoelaces around the back of the chair and place the main ends in the middle, and place the workers on the sides.
- Work item to throw over the main.
- Lay the left end of the lace on the right and skip immediately under the main one.
- Repeat the steps along the chain until the workpiece is twisted in a spiral.
- After that, turn the workpiece ninety degrees and secure with a pin.
- Continue weaving, and finally make a knot.
- Tie knots on working threads.
- Attach a small bead from the other end.

Simple macrame products can weave even preschool children
Cut off the ends and glue with glue.
Macrame pots: step by step instructions
Such a planter can weave even a novice who has mastered the features of knitting the main knots. No circuitry or complex fixtures will be needed.
Yes, and the materials in the work will require a minimum amount:
- pot or vase;
- white nylon threads;
- scotch.

Such a planter can weave even a novice who has mastered the features of knitting the main knots
Working process:
- Cut the threads into eight identical parts and fold them into grindings.
- Attach them to the work plane with tape.
- Twist the eight prepared with an additional thread.
- Hide the tip of the loop, which as a result turned out.
- Divide the shoelaces prepared for work into four parts.
- Perform a twisted chain on each of these fragments.
- Measure the length t to tie a knot under each of the straps.
- To retreat from the top of the vase is about five centimeters.
- Divide the details of each element in half.
- Take a pair of threads from the first element and tie them to a pair of threads of the second.
- Such a pattern is performed from all groups of elements.
- When weaving comes to the bottom of the pot, knit four chains, making square knots.
- Repeat the same steps that were done at the very beginning of the work.
Trim the ends.
Macrame weaving benefits
Increasingly, this type of needlework in the process of teaching children. Despite the fact that at the moment there are many other options for needlework, the choice is stopped on this. There are several reasons for this:
- all lessons go from simple to complex. There are many schemes suitable for different age categories;
- crafts are characterized by increased strength and durability. They can be stored in the most visible place and not be afraid that their appearance and integrity will suffer;
- it is possible to make in this way not only jewelry, but also useful things, among which: clothes, flower pots and bags. This is an excellent motivation for action, since in the future such products can be used in everyday life;
- the opportunity to make a mistake is minimized, but even if it was, correcting it is very easy;
- only simple and accessible materials are used in the process of work;
- classes do not have to be held indoors. Amazing masterpieces can be created even in nature.
Macrame Handbag (video)
Materials and tools required for work
The most important step in preparing for work is the selection of threads. Materials made of cotton, silk and even nylon are used. Suitable for weaving and ordinary shoelaces. Incredibly beautifully look products for the manufacture of which twisted threads were used. Fluffy yarn for knitting knots is not recommended. Because of the fluff, the pattern will be barely noticeable, and the craft itself will seem very untidy.
The art of macramé has never lost its popularity. And all because a simple rope, gray twine or just a cord in skillful hands turns into real masterpieces of needlework. This article "Cross" is prepared for beginners to learn macramé. It will allow you to get all the basic knowledge and master the initial skills of weaving using the macrame technique.
Macrame History
This art was born with the first knot that the ancient man tied. The first nets for catching birds and fish (first nodless, then nodular) were made of grass or animal hair.
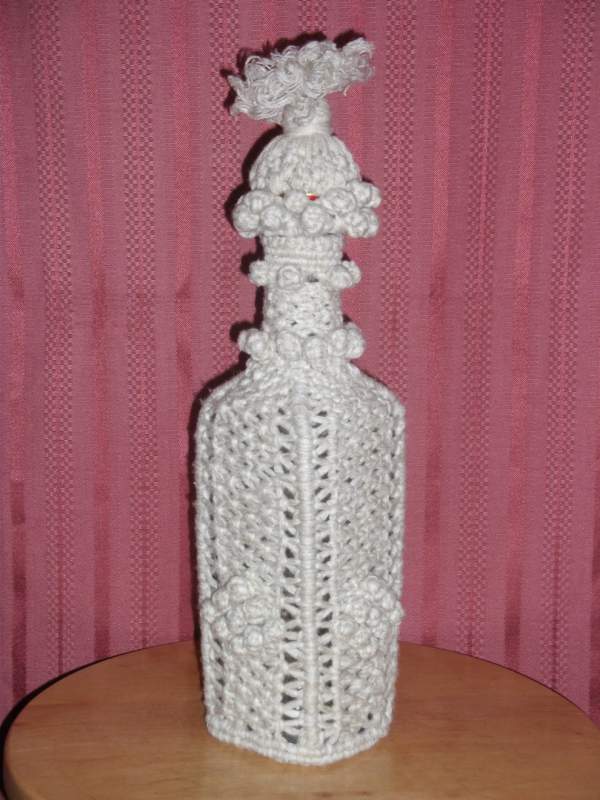
But the sailors of the sailing fleet improved this technique best of all. By virtue of their professional activities, they had to be able to tie various sea knots, of which there are more than four thousand. In their free time from their main work, they, having fun, braided flasks, bottles, utensils, knife handles, etc.
Already from sailors in the XIV century, residents of other countries learned the technique of sea weaving and applied it in their products. Therefore, marine nodes are so widely represented in the macrame technique.

If in our time simple material is taken for work, then for the weaving of that time we used golden thread, silk threads and laces, animal hair, leather. Masters used amber, beads, pearls, wood in their work (used them as decorative elements).
Macrame Product Examples
Very often macrame products decorate not only residential buildings, but also public institutions.

For many years, at the peak of popularity, a stylized panel in the shape of an owl, as a symbol of wisdom and good luck.

Wall panels are one of the most popular macrame products.


Macrame weaving can be combined with other types of needlework:
The simplest shelf will look much more expressive if we add to it weaving from threads:

Jewelry and caskets for storing them can also be made using the macrame technique!


A hammock chair and a wicker curtain will make the interior of the house especially cozy!


What threads are suitable for weaving
For weaving using the macrame technique, threads of different thicknesses and degrees of torsion are used.
Of thin threads such as mouline thread and harsh threads of various compositions (nylon, silk and cotton). marvelous come out,.

You can braid an ordinary rope with an average thickness or, the original one will come out, which will decorate your table.
Thick threads are used to create, interior curtains, etc.

Looks great pots, woven from a thick linen or hemp rope.

Most often, to work in this technique are used:
- cords of different thicknesses,
- thick cotton threads
- nylon cords
- clothesline,
- twine,
- flat braid
- sisal,
- jute,
- fishing line
- plant fiber, etc.
Basic requirements for the selection of material:
- should be strong enough, but at the same time pliable;
- match the selected model and theme;
- be of good quality and nice colors;
- the threads should be moderately twisted and rigid, without this a beautiful knot will not work (if the threads are too rigid, they must be softened by boiling for several minutes in water);
- the rope surface should not be too slippery, which is typical for synthetic threads;
- threads should not be fluffy, as the nodes in the product will be inexpressive.
Still need some tools and fixtures.
Materials and Tools
1) Fixture for attaching the thread. It can be a fairly stiff and comfortable pillow.
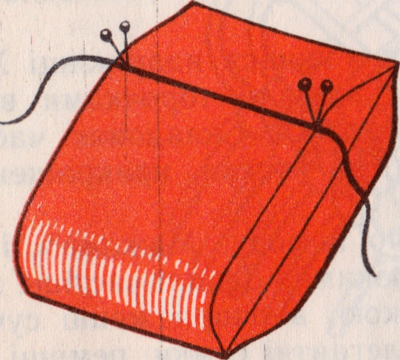
You can replace it with a piece of foam. Or you can just use the back of a chair or chair covered in cloth. Sometimes even a piece of plywood with a size of 25 by 40 cm or 30 by 45 cm is suitable. Put foam rubber with a thickness of 5 - 7 cm on it and tighten it with a strong cloth.
2) Pins for fixing parts of the product and shaping. They should be long enough, strong, with large heads.

3) Knitting hooks of large sizes.
4) Centimeter tape.
5) Scissors.
6) Knitting needles or awl for untying ugly or improperly knotted knots.
7) Clamps (such as a vise) for fixing the base of the product.
8) Weights for leveling.
9) PVA glue for installation of products.
10) Decorative elements: buttons, buckles, beads, wooden balls - for decorating crafts using the macrame technique.

Beginning of work. Thread fixing
You have decided to knit a product using the macrame technique. Decided on the choice of model, picked up the product scheme, material. Next you need to cut the threads. But they do not all fulfill the same role.
The basis is axial threadsalong which weave. They need less and they should be much shorter. Is there work threadswith which weave knots. Naturally, when weaving, the working threads are consumed faster and therefore they need much more.
After cutting the thread, you need to attach it to the bar. More often it is an uneven fastening, where the axial threads are shorter than the workers.
Remember that it is easier to start learning with thick and not very slippery threads, because it is much easier to weave with them. Each node is clearly visible. And when you master the basic knots and weaving technique according to the schemes, it will be possible to switch to thin threads.
The first way.We fold the thread in half, make a loop and lower it from ourselves. We hang the freely hanging ends into a loop and tighten it. We got a lock on top, and the ends of the threads behind the loop. It should be like in the photo:
The second way. Again we make a loop, bring it back to the bar, bend it over ourselves and stretch the ends of the thread into the loop. The lock is on the bottom. Pay attention to the photo:
Third way not much harder, but more interesting. First, we fix the threads, bending over ourselves. Then we shift the right end of the thread through the bar from top to bottom and tighten the loop. Repeat the same with the left end. Do it right, it will turn out as in the photo:

In the lessons from the Workshop of Selena, you will clearly see the process of attaching threads and weaving basic knots:
The main nodes of macrame
To master the art of macrame, you need to master the technique of knitting basic knots.
The main nodes are simple hercules knot and. Although there are a great many different nodes in macram, these basic nodes most often lie at the heart of them.
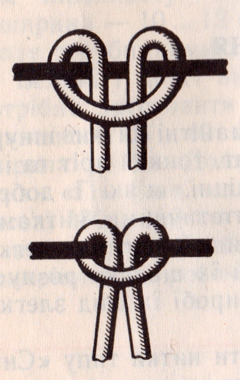
Simple Hercules Knot
Fasten the two cords. Then wind the right cord under the left, and braid the left into a loop. Pay attention to the scheme:

Right and left flat knots
Why are they called that? What is the difference? And they differ only in what thread the weaving of the knot began with. If you start from the right side, then the right-side flat knot will come out, if the first working thread is left - then the left-side flat knot will come out.
For a sample, take a couple of threads of short length. Fix them on a pillow vertically. Threads No. 2 and No. 3 in the middle (axial) are the basis, and we will knit with working threads under No. 1 and No. 4.
We take thread number 4 with our right hand, put it on the axial threads, and then under thread number 1. With your left hand we stretch the thread number 1 under the warp and pass from below into the loop between the warp and thread number 4. The figure clearly shows the sequence of work.
Then tighten the knot. Now you see why the node is right-handed. Because we start to knit with the right hand and the working thread on the right lies on top of the base, and the left on the bottom. The horizontal thread is used for fastening.
The left-side flat knot is woven in the same way as the right-side one, only in a mirror image.
We begin work with the left extreme thread No. 1. With your left hand we put it on the axial threads in the middle and under thread No. 4. Then, with your right hand, grab the thread No. 4 on the right, draw it under the base and pull it from below into the loop formed.
Square flat knot
To weave it, one must master the technique of knitting flat knots: left-handed and right-handed. Combining these nodes with each other, you get a square flat node. You need to finish with a lock so that the product holds firmly.

Space Dasha shows how to weave a square knot:
Having mastered the weaving of a square flat knot, you can create various patterns and simple products.
Chain of square knots
We attach 2 threads to the base with an uneven mount. Then we begin to alternate the left-side flat knot and the right-side flat knot to the length we need. We will get a beautiful chain that can be used as a bracelet, a handle for a bag or a decorative basket.

Rep node
Another of the basic nodes in macram is the rep node. It is very similar to a volume lace and is called a brid.
Rep nodes are vertical, diagonal and horizontal. It all depends on the location of the axial thread.
By combining various rep knots, decorative elements can be woven into the product.
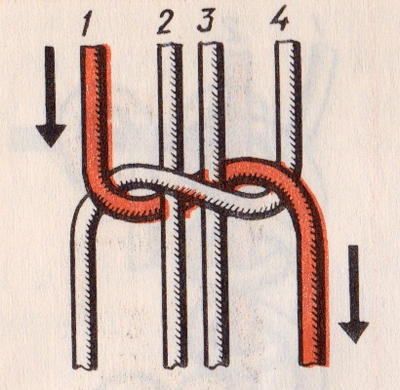
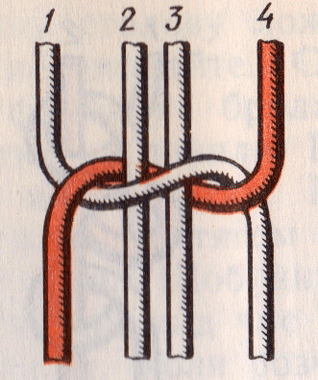
How to knit horizontal rep node? Pull the first thread (axial) near the working threads horizontally. Then make two turns from the bottom up and tighten the loop between turns. In the same way, we repeat with another working thread. And so on until the end of the row.

If we need vertical rep nodethen we do the opposite. The main thread here is vertical. Practice linking a series of rep nodes, horizontal and vertical breeches.
Lesson from Svetlana Shchepkina on knitting rep knots:
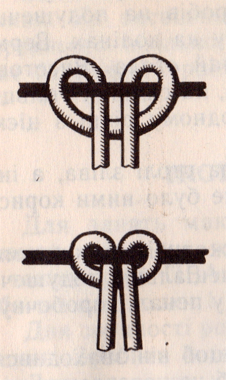
Tatting knot
The edge of any of your products will look great, decorated with a wonderful pattern with such a frivolous name. It weaves quite simply, but it looks very impressive. The tatting knot can be woven from both two and four threads. In the first case, one thread is braided by the second, and in the second, two extreme threads braid a group of warp threads.
Secure the working thread with a lock to your face. Bring the left thread under the warp, then onto the warp and into the loop. Then put the left thread back on the warp, then under the warp and into the loop.
How to weave a beautiful ribbon from the “tatting” knots connected in pairs, see in the mini master class of Yulia Zheglova:

Chinese knots
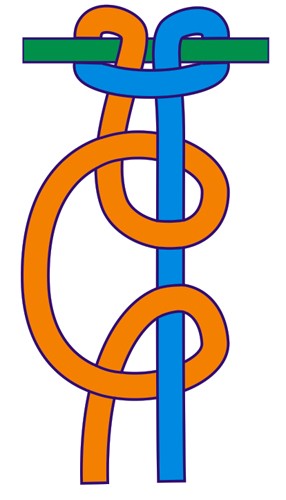
Chinese nodes very often carry a hidden sacred meaning. They are quite complex, but they look elegant. One of them is called "Lotus." It is often used to weave various pendants and laces.

How to knit a Chinese knot "Lotus". It is necessary to put two threads on the pillow one on the other and fix them with a pin. Then, alternately lay the ends of the threads in a circle: the first - on the second, the second - on the third, the third - on the fourth, and pass the fourth into the loop of the first thread. Gently pull each end to its side until a beautiful knot is formed.
How to tie a Chinese Lotus knot, see the video from Svetlana Shchepkina:
Macrame weaving patterns
The Spider weaving pattern is very often used to create macramé products.
First, several square knots will be made, then one of them will be tied on three to six threads in the second row. The basis of the product is the fourth and fifth cords. Performing the third row, weave one square knot, using the same base (4th and 5th cord), and then adding the 7th and 2nd thread to the work. In the fourth row of the circuit, threads 4 and 5 are used, as well as 8 and 1. Pay attention to the scheme:

See other macrame weaving patterns below:


Beginner's Workshop “Macro Cache-pot”
Very often, various rooms are decorated with living plants. To create a special style and atmosphere, flowers can be placed in a glass vase. And if you place this transparent vessel in a flowerpot, created by yourself using the macrame technique, you can originally decorate the interior.

In the same way, you can create a flowerpot for a flowerpot with flowers.

No special skills are required here. The main nodes of macrame are described in detail above.
To perform the work you will need such materials:
- round glass vase;
- kapron threads;
- some scotch tape;
- sharp scissors;
- basis for fastening.

The order of the work. Take 8 threads, fold them in half and fasten with tape.
The calculation of thread consumption for work is approximately the following: multiply the product height by 4 and add a little more for insurance. If the threads are doubled (as in this case), then you need to multiply by 8, and not by 4.

Then take the ninth thread and wrap it tightly over the previous threads to make a sufficiently strong loop.
Carefully review the step by step photos. They show in great detail the operating procedure.

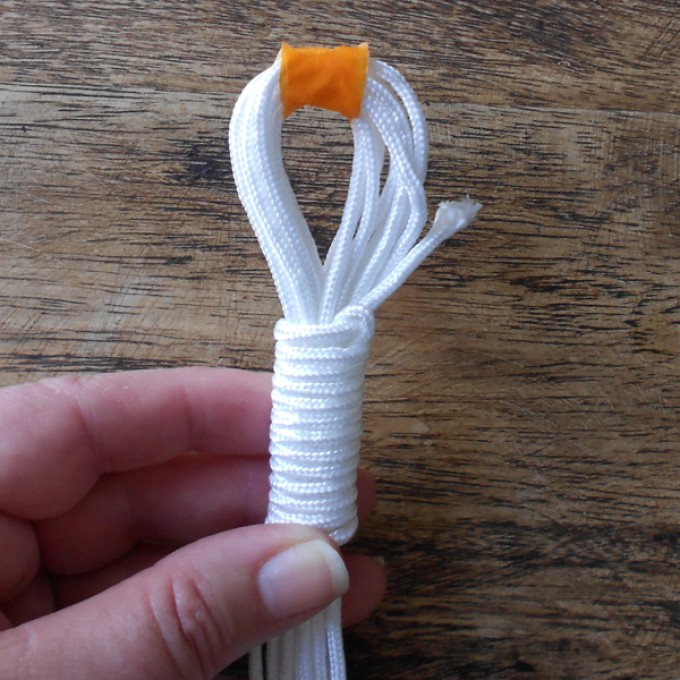
We carefully cut off the excess with scissors.

Then we divide our bundle into 4 parts, each of which will also have 4 threads. And we begin to knit a left-side flat knot. Put the working thread on the left above the axial threads and under the working thread on the right. Next, we stretch the right thread under the axial threads into the hole and tighten the knot. And so on to the height we need.

So we knit a twisted chain.

After several macramé knots, you can step back and again dress the threads with a simple knot.

Similarly, we need to weave three more of these cords.

Then we begin to make the foundation for the vase. Each part is divided in half by 2 threads.

And we knot such knots like this:

Flat knot ...

... and twisted
At the bottom, we decorate the product with square knots and tightly braid it so that the vase does not fall out.

At the end of each thread we tie a knot. To keep it tighter, it can be melted.

Here is such a beauty!

It remains only to insert a vase and admire the wonderful result.
HeadingsThe art of weaving knots in Slavic culture was equated with pagan rites, because amulets and charms were made using just such a technique. Nowadays macrame art has become not only fashionable, but also a practical hobby. Modern craftsmen combine weaving with decor from beads, rhinestones and semiprecious stones. Let’s try and we will independently master this interesting technique.
How to make macramé according to weaving patterns
Introducing Macrame Weaving Patterns for Beginners
Weaving using the technique of nodular weaving is possible not only on panels and hammocks. Craftswomen create earrings, necklaces, belts and lace to decorate clothing items.
First you need to determine the quality of the weaving threads and take into account several nuances:

For work, you will need a board or a book in the format of a landscape sheet. Some craftswomen fasten the threads to a special tube or a rod of small diameter. But in order to weave knots in a canopy, some preparation is required.
Preparation before work:

Now on this blank you can weave the first training knots.
Knots and patterns of weaving macrame for beginners
A single flat unit consists of a single loop. How to do this can be seen in the diagram.

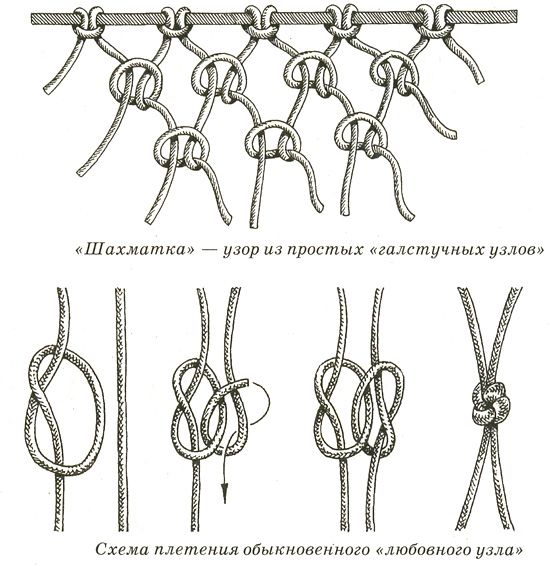
A double flat knot is used for weaving - baubles made of floss - or other types of threads. Pay attention to the weaving sequence: each next knot should be a mirror image of the previous one. In another case, the resulting flat thread will begin to twist in a spiral.


From square knots you can weave a rhombus, as shown in the diagram.

The number of nodes is measured in dozens. We will consider basic techniques with corresponding schemes.
Nodular chain.

Node "chameleon".

Node "tatting".

In the diagram, you can consider and test other, no less beautiful techniques for creating nodes.

Patterns of weaving panels on the wall using the macrame technique (with step-by-step photo)
A wall panel is an excellent occasion not only to practice weaving techniques, but also the opportunity to create an original thing for your interior with your own hands.
For the panel you will need:
- 10 threads of 5 m each; scissors;
- wooden plank 45-50 cm long (it will become part of the future panel).

Operating procedure:

To diversify home decor and create original jewelry It is possible with the help of “flowers from beads”.
How to weave a macrame belt (master class for beginners)
For work you will need:
- beautiful cross buckle for threads:
- silk or synthetic threads - 3 pcs. 10 m each;
- scissors.
Operating procedure:
- first you need to master the weaving of a double flat knot with a central thread (you can choose a different color for the central thread);

- attach the threads to the buckle as shown in the figure;

- to end weaving, use the node “diagonal bead roller”, as shown in the diagram;


Using this technique, you can weave a watch strap.


Pattern for weaving macrame for pots (step by step for beginners)
DIY weaving patterns for flower pots from macramé are varied and popular among craftswomen. Someone weaves a cache-pot from the top edge, someone starts weaving from below. Consider simple schemes for beginners.
For work and training you can use threads cut from old colored t-shirts. How to make such a yarn can be seen in the photo.


The scheme for weaving planters from below:

For work you will need:
- 8 blanks of threads of 2-3 m each (depends on what height you plan to hang the pot);
- flower pot; scissors.
Operating procedure:

In the same way, you can weave a cache-pot, starting from the top. To do this, you will additionally need a ring for attaching threads. The lower part can be connected by a common knot and make a second tier for the second pot.


Here are some examples of interior decoration using simple flowerpots.


If you have a ready-made flower pot, but no fresh flowers, you can do it yourself — bead trees—.
From knots, you can create many practical and sophisticated things. Designer jewelry is highly valued, and the abundance of blanks for jewelry and decorative items in needlework stores allows you to create original pendants and earrings. Original “bead bracelets” will be a worthy addition to the kit.
For starters, you can practice simple patterns and weave, for example, a keychain. For additional clearance you you will need large beads, a key ring and multi-colored cords. How to do this can be seen in the diagram.


Handicraft shops are a separate universe, once in which it is no longer possible to go out without a purchase. “Bead brooches” look exquisite and elegant, because there will be no more in the world.
Pendants and necklaces can be made from any improvised materials. Lace, multi-colored threads and cords, multi-colored beads and openwork jewelry are used. The order of work and the scheme can be seen in the photo.
Video with a step-by-step macrame weaving workshop for beginners
- A macrame owl in the shape of a keychain can be your friend, and a simple weaving pattern will help weave it in one evening. For the owl’s eyes, you need a few large beads. See other ideas — beadwork — you might find new ideas for inspiration.
- The technique of weaving a glamorous leash and collar for your favorite macrame dog is shown in a detailed master class. In this way you can please your four-legged friend with your skills.
- The video shows a detailed workshop on weaving bags using the macrame technique in a simple pattern. A detailed story about the choice of material and additional tools that you may need in the process.
Write how you liked the idea of \u200b\u200bweaving original macrame jewelry? We welcome any comments.
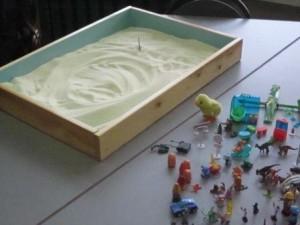 Sand show for a children's holiday
 Beautiful pictures with the Navy Day (34 cards for free) Old postcards with the day of the Navy
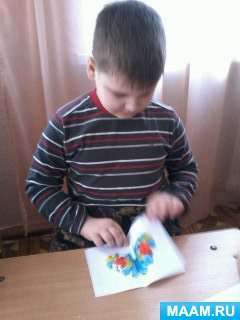 Exercises for the development of creative abilities in children Classes for the development of creative abilities of preschool children