How to sew men's chinos. Sewing women's trousers: several relevant models step by step
- sophisticated and laid-back. There are both male and female versions of chinos. Chinos summer versatile pants, appreciated for a laid-back and at the same time sophisticated look. Convenient, comfortable pants suitable for almost everyone, on the basis of which you can create various spectacular images. With what to wear chinos, patterns, where to buy them and whether it is possible to buy in online stores - all this is described below.
Chinos Pants: A Story
Chinos have a military background. Pants of this kind were part of the military uniforms of the British troops in India. They were originally white. In a tropical climate, it turned out to be difficult to maintain their white color, dust and dirt was impossible to remove. Therefore, the regiment commander Harry Lamsden decided to paint the white uniform using abundant natural dyes: hazel, coffee dust and mulberry juice. As a result of mixing these dyes, a unique color was obtained, which the locals nicknamed “dusty” - khaki. The color turned out to be so successful that the military field uniform is still sewn from the fabric of this color. The comfortable look of trousers, a practical color, became part of the uniform of the US Army, which at the end of the 19th century conducted military operations on the Philippine islands. Pants were made from cotton fabric made in China. And China in Spanish is pronounced chinos, it is this name that has been attached to trousers. Until the mid-twentieth century, they continued to be part of the military uniform, only after the Second World War the chinos fell into the wardrobes of civilians. At first they became men's trousers, and then women's.
Chinos pants: characteristic features and features, patterns
The cloth. Chinos are sewn only from natural, lightweight fabrics; in modern conditions, the addition of a small amount of synthetic fibers is allowed, which makes caring for them less problematic. Therefore, chinos are exclusively summer trousers.
Color. As mentioned above, initially they were white, then they became khaki, now the color of trousers can be any.
Style. Chinos are not limited to one strictly defined model, but they are all free-cut, not constraining movements. The original style of these trousers was modified by the fashion cut and style, complemented by decorative elements. But the main features by which you can visually distinguish chinos from others remain unchanged.
Classic features:

A leg cut narrowed to the bottom and slightly shortened to the ankles.
Pockets on the sides are beveled, hidden behind.
Button closure.
The landing is classic.
Modern innovations:
The degree of narrowing of the legs can be different. There were models with a zipper. Landing can now be both understated and overpriced.
How to choose and wear chinos.
A unique sample of chinos, combine sophistication and ease, sometimes even negligence. A large number of styles in a different color scheme and excellent ability to combine with various types of clothes creates a wide field for imagination and the ability to create different images: business, romantic, casual, sports. In the wardrobe of a modern woman who follows fashion, chinos should be better if there are several.
Chinos pants: color

Chinos color from a huge color variety can be selected for practical reasons - so that it goes well with the basic things of the wardrobe or from personal color preferences.
Having decided on the color, you can begin to try on various styles based on the fact that any woman can choose chinos for herself.
Chinos with pinches or pleats are perfect for slim women, this will add an attractive volume to the breeders, and without folds, slimness will be emphasized.

For the full ones, the option with folds is not suitable, they have enough of their volume, you should choose models without folds, and without a strong fit from a lightweight fabric, they should be moderately free.
Chinos with folds creating volume in the hips will do good service to women who have a problem when the shoulders are wider and the hips are narrow, the chinos will add extra volume to the hips and resolve the imbalance.
There is one caveat: for those who have sufficiently full shin and ankle, it is better to avoid this type of trousers, since they emphasize this feature due to narrowing.
High-waisted chinos can visually lengthen your legs. Low-rise chinos can be afforded only by tall women. For everyone else, a classic fit is ideal.
Chinos are tucked at the bottom, doing something like a cuff, so you can adjust the length, they should be several centimeters higher than the ankle. The width of the lapel is regulated depending on the height, the lower the woman, the narrower the lapel. Owners of small stature can make them a little longer so as not to cut the leg visually.
Chinos Pants: Accessories

The most necessary accessory for chinos is a belt. Any color, but not black, this color is too strict for laid-back chinos. For a more relaxed image, the belt can be taken in a different color matching the color of the shoe or bag. The belt can be replaced with a beautiful multi-colored scarf.
How the image created by chinos will look like depends on the shoes. For everyday and sports looks, the ideal option would be flat shoes: moccasins, loafers, ballet shoes, sandals, sneakers, sneakers. Business and evening looks are created using high-heeled shoes: a stiletto heel, a large, steady, or solid sole.
Clothing is selected to the chinos according to the created image.
A sophisticated evening option with a blouse made of silk or chiffon in addition to a bright touch in the form of an elegant small handbag.

For fans of casual chinos, this is a real find, with a blouse, t-shirt, cardigan, sweater, a free cut jacket, you can create beautiful, laid-back images for a walk in the park, in the country or in the shops, picking up various bags large and comfortable, comfortable shoes, and original accessories.
You can create a business image with beige chinos and a shirt-type blouse with a simple jacket or vest and medium-sized bags.
Refined and laid-back chinos will bring a fresh touch to the summer wardrobe, so be sure to be present in the women's wardrobe.
— Headings
- everything for a diary (478)
- all out of paper (369)
- main dishes (4200)
- cutlets, zrazy (216)
- dumplings, dumplings, manti, khinkali (85)
- cook delicious (58)
- we cook deliciously (13)
- cereal (247)
- dairy dishes (463)
- meat dishes (512)
- meat dishes (536)
- vegetable dishes (1269)
- rolls (681)
- baking (5064)
- pancakes (659)
- pizza (41)
- bread machine recipes (324)
- baking (411)
- pancakes (52)
- knitting (5792)
- slippers, socks, tracks (273)
- knitting (237)
- Hats (188)
- bag knitting (42)
- crochet (2706)
- knitting (2296)
- desserts (1129)
- for computer (228)
- home economics (24)
- blanks for the winter (1807)
- blanks for the winter (650)
- health (8304)
- medicinal herbs (455)
- gymnastics (413)
- circulatory and lymphatic systems (392)
- massage, gymnastics (231)
- nordic Walking (10)
- health (1548)
- joint diseases (544)
- diabetes (294)
- hypertension (166)
- pancreatitis (138)
- games (11)
- ideas for a summer residence (2745)
- all for the garden (286)
- tomatoes (104)
- garden trees (87)
- all about cucumbers (71)
- tomatoes, eggplant, peppers (59)
- home ideas (1568)
- learning english (143)
- internet (23)
- Beauty & Health (2962)
- face masks (552)
- legs (196)
- all for hands (128)
- nails (92)
- hairstyles (330)
- cooking (7894)
- chicken dishes (1094)
- cooking tips (75)
- my recipes (9)
- sushi rolls (4)
- grill-gas pan (3)
- snacks (1887)
- casseroles (656)
- drinks (466)
- first courses (541)
- steamer recipes (6)
- salads (2384)
- sauces (480)
- microwave (19)
- musical kaleidoscope (508)
- thoughts, phrases, quotes (209)
- drinks (285)
- useful advice (1030)
- poetry (104)
- orthodoxy (486)
- holidays (42)
- nature (58)
- Holders (126)
- travels (92)
- recommend reading (139)
- slow cooker recipes (433)
- needlework (1282)
- embroidery (93)
- embroidery (69)
- Soap Stories (43)
- beadwork (42)
- ribbon Embroidery (24)
- dolls - hosiery (9)
- do it yourself (152)
- Fish Cooking (1063)
- Fish Cooking (343)
- food decoration (247)
- movies (54)
- movies (55)
- artist, photographer (21)
- flowers (629)
- paper flowers (60)
- Fabric and knitted flowers (617)
- school (688)
- we sew ourselves (1865)
- sewing machine (98)
- patchwork (81)
- it's interesting (1309)
— Diary Search
— Email Subscription
— Statistics
Correct the pattern of trousers. So that the pants fit well
For no part of the clothes is the fit on the figure so unimportant as for trousers! And she, unfortunately, is not guaranteed even to those whose measurements completely coincide with the standard. (By standard sizes we mean the sizes presented in the table in fashion magazines).
Consider what can be done to pants sat well, both at the stage of adjusting the pattern, and in finished trousers.
Correction trousers Depending on the size, it can be made according to several basic parameters.
Length
Determine the difference between your height and standard. It is necessary to shorten or lengthen the pattern by this value.
Width
If your measurements of waist or hips differ from the standard ones - into the pattern trousers necessary changes must be made.
Seat height
This is a control value, it is not in the table. Take this measurement yourself in a sitting position: from the waistline to the plane of the chair. See also article: “Correction of the finished pattern of trousers“ Correction of the finished pattern of trousers ”
On the pattern of the back part, draw an additional line perpendicular to the lobar. This line should go through the bottom of the middle seam line.
Set aside the height when sitting (1).
Important: height trousers when sitting may vary depending on the model.
For example, in a very tight-fitting model of trousers, step seams (middle seam) fit tightly to the body. For wide trousers such as pajama or with folds at the waist, the height of the trousers when sitting should be greater. stepping seam is more or less low.
To check the required height of the trousers when sitting, glue the details of the pattern along the lines of the step seam and the side, try on half of the trousers. If the height of the trousers when sitting is not enough, cut the paper patterns of the front and back halves of the trousers across at a height of about 15 cm from the waist line and add the desired length (2).
If the height trousers when sitting too large, then sew in the form of a transverse fold of excess length along the hips (3).
Hip girth
This is a very important control measure for tight-fitting trousers and with non-standard thigh widths. On the details of the patterns, it is measured directly at the lower point of the middle seam. Here the main rule is the measured value plus 4 cm. If there is not enough width up to 1.5 cm, then it is added to the pattern of the back half along the line of the step seam to the level of the knees (4).
If the difference in width is greater, then you can expand the pattern further along the line of the side seams.
Protruding buttocks
Pants stretched on the buttocks, the side seams go back, the seam of the belt is pulled down.
Usually pants sit like that in case (5), if the buttocks are slightly larger than what is provided for in the pattern.
Correction of finished trousers:
In the finished trousers you can add widths on the side seams and stepping seams of the rear halves, the length can be added at the seam of the sewing belt.
Correction of "trial" trousers:
If you are going to sew pants from expensive material, it is advisable to first sew a trial version of inexpensive material.
In the "trial" trousers make cuts at the most strained places along the lobar from the belt almost to the knees and along the transverse almost to the side seams. Pin strips of fabric under the cuts (6).
Correction of a paper pattern:
Mark the direction of the line along the midline of the rear part.
To add the desired width, draw two auxiliary dashed lines:
- at the height of the knees, an auxiliary vertical line perpendicular to the lobar;
- from the top of the back tuck to the point of intersection of the direction line of the shared thread and the drawn auxiliary transverse line (7).
Cut the pattern along the line of the middle of the depth of the tuck and then along the auxiliary line to the level of the knees, and then along the drawn transverse line to the side edges. Add the desired width of the pattern in the form of a tuck to the line of the knees. Mark the tuck again, while the top of the tuck passes exactly along the line of the middle of the wedge-shaped insert. The pattern is also slightly expanded along the line of the stepping seam (8).
To lengthen the pattern, draw a horizontal auxiliary line perpendicular to the direction line of the shared thread and passing through the top of the tuck. Draw a vertical line in the middle between the side seam line and the tuck.
- from the line of the back middle seam along the horizontal line almost to the line of the side seam - from the upper edge of the part along the vertical line to almost the horizontal section.
Add the length to the horizontal wedge-shaped incision: at the line of the middle posterior suture 1-2 cm, at the vertical section - another 0.5-1 cm at the side seam but add nothing. Thanks to these manipulations, a second tuck is formed at the vertical incision, which is necessary for full buttocks. Because the first tuck, due to the increase in width, has become very deep, then reduce it by half and add this value to the second tuck.
Draw a new tuck 2-3 cm shorter than the original. Align the side seam line.
Draw a new line of the line on the upper part of the pattern, extending the line of the line from the bottom of the pattern up to the upper edge of the part (9).
Pants with a good fit will be worn for a long time and with pleasure.

Modeling Lesson: How to Stitch Pants
Evgenia Rodina
Fashion designer
To build and put on a figure trousers is not an easy task, even for an experienced tailor. In order to be sure of success you need a well-calibrated and successfully sat on the figure pattern-base. You can build it by any method, or you can generate it on our website. Building a pattern by your standards will not take a minute, and after payment and receipt you can print it on any printer. Here is a detailed description of how. Its cost is small, and its value is enormous. Proof of this is positive feedback sent from different parts of the country and even from abroad.
« I want to say thank you very much for the patterns through the generator. I sewed trousers, I just want to cry with happiness, because the size is 60. Two summer trousers are cut. Once again, thanks to all the staff of this project for their great help ... »
« I am a large girl, size 58-60, so I was very surprised when the trousers sewn to the basic pattern sat perfectly from the first fitting. I experienced a real shock. That was a week ago. Now I sew two more pairs already from expensive fabric. To say that I am satisfied is not enough! I am infinitely happy! Thanks. "
“... I already took advantage of the pattern of trousers. I liked to use the service: easy, affordable and understandable, and inexpensive. Thanks. I will master other sections. And I will definitely recommend it to interested friends. All the best. Further success and development ... "
It is very nice to receive such feedback from you! When you realize that your work is beneficial, you experience incomparable pleasure. On this wave, we decided to go ahead and publish a trouser modeling lesson for you. We hope you find it useful. We will learn to model such models.
Palazzo Trouser Pattern
The first trouser model we will look at is the palazzo trousers. Loose, flared from the hip, they resemble a skirt, pants. Very comfortable at any time of the year, in the summer - indispensable. Sewn from fine viscose knitwear, silk, linen .. pleasantly flow on the foot and! importantly, they hide flaws, if any.
For modeling, we need a pattern-base of trousers, scissors and glue.
The first step of the points formed by the intersection of the lines of the side seam and the line of the hips, and the end points of the seam of the seat on both halves of the trousers, lower the perpendiculars to the bottom line of the trousers.
The second step in modeling the pattern of the palazzo trousers. In order to obtain the desired flared shape, it is necessary to perform cuts of the pattern details along the planned lines from the bottom up to the top of the tucks on both halves. Having closed part of the tuck solution, we open them below, thus obtaining the necessary width of the trousers along the bottom.
We outline the width of the finishing part, the stripes, its width can be different, according to your desire, by straight lines along the line of the side seam, perpendicular to the bottom. Cutting along the intended lines, the details are compatible in one. The tuck solution along the side seam can be left in the center of the part, or it can be distributed into the seam of the half-trouser stitching to the main parts.
The upper section of the trousers is treated with a stitched belt. Cut it out in the form of a straight 7 cm wide (without allowances for seams), ready-made (bent) 3.5 cm, and a length equal to the waist circumference. We offer to make a fastener in any seam with a secret zipper.
Pattern of jogger pants
Pants - joggers have a definite advantage - they are very comfortable. Their free, but not too much, cut in the hips, a slightly lower waist line and seats, soft knitted elastic cuffs and elastic at the top, performance material - all this provides comfort and ease of style. It is worth wearing in everyday life, although made of silk, fabrics with lurex ... they can also become the subject of an evening wardrobe. In our photo, a model of trousers - Ralph Lauren joggers, they are made of high quality soft knitwear.
We begin the simulation by checking on the hips. After you have printed the pattern, pick up a measuring tape and measure both parts of the trousers along the thigh line, compare the result with your measurements + increase in freedom of fitting. We recommend an increase to about 6-8 cm, for this model. If the pattern in the hips does not meet your request, it is easy to adjust.
It is necessary to cut the details of the pattern along the center and push it to the missing value. See picture.
Lower the seat line.
Do not forget to shorten the trousers to the width of the elastic cuff.
Cuffs - elastic bands at the bottom of the trousers are cut out with rectangular details with a width equal to their doubled width in the finished form plus an increase in the seam of the stitching (1 cm), and a length equal to the girth of the ankle, plus a small (1.5-3 cm) increase in freedom of fitting, plus an allowance for the seam.
The belt is also cut out in the form of a rectangle of length OT + an increase in freedom of fit of 2-3 cm and an allowance for a seam of a width equal to twice the width in the finished form.
On the outside, in the center of the belt, break through two blocks or over two loops to wind the cord.
Stitch cuffs and a belt must be slightly stretched, equalizing the cuts of trousers and processing details.
Pocket. To make a pocket with a false seam, bending the slices inward, process the slice of the entrance to the pocket into a hem or hem.
Cigarette Trouser Pattern
The next model we have chosen for the lesson is elegant and graceful. Pants - cigarettes - are very popular, they add sexuality and grace to the female legs.
Modeling it is not at all complicated. Having a well-fitting base pattern, you can easily cope with this task.
Just tighten the pants and adjust the length. For narrowing, you need to know exactly the desired width of the trousers along the bottom and in the knee area - for control. This can be done simply by removing the parameters from the figure plus an increase in freedom of fit. The recommended increase in the knee area is 8-12 cm, on the bottom 5-10 cm. The size depends on the fabric, because fabrics with a high elastane content can be used. Have you decided? Then measure the pattern in these places, maybe modeling is not needed!
If the base pattern turned out to be wider (narrower) - we will correct it.
In order not to lose the proportions of the trousers, the excess (missing) value must be adjusted with the same segments on each side of the side seam along the bottom and the knee line, on both halves of the trousers. See picture.
Process the top of the trousers with a stitched belt, which is cut out in the form of a rectangle with a length equal to the measure From plus an allowance for freedom and an allowance for the fastener. The width of the belt is 3 cm in the ironed finished form. The fastener of cigarette trousers will look best in the side seam, on the hidden braid-zipper.

Modeling narrow trousers
Hi, I'm modeling the pants of the pipes. In this post, narrow, in the next classic version with a fold.
I model a pattern on a ready-made basis.
So, for tight pants I do
Raising the step point and narrowing the step seam
Front half
I spend the straight to the knee, just as an auxiliary.
Adjust the midline
Back half
I increase the rotation of the rear half
With a narrow width of the trousers on the knee, so that when raising the legs the trousers do not go down from the waist to the back, increase the rotation of the back half. So to speak, to maintain the dynamic properties of trousers.
The more the buttocks protrude, the greater the opening.
Correct the middle line.
When combining the front and rear halves along the lines of the arrow and the knee (bottom), the distance between the middle lines should be at least 10 mm.
Front leg
Width of the bottom and knee
The width along the bottom is chosen approximately in the range of 30 - 34 cm around the entire circumference. The distance from the middle of the leg in both directions is calculated as Width / 4 - 0.5 cm.
The width along the knee line should not be less than the girth of the knee in a bent state.
Side and step lines
Back leg same lines
If the trousers will sit on the natural waistline, then the belt will be just a straight rectangular.
If the waistline is flat, then the belt must be trimmed so that it fits snugly and does not puff.
We lowered the waist by omitting the waist line by the desired value.
It can be useful:
How to build a side pocket with a trimmed barrel and a codpiece fastener, see here.
The order of sewing straight women's trousers. The post contains the complete process of creating trousers, go directly to sewing. The sequence of steps is the same.
We sew trendy skinny and sexy pants skinny and cargo!
SKINNY (skinny) - skinny trousers or jeans, starting from “pencils” (pencil leg) and ending with jeggings (jeans + leggings) are still very relevant.
And this is an illusion that skinny suits only skinny!
Look at Kim Kardashian, Rihanna and Sofia Vergara, who look very attractive to them. Skinny in different interpretations, colors, textures and details can be found at 7 For All Mankind, Balmain, Burberry, Chanel, Dsquared, J Brand, Notify, Roberto Cavalli, Victoria Beckham Denim, True Religion, Black Orchid - and count on the fact that in the near future they will disappear, fortunately, do not have to.
Jeggings, unlike leggings, do not require covering our fifth point, which gives us freedom in choosing the upper part of the wardrobe.
CARGO
According to fashion experts, 2010 was marked by J Brand Houlihan jeans, which were sold out in America and Europe with incredible excitement! It was in this model of jeans that Gwen Stefani, Renne Zellweger, Gwyneth Paltrow, Charlize Theron, Eva Longoria, Rihanna, Sarah Jessica Parker, Fergie, Cindy Crawford and many, believe me, many others were noticed. Good does not disappear without a trace.
And in 2011, many designers picked up this trend, expanding and evolving it a bit in their collections:
7 For All Mankind, Balmain, Black Orchid, Current / Elliott, Dsquared, J Brand, Stella McCartney, True Religion, Work Custom. This season, a new, no less delicious beige has been added to the already popular olive and gray colors of cargo jeans.
All models are modeled on a single pattern-based - tight skinny pants.
The pattern is built according to the method of "Muller and son."
Size 44. Hip 88-92cm. The remaining sizes are constructed in the same way.
Merki
How to take measurements - read here.
From the photo you see that the trousers very fit the figure. So you need to sew them only from elastic fabrics, otherwise you can neither sit down nor raise your leg in them. We do not make any allowance for relief, even negative ones. We take measurements as they are.
We do the necessary calculations
Дш - Step length. Dsh \u003d Dsb-Vs \u003d 106-25 \u003d 80cm
VK - Knee Height. Vk \u003d Dsh / 2 - Dsh / 10 \u003d 80/2 - 80/10 \u003d 32cm
Shpb - the width of the front half. Shpb \u003d OB / 4 - 1 \u003d 92/4 - 1 \u003d 22cm
Shzb - the width of the rear half. Shzb \u003d OB / 1 + 1 \u003d 92/4 + 1 \u003d 24cm.
We build a pattern-base of narrow trousers
From this basis in the future you will be able to simulate and sew any tight jeans or leather pants.
1-3 Seat height. Sun \u003d 25cm
3-4 Knee Height Bk \u003d 32cm
1-5 Length of trousers on the side (with heel) ДСБ \u003d 106cm
5-6 Ankle level. The difference between Dsb - Dsch \u003d 106-96 \u003d 10cm. Optionally, you can make pants up to the ankle, or to the knee. In my case, I will not do anything, I want such as in the photo, long.
3-7 Hip line. RP / 20 + 3cm \u003d 92/20 + 3 \u003d 7.6cm
From points 2, 7, 3, 4, 5 draw perpendicular lines to the right.
7-8 Width of the front half of the trousers Шпб \u003d 22cm
8-9 Step width of the front half of the trousers OB / 20 + 0.5 (for all sizes) \u003d 92/20 + 0.5 \u003d 5.1 cm
Through point 8 draw a perpendicular, at points of intersection put points 8a and 10.
Here is what we have, drawing 1:
Buildings to drawing 2
11 half segment 7-9
Through t.11 draw up the arrow line - we get points 13 and 14.
12-15 and 12-16 1/4 Width of the bottom of the trousers minus 0.5 cm. 21/4 - 0.5 \u003d 4.8cm
15a-16a lower the perpendiculars down to the bottom line.
7-15a and 9-16a Draw the side and step lines. 17, 18, 19 we get at the intersection.
from 8 to the right put aside 0.5cm.
8a - 8b, copy half of section 8a-17. Points 8b and 17 connect the auxiliary line.
Draw a smooth bow cut line, see drawing 2.
Extend the bow line, draw a straight line perpendicular to it. This straight line will cross the waist line at a distance of 5 cm from the arrow line.
20-21 OT / 4 + 1cm \u003d 68/4 + 1 \u003d 18cm
21-22 \u003d 1-2 In our case, 1.5cm. Make a section of the waist in a smooth line.
Make a side cut by connecting 22 and 7.
18-23 and 19-24 narrowing depending on the desired shape of the trousers.
23-24 Should equal 2 * (1/4 Width at the knee minus 0.5cm). 2 * (34 / 4-0.5) \u003d 16cm.
The back half. Drawings to drawing 3
The construction of the rear half is performed on the drawing of the front part.
11-25 retraction of the arrow on the rear half of the trousers - 2cm.
25-26 Shzb / 4 + 0.5cm \u003d 6 + 0.5 \u003d 6.5cm
26-27 straight section. From v.26 restore the perpendiculars up and down.
Waist lines and hips extend left and right.
28-29 Hip line at the back of the trousers. The line is Shzb-1cm \u003d 24-1 \u003d 23cm. It is parallel to segment 26-27 and perpendicular to 28-36, must cross the line of the hips of the front half.
25-30 \u003d 25-29 \u003d 17.3cm
On the bottom line, put 1cm to the right and left of the side lines, also on the knee line. Draw a side line and a step line, getting points 31, 32, 33, 33a, 34, 34a.
From 32 through 29, draw a straight line to the intersection with the waistline - we get 35.
Connect 30 and 31.
13-36 \u003d segment (13-35) + 3cm \u003d 61.3cm. On the perception with the line of the rear middle cut, we get 36.
35-36 to connect.
37-38 OT / 4 - 1cm + 1.5cm (tuck) \u003d 68 / 4-1 + 1.5 \u003d 17.5cm
In the middle of section 37-38 draw a perpendicular and on its sides set aside the back tuck 1.5cm long 8-10cm.
From 38 draw a short perpendicular up.
Copy the line of the side cut of the front half, align it along the femoral line of the rear half and turning, find the intersection with the perpendicular from t. 38. So leave it - we got the line of the side seam of the back.
Make a waist line.
31-39 Length of the seam of the rear half. 0.5 cm shorter than the length of the front seam.
37-39 Draw a mid-section line of the rear half of the trousers.
Here is the pattern we need for modeling - the basis of the fitting trousers
Let's model the dark blue suede trousers by Balmain.
Lower the waist line 2 cm down. Draw a belt line, width 4 cm.
On the pattern, we apply the position and size of the welt pockets “in the frame”. Width 15mm, length 12cm. Do not forget about pockets and a hem for a pocket 2 cm wide.
Draw lines of embossed joints, randomly, approximately as on the original. My model is already sewn, so you can apply it as mine.
We put the line of the yoke on the back, the width along the midline is 6-7cm.
We perform a tuck on the rear half. It is needed so that the tissue under the buttock fold fits well to the body and does not sag. Tuck width 1.5-2cm. But you can do it only if the fabric stretches a little (2-5% elasticity) and when building the base pattern, you did not make negative increases for elastic fabrics.
We draw a pocket, on it we also need to draw the lines of the tuck and the welt pocket “in the frame”.
In order to sew this model from leather or leather. the fabric will need glue “moment” shoe for leather (for some knots), threads for leather, 6 metal locks, the material itself, a hook for trousers.
Skin cannot be ironed with a damp iron. Only defend with a very hot iron.
And now ideas from fashion designers!

How to sew pants with your own hands?
Hello, my dear readers of the Sheysomnoy.rf blog. Now we will sew fashion pants with a lowered seat line and a length of 7/8.
The following ready-made pattern for download is designed for such sizes:
- St \u003d 38
- Sat \u003d 50
- Height to knee from waist \u003d 56
- Knee Half Girth \u003d 22
- Width of trousers below \u003d 33 cm. (On narrow calves)
- Pants length 93 cm.
If you fit on your hips, then you can correct the rest of the measurements.
If you want to build trouser pattern for yourself, be sure to read these two articles:
The whole process is examined in them step by step. building a pattern of trousers by your measurements.
Download the pattern and cut out the details from the fabric. I sew from costume non-stretch fabric. You can take any costume or jeans, as you wish.
Cut the front details of the trousers:
Cut the back details of the trousers:
We note on the details of the trousers the control points of the knee line and the undercut.
We cut out the details of the pocket and the slope (it will need to be built using a codpiece pattern). Let's consider this moment a bit later.
Slope and zipper in trousers.
We cut and glue with doublerin the details of the belt and the hem.
Sew a recess on the back halves of the trousers. Ironing allowances to the center of the trousers (rear middle seam).
On the front halves of the trousers we make side pockets.
We connect both halves of the trousers (front and back) from knee point first up, then down. Fasten with pins or sweep.
Sew on the machine both halves of the trousers. Here's what you should get:
Now we will process the bottom of the trousers. Initially, I laid down 2 cm allowances so that 1 cm could be twisted twice. First we turn on the bottom of the trousers by 1 cm. Iron this place.
Then we tuck another 1 cm. Iron.
We flash it on a typewriter, make sure that the seam is even and there are no wrinkles on the fabric anywhere.
Once again iron the finished bottom of the trousers.
Now you need to process the zipper in the trousers and make a belt.
We pin or weave the finished belt face to face to the upper section of the trousers.
Sew the belt to the trousers on a typewriter.
We turn the belt so that both its parts (external and internal) are face to face. Now you need to sew up the sides of the belt so that they smoothly go into the codpiece. We sweep and flush the sides of the belt along the allowance line. (as in the photo on the right)
Here's what you should get:
Now we bend the allowances on the side of the belt and tuck the allowances of the inner belt so as to slightly close the seam of attaching the belt to the trousers with the inner belt. It is advisable to break this seam 2 mm, then you get a neat inner part of the belt.
We take it. We make sure that the inner belt lies flat, does not pull anywhere. It is best to first hem it on the front of the trousers, and then on the back.
Now the important point. We sew from the front side in the seam of the belt’s stitching to the trousers. Thus, we will sew the inner belt to the outer, and all the allowances will remain inside, and there will be a beautiful inner processing of the trousers.
It is only very important to precisely fall into this seam. To do this, we push apart (as if we were pulling) the belt and the trousers themselves in different directions. Then we will iron the belt and this line will not be visible if you do everything carefully.
Here is a belt should work.
Here is the inside view:
But there isn’t enough loops on the belt where we can get the belt.
Now it's time to make a buttonhole and sew a button on your pants.
To do this, use a special foot for loops. Insert our button in the foot, put the foot in the machine. Do not forget to lower the special little thing so that it stops the machine and guides in the opposite direction.
There is a special loop mode on the typewriter, as in the photo below.
And of course, do not make a loop immediately on the trousers, but first practice several times on the same fabric with which you sew the trousers. Since the loop may need to be adjusted.
We made a loop on the trousers.
And sewed a button.
These are such wonderful trousers.
P.S. Although I built them on myself, I wanted them to be with an understated seam (I lowered the seat line 5 cm from the natural one), but this turned out to be a bit much in the finished product. Perhaps this depends on the quality and density of the fabric. In any case, you can adjust this moment in case of need (to hem the excess from the inside).
See also a video about how to sew new trousers without a pattern, taking as a basis your favorite old pants:
I hope you liked the article and if you sewed pants, they will bring you many joyful moments !! Sew with me!

Pattern of women's trousers Step by step construction
The pattern is the basis of women's trousers. Step by step drawing design patterns
Styles of trousers can be very diverse: classic and sporty; voluminous in the hips and more adjacent; extended to the bottom and narrowed; with and without cuffs; with different types of pockets and without them; length that varies from knees to foot level; with cuts in the side seams and without cuts; with various finishes: braid, lace, lacing and other decorative elements. Pants are made both lined and without it. The fabrics for sewing trousers are used in the most diverse: from guipure to drape.
The starting point for all this abundance is building a basic drawing of trousers. And already on its basis are constructed all the styles that you can imagine.
And one more thing I would like to remind: If you think that it is difficult, you will be sure that you were right. If you think that this is simple, you will again be convinced that you are right. So before you think - think!
I wish you courage and self-confidence.
Let's take the first step.
To build a drawing of the base of the trousers, the following measurements and additions are necessary (the figures given correspond to size 48):
Semicircle of the waist (St) \u003d 38 cm,
Hip semicircle (Sat) \u003d 52 cm,
The length of the trousers to the knee (DK) \u003d 56 cm;
Pants length on the side (DB) \u003d 100 cm;
Width of trousers below (Shn) \u003d 24 cm;
The allowances for free fitting around the waist (Fri) and hips (PB) are selected depending on the degree of fit of the trousers: Fri - from 0 to 1.5 cm, PB - from 0.5 to 4 cm. For our construction, we take the minimum allowance at the waist , i.e. zero, and on the hips - 1 cm.
We also need three control measures: knee girth, ankle girth and hip girth.
Drawing a front half of trousers.
We begin the construction of the drawing by drawing two mutually perpendicular lines.
The intersection point is denoted by T1.
Seat height.
There are two options for determining the height of the seat: by taking measurements and by calculation. In our example, we use the second option, i.e. we determine this value by the formula T1Y1 \u003d 0.5 x (Sat + Pb) + 1 cm. Substitute the values, we get \u003d 0.5 x (52+ 1) + 1 \u003d 27,5 cm.
From the point T1 down vertically, lay 27.5 cm and put the point Я1. From point I1, left and right, draw a horizontal line.
From the point Я1 upward, put aside 9.1 cm and put the point B1. Through point B1 draw a horizontal line left and right.
The width along the hips.
Formula, values, result. Moving on.
B1B2 \u003d 0.5 x (Sat + Pb) - 1 \u003d 0.5 x (52+ 1) - 1 \u003d 26.5 - 1 \u003d 25.5 cm.
From the point B1 to the right horizontally lay 25.5 cm and put the point B2. Draw vertical line through point B2 up and down, designate intersection points T2 and H2.
Stride width.
Я2Я3 \u003d 0.1 x (Sat + Pb) Carefully substitute the values \u200b\u200b\u003d 0.1 x (52 + 1) \u003d 5.3 cm (see the figure below).
From the point H2 to the right horizontally lay 5.3 cm and put the point Я3.
The position of the fold line.
Divide the line Я1Я3 in half and put the point I.
Through the point I up and down draw a vertical line, the points of intersection with auxiliary lines indicate T and B.
Knee line.
The distance of the shopping mall is equal to the taken measurement Dk \u003d 56 cm.
From point T down the fold line, lay 56 cm and put point K. Through point K, draw a horizontal line to the left and right.
Length trousers.
From point T down the fold line, set aside 100 cm and put point N. Through point H, draw a horizontal line left and right.
The width of the trousers along the knee.
KK1 \u003d KK2 \u003d HH1 \u003d 11 cm.
It should be noted that the width of the trousers along the knee line can be greater than or less than the width of the trousers along the bottom line or be the same, but should not be less than the measure of the circumference of the knee (Ok) plus an increase of 2 cm for loose fitting. We take the width of the trousers along the knee line equal to the width of the trousers along the bottom line. From the point K to the left and right horizontally put aside 11 cm and put the points: on the left - K1, on the right - K2. The width of the trousers along the bottom line.
НН1 \u003d НН2 \u003d 0.5 х (Шн - 2) \u003d 0.5 х (24 - 2) \u003d 11 cm. From the point Н to the left and to the right put aside 11 cm and put the points: on the left - Н1, on the right - Н2.
The width of the trousers at the bottom should not be less than the measurement of the girth of the ankle Osc.
Auxiliary points for the design of the line of the stepping cut.
We get the point Я21 by dividing the segment Я2Я3 in half.
Connect the points Y21 and K2 with a straight line, divide this segment in half and connect the division point with a smooth concave line with the point Y3.
Draw the line of the step cut below the division point through the points K2 and H2, connecting them with a straight line.
Designs of the “bow” line (middle cut line of the front half).
T2T0 \u003d from 0 to 1 cm;
The distance T2T0 is taken equal to zero for figures with a convex stomach, and also when the trousers are supposed to be sewn from fabric with a pattern into a cage and a strip, although the latter condition is not necessary.
In our example, the distance T2T0 is 1 cm.
From the point T2 left horizontally lay 1 cm and put the point T0. Connect the points T0 and B2 with a straight line. Connect the points B2 and H3 with the auxiliary line, divide the segment in half and put the point D. Connect the line D with the point H2. Line ДЯ2 divide in half the point of division mark Д1. Draw the “bow” line through the points T0, B2, D1, and H3 with a smooth line.
Width along the waistline.
T0T4 \u003d 0.5 x (St + Fri) + two tucks. The width of each tuck is 2 cm. We take the minimum allowance along the waistline, i.e. equal to zero. We substitute the values \u200b\u200bin the formula \u003d 0.5x (38 + 0) + 2x2 \u003d 23 cm.
From the point T0 to the left horizontally lay 23 cm and put the point T4.
The position of the tucks on the waistline.
The first tuck is located along the fold line, from the point T to the left and to the right put aside 1 cm. The length of the groove is 8-10 cm. Draw the sides of the tuck in straight lines;
The second tuck is located in the middle of the segment from point T4 to the solution of the first tuck. From the point of division, drop the perpendicular 8-10 cm long - this is the axial line of the tuck, put 1 cm to the left and right from it and draw the sides of the tuck.
Side cut line.
Connect the points I1 and K1 of the auxiliary line, divide it in half, and deflect 0.5-0.7 cm deflection from the right point along the perpendicular. Draw a side cut line through points T4, B1, Y1, deflection point, K1, H1.
Bottom line.
The bottom line of the front half is formed by a straight line Н1Н2.
The drawing of the front half of the trousers is completed.
Drawing drawing back half of trousers.
Width along the bottom line.
Н1Н3 \u003d Н2Н4 \u003d 2cm.
Set aside 2 cm from the left and right points Н1 and Н2 and put the points Н3 on the left and Н4 on the right, respectively.
Bottom line of the rear half: from the point H, lay down vertically down 0.5 cm and put the point H5. Draw the bottom line with straight lines, connecting the points H3, H5, H4.
Width along the knee line.
K1K3 \u003d K2K4 \u003d 2 cm. From the points K1 and K2, put 2 cm to the left and right and put the points K3 and K4, respectively. Connect points K3 and K4 in straight lines to points H3 and H4.
Stride width(See pic below) . Я2Я5 \u003d 0.2 x (Sat + Pb) + 1. Substitute the values \u200b\u200bin the formula \u003d 0.2 x (52+ 1) + 1 \u003d 11.6 cm. From the point R2 to the right horizontally put 11.6 cm and put the point R5.
Step cut line.
Points Y5 and K4, connect a straight line. Divide the Ya5K4 segment in half, at the point of division along the perpendicular to the left, postpone 0.5-0.7 cm - we get the auxiliary deflection point. From point H3 down, lower the perpendicular 1 cm long and put the point H31. Я3 Я31 \u003d 1 cm. From the point Я2 through the point Я31 draw a straight line to the right to the intersection with the auxiliary line. The intersection point is denoted by J51.
Draw the step cut line through the points H51, the deflection point and the point K4 with a smooth concave line, and through the points K4, H4 - a straight line.
Mid cut line.
Trouser balance is the ratio of the levels of the tops of the slice of the front and rear halves.
From point T to the right, set aside 1/3 of the length of the segment TT2 and put the point T21. From vertical point T21, draw a vertical, put 4.3 cm on it and put point T5:
T21T5 \u003d 0.1 x (Sat + Pb) - 1 \u003d 0.1 x (52 + 1) - 1 \u003d 4.3 cm.
Connect the points T5 and H2 to a straight line, the point of intersection with the hip line to designate B3.
Draw the middle cut line through the points T5, B3 with a straight line, then through the points D2, Y31, Y51 - a slightly concave line.
The width along the hips.
B3B4 \u003d (Sat + Pb) - B1B2 from the front half \u003d (52 + 1) - 25.5 \u003d 27.5 cm.
From point B3 to the left horizontally lay 27.5 cm and put point B4.
Width along the waistline.
T5T7 \u003d 0.5 x (St + Fri) + 2 tucks. The width of the solution of each tuck is taken at 2 cm \u003d 0.5 x (38 + 0) + 2 x 2 \u003d 23 cm.
From point T5 to the left, make a notch on the waist line with a radius of 23 cm and put the point T7. Points T7 and T5 connect a straight line.
Tuck position.
Divide the T5T7 segment into three equal parts, omit the perpendiculars 8-10 cm long from the division points - we obtain the axial lines of the tucks, from which to the left and to the right put aside half of the tuck solution, i.e. 1 cm. Draw the sides of the darts with straight lines.
Side cut line.
To ensure a smooth side cut line, the B4K3 distance must be divided into three equal parts. From the division points along the perpendicular, we postpone 0.5 - 0.7 cm. Moreover, at the upper division point to the left, and at the bottom point to the right.
Making the side cut line.
Connect points T7 and B4 with a slightly convex line, points B4 and K3 with a convex-concave line, through auxiliary points (see figure). Points K3 and H4 are connected by a straight line.
The drawing of the back half of the trousers is completed.
Cut details
You have completed the construction of the trouser pattern drawing.
Any style can be constructed from this basis and, of course, it can be used as a pattern for sewing classic trousers. Having made minor changes to the design, for example, expanding in the knee area or narrowing the bottom, you get a completely new model. By experimenting, you gain invaluable experience.
Detailed instructions for the design and technology of tailoring with illustrative examples we will lay out in the relevant sections.
Wish you luck!
Information taken from the site Sewing master
Skinny pants remain relevant for many years, and are unlikely to leave the fashionable Olympus in the near future. Details change a little, but the narrowed cut itself remains unchanged. So, today pants with high and medium height, shortened from below, are popular. The pattern of just such trousers is presented in today's article. In addition, I offer 2 options for stylish skinny pants from Marlene Mukai. So, first things first.
Pattern of cropped trousers, tapered down
Any trouser fabrics are suitable for sewing trousers. If you want the pants to be elastic, it is better to give preference to fabrics with the addition of elastane. Otherwise, you can choose fabrics that hold their shape well. Since cropped jeans are in fashion now, you can choose thin denim, or cotton fabric dyed under a jeans.
At the end of the sewing description, you can download patterns of cropped trousers for sizes 40,44,48.
Cut
- 1. The front half of the trousers - 2 children. (allowance for hem hem not less than 4.5 cm)
- 2. The back half of the trousers - 2 children. (allowance for hem hem not less than 4.5 cm)
- 3. The front of the belt - 4 parts
- 4. The back of the belt - 2 parts with a fold
- Pocket lining - 2 parts (copy from part 1) A rectangle 6 cm wide and a length equal to the length of the zipper, plus allowances (for bending the fastener)
- 5 strips 2.5 x 5 cm plus allowances (for loops)
Cut out of the lining material:
- Pocket Lining - 2 Parts

Sewing cropped trousers
Duplicate two parts of the front part of the belt and one part of the back part with adhesive cushioning material.
On each front half of the trousers, make a slotted pocket with a leaflet with set-in ends in the waist products: pin one part of the lining from the wrong side according to the marking of the pocket with the wrong side down. Cut in the fractional direction of the warp threads from the base material a leaflet - a strip, the width of which is equal to twice the width of the leaflet plus allowances for the seam on both sides, with a length equal to the length of the entrance to the pocket plus allowances for the seams on both sides. Duplicate half the width of the leaflet with adhesive cushioning material. Iron the leaf along the center inside out. Stitch the leaflet on the main part with the front sides, marking the leaflet with a fold towards the middle of the main part (or down, if the leaflet is horizontal).
On the other hand, grind a gap from the marking of the pocket (cut out from the main material in the form of a strip with a length equal to the length of the part of the leaf and a width equal to about 5-6 cm) of the faces. side down so that the area between the lines is equal to the width of the leaflet in the finished form (\u003d the length from the fold of the leaflet to the stitch of its stitching).
Cut between the lines the main part and the lining with diagonal notches to the ends of the lines, bend the leaf forward (or up - according to the model), the gap - on the wrong side. Sew in a zigzag stitch the stitch sections of the stitch. leaflets on a pocket lining. According to the model - sew a stitch to the edge of the seam of the parable. leaflets.
Place the 2nd part of the pocket lining over the gap. Spread out the gap and sew its inner cut onto the pocket lining with a zigzag stitch. Fasten the ends of the pocket by sewing the stitches along the base of the allowance angles. Stitch sections of pocket lining. Lay a through stitch in the seam of the sewing-in leaves and at the seams at the ends of the pocket on the front or back side. According to the model - lay a line to the edge along the seam of the parable. leaflets and at the ends of the pocket. Baste the pocket lining to the cuts of the main part.
Treat the tuck on each back half of the trousers.
Stitch the side sections of the trousers from the upper to the lower sections, leaving the slots open on the side of the trousers and on the allowances for the hem of the bottom (3.5 cm from the bottom line to both sides).
Stitch step and middle sections of the trousers (leave a section for the zipper in the front middle seam unstacked).
Handle the zipper and chamfer closure.
Process a stitched belt with loops.
Fold the bottom hem onto the faces. side and grind the side sections of the splines. Bend the hem of the bottom of the shortened trousers to the wrong side, straighten the turned edges; press and sew hem hem with hidden stitches.
Sew a loop at the ends of the belt; sew a button.
Tighten the front and rear folds of the trousers (“arrows”).
Download patterns of cropped trousers, tapered down:

Patterns of narrowed women's trousers from Marlene Mukai
And two more models of narrowed women's trousers from Marlene Mukai. The sizes are indicated in Portuguese, a table is attached to them below.

Size 36 Size 38 Size 40 Size 42
Size 44 Size 46 Size 48 Size 50
Size 52 Size 54 Size 56

These charming skinny trousers are the perfect fashionable combi partner for any top or jacket. Not a single woman of fashion can simply do without such trousers. Shortened and narrowed down, the trousers perfectly fit the figure due to soft folds and at the same time allow you to demonstrate beautiful shoes. Combine these trousers with a short jacket, matching the color - and the spectacular look is ready!
Pattern of narrowed trousers - details
Fig. 1-2. Sketch of skinny trousers front and back
Pattern of narrowed trousers - modeling
The pattern of narrowed trousers is modeled by. The length from the waist is about 97 cm, the width of the trousers on the bottom is 29 cm. On the pattern-base of women's trousers, apply modeling lines as shown in Fig. 3. Pattern of narrowed trousers - modeling of the front and rear halves.
IMPORTANT! The waistline of the trousers is underestimated, so before you start modeling the trousers, set aside 3 cm from the waistline (on the front and back halves of the trouser base pattern), draw a new understated waistline, cut along the line.
Fig. 3. Pattern of skinny trousers - modeling the front and back halves
Modeling the front half of the trousers
Draw the entry lines into the pocket, laying 4 cm along the waist line to the right and 14 cm down, and the burlap pocket. Tuck into the crease. Increase to a one-piece clearance of 3-4 cm wide and about 14 cm long (for attaching zippers).
Tighten the trousers on the bottom to 14 cm, and shorten according to your measurement (the length of the trousers depends on your height).
For the second fold, additional volume is needed. To do this, cut the pattern along the line of the arrow and move it 4 cm apart - we get a second fold and an additional volume on the hips.
Modeling the back half of trousers
Tighten the back half of the trousers to 15 cm and shorten. The width of the rear leg on the bottom should be 1-2 cm greater than the width of the front leg on the bottom. Draw a pocket entry line 15 cm wide and 1.5 cm high.
Pattern of narrowed trousers - cutting
In fig. 4. presents the details of the cut narrowed trousers. Please note that a detachable barrel, one-piece with a burlap pocket is cut out from a plain black fabric. The consumption of fabric for trousers is 1.4-1.5 m with a width of 145 cm.
Fig. 4. Pattern of skinny trousers - details of the cut
From the main fabric to cut:
- Front half of trousers - 2 parts
- The back half of trousers - 2 parts
- The belt of the front half of the trousers - 4 parts with a width of 8 cm (5 cm in finished form) and a length along the tackle section of the front half, taking into account the approach to the fastener.
- The belt of the rear half of the trousers is 4 parts with a width of 8 cm (5 cm in finished form) and a length along the threaded section of the rear half, excluding the tuck.
- Burlap side pocket - 2 parts
- Burlap of the back pocket - 4 parts 18 cm wide and 20 cm long
- Back pocket trim - 2 parts, 5 cm wide and 18 cm long
From a plain black fabric to carve:
Cutting barrel, one-piece with burlap - 2 parts
Seam allowances - 1.5 cm, on the bottom of the trousers - 2 cm.
How to sew skinny pants
On the front halves of the trousers perform. On the back halves of the trousers perform.
On the front halves, lay the folds in the direction indicated by the arrows.
Sweep and grind side and step sections, the middle seam, leaving the area for stitching the zipper open. Front
External belt details. Start reinforced and loose parts of the belt between each other along the side seams and the middle seam of the back at an angle (so that the belt fits tightly around the waist, the connecting seams should be laid so that the belt is narrower at the upper section than at the bottom, so each seam should be laid at 0 , 5 cm to the left to the top of the planned line). Cut allowances and iron them.
Stitch the outer reinforced part of the belt into the trousers, aligning along the side seams, place the unsecured part of the belt face-to-face on the set-in part, sew along the upper allowance and short allowances, unscrew, clean the surface, tuck open and allow openings. To stitch a belt along the edge, to sew loops on a marking.
To overcast the lower allowance of trousers, to bend and hem by hand with hidden stitches.
Your skinny pants are ready, wear with pleasure! You will find even more interesting new ideas on the Anastasia Korfiati Sewing School website. Subscribe to free lessons and sew fashionable clothes with us!
Sewing. Pattern-based trousers according to Italian technique. Description and video workshopDo not rush to leave the page, thinking that you already know how to build a pattern of trousers! Why? I'll explain now…
How much action needs to be done to get a pattern, isn't it?
That is why I went searching on the Internet, and came across a surprisingly simple, but at the same time accurate Italian technique.
The construction of the pattern-basis of trousers (description)
In this article, we will consider the construction of a basic pattern of straight women's trousers according to the Italian method. Its main difference from other methods is that the side seam of the product is shifted to the center of the back panel by 1 cm.
The main advantage of basic patterns, as a rule, is the possibility of using them as a basis for modeling trousers, shorts, a bridge, etc. The advantages of the Italian cut are obvious for women with a large bend of the back. Due to their design, the trousers have a perfect fit in the zone of the waist and hips.
Initial data
So, to build a pattern, we need initial data - measurements. It is advisable that someone help you measure them. Note that all measurements are measured in underwear and are recorded in a table.
Important: as the initial data, measurements of 50 sizes for women according to the Italian system of cut were taken.
For other sizes, see typical measurements used in the Italian cut system.
Measure Designation Value
Waist circumference FROM 84
Hip circumference OB 110
WB thigh height 20.5
Seat height Aircraft 28
VK knee height 60.5
Girth of the knee OK 26
Trouser Length DI 106
Note: Wb is measured from the waistline to the horizontal, drawn along the most prominent points of the buttocks; Sun is measured in a sitting position - the distance from the lower edge of the tape at the waist to the plane of the chair; Bk in this case is measured on the side from the waist to the middle of the patella.
When constructing the basic pattern of trousers, we take the necessary increases in free fit:
Increment Designation Value (CM)
Increase in a waist of Ave. T 1
Hip supplement Pr. B 2
When modeling, the increments can be changed within the limits: for Fri from 0 to 1.5 cm, for Pb from 0.5 to 4 cm. The degree of fitting of the product depends on the increments.
Building a pattern of trousers
(Fig. 1) So, we recommend building a pattern drawing on graph paper (it is sold in rolls up to 1 m wide) or in special programs for creating patterns, such as RedCafe. (Favorite Autocad engineers program is also suitable)
Let's start with the construction of the front panel of trousers. In the upper right corner, put point A. Next, from T.A we postpone two measurements down: Wb - put T.V and Sun - put T.S. 
(Fig. 2) From T. B to the left, we postpone a segment equal to ¼ (OB + Pr. B) - T. B1 and to the right 0.5 cm - T. B2 
(Fig. 3) From point C, to the left we postpone the value of the segment BB1, put T.C1 and to the right - the segment equal to 1/20 OB - t. C2 
(Fig. 4) Connect the points C2, B2 and A with a smooth line, we get the middle seam. 
(Fig. 5) We return to T.A. To the left we postpone ¼TH + 3cm, put T.A1. Upward from T.A1 we put aside 1cm and put T.A2. 
(Fig. 6) Using the pattern we connect the points A2, B1, C1. If there is no pattern at hand, draw a smooth line. 
(Fig. 7) Find the middle of the segment C1C2, set T.D. Draw a perpendicular to the C1C2 line and set T.E. at the intersection with the AA1 line. 
(Fig. 8) From T.E. down we postpone two measures: Bk - put T.D1 and Long br - T.F. 
(Fig. 9) From point D1, put equal segments to the right and left and set points D2 and D3. The segment D2D3 will be equal to the measure 1/2 O. 
(Fig. 10) We take the bottom of the trouser pattern equal to the segment D2D3, set the points F2 and F1, where T. F is the middle of the segment F2F1. 
(Fig. 11) Connect the points C2, D2, F2 and get the inner seam. Connect the points C1, D3, F1 and get the outer seam. The DD1F line is the middle. 
(Fig. 12) Next, we build the front tuck. Set aside 1 cm and down 10 cm on both sides of T.E., set the points E3, E2, E1 and connect them. 
(Fig. 13) We connect the points of the upper cut AE2 and A2E1 with a pattern. 
(Fig. 14) The pattern of the front of the trousers is ready. Proceed to the back part.
The construction of the back of the trouser pattern:
We make the construction on a ready-made drawing. We recommend picking up a colored pencil so that you don’t get confused in the lines. We start again with T.A. To the left of it we postpone a segment equal to ½ AE + 2cm and put the T.N. Up 2 cm from T.N. draw a perpendicular and put T.N1. 
(Fig. 15) To the left of T. C, set aside a segment equal to 1/24 (1/2 OB), set C. C3 and connect it with a straight line with T. H1. 
(Fig. 16) From t. C3, set aside a segment equal to 1/10 Ob - t. C4 to the right. 
(Fig. 17) We extend the AA1 line to the left from T.N to ¼ From - 1cm (this is the Italian offset of the side seam) + 2 cm (to the tuck) and put T.N2. From it we draw up 1 cm perpendicular and put T.N3, which we connect with T.N1. 
(Fig. 18) We introduce the reference T. L, which is the intersection point of the segments B1B2 and H1C3. 
(Fig. 19) From T.L to the left, draw a segment equal to ¼OB and set T.L1.
With a pattern we connect the points H3, L1 - we get the outer seam. Connect the points L, C4 - we get the middle seam. 
(Fig. 20) The construction of the knee line and the bottom line on the rear part of the pattern is as follows: from the points D2, D3, F1, F2 we postpone 1.5 cm upwards and put the points G, G1, F3, F4. We connect the points L1, G, F3 and the points C4, G1, F4 with smooth lines. We get the inner and outer seams. 
(Fig. 21) A tuck in the back half of the trousers is built on the H1H3 line. t. M is the middle of this line. Set aside from T.M on both sides 1 cm and down parallel to the H1L line of 14 cm, we get points M1, M2 and N. 
(Fig. 22) Now the main thing is to check the pattern. The length at both seams (inner and outer) on the front and back panels should be the same. To do this, remove the pattern of the front of the trousers from the tracing paper and put it on the pattern of the back of the trousers, combining the edges of the inner seams. Next, we shift the pattern to align the line of the middle seam, and the back seam can be longer than the front. Then we follow the same principle, combining the edges of the external seams and shifting the pattern until the side points of the waist coincide.
Congratulations! The pattern of women's trousers is ready! 
BASIS OF THE PATTERN PATTERN. Video master class!
It will be built in two stages, and will look like this in finished form: 
Front half - how to make a video pattern:
And of course, the back half, which is based on the front half:
 Constructing a dress base pattern and design modeling
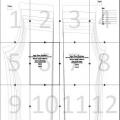 Patterns of children's trousers and sewing master classes Building the back half of trousers
 Building a pattern of vests for boys: the easiest way